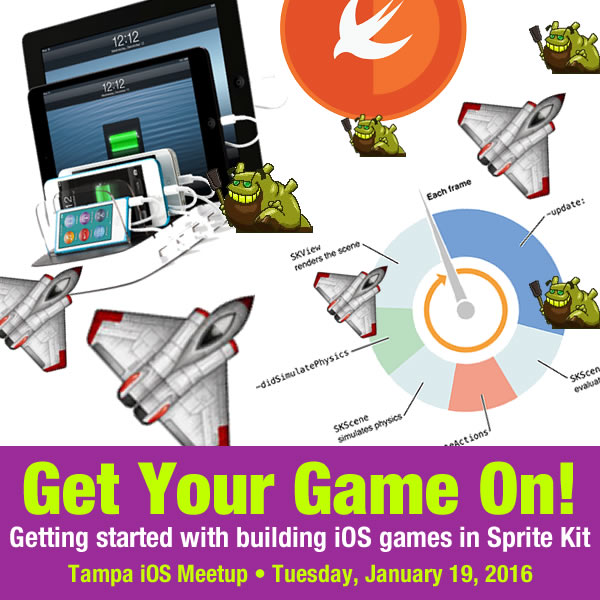
 I’m the co-organizer of the Tampa iOS meetup, a monthly gathering of iOS developers based in the Tampa Bay area, and we recently had a session on game development with Sprite Kit that garnered a fair bit of attention. This series of articles takes some of the ideas from that session and uses them as a jumping-off point for exploring game development techniques using Apple’s Sprite Kit framework.
In this first article in the series, we’ll cover enough Sprite Kit to create an app that displays the animated scene below. Best of all, we’ll do it in 26 lines of code:
If you’re comfortable with building basic iOS apps, you shouldn’t have any problem following along.
Setting up the project
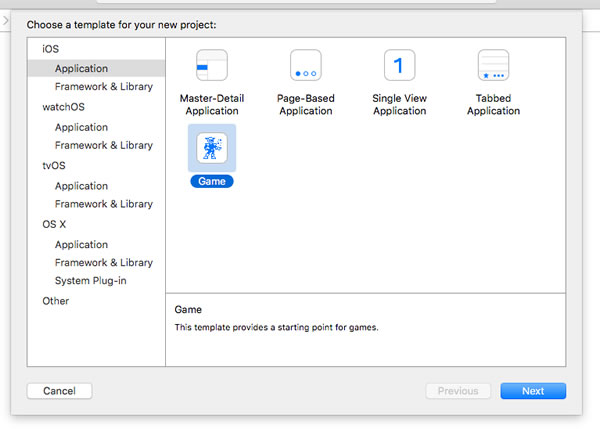
Create a new Game project in Xcode by selecting File → New → Project… In the “Choose a template for your new project” window that appears:
- Select Application under iOS from the list on the left-hand side, and
- select Game from icon list of template types on the right-hand side
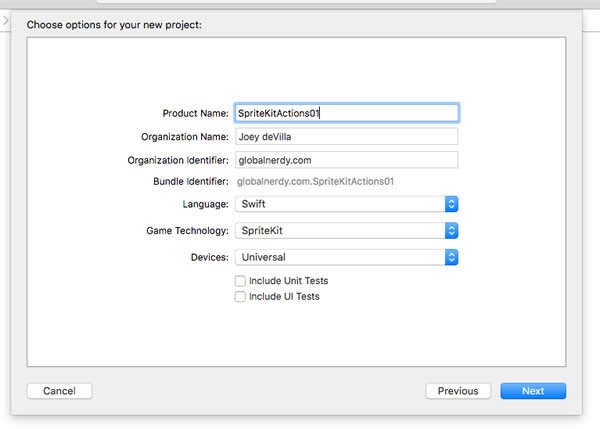
In the “Choose options for your new project” window, give your app a name in the Product Name: text field (I named mine “SpriteKitActions01”, since this project is an introduction to Sprite Kit actions), and went with all the other default options:
After you choose a place to save your project, you should see the various properties for your new project, which should look something like the screenshot below.
In this project, we’re going to show spaceships flying across the full width of the screen, so we want our app to be landscape-only. The simplest way to restrict our app’s orientation to landscape is by checking and unchecking the appropriate Device Orientation checkboxes in the app’s properties. Make sure that:
- Portrait is unchecked
- Landscape Left and Landscape Right are checked
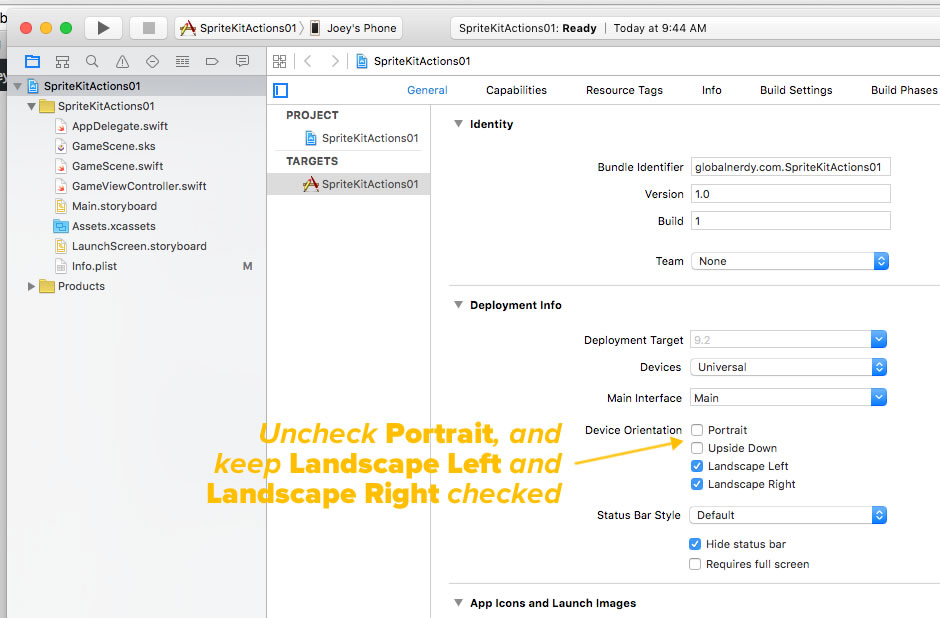
Click the screenshot to see it at full size.
You can confirm that the app is landscape-only by running it. It should look like the video below, with spinning spaceships appearing wherever you tap the screen. It shouldn’t switch to portrait mode when you rotate the phone to a portrait orientation:
Your first scene, your first sprite
Let’s dive right in and draw our first sprite on the screen. Open GameScene.swift and replace all its code with the following:
import SpriteKit

class GameScene: SKScene {

  let spaceshipSprite = SKSpriteNode(imageNamed: "Spaceship")

  override func didMoveToView(view: SKView) {
    spaceshipSprite.position = CGPoint(x: 300, y: 300)
    addChild(spaceshipSprite)
  }

}
In this example app, we’ll be doing all our coding in GameScene.swift, which contains the GameScene class. GameScene is a subclass of SKScene, the superclass for all scenes. Sprite Kit class names usually begin with the letters SK.
In Sprite Kit, a scene is both:
- A “canvas” where we draw objects to the screen, such as sprites, and
- a place for the logic that draws onscreen objects, responds to user input, and deals with the interactions of onscreen objects.
A scene is usually used to correspond to a “screen” in a game. For example, you might use one scene for a game’s title screen, another for gameplay, and a third scene for the “game over” screen. This example app will have just one screen, so we just need one scene: GameScene.
Run the app. You should see something like this:
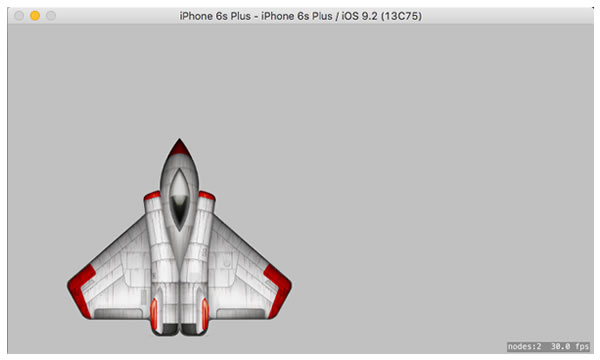
The spaceship that you see is the onscreen rendering of the spaceshipSprite object, the one property in our GameScene class. It’s an instance of SKSpriteNode, Sprite Kit’s sprite class. It’s declared and instantiated in a single line:
let spaceshipSprite = SKSpriteNode(imageNamed: "Spaceship")
The method that you’ll probably use to instantiate sprite objects most of the time is the init(imageNamed:) method, which takes the name of an image file in the app bundle (in the project’s filesystem) as its argument. The Spaceship image is included in the template that Xcode creates for new game projects, and can be found in the default asset catalog, Assets.xcassets.
Our GameScene class has a single method: didMoveToView. This method is called when the scene is first presented, and at the moment, it contains two lines. Here’s the first one:
spaceshipSprite.position = CGPoint(x: 300, y: 300)
The location of a sprite is determined by its position property, which is a CGPoint, a struct representing a point in 2D space defined by an x-coordinate and a y-coordinate (the CG prefix indicates that it’s from the Core Graphics library).
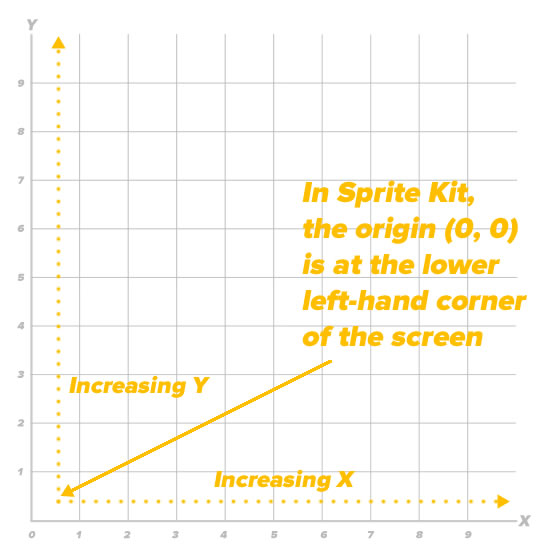
You’ve probably figured out that this line of code puts the spaceship at the point (300, 300). What you might not know is that (300, 300) means:
- x-coordinate: 300 points from the left edge of the view
- y-coordinate: 300 points from the bottom edge of the view
Most programming frameworks treat increasing y-coordinates as going downward, but Sprite Kit is based on OpenGL, which uses the coordinate system used in math, where increasing x goes right, and increasing y goes up:
When setting a sprite’s coordinates, you should keep a sprite’s anchor point — represented by its anchorPoint property — in mind. It’s a CGPoint value that corresponds to the point in a sprite that corresponds to the position in the scene that you assign to it, whose x- and y-coordinates range from 0 to 1 as shown below:
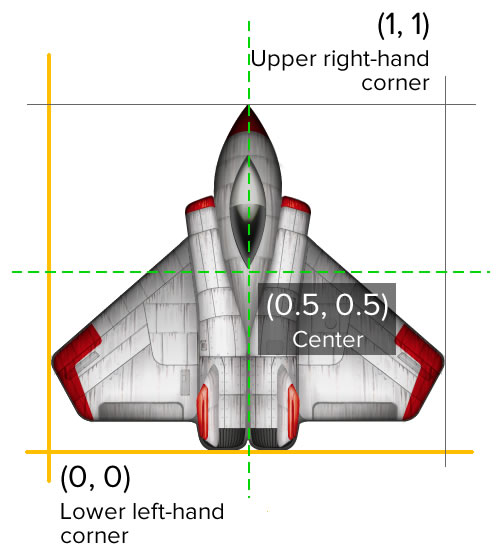
The default anchorPoint value for a sprite is (0.5, 0.5), which corresponds to a point in the dead center of the sprite. This means that if we set the sprite’s position to (300, 300), the sprite’s center will be located at (300, 300). If we change the sprite’s anchorPoint to (0, 0), its lower left-hand corner, its lower left-hand corner will be at the coordinates (300, 300), and the rest of the sprite will be above and to the right of that point. On the other hand, if we change the sprite’s anchorPoint to (1, 1), its upper right-hand corner will be at the coordinates (300, 300) and the rest of the sprite will be below and to the left of that point.
The sprite doesn’t actually appear until the second line of the didMoveToView method gets executed:
addChild(spaceshipSprite)
Only sprites that are added as children of a scene appear in the scene.
Scenes, sprites, and nodes
In this tutorial, the only Sprite Kit objects that we’ll be drawing onscreen are scenes and sprites, but it’s worth talking about the larger Sprite Kit framework and how scenes and sprites fit into it.
Most objects in a Sprite Kit-based game that are responsible for putting images on the screen or playing sound are nodes — subclasses of the SKNode class. You’ll probably never have to instantiate an SKNode instance; its purpose is to provide some baseline of behavior and capabilities for its subclasses.
![]()
The term “node” implies that there’s a tree structure of some kind, and that’s the case. The scene in a game — represented by the SKScene class — acts as the root node of this tree, and the scene’s child nodes are the ones that appear in it and interact in it. If you want a node like a sprite to appear in a scene, you must add it as a child of that scene.
![]()
Sprites — represented by the SKSpriteNode class — can have child sprites. We’ll cover child sprites in another article, but we’ll say that they’re useful for creating onscreen objects made up of two or more sprites, such in the example above where the mad scientist sprite character has a force field as a child sprite. Just as child sprites of a scene are attached to the parent scene and have a location in their parent scene’s coordinate system, child sprites of a sprite are attached to the parent sprite and have a location in their parent sprite’s coordinate system.
That’s enough big picture discussion for now — let’s get back to coding!
Scaling and rotation
Let’s make a couple of changes to our spaceship sprite. We want to:
- Scale it down to a quarter of its current size, and
- Rotate it 90 degrees so that it’s pointing to the right.
This is easily done — just add a couple of lines to didMoveToView so that it looks like this:
override func didMoveToView(view: SKView) {
  spaceshipSprite.position = CGPoint(x: 300, y: 300)
  spaceshipSprite.setScale(0.25)
  spaceshipSprite.zRotation = CGFloat(-M_PI_2)
  addChild(spaceshipSprite)
}
Run the app. You should now see this:
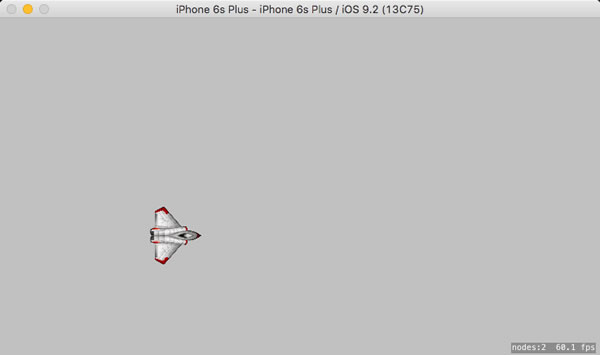
The setScale method is pretty straightforward. It scales the sprite in both the x- and y-directions by the factor specified in the argument you provide it with, which in this case is 0.25.
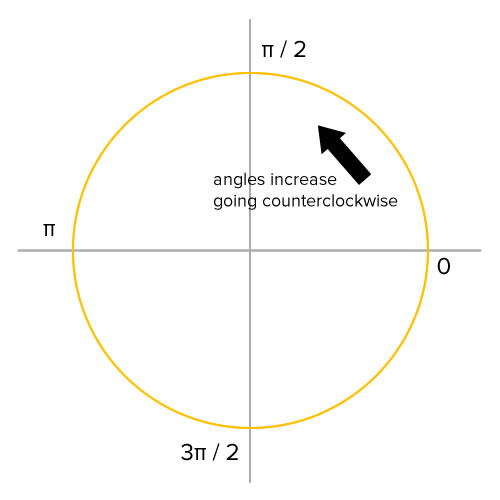
The zRotation property specifies rotation around the z-axis. As with most programming languages and frameworks, Sprite Kit requires that you specify angles in radians instead of degrees. It also follows the convention in mathematics where angles increase in the counterclockwise direction:
The standard math library included with Swift comes with a number of π-related constants that you’ll find useful when working with angles:
M_PI: π, or 180°M_PI_2: π / 2, or 90°M_PI_4: π / 4, or 45°
The spaceship graphic points upwards, so in order to point it to the right, we need to rotate it 90° clockwise, hence spaceshipSprite.zRotation = CGFloat(-M_PI_2).
The event loop and moving sprites the hard way
Most game frameworks operate in an event loop, which is a repeating cycle based on this general sequence of events:
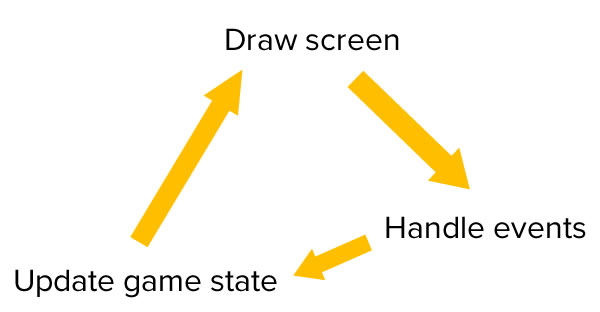
The specifics of the event loop vary from game framework to game framework. Here’s what Sprite Kit’s event loop looks like:
![]()
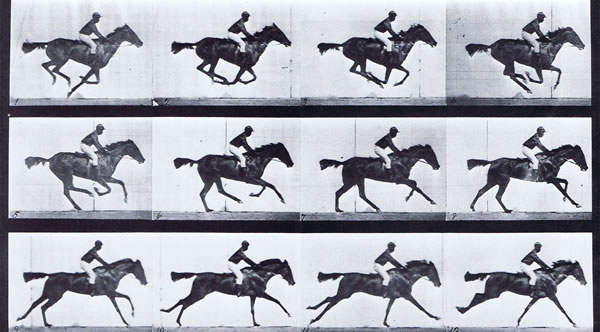
Each cycle of the event loop is called a frame. That’s because at the end of each cycle, the currently displayed scene is rendered. By making small changes during each frame and rendering frames several times a second, we create motion, in pretty much the same way that’s it’s done with film and television, which is where the term “frame” comes from — it refers to frames of film:
As the scene executes the event loop, it calls a number of methods, each of which corresponds to a specific part of the loop. By overriding these methods, we can make our own code execute at specific points of the event loop.
In this application, we’ll override the update method, which gets executed at the start of each frame, immediately after Sprite Kit renders the screen. It’s a good place to define changes to objects in the scene. As a method automatically called by the system every time it goes around the event loop, it takes the argument currentTime, a sub-millisecond-accurate number in seconds that makes it possible to determine the amount of time that has elapsed since the last call to update.
Let’s use it to move the spaceship in a rightward direction by adding the following code to GameScene:
override func update(currentTime: CFTimeInterval) {
  spaceshipSprite.position.x += 10
}
If you run the app, you’ll see the ship start at (300, 300) and move to the right, eventually going off the screen. This method of moving the spaceship around works, but would require you to write a fair bit of code to get this result:
In the app shown above, each spaceship sprite:
- Appears on the left edge of the scene at a random y-coordinate and flies across the screen to disappear off the right edge in 5 seconds’ time,
- Backs up from the right edge a distance of about a third of the scene over 2 seconds,
- Executes a 180-degree counterclockwise turn in 1.5 seconds,
- waits 2 seconds, and
- Zips off the left edge of the scene in half a second.
Luckily for us, Sprite Kit provides a set of powerful tools that lets us get around the kind of micromanagement that game development once required. They’re called actions, and they’ll let us code the activity shown above in just over two dozen lines of code.
Your first action
Change the code in GameScene so it looks like this:
import SpriteKit

class GameScene: SKScene {

  let spaceshipSprite = SKSpriteNode(imageNamed: "Spaceship")

  override func didMoveToView(view: SKView) {
    spaceshipSprite.position = CGPoint(x: -spaceshipSprite.size.width / 2,
                                       y: 300)
    spaceshipSprite.setScale(0.25)
    spaceshipSprite.zRotation = CGFloat(-M_PI_2)
    addChild(spaceshipSprite)

    let flyAcrossScreen = SKAction.moveTo(CGPoint(x: size.width +
                                                     spaceshipSprite.size.width / 2,
                                                  y: 300),
                                          duration: 5)
    spaceshipSprite.runAction(flyAcrossScreen)
  }

}
Note the changes:
- We’ve eliminated the
updatemethod, - the spaceship sprite’s starting x-coordinate is half its width to the left of the left edge of the scene, and
- we’ve added a couple of lines of code that concern themselves with something named
flyAcrossScreen.
Before we discuss the changes, run the app. It should look like this:
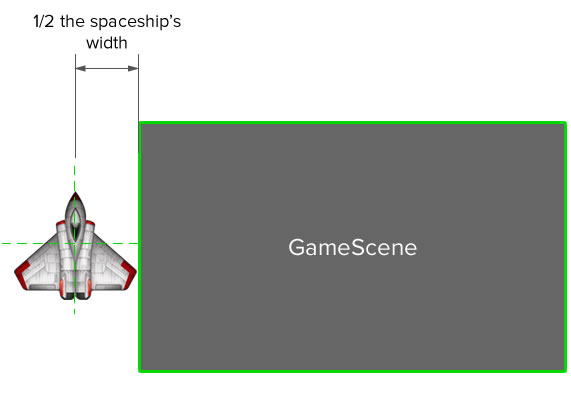
Let’s look at why we set the spaceship sprite’s x-coordinate to -spaceshipSprite.size.width / 2. That’s the minimum x-coordinate that ensures that the sprite is far enough to the left so that it’s no longer visible onscreen (remember what we discussed about anchor points earlier):
Now let’s discuss the more interesting thing: that thing named flyAcrossScreen. It’s an action — represented by the class SKAction — an object that changes something about the structure or properties of a node. There are many types of SKActions, including:
- Actions that move nodes, either to specific coordinates or in a direction relative to the current position, in a straight line or along a specified path,
- actions that rotate nodes, either to a specific angle or by a certain angle relative to the current orientation,
- actions that scale nodes, either to a specific size or by a specific factor relative to the current size, in the x-, y-, or both directions,
- actions that change the content of a node, either by changing its current appearance, producing an animation effect by rapidly cycling through a set of “frames”, changing its opacity, or colorizing it,
- actions that play sounds,
- actions that combine actions, either by executing them in sequence or concurrently,
- actions that act as pauses or delays,
- actions that repeat or reverse actions, and
- actions that execute custom code.
flyAcrossScreen is an instance of an SKAction.moveTo function. This type of function moves a node to a specific point in the scene (in this case, just off the right edge of the screen) in an amount of time specified in seconds (in this case, 5). The function returns an action, which is performed by a node when it is provided as an argument for one of the node’s runAction methods.
Note that in a single line of code:
- We’ve defined something that moves a sprite to a given coordinate in a given amount of time without having to write any code to manage that movement, and
- we’ve also stored it in a constant for later use.
Adding another action and introducing action sequences
Let’s try adding another action to the mix, so that after the spaceship has flown off the right edge of the scene, it reappears on the screen by backing up 400 points.
We’ll do this by defining a new action called backUpALittle, using SKAction‘s moveByX(_:y:duration:) method. Unlike moveTo(_:duration:), which moves a node to a specific point in the scene, moveByX(_:y:duration:) moves a node by a number of x- and -y points relative to its current position. Change the code in your didMoveToView method to the code shown below:
override func didMoveToView(view: SKView) {
  spaceshipSprite.position = CGPoint(x: -spaceshipSprite.size.width,
                                     y: 300)
  spaceshipSprite.setScale(0.25)
  spaceshipSprite.zRotation = CGFloat(-M_PI_2)

  addChild(spaceshipSprite)

  let flyAcrossScreen = SKAction.moveTo(CGPoint(x: size.width +
                                                   spaceshipSprite.size.width,
                                                y: 300),
                                        duration: 5)
  spaceshipSprite.runAction(flyAcrossScreen)

  let backUpALittle = SKAction.moveByX(-400,
                                       y: 0,
                                       duration: 2)
  spaceshipSprite.runAction(backUpALittle)
}
If you were to run the app now, you’d see the spaceship fly across the screen, but you won’t see it back up back onto the screen afterwards. If you put some print statements around the runAction method that runs the backUpALittle action, as shown below…
let backUpALittle = SKAction.moveByX(-400,
                                     y: 0,
                                     duration: 2)
print("Commence backing up")
spaceshipSprite.runAction(backUpALittle)
print("Completed backing up")
…you’ll see the lines “Commence backing up” and “Completed backing up” appear in Xcode’s console while the spaceship is still executing the flyAcrossScreen method. Obviously, there’s more to running two or more actions in a sequence than simply running them one after another.
That’s what the SKAction.sequence method is for. Given an array of SKActions, it executes them in the order in which they appear in that array. Change the code in didMoveToView to this:
override func didMoveToView(view: SKView) {
  spaceshipSprite.position = CGPoint(x: -spaceshipSprite.size.width,
                                     y: 300)
  spaceshipSprite.setScale(0.25)
  spaceshipSprite.zRotation = CGFloat(-M_PI_2)

  addChild(spaceshipSprite)

  let flyAcrossScreen = SKAction.moveTo(CGPoint(x: size.width +
                                                   spaceshipSprite.size.width,
                                                y: 300),
                                        duration: 5)
  let backUpALittle = SKAction.moveByX(-400,
                                       y: 0,
                                       duration: 2)
  let spaceshipActions = SKAction.sequence([flyAcrossScreen, backUpALittle])

  spaceshipSprite.runAction(spaceshipActions)
}
When you run the app, you should see this:
Let’s make the sequence a little fancier. We’ll define these actions and then add them to the sequence:
doA180: UsingSKAction.rotateByAngle, we’ll rotate the spaceship 180 degrees clockwise over a span of 1.5 seconds,wait2Seconds: UsingSKAction.waitForDuration, introduce a 2-second pause, andblastOff: UsingSKAction.moveTo, blast the spaceship off the left edge of the screen in half a second.
Here’s the code for running all the actions…
let flyAcrossScreen = SKAction.moveTo(CGPoint(x: size.width +
                                                 spaceshipSprite.size.width,
                                              y: 300),
                                      duration: 5)
let backUpALittle = SKAction.moveByX(-400,
                                     y: 0,
                                     duration: 2)
let doA180 = SKAction.rotateByAngle(CGFloat(M_PI), duration: 1.5)
let wait2seconds = SKAction.waitForDuration(2)
let blastOff = SKAction.moveTo(CGPoint(x: -spaceshipSprite.size.width / 2,
                                       y: 300),
                                       duration: 0.5)
let spaceshipActions = SKAction.sequence([flyAcrossScreen,
                                          backUpALittle,
                                          doA180,
                                          wait2seconds,
                                          blastOff])

spaceshipSprite.runAction(spaceshipActions)
…and here’s what the app looks like when you run it:
Spawning multiple spaceships, part one
Let’s harness the true power of actions by changing the code so that we spawn a new spaceship that performs all the actions we defined every time the user taps the screen. Here’s the code:
import SpriteKit

class GameScene: SKScene {

  override func didMoveToView(view: SKView) {
    spawnSpaceship(y: 300)
  }

  func spawnSpaceship(y yposition: CGFloat) {
    let spaceshipSprite = SKSpriteNode(imageNamed: "Spaceship")

    spaceshipSprite.position = CGPoint(x: -spaceshipSprite.size.width / 2,
      y: yposition)
    spaceshipSprite.zRotation = CGFloat(-M_PI_2)
    spaceshipSprite.setScale(0.25)
    addChild(spaceshipSprite)

    let flyAcrossScreen = SKAction.moveTo(CGPoint(x: size.width + spaceshipSprite.size.width / 2,
      y: yposition),
      duration: 5)
    let backUpALittle = SKAction.moveByX(-400,
      y: 0,
      duration: 2)
    let doA180 = SKAction.rotateByAngle(CGFloat(M_PI), duration: 1.5)
    let wait2seconds = SKAction.waitForDuration(2)
    let blastOff = SKAction.moveTo(CGPoint(x: -spaceshipSprite.size.width / 2,
      y: yposition),
      duration: 0.5)
    let spaceshipActions = SKAction.sequence([flyAcrossScreen,
      backUpALittle,
      doA180,
      wait2seconds,
      blastOff])
    spaceshipSprite.runAction(spaceshipActions)
  }

  override func touchesBegan(touches: Set<UITouch>, withEvent event: UIEvent?) {
    for touch in touches {
      spawnSpaceship(y: touch.locationInNode(self).y)
    }
  }

}
Note the changes that we’ve made:
- We’ve taken our spaceship setup and action code and put it into its own method,
spawnSpaceship, which takes a y-coordinate as an argument, - we call
spawnSpaceshipin thedidMoveToViewmethod in such a way that the first spaceship shown onscreen behaves like the one in the previous version of the app, and - we respond to touches onscreen with the
touchesBeganmethod. It’s called whenever a user touches down on the screen, and one of the arguments it provides is aSetofUITouchobjects. From each of these objects, we can get the y-coordinate of each spot where the user touched the screen, and we spawn a new spaceship and performing its actions at that y-coordinate. (We’ll cover touch events in greater detail in a later article.)
When you run this app, it looks like this:
Not bad for a couple dozen lines of code!
Spawning multiple spaceships, part two: using the update method as a timer
Let’s change the app so that it in addition to spawning a new spaceship when the user touches the screen, it also automatically spawns a new spaceship at a random y-coordinate every half second. Here’s the code:
import SpriteKit

class GameScene: SKScene {

  var lastSpaceshipSpawnTime: CFTimeInterval = 0

  override func didMoveToView(view: SKView) {
    spawnSpaceship(y: 300)
  }

  override func touchesBegan(touches: Set<UITouch>, withEvent event: UIEvent?) {
    for touch in touches {
      spawnSpaceship(y: touch.locationInNode(self).y)
    }
  }

  override func update(currentTime: CFTimeInterval) {
    if currentTime - lastSpaceshipSpawnTime > 0.5 {
      spawnSpaceship(y: CGFloat(arc4random_uniform(UInt32(size.height))))
      lastSpaceshipSpawnTime = currentTime
    }
  }

  func spawnSpaceship(y yposition: CGFloat) {
    let spaceshipSprite = SKSpriteNode(imageNamed: "Spaceship")

    spaceshipSprite.position = CGPoint(x: -spaceshipSprite.size.width / 2,
      y: yposition)
    spaceshipSprite.zRotation = CGFloat(-M_PI_2)
    spaceshipSprite.setScale(0.25)
    addChild(spaceshipSprite)

    let flyAcrossScreen = SKAction.moveTo(CGPoint(x: size.width + spaceshipSprite.size.width / 2,
      y: yposition),
      duration: 5)
    let backUpALittle = SKAction.moveByX(-400,
      y: 0,
      duration: 2)
    let doA180 = SKAction.rotateByAngle(CGFloat(M_PI), duration: 1.5)
    let wait2seconds = SKAction.waitForDuration(2)
    let blastOff = SKAction.moveTo(CGPoint(x: -spaceshipSprite.size.width / 2,
      y: yposition),
      duration: 0.5)
    let spaceshipActions = SKAction.sequence([flyAcrossScreen,
      backUpALittle,
      doA180,
      wait2seconds,
      blastOff])
    spaceshipSprite.runAction(spaceshipActions)
  }

}
Note the changes:
- We’ve introduced a new property to the
GameSceneclass:lastSpaceshipSpawnTime, aCFTimeIntervalvariable to keep track of when thespawnSpaceshipmethod was last executed. - We’ve brought back the
updatemethod. It gets called often enough that we can use it to hold some code to callspawnSpaceshipat intervals very, very close to every half second.
Here’s what the app looks like when you run it:
The spaceships spawn every half second, but doing so requires us to write some code and declare a property in order to manage the spawning process. Isn’t there an action that do the management for us?
Spawning multiple spaceships, part three: Using actions to manage the entire process
In this version of our spaceship-spawning app, we’ll make use of two new actions:
SKAction.runBlock, which lets you define a block of code — a closure — as an action that can then be run by a node, andSKAction.repeatActionForever, whose name is pretty self-explanatory.
Change the code so that it looks like this:
import SpriteKit

class GameScene: SKScene {

  override func didMoveToView(view: SKView) {
    spawnSpaceship(y: 300)

    let addAnotherShip = SKAction.runBlock {
      self.spawnSpaceship(y: CGFloat(arc4random_uniform(UInt32(self.size.height))))
    }
    let waitAHalfSecond = SKAction.waitForDuration(0.5)
    let addShipThenWait = SKAction.sequence([addAnotherShip, waitAHalfSecond])
    let addShipsAdInfinitum = SKAction.repeatActionForever(addShipThenWait)
    runAction(addShipsAdInfinitum)
  }

  override func touchesBegan(touches: Set<UITouch>, withEvent event: UIEvent?) {
    for touch in touches {
      spawnSpaceship(y: touch.locationInNode(self).y)
    }
  }

  func spawnSpaceship(y yposition: CGFloat) {
    let spaceshipSprite = SKSpriteNode(imageNamed: "Spaceship")

    spaceshipSprite.position = CGPoint(x: -spaceshipSprite.size.width / 2,
                                       y: yposition)
    spaceshipSprite.zRotation = CGFloat(-M_PI_2)
    spaceshipSprite.setScale(0.25)
    addChild(spaceshipSprite)

    let flyAcrossScreen = SKAction.moveTo(CGPoint(x: size.width + spaceshipSprite.size.width / 2,
                                                  y: yposition),
                                          duration: 5)
    let backUpALittle = SKAction.moveByX(-400,
                                         y: 0,
                                         duration: 2)
    let doA180 = SKAction.rotateByAngle(CGFloat(M_PI), duration: 1.5)
    let wait2seconds = SKAction.waitForDuration(2)
    let blastOff = SKAction.moveTo(CGPoint(x: -spaceshipSprite.size.width / 2,
                                           y: yposition),
                                   duration: 0.5)
    let spaceshipActions = SKAction.sequence([flyAcrossScreen,
                                              backUpALittle,
                                              doA180,
                                              wait2seconds,
                                              blastOff])
    spaceshipSprite.runAction(spaceshipActions)
  }

}
Let’s look at the changes:
- We got rid of the
updatemethod. We don’t need it to function as a timekeeper, as we’re using actions to manage the spaceship spawning process. - In
didMoveToView, we define a set of actions that will end up managing the task of spawning spaceships:- First, we define
addAnotherShipas arunBlockaction that calls thespawnSpaceshipmethod. Remember that in closures, you have to be explicit when referring to methods and properties of the containing class, which is why there’s an explicit use ofself. - We define
waitAHalfSecondas awaitForDurationaction, which we’ll use to create the half-second delay between spaceship spawnings. - We create
addShipThenWaitas asequenceofaddAnotherShipfollowed bywaitAHalfSecond. By now, you can probably see where we’re going with this. - Then we define
addShipsAdInfinitumas arepeatActionForeveraction that performsaddShipThenWaitover and over and over again. - And finally, we have the scene (remember, it’s a node, so it too can run actions) run the
addShipsAdInfinitumaction. From this point on, we no longer have to worry about spawning those spaceship sprites — we’ve got actions to do that!
- First, we define
Here’s what it looks like when you run it:
Not bade for 26 lines of code, and that includes the line import SpriteKit!
What we just covered
In this article, we covered:
- Starting a new Game project in Xcode
- Restricting an app’s orientation to landscape-only
- Drawing sprites at a specified location on the screen
- Screen coordinates in Sprite Kit
- Anchor points in sprites
- Nodes, scenes, sprites, and how they’re related
- Scaling and rotating sprites
- The event loop and the update method
- Moving sprites by writing code to update their position
- Moving sprites by using the
moveToandMoveByactions - Performing multiple actions in sequence using
sequenceactions - Rotating sprites using the
rotateByAngleaction - Introducing a delay for action sequences with the
waitForDurationaction - Responding to touches on the screen with the
touchesBeganmethod - Using the
updatemethod as a timer to perform tasks at specific intervals - Running code as an action using the
runBlockaction - Repeating actions indefinitely using the
repeatActionForeveraction - Using actions to reduce the amount of code we have to write to manage multiple onscreen objects
We’ll expand on this material and work towards building an actual game in the following articles in this series.
5 replies on “Writing iOS games with Swift and Sprite Kit, part 1: The power of actions”
[…] In the previous article in this series, we looked using actions to create complex sprite movements w… As this series progresses, we’ll work our way towards building complete games. […]
many thanks for the clear explanation
Excellent and informative . I found this most helpful – Thanks
[…] Sprite Kit actions tutorial […]
It’s what I’m looking for.Thank you!