This made-for-the-modern office version of The Odyssey will make you both and laugh and weep, especially if you’ve suffered through a long Zoom/Teams call today.
Category: Tools
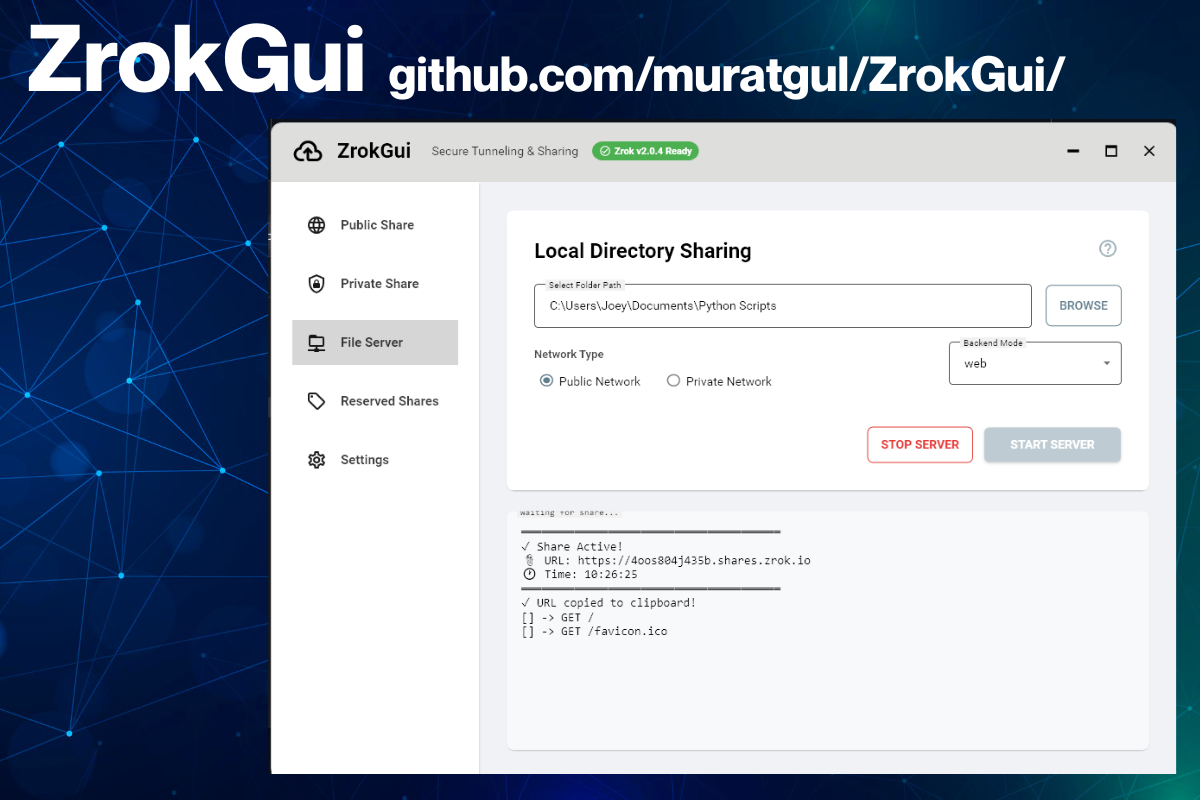
Someone in the wild built a Windows GUI for zrok, and it’s worth a look!
ZrokGui, by GitHub user muratgul, is a WPF / Material Design 3 desktop app that puts a friendly front-end on the zrok CLI. If you know someone who needs to use zrok and doesn’t feel comfortable with the command line (often the case with people who just want to share files or run an internal web site), this could come in handy.
- Here’s the GitHub repo: https://github.com/muratgul/ZrokGui
- And if you just want the .exe, the latest release at the time of writing is v1.1.5; just download and unzip ZrokGui_v1.1.5.zip
What’s zrok?

One of the most useful tools produced by NetFoundry (where I work as their developer advocate) is zrok. If you’ve ever used ngrok to punch a temporary public URL through to something running on localhost (such as demo, a webhook receiver, a work-in-progress site, or even just a directory of files you want to make available) then you already know what zrok does.
zrok is an open-source sharing platform, and it’s quite clear that ngrok insipred it. It had the exact same “one command and your local thing is reachable from the outside world” ergonomics that made ngrok a developer staple.
Where zrok goes further is what’s underneath. It’s built on OpenZiti, an open-source zero-trust networking project that forms the basis of all of NetFoundry’s offerings.
Having an OpenZiti foundation gives zrok two things that ngrok doesn’t give you out of the box:
- Private sharing: instead of only exposing something to the whole internet, you can share it with specific people over a secure, zero-trust connection. The URL is private, not public.
- You can run it yourself because it’s open source. You can run your own zrok instance on your own infrastructure, rather than being tied to someone else’s hosted service. (There’s also a free hosted zrok if you just want to get going without standing anything up. That’s what I use.)
zrok gives you ngrok’s convenience, plus private-by-default sharing and the option to own the whole stack.
- Here’s the zrok repo: https://github.com/openziti/zrok/
- And you can get the latest release here: https://github.com/muratgul/ZrokGui/releases/
I did a recent livestream on the OpenZiti YouTube channel on zrok with my co-host Clint and zrok developer Michael Quigley:
ZrokGui
Just for kicks, I cloned the source code and compiled it myself. It was no biggie; with the .NET 10 SDK already installed on my system, it was a matter of opening PowerShell, navigating to the directory containing ZrokGui.slnx and running the command dotnet build.
If you’re of the “I don’t want to compile anything; I just want a working application” school, go to ZrokGui’s Releases page, and download and unzip the .zip file for the latest release. The application is ZrokGuiWpf.exe.
ZrokGui is just a graphical interface for zrok, so you’ll need to have that on your system as well. As long as either zrok.exe or zrok2.exe are in the same directory as the ZrokGui application file (ZrokGuiWpf.exe), ZrokGui app finds zrok automatically, and then drives it for the user in the background. The GUI makes it simple to spin up public, private, file, and reserved shares, pick a backend mode (proxy, web, caddy, drive, tcpTunnel, udpTunnel, socks), and set basic auth or access grants. It presents live log output, pastes the share URL land into the clipboard the moment it’s live.
This is an early-stage project, but a real one. It’s past v1.0 with a downloadable release (v1.1.5 dropped a couple of days ago) and an active commit rhythm. I consider it beyond a weekend experiment at this point, and a nice piece of work. It’s the kind of thing that’s fun to see grow up around zrok.
Where to get ZrokGui
Once again:
- Here’s the GitHub repo: https://github.com/muratgul/ZrokGui
- And if you just want the .exe, the latest release at the time of writing is v1.1.5; just download and unzip ZrokGui_v1.1.5.zip
Categories
Happy 20th birthday, Pandoc!

One of the bragging points of digital information is that it’s supposed to be possible to convert it from one format to another. Actually doing the conversion is often where theory runs headlong into practice and gets a concussion. Thankfully, when I need to convert text documents from one format into another, whether for myself or as part of an application, I’ve been able to hand the job to Pandoc.
 When people ask me “What is Pandoc?”, I reply with a Star Trek-y summary: “It’s the Universal Translator for text document formats.” Need to take a LaTeX file and turn it into a PDF or Epub ebook? No prob. Got documents on a topic from different sources in different formats and need them all converted to HTML? Easy-peasy. Are you writing an application that takes documents in multiple formats as input and needs to extract the information from them? Have your application call Pandoc to convert those docs into a format it can read.
Want a sense of the formats that Pandoc can translate from and to? Check out the graph below, which shows but a fraction of its translation repertoire, and click on it to see the whole thing:

Like many of the best tools in my “belt,” Pandoc is open source, and it’s also been around for a while. In fact, today (August 3, 2026) is its 20th anniversary!
Developer John MacFarlane wrote it in Haskell (in fact, it’s the most popular program written in Haskell) and first published it on his website under the GPL 20 years ago. I’ve used it regularly for all kinds of projects, including an integration into documentation management system that’s still in use at a very pricey cruise ship company.
To celebrate this milestone anniversary, MacFarlane wrote up an article, Twenty Years of Pandoc, which is worth checking out. However, the best way to really celebrate this anniversary is to take Pandoc for a spin if you’ve never use it before.
Happy 20th, Pandoc, and thanks for all the help!

Interviews, even for people who appear onstage often, are still stressful. It often helps to have some prepared notes handy so you can spend more brainpower on the actual interview and less brainpower on remembering things. Pictured above is page one of a three-page set of notes from a recent interview; I can share this one because it’s generic enough that it didn’t need too much redacting.
I strongly recommend that if time allows, write your interview notes by hand instead of typing them. Here are my reasons why:
- Writing by hand buys you extra time to think. The slow, deliberate process of writing something down gives you an opportunity to think about things, including what the interviewer might be looking for, and what you might what to say or emphasize during the interview. I often come up with an interesting new angle or idea, thanks to the extra time writing requires.
- Writing by hand helps you remember what you wrote. Again, it’s about the process being deliberate: writing by hand requires you to use your fine motor control to form letters, and forming letters is different for each letter — you use a different set of motions to write “b” than you do when writing “M”. Typing uses a similar motion for write different letters; the only difference is their location on the keyboard. Writing those letters engages more “muscle memory” than typing, which “locks in” those facts better.
- Writing by hand requires you to pay attention to what you’re writing. Audrey van der Meer, Brain researcher and Professor of Neuropsychology at NTNU (Norwegian University of Science and Technology), says this about typing to ake notes in class: “It’s very tempting to type down everything that the lecturer is saying. It kind of goes in through your ears and comes out through your fingertips, but you don’t process the incoming information.” I find the same is true for taking down pre-interview notes.

For the longest time, I’d been using iTerm2 as my terminal app on the Mac, but switched to Warp a couple of years ago. Its smart completions and IDE-like editing are incredibly useful features, but the thing that really makes it stand apart is the AI assistance.
Here’s a recent example. I’m more familiar with mobile and Python frameworks than I am with JavaScript and TypeScript ones, so I never know how to launch a JS/TS application when the developer hasn’t provided a README.
Normally, I’d start poking around the filesystem, looking at config files and other artifacts and doing some Googling to see which framework they belonged to. But this time, I decided “Why not let the AI do the scut work?” So that’s what I did.
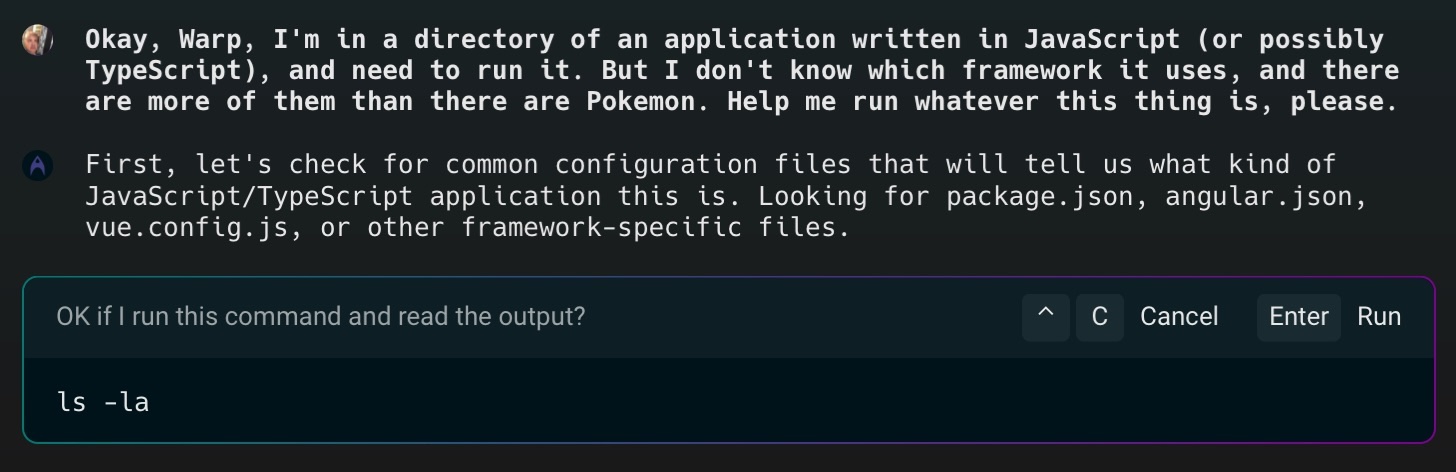
I opened a new tab in Warp and entered:
Okay, Warp, I'm in a directory of an application written in
JavaScript (or possibly TypeScript), and need to run it.
But I don't know which framework it uses, and there are more
of them than there are Pokemon. Help me run whatever this
thing is, please.
It replied with:
First, let's check for common configuration files that will
tell us what kind of JavaScript/TypeScript application
this is. Looking for package.json, angular.json,
vue.config.js, or other framework-specific files.
It then asked for permission to execute the command ls -la, which I deemed as harmless (directory listing, long format, all files).
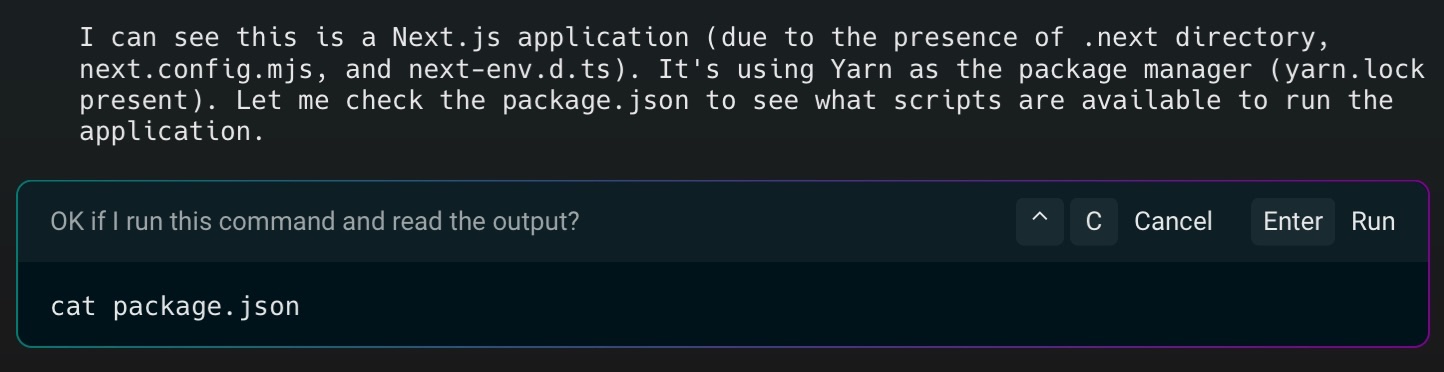
Warp responded with:
I can see this is a Next.js application (due to the presence
of .next directory, next.config.mjs, and next-env.d.ts).
It's using Yarn as the package manager (yarn.lock present).
Let me check the package.json to see what scripts are
available to run the application.
It asked for permission to do something again — this time, to execute cat package.json (print out, or conCATenate the contents of the file package.jsonso that it could read it. I gave my approval, and it responded with the steps necessary to run the application:
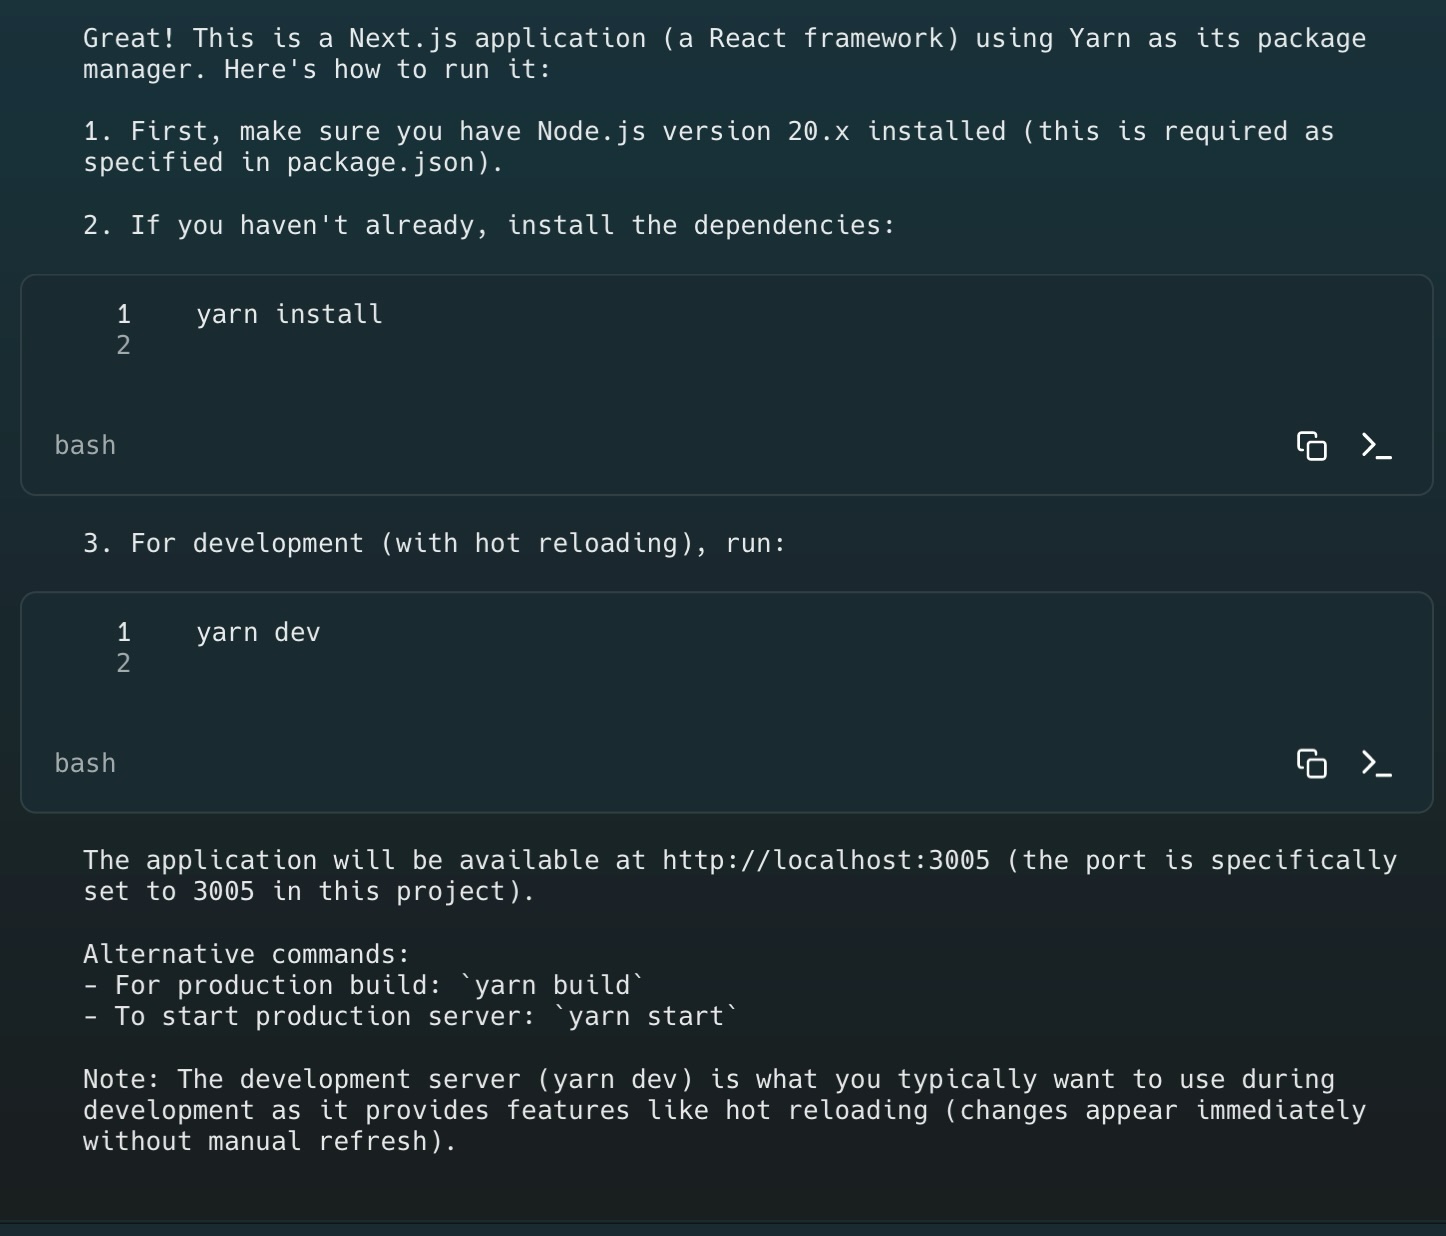 Features like this are why I use Warp and other AI tools!
Right now, Warp is available for macOS, as well as Debian, Fedora, Red Hat, SUSE, and Ubuntu flavors of Linux. They’re working on a Windows version too.