The Hooters in St. Louis, Missouri. Photo by Duolingo.
The locations are:
St. Louis, Missouri
Charlotte, North Carolina
Beaumont, Texas
Galveston, Texas
The Hooters in Charlotte, North Carolina. Photo by Duolingo.
Earlier this year, Hooters announced that it had filed for Chapter 11 bankruptcy protection and closed a number of its locations.
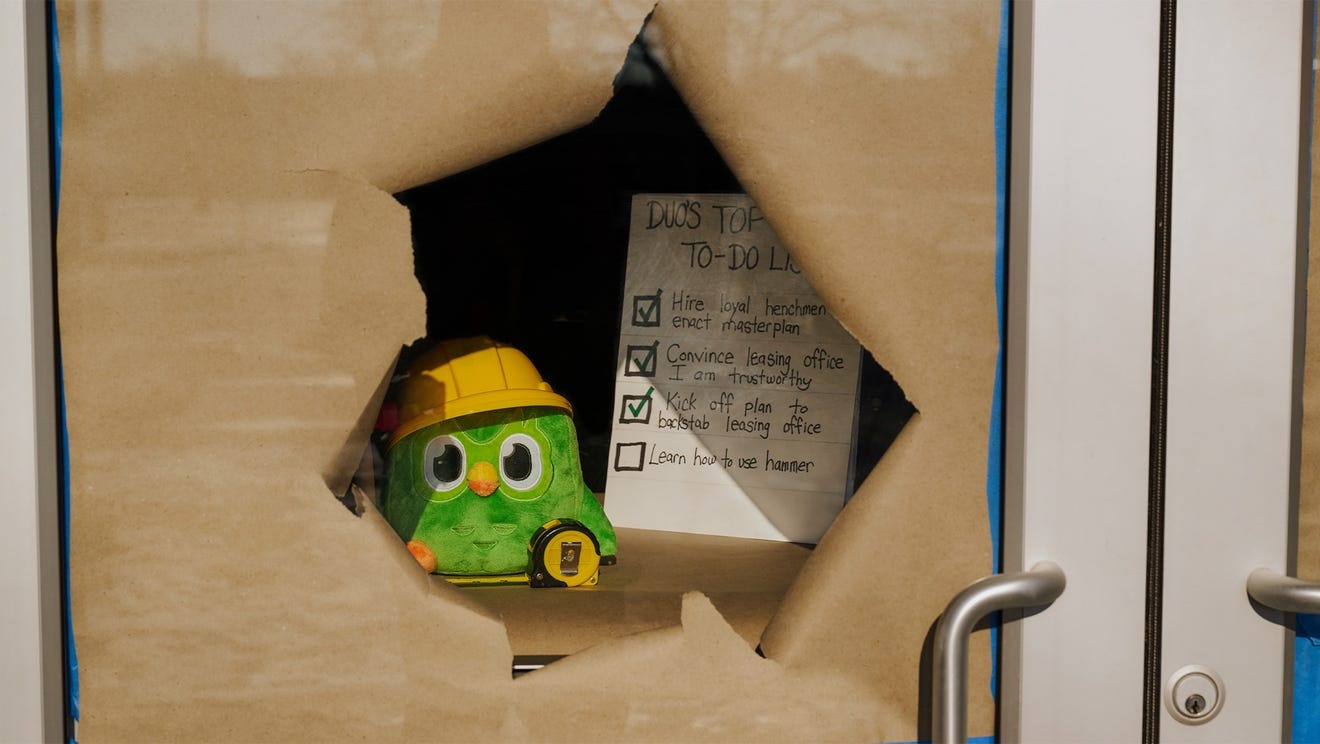
The door of the Hooters in St. Louis, Missouri. Photo by Duolingo.
Duolingo, who’ve always been a little bit odd with their self-promotion, have responded to queries as you might expect:
They told USA Today that the “installations” (referring to the Hotters branches with Duolingo banners) will be open for a “limited time.”
When contacted by the Houston Chronicle, a spokesperson for Duolingo replied “Duo [the Duolingo owl mascot] has always had a flair for drama. When he spotted an empty nest in Galveston, he did what an overly ambitious owl might do: leave a few feathers and see who noticed.”
The Hooters in Beaumont, Texas. Photo by Duolingo.
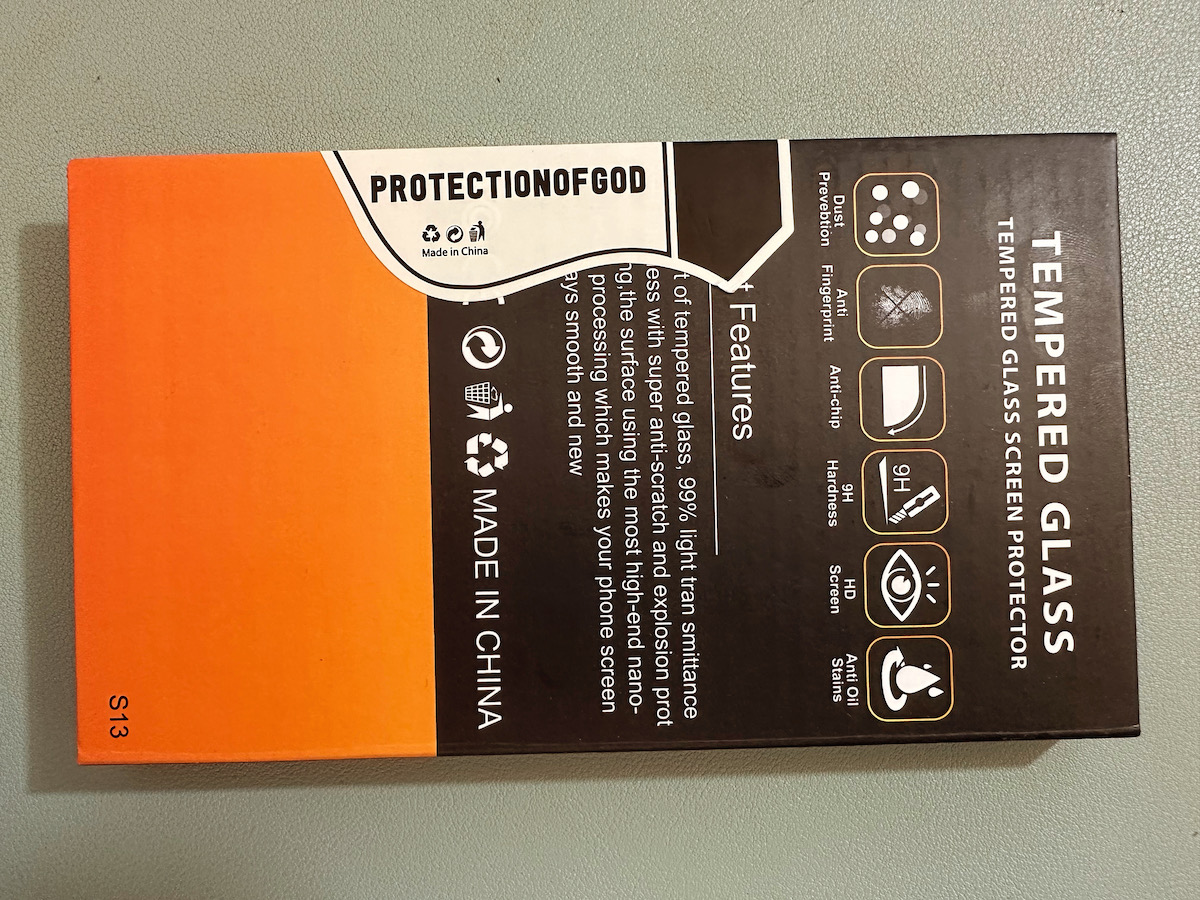
Pictured above is the back of the packaging for Samcorn’s 9H tempered glass screen protector for smartphones. I chuckled at the “Protection of God” sticker that seals the box — these screen protectors are good, but they’re not that good.
Tap to view at full size.
Of more interest to me is what they’re protecting: a Google Pixel 7 phone with 128GB storage, pictured above. It’s not the newest Pixel anymore, but its specs are pretty good (its benchmark scores are 813,114 for AnTuTu v9: 813114, 3288 for GeekBench v5.1, and 59fps for GFXBench). I picked up a refurbished model for a little over $300. If you can find one at this price, it’s one of the best “bangs for the buck” in smartphones right now.
I’ve got a whole lot of mobile development articles coming up — for both here and the Auth0 Developer Blog — and having a nice Android unit will come in handy.
Don’t worry, this isn’t mandatory, but if you’re new to Xcode (or new-ish), you might want to try out this simple app exercise beforehand, just to get comfortable with the tools.
Once you’ve installed Xcode, launch it and follow the steps below. The app you’ll make is simple, but the exercise will get you used to working with the tools.
Create a new project
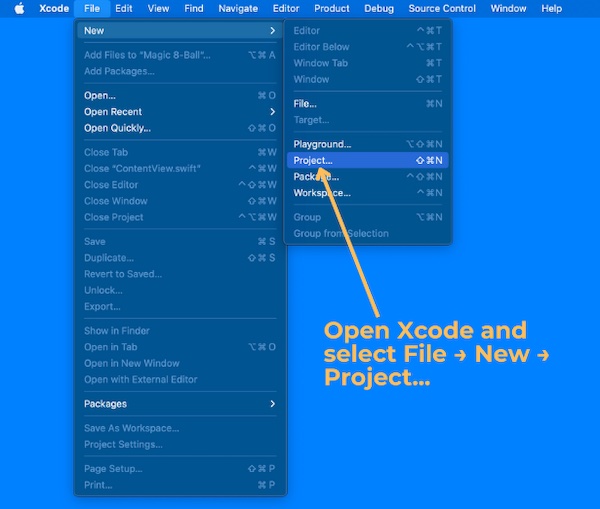
Open Xcode. From the File menu, select New, then Project.
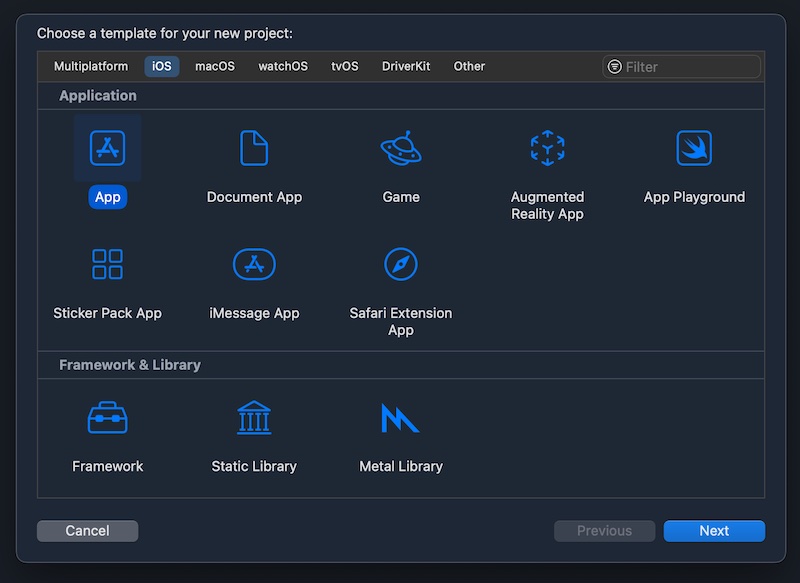
You’ll see this window pop up:
This window lists templates for the different kinds of projects that you can build using Xcode. Templates are starting points for projects that contain just enough code to actually work, but they do little more than display a blank (or mostly blank) screen.
Make sure that the selected template category near the top of the window is iOS and that App is the selected template. Then click the Next button.
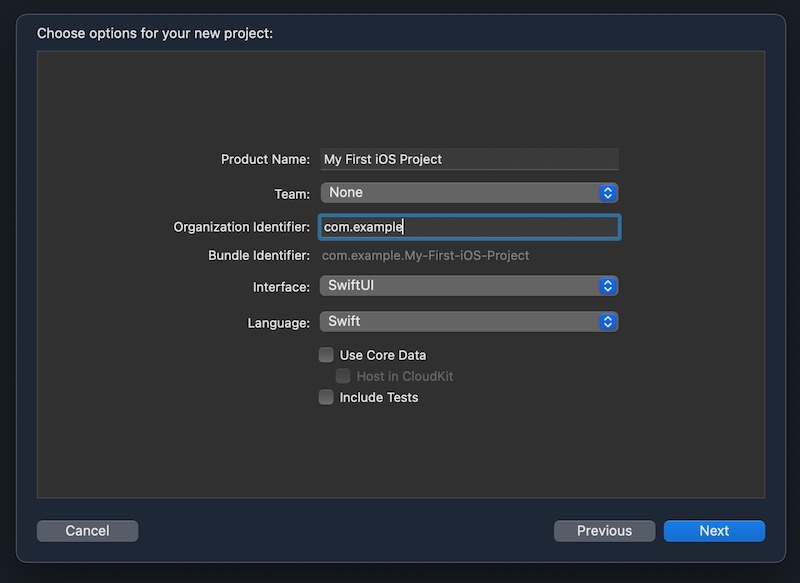
The contents of the window will change to this:
This window lets you choose options for the project you’re creating. For simplicity’s sake, we’ll take the approach you might take if you’d just installed Xcode and don’t have an Apple Developer account. Here’s how you should fill out this screen:
Product Name:My First iOS Project
Team: Select None.
Organization Identifier: Use com.example (or, if you own your own domain, use it, but in reverse — for example, if you own the domain abcde.net, you’d enter net.abcde into this field).
Interface: Go with the default SwiftUI.
Language: Go with the default Swift.
Leave the Use Core Data and Include Tests checkboxes unchecked.
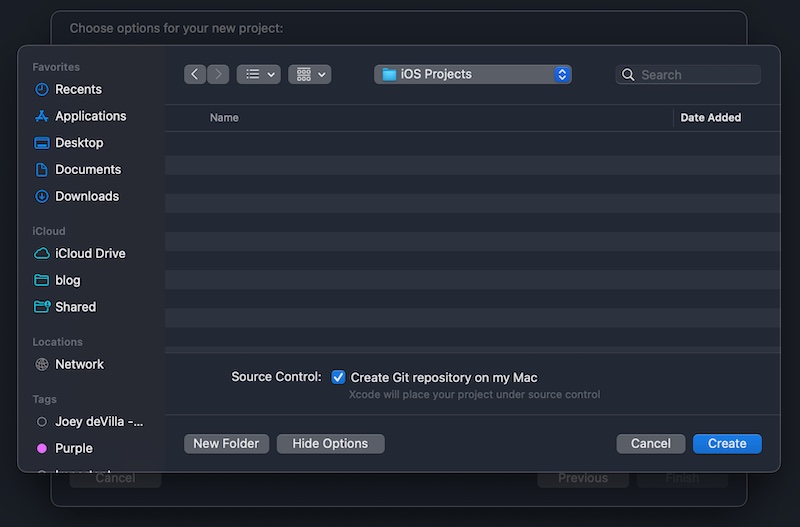
Click the Next button, and you’ll see this:
Select a place to save the project, then click Create.
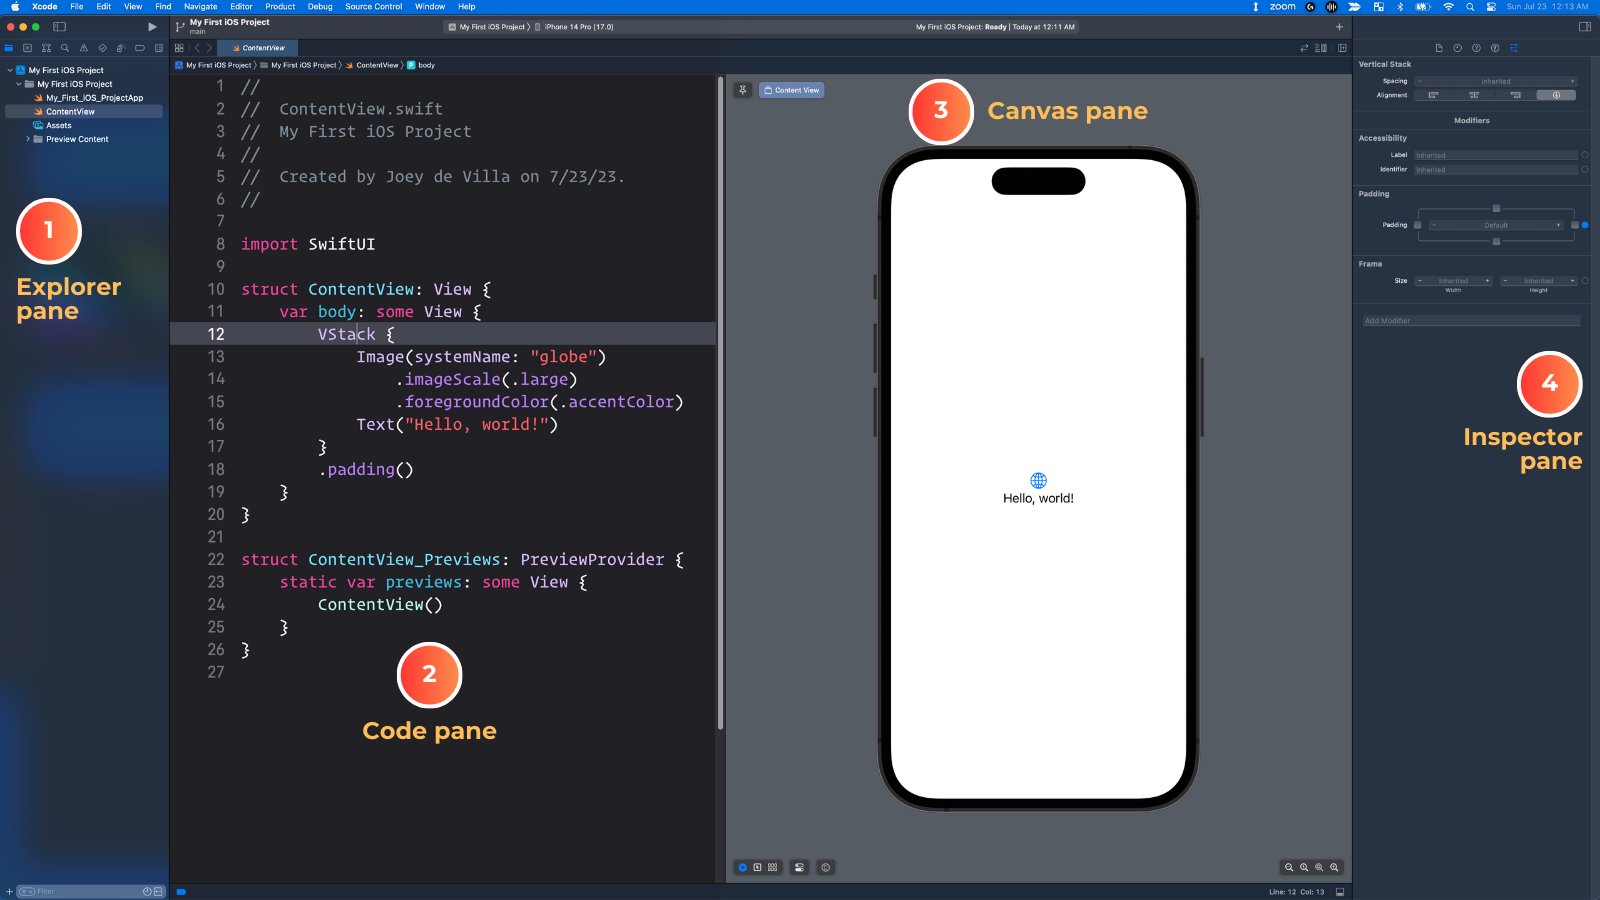
Xcode now has all the information it needs to build a basic iOS app project. It will build this project and then present the full Xcode interface, as shown below:
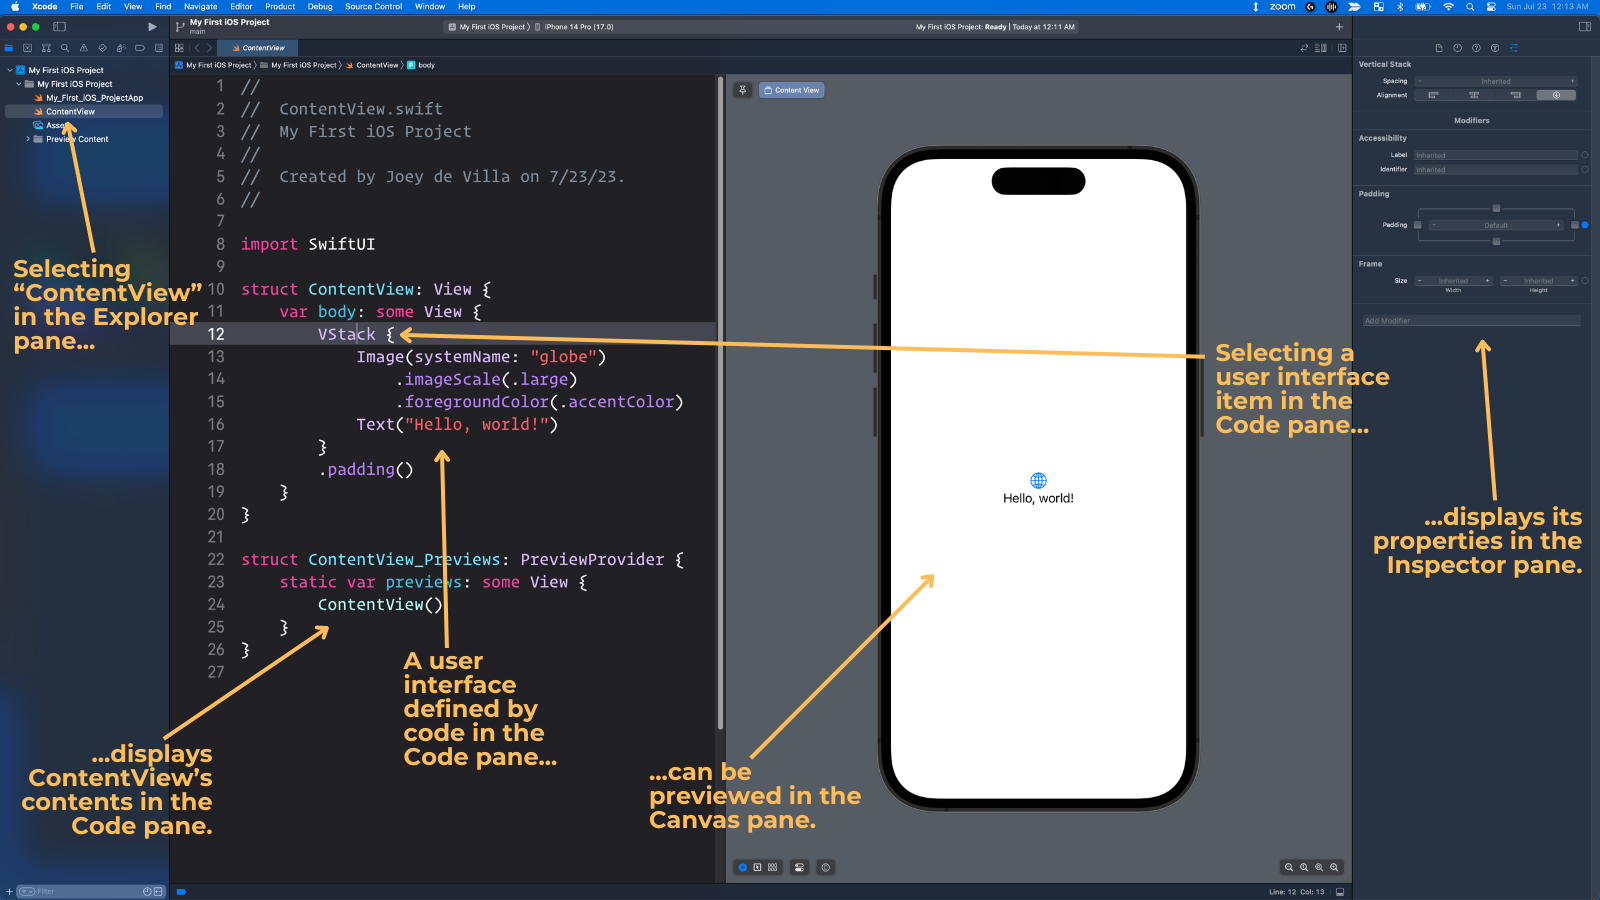
The Xcode window has four general areas, which I’ve numbered in the screenshot above:
The Explorer pane. The leftmost pane of the Xcode window contains a set of Explorers, which is a set of menus that let you look at different aspects of your project. The one you’ll probably use most is the Project Explorer, which lists the project’s files and allows you to select the file you want to view or edit.
The Code pane. This is where you’ll read, enter, and edit code. You’ll use this pane a lot.
The Canvas pane. This pane lets you preview what the user interface will look like in real time, as you enter code that defines the it.
The Inspector pane. The rightmost pane lets you get details about any code or user interface element that you currently have selected.
As I said earlier, when you create a new Xcode project, Xcode builds in enough code for a very bare-bones application.
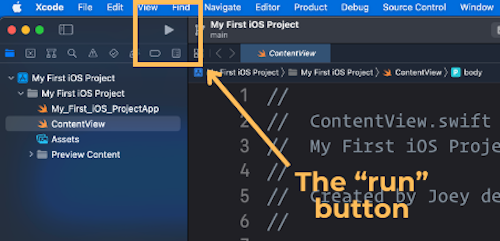
Run the project
Take a look at that application in action — click the Run button (located near the top of the screen; it looks like a ▶️ or “play” button)…
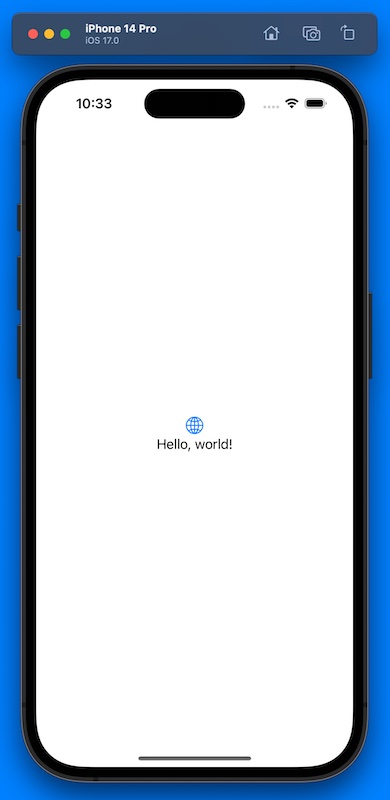
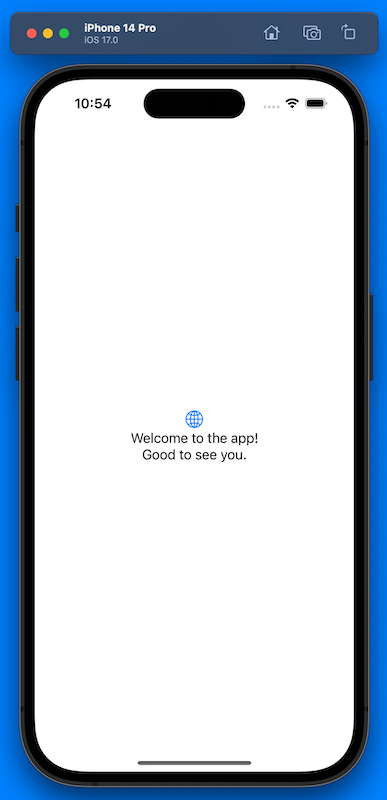
…and Xcode will launch the iOS simulator, which imitates an iOS device. Give it a few seconds to launch, and then you’ll see this:
The app doesn’t do anything other than display a 🌐 icon and the text “Hello, world!” In this exercise, we’ll take this starter app and make it do a little more, adding user interface elements along the way.
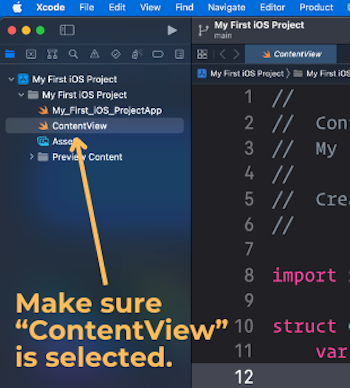
The ContentView file
Let’s take a closer look at the code. First, look at the Explorer pane and make sure that ContentView is selected:
ContentView is a file, and the code inside it defines the app’s one and only screen looks and works.
Here’s the code inside ContentView:
struct ContentView: View {
    var body: some View {
        VStack {
            Image(systemName: "globe")
                .imageScale(.large)
                .foregroundColor(.accentColor)
            Text("Hello, world!")
        }
        .padding()
    }
}

struct ContentView_Previews: PreviewProvider {
    static var previews: some View {
        ContentView()
    }
}
Structs
You’ll see that the code is divided into two blocks, each beginning with a keyword: struct, which is short for “structure.” If you’re familiar with object-oriented programming languages like Python or JavaScript, you should think of Swift’s structs as being like classes: they’re “blueprints” for objects, and can have properties and methods.
There are two structs in the ContentView file:
ContentView, which defines what appears on the screen when you run the app.
ContentView_Previews, which displays ContentView in the Canvas pane, allows you to see what ContentView will look like while you’re coding the app.
For now, let’s just look at ContentView.
The ContentView struct
When you create a new iOS app project in Xcode, Xcode creates a “starter” project for an app with a single screen. Xcode gives this screen a default name: ContentView.
The name ContentView is arbitrary. You could rename it MainScreen or HelloWorldDisplay, and it would still work. Many developers change the name of ContentView immediately after they start a new iOS app project, but for this exercise, we’ll just stick with the name.
Let’s take a look at the first line of ContentView:
struct ContentView: View {
The struct ContentView part of the line declares ContentView as a struct.
The : View part says that ContentViewadopts or conforms to the View protocol:
If you’ve programmed in C#, Go, Java, PHP, or Python 3.8 and later, think of a Swift protocol as being similar to an interface.
If you’re not familiar with interfaces but have programmed in an object-oriented programming language like JavaScript or Python prior to version 3.8, think of protocols as a loose form of inheritance.
You can think of the line struct ContentView: View { as saying “This is a struct named ContentView, which includes the properties and methods of a View object.”
Now let’s look at what’s inside ContentView:
var body: some View {
    VStack {
        Image(systemName: "globe")
            .imageScale(.large)
            .foregroundColor(.accentColor)
        Text("Welcome to the app!")
    }
    .padding()
}
Pay particular attention to that first line:
var body: some View {
ContentView contains just one thing: a variable. That’s it!
The var body part of the line declares body as a variable.
The : some View part says that body contains some kind of object that adopts the View protocol.
You can think of the line var body: some View { as saying “This is a var named body, which contains some kind of View object.”
The View protocol
The term “view” has a specific meaning in non-web GUI programming. It’s used to refer to any of the following:
A user interface element such as static text, a text field, a button, a switch, an image, and so on, or
A container for other user interface elements.
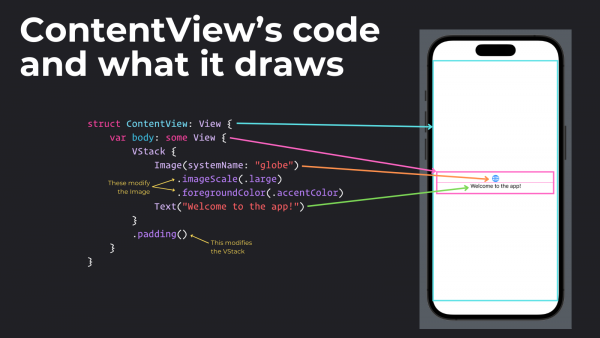
Here’s the code for ContentView and the resulting screen that shows the connections between the code and the views it creates:
Tap to view at full size.
ContentView is a plain View. It functions as the app’s one and only screen, and it contains that screen’s views.
Inside the ContentView is a VStack, which is a kind of View whose name is short for “vertical stack.” Like ContentView, VStack is a view that contains other views, but the views it contains are arranged in…you guessed it: a vertical stack or column.
Inside the VStack are two other views whose purposes you can get from their names:
Image: This view displays images.
Text: This view displays static text — the kind that the user can’t edit.
All of these things listed above adopt the View protocol, which means:
They are either a user interface element or a container for user interface elements, and
They include the properties and methods of a View object.
Let’s talk about that second point: that in order to adopt the View protocol (or more loosely, to be a kind of View), a struct includes the properties and methods of a View object.
There’s only one required property an object needs to adopt the View protocol: it just needs to have a variable named body, whose type is some View. body is a property that contains some kind of user interface element or a container for user interface elements.
In the case of ContentView, which adopts the View protocol, its body property contains a VStack. That VStack contains an Image view and a Text view.
The Text view
Let’s play around with the Text view first. Find the line inside ContentView that looks like this:
Text("Hello, world!")
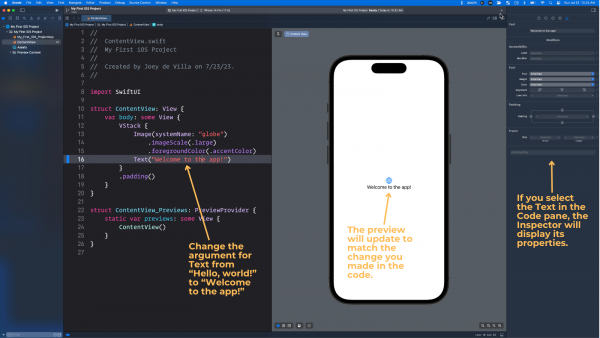
And change it to this:
Text("Welcome to the app!")
You should see the preview in the Canvas pane update to match the change you made:
Tap to view at full size.
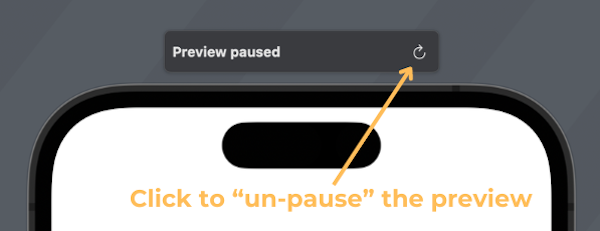
If for some reason the preview didn’t update, look for the text “Preview paused” at the top of the preview and click the “refresh” icon to “un-pause” it:
Add a new line after the Text:
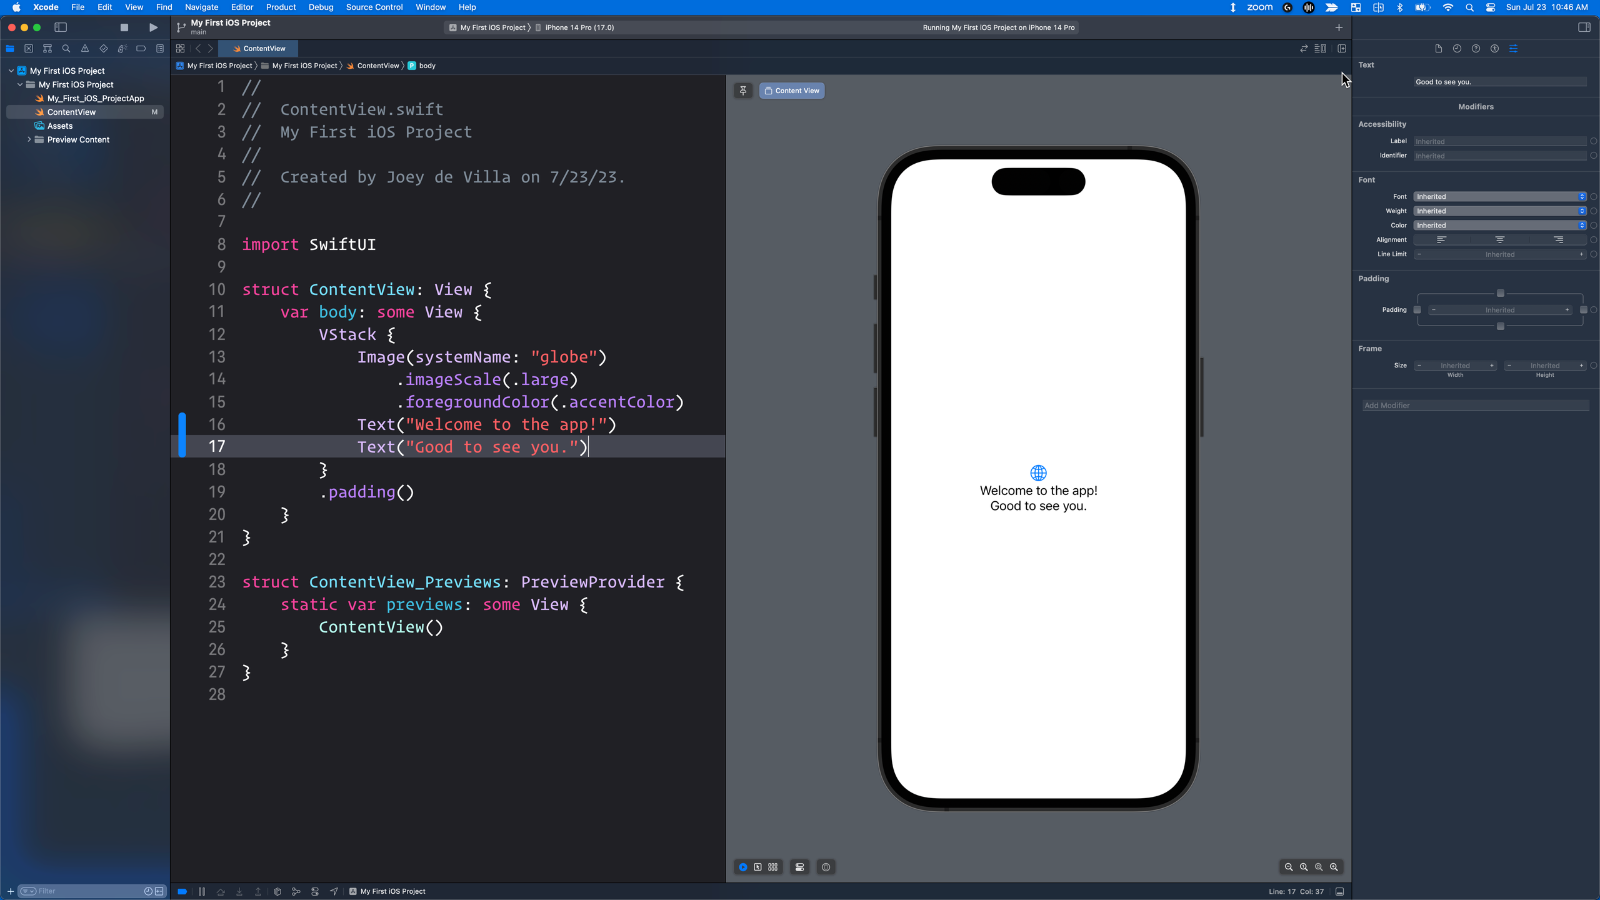
Text("Good to see you.")
This should add a new Text view to ContentView, and Xcode’s preview should update to reflect the change:
Tap to view at full size.
Run the app. The preview will pause and the Simulator will start up and launch the app, which will look like this:
Notice that running the app in the Simulator pauses the preview. Running the app in the Simulator or making big changes to the code causes the preview to pause, but you can always restart it by either:
Clicking on the “refresh” icon at the top of the preview, or
Using the keyboard shortcut command + option + p
Text view modifiers
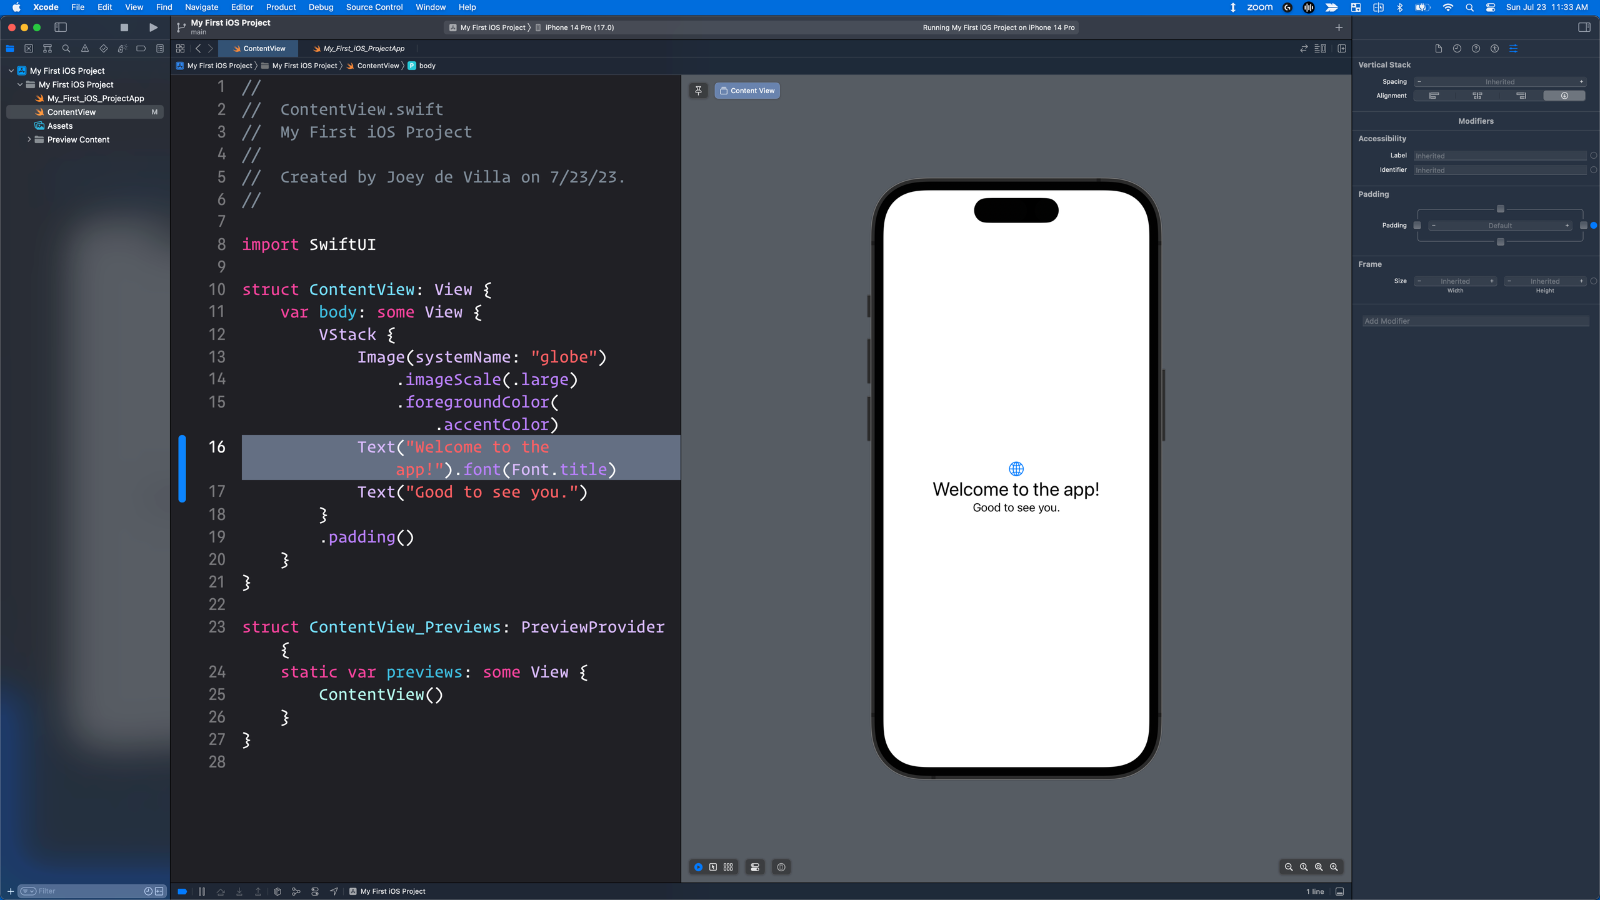
Let’s make the “Welcome to the app!” message on the screen larger — it should be the size of a title. Do this by changing the line that creates that Text view to the following:
Text("Welcome to the app!").font(Font.title)
Run the app or restart the preview — it should look like this:
I’ll cover more in Monday’s session, but feel free to experiment!
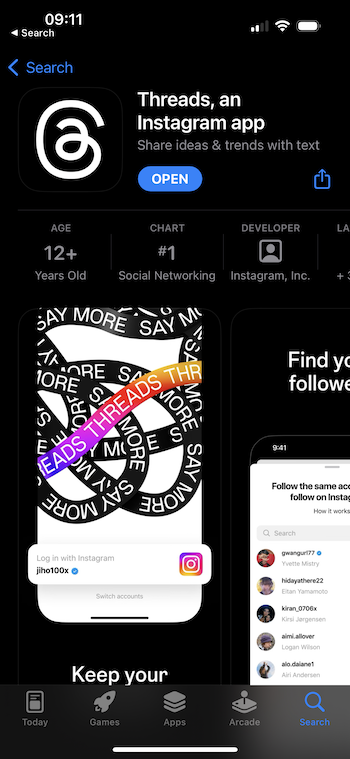
Threads is a newly-released social media app created by Meta (the company behind Facebook and Instagram). It’s a direct competitor of Twitter.
Meta is promoting it as “Instagram’s text-based conversation app;” I’ve heard it referred to as “Instagram for words,” and I like to think of it as “Twitter, but with your Instagram social graph.”
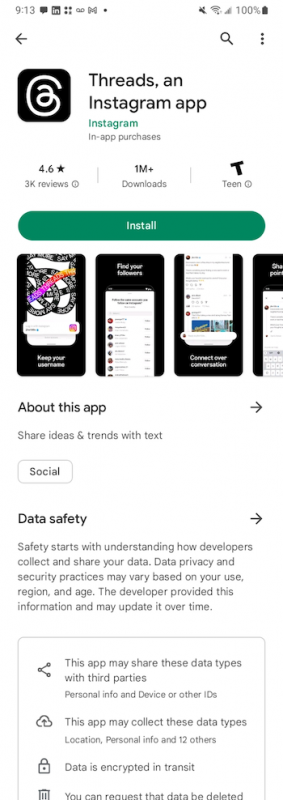
Why do you need an Instagram account to join Threads?
The simple reason is that it’s an extension of Instagram. You use your Instagram credentials to log in, and your Instagram contacts are automatically part of your Threads social network.
The usefulness of a social networking application is directly proportional to the number of users — the more, the better. By “piggybacking” it on Instagram — a social network with over 2.35 billion monthly active users — they solve this problem.
The Instagram connection also provides another advantage: you don’t have to create another set of login credentials, you can start with your established Instagram handle.
You’ll also start with a network of connections made up of your Instagram friends, meaning that you’re not starting from scratch, as you’d have to on other networks like Bluesky or Mastodon.
It’s basically Twitter in 2010, in other words, with one nice feature that has been added since then: the quote-tweet, which Mastodon has avoided adding but turns out (I think) to be an essential feature of the modern-day Twitter experience.
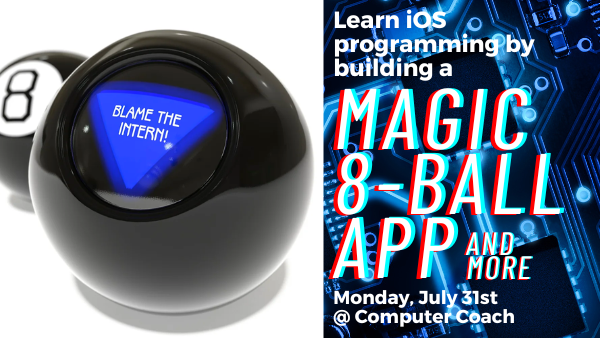
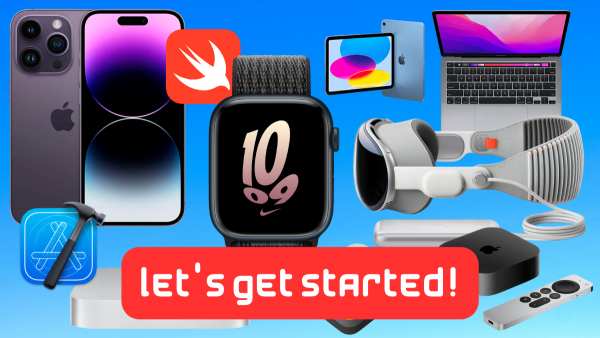
It’s been a while, so let’s go back to the beginning and build an iOS app!
Join us on Monday, June 26 at 6:00 p.m. at Computer Coach to sit down, fire up Xcode, and write an iOS app. Register here!
It’s been a while since Tampa Bay has had a meetup for Apple platforms — iOS, iPadOS, macOS, watchOS, tvOS, and the upcoming visionOS (as in the OS for Apple’s Vision Pro, a.k.a. “the goggles”). The best way to learn how to develop for all of these platforms is to develop for iOS.
At this meetup, where we’ll build a simple iOS app and get re-acquainted with iOS development with Swift and SwiftUI.
Are you new to iOS development, the Swift programming language, Xcode, SwiftUI, or any combination of these? This meetup session is just for you! You’ll come to the meetup with your Mac with Xcode installed, and you’ll leave with a working app!
This meetup will be a “code along with the presenter” exercise. You’ll fire up Xcode, click File → New, and following the presenter’s work on the big screen, you’ll write code in Swift, build a user interface in SwiftUI, and compile and run the app. If you’ve never built an iOS app before — or it’s been a while — you’ll want to attend this meetup!
You’ll need:
A Mac computer — preferably a laptop, but we’ve had people bring in Mac desktops before.
Xcode 14.3.1. It’s free on the App Store, but it does take a while to download and install. It’s best if you install it in advance.
And because it’s hard to code on an empty stomach, we’ll provide the pizza, courtesy of our sponsor: Okta! We’d also like to thank Computer Coach for the generous use of their space.
Once again: Join us on Monday, June 26 at 6:00 p.m. at Computer Coach to sit down, fire up Xcode, and write an iOS app. Register here!
The Pixies’ 1988 album “Surfer Rosa,” on which “WHere is My Mind?” appears.
If you use a Google Pixel as a musical alarm clock and your wake-up music playlist leans towards ’90s alternative rock, there’s a chance that your phone might not wake you up at the set time. And it’s all the fault of the original version of the Pixies song Where is My Mind?
Where is My Mind? starts with a short silence, followed by Black Francis (the stage name of Pixies lead vocalist Charles Michael Kittridge Thompson IV) saying a single word very clearly and distinctly: “Stop.”
Creative Commons photo by “Bidgee”. Tap to see the source.
For the past few months, I could not figure out why on random days, with seemingly no reason, sometimes my alarm would either not go off, or turn itself off very quickly. Maybe once every other week or so, I would wake up 30 minutes later on my backup alarm, with no indication as to why the first shut itself off.
They also figured it out. The phone’s Google Assistant was interpreting the word “Stop” as a command to cancel the most recent request, and the command doesn’t need to be preceded by “Okay Google:”
The alarm is set to play a Spotify playlist, and one of the songs on that playlist is “Where is My Mind” by the Pixies. If you know the first line of that song, you may know where I’m going with this…
The first line in the song is “Ooohhh STOP”, with the word “stop” said very clearly. My Pixel has been hearing that “stop” and turning the alarm off. Since it’s a playlist on shuffle, it only comes up every once in a while, so it’s not happening every morning.
Given that the song was released in 1988, it’s not likely that the “Stop” at the start of the song was a deliberate attempt to mess with voice-command devices. The song predates smartphones by almost 20 years!
Here’s the original song:
If it sounds familiar, it may be because you may remember it from the end of the film Fight Club…
…or, more recently, the Maxence Cyrin piano cover from the TV series Mr. Robot:
Here’s the official version of Maxence Cyrin’s version:
Sometimes the strangest bugs come from the strangest places.
Swift (or more accurately, the Foundation framework from which Swift gets its date and time classes) gets a bad rap for complex date and time programming, but that’s because date and time programming is complex, and many programmers have erroneous ideas on the topic.
This blog used to be home to a four-part series on date and time programming in Swift. I’ve recently updated that series and moved it to the Auth0 Developer Blog (the one that has much greater reach and also pays my mortgage). It’s also a four-parter: