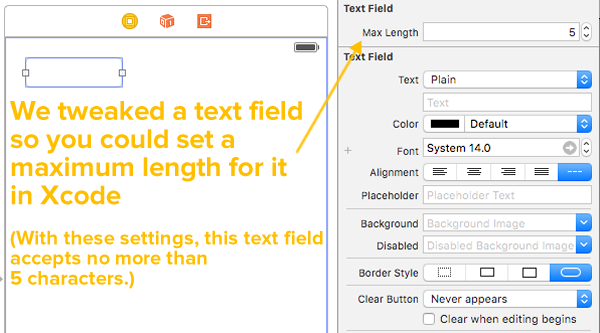
In my last article on iOS programming in Swift, I showed you how to add some code to your project that would allow you to add a “Max Length” property to all its text fields, which you could set in code, or better yet, in Xcode’s Interface Builder, as shown below:
For more details, you should take a look at that article, iOS programming trick: How to use Xcode to set a text field’s maximum length, Visual Studio-style.
A key part of what made it work was the @IBInspectable keyword. When applied to a property of an object that can be displayed in Interface Builder, it makes that property available to the Attributes Inspector, which in turn provides a user interface for viewing and changing that property.
That got me thinking: could I apply @IBInspectable to the text field tricks I covered in my April 2015 article, How to program an iOS text field that takes only numeric input or specific characters with a maximum length?
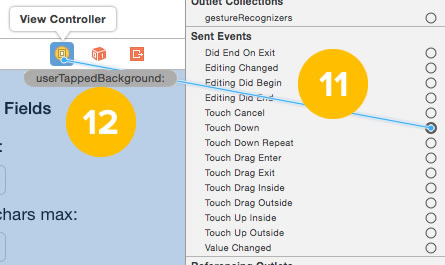
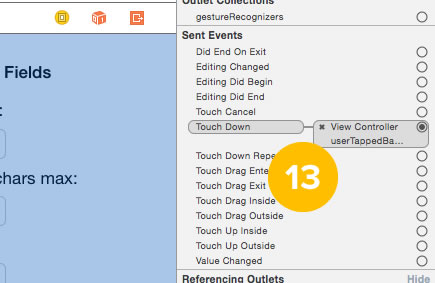
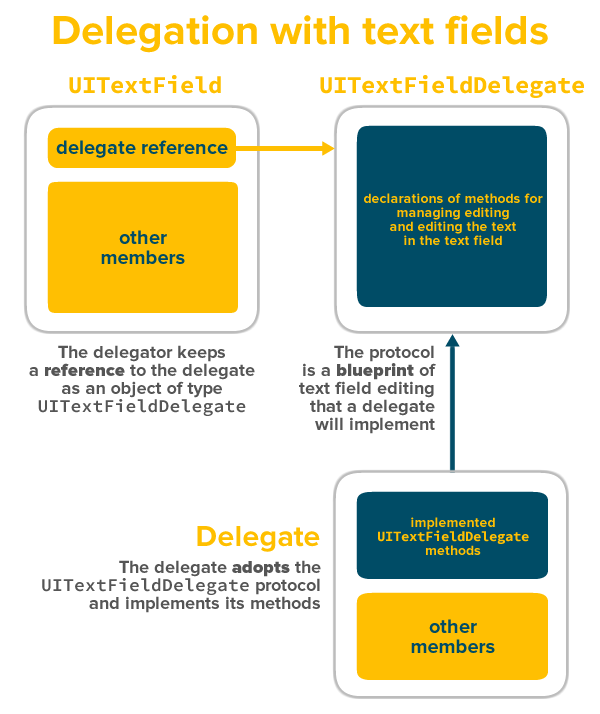
In that article, I covered how to program text fields that accepted only specified characters or accepted all characters except a specified set, and it required making the containing view controller adopt the UITextFieldDelegate protocol and use itself as its own delegate, and then implementing the textField(_:shouldChangeCharactersInRange:replacementString:) method.
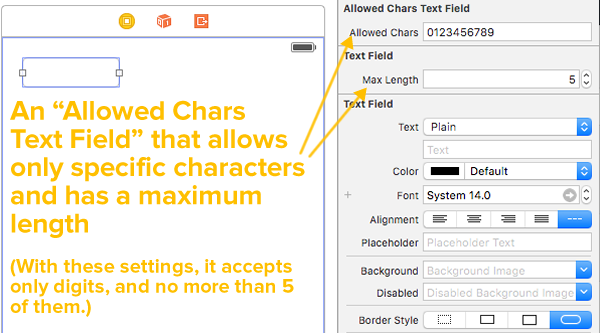
Wouldn’t it be nice if it were simpler? Consider the illustration below of an “Allowed Chars Text Field”. It lets me specify the following in Interface Builder:
- That characters that are allowed to be entered into the text field, and
- The maximum number of characters that are allowed to be entered into the text field.
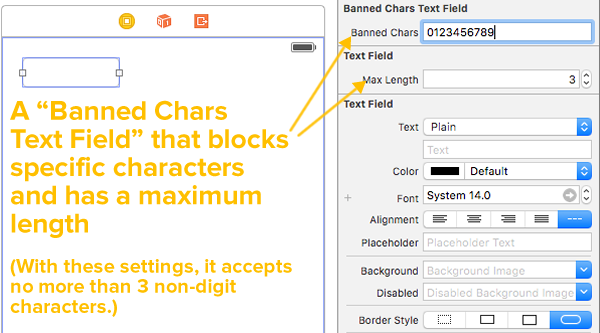
This works if the set of characters that I want to allow into the text field is small. How about the case where I want to do the opposite: prevent the user from entering a small set of specified characters? That would be a “Banned Chars Text Field”, and it would allow me to specify the following in Interface Builder:
- That characters that are not allowed to be entered into the text field, and
- The maximum number of characters that are allowed to be entered into the text field.
Let’s make these happen!
Limiting the number of characters that can be put into a text field
In the article iOS programming trick: How to use Xcode to set a text field’s maximum length, Visual Studio-style, we put the following code into a file named TextFieldMaxLengths.swift:
import UIKit

// 1
private var maxLengths = [UITextField: Int]()

// 2
extension UITextField {

  // 3
  @IBInspectable var maxLength: Int {
    get {
      // 4
      guard let length = maxLengths[self] else {
        return Int.max
      }
      return length
    }
    set {
      maxLengths[self] = newValue
      // 5
      addTarget(
        self,
        action: #selector(limitLength),
        forControlEvents: UIControlEvents.EditingChanged
      )
    }
  }

  func limitLength(textField: UITextField) {
    // 6
    guard let prospectiveText = textField.text
      where prospectiveText.characters.count > maxLength else {
        return
    }

    let selection = selectedTextRange
    // 7
    text = prospectiveText.substringWithRange(
      Range<String.Index>(prospectiveText.startIndex ..< prospectiveText.startIndex.advancedBy(maxLength))
    )
    selectedTextRange = selection
  }

}
Once again, here are the annotations for the numbered comments in the code:
- There are two big things going on in this single line of code, which declares and initializes
maxLengths, a dictionary that stores the maximum lengths of text fields:- First, there’s the
privatedeclaration. In many programming languages,privatemeans “accessible only inside the class”, but in Swift,privatemeans “accessible only inside the source file where they’re defined”. Any code inside TextFieldMaxLengths.swift has access tomaxLengths, and any code outside TextFieldMaxLengths.swift does not. By puttingmaxLengthsin the same file as ourUITextFieldextension, we get a place where we can store the maximum lengths of text fields (remember: extensions can only add methods, not properties), and by making itprivate, we keep other code from messing with it. - Then there’s the matter of what to use as the key for the
maxLengthsdictionary. Swift lets you use anything that conforms to theHashableprotocol as a dictionary key, andUITextFielddoes just that. It makes sense to use the text fields themselves as the keys to the values for their maximum lengths.
- First, there’s the
- Swift
extensions let you add new functionality to existingclasses,structs,enumerations, andprotocols. We’re using anextensiontoUITextFieldto add two things:maxLength, a property that lets the programmer set and get the maximum length of a text field, andlimitLength, a method called whenever the contents of a text field are changed, and limits the number of characters in that text field.
- By marking the
maxLengthproperty with@IBInspectable, we make it available to Interface Builder, which then provides an editor for its value in the Attributes Inspector. - Get to know and love the
guardstatement and the “early return” style of programming; you’re going to see a lot of it in a lot of Swift coding. Here, we’re usingguardto filter out cases where no maximum length has been defined for the text field, in which case, we simply return the theoretical maximum string size. - We use
addTargetinmaxLength‘s setter to ensure that if a text field is assigned a maximum length, thelimitLengthmethod is called whenever the text field’s contents change. - Another
guardstatement. Any case that gets past it is one where the text about to go into the text field is longer than the maximum length. - Cocoa sometimes likes to make things complicated. This line is the Cocoa way of saying “put the first
maxLengthcharacters ofprospectiveTextintotext“. If you’re going to be playing with substrings, you need to get comfortable withRanges and intervals.

Any Xcode project containing the code in TextFieldMaxLengths.swift will have text fields featuring “maximum length” properties that can be set in either Interface Builder or in code.
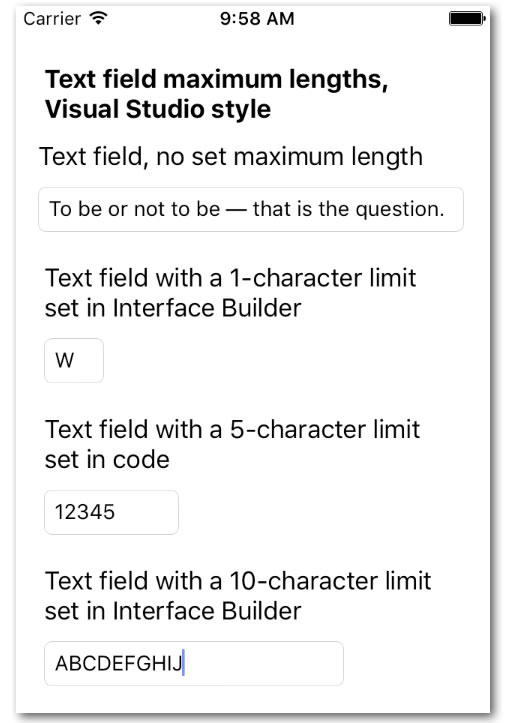
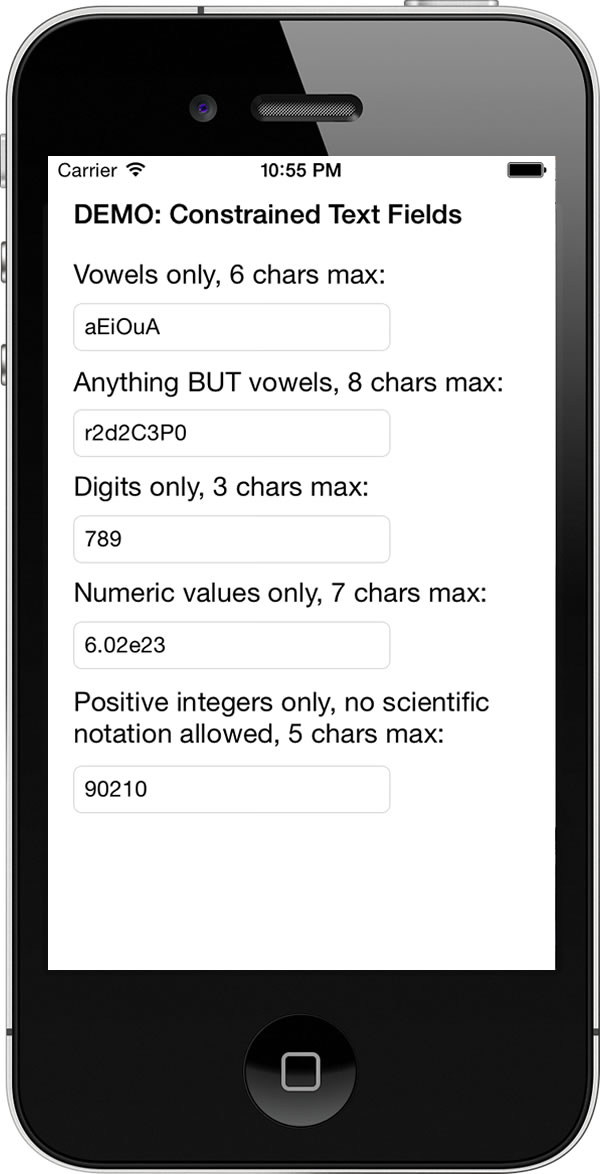
If you’d like to see these “max length” text fields in action, download the Text2 project (the running app is pictured above) and try them out!
AllowedCharsTextField: A text field that allows only specific characters
Let’s build on our new, improved text fields by creating one that accepts only characters from a defined set. You might need a text field that accepts only digits, or punctuation, or the letters A, C, G, and T. We’ll make setting up such a text field easy by creating a subclass of UITextField, which we’ll call AllowedCharsTextField. Since it’s a subclass of UITextField, it inherits all its capabilities, which includes any extensions, including the “max length” one we created.
Use File → New → File… to create a new Swift File. Give it the name AllowedCharsTextField.swift, and once you’ve created it, enter the following code into it:
import UIKit


// 1
class AllowedCharsTextField: UITextField, UITextFieldDelegate {

  // 2
  @IBInspectable var allowedChars: String = ""

  required init?(coder aDecoder: NSCoder) {
    super.init(coder: aDecoder)
    // 3
    delegate = self
    // 4
    autocorrectionType = .No
  }

  // 5
  func textField(textField: UITextField, shouldChangeCharactersInRange range: NSRange, replacementString string: String) -> Bool {
    // 6
    guard string.characters.count > 0 else {
      return true
    }

    // 7
    let currentText = textField.text ?? ""
    let prospectiveText = (currentText as NSString).stringByReplacingCharactersInRange(range, withString: string)
    return prospectiveText.containsOnlyCharactersIn(allowedChars)
  }

}


// 8
extension String {

  // Returns true if the string contains only characters found in matchCharacters.
  func containsOnlyCharactersIn(matchCharacters: String) -> Bool {
    let disallowedCharacterSet = NSCharacterSet(charactersInString: matchCharacters).invertedSet
    return self.rangeOfCharacterFromSet(disallowedCharacterSet) == nil
  }

}
Here’s what’s happening just after the numbered comments in the code:
- Our class inherits from
UITextFieldto get the capabilities of a text field, and it adopts theUITextFieldDelegateprotocol to be able to respond to thetextField(_:shouldChangeCharactersInRange:replacementString:)method in order to intercept changes to the text field just after they’ve been input by the user, but before they’re committed to the text field. allowedCharsstores the characters that we’ll allow in the text field, and@IBInspectablemakes its value editable in Interface Builder. Interface Builder takes the code-casedallowedCharsproperty name and displays it as Allowed Chars in the Attributes Inspector.- This indicates that this class is the
UITextFieldDelegateand will implement at least oneUITextFieldDelegatemethod — in this case,textField(_:shouldChangeCharactersInRange:replacementString:). - We disable autocorrection because it has a tendency to bypass the the
textField(_:shouldChangeCharactersInRange:replacementString:)method that we use to detect allowed characters. I’ll admit it; this is a quick a dirty fix. That being said, you probably don’t want “autocucumber” in a text field like this anyway. I’m looking into ways to allow autocorrection and still have this text field work as designed. - This method gets called after the user has made changes to the text field, but before they’re committed. It gives us a chance to cancel those changes. The method should return
trueif we want to accept the changes, andfalseotherwise. - We’re only concerned about cases where characters are added, so if this string has a length of 0, exit early.
- Here’s where the real work is done:
??is Swift’s nil coalescing operator. It returns the left operand if it’s notnil, otherwise it returns the right operation (e.g.:x ?? yreturnsxif it isn’tnil, otherwise it returnsy).- We create
prospectiveText, which is the text that would result if we accept the user’s changes. - If
prospectiveTextcontains only the allowed characters, we returntrue; otherwise, we returnfalse.
- We’re using an extension of
Stringto give it acontainsOnlyCharactersInfunction, which returnstrueif the string contains only the characters in the given string,falseotherwise.
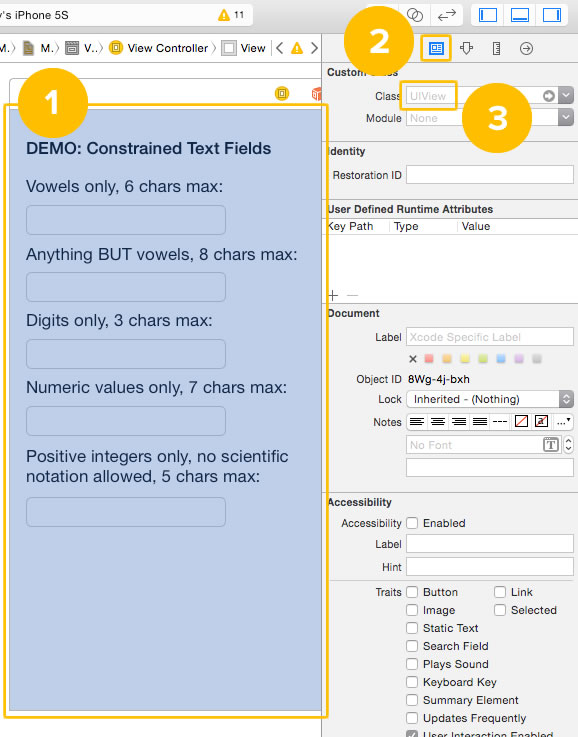
That’s all the code we need to create AllowedCharsTextField. To use it, drag a plain ol’ text field onto a view in the storyboard and do the following:
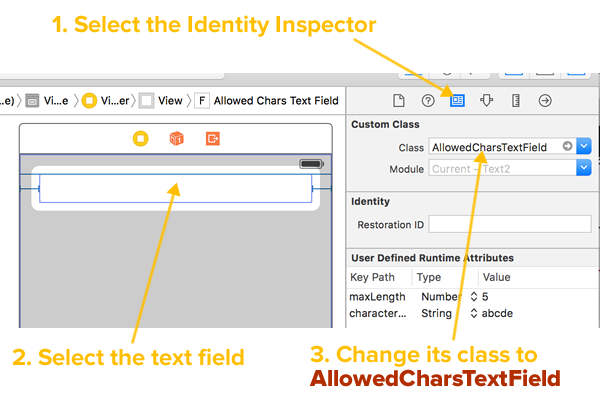
1. Select the Identity Inspector.
2. Select the text field.
3. Change its class to AllowedCharsTextField.
By default, the underlying class for a text field in the Storyboard is UITextField. However, the Identity Inspector lets you change the classes of things on the storyboard to other classes related by inheritance. If you got to the Custom Class menu in the Identity Inspector and expand the Class drop-down menu, you’ll see that you now have two choices: AllowedCharsTextField and UITextField. Changing this value to AllowedCharsTextField marks the text field as an instance of our new AllowedCharsTextField instance instead of a regular UITextField.
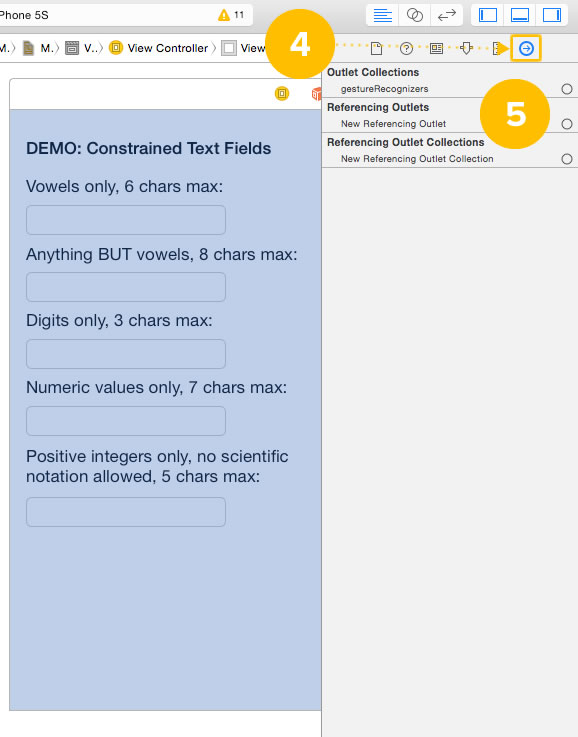
You’ll know it’s working in the next couple of steps:
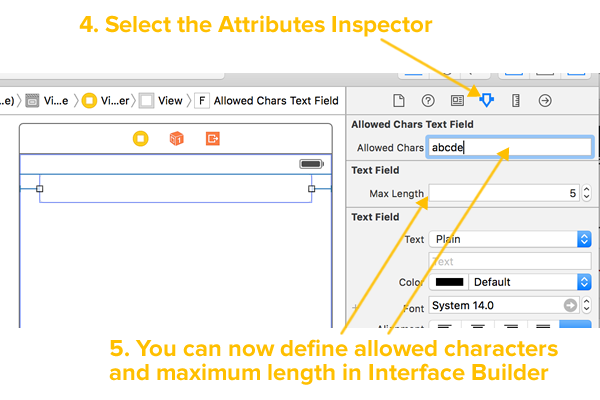
4. Select the Attributes Inspector.
5. You can now define allowed characters and maximum length in Interface Builder.
You can also define allowed characters and maximum length in code:
// myTextField is an instance of AllowedCharsTextField.
// It should accept up to 7 characters,
// and they MUST be vowels.
myTextField.allowedChars = "aeiou"
myTextField.maxLength = 7
BannedCharsTextField: A text field that bans only specific characters
AllowedCharsTextField works well for text fields where the set of characters that we want to allow into it is relatively small. There may be times when you want the opposite: a text field that accepts all characters, except for a certain few specific ones. Let’s build one in the same way we built AllowedCharsTextField and call it BannedCharsTextField.
Use File → New → File… to create a new Swift File. Give it the name BannedCharsTextField.swift, and once you’ve created it, enter the following code into it:
import UIKit


// 1
class BannedCharsTextField: UITextField, UITextFieldDelegate {


  // 2
  @IBInspectable var bannedChars: String = ""

  required init?(coder aDecoder: NSCoder) {
    super.init(coder: aDecoder)
    // 3
    delegate = self
    // 4
    autocorrectionType = .No
  }

  // 5
  func textField(textField: UITextField, shouldChangeCharactersInRange range: NSRange, replacementString string: String) -> Bool {
    // 6
    guard string.characters.count > 0 else {
      return true
    }

    // 7
    let currentText = textField.text ?? ""
    let prospectiveText = (currentText as NSString).stringByReplacingCharactersInRange(range, withString: string)
    return prospectiveText.doesNotContainCharactersIn(bannedChars)
  }

}


// 8
extension String {

  // Returns true if the string has no characters in common with matchCharacters.
  func doesNotContainCharactersIn(matchCharacters: String) -> Bool {
    let characterSet = NSCharacterSet(charactersInString: matchCharacters)
    return self.rangeOfCharacterFromSet(characterSet) == nil
  }

}
Here’s what’s happening just after the numbered comments in the code:
- Our class inherits from
UITextFieldto get the capabilities of a text field, and it adopts theUITextFieldDelegateprotocol to be able to respond to thetextField(_:shouldChangeCharactersInRange:replacementString:)method in order to intercept changes to the text field just after they’ve been input by the user, but before they’re committed to the text field. bannedCharsstores the characters that we’ll allow in the text field, and@IBInspectablemakes its value editable in Interface Builder. Interface Builder takes the code-casedbannedCharsproperty name and displays it as Banned Chars in the Attributes Inspector.- This indicates that this class is the
UITextFieldDelegateand will implement at least oneUITextFieldDelegatemethod — in this case,textField(_:shouldChangeCharactersInRange:replacementString:). - We disable autocorrection because it has a tendency to bypass the the
textField(_:shouldChangeCharactersInRange:replacementString:)method that we use to detect banned characters. I’ll admit it; this is a quick a dirty fix. That being said, you probably don’t want “autocucumber” in a text field like this anyway. I’m looking into ways to allow autocorrection and still have this text field work as designed. - This method gets called after the user has made changes to the text field, but before they’re committed. It gives us a chance to cancel those changes. The method should return
trueif we want to accept the changes, andfalseotherwise. - We’re only concerned about cases where characters are added, so if this string has a length of 0, exit early.
- Here’s where the real work is done:
??is Swift’s nil coalescing operator. It returns the left operand if it’s notnil, otherwise it returns the right operation (e.g.:x ?? yreturnsxif it isn’tnil, otherwise it returnsy).- We create
prospectiveText, which is the text that would result if we accept the user’s changes. - If
prospectiveTextcontains only the allowed characters, we returntrue; otherwise, we returnfalse.
- We’re using an extension of
Stringto give it adoesNotContainCharactersInfunction, which returnstrueif the string doesn’t contain any of the characters in the given string,falseotherwise.
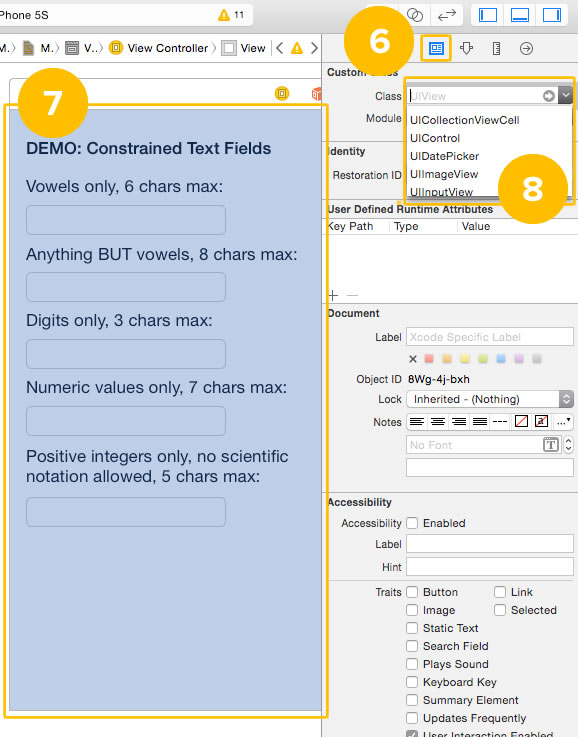
That’s all the code we need to create BannedCharsTextField. To use it, drag a plain ol’ text field onto a view in the storyboard and do the following:
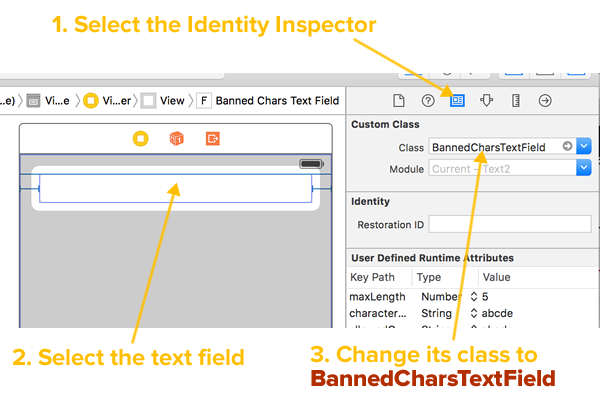
1. Select the Identity Inspector.
2. Select the text field.
3. Change its class to BannedCharsTextField.
By default, the underlying class for a text field in the Storyboard is UITextField. However, the Identity Inspector lets you change the classes of things on the storyboard to other classes related by inheritance. If you got to the Custom Class menu in the Identity Inspector and expand the Class drop-down menu, you’ll see that you now have three choices: AllowedCharsTextField, BannedCharsTextField, and UITextField. Changing this value to BannedCharsTextField marks the text field as an instance of our new BannedCharsTextField instance instead of a regular UITextField.
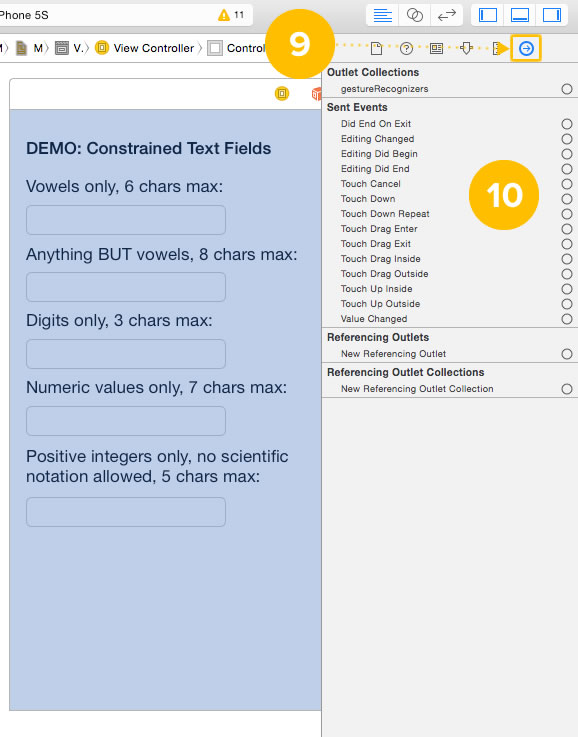
You’ll know it’s working in the next couple of steps:
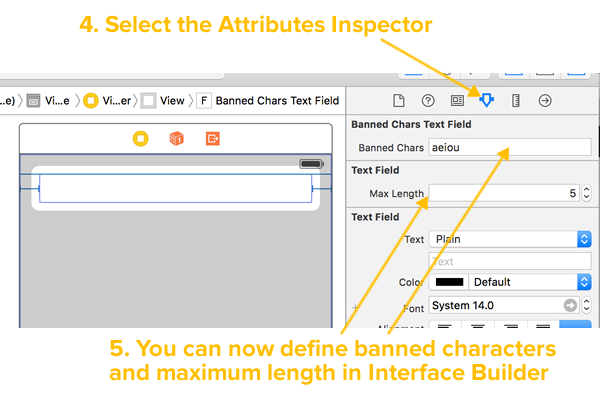
4. Select the Attributes Inspector.
5. You can now define allowed characters and maximum length in Interface Builder.
You can also define allowed characters and maximum length in code:
// myTextField is an instance of BannedCharsTextField.
// It should accept up to 7 characters,
// and they CANNOT be vowels.
myTextField.bannedChars = "aeiou"
myTextField.maxLength = 7
“Allowed + Banned Chars Text Fields”: A sample project showing text fields with maximum lengths, AllowedCharsTextField, and BannedCharsTextField in action
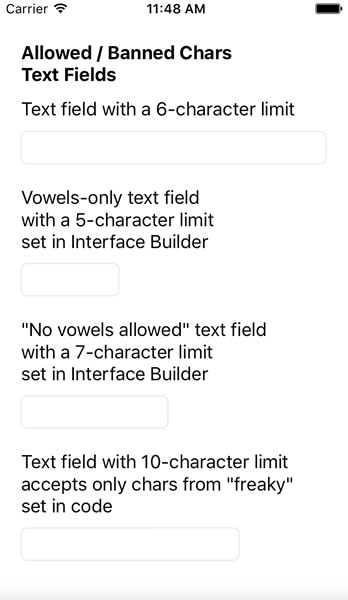
You’re probably raring to try out the code from this article. Here’s a project you can play with that presents a quick-and-dirty single view app with 4 text fields:
- A text field a maximum length of 6 characters.
- A vowels-only text field with a 5-character maximum length, with the Max Length and Allowed Chars properties set in Interface Builder.
- A no-vowels-allowed text field with a 7-character maximum length, with the Max Length and Banned Chars properties set in Interface Builder.
- A text field with a 10-character maximum length that accepts only the characters from the word freaky. Its
maxLengthandallowedCharsproperties were set in code in the view controller’sviewDidLoadmethod.
Give it a try, learn what makes it tick, and use it as a jumping-off point for your own projects!

You can download the project files for this article (37KB zipped) here.