You can actually buy this thing on Etsy! Click the photo for details.
What we’ve covered so far, and what we’ll cover in this installment
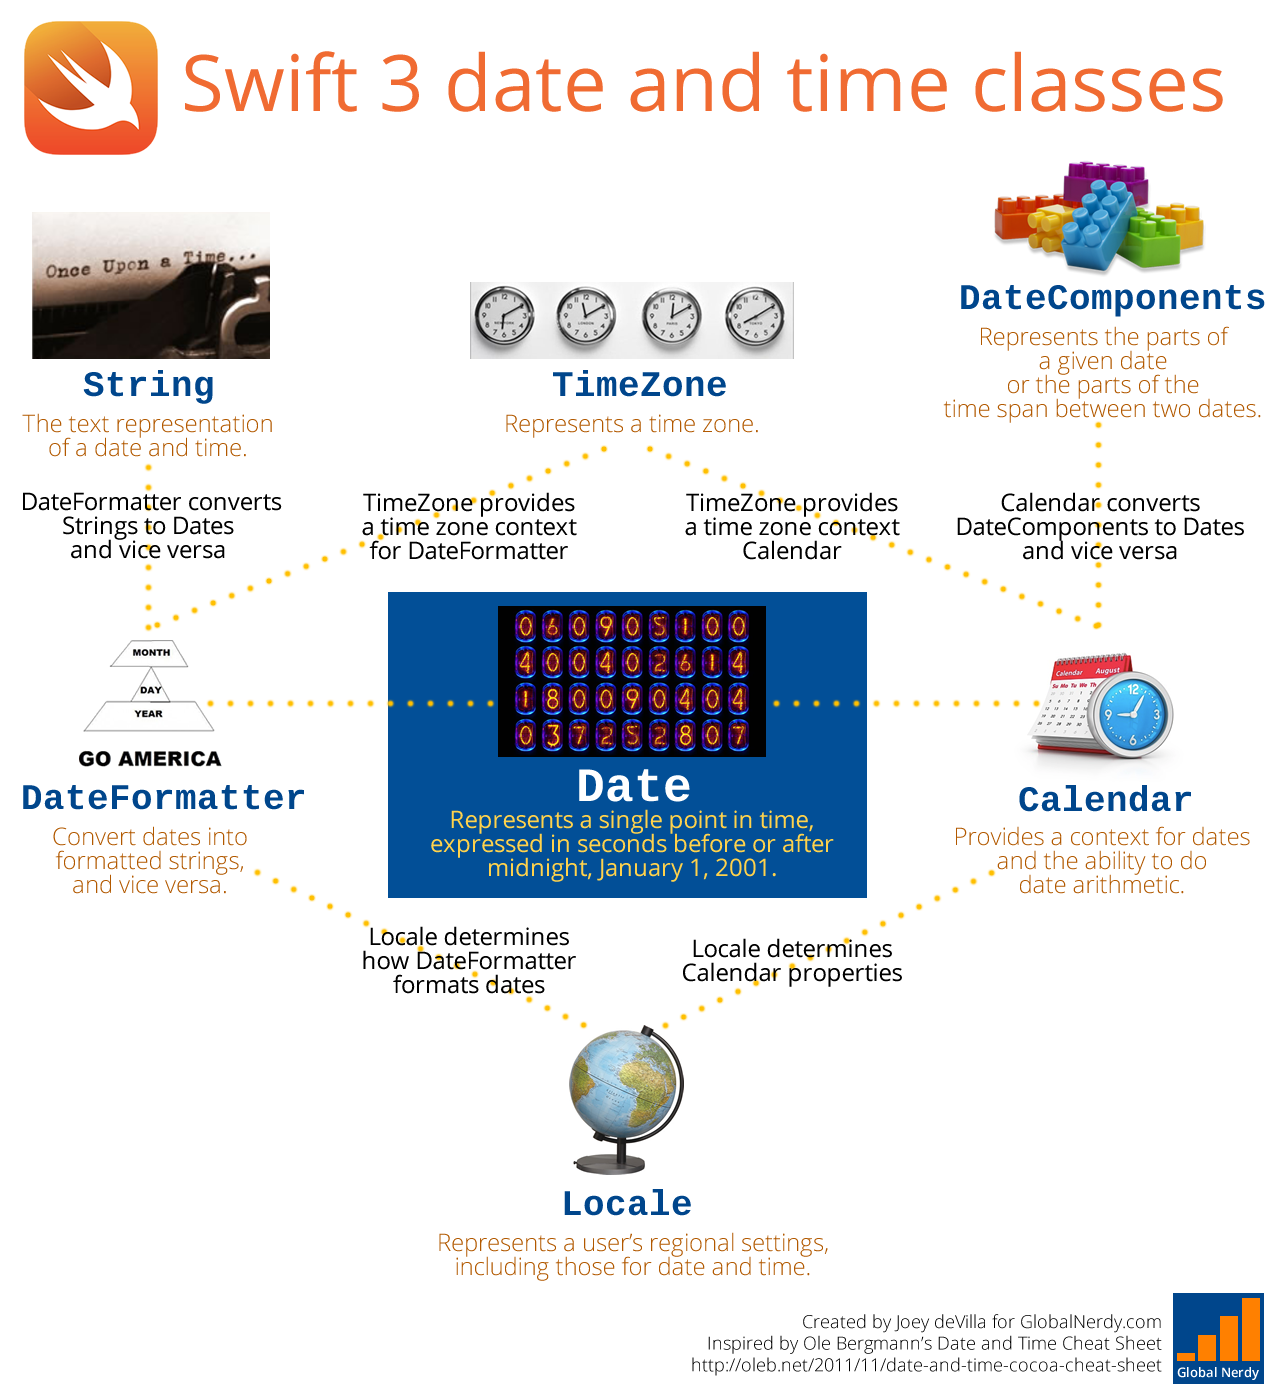
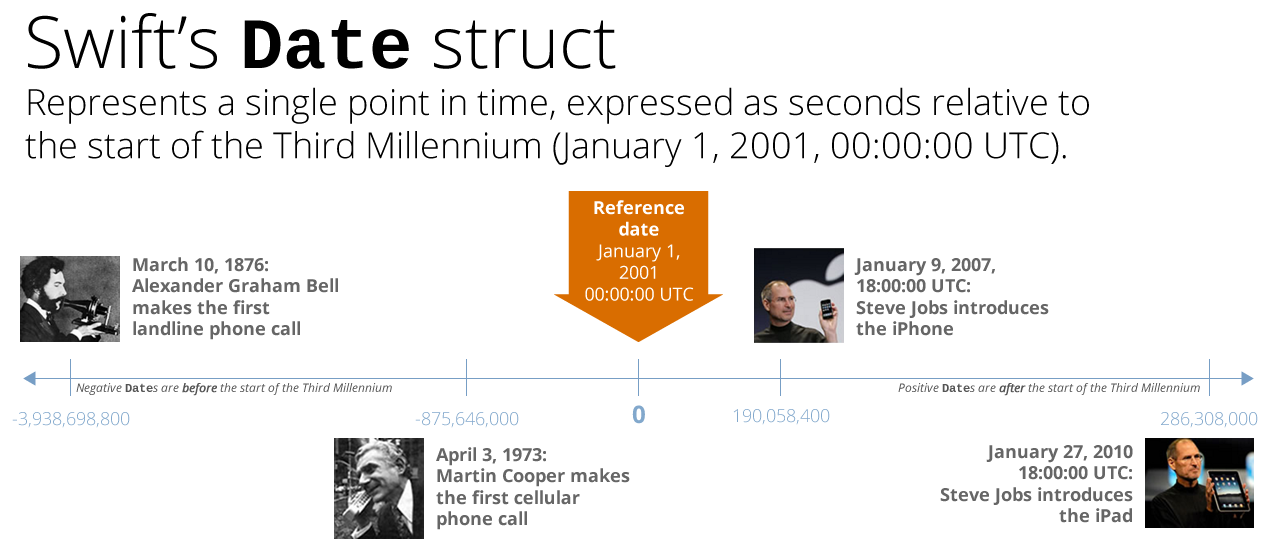
So far, in this series on date and time programming in Swift 3, we’ve looked at:
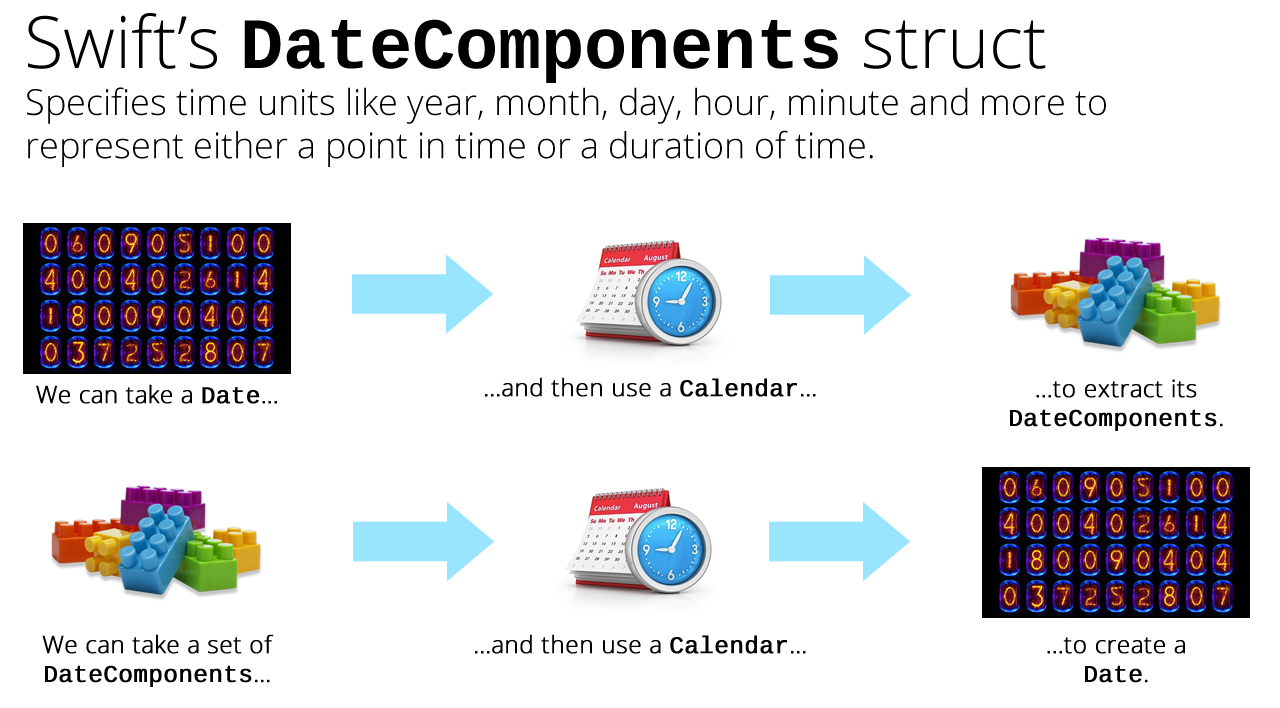
- The basic structs, which let us create dates and times, and work with their components. They are:
Date, which represents a single point in time,DateComponents, which represents the units that make up a date, such as year, month, day, hour, and minute, and which can be used to represent either a single point in time or a duration of time, andCalendar, which provides a context forDates, and allows us to convert betweenDates andDateComponents.
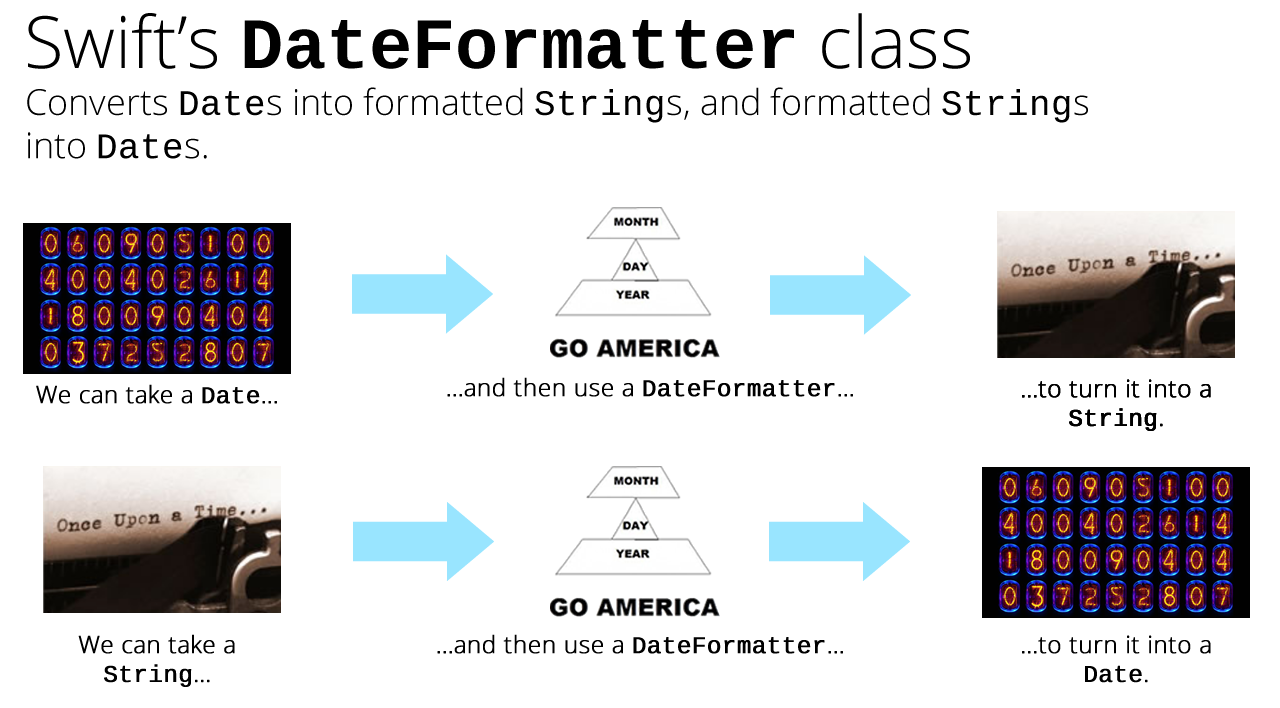
- The
DateFormatterclass, which convertsDates into formattedStrings, and formattedStrings intoDates.
With this knowledge under our belts, let’s get to this article’s topic: doing date calculations.
Creating a couple of Dates to work with

Let’s create a couple of Dates to work with:
- The date and time of the Stevenote where the iPhone was introduced: January 9, 2007, 10:00 a.m. Pacific time (UTC-8), and
- The date and time of the Stevenote where the iPad was introduced: January 27, 2010, 10:00 a.m. Pacific time (UTC-8).
Start with a fresh playground, and paste or enter the following code into it:
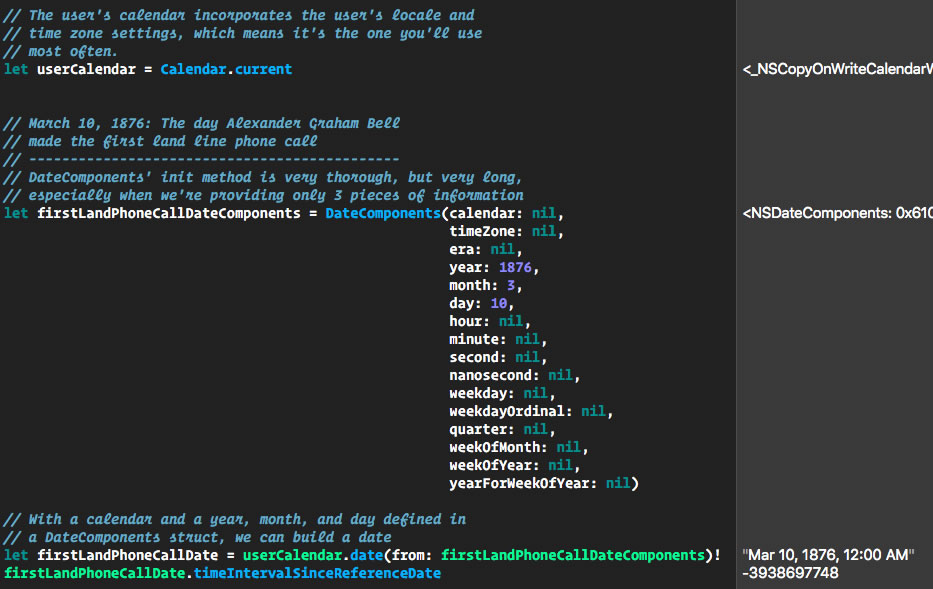
import UIKit

// The user's calendar incorporates the user's locale and
// time zone settings, which means it's the one you'll use
// most often.
let userCalendar = Calendar.current

// Let's create a Date for the start of the Stevenote
// where the iPhone was introduced (January 9, 2007, 10:00:00 Pacific time)
// using DateComponents.
var iPhoneStevenoteDateComponents = DateComponents()
iPhoneStevenoteDateComponents.year = 2007
iPhoneStevenoteDateComponents.month = 1
iPhoneStevenoteDateComponents.day = 9
iPhoneStevenoteDateComponents.hour = 10
iPhoneStevenoteDateComponents.timeZone = TimeZone(abbreviation: "PST")
let iPhoneStevenoteDate = userCalendar.date(from: iPhoneStevenoteDateComponents)!

// Let's create a Date for the start of the Stevenote
// where the iPad was introduced (January 27, 2010, 10:00:00 Pacific time)
// using DateFormatter.
var dateMakerFormatter = DateFormatter()
dateMakerFormatter.calendar = userCalendar
dateMakerFormatter.dateFormat = "MMM d, yyyy, hh:mm a zz"
let iPadStevenoteDate = dateMakerFormatter.date(from: "Jan 27, 2010, 10:00 AM PST")!
In the code above, we’ve created our dates in two different ways:
- We created
iPhoneStevenoteDateby setting up aDateComponentsstruct and then using the user’sCalendarto convert thoseDateComponentsinto aDate. - We created
iPadStevenoteDateby converting itsStringrepresentation into aDateusing aDateFormatter. You may find that if you need to instantiate a large number ofDates in code, you may want to do so this way, since this approach requires far fewer lines of code than doing so usingDateComponents.
Date comparisons, part 1

Now that we have two Dates, let’s compare them. In Swift 3, we can use familiar comparison operators — <, <=, ==, !=, >, >== — to tell which Date came first, or if they represent the same point in time.
Add the following code to the playground:
// (Previous code goes here)

// Does Valentine's Day come BEFORE St. Patrick's Day?
valentinesDay < stPatricksDay   // true

// Does Valentine's Day come AFTER St. Patrick's Day?
valentinesDay > stPatricksDay   // false

// Does St. Patrick's Day come BEFORE Valentine's Day?
stPatricksDay < valentinesDay   // false

// Did the iPhone Stevenote come BEFORE the iPad Stevenote?
iPhoneStevenoteDate < iPadStevenoteDate   // true

// Did the iPhone Stevenote come AFTER the iPad Stevenote?
iPhoneStevenoteDate > iPadStevenoteDate   // false

// Did the iPad Stevenote come BEFORE the iPhone Stevenote?
iPadStevenoteDate < iPhoneStevenoteDate   // false

// Does the iPad Stevenote come AFTER the iPhone Stevenote?
iPadStevenoteDate > iPhoneStevenoteDate   // true

// Do the iPhone Stevenote and the iPad Stevenote fall on DIFFERENT dates?
iPhoneStevenoteDate == iPadStevenoteDate  // false

// Do the iPhone Stevenote and the iPad Stevenote fall on the SAME date?
iPhoneStevenoteDate != iPadStevenoteDate  // true

// And just for kicks, some trivial comparisons.
iPhoneStevenoteDate == iPhoneStevenoteDate  // true
iPadStevenoteDate == iPadStevenoteDate  // true
Note that these are comparisons of Dates, which measure time down to the nearest nanosecond. If you compare two Dates named date1 and date2, where date2 represents a point in time one nanosecond after date1, they will not be equal; date2 will be greater than date1.
A little later on in this article, we’ll look at more “human” ways of comparing Dates.
How far apart are the iPhone and iPad Stevenotes, part 1: In seconds, using Date’s timeIntervalSince method
Date‘s timeIntervalSince method can give us the difference between two dates and times — in seconds. Add the following code to the playground:
// (Previous code goes here)

// Number of seconds between the iPhone Stevenote and the iPad Stevenote
iPhoneStevenoteDate.timeIntervalSince(iPadStevenoteDate)  // -96249600

// Number of seconds between the iPad Stevenote and the iPhone Stevenote
iPadStevenoteDate.timeIntervalSince(iPhoneStevenoteDate)  // 96249600
The results tell us that there were 96,248,600 seconds between the iPhone Stevenote and the iPad Stevenote.
While there are cases when you’ll want to know how many seconds there are between two given points in time, there are also many cases where you’ll want to find the differences between two points in time using other units, such as days, weeks, months, and years, not to mention hours and minutes. Date‘s timeIntervalSince method isn’t going to work for these cases.
How far apart are the iPhone and iPad Stevenotes, part 2: In days, using Calendar’s dateComponents(_:from:to:) method
Most of the time, when you are calculating how far apart two given Dates are, you’ll be using this method of the Calendar struct:
dateComponents(components, from: startDate, to: endDate)
Here’s a run-down of its parameters:
| Parameter | Description |
|---|---|
components |
A Set (expressed in array notation) of Calendar.Component values specifying the time units you want, which can be:
|
startDate |
.orderedSame |
endDate |
.orderedAscending |
Let’s use dateComponents(_:from:to:) to find out how many days there were between the iPhone Stevenote and the iPad Stevenote. Add the following code to the playground:
// (Previous code goes here)

// The result in the sidebar should be:
// day: 1114 isLeapMonth: false
let daysBetweenStevenotes = userCalendar.dateComponents([.day],
                                                        from: iPhoneStevenoteDate,
                                                        to: iPadStevenoteDate)
daysBetweenStevenotes.day!  // 1114
In the code above, we passed dateComponents(_:from:to:) three values:
- An array containing the
Calendar.Componentvalue.day, which specifies that we want the result expressed as the difference betweeniPadStevenoteDateandiPhoneStevenoteDatein terms of days. - The two dates in question,
iPhoneStevenoteDateandiPadStevenoteDate.
As the result tells us, there were 1,114 days between the iPhone Stevenote and the iPad Stevenote.
How far apart are the iPhone and iPad Stevenotes, part 3: In weeks
By changing the contents of the array of Calendar.Component values that we provide in the first argument of Calendar’s dateComponents(components, from: startDate, to: endDate) method, we can get the result expressed in different time units. Add the following code to the playground:
// (Previous code goes here)

// The result in the sidebar should be:
// weekOfYear: 159 isLeapMonth: false
let weeksBetweenStevenotes = userCalendar.dateComponents([.weekOfYear],
                                                         from: iPhoneStevenoteDate,
                                                         to: iPadStevenoteDate)
weeksBetweenStevenotes.weekOfYear!  // 159
In the code above, we passed dateComponents(_:from:to:) three values:
- An array containing the
Calendar.Componentvalue.weekOfYear, which specifies that we want the result expressed as the difference betweeniPadStevenoteDateandiPhoneStevenoteDatein terms of the numbered weeks of the year on which both dates fall. For example, if event1 took place on week 2 of a year and event2 took place on week 5, the difference between the two in.weekOfYearterms would be 3. - The two dates in question,
iPhoneStevenoteDateandiPadStevenoteDate.
The result indicates that 159 weeks passed between the iPhone Stevenote and the iPad Stevenote.
If you do the math, 159 times 7 days is 1,113 days, but our previous calculation said that the iPhone Stevenote and the iPad Stevenote were 1,114 days apart. That’s because the two events are 159 whole weeks apart, plus an extra day.
How far apart are the iPhone and iPad Stevenotes, part 4: In years, months, and days
We can also put multiple values of Calendar.Component into the array that we provide as the first argument of Calendar’s dateComponents(components, from: startDate, to: endDate) method. Add the following code to the playground:
// (Previous code goes here)

// The result in the sidebar should be:
// year: 3 month: 0 day: 18 hour: 0 minute: 0 isLeapMonth: false
let yearsMonthsDaysHoursMinutesBetweenStevenotes = userCalendar.dateComponents([.year, .month, .day, .hour, .minute],
                                                                               from: iPhoneStevenoteDate,
                                                                               to: iPadStevenoteDate)
yearsMonthsDaysHoursMinutesBetweenStevenotes.year!    // 3
yearsMonthsDaysHoursMinutesBetweenStevenotes.month!   // 0
yearsMonthsDaysHoursMinutesBetweenStevenotes.day!     // 18
yearsMonthsDaysHoursMinutesBetweenStevenotes.hour!    // 0
yearsMonthsDaysHoursMinutesBetweenStevenotes.minute!  // 0
In the code above, we passed dateComponents(_:from:to:) three values:
- An array containing the
Calendar.Componentvalues.year, .month, .day, .hour, .minute, which specifies that we want the result expressed as the difference betweeniPadStevenoteDateandiPhoneStevenoteDatein terms of years, months, days, hours, and minutes. The method uses the largest applicable component before using smaller ones — for example, it will give results like 1 month and 5 days rather than 35 days. - The two dates in question,
iPhoneStevenoteDateandiPadStevenoteDate.
The results show that the iPhone Stevenote and the iPad Stevenote were 3 years and 18 days apart.
Date addition, part 1: What’s the last day of a 90-day warranty that starts today?

Now that we know how to answer the question “What’s the difference in time between two Dates?”, let’s try answering a different question: “If we add a time interval to a Date, what’s the resulting Date?”
To answer this question, we’ll use this method of the Calendar struct:
date(byAdding: timeUnit, value: numberOfTimeUnits to: startDate)
Here’s a run-down of its parameters:
| Parameter | Description |
|---|---|
timeInterval |
A dateComponents struct whose properties contain values defining the interval of time. |
numberOfTimeUnits |
The number of timeInterval units to be added to the Date in question. |
startDate |
The Date in question. |
Let’s start with a simple bit of code that tells us the last day of a 90-day warranty whose term starts right now:
// (Previous code goes here)

// What's the last day of a 90-day warranty that starts today?
userCalendar.date(byAdding: .day, value: 90, to: Date())  // 90 days from now
The result is a Date representing a point in time 90 days from the present.
Date addition, part 2: What was the date 5 weeks ago?
Just as we can convert addition to subtraction by adding a negative value, we can also do Date subtraction by providing date(byAdding:value:to:) with negative values. Here’s an example of code that returns a date that is an interval of time prior to the date in question:
// What was the date 5 weeks ago?
userCalendar.date(byAdding: .weekOfYear, value: -5, to: Date())
The result is a Date representing a point in time 5 weeks in the past.
Date addition, part 3: What time will it be 4 hours and 30 minutes from now, and 4 hours and 30 minutes ago?
The date(byAdding:value:to:) method works when you just want to add one kind of time unit — a minute, hour, day, week, month, or year — to a Date. If you want to add multiple kinds of time units to a Date, such as 4 hours and 30 minutes, you need to use this Calendar method instead:
date(byAdding: timeIntervalComponents, to: startDate)
Here’s a run-down of its parameters:
| Parameter | Description |
|---|---|
timeInterval |
A dateComponents struct whose properties contain values defining the interval of time. |
startDate |
The Date in question. |
Here’s the code that answers the question “What time will it be 4 hours and 30 minutes from now?”
// (Previous code goes here)

// What time will it be 4 hours and 30 minutes from now?
// First, we need to define a DateComponents struct representing
// a time interval of 4 hours and 30 minutes
var fourHoursThirtyMinutes = DateComponents()
fourHoursThirtyMinutes.hour = 4
fourHoursThirtyMinutes.minute = 30

// Now add the interval to the Date
let fourHoursThirtyMinutesFromNow = userCalendar.date(byAdding: fourHoursThirtyMinutes, to: Date()) // 4 hours and 30 minutes from now
In the code above, we did the following:
- First, we defined a
DateComponentsstruct representing a 4-hour, 30-minute span of time, - then we added that span of time to the present date and time using the
date(byAdding:to:)method.
The result is a Date representing a time 4 hours and 30 seconds in the future.
Let’s find out what the Date was 4 hours and 30 seconds ago:
// (Previous code goes here)

// What time was it 4 hours and 30 minutes ago?
var minusFourHoursThirtyMinutes = DateComponents()
minusFourHoursThirtyMinutes.hour = -4
minusFourHoursThirtyMinutes.minute = -30
let fourHoursThirtyMinutesAgo = userCalendar.date(byAdding: fourHoursThirtyMinutes, to: Date()) // 4 hours and 30 minutes ago
Date comparisons, part 2: Making Date comparisons a little more “human”

One recurring theme in science fiction (and especially in Star Trek) is the tendency for ultra-smart characters and computers to be overly, needlessly, pointlessly precise. The writers for the original series often did this with Spock, and it seemed that at least a few writers were aware of this annoying trope in later series. Here’s a bit of dialogue from The Next Generation:
Data: 6 days, 13 hours, 47 minutes.
Riker: What, no seconds?
Data: I have discovered, sir, a certain level of impatience when I calculate a lengthy time interval to the nearest second. [beat] However if you wish…
Riker: No. No. Minutes is fine.
Date‘s comparison operators have the same problem with being overly precise. Consider the following Dates:
- The start of the iPhone Stevenote: January 9, 2007, 10:00:00 a.m. PST
- One second after the start of the iPhone Stevenote: January 9, 2007, 10:00:01 a.m. PST
- Five minutes after the start of the iPhone Stevenote: January 9, 2007, 10:05:00 a.m. PST
- Three hours after the start of the iPhone Stevenote: January 9, 2007, 1:00:00 p.m. PST
Date‘s comparison operators think of all these points in time as very different, but depending on your circumstances you may think of them as being practically the same:
- In most cases, there really isn’t a difference between the time when the iPhone Stevenote and one second after.
- If you’re concerned only with the day on which the iPhone Stevenote took place and not the exact time, there’s effectively no difference between any of the
Dates listed above.
Calendar‘s compare(_:to:toGranularity) method allows us to perform Date comparisons at different levels of granularity:
compare(firstDate, to: secondDate, toGranularity: granularity)
Here’s a run-down of its parameters:
| Parameter | Description |
|---|---|
firstDate |
The first Date in the comparison. |
secondDate |
The second Date in the comparison. |
granularity |
The level of precision for the comparison, expressed as an Calendar.Component value, which includes:
|
This is a Cocoa method named “compare”, so you’ve probably guessed that its return type is ComparisonResult. Here’s what it returns:
| If… | compare returns: |
|---|---|
firstDate is earlier than secondDate, when compared at the specified level of precision |
.orderedAscending |
firstDate is equal to secondDate, when compared at the specified level of precision |
.orderedSame |
firstDate is later than secondDate, when compared at the specified level of precision |
.orderedAscending |
It’s easier to show compare(_:to:toGranularity) in action than to explain how it works. Add the following code into the playground:
// (Previous code goes here)

// Let's define some Dates relative to iPhoneStevenoteDate
let iPhoneStevenotePlusOneSecond = userCalendar.date(byAdding: .second, value: 1, to: iPhoneStevenoteDate)!
let iPhoneStevenotePlusFiveMinutes = userCalendar.date(byAdding: .minute, value: 5, to: iPhoneStevenoteDate)!
let iPhoneStevenotePlusThreeHours = userCalendar.date(byAdding: .hour, value: 3, to: iPhoneStevenoteDate)!

// This returns false, because iPhoneStevenoteDate and iPhoneStevenotePlusOneSecond
// are NOT both within the same SECOND.
userCalendar.compare(iPhoneStevenoteDate,
                     to: iPhoneStevenotePlusOneSecond,
                     toGranularity: .second)
  == .orderedSame

// This returns true, because iPhoneStevenoteDate comes one second BEFORE
// iPhoneStevenotePlusOneSecond, and we're comparing the two at the one-second
// level of granularity.
userCalendar.compare(iPhoneStevenoteDate,
                     to: iPhoneStevenotePlusOneSecond,
                     toGranularity: .second)
  == .orderedAscending

// This returns true, because iPhoneStevenoteDate and iPhoneStevenotePlusOneSecond
// ARE both within the same MINUTE.
userCalendar.compare(iPhoneStevenoteDate,
                     to: iPhoneStevenotePlusOneSecond,
                     toGranularity: .minute)
  == .orderedSame

// This returns true, because iPhoneStevenoteDate and iPhoneStevenotePlusFiveMinutes
// ARE both within the same HOUR.
userCalendar.compare(iPhoneStevenoteDate,
                     to: iPhoneStevenotePlusFiveMinutes,
                     toGranularity: .hour)
  == .orderedSame

// This returns true, because iPhoneStevenotePlusFiveMinutes comes 5 minutes AFTER
// iPhoneStevenoteDate, and we're comparing the two at the one-minute level
// of granularity.
userCalendar.compare(iPhoneStevenotePlusFiveMinutes,
                     to: iPhoneStevenoteDate,
                     toGranularity: .minute)
  == .orderedDescending

// This returns true, because iPhoneStevenoteDate and iPhoneStevenotePlusThreeHours
// ARE both within the same DAY.
userCalendar.compare(iPhoneStevenoteDate,
                     to: iPhoneStevenotePlusThreeHours,
                     toGranularity: .day)
  == .orderedSame
Wrapping it all up
Here’s the playground containing all the code we just worked with:
import UIKit

// The user's calendar incorporates the user's locale and
// time zone settings, which means it's the one you'll use
// most often.
let userCalendar = Calendar.current


// A couple of Dates to work with
// ------------------------------

// Let's create a Date for the start of the Stevenote
// where the iPhone was introduced (January 9, 2007, 10:00:00 Pacific time)
// using DateComponents.
var iPhoneStevenoteDateComponents = DateComponents()
iPhoneStevenoteDateComponents.year = 2007
iPhoneStevenoteDateComponents.month = 1
iPhoneStevenoteDateComponents.day = 9
iPhoneStevenoteDateComponents.hour = 10
iPhoneStevenoteDateComponents.timeZone = TimeZone(abbreviation: "PST")
let iPhoneStevenoteDate = userCalendar.date(from: iPhoneStevenoteDateComponents)!

// Now let's create a Date for the start of the Stevenote
// where the iPad was introduced (January 27, 2010, 10:00:00 Pacific time)
// using DateFormatter.
var dateMakerFormatter = DateFormatter()
dateMakerFormatter.calendar = userCalendar
dateMakerFormatter.dateFormat = "MMM d, yyyy, hh:mm a zz"
let iPadStevenoteDate = dateMakerFormatter.date(from: "Jan 27, 2010, 10:00 AM PST")!


// Date comparisons, part 1
// ------------------------

// Did the iPhone Stevenote come BEFORE the iPad Stevenote?
iPhoneStevenoteDate < iPadStevenoteDate   // true

// Did the iPhone Stevenote come AFTER the iPad Stevenote?
iPhoneStevenoteDate > iPadStevenoteDate   // false

// Did the iPad Stevenote come BEFORE the iPhone Stevenote?
iPadStevenoteDate < iPhoneStevenoteDate   // false

// Does the iPad Stevenote come AFTER the iPhone Stevenote?
iPadStevenoteDate > iPhoneStevenoteDate   // true

// Do the iPhone Stevenote and the iPad Stevenote fall on DIFFERENT dates?
iPhoneStevenoteDate == iPadStevenoteDate  // false

// Do the iPhone Stevenote and the iPad Stevenote fall on the SAME date?
iPhoneStevenoteDate != iPadStevenoteDate  // true

// And just for kicks, some trivial comparisons.
iPhoneStevenoteDate == iPhoneStevenoteDate  // true
iPadStevenoteDate == iPadStevenoteDate  // true


// Date arithmetic, part 1:
// Number of seconds between the iPhone Stevenote and iPad Stevenote
// -----------------------------------------------------------------

// Number of seconds between the iPhone Stevenote and the iPad Stevenote
iPhoneStevenoteDate.timeIntervalSince(iPadStevenoteDate)  // -96249600

// Number of seconds between the iPad Stevenote and the iPhone Stevenote
iPadStevenoteDate.timeIntervalSince(iPhoneStevenoteDate)  // 96249600


// Date arithmetic, part 2:
// Number of days between the iPhone Stevenote and iPad Stevenote
// --------------------------------------------------------------

// The result in the sidebar should be:
// day: 1114 isLeapMonth: false
let daysBetweenStevenotes = userCalendar.dateComponents([.day],
                                                        from: iPhoneStevenoteDate,
                                                        to: iPadStevenoteDate)
daysBetweenStevenotes.day!  // 1114


// Date arithmetic, part 3:
// Number of weeks between the iPhone Stevenote and iPad Stevenote
// ---------------------------------------------------------------

// The result in the sidebar should be:
// weekOfYear: 159 isLeapMonth: false
let weeksBetweenStevenotes = userCalendar.dateComponents([.weekOfYear],
                                                         from: iPhoneStevenoteDate,
                                                         to: iPadStevenoteDate)
weeksBetweenStevenotes.weekOfYear!  // 159


// Date arithmetic, part 4:
// Number of years, months, and days between the
// iPhone Stevenote and iPad Stevenote
// ---------------------------------------------

// The result in the sidebar should be:
// year: 3 month: 0 day: 18 hour: 0 minute: 0 isLeapMonth: false
let yearsMonthsDaysHoursMinutesBetweenStevenotes = userCalendar.dateComponents([.year, .month, .day, .hour, .minute],
                                                                               from: iPhoneStevenoteDate,
                                                                               to: iPadStevenoteDate)
yearsMonthsDaysHoursMinutesBetweenStevenotes.year!    // 3
yearsMonthsDaysHoursMinutesBetweenStevenotes.month!   // 0
yearsMonthsDaysHoursMinutesBetweenStevenotes.day!     // 18
yearsMonthsDaysHoursMinutesBetweenStevenotes.hour!    // 0
yearsMonthsDaysHoursMinutesBetweenStevenotes.minute!  // 0


// Date addition, part 1:
// What's the last day of a 90-day warranty that starts today?
// -----------------------------------------------------------
userCalendar.date(byAdding: .day, value: 90, to: Date())  // 90 days from now


// Date addition, part 2:
// What was the date 5 weeks ago?
// ------------------------------
userCalendar.date(byAdding: .weekOfYear, value: -5, to: Date())


// Date addition, part 3:
// What time will it be 4 hours and 30 minutes from now,
// and 4 hours and 30 minutes ago?
// -----------------------------------------------------

// What time will it be 4 hours and 30 minutes from now?
// First, we need to define a DateComponents struct representing
// a time interval of 4 hours and 30 minutes
var fourHoursThirtyMinutes = DateComponents()
fourHoursThirtyMinutes.hour = 4
fourHoursThirtyMinutes.minute = 30

// Now add the interval to the Date
let fourHoursThirtyMinutesFromNow = userCalendar.date(byAdding: fourHoursThirtyMinutes, to: Date()) // 4 hours and 30 minutes from now

// Now, let's define a DateComponents struct representing
// a time interval of -4 hours and -30 minutes
var minusFourHoursThirtyMinutes = DateComponents()
minusFourHoursThirtyMinutes.hour = -4
minusFourHoursThirtyMinutes.minute = -30

// Now add the interval to the Date
let fourHoursThirtyMinutesAgo = userCalendar.date(byAdding: fourHoursThirtyMinutes, to: Date()) // 4 hours and 30 minutes ago


// Date comparisons, part 2:
// Making Date comparisons a little more "human"
// ---------------------------------------------

// Let's define some Dates relative to iPhoneStevenoteDate
let iPhoneStevenotePlusOneSecond = userCalendar.date(byAdding: .second, value: 1, to: iPhoneStevenoteDate)!
let iPhoneStevenotePlusFiveMinutes = userCalendar.date(byAdding: .minute, value: 5, to: iPhoneStevenoteDate)!
let iPhoneStevenotePlusThreeHours = userCalendar.date(byAdding: .hour, value: 3, to: iPhoneStevenoteDate)!

// This returns false, because iPhoneStevenoteDate and iPhoneStevenotePlusOneSecond
// are NOT both within the same SECOND.
userCalendar.compare(iPhoneStevenoteDate,
                     to: iPhoneStevenotePlusOneSecond,
                     toGranularity: .second)
  == .orderedSame

// This returns true, because iPhoneStevenoteDate comes one second BEFORE
// iPhoneStevenotePlusOneSecond, and we're comparing the two at the one-second
// level of granularity.
userCalendar.compare(iPhoneStevenoteDate,
                     to: iPhoneStevenotePlusOneSecond,
                     toGranularity: .second)
  == .orderedAscending

// This returns true, because iPhoneStevenoteDate and iPhoneStevenotePlusOneSecond
// ARE both within the same MINUTE.
userCalendar.compare(iPhoneStevenoteDate,
                     to: iPhoneStevenotePlusOneSecond,
                     toGranularity: .minute)
  == .orderedSame

// This returns true, because iPhoneStevenoteDate and iPhoneStevenotePlusFiveMinutes
// ARE both within the same HOUR.
userCalendar.compare(iPhoneStevenoteDate,
                     to: iPhoneStevenotePlusFiveMinutes,
                     toGranularity: .hour)
  == .orderedSame

// This returns true, because iPhoneStevenotePlusFiveMinutes comes 5 minutes AFTER
// iPhoneStevenoteDate, and we're comparing the two at the one-minute level
// of granularity.
userCalendar.compare(iPhoneStevenotePlusFiveMinutes,
                     to: iPhoneStevenoteDate,
                     toGranularity: .minute)
  == .orderedDescending

// This returns true, because iPhoneStevenoteDate and iPhoneStevenotePlusThreeHours
// ARE both within the same DAY.
userCalendar.compare(iPhoneStevenoteDate,
                     to: iPhoneStevenotePlusThreeHours,
                     toGranularity: .day)
  == .orderedSame
In the next installment, we’ll look at making working with dates and times more Swift-like.


 The first change is that Angela, who originally put this Meetup group together, landed a job in San Francisco and moved there. I want to congratulate her on seizing this opportunity — I did the same thing during the dot-com bubble of the late ’90s — and wish her the very best in her adventures in the other Bay Area. I’d also like to thank her for all the work she’s done for this Meetup group, which wouldn’t even exist without the initial spark that she provided.