 Here’s the second in a series of articles based on the most recent Tampa iOS Meetup, where I walked the group through building a tip calculator. If you’re new to iOS development, you’ll may find this series a useful introduction.
(And if you’re in the Tampa Bay area, perhaps you’d like to join us at the next Tampa iOS Meetup, currently scheduled for Tuesday, February 28th.)
Other articles in this series:
The story so far: What we did in the previous article
In the previous article, we put together a simple application featuring one button and one label:
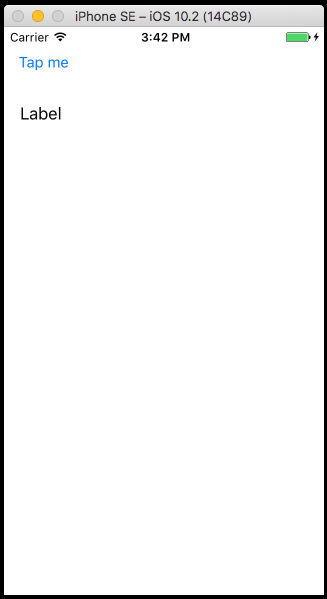
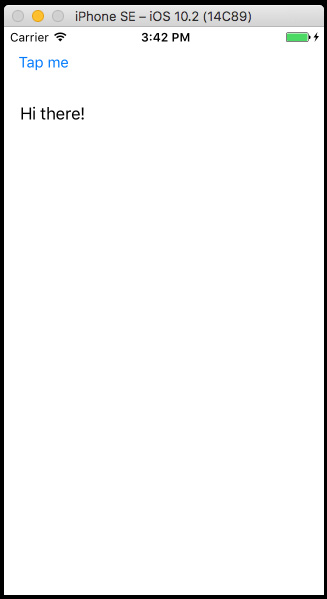
If you tap the button, the text of the label changes to Hi there!
Right now, the app doesn’t act anything like a tip calculator should, but over this series of article, we’ll turn it into one. Along that way, you’ll become familiar with a number of aspects of iOS programming, including Xcode, the Swift programming language, and a couple of iOS user interface objects.
 This article will start from where the previous article left off. You can either follow its steps, or if you prefer, you can start with the completed projects from the previous article.
What we’ll do in this article
A tip calculator has to have some way for the user to enter a dollar amount so that a tip for that amount can be calculated. In this article, we’re going to add a text field to our app as the first step in converting our simple app into a tip calculator.
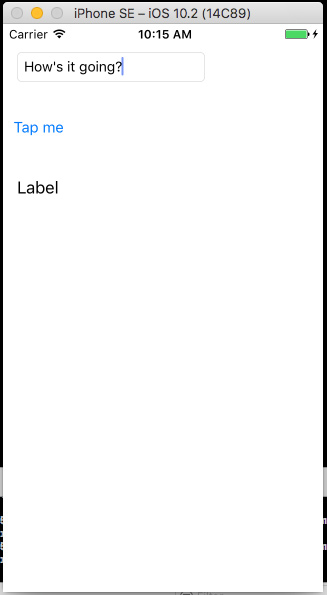
By the end of this article, our app will look like this:
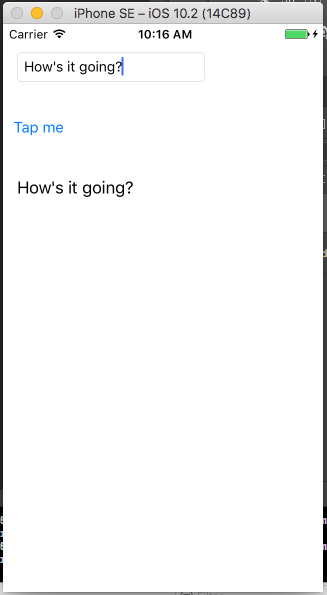
The user will be able to type text into the text field, and when s/he taps the Tap me button, the label will display the text in the text field:
I’ll admit that it won’t calculate tips, but by providing a text field and being able to read its contents, we’ll be a step closer to having a functioning tip calculator.
Let’s add a text field to our app
A tip calculator has to have some way for the user to enter a dollar amount so that a tip for that amount can be calculated. We’ll use a text field as that way.
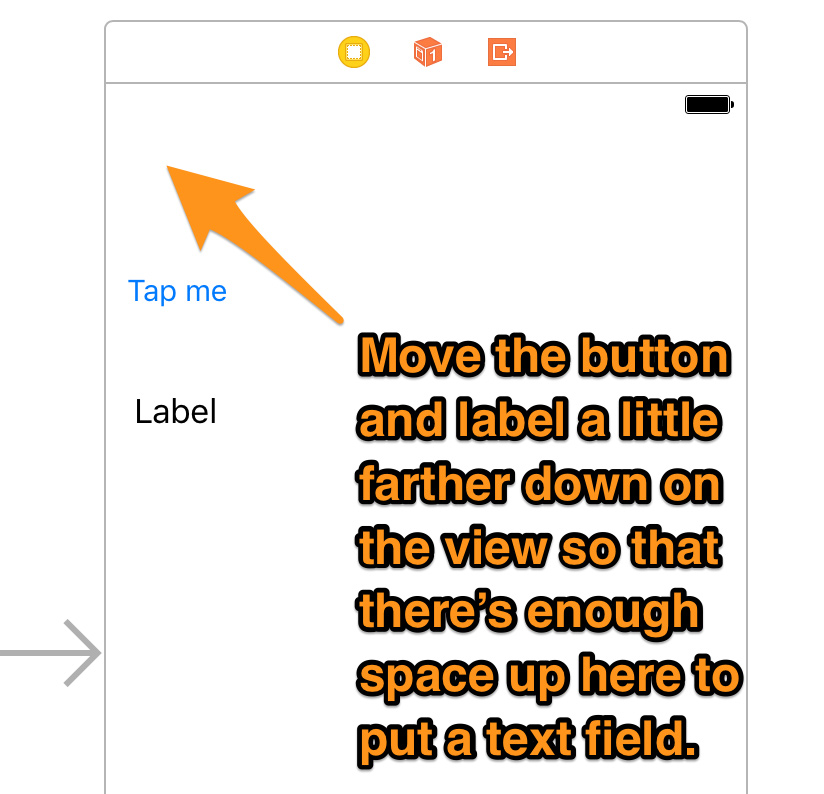
We want to put the text field near the top of the view, so we’ll need to:
- Move both the button and label farther down on the view so that there’s enough space near the top to place a text field.
Like the button and the label, the text field is a user interface object that you can get from the Object Library, which is part of the Libraries section of the Xcode interface, and located near the lower right-hand corner. Look at the lower right-hand corner and make sure that the Object Library icon is highlighted…
![]()
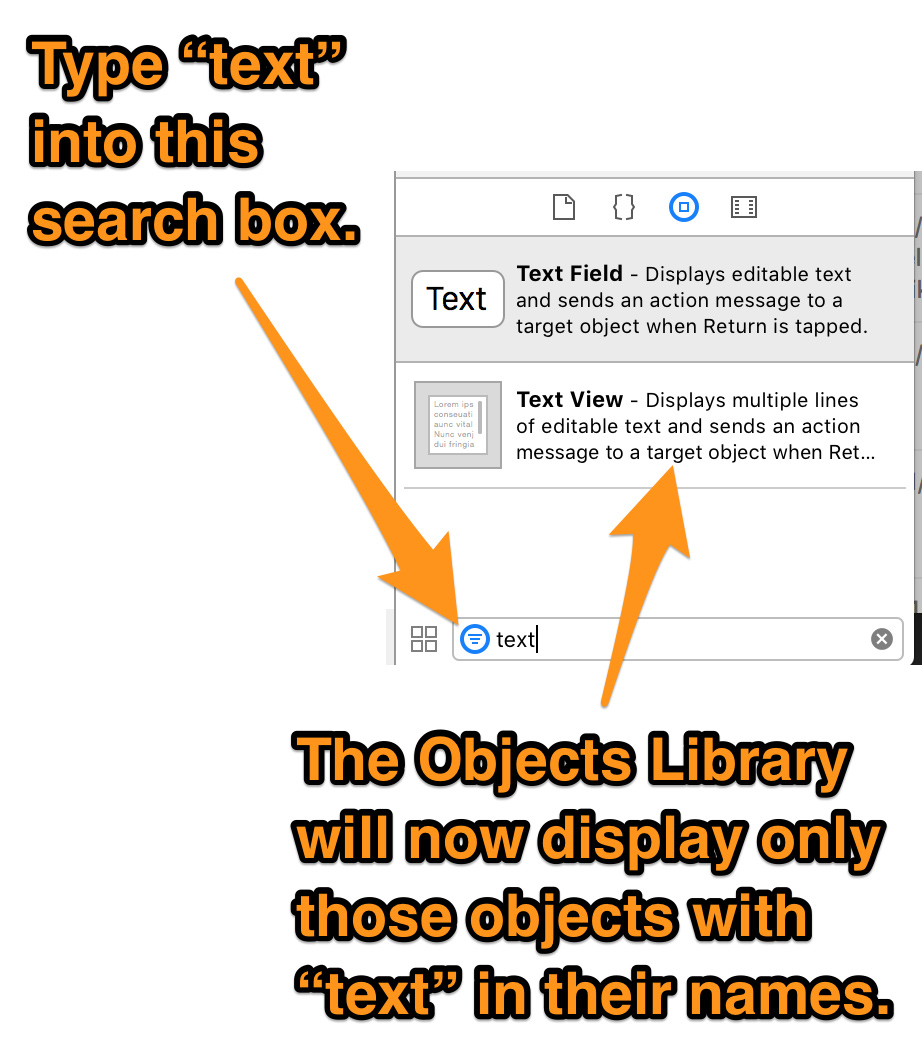
…and then look for the Text Field object in that list. There are a lot of objects in the Object Library, so you can either scroll around for Text Field, or you can pare down what’s shown in the list by using the Filter box at the bottom:
Do the following:
- Type text into the box.
- The Objects Library will respond by displaying only those objects with text in their names. One of them is the Text Field, and that’s what we want to add to our app’s view.
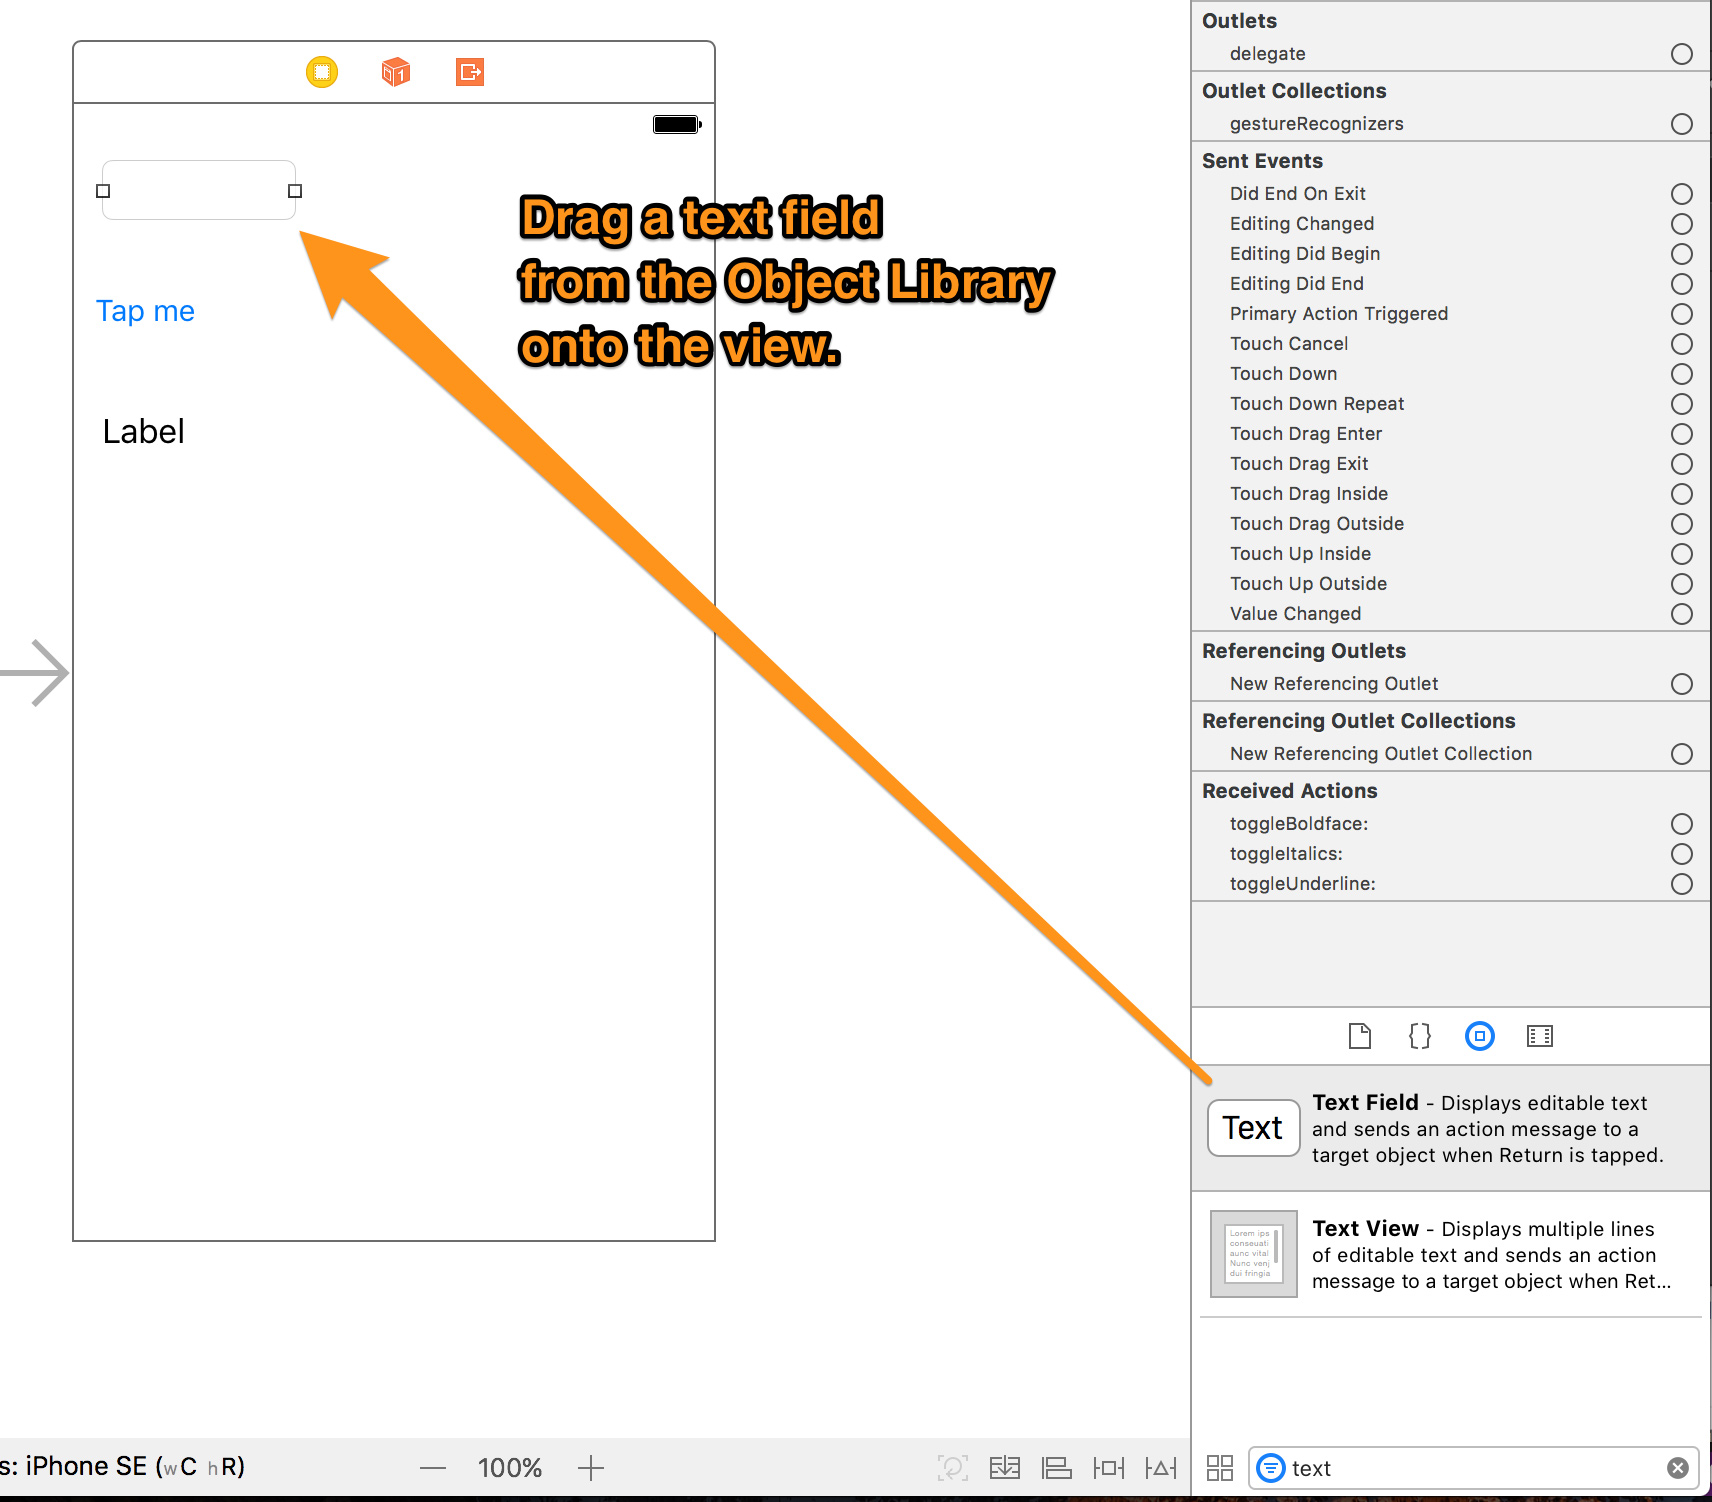
- Drag a Text Field from the Object Library and onto the view. Place it near the upper left-hand corner of the view. As you bring the button close to that corner, Xcode will cause a couple of guides to appear. Line the text field up with those guides.
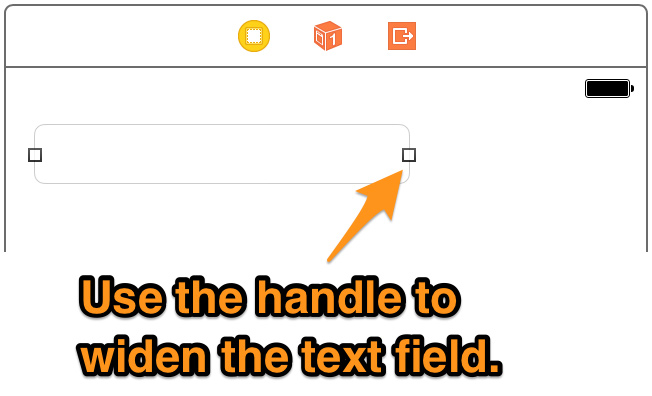
- We want to provide the user with enough room to enter a few words into our text field, so widen it so that it goes about two-thirds of the way across the view.
Connect the text field to the view controller
Now that we’ve added a text field to the view, we need to make a connection between it and the view controller. In the previous article, we said that there were two kinds of connections you could make:
- Outlet:
- In the view controller, an outlet is a variable that contains a reference to a specific object (such as a label, button, or text field) in the view. It’s marked with the
@IBOutletkeyword, which tells Xcode that it isn’t just a variable, but an outlet. - Allows the code in the view controller to “talk” to an object in the view.
- By connecting an object in the view to the view controller with an outlet, the view controller can:
- call that object’s methods,
- set one of its properties (such as the text it displays, its color, and so on), and
- get the value of any of its properties.
- The bottom line: If you want to call the methods for an object in the view, or get or set its properties, use an outlet.
- In the view controller, an outlet is a variable that contains a reference to a specific object (such as a label, button, or text field) in the view. It’s marked with the
- Action:
- In the view controller, an action is a method that gets called in response to a specific event occurring for an object in the view (such as when a button is tapped, or the text in a text field is changed). It’s marked with the
@IBActionkeyword, which tells Xcode that it isn’t just a method, but an action. - Allows an object in the view to “talk” to the code in the view controller.
- By connecting an object in the view to the view controller with an action, the view controller can:
- Respond to specific events that occur for the object.
- The bottom line: If you want to respond to the events for an object in the view, use an action.
- In the view controller, an action is a method that gets called in response to a specific event occurring for an object in the view (such as when a button is tapped, or the text in a text field is changed). It’s marked with the
We want a connection that will allow us to get the contents of the text field. An outlet will allow us to do that.
Once again, we’d like to have both the view (which lives the in Main.storyboard file) and the underlying view controller code (which lives in the ViewController.swift file) visible at the same time. We’ll use the Assistant Editor, which allows us to view two files side by side.
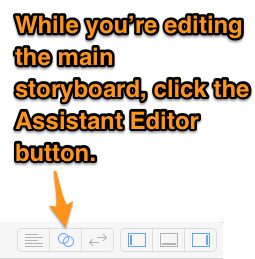
The Assistant Editor button is located near the upper right-hand corner of the Xcode interface. Do this:
- With the main storyboard visible in the editor area in the center of Xcode, click the Assistant Editor button. Xcode tries to be “smart” about which file you want to edit, and in this case, it should “assume” that you want to look at the app’s only view’s view controller code.

You should see something like the screenshot above. You may want to expand the Xcode window so that it takes up the entire screen.
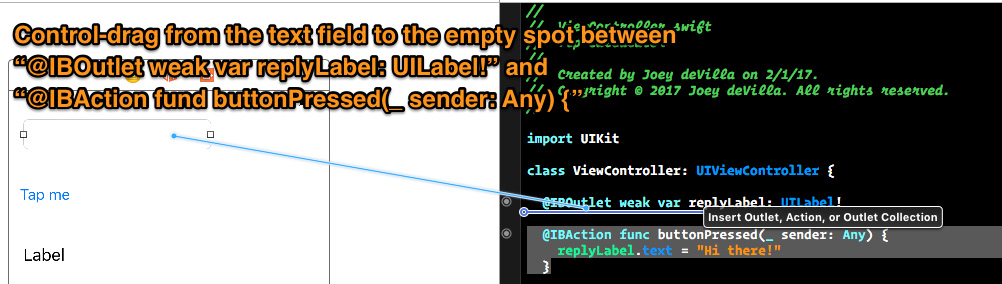
Let’s connect the text field to the view controller:
- Select the text field on the view in the main storyboard, then control-drag (that is, drag while holding down the control key on the keyboard, or if you have a mouse, right-drag) from the view to the ViewController.swift code.
- Let go of the mouse in the empty spot between
@IBOutlet weak var replyLabel: UILabel!
and
@IBAction func buttonPressed(_ sender: Any) {
A pop-up will appear:
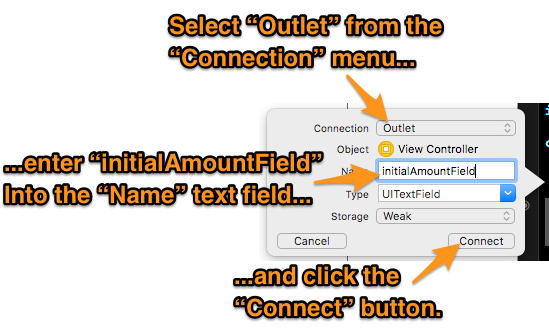
Do the following with the pop-up:
- Select Outlet from the Connection menu.
- Give the outlet a name: enter initialAmountField into the Name field.
- Click the Connect button.
The text field is now connected to the view controller.
Changing what the button does
At this point, the code in ViewController.swift should look similar to this:
import UIKit

class ViewController: UIViewController {

  @IBOutlet weak var replyLabel: UILabel!
  @IBOutlet weak var initialAmountField: UITextField!

  @IBAction func buttonPressed(_ sender: Any) {
    replyLabel.text = "Hi there!"
  }

  override func viewDidLoad() {
    super.viewDidLoad()
    // Do any additional setup after loading the view, typically from a nib.
  }

  override func didReceiveMemoryWarning() {
    super.didReceiveMemoryWarning()
    // Dispose of any resources that can be recreated.
  }

}
We want to change the code so that when the user taps the Tap me button, the text of the label is set to whatever text is in the text field.
The buttonPressed method — which is also an action — is executed whenever the user taps on the button, so that’s where we’ll want to make the change. Change the contents of buttonPressed so that it contains just this line:
replyLabel.text = initialAmountField.text
The code in ViewController.swift should now look like this:
import UIKit

class ViewController: UIViewController {

  @IBOutlet weak var replyLabel: UILabel!
  @IBOutlet weak var initialAmountField: UITextField!

  @IBAction func buttonPressed(_ sender: Any) {
    replyLabel.text = initialAmountField.text
  }

  override func viewDidLoad() {
    super.viewDidLoad()
    // Do any additional setup after loading the view, typically from a nib.
  }

  override func didReceiveMemoryWarning() {
    super.didReceiveMemoryWarning()
    // Dispose of any resources that can be recreated.
  }

}
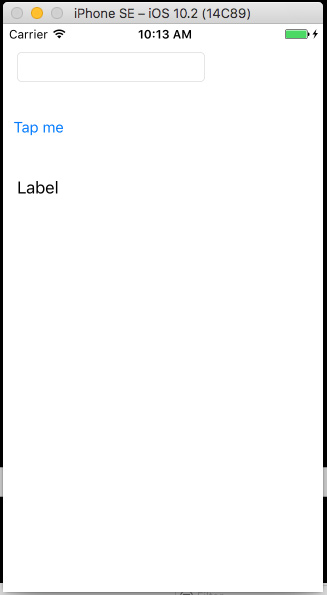
Run the app. You should see this:
Now enter some text into the text field:
Now tap the Tap me button. You’ll know the app is working as expected when the contents of the label are the same as the contents of the text field:
Now that the app can accept user input and do something simple with it, we’re a step closer to having a working tip calculator. In the next installment, we’ll make our first actual tip calculation!
Download the project files
Although this is an extremely simple project, I’ve made its files available for download — click here to get them!