
 In the last installment of the Enlightened Laziness series (my new series of articles on cross-platform mobile development with Xamarin), I gave you the code for a slightly more complex “Hello, World!” app: a “Magic 8-Ball” app for Android and iOS. It’s pretty simple: the user is presented with a button which gives a random yes/no/maybe answer.
My options
I had a choice of approaches I could take when writing the app. I could’ve written it the standard way, which is diagrammed below:
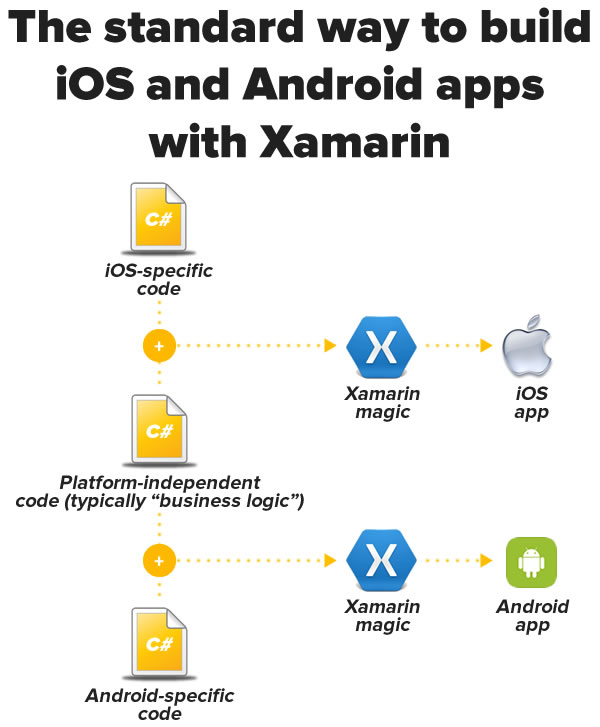
The standard way — the one that’s been available since Xamarin 1.0 — is to write some iOS-specific C# code (typically for the UI and other iOS-specific APIs and features), some Android C# code (once again, typically for the UI and other Android-specific APIs and features), and some C# code common to both versions, typically the app’s “business logic” and other code that’s specific to the app’s domain rather than the platform. It’s still less work than dealing with an iOS Xcode project with code in Objective-C and an Android ADT or Android Studio project with code in Java, but it’s still not quite the “write once, run anywhere” dream.
The other way — the way I chose — is new to Xamarin: the Xamarin.Forms route, which is diagrammed below:
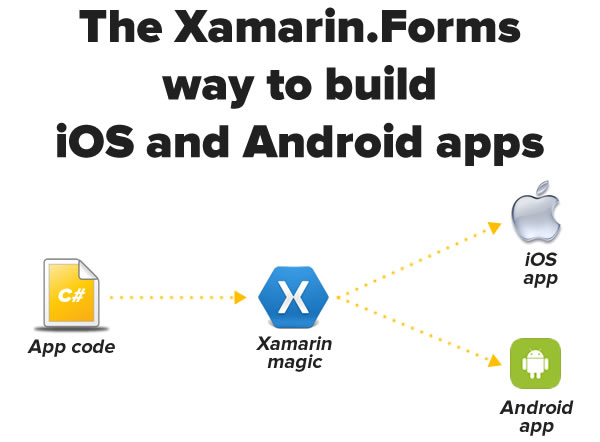
With Xamarin.Forms, you’re coding to a single, platform-independent UI toolkit, and Xamarin does the necessary conversions during the compilation process. This sounds like the “write once, run anywhere” dream, and I’ll be spending the next few weeks playing with it. If you’ve used similar tools or platforms, you know that these sorts of systems are never perfect, and one of the things I’m going to be exploring is the set of trade-offs you have to make when using Xamarin.Forms for cross-platform development.
The full code for the Magic 8-Ball app
Here’s a screenshot of Xamarin running on my Mac that shows the structure of the Magic 8-Ball solution:

Click the screenshot to see it at full size.
The solution has three projects:
- Magic8Ball: Contains the code for the app itself
- Magic8Ball.Android: Contains the necessary code for building the Android version
- Magic8Ball.iOS: Contains the necessary code for building the iOS version
If you look at the contents of the MainActivity.cs file in Magic8Ball.Android, you’ll see this. It bears a strong (if C#-flavored) resemblance to the sort of MainActivity.java file that gets auto-generated when you start a new Android project in ADT or Android Studio:
using System;

using Android.App;
using Android.Content;
using Android.Content.PM;
using Android.Runtime;
using Android.Views;
using Android.Widget;
using Android.OS;

using Xamarin.Forms.Platform.Android;


namespace Magic8Ball.Android
{
	[Activity (Label = "Magic8Ball.Android.Android", MainLauncher = true, ConfigurationChanges = ConfigChanges.ScreenSize | ConfigChanges.Orientation)]
	public class MainActivity : AndroidActivity
	{
		protected override void OnCreate (Bundle bundle)
		{
			base.OnCreate (bundle);

			Xamarin.Forms.Forms.Init (this, bundle);

			SetPage (App.GetMainPage ());
		}
	}
}
Note the last line of code: it contains a call to the GetMainPage() method of the App class. The App class is defined in the App.cs file of the platform-independent project, Magic8Ball.
There’s similar code in the AppDelegate.cs file in Magic8Ball.iOS. It looks like the AppDelegate.m or AppDelegate.swift file that gets auto-generated for new iOS projects in Objective-C or Swift, but in C#:
using System;
using System.Collections.Generic;
using System.Linq;

using MonoTouch.Foundation;
using MonoTouch.UIKit;

using Xamarin.Forms;

namespace Magic8Ball.iOS
{
	[Register ("AppDelegate")]
	public partial class AppDelegate : UIApplicationDelegate
	{
		UIWindow window;

		public override bool FinishedLaunching (UIApplication app, NSDictionary options)
		{
			Forms.Init ();

			window = new UIWindow (UIScreen.MainScreen.Bounds);

			window.RootViewController = App.GetMainPage ().CreateViewController ();
			window.MakeKeyAndVisible ();

			return true;
		}
	}
}
As with the Android version, there’s a call to App.GetMainPage() in the iOS version. That’s where your part of the app begins — let’s look at the App class and its GetMainPage() method.
Since it’s simple and the point of the exercise is to provide a quick-and-dirty intro to Xamarin.Forms, I’m foregoing the general rules about keeping interface and implementation separate (you shouldn’t stuff all the code into the view in a “real” app). The code for the entire “Magic 8-Ball” app is in the GetMainPage() method:
using System;
using Xamarin.Forms;
using System.Collections.Generic;

namespace Magic8Ball
{
	public class App
	{
		public static Page GetMainPage ()
		{
			var answers = new List<string> {
				"Yes.",
				"Sure thing.",
				"But of course!",
				"I'd bet on it.",
				"AWWW YISSS!",
				"No.",
				"Nuh-uh.",
				"Absolutely not!",
				"I wouldn't bet on it",
				"HELL NO.",
				"Maybe",
				"Possibly...",
				"Ask again later.",
				"I can't be certain.",
				"Clouded by the Dark Side, the future is."
			};

			var randomAnswerSelector = new Random ();

			var layout = new StackLayout {
				Padding = 20,
				VerticalOptions = LayoutOptions.Center
			};

			var answerButton = new Button {
				Text = "I need an answer!",
				Font = Font.BoldSystemFontOfSize (30),
				HorizontalOptions = LayoutOptions.CenterAndExpand
			};

			var answerLabel = new Label {
				Text = "",
				Font = Font.BoldSystemFontOfSize (50),
				HorizontalOptions = LayoutOptions.CenterAndExpand,
				XAlign = TextAlignment.Center
			};

			answerButton.Clicked += (object sender, EventArgs e) => {
				answerLabel.Text = answers[randomAnswerSelector.Next (answers.Count)];
			};

			layout.Children.Add (answerButton);
			layout.Children.Add (answerLabel);

			return new ContentPage {
				Content = layout
			};
		}

	}
}
The Magic 8-Ball app’s UI structure
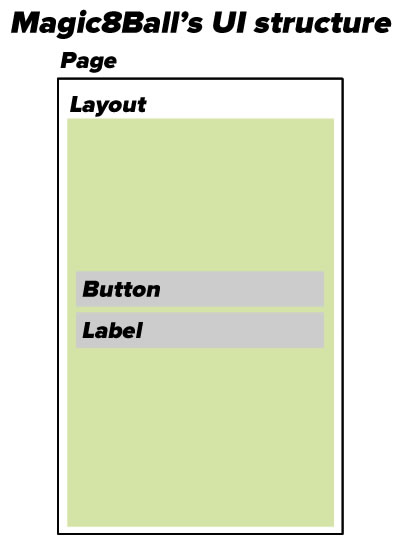
As you can see in the code, the GetMainPage() method’s job is to draw the app’s main (and only) screen, which in Xamarin.Forms parlance is a Page. Xamarin.Forms’ Page class represents different things on different mobile OSs:
- An Activity in Android
- A View Controller in iOS
- A Page in Windows Phone
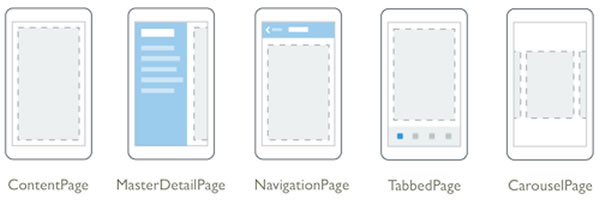
Xamarin.Forms pages come in 5 different flavors:
A page can contain a single child. Typically, this child is some sort of container for other controls.
For this app, our main screen is a ContentPage, the simplest type. If you’d like to find out about the other page types, see Xamarin.Forms’ Pages documentation.
Since a page can have only one child and we need two controls, we’ll need to make that child something that can hold other controls. That’s what the various subclasses of the Layout class are for:
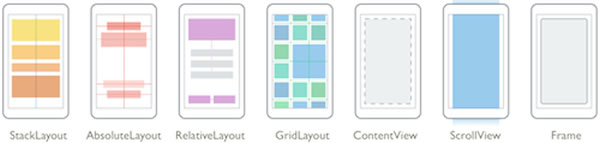
For this app, we’ll use the StackLayout layout, which is used to lay out controls in a single horizontal or vertical line. We’ll give it two children:
- A
Button, which the user will tap to get a random yes/no/maybe answer, and - A
Label, which will display that random yes/no/maybe answer.
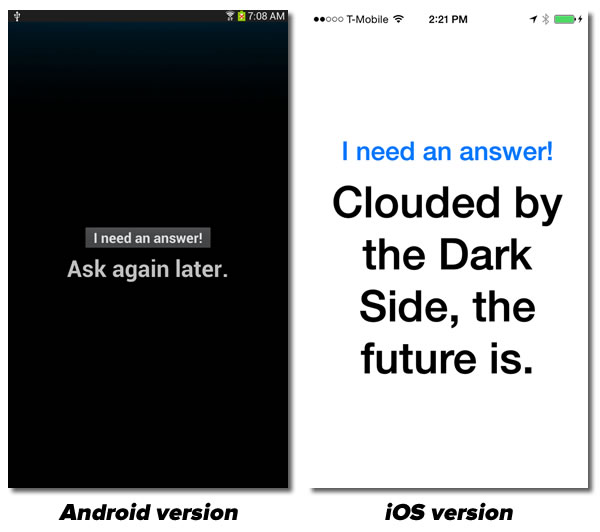
As I showed in the previous article, Xamarin converts these UI-independent views into their equivalents on their respective platforms:
A walk through the code for C# newbies
If you’re familiar with C# programming, you can skip this final section. This is for the benefit of people who are new to C# or haven’t coded in it in a while.
Creating the set of answers
Here’s the first line of the GetMainPage() method. It defines the app’s randomly-selected answers:
var answers = new List<string> {
	"Yes.",
	"Sure thing.",
	"But of course!",
	"I'd bet on it.",
	"AWWW YISSS!",
	"No.",
	"Nuh-uh.",
	"Absolutely not!",
	"I wouldn't bet on it",
	"HELL NO.",
	"Maybe",
	"Possibly...",
	"Ask again later.",
	"I can't be certain.",
	"Clouded by the Dark Side, the future is."
};
C#’s var keyword lets you declare variables at the method level without having to explicitly specify their type — given enough information, the compiler is smart enough to figure out the type all by itself. After all, why type in this redundancy-filled line:
Thingy myThingy = new Thingy();
when you can simply type:
var myThingy = new Thingy();
If you’ve been coding in Swift, you’re familiar with this sort of implicit declaration.
C# has a built-in array type, but it’s generally recommended that you ignore it most of the time in favor of using the the List<T> type instead. Lists offer more features than arrays (even when you factor in LINQ), and unlike arrays, they’re resizable. Like arrays, the List collection has an initialization syntax that filling it simpler.
Setting up the random number generator
The next line sets up the random number generator by initializing a new instance of the Random class:
var randomAnswerSelector = new Random ();
This is pretty close to the way you’d do it in with Android in Java. Both the .NET and Java libraries have a class called Random which is used to generate pseudorandom integer and real numbers. In this case, we want to generate a random integer that we’ll use to select an answer to give the user.
Random number generation is a little different in Objective-C/Swift and iOS. There, we’d use some version of the arc4random() function from the standard C library — most likely arc4random_uniform(), which avoids the “modulo bias problem” — to generate a pseudorandom integer.
Setting up the controls
These lines initialize the controls: the Button, the Label, and the StackLayout that will contain them both. These are pretty straightforward:
var layout = new StackLayout {
	Padding = 20,
	VerticalOptions = LayoutOptions.Center
};

var answerButton = new Button {
	Text = "I need an answer!",
	Font = Font.BoldSystemFontOfSize (30),
	HorizontalOptions = LayoutOptions.CenterAndExpand
};

var answerLabel = new Label {
	Text = "",
	Font = Font.BoldSystemFontOfSize (50),
	HorizontalOptions = LayoutOptions.CenterAndExpand,
	XAlign = TextAlignment.Center
};
Note the object initialization syntax. This:
var answerLabel = new Label {
	Text = "",
	Font = Font.BoldSystemFontOfSize (50),
	HorizontalOptions = LayoutOptions.CenterAndExpand,
	XAlign = TextAlignment.Center
};
is the equivalent of this:
var answerLabel = new Label ();
answerLabel.Text = "";
answerLabel.Font = Font.BoldSystemFontOfSize (50);
answerLabel.HorizontalOptions = LayoutOptions.CenterAndExpand;
answerLabel.XAlign = TextAlignment.Center;
It makes for less typing, which according to Corbato’s Law, is a good thing (as long you don’t make the code hard to read).
Responding to a tap on the button
Let’s define what happens when the user taps the button, which raises the Clicked event. We want to attach an event handler to the Clicked event that selects a random answer and sets the text of the label on the screen to that answer:
answerButton.Clicked += (object sender, EventArgs e) => {
				answerLabel.Text = answers[randomAnswerSelector.Next (answers.Count)];
			};
The => is C#’s lambda operator. The ability to define anonymous functions which can then be passed about is also available in Objective-C in the form of blocks and in Swift in the form of closures, and well as in Java 8.
Defining and returning the page
With the UI completely defined — layout, controls, and even an event hander — it’s time to lay out the content of the page and return it:
layout.Children.Add (answerButton);
layout.Children.Add (answerLabel);

return new ContentPage {
	Content = layout
};
Keep an eye on this blog — I’ll be doing a lot of exploring of Xamarin and especially Xamarin.Forms and sharing my findings here!
One reply on “A closer look at the quick and dirty Xamarin.Forms “Magic 8-Ball” app”
Great article. Thank you!