
Categories

In this article, we’ll expand on material covered in the three previous articles in this series:
Date, which represents a single point in time,DateComponents, which represents the units that make up a date, such as year, month, day, hour, and minute, and which can be used to represent either a single point in time or a duration of time, andCalendar, which provides a context for Dates, and allows us to convert between Dates and DateComponents.DateFormatter class, which converts Dates into formatted Strings, and formatted Strings into Dates.Dates, find the difference in time between two Dates, and compare Dates.Dates and DateComponentsSuppose we want to find out what the date and time will be 2 months, 3 days, 4 hours, 5 minutes, and 6 seconds from now will be. If you recall what we covered in the last installment in this series, you’d probably use code like this:
var timeInterval = DateComponents()
timeInterval.month = 2
timeInterval.day = 3
timeInterval.hour = 4
timeInterval.minute = 5
timeInterval.second = 6
let futureDate = Calendar.current.date(byAdding: timeInterval, to: Date())!
In the code above, we did the following:
DateComponents struct.Calendar‘s date(byAdding:to:) method to add the time interval to a Date.This code wouldn’t look out of place in a lot of other programming languages, but we can do better in Swift. What if I told you that by defining a few helper functions, you can turn the code above into the code below?
let coolerFutureDate = Date() + 2.months + 3.days + 4.hours + 5.minutes + 6.seconds
let coolerPastDate   = Date() - 2.months - 3.days - 4.hours - 5.minutes - 6.seconds
Or this code?
let coolerFutureDate = (2.months + 3.days + 4.hours + 5.minutes + 6.seconds).fromNow
let coolerPastDate   = (2.months + 3.days + 4.hours + 5.minutes + 6.seconds).ago
I’d much rather write the code above. This article will cover the code necessary to make this kind of syntactic magic possible.
+ and - so that we can add and subtract DateComponentsFirst, let’s write some code that allows us to add and subtract DateComponents. Start a new playground and enter the following code into it:
func +(_ lhs: DateComponents, _ rhs: DateComponents) -> DateComponents {
  return combineComponents(lhs, rhs)
}

func -(_ lhs: DateComponents, _ rhs: DateComponents) -> DateComponents {
  return combineComponents(lhs, rhs, multiplier: -1)
}

func combineComponents(_ lhs: DateComponents,
                       _ rhs: DateComponents,
                       multiplier: Int = 1)
                       -> DateComponents {
  var result = DateComponents()
  result.second     = (lhs.second     ?? 0) + (rhs.second     ?? 0) * multiplier
  result.minute     = (lhs.minute     ?? 0) + (rhs.minute     ?? 0) * multiplier
  result.hour       = (lhs.hour       ?? 0) + (rhs.hour       ?? 0) * multiplier
  result.day        = (lhs.day        ?? 0) + (rhs.day        ?? 0) * multiplier
  result.weekOfYear = (lhs.weekOfYear ?? 0) + (rhs.weekOfYear ?? 0) * multiplier
  result.month      = (lhs.month      ?? 0) + (rhs.month      ?? 0) * multiplier
  result.year       = (lhs.year       ?? 0) + (rhs.year       ?? 0) * multiplier
  return result
}
In the code above, we’ve overloaded the + and – operators so that we can add and subtract DateComponents. I derived these functions from Axel Schlueter’s SwiftDateTimeExtensions library. He wrote them when Swift was still in beta; I updated them so that they compile with the current version and added a couple of tweaks of my own.
The addition and subtraction operations are so similar and so tedious, which is a sign that there’s an opportunity to DRY up the code. I factored out the duplicate code from both the + and - overloads and put it into its own method, combineComponents, which does the actual DateComponents addition and subtraction.
You may have noticed a lot of ?? operators in the code for combineComponents. ?? is referred to as the nil coalescing operator, and it’s a clever bit of syntactic shorthand. For the expression below:
let finalValue = someOptionalValue ?? fallbackValue
someOptionalValue is not nil, finalValue is set to someOptionalValue‘s value.someOptionalValue is nil, finalValue is set to fallbackValue‘s value.Let’s confirm that our code works. Try out the following code:
// (Previous code goes here)

// Let's define a couple of durations of time

var oneDayFiveHoursTenMinutes = DateComponents()
oneDayFiveHoursTenMinutes.day = 1
oneDayFiveHoursTenMinutes.hour = 5
oneDayFiveHoursTenMinutes.minute = 10

var threeDaysTenHoursThirtyMinutes = DateComponents()
threeDaysTenHoursThirtyMinutes.day = 3
threeDaysTenHoursThirtyMinutes.hour = 10
threeDaysTenHoursThirtyMinutes.minute = 30


// Now let's add and subtract them

let additionResult = OneDayFiveHoursTenMinutes + ThreeDaysTenHoursThirtyMinutes
additionResult.day     // 4
additionResult.hour    // 15
additionResult.minute  // 40

let subtractionResult = ThreeDaysTenHoursThirtyMinutes - OneDayFiveHoursTenMinutes
subtractionResult.day     // 2
subtractionResult.hour    // 5
subtractionResult.minute  // 20
- so that we can negate DateComponentsNow that we can add and subtract DateComponents, let’s overload the unary minus so that we can negate DateComponents:
// (Previous code goes here)

prefix func -(components: DateComponents) -> DateComponents {
  var result = DateComponents()
  if components.second     != nil { result.second     = -components.second! }
  if components.minute     != nil { result.minute     = -components.minute! }
  if components.hour       != nil { result.hour       = -components.hour! }
  if components.day        != nil { result.day        = -components.day! }
  if components.weekOfYear != nil { result.weekOfYear = -components.weekOfYear! }
  if components.month      != nil { result.month      = -components.month! }
  if components.year       != nil { result.year       = -components.year! }
  return result
}
With this overload defined, we can now use the unary minus to negate DateComponents:
// (Previous code goes here)

let negativeTime = -oneDayFiveHoursTenMinutes
negativeTime.day     // -1
negativeTime.hour    // -5
negativeTime.minute  // -10
+ and - so that we can add Dates and DateComponents and subtract DateComponents from DatesWith the unary minus defined, we can now define the following operations:
Date + DateComponentsDateComponents + DateDate – DateComponents// (Previous code goes here)
// Date + DateComponents
func +(_ lhs: Date, _ rhs: DateComponents) -> Date
{
return Calendar.current.date(byAdding: rhs, to: lhs)!
}
// DateComponents + Dates
func +(_ lhs: DateComponents, _ rhs: Date) -> Date
{
return rhs + lhs
}
// Date - DateComponents
func -(_ lhs: Date, _ rhs: DateComponents) -> Date
{
return lhs + (-rhs)
}
Note that we didn’t define an overload for subtracting Date from DateComponents — such an operation doesn’t make any sense.
With these overloads defined, a lot of Date/DateComponents arithmetic in Swift becomes much easier to enter and read:
// (Previous code goes here)

// What time will it be 1 day, 5 hours, and 10 minutes from now?

// Here's the standard way of finding out:
Calendar.current.date(byAdding: oneDayFiveHoursTenMinutes, to: Date())

// With our overloads and function definitions, we can now do it this way:
Date() + oneDayFiveHoursTenMinutes
// This will work as well:
oneDayFiveHoursTenMinutes + Date()


// What time was it 3 days, 10 hours, and 30 minutes ago?

// Doing it the standard way takes some work
var minus3Days5Hours30minutes = threeDaysTenHoursThirtyMinutes
minus3Days5Hours30minutes.day = -threeDaysTenHoursThirtyMinutes.day!
minus3Days5Hours30minutes.hour = -threeDaysTenHoursThirtyMinutes.hour!
minus3Days5Hours30minutes.minute = -threeDaysTenHoursThirtyMinutes.minute!
Calendar.current.date(byAdding: minus3Days5Hours30minutes, to: Date())

// With our overloads and function definitions, it's so much easier:
Date() - threeDaysTenHoursThirtyMinutes
Date so that creating dates is simplerCreating Dates in Swift is a roundabout process. Usually, you end up creating them in one of two ways:
DateComponents struct and then using it to create a Date using Calendar‘s date(from:) method, orString representation of the Date and then using it to create a Date using DateFormatter‘s date(from:) method.Let’s simplify things by extending the Date struct with a couple of convenient init method overloads:
extension Date {

  init(year: Int,
       month: Int,
       day: Int,
       hour: Int = 0,
       minute: Int = 0,
       second: Int = 0,
       timeZone: TimeZone = TimeZone(abbreviation: "UTC")!) {
    var components = DateComponents()
    components.year = year
    components.month = month
    components.day = day
    components.hour = hour
    components.minute = minute
    components.second = second
    components.timeZone = timeZone
    self = Calendar.current.date(from: components)!
  }

  init(dateString: String) {
    let formatter = DateFormatter()
    formatter.dateFormat = "yyyy-MM-dd HH:mm:ss zz"
    self = formatter.date(from: dateString)!
  }

}
With these methods, initializing Dates is a lot more simple:
// (Previous code goes here)

// The Stevenote where the original iPhone was announced took place
// on January 9, 2007 at 10:00 a.m. PST
let iPhoneStevenoteDate = Date(year: 2007,
                               month: 1,
                               day: 9,
                               hour: 10,
                               minute: 0,
                               second: 0,
                               timeZone: TimeZone(abbreviation: "PST")!)

// The original iPhone went on sale on June 27, 2007
let iPhoneReleaseDate = Date(year: 2007, month: 6, day: 27) // June 27, 2007, 00:00:00 UTC

// The Stevenote where the original iPhone was announced took place
// on January 27, 2010 at 10:00 a.m. PST
let iPadStevenoteDate = Date(dateString: "2010-01-27 10:00:00 PST")
- so that we can use it to find the difference between two DatesWhen we’re trying to determine the time between two given Dates, what we’re doing is finding the difference between them. Wouldn’t it be nice if we could use the - operator to find the difference between Dates, just as we can use it to find the difference between numbers?
Let’s code an overload to do just that:
// (Previous code goes here)

func -(_ lhs: Date, _ rhs: Date) -> DateComponents
{
  return Calendar.current.dateComponents([.year, .month, .day, .hour, .minute],
                                         from: lhs,
                                         to: rhs)
}
Let’s test it in action:
let timeFromAnnouncementToRelease = iPhoneReleaseDate - iPhoneStevenoteDate
timeFromAnnouncementToRelease.year    // 0
timeFromAnnouncementToRelease.month   // 5
timeFromAnnouncementToRelease.day     // 17
timeFromAnnouncementToRelease.hour    // 7
timeFromAnnouncementToRelease.minute  // 0

// How long ago was the first moon landing, which took place
// on July 20, 1969, 20:18 UTC?
Date() - Date(dateString: "1969-07-20 20:18:00 UTC")
// At the time of writing, this value was a Date with the following properties:
// - year: 47
// - month: 1
// - day: 9
// - hour: 22
// - minute: 14
Int to add some syntactic magic to date componentsWe’ve already got some syntactic niceties, but the real Swift magic happens when we add this code to the mix:
// (Previous code goes here)

extension Int {

  var second: DateComponents {
    var components = DateComponents()
    components.second = self;
    return components
  }

  var seconds: DateComponents {
    return self.second
  }

  var minute: DateComponents {
    var components = DateComponents()
    components.minute = self;
    return components
  }

  var minutes: DateComponents {
    return self.minute
  }

  var hour: DateComponents {
    var components = DateComponents()
    components.hour = self;
    return components
  }

  var hours: DateComponents {
    return self.hour
  }

  var day: DateComponents {
    var components = DateComponents()
    components.day = self;
    return components
  }

  var days: DateComponents {
    return self.day
  }

  var week: DateComponents {
    var components = DateComponents()
    components.weekOfYear = self;
    return components
  }

  var weeks: DateComponents {
    return self.week
  }

  var month: DateComponents {
    var components = DateComponents()
    components.month = self;
    return components
  }

  var months: DateComponents {
    return self.month
  }

  var year: DateComponents {
    var components = DateComponents()
    components.year = self;
    return components
  }

  var years: DateComponents {
    return self.year
  }

}
This additions to Int allow us to convert Ints to DateComponents in an easy-to-read way, and with our overloads to add and subtract DateComponents to and from each other, and to add Dates to DateComponents, we can now perform all sorts of syntactic magic like this:
// From our earlier test of Date subtraction, we know that
// there were 5 months, 17 days, and 7 hours between
// the Stevenote when the iPhone was announced and
// midnight UTC on the day it was released.
iPhoneStevenoteDate + 5.months + 17.days + 7.hours  // June 27, 2007, 00:00:00 UTC

// What was the date 10 years, 9 months, 8 days, 7 hours, and 6 minutes ago?
Date() - 10.years - 9.months - 8.days - 7.hours - 6.minutes
// At the time of writing, this value was Nov 22, 2005, 6:51 a.m. EST.
DateComponents to add even more syntactic magic: fromNow and agoAnd finally, a couple of additions to the DateComponents struct to make Date/DateComponent calculations even more concise and readable:
extension DateComponents {

  var fromNow: Date {
    return Calendar.current.date(byAdding: self,
                                 to: Date())!
  }

  var ago: Date {
    return Calendar.current.date(byAdding: -self,
                                 to: Date())!
  }

}
Here are these additions in action:
2.weeks.fromNow
// At the time of writing, this value was
// Sep 13, 2016, 2:55 PM

3.months.fromNow
// At the time of writing, this value was
// Nov 30, 2016, 2:55 PM

(2.months + 3.days + 4.hours + 5.minutes + 6.seconds).fromNow
// At the time of writing, this value was
// Nov 2, 2016, 7:04 PM

(2.months + 3.days + 4.hours + 5.minutes + 6.seconds).ago
// At the time of writing, this value was
// Nov 2, 2016, 7:04 PM
Here’s the playground containing all the code we just worked with:
import UIKit


// Overloading + and - so that we can add and subtract DateComponents
// ------------------------------------------------------------------

func +(_ lhs: DateComponents, _ rhs: DateComponents) -> DateComponents {
  return combineComponents(lhs, rhs)
}

func -(_ lhs: DateComponents, _ rhs: DateComponents) -> DateComponents {
  return combineComponents(lhs, rhs, multiplier: -1)
}

func combineComponents(_ lhs: DateComponents,
                       _ rhs: DateComponents,
                       multiplier: Int = 1)
                       -> DateComponents {
  var result = DateComponents()
  result.second     = (lhs.second     ?? 0) + (rhs.second     ?? 0) * multiplier
  result.minute     = (lhs.minute     ?? 0) + (rhs.minute     ?? 0) * multiplier
  result.hour       = (lhs.hour       ?? 0) + (rhs.hour       ?? 0) * multiplier
  result.day        = (lhs.day        ?? 0) + (rhs.day        ?? 0) * multiplier
  result.weekOfYear = (lhs.weekOfYear ?? 0) + (rhs.weekOfYear ?? 0) * multiplier
  result.month      = (lhs.month      ?? 0) + (rhs.month      ?? 0) * multiplier
  result.year       = (lhs.year       ?? 0) + (rhs.year       ?? 0) * multiplier
  return result
}


// Let's define a couple of durations of time

var oneDayFiveHoursTenMinutes = DateComponents()
oneDayFiveHoursTenMinutes.day = 1
oneDayFiveHoursTenMinutes.hour = 5
oneDayFiveHoursTenMinutes.minute = 10


var threeDaysTenHoursThirtyMinutes = DateComponents()
threeDaysTenHoursThirtyMinutes.day = 3
threeDaysTenHoursThirtyMinutes.hour = 10
threeDaysTenHoursThirtyMinutes.minute = 30


// Now let's add and subtract them

let additionResult = oneDayFiveHoursTenMinutes + threeDaysTenHoursThirtyMinutes
additionResult.day     // 4
additionResult.hour    // 15
additionResult.minute  // 40

let subtractionResult = threeDaysTenHoursThirtyMinutes - oneDayFiveHoursTenMinutes
subtractionResult.day     // 2
subtractionResult.hour    // 5
subtractionResult.minute  // 20


// Overloading - so that we can negate DateComponents
// --------------------------------------------------

// We'll need to overload unary - so we can negate components
prefix func -(components: DateComponents) -> DateComponents {
  var result = DateComponents()
  if components.second     != nil { result.second     = -components.second! }
  if components.minute     != nil { result.minute     = -components.minute! }
  if components.hour       != nil { result.hour       = -components.hour! }
  if components.day        != nil { result.day        = -components.day! }
  if components.weekOfYear != nil { result.weekOfYear = -components.weekOfYear! }
  if components.month      != nil { result.month      = -components.month! }
  if components.year       != nil { result.year       = -components.year! }
  return result
}


let negativeTime = -oneDayFiveHoursTenMinutes
negativeTime.day     // -1
negativeTime.hour    // -5
negativeTime.minute  // -10


// Overloading + and - so that we can add Dates and DateComponents
// and subtract DateComponents from Dates

// Date + DateComponents
func +(_ lhs: Date, _ rhs: DateComponents) -> Date
{
  return Calendar.current.date(byAdding: rhs, to: lhs)!
}

// DateComponents + Dates
func +(_ lhs: DateComponents, _ rhs: Date) -> Date
{
  return rhs + lhs
}

// Date - DateComponents
func -(_ lhs: Date, _ rhs: DateComponents) -> Date
{
  return lhs + (-rhs)
}


// What time will it be 1 day, 5 hours, and 10 minutes from now?

// Here's the standard way of finding out:
Calendar.current.date(byAdding: oneDayFiveHoursTenMinutes, to: Date())

// With our overloads and function definitions, we can now do it this way:
Date() + oneDayFiveHoursTenMinutes
// This will work as well:
oneDayFiveHoursTenMinutes + Date()


// What time was it 3 days, 10 hours, and 30 minutes ago?

// Doing it the standard way takes some work
var minus3Days5Hours30minutes = threeDaysTenHoursThirtyMinutes
minus3Days5Hours30minutes.day = -threeDaysTenHoursThirtyMinutes.day!
minus3Days5Hours30minutes.hour = -threeDaysTenHoursThirtyMinutes.hour!
minus3Days5Hours30minutes.minute = -threeDaysTenHoursThirtyMinutes.minute!
Calendar.current.date(byAdding: minus3Days5Hours30minutes, to: Date())

// With our overloads and function definitions, it's so much easier:
Date() - threeDaysTenHoursThirtyMinutes


// Extending Date so that creating dates is simpler
// ------------------------------------------------

extension Date {

  init(year: Int,
       month: Int,
       day: Int,
       hour: Int = 0,
       minute: Int = 0,
       second: Int = 0,
       timeZone: TimeZone = TimeZone(abbreviation: "UTC")!) {
    var components = DateComponents()
    components.year = year
    components.month = month
    components.day = day
    components.hour = hour
    components.minute = minute
    components.second = second
    components.timeZone = timeZone
    self = Calendar.current.date(from: components)!
  }

  init(dateString: String) {
    let formatter = DateFormatter()
    formatter.dateFormat = "yyyy-MM-dd HH:mm:ss zz"
    self = formatter.date(from: dateString)!
  }

}


// The Stevenote where the original iPhone was announced took place
// on January 9, 2007 at 10:00 a.m. PST
let iPhoneStevenoteDate = Date(year: 2007,
                               month: 1,
                               day: 9,
                               hour: 10,
                               minute: 0,
                               second: 0,
                               timeZone: TimeZone(abbreviation: "PST")!)

// The original iPhone went on sale on June 27, 2007
let iPhoneReleaseDate = Date(year: 2007, month: 6, day: 27) // June 27, 2007, 00:00:00 UTC

// The Stevenote where the original iPhone was announced took place
// on January 27, 2010 at 10:00 a.m. PST
let iPadStevenoteDate = Date(dateString: "2010-01-27 10:00:00 PST")


// Overloading - so that we can use it to find the difference between two Dates

func -(_ lhs: Date, _ rhs: Date) -> DateComponents
{
  return Calendar.current.dateComponents([.year, .month, .day, .hour, .minute],
                                         from: rhs,
                                         to: lhs)
}


let timeFromAnnouncementToRelease = iPhoneReleaseDate - iPhoneStevenoteDate
timeFromAnnouncementToRelease.year    // 0
timeFromAnnouncementToRelease.month   // 5
timeFromAnnouncementToRelease.day     // 17
timeFromAnnouncementToRelease.hour    // 7
timeFromAnnouncementToRelease.minute  // 0

// How long ago was the first moon landing, which took place
// on July 20, 1969, 20:18 UTC?
Date() - Date(dateString: "1969-07-20 20:18:00 UTC")
// At the time of writing, this value was a Date with the following properties:
// - year: 47
// - month: 1
// - day: 9
// - hour: 22
// - minute: 14


// Extending Int to add some syntactic magic to date components
// ------------------------------------------------------------

extension Int {

  var second: DateComponents {
    var components = DateComponents()
    components.second = self;
    return components
  }

  var seconds: DateComponents {
    return self.second
  }

  var minute: DateComponents {
    var components = DateComponents()
    components.minute = self;
    return components
  }

  var minutes: DateComponents {
    return self.minute
  }

  var hour: DateComponents {
    var components = DateComponents()
    components.hour = self;
    return components
  }

  var hours: DateComponents {
    return self.hour
  }

  var day: DateComponents {
    var components = DateComponents()
    components.day = self;
    return components
  }

  var days: DateComponents {
    return self.day
  }

  var week: DateComponents {
    var components = DateComponents()
    components.weekOfYear = self;
    return components
  }

  var weeks: DateComponents {
    return self.week
  }

  var month: DateComponents {
    var components = DateComponents()
    components.month = self;
    return components
  }

  var months: DateComponents {
    return self.month
  }

  var year: DateComponents {
    var components = DateComponents()
    components.year = self;
    return components
  }

  var years: DateComponents {
    return self.year
  }

}


// From our earlier test of Date subtraction, we know that
// there were 5 months, 17 days, and 7 hours between
// the Stevenote when the iPhone was announced and
// midnight UTC on the day it was released.
iPhoneStevenoteDate + 5.months + 17.days + 7.hours  // June 27, 2007, 00:00:00 UTC

// What was the date 10 years, 9 months, 8 days, 7 hours, and 6 minutes ago?
Date() - 10.years - 9.months - 8.days - 7.hours - 6.minutes
// At the time of writing, this value was Nov 22, 2005, 6:51 a.m. EST.


// Extending DateComponents to add even more syntactic magic: fromNow and ago
// --------------------------------------------------------------------------

extension DateComponents {

  var fromNow: Date {
    return Calendar.current.date(byAdding: self,
                                 to: Date())!
  }

  var ago: Date {
    return Calendar.current.date(byAdding: -self,
                                 to: Date())!
  }

}


2.weeks.fromNow
// At the time of writing, this value was
// Sep 13, 2016, 2:55 PM

3.months.fromNow
// At the time of writing, this value was
// Nov 30, 2016, 2:55 PM

(2.months + 3.days + 4.hours + 5.minutes + 6.seconds).fromNow
// At the time of writing, this value was
// Nov 2, 2016, 7:04 PM

(2.months + 3.days + 4.hours + 5.minutes + 6.seconds).ago
// At the time of writing, this value was
// Nov 2, 2016, 7:04 PM
You can actually buy this thing on Etsy! Click the photo for details.
So far, in this series on date and time programming in Swift 3, we’ve looked at:
Date, which represents a single point in time,DateComponents, which represents the units that make up a date, such as year, month, day, hour, and minute, and which can be used to represent either a single point in time or a duration of time, andCalendar, which provides a context for Dates, and allows us to convert between Dates and DateComponents.DateFormatter class, which converts Dates into formatted Strings, and formatted Strings into Dates.With this knowledge under our belts, let’s get to this article’s topic: doing date calculations.
Dates to work with
Let’s create a couple of Dates to work with:
Start with a fresh playground, and paste or enter the following code into it:
import UIKit

// The user's calendar incorporates the user's locale and
// time zone settings, which means it's the one you'll use
// most often.
let userCalendar = Calendar.current

// Let's create a Date for the start of the Stevenote
// where the iPhone was introduced (January 9, 2007, 10:00:00 Pacific time)
// using DateComponents.
var iPhoneStevenoteDateComponents = DateComponents()
iPhoneStevenoteDateComponents.year = 2007
iPhoneStevenoteDateComponents.month = 1
iPhoneStevenoteDateComponents.day = 9
iPhoneStevenoteDateComponents.hour = 10
iPhoneStevenoteDateComponents.timeZone = TimeZone(abbreviation: "PST")
let iPhoneStevenoteDate = userCalendar.date(from: iPhoneStevenoteDateComponents)!

// Let's create a Date for the start of the Stevenote
// where the iPad was introduced (January 27, 2010, 10:00:00 Pacific time)
// using DateFormatter.
var dateMakerFormatter = DateFormatter()
dateMakerFormatter.calendar = userCalendar
dateMakerFormatter.dateFormat = "MMM d, yyyy, hh:mm a zz"
let iPadStevenoteDate = dateMakerFormatter.date(from: "Jan 27, 2010, 10:00 AM PST")!
In the code above, we’ve created our dates in two different ways:
iPhoneStevenoteDate by setting up a DateComponents struct and then using the user’s Calendar to convert those DateComponents into a Date.iPadStevenoteDate by converting its String representation into a Date using a DateFormatter. You may find that if you need to instantiate a large number of Dates in code, you may want to do so this way, since this approach requires far fewer lines of code than doing so using DateComponents.Date comparisons, part 1
Now that we have two Dates, let’s compare them. In Swift 3, we can use familiar comparison operators — <, <=, ==, !=, >, >== — to tell which Date came first, or if they represent the same point in time.
Add the following code to the playground:
// (Previous code goes here)

// Does Valentine's Day come BEFORE St. Patrick's Day?
valentinesDay < stPatricksDay   // true

// Does Valentine's Day come AFTER St. Patrick's Day?
valentinesDay > stPatricksDay   // false

// Does St. Patrick's Day come BEFORE Valentine's Day?
stPatricksDay < valentinesDay   // false

// Did the iPhone Stevenote come BEFORE the iPad Stevenote?
iPhoneStevenoteDate < iPadStevenoteDate   // true

// Did the iPhone Stevenote come AFTER the iPad Stevenote?
iPhoneStevenoteDate > iPadStevenoteDate   // false

// Did the iPad Stevenote come BEFORE the iPhone Stevenote?
iPadStevenoteDate < iPhoneStevenoteDate   // false

// Does the iPad Stevenote come AFTER the iPhone Stevenote?
iPadStevenoteDate > iPhoneStevenoteDate   // true

// Do the iPhone Stevenote and the iPad Stevenote fall on DIFFERENT dates?
iPhoneStevenoteDate == iPadStevenoteDate  // false

// Do the iPhone Stevenote and the iPad Stevenote fall on the SAME date?
iPhoneStevenoteDate != iPadStevenoteDate  // true

// And just for kicks, some trivial comparisons.
iPhoneStevenoteDate == iPhoneStevenoteDate  // true
iPadStevenoteDate == iPadStevenoteDate  // true
Note that these are comparisons of Dates, which measure time down to the nearest nanosecond. If you compare two Dates named date1 and date2, where date2 represents a point in time one nanosecond after date1, they will not be equal; date2 will be greater than date1.
A little later on in this article, we’ll look at more “human” ways of comparing Dates.
Date’s timeIntervalSince methodDate‘s timeIntervalSince method can give us the difference between two dates and times — in seconds. Add the following code to the playground:
// (Previous code goes here)

// Number of seconds between the iPhone Stevenote and the iPad Stevenote
iPhoneStevenoteDate.timeIntervalSince(iPadStevenoteDate)  // -96249600

// Number of seconds between the iPad Stevenote and the iPhone Stevenote
iPadStevenoteDate.timeIntervalSince(iPhoneStevenoteDate)  // 96249600
The results tell us that there were 96,248,600 seconds between the iPhone Stevenote and the iPad Stevenote.
While there are cases when you’ll want to know how many seconds there are between two given points in time, there are also many cases where you’ll want to find the differences between two points in time using other units, such as days, weeks, months, and years, not to mention hours and minutes. Date‘s timeIntervalSince method isn’t going to work for these cases.
Calendar’s dateComponents(_:from:to:) methodMost of the time, when you are calculating how far apart two given Dates are, you’ll be using this method of the Calendar struct:
dateComponents(components, from: startDate, to: endDate)
Here’s a run-down of its parameters:
| Parameter | Description |
|---|---|
components |
A Set (expressed in array notation) of Calendar.Component values specifying the time units you want, which can be:
|
startDate |
.orderedSame |
endDate |
.orderedAscending |
Let’s use dateComponents(_:from:to:) to find out how many days there were between the iPhone Stevenote and the iPad Stevenote. Add the following code to the playground:
// (Previous code goes here)

// The result in the sidebar should be:
// day: 1114 isLeapMonth: false
let daysBetweenStevenotes = userCalendar.dateComponents([.day],
                                                        from: iPhoneStevenoteDate,
                                                        to: iPadStevenoteDate)
daysBetweenStevenotes.day!  // 1114
In the code above, we passed dateComponents(_:from:to:) three values:
Calendar.Component value .day, which specifies that we want the result expressed as the difference between iPadStevenoteDate and iPhoneStevenoteDate in terms of days.iPhoneStevenoteDate and iPadStevenoteDate.As the result tells us, there were 1,114 days between the iPhone Stevenote and the iPad Stevenote.
By changing the contents of the array of Calendar.Component values that we provide in the first argument of Calendar’s dateComponents(components, from: startDate, to: endDate) method, we can get the result expressed in different time units. Add the following code to the playground:
// (Previous code goes here)

// The result in the sidebar should be:
// weekOfYear: 159 isLeapMonth: false
let weeksBetweenStevenotes = userCalendar.dateComponents([.weekOfYear],
                                                         from: iPhoneStevenoteDate,
                                                         to: iPadStevenoteDate)
weeksBetweenStevenotes.weekOfYear!  // 159
In the code above, we passed dateComponents(_:from:to:) three values:
Calendar.Component value .weekOfYear, which specifies that we want the result expressed as the difference between iPadStevenoteDate and iPhoneStevenoteDate in terms of the numbered weeks of the year on which both dates fall. For example, if event1 took place on week 2 of a year and event2 took place on week 5, the difference between the two in .weekOfYear terms would be 3.iPhoneStevenoteDate and iPadStevenoteDate.The result indicates that 159 weeks passed between the iPhone Stevenote and the iPad Stevenote.
If you do the math, 159 times 7 days is 1,113 days, but our previous calculation said that the iPhone Stevenote and the iPad Stevenote were 1,114 days apart. That’s because the two events are 159 whole weeks apart, plus an extra day.
We can also put multiple values of Calendar.Component into the array that we provide as the first argument of Calendar’s dateComponents(components, from: startDate, to: endDate) method. Add the following code to the playground:
// (Previous code goes here)

// The result in the sidebar should be:
// year: 3 month: 0 day: 18 hour: 0 minute: 0 isLeapMonth: false
let yearsMonthsDaysHoursMinutesBetweenStevenotes = userCalendar.dateComponents([.year, .month, .day, .hour, .minute],
                                                                               from: iPhoneStevenoteDate,
                                                                               to: iPadStevenoteDate)
yearsMonthsDaysHoursMinutesBetweenStevenotes.year!    // 3
yearsMonthsDaysHoursMinutesBetweenStevenotes.month!   // 0
yearsMonthsDaysHoursMinutesBetweenStevenotes.day!     // 18
yearsMonthsDaysHoursMinutesBetweenStevenotes.hour!    // 0
yearsMonthsDaysHoursMinutesBetweenStevenotes.minute!  // 0
In the code above, we passed dateComponents(_:from:to:) three values:
Calendar.Component values .year, .month, .day, .hour, .minute, which specifies that we want the result expressed as the difference between iPadStevenoteDate and iPhoneStevenoteDate in terms of years, months, days, hours, and minutes. The method uses the largest applicable component before using smaller ones — for example, it will give results like 1 month and 5 days rather than 35 days.iPhoneStevenoteDate and iPadStevenoteDate.The results show that the iPhone Stevenote and the iPad Stevenote were 3 years and 18 days apart.
Date addition, part 1: What’s the last day of a 90-day warranty that starts today?
Now that we know how to answer the question “What’s the difference in time between two Dates?”, let’s try answering a different question: “If we add a time interval to a Date, what’s the resulting Date?”
To answer this question, we’ll use this method of the Calendar struct:
date(byAdding: timeUnit, value: numberOfTimeUnits to: startDate)
Here’s a run-down of its parameters:
| Parameter | Description |
|---|---|
timeInterval |
A dateComponents struct whose properties contain values defining the interval of time. |
numberOfTimeUnits |
The number of timeInterval units to be added to the Date in question. |
startDate |
The Date in question. |
Let’s start with a simple bit of code that tells us the last day of a 90-day warranty whose term starts right now:
// (Previous code goes here)

// What's the last day of a 90-day warranty that starts today?
userCalendar.date(byAdding: .day, value: 90, to: Date())  // 90 days from now
The result is a Date representing a point in time 90 days from the present.
Date addition, part 2: What was the date 5 weeks ago?Just as we can convert addition to subtraction by adding a negative value, we can also do Date subtraction by providing date(byAdding:value:to:) with negative values. Here’s an example of code that returns a date that is an interval of time prior to the date in question:
// What was the date 5 weeks ago?
userCalendar.date(byAdding: .weekOfYear, value: -5, to: Date())
The result is a Date representing a point in time 5 weeks in the past.
Date addition, part 3: What time will it be 4 hours and 30 minutes from now, and 4 hours and 30 minutes ago?The date(byAdding:value:to:) method works when you just want to add one kind of time unit — a minute, hour, day, week, month, or year — to a Date. If you want to add multiple kinds of time units to a Date, such as 4 hours and 30 minutes, you need to use this Calendar method instead:
date(byAdding: timeIntervalComponents, to: startDate)
Here’s a run-down of its parameters:
| Parameter | Description |
|---|---|
timeInterval |
A dateComponents struct whose properties contain values defining the interval of time. |
startDate |
The Date in question. |
Here’s the code that answers the question “What time will it be 4 hours and 30 minutes from now?”
// (Previous code goes here)

// What time will it be 4 hours and 30 minutes from now?
// First, we need to define a DateComponents struct representing
// a time interval of 4 hours and 30 minutes
var fourHoursThirtyMinutes = DateComponents()
fourHoursThirtyMinutes.hour = 4
fourHoursThirtyMinutes.minute = 30

// Now add the interval to the Date
let fourHoursThirtyMinutesFromNow = userCalendar.date(byAdding: fourHoursThirtyMinutes, to: Date()) // 4 hours and 30 minutes from now
In the code above, we did the following:
DateComponents struct representing a 4-hour, 30-minute span of time,date(byAdding:to:) method.The result is a Date representing a time 4 hours and 30 seconds in the future.
Let’s find out what the Date was 4 hours and 30 seconds ago:
// (Previous code goes here)

// What time was it 4 hours and 30 minutes ago?
var minusFourHoursThirtyMinutes = DateComponents()
minusFourHoursThirtyMinutes.hour = -4
minusFourHoursThirtyMinutes.minute = -30
let fourHoursThirtyMinutesAgo = userCalendar.date(byAdding: fourHoursThirtyMinutes, to: Date()) // 4 hours and 30 minutes ago

One recurring theme in science fiction (and especially in Star Trek) is the tendency for ultra-smart characters and computers to be overly, needlessly, pointlessly precise. The writers for the original series often did this with Spock, and it seemed that at least a few writers were aware of this annoying trope in later series. Here’s a bit of dialogue from The Next Generation:
Data: 6 days, 13 hours, 47 minutes.
Riker: What, no seconds?
Data: I have discovered, sir, a certain level of impatience when I calculate a lengthy time interval to the nearest second. [beat] However if you wish…
Riker: No. No. Minutes is fine.
Date‘s comparison operators have the same problem with being overly precise. Consider the following Dates:
Date‘s comparison operators think of all these points in time as very different, but depending on your circumstances you may think of them as being practically the same:
Dates listed above.Calendar‘s compare(_:to:toGranularity) method allows us to perform Date comparisons at different levels of granularity:
compare(firstDate, to: secondDate, toGranularity: granularity)
Here’s a run-down of its parameters:
| Parameter | Description |
|---|---|
firstDate |
The first Date in the comparison. |
secondDate |
The second Date in the comparison. |
granularity |
The level of precision for the comparison, expressed as an Calendar.Component value, which includes:
|
This is a Cocoa method named “compare”, so you’ve probably guessed that its return type is ComparisonResult. Here’s what it returns:
| If… | compare returns: |
|---|---|
firstDate is earlier than secondDate, when compared at the specified level of precision |
.orderedAscending |
firstDate is equal to secondDate, when compared at the specified level of precision |
.orderedSame |
firstDate is later than secondDate, when compared at the specified level of precision |
.orderedAscending |
It’s easier to show compare(_:to:toGranularity) in action than to explain how it works. Add the following code into the playground:
// (Previous code goes here)

// Let's define some Dates relative to iPhoneStevenoteDate
let iPhoneStevenotePlusOneSecond = userCalendar.date(byAdding: .second, value: 1, to: iPhoneStevenoteDate)!
let iPhoneStevenotePlusFiveMinutes = userCalendar.date(byAdding: .minute, value: 5, to: iPhoneStevenoteDate)!
let iPhoneStevenotePlusThreeHours = userCalendar.date(byAdding: .hour, value: 3, to: iPhoneStevenoteDate)!

// This returns false, because iPhoneStevenoteDate and iPhoneStevenotePlusOneSecond
// are NOT both within the same SECOND.
userCalendar.compare(iPhoneStevenoteDate,
                     to: iPhoneStevenotePlusOneSecond,
                     toGranularity: .second)
  == .orderedSame

// This returns true, because iPhoneStevenoteDate comes one second BEFORE
// iPhoneStevenotePlusOneSecond, and we're comparing the two at the one-second
// level of granularity.
userCalendar.compare(iPhoneStevenoteDate,
                     to: iPhoneStevenotePlusOneSecond,
                     toGranularity: .second)
  == .orderedAscending

// This returns true, because iPhoneStevenoteDate and iPhoneStevenotePlusOneSecond
// ARE both within the same MINUTE.
userCalendar.compare(iPhoneStevenoteDate,
                     to: iPhoneStevenotePlusOneSecond,
                     toGranularity: .minute)
  == .orderedSame

// This returns true, because iPhoneStevenoteDate and iPhoneStevenotePlusFiveMinutes
// ARE both within the same HOUR.
userCalendar.compare(iPhoneStevenoteDate,
                     to: iPhoneStevenotePlusFiveMinutes,
                     toGranularity: .hour)
  == .orderedSame

// This returns true, because iPhoneStevenotePlusFiveMinutes comes 5 minutes AFTER
// iPhoneStevenoteDate, and we're comparing the two at the one-minute level
// of granularity.
userCalendar.compare(iPhoneStevenotePlusFiveMinutes,
                     to: iPhoneStevenoteDate,
                     toGranularity: .minute)
  == .orderedDescending

// This returns true, because iPhoneStevenoteDate and iPhoneStevenotePlusThreeHours
// ARE both within the same DAY.
userCalendar.compare(iPhoneStevenoteDate,
                     to: iPhoneStevenotePlusThreeHours,
                     toGranularity: .day)
  == .orderedSame
Here’s the playground containing all the code we just worked with:
import UIKit

// The user's calendar incorporates the user's locale and
// time zone settings, which means it's the one you'll use
// most often.
let userCalendar = Calendar.current


// A couple of Dates to work with
// ------------------------------

// Let's create a Date for the start of the Stevenote
// where the iPhone was introduced (January 9, 2007, 10:00:00 Pacific time)
// using DateComponents.
var iPhoneStevenoteDateComponents = DateComponents()
iPhoneStevenoteDateComponents.year = 2007
iPhoneStevenoteDateComponents.month = 1
iPhoneStevenoteDateComponents.day = 9
iPhoneStevenoteDateComponents.hour = 10
iPhoneStevenoteDateComponents.timeZone = TimeZone(abbreviation: "PST")
let iPhoneStevenoteDate = userCalendar.date(from: iPhoneStevenoteDateComponents)!

// Now let's create a Date for the start of the Stevenote
// where the iPad was introduced (January 27, 2010, 10:00:00 Pacific time)
// using DateFormatter.
var dateMakerFormatter = DateFormatter()
dateMakerFormatter.calendar = userCalendar
dateMakerFormatter.dateFormat = "MMM d, yyyy, hh:mm a zz"
let iPadStevenoteDate = dateMakerFormatter.date(from: "Jan 27, 2010, 10:00 AM PST")!


// Date comparisons, part 1
// ------------------------

// Did the iPhone Stevenote come BEFORE the iPad Stevenote?
iPhoneStevenoteDate < iPadStevenoteDate   // true

// Did the iPhone Stevenote come AFTER the iPad Stevenote?
iPhoneStevenoteDate > iPadStevenoteDate   // false

// Did the iPad Stevenote come BEFORE the iPhone Stevenote?
iPadStevenoteDate < iPhoneStevenoteDate   // false

// Does the iPad Stevenote come AFTER the iPhone Stevenote?
iPadStevenoteDate > iPhoneStevenoteDate   // true

// Do the iPhone Stevenote and the iPad Stevenote fall on DIFFERENT dates?
iPhoneStevenoteDate == iPadStevenoteDate  // false

// Do the iPhone Stevenote and the iPad Stevenote fall on the SAME date?
iPhoneStevenoteDate != iPadStevenoteDate  // true

// And just for kicks, some trivial comparisons.
iPhoneStevenoteDate == iPhoneStevenoteDate  // true
iPadStevenoteDate == iPadStevenoteDate  // true


// Date arithmetic, part 1:
// Number of seconds between the iPhone Stevenote and iPad Stevenote
// -----------------------------------------------------------------

// Number of seconds between the iPhone Stevenote and the iPad Stevenote
iPhoneStevenoteDate.timeIntervalSince(iPadStevenoteDate)  // -96249600

// Number of seconds between the iPad Stevenote and the iPhone Stevenote
iPadStevenoteDate.timeIntervalSince(iPhoneStevenoteDate)  // 96249600


// Date arithmetic, part 2:
// Number of days between the iPhone Stevenote and iPad Stevenote
// --------------------------------------------------------------

// The result in the sidebar should be:
// day: 1114 isLeapMonth: false
let daysBetweenStevenotes = userCalendar.dateComponents([.day],
                                                        from: iPhoneStevenoteDate,
                                                        to: iPadStevenoteDate)
daysBetweenStevenotes.day!  // 1114


// Date arithmetic, part 3:
// Number of weeks between the iPhone Stevenote and iPad Stevenote
// ---------------------------------------------------------------

// The result in the sidebar should be:
// weekOfYear: 159 isLeapMonth: false
let weeksBetweenStevenotes = userCalendar.dateComponents([.weekOfYear],
                                                         from: iPhoneStevenoteDate,
                                                         to: iPadStevenoteDate)
weeksBetweenStevenotes.weekOfYear!  // 159


// Date arithmetic, part 4:
// Number of years, months, and days between the
// iPhone Stevenote and iPad Stevenote
// ---------------------------------------------

// The result in the sidebar should be:
// year: 3 month: 0 day: 18 hour: 0 minute: 0 isLeapMonth: false
let yearsMonthsDaysHoursMinutesBetweenStevenotes = userCalendar.dateComponents([.year, .month, .day, .hour, .minute],
                                                                               from: iPhoneStevenoteDate,
                                                                               to: iPadStevenoteDate)
yearsMonthsDaysHoursMinutesBetweenStevenotes.year!    // 3
yearsMonthsDaysHoursMinutesBetweenStevenotes.month!   // 0
yearsMonthsDaysHoursMinutesBetweenStevenotes.day!     // 18
yearsMonthsDaysHoursMinutesBetweenStevenotes.hour!    // 0
yearsMonthsDaysHoursMinutesBetweenStevenotes.minute!  // 0


// Date addition, part 1:
// What's the last day of a 90-day warranty that starts today?
// -----------------------------------------------------------
userCalendar.date(byAdding: .day, value: 90, to: Date())  // 90 days from now


// Date addition, part 2:
// What was the date 5 weeks ago?
// ------------------------------
userCalendar.date(byAdding: .weekOfYear, value: -5, to: Date())


// Date addition, part 3:
// What time will it be 4 hours and 30 minutes from now,
// and 4 hours and 30 minutes ago?
// -----------------------------------------------------

// What time will it be 4 hours and 30 minutes from now?
// First, we need to define a DateComponents struct representing
// a time interval of 4 hours and 30 minutes
var fourHoursThirtyMinutes = DateComponents()
fourHoursThirtyMinutes.hour = 4
fourHoursThirtyMinutes.minute = 30

// Now add the interval to the Date
let fourHoursThirtyMinutesFromNow = userCalendar.date(byAdding: fourHoursThirtyMinutes, to: Date()) // 4 hours and 30 minutes from now

// Now, let's define a DateComponents struct representing
// a time interval of -4 hours and -30 minutes
var minusFourHoursThirtyMinutes = DateComponents()
minusFourHoursThirtyMinutes.hour = -4
minusFourHoursThirtyMinutes.minute = -30

// Now add the interval to the Date
let fourHoursThirtyMinutesAgo = userCalendar.date(byAdding: fourHoursThirtyMinutes, to: Date()) // 4 hours and 30 minutes ago


// Date comparisons, part 2:
// Making Date comparisons a little more "human"
// ---------------------------------------------

// Let's define some Dates relative to iPhoneStevenoteDate
let iPhoneStevenotePlusOneSecond = userCalendar.date(byAdding: .second, value: 1, to: iPhoneStevenoteDate)!
let iPhoneStevenotePlusFiveMinutes = userCalendar.date(byAdding: .minute, value: 5, to: iPhoneStevenoteDate)!
let iPhoneStevenotePlusThreeHours = userCalendar.date(byAdding: .hour, value: 3, to: iPhoneStevenoteDate)!

// This returns false, because iPhoneStevenoteDate and iPhoneStevenotePlusOneSecond
// are NOT both within the same SECOND.
userCalendar.compare(iPhoneStevenoteDate,
                     to: iPhoneStevenotePlusOneSecond,
                     toGranularity: .second)
  == .orderedSame

// This returns true, because iPhoneStevenoteDate comes one second BEFORE
// iPhoneStevenotePlusOneSecond, and we're comparing the two at the one-second
// level of granularity.
userCalendar.compare(iPhoneStevenoteDate,
                     to: iPhoneStevenotePlusOneSecond,
                     toGranularity: .second)
  == .orderedAscending

// This returns true, because iPhoneStevenoteDate and iPhoneStevenotePlusOneSecond
// ARE both within the same MINUTE.
userCalendar.compare(iPhoneStevenoteDate,
                     to: iPhoneStevenotePlusOneSecond,
                     toGranularity: .minute)
  == .orderedSame

// This returns true, because iPhoneStevenoteDate and iPhoneStevenotePlusFiveMinutes
// ARE both within the same HOUR.
userCalendar.compare(iPhoneStevenoteDate,
                     to: iPhoneStevenotePlusFiveMinutes,
                     toGranularity: .hour)
  == .orderedSame

// This returns true, because iPhoneStevenotePlusFiveMinutes comes 5 minutes AFTER
// iPhoneStevenoteDate, and we're comparing the two at the one-minute level
// of granularity.
userCalendar.compare(iPhoneStevenotePlusFiveMinutes,
                     to: iPhoneStevenoteDate,
                     toGranularity: .minute)
  == .orderedDescending

// This returns true, because iPhoneStevenoteDate and iPhoneStevenotePlusThreeHours
// ARE both within the same DAY.
userCalendar.compare(iPhoneStevenoteDate,
                     to: iPhoneStevenotePlusThreeHours,
                     toGranularity: .day)
  == .orderedSame
In the next installment, we’ll look at making working with dates and times more Swift-like.

…namely, Whisk(e)y and bacon. Now my communications needs have been met — I just have to wait for the over-the-air update to come out for my Moto G4.
Click the diagram to see it at full size.
In the previous article in this series, we looked at three key structs for date and time programming in Swift:
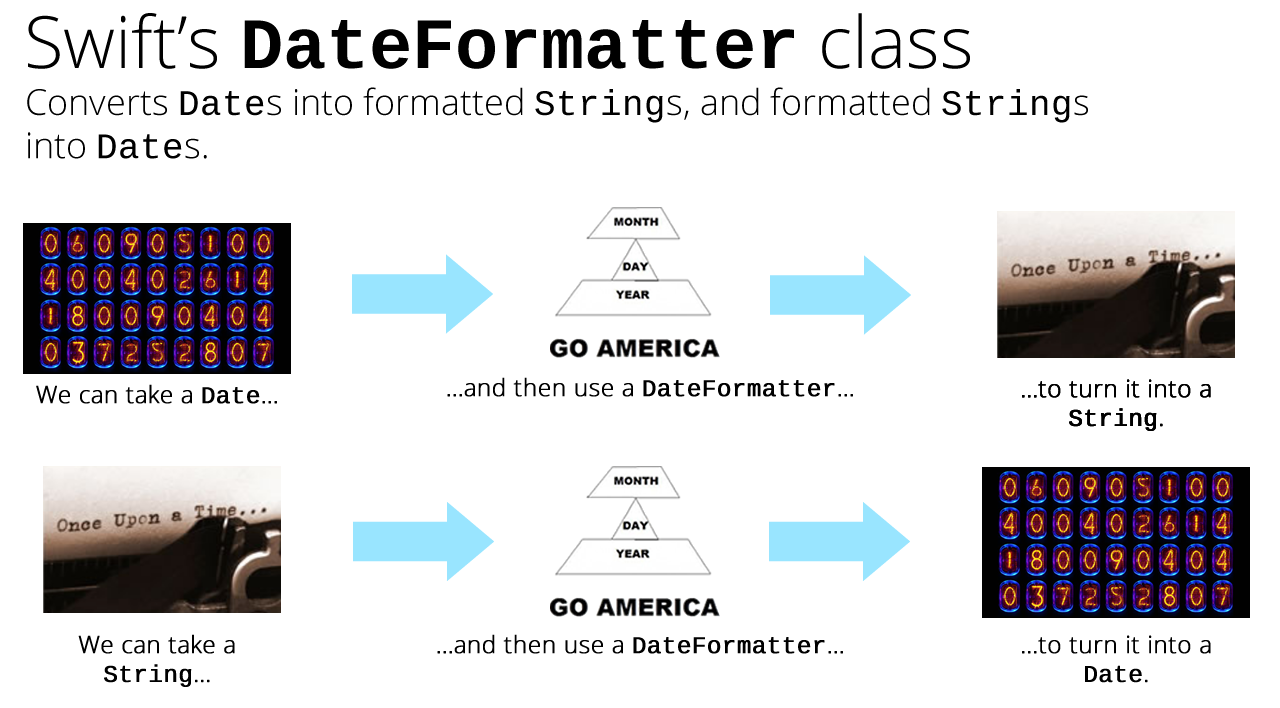
Date represents a single point in time, using a format that can easily be translated into just about any calendar and time-reckoning system: a number of seconds relative to the start of the Third Millennium (January 1, 2001, 00:00:00 UTC).DateComponents specifies time units like year, month, day, hour, minute, and more to represent either a point in time or a duration of time.Calendar provides a context for Dates, and converts Dates to DateComponents and DateComponents to Dates.These structs all deal with the internal representation of dates and times. In this article, we’ll look at the DateFormatter class, which allows us to deal with their external representation — by converting Dates into Strings, and properly-formatted Strings into Dates.
Date into a String, part 1: Just the date
Start a new playground and enter the following code, which gives us a Date that we can format — the day when Alexander Graham Bell made the very first phone call:
// The user's calendar incorporates the user's locale and
// time zone settings, which means it's the one you'll use
// most often.
let userCalendar = Calendar.current

// On March 10, 1876, Alexander Graham Bell
// made the first land line phone call.
var firstLandPhoneCallDateComponents = DateComponents()
firstLandPhoneCallDateComponents.year = 1876
firstLandPhoneCallDateComponents.month = 3
firstLandPhoneCallDateComponents.day = 10
let firstLandPhoneCallDate = userCalendar.date(from: firstLandPhoneCallDateComponents)!

// The value "Mar 10, 1876, 12:00 AM" should appear in the
// playground sidebar.
firstLandPhoneCallDate
Now let’s try turning this date into a string with a DateFormatter:
let myFormatter = DateFormatter()

myFormatter.string(from: firstLandPhoneCallDate) // What gives?
You may be surprised that the result is an empty String. This can be fixed by specifying a dateStyle:
let myFormatter = DateFormatter()

myFormatter.string(from: firstLandPhoneCallDate) // What gives?

myFormatter.dateStyle = .short
myFormatter.string(from: firstLandPhoneCallDate) // "3/10/76"
Let’s try the other dateStyles:
let myFormatter = DateFormatter()

myFormatter.string(from: firstLandPhoneCallDate) // What gives?

myFormatter.dateStyle = .short
myFormatter.string(from: firstLandPhoneCallDate) // "3/10/76"

myFormatter.dateStyle = .medium
myFormatter.string(from: firstLandPhoneCallDate) // "Mar 10, 1876"

myFormatter.dateStyle = .long
myFormatter.string(from: firstLandPhoneCallDate) // "March 10, 1876"

myFormatter.dateStyle = .full
myFormatter.string(from: firstLandPhoneCallDate) // "Friday, March 10, 1876"

myFormatter.dateStyle = .none
myFormatter.string(from: firstLandPhoneCallDate) // ""
Why would there be a dateStyle called .none? I’ll explain in a little bit.
Date into a String, part 2: A date and a time
Let’s work with an event for which we know both the date and time: the “Stevenote” where the iPad was introduced, which started on January 27, 2010, at 10:00 a.m. Pacific Time (UTC-8). We’ll define this as a Date by adding the following code:
// (Previous code goes here)

// The Stevenote where the iPad was introduced took place on
// January 27, 2010 at 10:00 a.m. Pacific time.
var iPadStevenoteDateComponents = DateComponents()
iPadStevenoteDateComponents.year = 2010
iPadStevenoteDateComponents.month = 1
iPadStevenoteDateComponents.day = 27
iPadStevenoteDateComponents.hour = 10
iPadStevenoteDateComponents.minute = 0
iPadStevenoteDateComponents.timeZone = TimeZone(identifier: "America/Los_Angeles")
let iPadStevenoteDate = userCalendar.date(from: iPadStevenoteDateComponents)!
Now that we have a date and time, let’s format it using the dateStyle and timeStyle properties:
// (Previous code goes here)

myFormatter.dateStyle = .short
myFormatter.timeStyle = .short
myFormatter.string(from: iPadStevenoteDate)  // "1/27/10, 1:00 PM"

myFormatter.dateStyle = .medium
myFormatter.timeStyle = .medium
myFormatter.string(from: iPadStevenoteDate)  // "Jan 27, 2010, 1:00:00 PM"

myFormatter.dateStyle = .long
myFormatter.timeStyle = .long
myFormatter.string(from: iPadStevenoteDate)  // "January 27, 2010 at 1:00:00

myFormatter.dateStyle = .full
myFormatter.timeStyle = .full
myFormatter.string(from: iPadStevenoteDate)  // "Wednesday, January 27, 2010 at 1:00:00 PM Eastern Standard Time"
Now that we’re working with a date and time, let’s see what the .none style is for:
// (Previous code goes here)

// Show only the time
myFormatter.dateStyle = .none
myFormatter.timeStyle = .full
myFormatter.string(from: iPadStevenoteDate)  // "1:00:00 PM Eastern Standard Time"

// Show only the date
myFormatter.dateStyle = .full
myFormatter.timeStyle = .none
myFormatter.string(from: iPadStevenoteDate)  // "Wednesday, January 27, 2010"
Remember that in Swift, the Date struct represents a single point in time, which has both a date and a time. The .none style for DateFormatter‘s dateStyle and timeStyle properties allows us to create a String representation of a Date that shows only its date or time part.
Date into a String, part 3: Custom date/time formats
Before we begin working with custom date/time formats, I should point out that if you need to display a Date as a String to the user, it’s best if you use Swift’s built-in dateStyle and timeStyle values. They display dates and times properly, according to the user’s settings, which include country and language. You’d be surprised how date formats differ from culture to culture, and it’s better to let Swift do the formatting work.
However, there are times when you need to format dates and times in a specific way that doesn’t match the styles provided by DateFormatter‘s dateStyle and timeStyle properties, such as when dealing with certain APIs. That’s where DateFormatter‘s dateFormat property comes in handy:
// (Previous code goes here)

// Setting the locale to POSIX ensures that the user's locale
// won't be used to format the Date.
myFormatter.locale = Locale(identifier: "en_US_POSIX")

// DateFormatter's format string uses the date format specifiers
// spelled out in Unicode Technical Standard #35 (located at
// http://www.unicode.org/reports/tr35/tr35-25.html#Date_Format_Patterns)
myFormatter.dateFormat = "y-MM-dd"
myFormatter.string(from: iPadStevenoteDate)  // "2010-01-27"
You can use the date format specifiers listed in Appendix F of the Unicode Technical Standard #35 to define the formatting String for the dateFormat property. Here are some examples:
// (Previous code goes here)

myFormatter.dateFormat = "'Year: 'y' Month: 'M' Day: 'd"
myFormatter.string(from: iPadStevenoteDate)  // "Year: 2010 Month: 1 Day: 27"

myFormatter.dateFormat = "MM/dd/yy"
myFormatter.string(from: iPadStevenoteDate)  // "01/27/10"

myFormatter.dateFormat = "MMM dd, yyyy"
myFormatter.string(from: iPadStevenoteDate)  // "Jan 27, 2010"

myFormatter.dateFormat = "E MMM dd, yyyy"
myFormatter.string(from: iPadStevenoteDate)  // "Wed Jan 27, 2010"

myFormatter.dateFormat = "EEEE, MMMM dd, yyyy' at 'h:mm a."
myFormatter.string(from: iPadStevenoteDate)  // "Wednesday, January 27, 2010 at 1:00 PM."

myFormatter.dateFormat = "EEEE, MMMM dd, yyyy' at 'h:mm a zzzz."
myFormatter.string(from: iPadStevenoteDate)  // "Wednesday, January 27, 2010 at 1:00 PM Eastern Standard Time."
String into a Date
DateFormatter works the other way — just as it can convert Dates to Strings, it can also convert Strings to Dates. By setting its dateFormat to the format of the String it should expect, you can use its date(from:) method to convert a String into a Date:
// (Previous code goes here)

myFormatter.dateFormat = "yyyy/MM/dd hh:mm Z"

// Here's a date in the format specified by the string
// assigned to dateFormat:
let newDate1 = myFormatter.date(from: "2015/03/07 11:00 -0500")    // Date - "Mar 7, 2015, 11:00 AM"
// And here's the same date, but in a different format:
let newDate2 = myFormatter.date(from: "Mar 7, 2015, 11:00:00 AM")  // nil
Let’s change the dateFormat string and try it again:
// (Previous code goes here)

// Let's change the date format strings and try
// date(from:) with the same two strings:
myFormatter.dateFormat = "MMM d, yyyy, hh:mm a zz"

myFormatter.date(from: "2015/03/07 11:00 -0500")     // nil
myFormatter.date(from: "Mar 7, 2015, 11:00 AM EST")  // "Mar 7, 2015, 11:00 AM"
Here’s a playground containing all the code we just worked with:
import UIKit

// Let’s convert a Date into a String, part 1: Just the date
// =========================================================

// The user's calendar incorporates the user's locale and
// time zone settings, which means it's the one you'll use
// most often.
let userCalendar = Calendar.current

// On March 10, 1876, Alexander Graham Bell
// made the first land line phone call.
var firstLandPhoneCallDateComponents = DateComponents()
firstLandPhoneCallDateComponents.year = 1876
firstLandPhoneCallDateComponents.month = 3
firstLandPhoneCallDateComponents.day = 10
let firstLandPhoneCallDate = userCalendar.date(from: firstLandPhoneCallDateComponents)!

// The value "Mar 10, 1876, 12:00 AM" should appear in the
// playground sidebar.
firstLandPhoneCallDate

let myFormatter = DateFormatter()

myFormatter.string(from: firstLandPhoneCallDate) // What gives?

myFormatter.dateStyle = .short
myFormatter.string(from: firstLandPhoneCallDate) // "3/10/76"

myFormatter.dateStyle = .medium
myFormatter.string(from: firstLandPhoneCallDate) // "Mar 10, 1876"

myFormatter.dateStyle = .long
myFormatter.string(from: firstLandPhoneCallDate) // "March 10, 1876"

myFormatter.dateStyle = .full
myFormatter.string(from: firstLandPhoneCallDate) // "Friday, March 10, 1876"

myFormatter.dateStyle = .none
myFormatter.string(from: firstLandPhoneCallDate) // ""


// Let’s convert a Date into a String, part 2: A date and a time
// =============================================================

// The Stevenote where the iPad was introduced took place on
// January 27, 2010 at 10:00 a.m. Pacific time.
var iPadStevenoteDateComponents = DateComponents()
iPadStevenoteDateComponents.year = 2010
iPadStevenoteDateComponents.month = 1
iPadStevenoteDateComponents.day = 27
iPadStevenoteDateComponents.hour = 10
iPadStevenoteDateComponents.minute = 0
iPadStevenoteDateComponents.timeZone = TimeZone(identifier: "America/Los_Angeles")
let iPadStevenoteDate = userCalendar.date(from: iPadStevenoteDateComponents)!

myFormatter.dateStyle = .short
myFormatter.timeStyle = .short
myFormatter.string(from: iPadStevenoteDate)  // "1/27/10, 1:00 PM"

myFormatter.dateStyle = .medium
myFormatter.timeStyle = .medium
myFormatter.string(from: iPadStevenoteDate)  // "Jan 27, 2010, 1:00:00 PM"

myFormatter.dateStyle = .long
myFormatter.timeStyle = .long
myFormatter.string(from: iPadStevenoteDate)  // "January 27, 2010 at 1:00:00

myFormatter.dateStyle = .full
myFormatter.timeStyle = .full
myFormatter.string(from: iPadStevenoteDate)  // "Wednesday, January 27, 2010 at 1:00:00 PM Eastern Standard Time"

// Show only the time
myFormatter.dateStyle = .none
myFormatter.timeStyle = .full
myFormatter.string(from: iPadStevenoteDate)  // "1:00:00 PM Eastern Standard Time"

// Show only the date
myFormatter.dateStyle = .full
myFormatter.timeStyle = .none
myFormatter.string(from: iPadStevenoteDate)  // "Wednesday, January 27, 2010"


// Let’s convert a Date into a String, part 3: Custom date/time formats
// ====================================================================

// Setting the locale to POSIX ensures that the user's locale
// won't be used to format the Date.
myFormatter.locale = Locale(identifier: "en_US_POSIX")

// DateFormatter's format string uses the date format specifiers
// spelled out in Unicode Technical Standard #35 (located at
// http://www.unicode.org/reports/tr35/tr35-25.html#Date_Format_Patterns)
myFormatter.dateFormat = "y-MM-dd"
myFormatter.string(from: iPadStevenoteDate)  // "2010-01-27"

myFormatter.dateFormat = "'Year: 'y' Month: 'M' Day: 'd"
myFormatter.string(from: iPadStevenoteDate)  // "Year: 2010 Month: 1 Day: 27"

myFormatter.dateFormat = "MM/dd/yy"
myFormatter.string(from: iPadStevenoteDate)  // "01/27/10"

myFormatter.dateFormat = "MMM dd, yyyy"
myFormatter.string(from: iPadStevenoteDate)  // "Jan 27, 2010"

myFormatter.dateFormat = "E MMM dd, yyyy"
myFormatter.string(from: iPadStevenoteDate)  // "Wed Jan 27, 2010"

myFormatter.dateFormat = "EEEE, MMMM dd, yyyy' at 'h:mm a."
myFormatter.string(from: iPadStevenoteDate)  // "Wednesday, January 27, 2010 at 1:00 PM."

myFormatter.dateFormat = "EEEE, MMMM dd, yyyy' at 'h:mm a zzzz."
myFormatter.string(from: iPadStevenoteDate)  // "Wednesday, January 27, 2010 at 1:00 PM Eastern Standard Time."


// Let’s convert a String into a Date
// ==================================

myFormatter.dateFormat = "yyyy/MM/dd hh:mm Z"

// Here's a date in the format specified by the string
// assigned to dateFormat:
myFormatter.date(from: "2015/03/07 11:00 -0500")     // Date - "Mar 7, 2015, 11:00 AM"
// And here's the same date, but in a different format:
myFormatter.date(from: "Mar 7, 2015, 11:00 AM EST")  // nil


// Let's change the date format strings and try
// date(from:) with the same two strings:
myFormatter.dateFormat = "MMM d, yyyy, hh:mm a zz"

myFormatter.date(from: "2015/03/07 11:00 -0500")     // nil
myFormatter.date(from: "Mar 7, 2015, 11:00 AM EST")  // "Mar 7, 2015, 11:00 AM"
In the next installment, we’ll look at date calculations.

With over 25 million users playing every day, and downloads and active users surpassing even Twitter and Tinder, Pokémon Go is turning out to be one of the most popular mobile applications of all time. According to Data Security Law Blog, it also highlights the risks in BYOD (Bring Your Own Device) policies.
With a BYOD device that has Pokémon Go installed, the risks come from the security — or more accurately, insecurity — of the Pokémon Go app itself. Earlier versions of the game gave the app full access to the user’s complete Google account profile and related information, including Google-accessible email accounts and search history. While it’s not likely that this now-fixed security hole led to any breaches, it’s a prime example of how a suddenly popular app running on a BYOD device can lead to trouble.
All this is still new territory — the smartphone as we currently know it won’t even turn 10 until next year — and businesses would do well to watch the effects of apps like Pokémon Go, and alter their mobile policies accordingly.

As we’ve observed before, mobile devices are more personal than even “personal” computers. People don’t want to part with them, which is why they prefer to bring them to work — and use them for work. This attachment to our mobile devices, for which we’re finding more and more uses, is why at least two-thirds of employees are using their own mobile devices in the course of doing their jobs.
Tech.co has a brief but useful article that summarizes the big pros and cons of BYOD, explains what the general best practices are, and explains why training employees is key to a successful BYOD implementation. If your organization is considering or just starting with a BYOD program, it would be worth your time to read this article.

In a recent entry on their blog, Heimdal Security provide these BYOD statistics:
In the same article, they list eleven common sense (which is uncommon) steps for BYOD users to secure the personal mobile devices they use for work. As they say, “security is each user’s own business”.

It’s been a couple of months since the last Tampa iOS Meetup, and with summer drawing to a close and iOS 10 coming very soon, it’s time to kick things back into high gear. It’s going to be an interesting fall, what with the coming changes…

 The first change is that Angela, who originally put this Meetup group together, landed a job in San Francisco and moved there. I want to congratulate her on seizing this opportunity — I did the same thing during the dot-com bubble of the late ’90s — and wish her the very best in her adventures in the other Bay Area. I’d also like to thank her for all the work she’s done for this Meetup group, which wouldn’t even exist without the initial spark that she provided.
As for me, I plan to stick around, and will continue in my role as this Meetup group’s organizer, lead speaker, and accordion player.
The next change comes from Apple, in the form of iOS 10, Xcode 8, and Swift 3, and we’ll be talking about what these new versions mean for you as iOS developers over the next couple of meetups.
The date for the next meetup is to be determined, but I’m aiming for early September, and the topic will be Building iMessage sticker packs and messaging apps for iOS 10. iMessage is one of the most-used iOS apps, and a lot of people seem to like adding a little flair to their communications, so the introduction of sticker packs and iMessage apps represents an opportunity for the developer looking to make a splash. Sticker packs have the added bonus of not needed any programming to develop.
The final change is one that I’d like your opinion on. I’m thinking of expanding the subject area of our Meetup group to cover these topics:
In other words, I’m thinking about expanding our group’s coverage to while I like calling development for “Tiny shiny platforms”. Would this be something that you’d be interested in, or would you rather stick to just iOS? I’d love to hear what you think — let me know by dropping me a line at joey@joeydevilla.com!