If you’re just getting started with date and time programming in Swift 3, chances are that you probably did some Googling, found something about NSDate and its companion classes in Apple’s documentation and promptly got confused. Let me reassure you that it isn’t your fault.
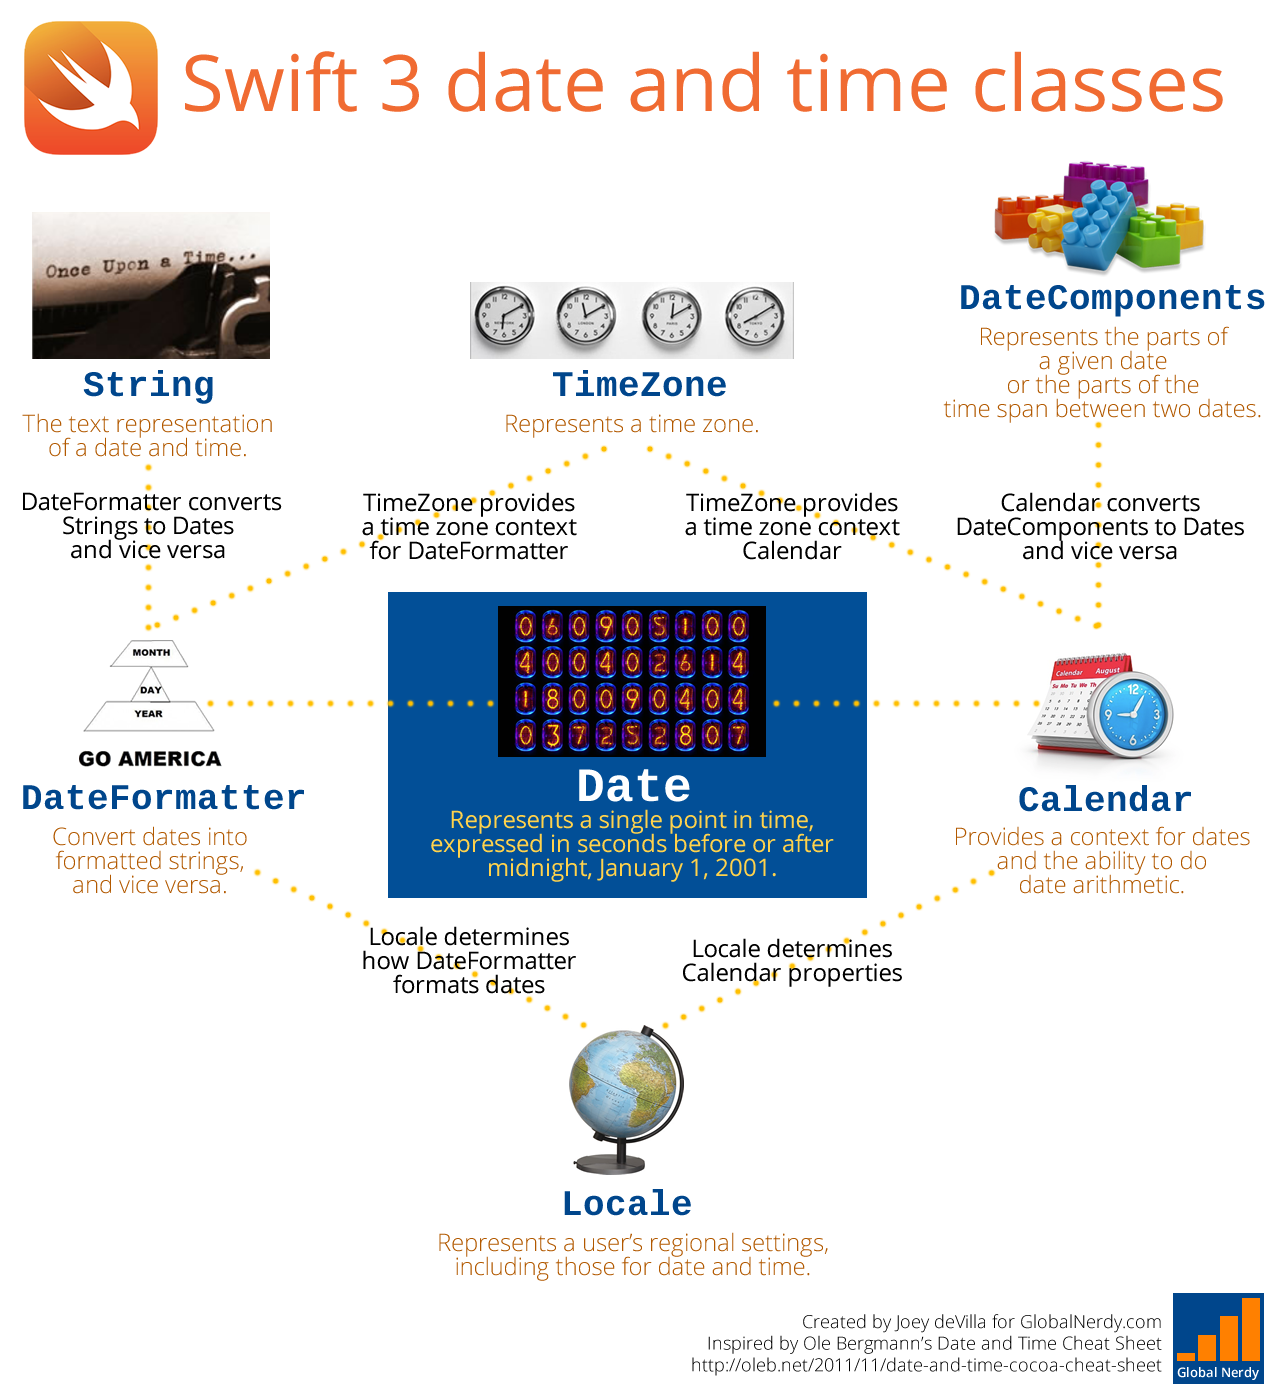
For starters, a lot of the documentation out there is in Objective-C, which can throw you off if you’re not familiar with its [instance method: parameter2: parameter3:] method-calling syntax. There’s also the fact that Apple recently removed the NS prefix from Cocoa’s class names — NSDate is now just plain ol’ Date, NSCalendar is now Calendar, NSDateComponents is now DateComponents, and so on. And finally, in the move towards protocol-oriented programming, Apple has changed some classes to structs, including many of the classes for working with dates and times.
And finally, if you’re coming to Swift 3 from JavaScript, which makes do with a single object type called Date, the idea of having this set of classes just to handle dates and times looks like overkill:
Click the diagram to see it at full size.
In this series of articles, we’ll look at date and time programming in Swift 3. By its end, you’ll have a firm grasp on the topic.
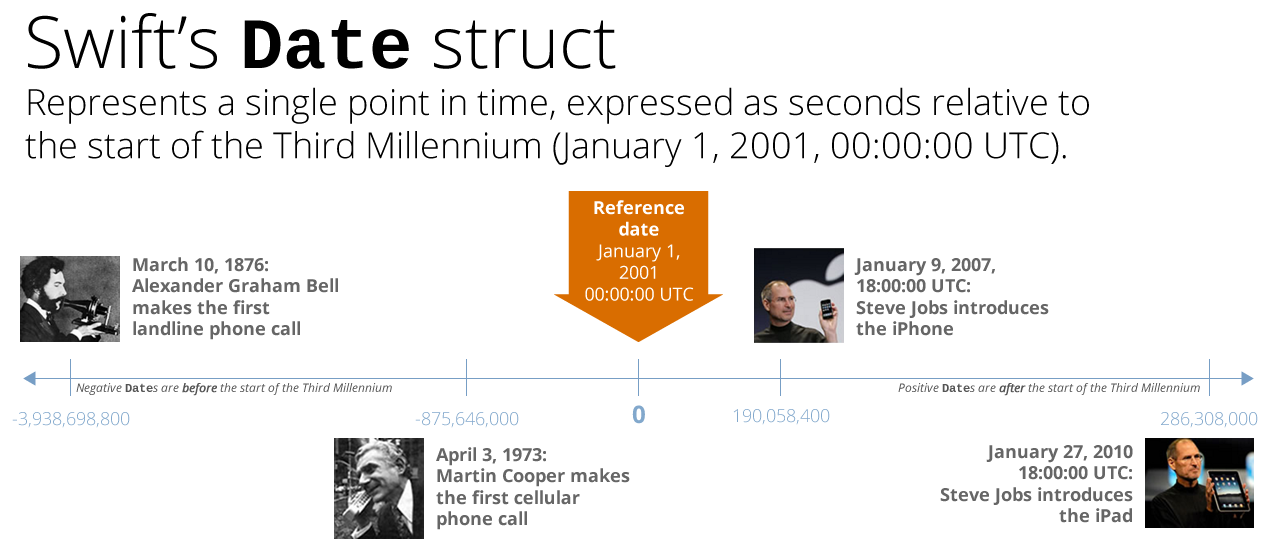
Swift’s Date struct represents dates and times
Click the diagram to see it at full size.
In Swift, dates and times are represented by instances of Date, which is a struct.Date is independent of any time zone, or even any calendar system. It gets this independence through the way it represents time: as a number of seconds relative to the start of the Third Millennium, January 1, 2001, 00:00:00 UTC.
The following playground code shows the various ways of creating Dates:
// To create a Date representing the current date and time,
// simply initialize a new Date.
let now = Date()


// The other initializers expect arguments of type TimeInterval,
// which is a typealias for Double.


// To create a Date a specified number of seconds before or after
// the current date and time, use the "timeIntervalSinceNow" initializer.
let fiveMinutesAgo = Date(timeIntervalSinceNow: -5 * 60)
let fiveMinutesFromNow = Date(timeIntervalSinceNow: 5 * 60)


// To create a Date relative to Swift's reference date and time,
// use the "timeIntervalSinceReferenceDate" initializer.

// The first mobile phone call was made on April 3, 1973.
// We don't know the exact time the call was made, but it happened
// sometime during business hours in New York City, in the U.S. Eastern
// Time Zone. Noon that day was 875,602,800 seconds prior to the
// reference date and time.
let firstMobileCallDate = Date(timeIntervalSinceReferenceDate: -875_602_800)

// The "Stevenote" where the iPhone was introduced started on January 9, 2007,
// 10 a.m. Pacific time, 190,058,400 seconds after the reference date and time.
let iPhoneStevenoteDate = Date(timeIntervalSinceReferenceDate: 190_058_400)


// Unix time (a.k.a. POSIX time or Epoch Time) is the way time is represented
// by Unix, Unix-like, and other operating systems. It defines time as a
// number of seconds after the Unix Epoch, January 1, 1970, 00:00:00 UTC.
// To create a Date relative to the Unix Epoch, use the
// "timeIntervalSince1970" initializer.
let oneYear = TimeInterval(60 * 60 * 24 * 365)
let newYears1971 = Date(timeIntervalSince1970: oneYear)
let newYears1969 = Date(timeIntervalSince1970: -oneYear)


// To create a Date relative to another Date, use the
// "timeInterval:Since:" initializer.

// The "Stevenote" where the iPad was introduced started on January 27, 2010,
// 10 a.m. Pacific time, 96,249,600 seconds after the start of the iPhone Stevenote
// three years earlier.
let secondsBetweeniPhoneAndiPadStevenote = TimeInterval(96_249_600)
let iPadStevenoteDate = Date(timeInterval: secondsBetweeniPhoneAndiPadStevenote,
                             since: iPhoneStevenoteDate)
Of course, we don’t think of dates and times in terms of seconds relative to the start of the Third Millennium, or the start of the Unix Epoch, or any other arbitrary date and time. That’s why Swift features a couple of other structs to help us make sense of Dates: Calendar and DateComponents.
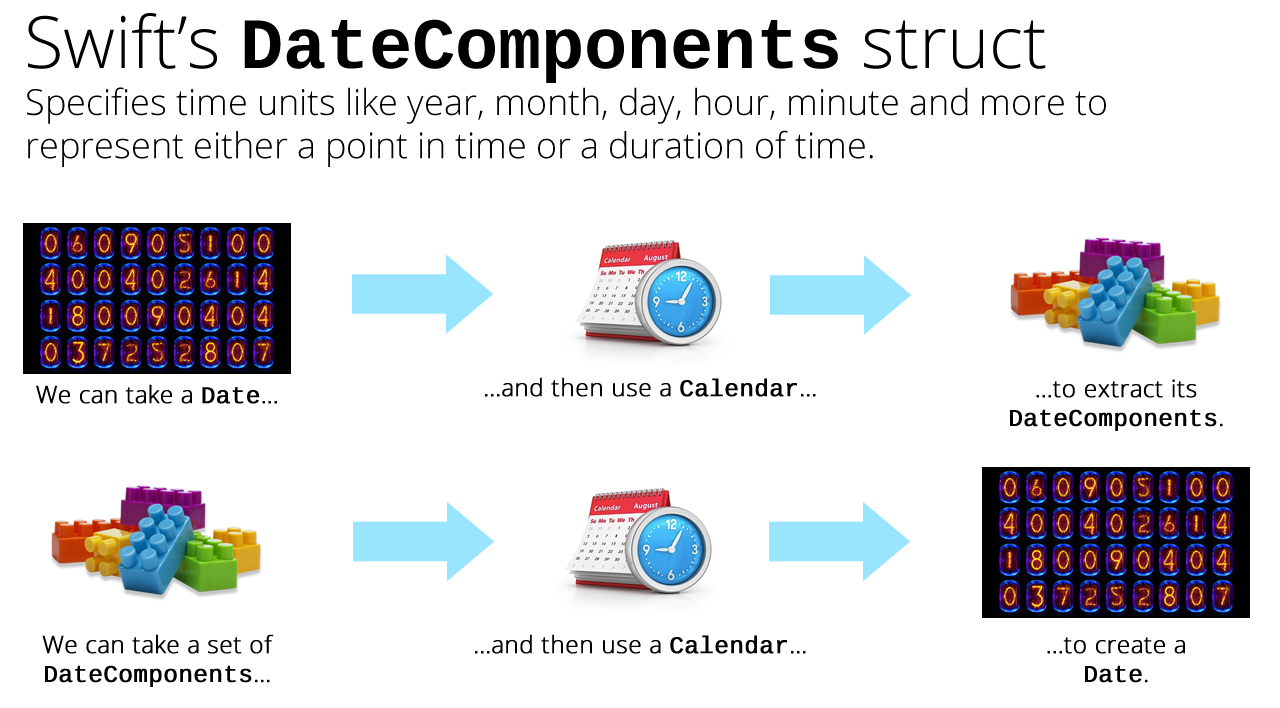
Calendars give dates context, DateComponents let us assemble dates or break dates apart
Click the diagram to see it at full size.
Think of the Calendar struct as a way to view Dates in a way that makes more sense to us: not as a number of seconds before or after January 1, 2001 00:00:00 UTC, but in terms of a year, month, day, hour, minute, and more.
The Calendar struct supports 16 different calendar systems, including the Gregorian calendar (a.k.a. the Western or Christian calendar), which is likely the one you use the most. Consider Swift’s reference date:
In a Date struct, its value is 0.
In the Gregorian calendar, this date has the following values:
In most apps, you’ll likely be using the Gregorian calendar, so Calendar‘s real use is to convert Dates into DateComponents, and DateComponents into Dates:
Click the diagram to see it at full size.
The DateComponents struct is an assembly of properties that make up a date, such as year, month, date, hour, minute, second, and so on. DateComponents instances can be used to represent either a specific point in time, or a duration of time.
Using both Calendar and DateComponents structs, we can perform these key actions:
Build Dates using properties such as year, month, day, hour, and minute rather than a number of second relative to a reference date, and
extract properties from Dates, such as year, month, day, hour, and minute.
Let’s start creating some Dates with the help of Calendar and DateComponents.
Let’s create a Date given a year, month, and day, part 1
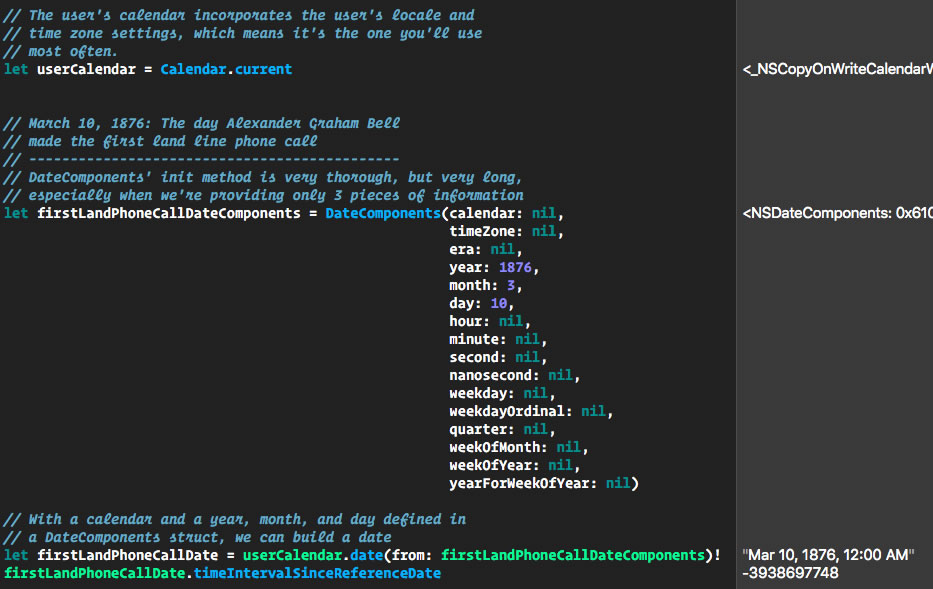
// The user's calendar incorporates the user's locale and
// time zone settings, which means it's the one you'll use
// most often.
let userCalendar = Calendar.current
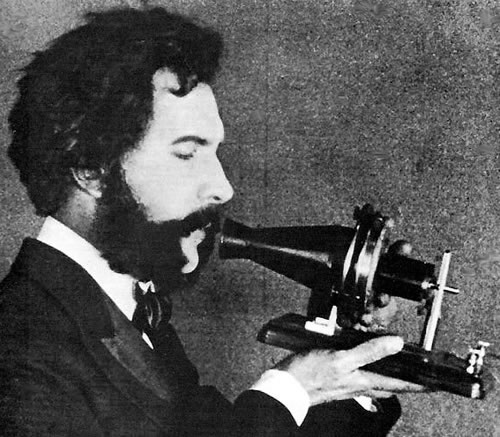
// March 10, 1876: The day Alexander Graham Bell
// made the first land line phone call
// ---------------------------------------------
// DateComponents' init method is very thorough, but very long,
// especially when we're providing only 3 pieces of information
let firstLandPhoneCallDateComponents = DateComponents(calendar: nil,
timeZone: nil,
era: nil,
year: 1876,
month: 3,
day: 10,
hour: nil,
minute: nil,
second: nil,
nanosecond: nil,
weekday: nil,
weekdayOrdinal: nil,
quarter: nil,
weekOfMonth: nil,
weekOfYear: nil,
yearForWeekOfYear: nil)
// With a calendar and a year, month, and day defined in
// a DateComponents struct, we can build a date
let firstLandPhoneCallDate = userCalendar.date(from: firstLandPhoneCallDateComponents)!
firstLandPhoneCallDate.timeIntervalSinceReferenceDate
In the code, we:
Get the user’s current Calendar.
Create an DateComponents struct, firstLandPhoneCallDateComponents, providing values for the year, month, and day parameters, and nil for all the others.
Use the user’s Calendar to create firstLandPhoneCallDate using firstLandPhoneCallDateComponents.
Get the internal representation of the Date.
Here’s a screenshot of the playground code as seen on my computer, whose time zone is set to “US/Eastern” (UTC-5):
Click the screenshot to see it at full size.
Note the results in the sidebar at the lower right-hand corner:
firstLandPhoneCallDate‘s value corresponds to the DateComponents properties we set: March 10, 1876, 12:00 a.m..
firstLandPhoneCallDate‘s internal value, contained within its timeIntervalSinceReferenceDate property, is -3,938,697,748, which indicates that Alexander Graham Bell’s inaugural phone call was made nearly 4 billion seconds prior to the start of the Third Millennium.
Let’s create a Date given a year, month, and day, part 2
Let’s try creating another momentous date in phone history: the day when Martin Cooper made the first cellular phone call, April 3, 1973. We’ll do it differently this time, by creating a blank DateComponents struct, and then setting its year, month, and day properties. Add the following code to the code above:
// (Previous code goes here)

// April 3, 1973: The day Martin Cooper
// made the first cellular phone call
// ------------------------------------
// This time, we'll create a blank DateComponents struct
// and set its year, month, and day properties.
var firstCellPhoneCallDateComponents = DateComponents()
firstCellPhoneCallDateComponents.year = 1973
firstCellPhoneCallDateComponents.month = 4
firstCellPhoneCallDateComponents.day = 3

let firstCellPhoneCallDate = userCalendar.date(from: firstCellPhoneCallDateComponents)!
firstCellPhoneCallDate.timeIntervalSinceReferenceDate
In the code, we:
Create an empty DateComponents struct, firstCellPhoneCallDateComponents.
Set the year, month, and day properties of firstCellPhoneCallDateComponents to correspond to the date April 3, 1973.
Use the user’s Calendar to create firstCellPhoneCallDate using firstCellPhoneCallDateComponents.
Get the internal representation of the Date.
Here’s a screenshot of the results:
Click the screenshot to see it at full size.
Let’s create a Date: What date does National Donut Day — the first Friday in June — fall on in 2017?
// (Previous code goes here)

// The first Friday in June, 2017:
// National Donut Day
// -------------------------------
var donutDayComponents = DateComponents()
donutDayComponents.year = 2017
donutDayComponents.month = 6
// We're looking for a Friday...
donutDayComponents.weekday = 6
// ...and it needs to be the first Friday of the month
donutDayComponents.weekdayOrdinal = 1

let donutDayDate = userCalendar.date(from: donutDayComponents)!
You should be familiar with the year and monthDayComponents properties by now, and we’re using a couple that may be new to you:
weekday: Specifies a day of the week. With the Gregorian calendar, valid values are 1 through 7, where 1 is Sunday, 2 is Monday, 3 is Tuesday, and so on. Since we’re looking for a Friday, we’ve set this value to 6.
weekdayOrdinal: Specifies the order of the given weekday in the next larger specified calendar unit. Since we set weekday to 6 and set this value to 1, and since the next largest specified calendar unit was month, we’ll get the date of the first Friday of the month.
If you check the value of donutDayDate in the playground’s sidebar, you should see Jun 2, 2017, 12:00 AM. If you look at a calendar, you’ll confirm that it is indeed the first Friday of June 2017.
In the spirit of the fake book cover shown above, let’s see what happens if we don’t specify the month. Comment out the following line from the code you just added…
donutDayComponents.month = 6
…so that the code now looks like this:
// The first Friday in June, 2017:
// National Donut Day
// -------------------------------
var donutDayComponents = DateComponents()
donutDayComponents.year = 2017
//donutDayComponents.month = 6
// We're looking for a Friday...
donutDayComponents.weekday = 6
// ...and it needs to be the first Friday of the month
donutDayComponents.weekdayOrdinal = 1

let donutDayDate = userCalendar.date(from: donutDayComponents)!
When you run the code, you’ll see that the date for donutDayDate is now Jan 6 2017, 12:00 AM. Now that we’re specifying only a year and not a month, Swift interprets the combination of donutDayComponents.weekday = 6 and donutDayComponents.weekdayOrdinal = 1 to mean “the first Friday of the year”. If you look at a calendar, you’ll confirm that January 6, 2017 is indeed the first Friday of the year.
Let’s create one more Date: 5:00.pm. on Thursday of the 18th week of 2017…in Tokyo.
The great thing about Swift’s Calendar class is that it does its best to work with the DateComponents that you give it, and DateComponents gives you all sorts of ways to specify a date. Let’s assume for a moment that you’re in Japan and want to leave work at the ridiculously early hour of 5 p.m. and have some relaxing Suntory times, and it just happens to be the 18th week of 2017. What’s the date?
The answer comes from this code:
// (Previous code goes here)

// Thursday on the 18th week of 2017 in Tokyo
// ------------------------------------------
var thursday5pm18thWeek2017TokyoDateComponents = DateComponents()
thursday5pm18thWeek2017TokyoDateComponents.year = 2017
thursday5pm18thWeek2017TokyoDateComponents.weekOfYear = 18
thursday5pm18thWeek2017TokyoDateComponents.weekday = 5
thursday5pm18thWeek2017TokyoDateComponents.hour = 17
thursday5pm18thWeek2017TokyoDateComponents.timeZone = TimeZone(identifier: "Asia/Tokyo")!

let thursday5pm18thWeek2017TokyoDate = userCalendar.date(from: thursday5pm18thWeek2017TokyoDateComponents)!
On my system, which is in the Eastern daylight time zone (UTC-4) at the time of writing, thursday5pm18thWeek2017TokyoDate displays as May 4, 2017, 4:00 AM in my playground’s sidebar, and looking at a calendar confirms that May 4th is indeed the Thursday of the 18th month of 2017.
Let’s extract DateComponents from a Date, part 1
Now that we’ve created some Dates using DateComponents, let’s do the reverse and extract DateComponents from given Dates. We’ll continue with our playground and use a Date we’ve already created: firstLandPhoneCallDate, which corresponds to the date of Alexander Graham Bell’s historic phone call, March 10, 1876. Here’s code that extracts the year, month, and day from this Date:
// (Previous code goes here)

// We want to extract the year, month, and day from firstLandPhoneCallDate
let alexanderGrahamBellDateComponents = userCalendar.dateComponents([.year, .month, .day],
                                                                    from: firstLandPhoneCallDate)
alexanderGrahamBellDateComponents.year     // 1876
alexanderGrahamBellDateComponents.month    // 3
alexanderGrahamBellDateComponents.day      // 10
Let’s extract DateComponents from a Date, part 2
This time, let’s create a new Date — one that corresponds to this key date in iOS history: the “Stevenote” where the original iPhone was first announced:
If you were to ask Swift when this Stevenote took place, it would reply “190,058,400 seconds after the reference date”. For most of us, this is a meaningless figure, so we’ll extract the following DateComponents from this Date:
Year
Month
Day
Hour
Minute
What day of the week this Date fell on
What week of the year this Date fell on
Here’s the code:
// (Previous code goes here)

// The "Stevenote" where the iPhone was announced took place
// 190,058,400 seconds after the start of the Third Millennium.
let iPhoneStevenoteDate = Date(timeIntervalSinceReferenceDate: 190_058_400)

// We want to extract the year, month, day, hour, and minute from this date,
// and we also want to know what day of the week and week of the year
// this date fell on.
let iPhoneStevenoteDateComponents = userCalendar.dateComponents(
      [.year, .month, .day, .hour, .minute, .weekday, .weekOfYear],
      from: iPhoneStevenoteDate)
iPhoneStevenoteDateComponents.year!        // 2007
iPhoneStevenoteDateComponents.month!       // 1
iPhoneStevenoteDateComponents.day!         // 9
iPhoneStevenoteDateComponents.hour!        // 13
iPhoneStevenoteDateComponents.minute!      // 0
iPhoneStevenoteDateComponents.weekday!     // 3 (Tuesday)
iPhoneStevenoteDateComponents.weekOfYear!  // 2 (2nd week of the year)
Let’s extract DateComponents from a Date, part 3
Let’s try it again with another key iOS date — the Stevenote where the original iPad was announced:
This time, if you were to ask Swift when this Stevenote took place, it would reply “286,308,000 seconds after the reference date”. Let’s get all the DateComponents for this date:
// (Previous code goes here)

// The "Stevenote" where the original iPad was announced took place
// 286,308,00 seconds after the start of the Third Millennium.
let iPadSteveNoteDate = Date(timeIntervalSinceReferenceDate: 286_308_000)

// We want to extract ALL the DateComponents.
let iPadSteveNoteDateComponents = userCalendar.dateComponents([.calendar,
                                                               .day,
                                                               .era,
                                                               .hour,
                                                               .minute,
                                                               .month,
                                                               .nanosecond,
                                                               .quarter,
                                                               .second,
                                                               .timeZone,
                                                               .weekday,
                                                               .weekdayOrdinal,
                                                               .weekOfMonth,
                                                               .weekOfYear,
                                                               .year,
                                                               .yearForWeekOfYear],
                                                              from: iPadSteveNoteDate)
iPadSteveNoteDateComponents.calendar?.identifier // gregorian
iPadSteveNoteDateComponents.day!                 // 27
iPadSteveNoteDateComponents.era!                 // 1
iPadSteveNoteDateComponents.hour!                // 13
iPadSteveNoteDateComponents.minute!              // 0
iPadSteveNoteDateComponents.month!               // 1
iPadSteveNoteDateComponents.nanosecond!          // 0
iPadSteveNoteDateComponents.quarter!             // 0
iPadSteveNoteDateComponents.second!              // 0
iPadSteveNoteDateComponents.timeZone!            // Eastern time zone
iPadSteveNoteDateComponents.weekday!             // 4 (Wednesday)
iPadSteveNoteDateComponents.weekdayOrdinal!      // 4 (4th Wednesday in the month)
iPadSteveNoteDateComponents.weekOfMonth!         // 5 (5th week of the month)
iPadSteveNoteDateComponents.weekOfYear!          // 5 (5th week of the year)
iPadSteveNoteDateComponents.year!                // 2010
iPadSteveNoteDateComponents.yearForWeekOfYear!   // 2010
Let’s take a look at each DateComponents property and what it represents:
Property
Description
calendar
The calendar system for the date represented by this set of DateComponents. We got these DateComponents by converting a Date using a Gregorian Calendar, so in this case, this value is gregorian.
day
The day number of this particular date and time. For January 27, 2010, 18:00:00 UTC, this value is 27.
era
The era for this particular date, which depends on the date’s calendar system. In this case, we’re using the Gregorian calendar, which has two eras:
BCE (a.k.a. BC), represented by the integer value 0
CE (a.k.a. AD), represented by the integer value 1
hour
The hour number of this particular date and time. For January 27, 2010, 18:00:00 UTC, this value is 13, because in my time zone, 18:00:00 UTC is 13:00:00.
minute
The minute number of this particular date and time. For January 27, 2010, 18:00:00 UTC, this value is 0.
month
The month number of this particular date and time. For January 27, 2010, 18:00:00 UTC, this value is 1.
nanosecond
The nanosecond number of this particular date and time. For January 27, 2010, 18:00:00 UTC, this value is 0.
quarter
The quarter number of this particular date and time. January 27, 2010, 18:00:00 UTC, is in the first quarter of the year, so this value is 0.
second
The second number of this particular date and time. For January 27, 2010, 18:00:00 UTC, this value is 0.
timeZone
The time zone of this particular date and time. I’m in the UTC-5 time zone (US Eastern), so this value is set to that time zone.
weekday
The day of the week of this particular date and time. In the Gregorian calendar, Sunday is 1, Monday is 2, Tuesday is 3, and so on. January 27, 2010, was a Wednesday, so this value is 4.
weekdayOrdinal
The position of the weekday within the next larger specified calendar unit, which in this case is a month. So this specifies nth weekday of the given month. Jauary 27, 2010 was on the 4th Wednesday of the month, so this value is 4.
weekOfMonth
The week of the month of this particular date and time. January 27, 2010 fell on the 5th week of January 2010, so this value is 5.
weekOfYear
The week of the year of this particular date and time. January 27, 2010 fell on the 5th week of 2010, so this value is 5.
year
The year number of this particular date and time. For January 27, 2010, 18:00:00 UTC, this value is 2010.
Here’s the playground containing all the code we just worked with:
// The user's calendar incorporates the user's locale and
// time zone settings, which means it's the one you'll use
// most often.
let userCalendar = Calendar.current


// March 10, 1876: The day Alexander Graham Bell
// made the first land line phone call
// ---------------------------------------------
// DateComponents' init method is very thorough, but very long,
// especially when we're providing only 3 pieces of information
let firstLandPhoneCallDateComponents = DateComponents(calendar: nil,
                                                      timeZone: nil,
                                                      era: nil,
                                                      year: 1876,
                                                      month: 3,
                                                      day: 10,
                                                      hour: nil,
                                                      minute: nil,
                                                      second: nil,
                                                      nanosecond: nil,
                                                      weekday: nil,
                                                      weekdayOrdinal: nil,
                                                      quarter: nil,
                                                      weekOfMonth: nil,
                                                      weekOfYear: nil,
                                                      yearForWeekOfYear: nil)

// With a calendar and a year, month, and day defined in
// a DateComponents struct, we can build a date
let firstLandPhoneCallDate = userCalendar.date(from: firstLandPhoneCallDateComponents)!
firstLandPhoneCallDate.timeIntervalSinceReferenceDate


// April 3, 1973: The day Martin Cooper
// made the first cellular phone call
// ------------------------------------
// This time, we'll create a blank DateComponents struct
// and set its year, month, and day properties.
var firstCellPhoneCallDateComponents = DateComponents()
firstCellPhoneCallDateComponents.year = 1973
firstCellPhoneCallDateComponents.month = 4
firstCellPhoneCallDateComponents.day = 3

let firstCellPhoneCallDate = userCalendar.date(from: firstCellPhoneCallDateComponents)!
firstCellPhoneCallDate.timeIntervalSinceReferenceDate


// The first Friday in June, 2017:
// National Donut Day
// -------------------------------
var donutDayComponents = DateComponents()
donutDayComponents.year = 2017
donutDayComponents.month = 6
// We're looking for a Friday...
donutDayComponents.weekday = 6
// ...and it needs to be the first Friday of the month
donutDayComponents.weekdayOrdinal = 1

let donutDayDate = userCalendar.date(from: donutDayComponents)!


// Thursday on the 18th week of 2017 in Tokyo
// ------------------------------------------
var thursday5pm18thWeek2017TokyoDateComponents = DateComponents()
thursday5pm18thWeek2017TokyoDateComponents.year = 2017
thursday5pm18thWeek2017TokyoDateComponents.weekOfYear = 18
thursday5pm18thWeek2017TokyoDateComponents.weekday = 5
thursday5pm18thWeek2017TokyoDateComponents.hour = 17
thursday5pm18thWeek2017TokyoDateComponents.timeZone = TimeZone(identifier: "Asia/Tokyo")!

let thursday5pm18thWeek2017TokyoDate = userCalendar.date(from: thursday5pm18thWeek2017TokyoDateComponents)!


var tokyoCalendar = Calendar(identifier: .ethiopicAmeteAlem)
tokyoCalendar.timeZone = TimeZone(identifier: "Asia/Tokyo")!


firstLandPhoneCallDate.timeIntervalSinceReferenceDate

// We want to extract the year, month, and day from firstLandPhoneCallDate
let alexanderGrahamBellDateComponents = userCalendar.dateComponents([.year, .month, .day],
                                                                    from: firstLandPhoneCallDate)
alexanderGrahamBellDateComponents.year     // 1876
alexanderGrahamBellDateComponents.month    // 3
alexanderGrahamBellDateComponents.day      // 10


// The "Stevenote" where the original iPhone was announced took place
// 190,058,400 seconds after the start of the Third Millennium.
let iPhoneStevenoteDate = Date(timeIntervalSinceReferenceDate: 190_058_400)

// We want to extract the year, month, day, hour, and minute from this date,
// and we also want to know what day of the week and week of the year
// this date fell on.
let iPhoneStevenoteDateComponents = userCalendar.dateComponents(
      [.year, .month, .day, .hour, .minute, .weekday, .weekOfYear],
      from: iPhoneStevenoteDate)
iPhoneStevenoteDateComponents.year!        // 2007
iPhoneStevenoteDateComponents.month!       // 1
iPhoneStevenoteDateComponents.day!         // 9
iPhoneStevenoteDateComponents.hour!        // 13
iPhoneStevenoteDateComponents.minute!      // 0
iPhoneStevenoteDateComponents.weekday!     // 3 (Tuesday)
iPhoneStevenoteDateComponents.weekOfYear!  // 2 (2nd week of the year)


// The "Stevenote" where the original iPad was announced took place
// 286,308,00 seconds after the start of the Third Millennium.
let iPadSteveNoteDate = Date(timeIntervalSinceReferenceDate: 286_308_000)

// We want to extract ALL the DateComponents.
let iPadSteveNoteDateComponents = userCalendar.dateComponents([.calendar,
                                                               .day,
                                                               .era,
                                                               .hour,
                                                               .minute,
                                                               .month,
                                                               .nanosecond,
                                                               .quarter,
                                                               .second,
                                                               .timeZone,
                                                               .weekday,
                                                               .weekdayOrdinal,
                                                               .weekOfMonth,
                                                               .weekOfYear,
                                                               .year,
                                                               .yearForWeekOfYear],
                                                              from: iPadSteveNoteDate)
iPadSteveNoteDateComponents.calendar?.identifier // gregorian
iPadSteveNoteDateComponents.day!                 // 27
iPadSteveNoteDateComponents.era!                 // 1
iPadSteveNoteDateComponents.hour!                // 13
iPadSteveNoteDateComponents.minute!              // 0
iPadSteveNoteDateComponents.month!               // 1
iPadSteveNoteDateComponents.nanosecond!          // 0
iPadSteveNoteDateComponents.quarter!             // 0
iPadSteveNoteDateComponents.second!              // 0
iPadSteveNoteDateComponents.timeZone!            // Eastern time zone
iPadSteveNoteDateComponents.weekday!             // 4 (Wednesday)
iPadSteveNoteDateComponents.weekdayOrdinal!      // 4 (4th Wednesday in the month)
iPadSteveNoteDateComponents.weekOfMonth!         // 5 (5th week of the month)
iPadSteveNoteDateComponents.weekOfYear!          // 5 (5th week of the year)
iPadSteveNoteDateComponents.year!                // 2010
iPadSteveNoteDateComponents.yearForWeekOfYear!   // 2010
In the next installment, we’ll look at converting Dates to Strings, and vice versa.
On the most recent Amazon Prime Day — an annual trick that Amazon pulls in order to boost sales in the same vein as Cyber Monday, but in the summer — I managed to limit myself to buying just one sale-priced thing that I didn’t really need: the CanaKit Raspberry Pi 3 Complete Starter Kit. It normally sells on Amazon for US$75, but it was on sale that day for US$60.
The Raspberry Pi 3 is the current version of a series of single-board computers about the size of a deck of playing cards, and are:
Supported by a community of software and hardware innovators and enthusiasts who produce all sorts of add-ons, peripherals, software, and guidance for making the most of the Raspberry Pi.
I plan to use the Raspberry Pi to make some initial delving into IoT (Internet of Things) development, and as part of my journey into developing for that category of computer that I call “tiny and shiny” — smartphones, tablets, and now Raspberry Pi / Arduino-type boards.
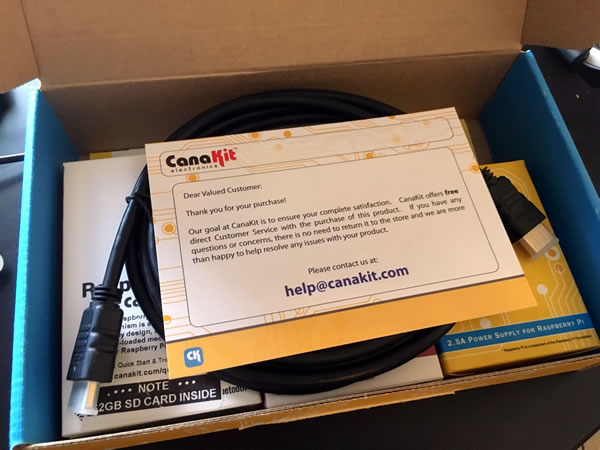
Here’s the CanaKit Raspberry Pi 3 Complete Start Kit box:
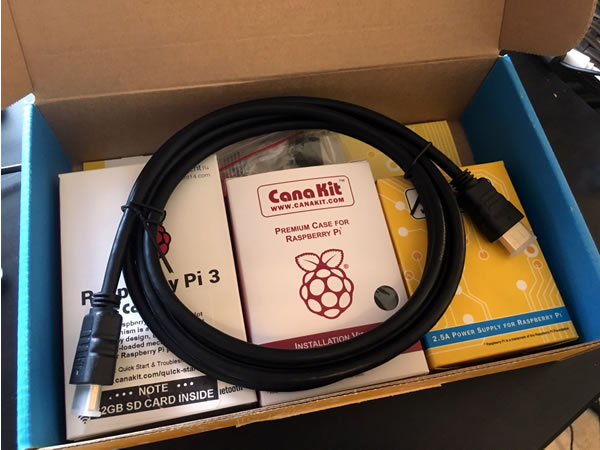
When I opened it, I saw this:
The first thing you should see is a greeting card that also provides an email address for assistance, should you need it. The other side of the card has a diagram explain what each of the GPIO interface pins on the Raspberry Pi 3 board is for.
Below the card was an HDMI cable:
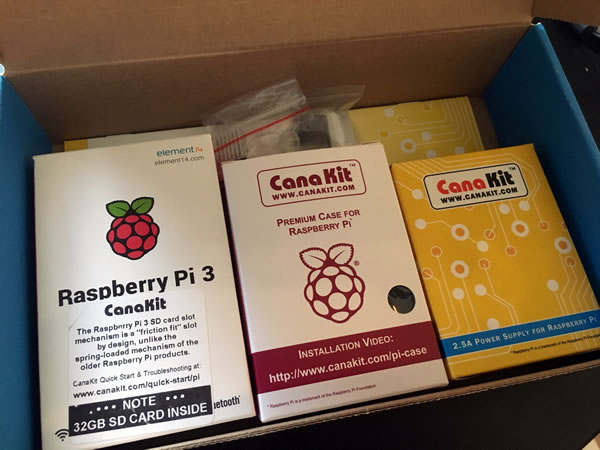
And below that were three boxes:
From largest to smallest, the three boxes contained the Raspberry Pi 3 board and SD card (which functions as its “hard drive”)…
…a case for the board…
…and a power supply for the board:
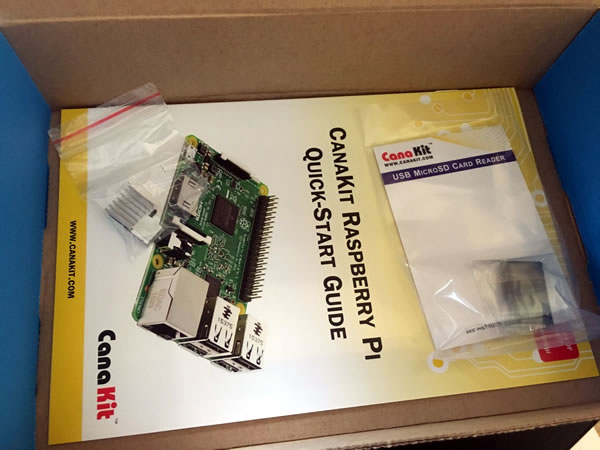
Below the boxes were these items:
One bag contained a USB microSD card reader. It allows you to use your regular computer to download updated or different versions of the Raspberry Pi OS or software and transfer them onto the microSD card:
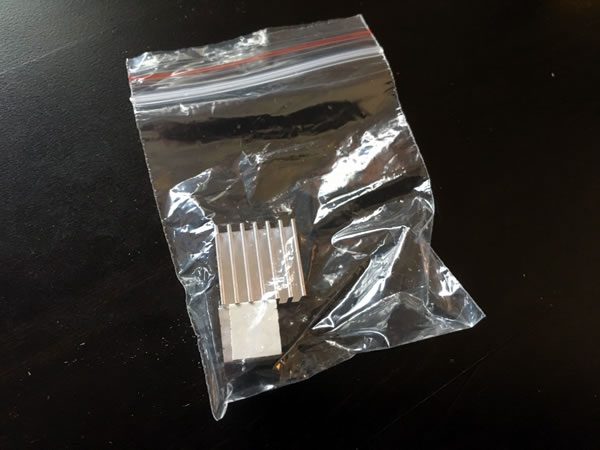
The other bag contained two heatsinks for its chips. They already have heatsink adhesive attacked to them; you just have to peel off the backing and stick them onto their respective chips:
At the bottom of the box was the “quick start” guide:
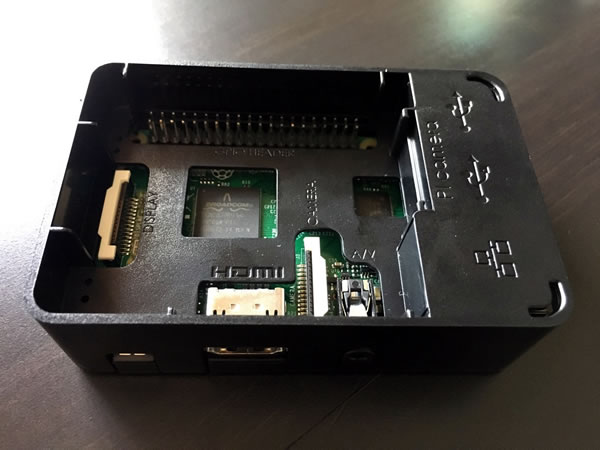
Here’s the board mounted in the lower tray portion of the case:
And here’s the board with the middle section of the case attached:
And here’s what the Pi looks like once the case is assembled:
Assembling the case is pretty easy, as no tools are required. It simply snaps together.
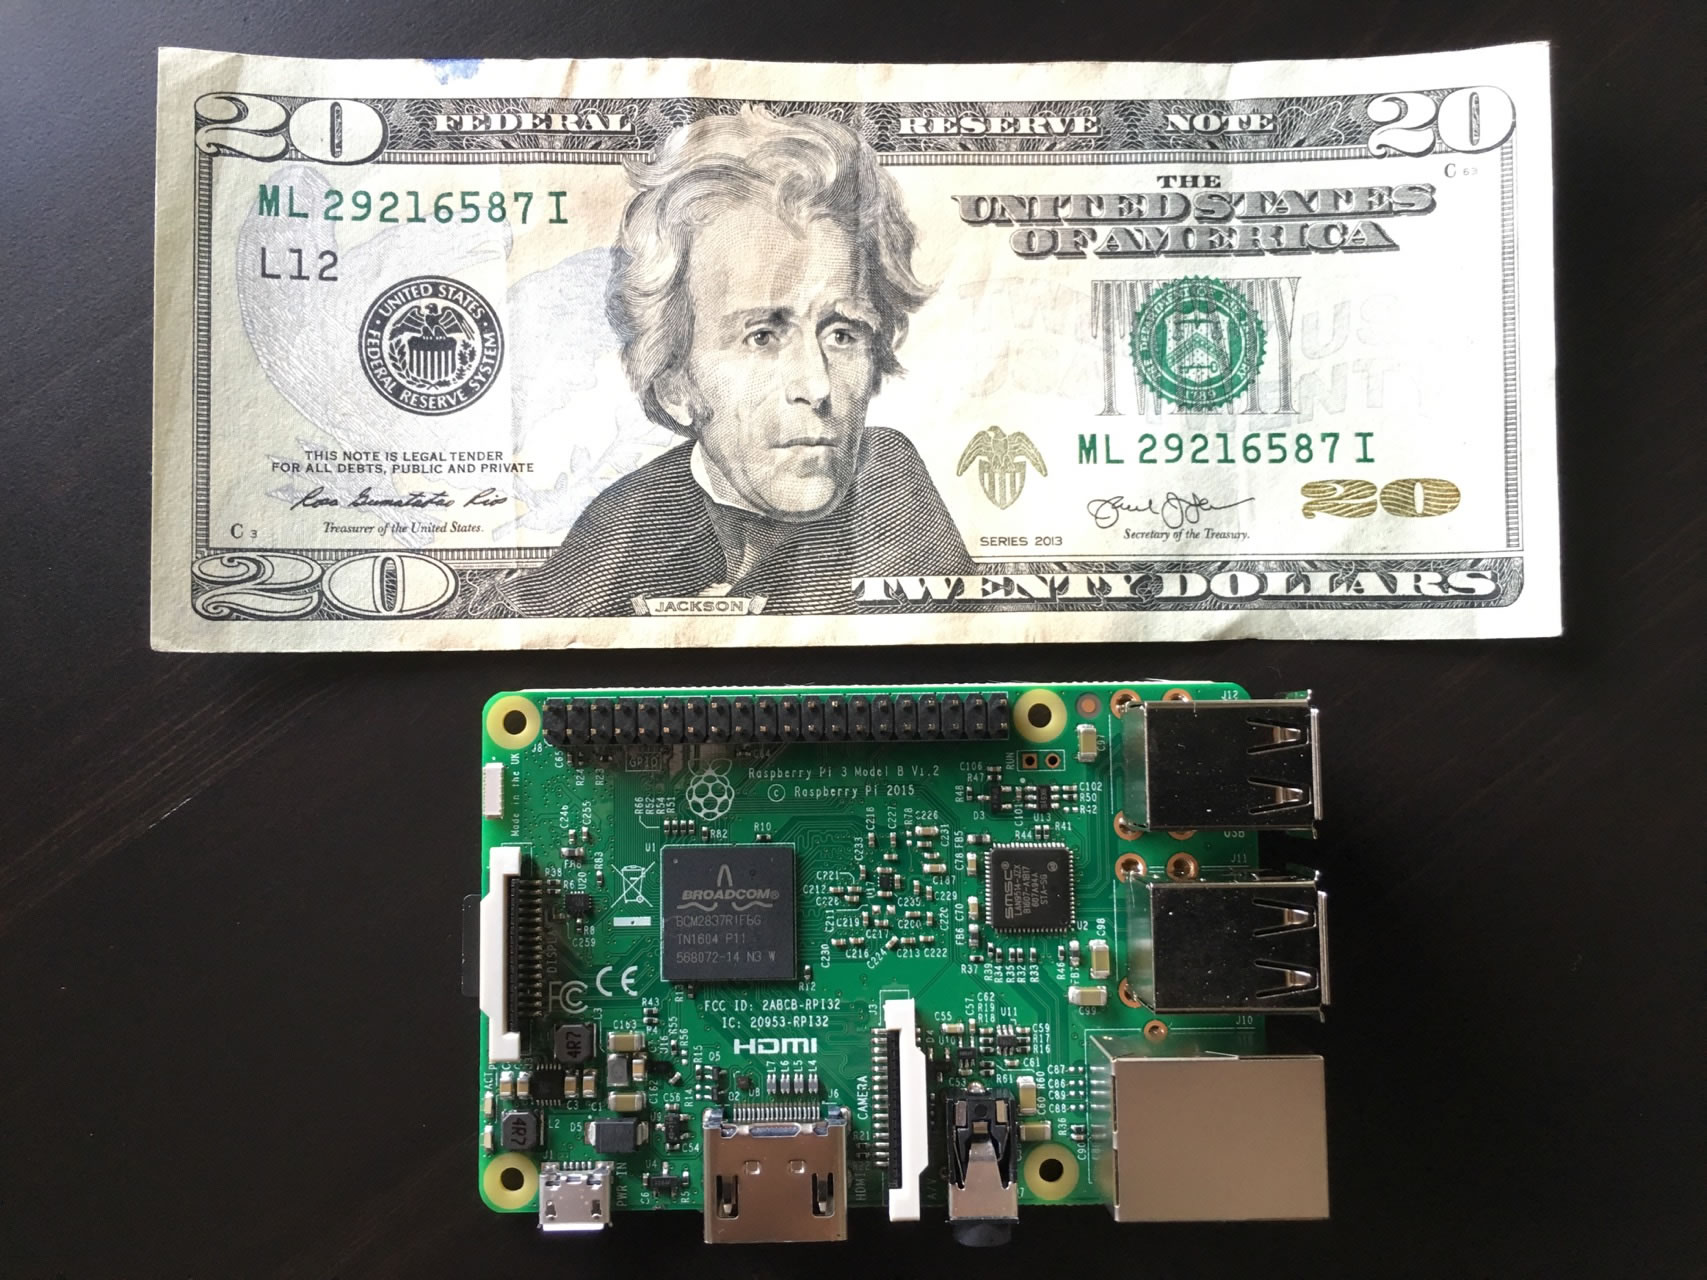
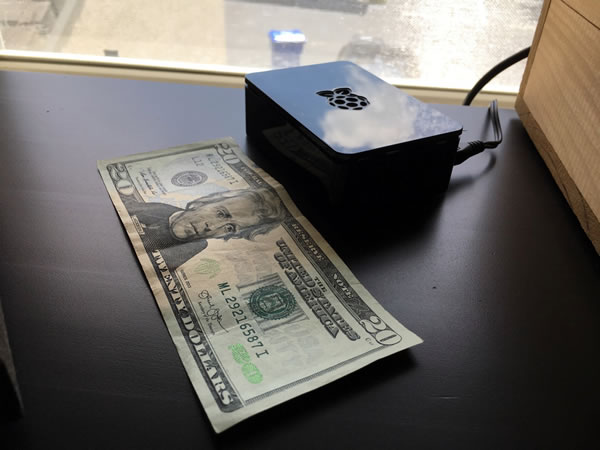
Here’s the case on my desk, placed beside a $20 bill for size comparison:
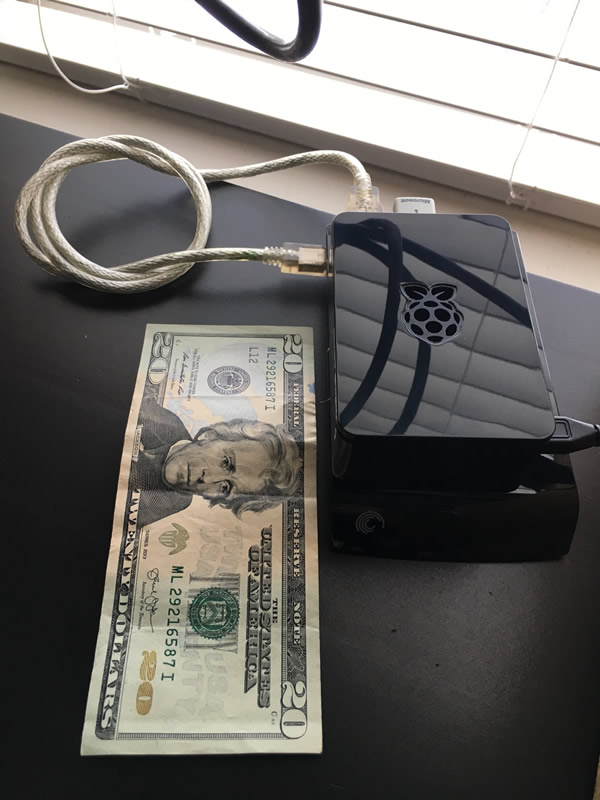
The Pi case is smaller than the hard drive that I connected to it (you can see it below the Pi):
I decided to take the beginner route and start up the system using NOOBS, short for “New out of the box software”. It came pre-loaded onto the SD card that came with the board, and it installed Raspbian, the official supportedRaspberry Pi OS, and based on Debian. Once the OS is installed, here’s what you see when you boot up the Pi:
Once it finishes booting up, you’re taken to a GNOME desktop:
I used to have a stack of USB keyboards, but I’d given most of them away to friends and family, and my last couple are still back in Toronto. Figuring that I’d end up taking the Pi to meetups, BarCamps, and other demo sessions, or perhaps use it as a living room media center / internet device, I went with the Logitech K400 all-in-one keyboard, shown below. It’s currently on sale at Walmart for US$20:
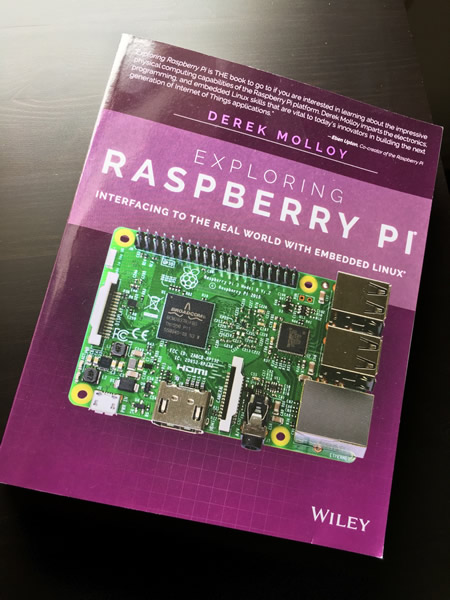
And thanks to Anastasia Sistevaris, an intern at Wiley, I got hooked up with a set of Raspberry Pi books, the first of which arrived recently: Exploring Raspberry Pi by Derek Molloy. I’ll do a writeup of this book in a later article:
Watch this space for more Raspberry Pi articles as I start noodling with my new toy!
Last night, I had the pleasure of meeting inventor Ron Klein and his wife Arlene, at the Next Money TPA meetup. If you’re a reader of this blog, it’s likely that you’ve used at least one of his innovations:
The MLS — as in multiple listing service — for real estate,
Interactive voice response for banks,
a bond monitoring system for Wall Street traders…
…and then there’s the innovation you’ve most likely used — automated validation of credit cards through the use of a magnetic stripe:
He was also an artillery forward observer in the Korean War, where he went on 58 missions. He got hurt during the last one, resulting in a spinal injury, and earning him a Purple Heart. The injury caused him painful spinal stenosis, where the bones in his spine put pressure the spinal cord and related nerves leading from it. He took up exercise, which he found was pain-relieving, and does it so often that he’s participated and won medals in the Florida Senior Games.
In the bad old days, credit card validation was done manually. Any merchant that accepted payments via credit card was given a long paper list of “bad” credit card numbers, and would have to “eyeball” the list in order to valid a credit card. I remember when this sort of thing was still done in the early 1970s, and it was slow even under the best of circumstances, never mind during big sales or something like Black Friday.
Klein, then director of engineering for Ultronics Systems Corporation — which would later become part of GT&E Financial — developed a “validity-checking system”, which allowed merchants to enter credit card numbers into a “desk-mountable interrogation unit” that could check against a central store of credit card numbers which would be stored in drum memory. If the account number on the card wasn’t on the “bad” list, the desk unit would show a “credit good” light; otherwise, it would display an error signal.
According to CreditCards.com, Klein’s original design for the verifier was such that a bad credit card would be held by the device. “If the credit wasn’t good,” he said, “it locked up the card so that the person didn’t get the card back, because the merchant got credit for capturing negative-account cards.”
At the age of 81, Ron could simply enjoy a quiet retirement, but that’s not his style. “I took three months off, but I got bored,” he said. “I’d rather keep busy, taking on new challenges. I’m not empty yet!”
He spoke to the group for about 90 minutes, regaling us with stories about his childhood, the business world, and his drive to find solutions to problems.
One theme he kept repeating to the meetup group was to simplify. “There’s a fix for everything, a solution for every challenge. The trick is to simplify. Identify the problem, simplify, then be smart, daring, and different.”
Another bit of advice he gave to the group was to “Be a smiling cobra, and never point an unloaded gun,” which I took to mean be nice as much as you can, but be tough when you have to — and mean it. I found him to be quite affable, but if he managed to operate in the world of Wall Street, I can he his need to be a cobra from time to time.
His last bit of advice to the group was to “sell the benefit, not the idea”. This is a good reminded for anyone who’s inventing a product or service — nobody cares about inventions for their own sake, but the benefits they provide. This may seem obvious to some, but as I like to say, there’s great power in stating the obvious.
Ron lives in Sarasota, about an hour and a quarter south of my place. I may have to drive down there sometime, take him and Arlene out to lunch, just so I can hear more stories about the things he created — and is still creating. My thanks to Ron and Arlene for appearing at the Next Money TPA meetup!
Next Money TPA is the Tampa chapter of Next Money, an international group of fintech communities, and the meetup group that brought Ron Klein to speak. Next Money TPA brings together people from the Tampa Bay area to discuss the intersection of finance, technology, design, and creative spaces. Organized by Bruce Burke, the meetup invites “casual, entrepreneurial, inquisitive minds” to gather, share ideas, and meet each other.