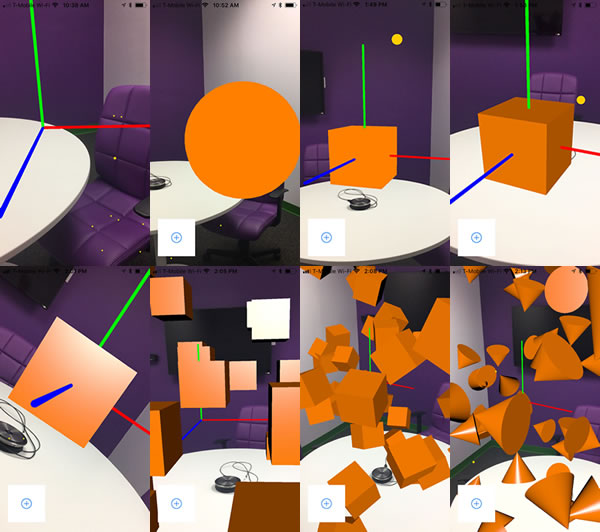
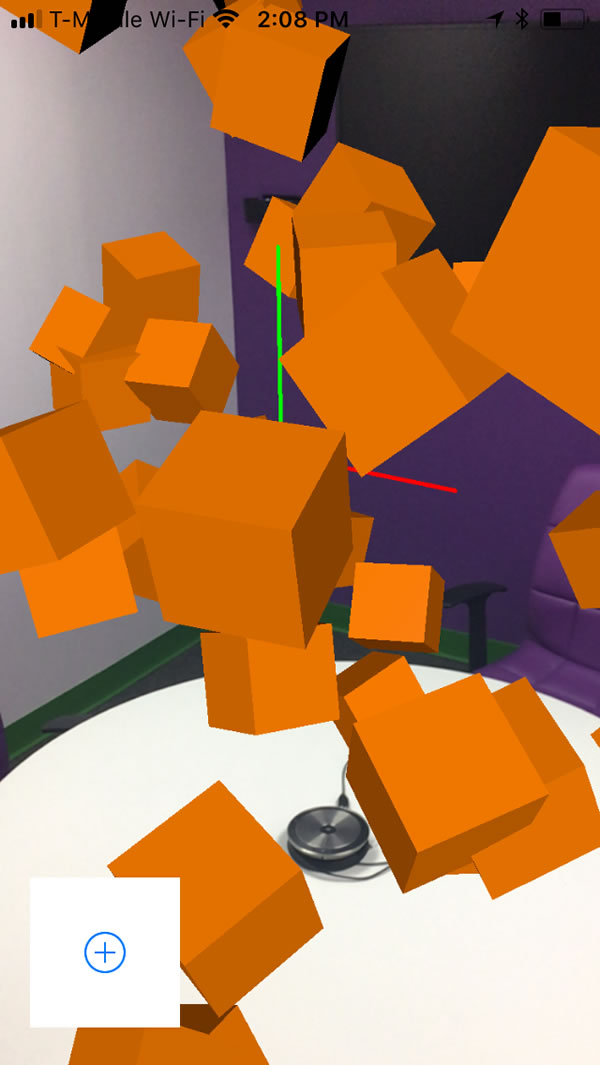
 At the last gathering of Tampa iOS Meetup, I walked the group through the creation of a couple of simple ARKit apps. The first was one that created shapes with random locations and orientations in the room you were in. You can see the evolution of the app from start to finish in the screenshot montage above.
This article walks you through the steps of creating this ARKit app. In order to develop it (or any other ARKit app), you’ll need the following:
- A Mac running the latest version of Xcode, Xcode 9
- An ARKit-compatible iPhone or iPad with an A9 or later processor, which is one of the following: iPhone 6S and 6S Plus, iPhone 7 and 7 Plus, iPhone SE, any of the first- or second-generation iPad Pros, iPad 2017, and eventually, the iPhone 8, 8 Plus, and X
- iOS 11 installed on your ARKit-compatible iPhone or iPad
Once you’ve gathered all these, you can get started!
First steps
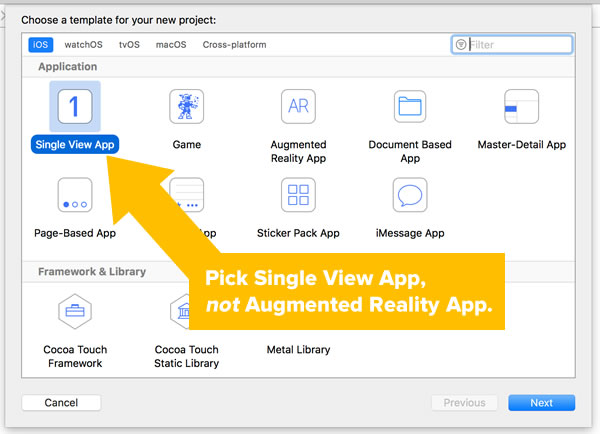
Start with the File → New → Project… dance and create a new project in Xcode. Choose the Single View App template and not Augmented Reality App, then continue through the usual steps until you’ve got a new project:
The app will consist of a single view that’s taken up by a special version of a SceneKit view: an ARKit SceneKit view, whose class name is ARSCNView. This is a view that combines two things to make an AR experience:
- 3D rendered objects courtesy of the SceneKit framework
- Real world camera views, real world tracking and horizontal plane detection courtesy of the ARKit framework
Let’s build the app’s single view. Open Main.storyboard. Look for ARKit SceneKit View in the Object Library. You may find it helpful to type ARKit or ARSCN into the Object Library’s search box:
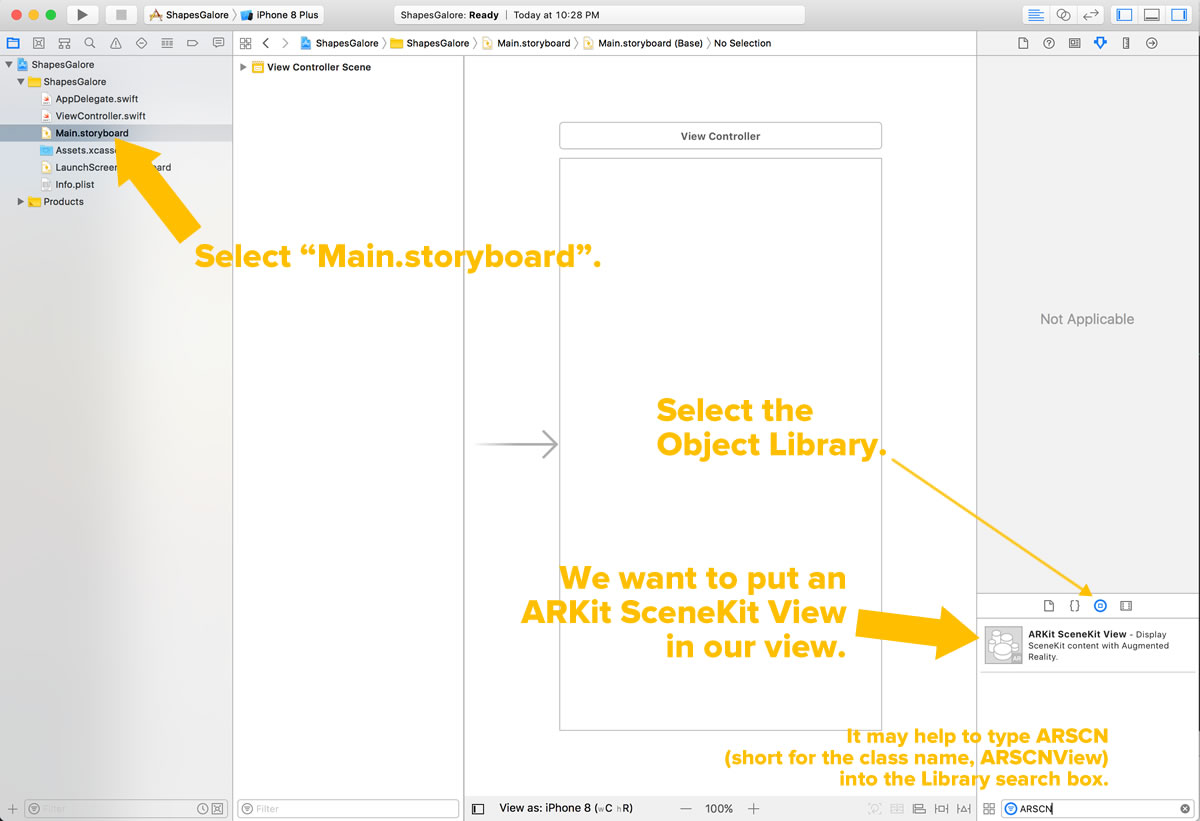
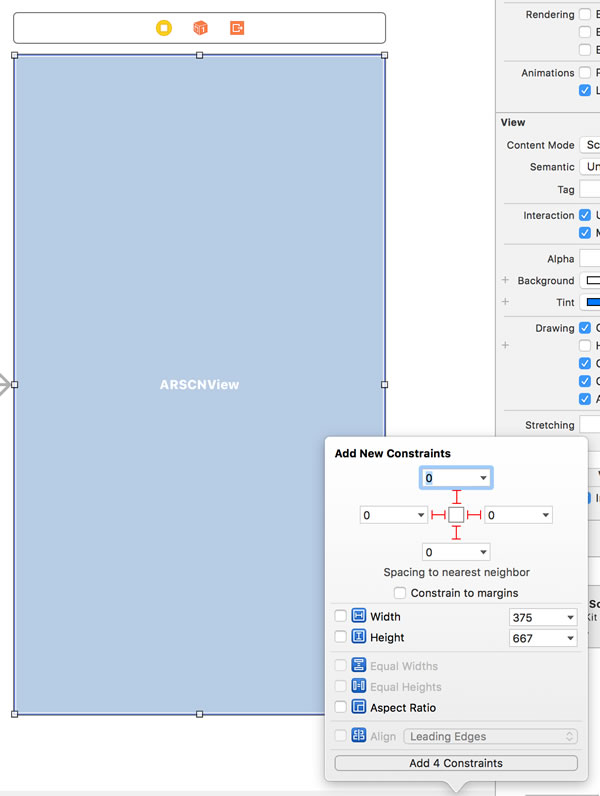
Drag an ARKit SceneKit view onto the view. Expand it so that it takes up the entire view and add these 4 constraints, as shown in the screenshot below:
- Top: 0
- Left: 0
- Right: 0
- Bottom: 0
By definition, ARKit apps make use of one of the cameras, which means that they require the user’s permission to do so. Open info.plist and add the following key/value pair:
- Key: Privacy – Camera Usage Description
- Value: This app uses the rear camera to make augmented reality images.
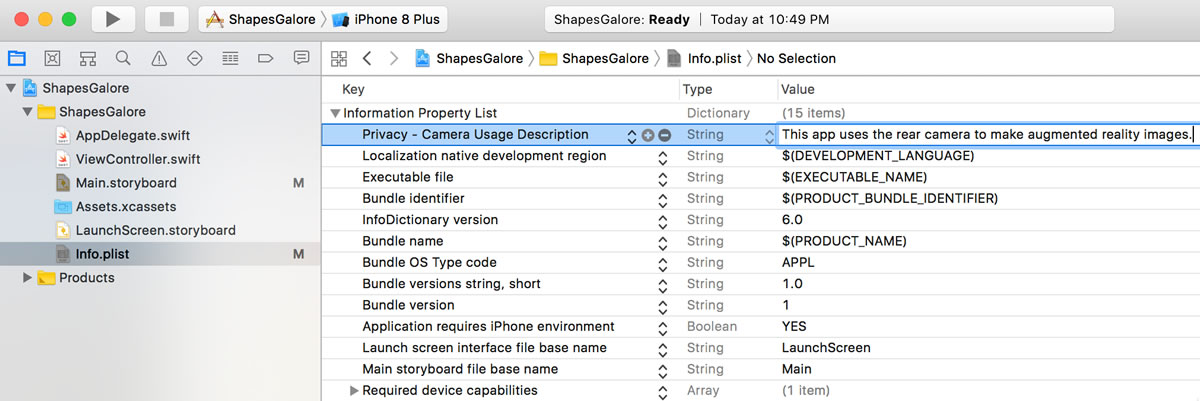
(Feel free to change the value to whatever text you feel is appropriate.)
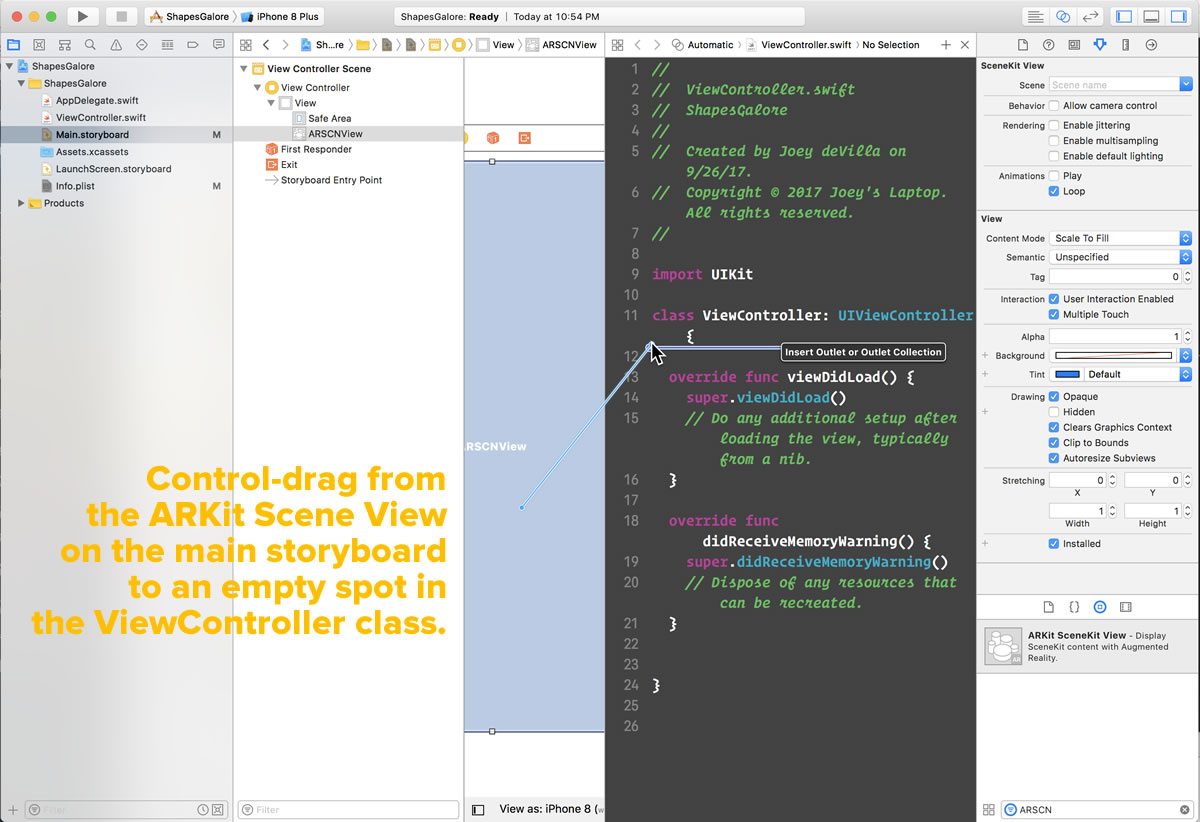
We need to be able to refer to the newly-added ARKit SceneKit View in our code, so we need to create an outlet for it. Switch back to Main.storyboard and then click the Assistant Editor button — ![]() — which should cause Xcode to show both Main.storyboard and ViewController.swift.
— which should cause Xcode to show both Main.storyboard and ViewController.swift.
Create an outlet for the ARKit SceneKit view by control-dragging from the ARKit SceneKit view on Main.storyboard to an empty spot in ViewController.swift — inside the class body, and outside any methods:
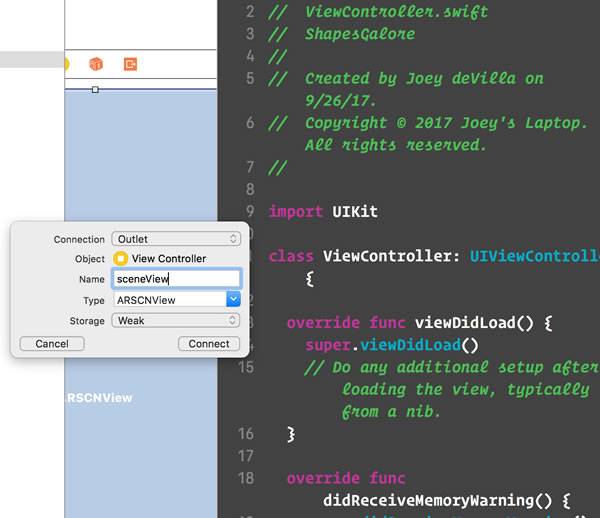
Once you’re done dragging, Xcode should display a pop-up box, as shown in the screenshot below. Do the following:
- Make sure that the Connection type is Outlet.
- Enter sceneView in the Name textbox.
- Click the Connect button.
You should now have a new instance property in your class:
@IBOutlet weak var sceneView: ARSCNView!
…but it also comes with a couple of error messages:
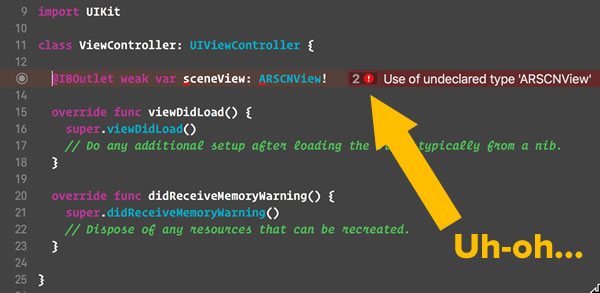
These messages are the result of your adding the ARKit SceneKit view and an outlet to it to the view controller code. That’s because your view controller has references to ARKit or all the goodies that come with it.
You can fix this by adding this line just below the import UIKit line:
import ARKit
When you do this, the error messages should disappear:

With an ARKit SceneKit view laid out on our view and an outlet for it in our code, it’s now time to initialize it.
The first thing we need to do create a configuration instance to determine the kind of augmented reality experience that we want to provide to the user. ARKit gives us three choices:
ARFaceTrackingConfiguration: For “selfie” AR apps that use the front-facing camera to track the user’s facial movements and expressions. This is probably the technology behind Animoji.AROrientationTrackingConfiguration: For apps that provide a basic AR experience. This uses the rear-facing camera and tracks only the device’s orientation — the direction it’s facing, or more precisely, its Euler angles.ARWorldTrackingConfiguration: For apps that provide high-quality AR experiences. This uses the rear-facing camera to precisely track both the device’s position and orientation, and it can do plane detection and hit testing.
For this app, we want the user to be able to create objects in the room they’re in and then be able to walk around them and view them from every possible angle, so we’ll go with ARWorldTrackingConfiguration.
Add this line below the declaration for the sceneView outlet:
// We'll use the AR configuration that provides the best AR experience,
// which tracks the device’s position and orientation, and allows for
// plane detection and hit testing.
let configuration = ARWorldTrackingConfiguration()
Now that we’ve defined the configuration instance, let’s initialize our ARKit SceneKit view.
Update the viewDidLoad method so that it looks like this:
override func viewDidLoad() {
  super.viewDidLoad()

  // 1
  sceneView.debugOptions = [
    ARSCNDebugOptions.showWorldOrigin,
    ARSCNDebugOptions.showFeaturePoints
  ]
  // 2
  sceneView.session.run(configuration)
}
Here’s what’s happening in the code above:
- This line turns on a couple of options which are useful for debugging ARKit apps. In most cases, you’ll want to turn them off when the app is ready for the general public:
ARSCNDebugOptions.showWorldOrigin: This causes SceneKit to display a group of three line segments that indicate the x-, y-, and z-axes of the coordinate system that ARKit will use for the real world. The x-axis is red, the y-axis is green, and the z-axis is blue. The point where the they meet is the origin, which is set as the location of the device when the augmented reality session is started. This point has the coordinates (0, 0, 0).ARSCNDebugOptions.showFeaturePoints: This causes SceneKit to display a number of yellow dots that represent points on horizontal planes that ARKit is using to “feel” its way around the real world.
- This line tells ARKit to start doing its thing using the given configuration, which we’ve specified as the “track the device’s motion in the real world with 6 degrees of freedom”.
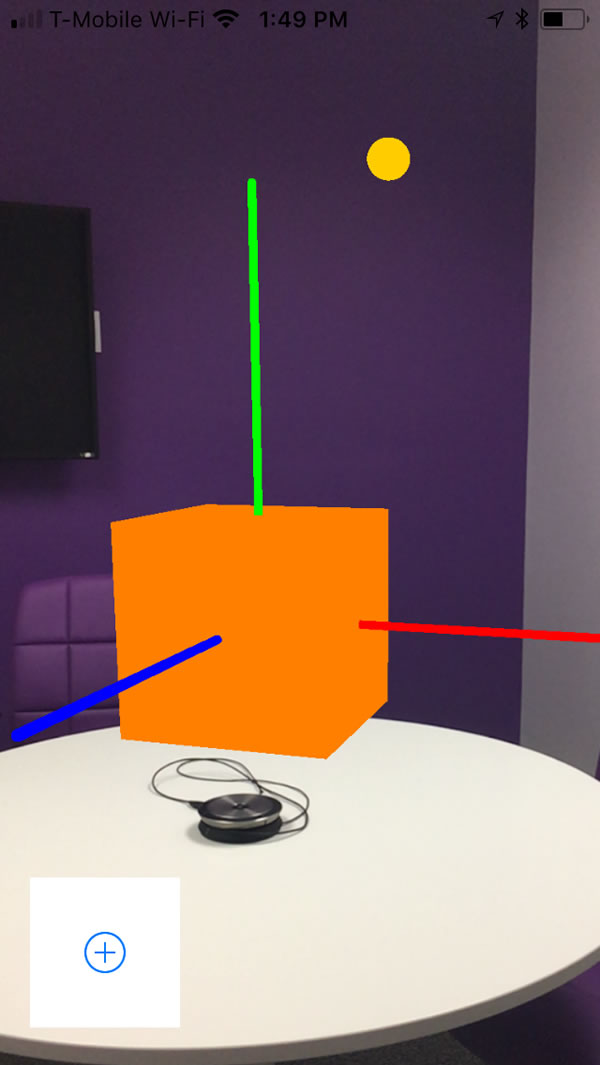
Run the app. Of course, the real-world images you’ll see are different from the ones shown in the screenshot below, but you should see the x-, y-, and z-axes and feature points that we specified as debug options:
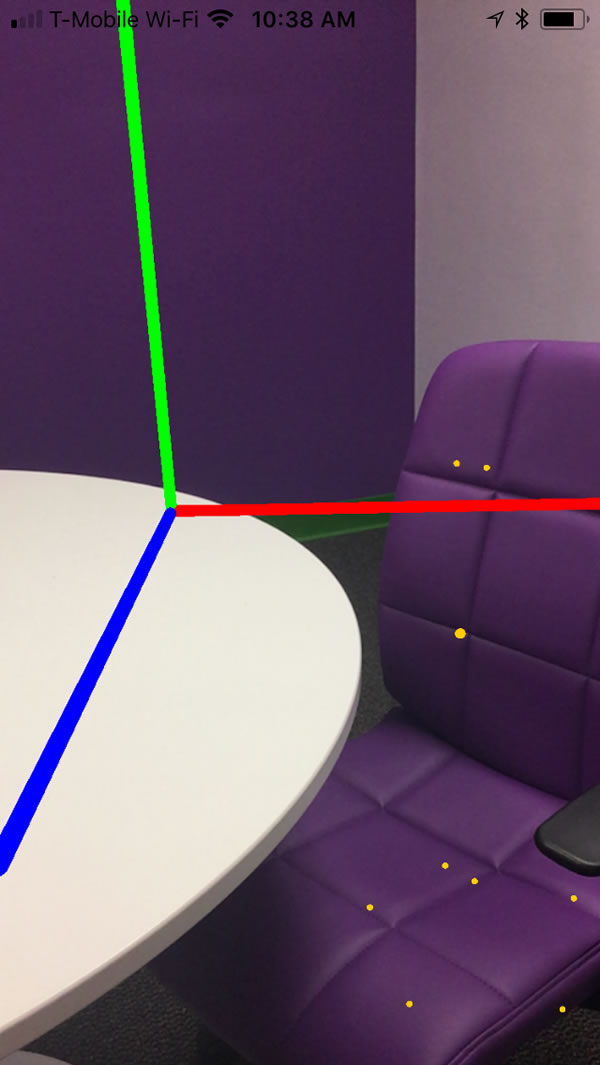
A screen capture from the app. The origin is where the positive x-axis (the red line), positive y-axis (the green line), and the positive z-axis (the blue line) meet. The yellow dots on the chair are the feature points.
Adding a button and a shape
It’s time to add a button that the user will press to add objects to the AR world.
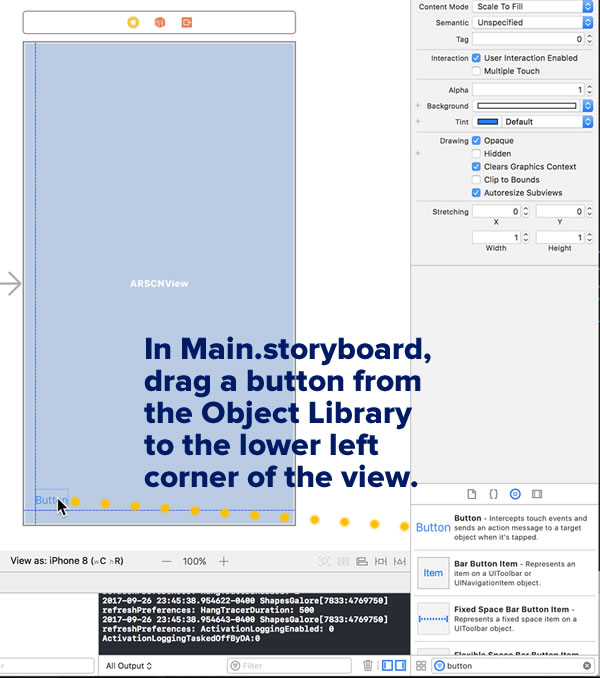
Open Main.storyboard, choose Button from the Object Library and drag it to the lower left corner of the view, leaving the default amount of distance from the left and bottom margin:
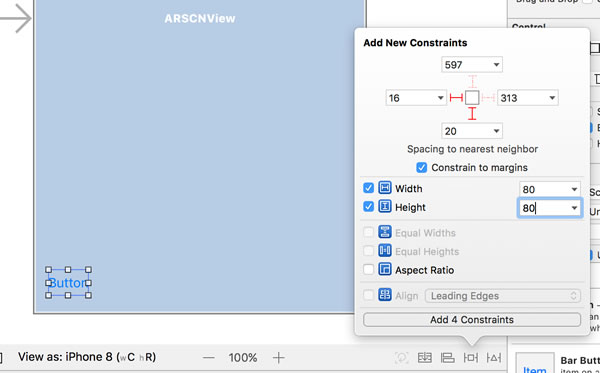
Give the button the following constraints:
- Left: 16
- Bottom: 20
- Constrain to margins: checked
- Width: 80
- Height: 80
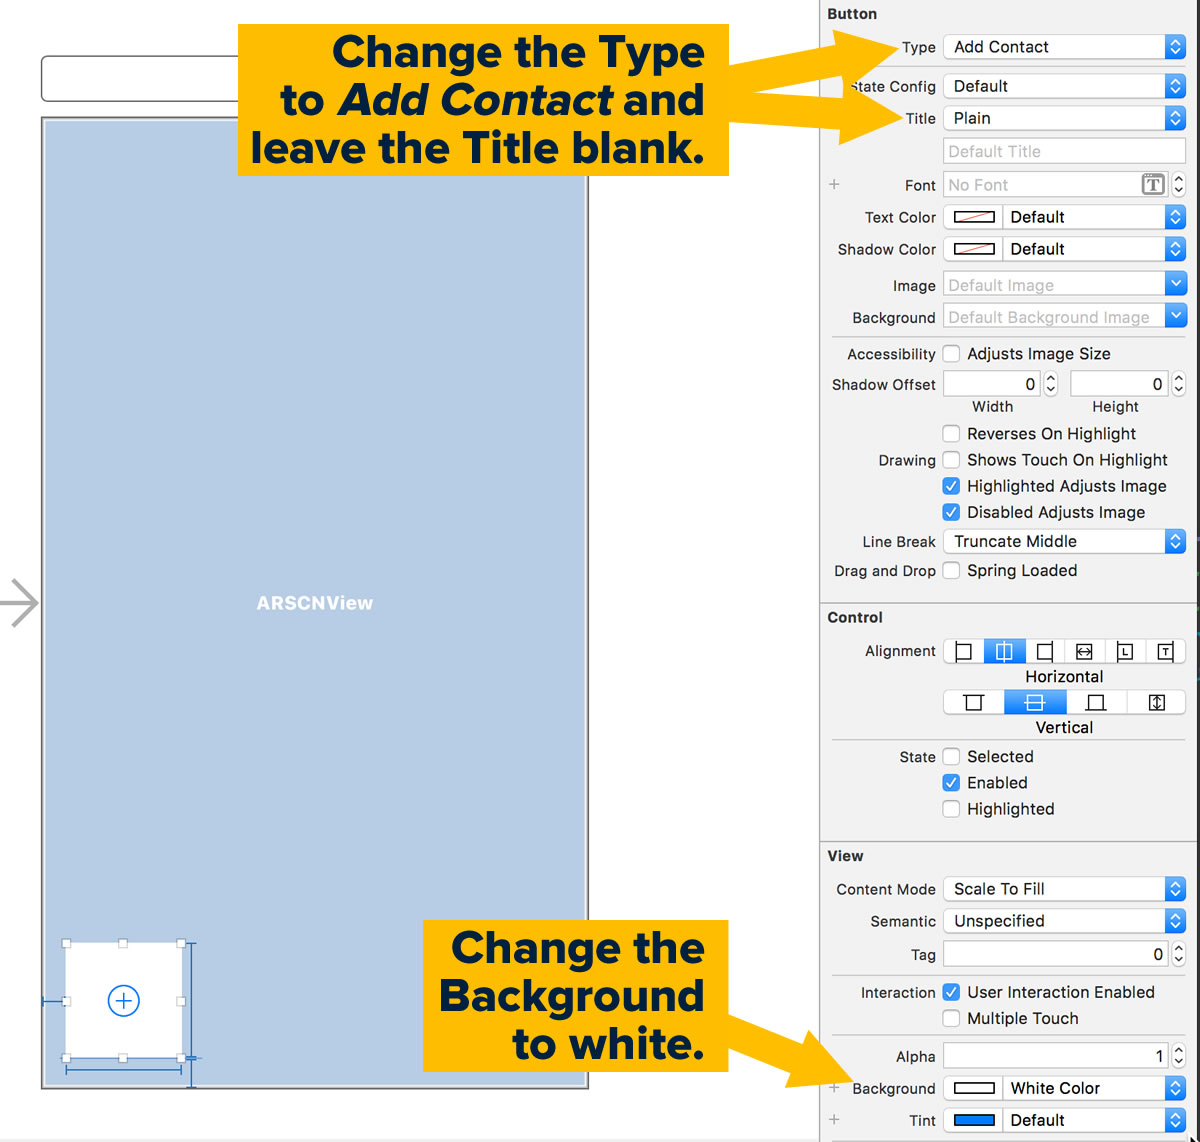
With the button still selected, switch to the Attributes Inspector — ![]() — and set the following attributes as follows:
— and set the following attributes as follows:
- Type: Add Contact
- Title: [blank]
- Background: White
The button needs to respond to taps, ]so we need to create an action for it. Click the Assistant Editor button — ![]() — which should cause Xcode to show both Main.storyboard and ViewController.swift.
— which should cause Xcode to show both Main.storyboard and ViewController.swift.
Create an action for the button by control-dragging from the button on Main.storyboard to an empty spot in ViewController.swift — inside the class body, and outside any methods:
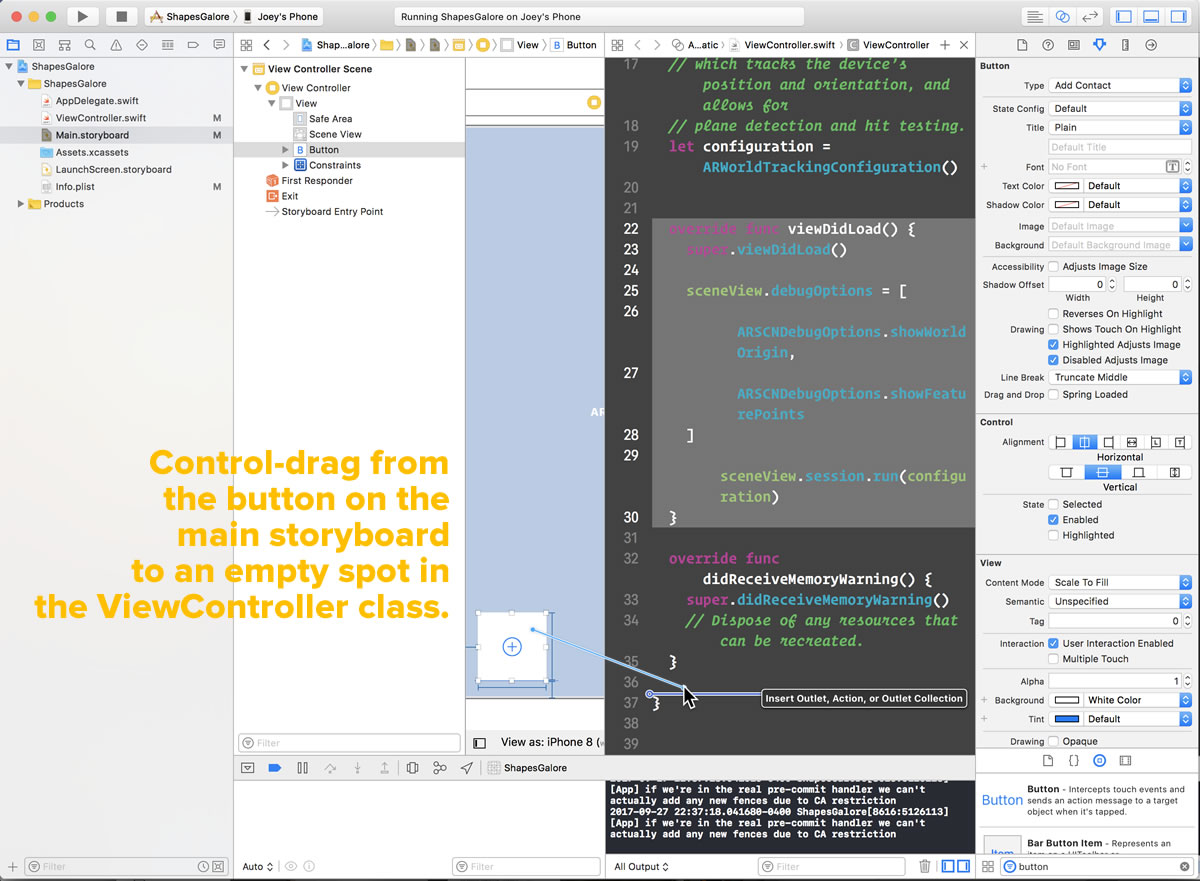
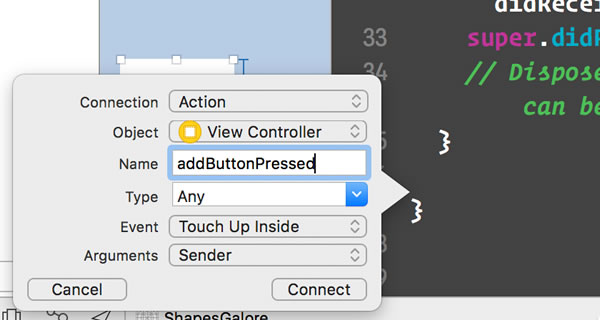
Once you’re done dragging, Xcode should display a pop-up box, as shown in the screenshot below. Do the following:
- Make sure that the Connection type is Action.
- Enter addButtonPressed in the Name textbox.
- Make sure that the Event type is Touch Up Inside.
- Click the Connect button.
The view controller will now have a new method:
@IBAction func addButtonPressed(_ sender: Any) {
}
Add one line to this method — a call to the addShape() method:
@IBAction func addButtonPressed(_ sender: Any) {
  addShape()
}
You’ve probably figured out that we need to define that method now:
func addShape() {
  let node = SCNNode()
  node.geometry = SCNSphere(radius: 0.2)
  node.geometry?.firstMaterial?.diffuse.contents = UIColor.orange
  node.position = SCNVector3(0, 0, 0)
  sceneView.scene.rootNode.addChildNode(node)
}
There’s a lot going on in this method, so let’s take it line by line:
let node = SCNNode()
As the name addShape() implies, the method adds a shape to the augmented reality environment we’re creating. We do this creating a SceneKit node — an instance of SCNNode — which represents a point in 3D space and its properties. We’ll then define some of those properties so that the node appears as a shape when we add it to the environment.
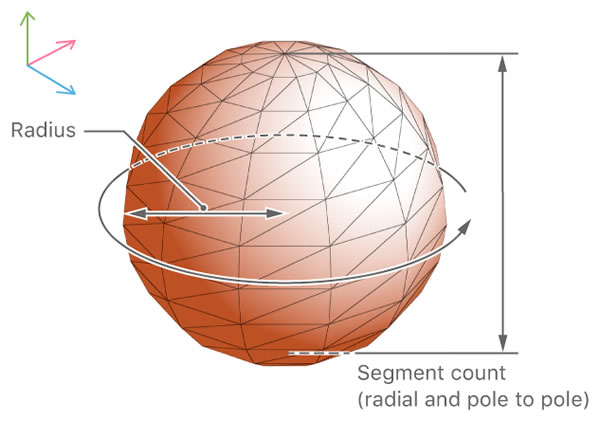
node.geometry = SCNSphere(radius: 0.2)
This line gives the node a shape. In this case, we’re assigning it a sphere geometry — an instance of SCNSphere — with a radius of 0.2 meters or 20 centimeters to the node we just created to the node.
node.geometry?.firstMaterial?.diffuse.contents = UIColor.orange
This line gives the shape a color. It has to go through a number of properties to do so:
firstMaterial: An instance ofSCNMaterial, which is a set of shading attributes that defines the appearance of anSCNNode’s geometry. You can add many materials to a geometry to give it a complex appearance, but you must specify at least one if you want it to be visible.firstMaterialis a convenience method that returns the first material in a geometry’smaterialsarray.diffuse: This is a material property that describes how light reflects from all directions from the material. Think of this as the material’s “base” color.contents: This specifies the visual content of a material property, such as color, image, or source of animated content. In this case we’re using it to specify a color.
node.position = SCNVector3(0, 0, 0)
This one’s pretty simple: it sets the coordinates of the node relative to the origin of the AR environment, which is the location of the phone at the start of the AR session. In SceneKit, you specify coordinates and many other things that can be described as related 3-number groups using SCNVector3 instances.
sceneView.scene.rootNode.addChildNode(node)
Now that we’ve properly defined the node, we add it to the scene. Every node in a SceneKit scene is a child of the root node or some other node in the scene.
Run the app. You should see something like this:
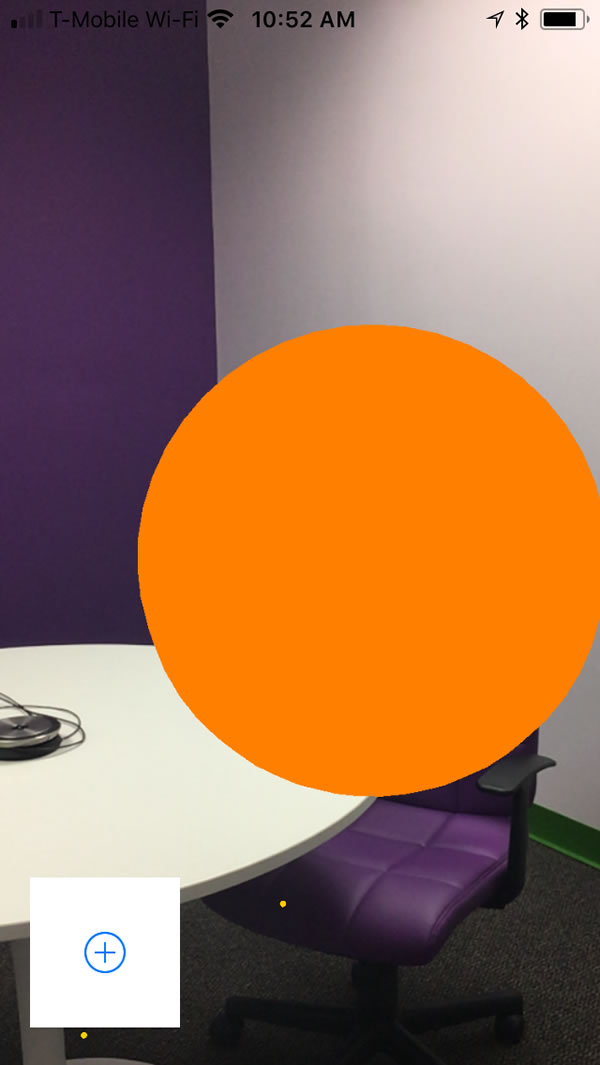
Remember, a sphere with a 0.2-meter radius has a 0.4-meter diameter, which is big enough to swallow up the axis guides around the origin. I made it big so that you wouldn’t miss it.
Changing the shape and size
Let’s give the node a different geometry and make it a little smaller. Change the node.geometry = SCNSphere(radius: 0.2) line in addShape() to:
node.geometry = SCNBox(width: 0.1, height: 0.1, length: 0.1, chamferRadius: 0)
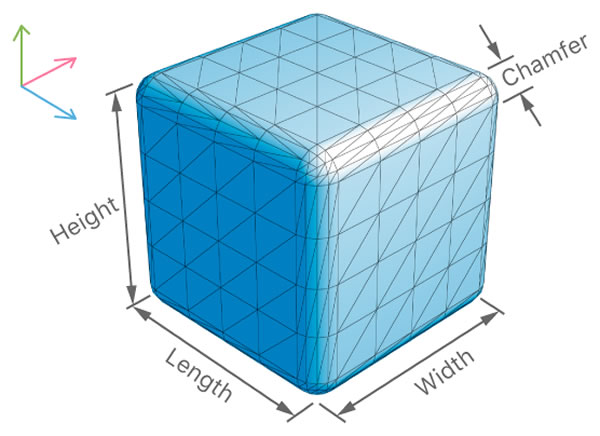
This line gives the node a box geometry — an instance of SCNBox — with a length, width, and height of 0.1 meters or 10 centimeters, and no chamfer.
In case you’re not familiar with the term, chamfering is the rounding of the corners; the greater the chamfer radius, the more rounded the corners.
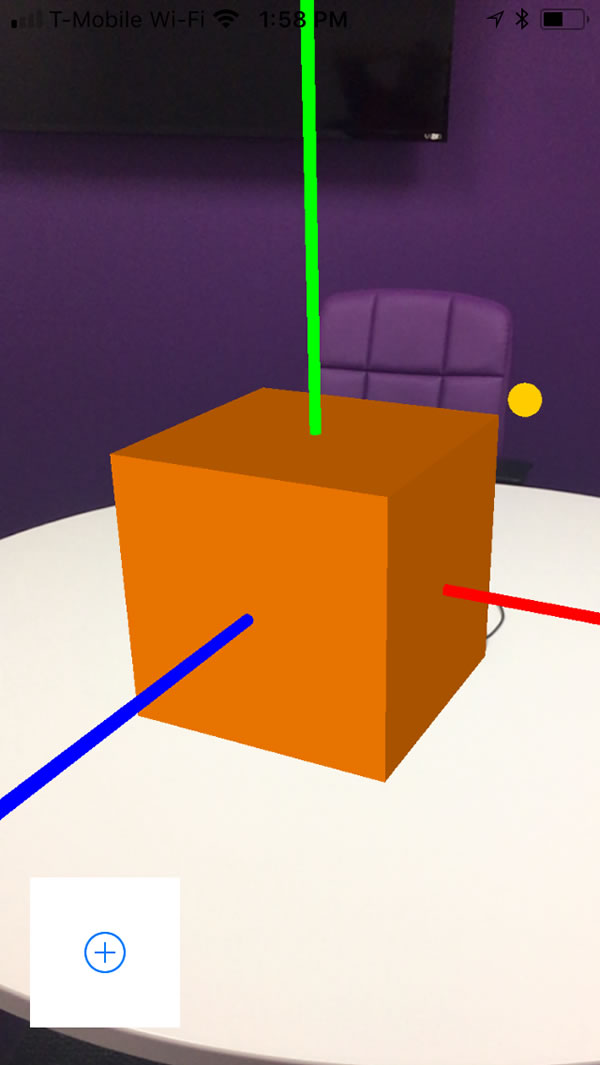
Run the app again. You should now see something like this:
Adding lighting effects
You may have noticed that it can be hard to see the edges of the box from certain angles. Some lighting effects will help with that. In the viewDidLoad() method, make the AR SceneKit view’s turn on default lighting by adding a line:
override func viewDidLoad() {
  super.viewDidLoad()

  sceneView.debugOptions = [
    ARSCNDebugOptions.showWorldOrigin,
    ARSCNDebugOptions.showFeaturePoints
  ]
  sceneView.autoenablesDefaultLighting = true
  sceneView.session.run(configuration)
}
With the default lighting turned on, it’s as if there’s an omnidirectional light source located right where the camera is, and this light will illuminate and be reflected by all SceneKit objects in the view. Since it’s virtual light, it won’t affect any real-world objects in the view.
If you run the app now, the box appears more defined:
Let’s add another lighting effect. In the addShape() method, add a line so that the shape gives off specular reflection in addition to diffuse reflection:
func addShape() {
  let node = SCNNode()
  node.geometry = SCNBox(width: 0.1, height: 0.1, length: 0.1, chamferRadius: 0)
  node.geometry?.firstMaterial?.diffuse.contents = UIColor.orange
  node.geometry?.firstMaterial?.specular.contents = UIColor.white
  node.position = SCNVector3(0, 0, 0)
  sceneView.scene.rootNode.addChildNode(node)
}
It’s easier to show you what specular reflection is than it is to describe it. Run the app, and you should see something like this:
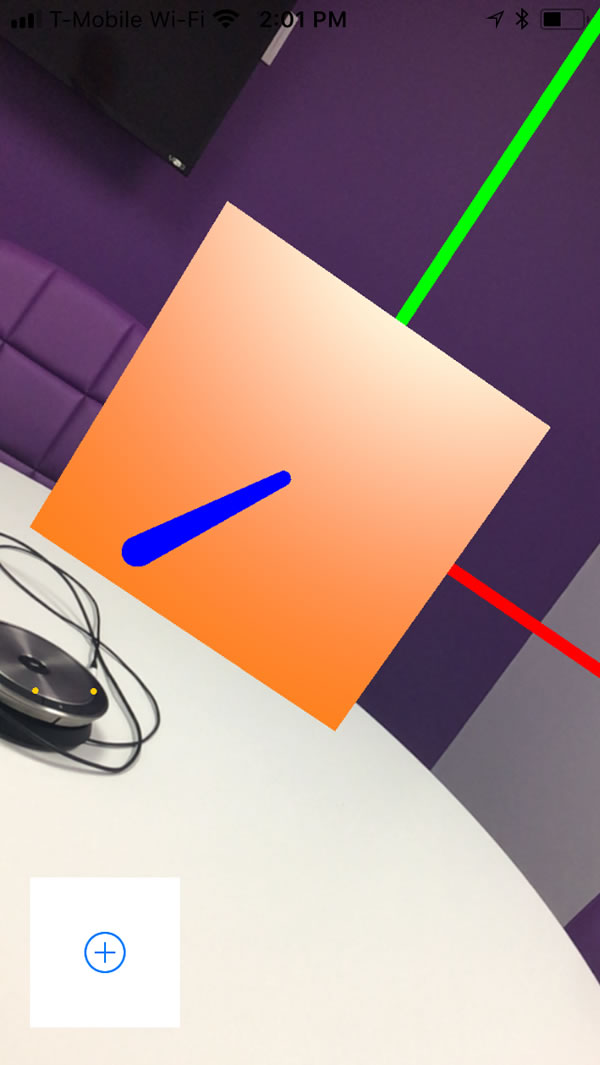
Remember, we’ve turned on the default lighting, which creates a virtual light source right where the camera is. You can see that light source’s specular reflection when you look at the box from certain angles.
Now that you’ve seen both diffuse and specular reflection in action, here’s the science that explains the difference between the two:
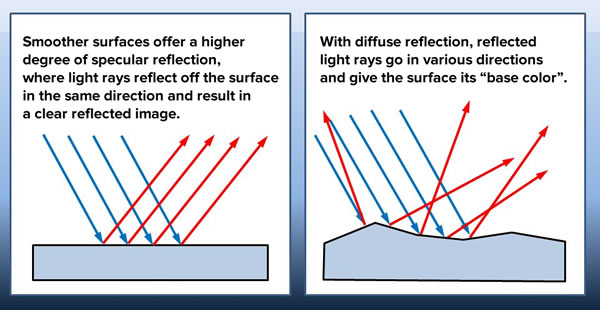
- In diffuse reflection, light rays that hit the surface get scattered at many angles. Diffuse reflection is what makes objects visible and gives them their base color and texture.
- In specular reflection, light rays that hit the surface reflect off the surface at the same angle. The more specular reflection an object exhibits, the more mirror-like it is.
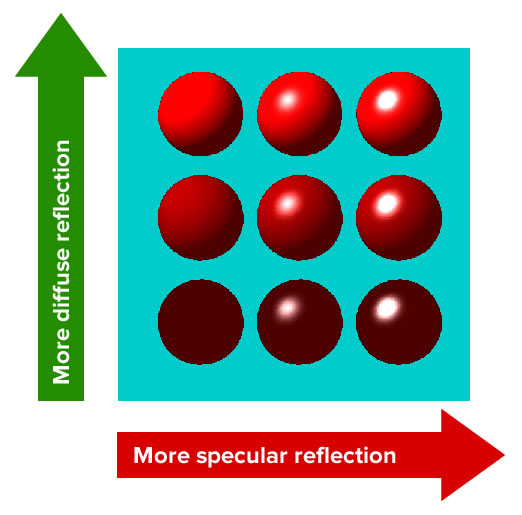
Here’s a diagram showing how differing combinations of diffuse and specular reflection appear on a computer-generated sphere:
Random locations
So far, we’ve been drawing what appears to be a single shape at the same location, (0, 0, 0). In fact, every time you press the button, you’re adding another shape to the AR world, but in the exact same place, which is why it seems that there’s only one shape there.
Let’s fix that by changing the addShape() method so that it draws its shape in a random location within a half-meter radius of the origin:
func addShape() {
  let node = SCNNode()
  node.geometry = SCNBox(width: 0.1, height: 0.1, length: 0.1, chamferRadius: 0)
  node.geometry?.firstMaterial?.diffuse.contents = UIColor.orange
  node.geometry?.firstMaterial?.specular.contents = UIColor.white

  // Give the shape a random location
  let x = drand48() * 1 - 0.5
  let y = drand48() * 1 - 0.5
  let z = drand48() * 1 - 0.5
  print("x:\(x) y:\(y) z:\(z)")
  node.position = SCNVector3(x, y, z)

  sceneView.scene.rootNode.addChildNode(node)
}
With this change, the app now draws cubes in random positions around the origin:

Stop the app and run it again, press the button over and over, and pay attention to where the cubes are drawn. You may notice that they seems to be appearing in the same places as the previous run. In fact, if you run the app with your device connected to the computer, you’ll see in Xcode’s debug console that every time you run the app and press the button, it always generates the same “random” coordinates. For one particular session, the app always generated these coordinates for the cubes:
x:-0.103535226239725 y:0.340485369411425 z:-0.146663902754756
x:-0.0534165652034559 y:-0.181307227688119 z:0.386428433223031
x:-0.484417150591671 y:0.0840902203172718 z:-0.340631373468195
x:-0.116284125192806 y:0.191004373382196 z:-0.441141086407264
x:0.399854306161604 y:-0.336454049369635 z:-0.340928497418194
x:0.0330647140218545 y:0.104144189711239 z:0.0826990212072189
This happens because drand48(), like most random number generating functions, isn’t truly random. It’s a pseudorandom function that starts with a “seed” value and then performs some mathematical operation on that value to get a new, seemingly-random number. If you don’t give drand48() a new seed value for each session, it will always generate the same sequence of pseudorandom numbers.
Fortunately, seeding drand48() is simple: all you have to do provide its seeding function, srand48() with an integer as a seed value. If you use an integer that you know will be different every time you run the app, drand48() will provide a different series of pseudorandom numbers every time you run the app. Many pseudorandom number-generating systems use the current time as the seed value, and that’s what we’ll do.
Change the code in viewDidLoad() so that it looks like this:
override func viewDidLoad() {
  super.viewDidLoad()

  srand48(Int(Date().timeIntervalSince1970))

  sceneView.debugOptions = [
    ARSCNDebugOptions.showWorldOrigin,
    ARSCNDebugOptions.showFeaturePoints
  ]
  sceneView.autoenablesDefaultLighting = true
  sceneView.session.run(configuration)
}
The Date class’ timeIntervalSince1970 property returns a Double representing the number of seconds that have passed since midnight UTC on January 1, 1970. As a constantly-changing value, it’s a pretty good one to use to seed drand48().
If you run the app with the above change in place, you’ll see that it generates cubes in different locations for every run.
Random orientations
Right now, all the shapes we’re drawing are in different positions, but all have the same orientations. Just as node positions are set using the Node.position property, node orientations are set during the Node.eulerAngles property, which sets the node’s angles of rotation around the x-, y-, and z-axes:
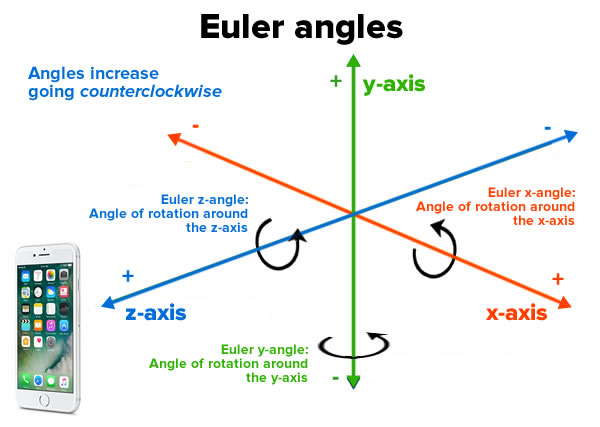
Euler is a reference to superstar mathematician Leonhard Euler, and it’s pronounced “Oiler”.
Update theaddShape() method so that it randomizes the shapes’ Euler angles:
@IBAction func addShape(_ sender: Any) {
  let node = SCNNode()
  node.geometry = SCNBox(width: 0.1, height: 0.1, length: 0.1, chamferRadius: 0)
  node.geometry?.firstMaterial?.diffuse.contents = UIColor.orange
  node.geometry?.firstMaterial?.specular.contents = UIColor.white

  // Give the shape a random location
  let x = drand48() * 1 - 0.5
  let y = drand48() * 1 - 0.5
  let z = drand48() * 1 - 0.5
  print("x:\(x) y:\(y) z:\(z)")
  node.position = SCNVector3(x, y, z)

  // Give the shape a random orientation
  let eulerX = drand48() * 2 * .pi
  let eulerY = drand48() * 2 * .pi
  let eulerZ = drand48() * 2 * .pi
  print("eulerX:\(eulerX) eulerY:\(eulerY) eulerZ:\(eulerZ)")
  node.eulerAngles = SCNVector3(eulerX, eulerY, eulerZ)

  sceneView.scene.rootNode.addChildNode(node)
}
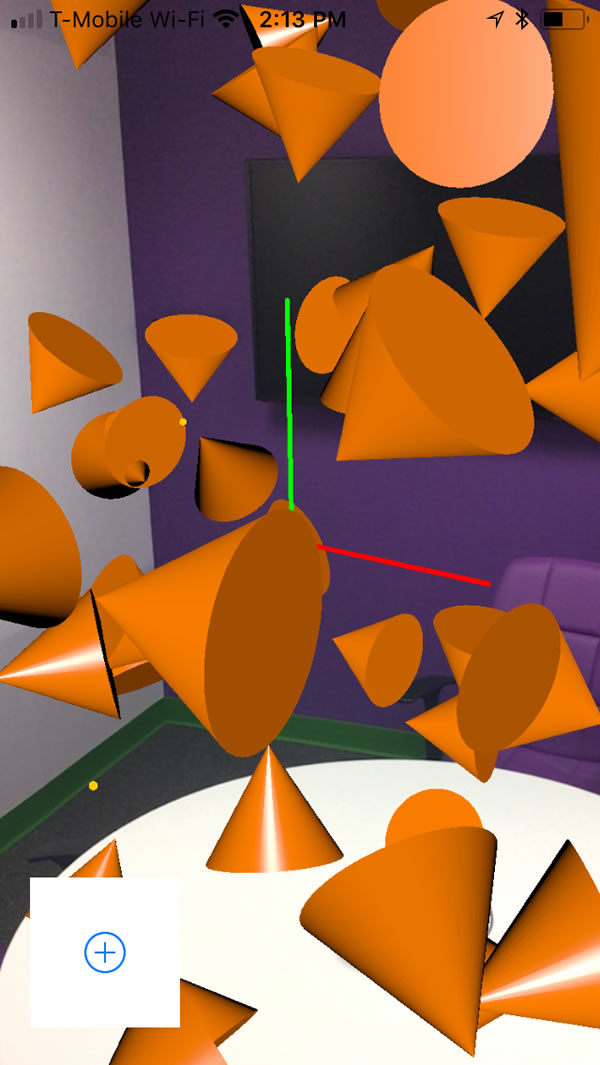
Now when you run the app and press the button, you should see something like this:
Another shape
And finally, if you’re getting tired of cubes, how about cones? Namely, SCNCones:
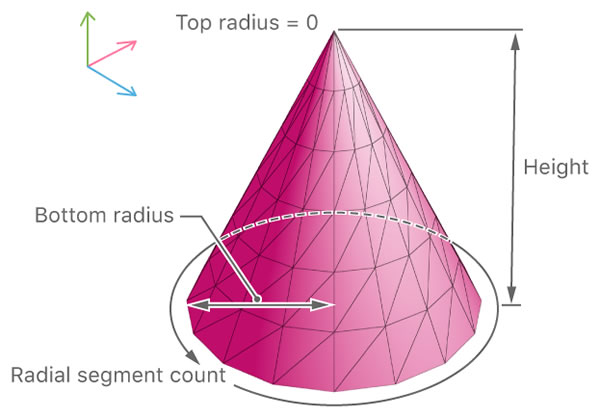
Change the line in the addShape() method that define’s the node’s geometry to:
node.geometry = SCNCone(topRadius: 0.1, bottomRadius: 0.2, height: 0.2)
Run the app. You should now see something like this:
Get the code / coming up next
Here’s the Xcode project containing the code shown in this article.
Be sure to try out the other available geometries for nodes:
In the next article in this series, we’ll apply what was covered in this article and use it to create an app that turns your iPhone or iPad into a simple version of Google’s Tilt Brush: