
In case you missed part 1…
Before you continue reading, be sure to check out part 1! It’s where I explain what a linked list is, and provide a couple of basic classes that we’ll build on in this article.
A quick recap
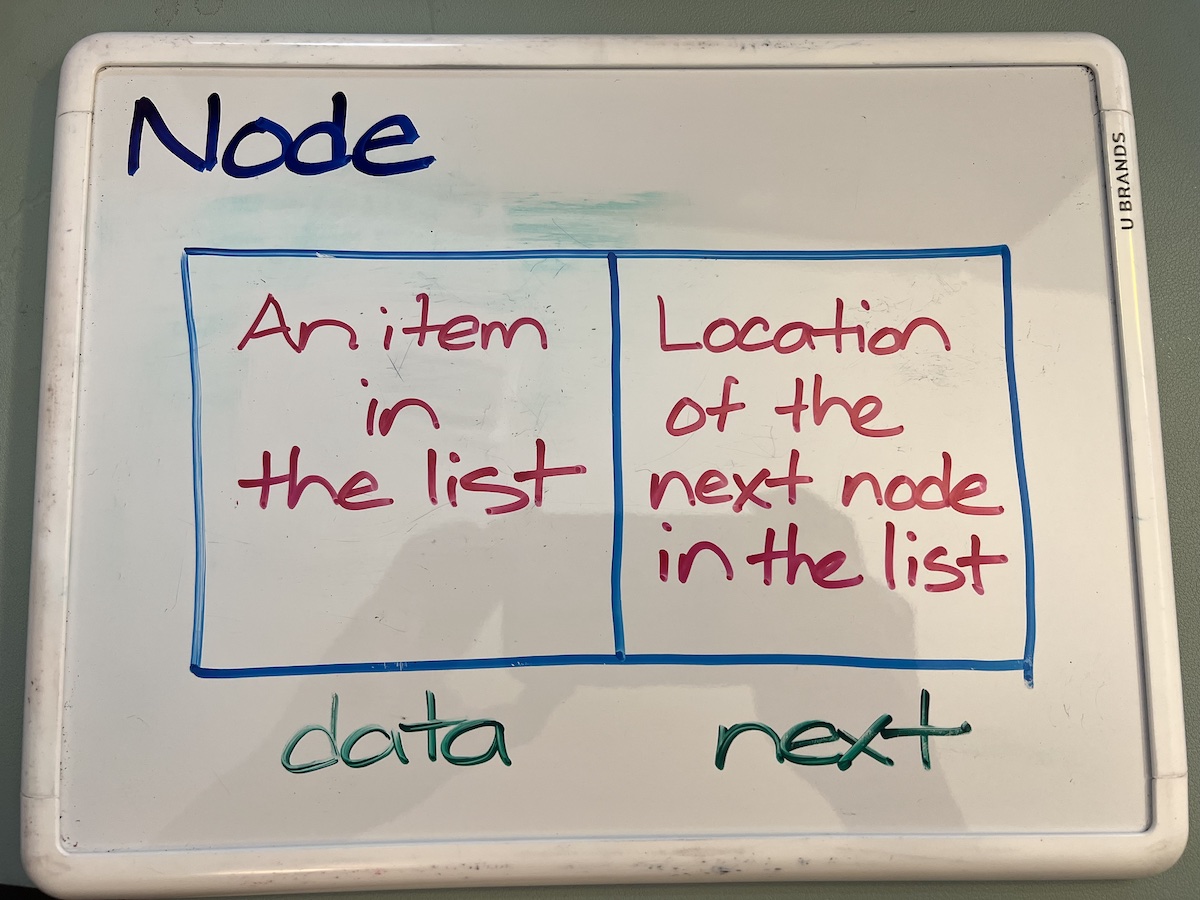
A linked list is a data structure that holds data as a list of items in a specific order. Each item in the list is represented by a node, which “knows” two things:
- Its data
- Where the next node is
Here’s a picture of a node’s structure:
Tap to view at full size.
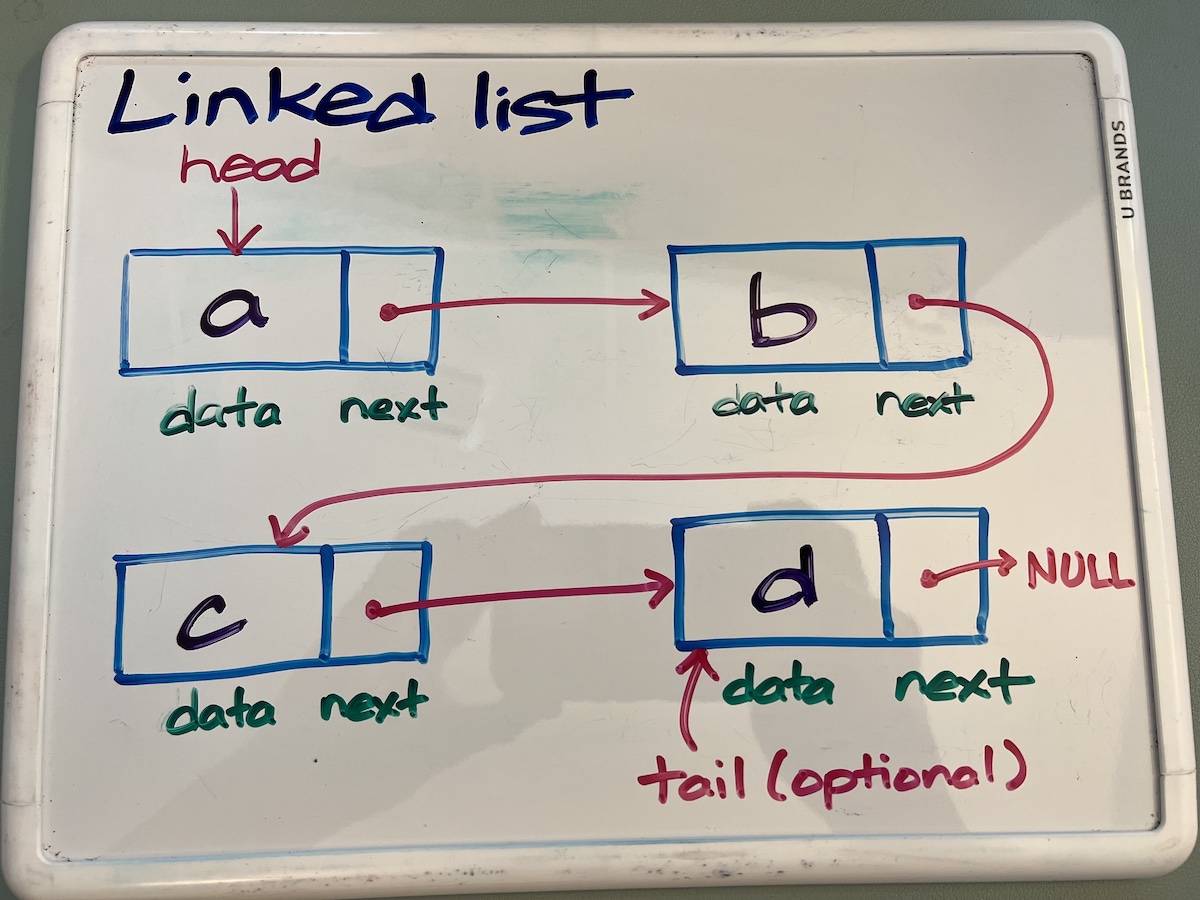
Linked lists are created by connecting nodes together, as shown in the diagram below for a list containing the characters a, b, c, and d in that order:
Tap to view at full size.
The diagram above features the following:
- Four nodes, each one for a letter in the list.
- A variable called
head, which is a pointer or reference to the first item in the list. It’s the entry point to the list, and it’s a necessary part of the list — you can’t access a linked list if you can’t access its head. - An optional variable called
tail, which is a pointer or reference to the last item in the list. It’s not absolutely necessary, but it’s convenient if you use the list like a queue, where the last element in the list is also the last item that was added to the list.
The JavaScript version of the previous article’s code
In the previous article, I provided code for the Node and LinkedList classes in Python. As promised, here are those classes implemented in JavaScript.
// JavaScript

class Node {

    constructor(data) {
        this.data = data
        this.next = null
    }

    toString() {
        return this.data.toString()
    }

}


class LinkedList {

    constructor() {
        this.head = null
    }

    toString() {
        let output = ""
        let currentNode = this.head

        while (currentNode) {
            output += `${currentNode.data.toString()}\n`
            currentNode = currentNode.next
        }

    toString() {
        if (!this.head) {
            return('Empty list.')
        }

        let output = ""
        let currentNode = this.head

        while (currentNode) {
            output += `${currentNode.data.toString()}\n`
            currentNode = currentNode.next
        }

        return output.trim()
    }

    addLast(data) {
        let newNode = new Node(data)

        // If the list is empty,
        // point `head` to the newly-added node
        // and exit.
        if (this.head === null) {
            this.head = newNode
            return
        }

        // If the list isn’t empty,
        // traverse the list by going to each node’s
        // `next` node until there isn’t a `next` node...
        let currentNode = this.head
        while (currentNode.next) {
            currentNode = currentNode.next
        }

        // If you’re here, `currentNode` is
        // the last node in the list.
        // Point `currentNode` at
        // the newly-added node.
        currentNode.next = newNode
    }

}
…where each item in a list is represented by the node. A node knows only about the data it contains and where the next node in the list is.
The JavaScript version of Node and LinkedList uses the same algorithms as the Python version. The Python version follows the snake_case naming convention, while the JavaScript version follows the camelCase convention.
The JavaScript LinkedList class has the following members:
head: A property containing a pointer or reference to the first item in the list, ornullif the list is empty. This property has the same name in the Python version.constructor(): The class constructor, which initializesheadtonull, meaning that any newly createdLinkedListinstance is an empty list. In the Python version, the__init__()method has this role.toString(): Returns a string representation of the contents of the linked list for debugging purposes. If the list contains at least one item, it returns the contents of the list. If the list is empty, it returns the stringEmpty list. In the Python version, the__str__()method has this role.addLast(): Given a value, it creates a newNodecontaining that value and adds thatNodeto the end of the list. In the Python version, theadd_last()method has this role.
Adding more functionality to the list
In this article, we’re going to add some much-needed additional functionality to the LinkedList class, namely:
- Reporting how many elements are in the list
- Getting the value of the nth item in the list
- Setting the value of the nth item in the list
I’ll provide both Python and JavaScript implementations.
How many elements are in the list?
To find out how many elements are in a linked list, you have to start at its head and “step through” every item in the list by following each node’s next property, keeping a count of each node you visit. When you reach the last node — the one whose next property is set to None in Python or null in JavaScript — report the number of nodes you counted.
The Python version uses one of its built-in “dunder” (Pythonese for double-underscore) methods, __len__(), to report the number of items in the list. Defining __len__() for LinkedList means that any LinkedList instance will report the number of items it contains when passed as an argument to the built-in len() function. For example, if a LinkedList instance named my_list contains 5 items, len(my_list) returns the value 5.
Here’s the Python version, which you should add to the Python version of LinkedList:
# Python

def __len__(self):
    count = 0
    current_node = self.head

    # Traverse the list, keeping count of
    # the nodes that you visit,
    # until you’ve gone past the last node.
    while current_node:
        current_node = current_node.next
        count += 1

    return count
The JavaScript version is getCount(). If a LinkedList instance named myList contains 5 items, len(myList) returns the value 5.
Here’s the JavaScript version, which you should add to the JavaScript version of LinkedList:
// JavaScript

getCount() {
    let count = 0
    let currentNode = this.head

    // Traverse the list, keeping count of
    // the nodes that you visit,
    // until you’ve gone past the last node.
    while (currentNode) {
        currentNode = currentNode.next
        count++
    }

    return count
}
How do I get the data at the nth node in the list?
To get the data at the nth node of the list, you can use an approach that’s similar to the one for counting the list’s elements. You have to start at the head and “step through” every item in the list by following each node’s next property, keeping a count of each node you visit and comparing it against n, where n is the index of the node whose data you want. When the count of nodes you’ve visited is equal to n, report the data contained within the current node.
Here’s the Python version, get_element_at(), which you should add to the Python version of LinkedList:
# Python

def get_element_at(self, index):
    current_index = 0
    current_node = self.head

    # Traverse the list, keeping count of
    # the nodes that you visit,
    # until you’ve reached the specified node.
    while current_node:
        if current_index == index:
            # We’re at the node at the given index!
            return current_node.data

        # We’re not there yet...
        current_node = current_node.next
        current_index += 1

    # If you’re here, the given index is larger
    # than the number of elements in the list.
    return None
Here’s the JavaScript version, getElementAt(), which you should add to the JavaScript version of LinkedList:
// JavaScript

getElementAt(index) {
    let currentIndex = 0
    let currentNode = this.head

    // Traverse the list, keeping count of
    // the nodes that you visit,
    // until you’ve reached the specified node.
    while (currentNode) {
        if (currentIndex === index) {
            // We’re at the node at the given index!
            return currentNode.data
        }

        // We’re not there yet...
        currentNode = currentNode.next
        currentIndex++
    }

    // If you’re here, the given index is larger
    // than the number of elements in the list.
    return null
}
How do I set the value of the nth node in the list?
To set the data at the nth node of the list, you can use an approach that’s similar to the one for getting the data at the nth node. You have to start at the head and “step through” every item in the list by following each node’s next property, keeping a count of each node you visit and comparing it against n, where n is the index of the node whose data you want. When the count of nodes you’ve visited is equal to n, set the current node’s data property to the new value.
Here’s the Python version, set_element_at(), which you should add to the Python version of LinkedList:
# Python

def set_element_at(self, index, value):
    current_index = 0
    current_node = self.head

    # Traverse the list, keeping count of
    # the nodes that you visit,
    # until you’ve reached the specified node.
    while current_node:
        if current_index == index:
            # We’re at the node at the given index!
            current_node.data = value
            return True

        # We’re not there yet...
        current_node = current_node.next
        current_index += 1

    # If you’re here, the given index is larger
    # than the number of elements in the list.
    return False
Here’s the JavaScript version, setElementAt(), which you should add to the JavaScript version of LinkedList:
// JavaScript

setElementAt(index, value) {
    let currentIndex = 0
    let currentNode = this.head

    // Traverse the list, keeping count of
    // the nodes that you visit,
    // until you’ve reached the specified node.
    while (currentNode) {
        if (currentIndex === index) {
            // We’re at the node at the given index!
            currentNode.data = value
            return true
        }

        // We’re not there yet...
        currentNode = currentNode.next
        currentIndex++
    }

    // If you’re here, the given index is larger
    // than the number of elements in the list.
    return false
}
The classes so far
Let’s take a look at the complete Node and LinkedList classes so far, in both Python and JavaScript.
Python
# Python

class Node:

    def __init__(self, data):
        self.data = data
        self.next = None

    def __str__(self):
        return f"{self.data}"


class LinkedList:

    def __init__(self):
        self.head = None

    def __str__(self):
        if self.head is None:
            return('Empty list.')

        result = ""
        current_node = self.head
        while current_node:
            result += f'{current_node}\n'
            current_node = current_node.next

        return result.strip()

    def add_last(self, value):
        new_node = Node(value)

        # If the list is empty,
        # point `head` to the newly-added node
        # and exit.
        if self.head is None:
            self.head = new_node
            return

        # If the list isn’t empty,
        # traverse the list by going to each node’s
        # `next` node until there isn’t a `next` node...
        current_node = self.head
        while current_node.next:
            current_node = current_node.next

        # If you’re here, `current_node` is
        # the last node in the list.
        # Point `current_node` at
        # the newly-added node.
        current_node.next = new_node

    def __len__(self):
        count = 0
        current_node = self.head

        # Traverse the list, keeping count of
        # the nodes that you visit,
        # until you’ve gone past the last node.
        while current_node:
            current_node = current_node.next
            count += 1

        return count

    def get_element_at(self, index):
        current_index = 0
        current_node = self.head

        # Traverse the list, keeping count of
        # the nodes that you visit,
        # until you’ve reached the specified node.
        while current_node:
            if current_index == index:
                # We’re at the node at the given index!
                return current_node.data

            # We’re not there yet...
            current_node = current_node.next
            current_index += 1

        # If you’re here, the given index is larger
        # than the number of elements in the list.
        return None

    def set_element_at(self, index, value):
        current_index = 0
        current_node = self.head

        # Traverse the list, keeping count of
        # the nodes that you visit,
        # until you’ve reached the specified node.
        while current_node:
            if current_index == index:
                # We’re at the node at the given index!
                current_node.data = value
                return True

            # We’re not there yet...
            current_node = current_node.next
            current_index += 1

        # If you’re here, the given index is larger
        # than the number of elements in the list.
        return False
JavaScript
// JavaScript

class Node {

    constructor(data) {
        this.data = data
        this.next = null
    }

    toString() {
        return this.data.toString()
    }

}


class LinkedList {

    constructor() {
        this.head = null
    }

    toString() {
        if (!this.head) {
            return('Empty list.')
        }

        let output = ""
        let currentNode = this.head

        while (currentNode) {
            output += `${currentNode.data.toString()}\n`
            currentNode = currentNode.next
        }

        return output.trim()
    }

    addLast(value) {
        let newNode = new Node(value)

        // If the list is empty,
        // point `head` to the newly-added node
        // and exit.
        if (this.head === null) {
            this.head = newNode
            return
        }

        // If the list isn’t empty,
        // traverse the list by going to each node’s
        // `next` node until there isn’t a `next` node...
        let currentNode = this.head
        while (currentNode.next) {
            currentNode = currentNode.next
        }

        // If you’re here, `currentNode` is
        // the last node in the list.
        // Point `currentNode` at
        // the newly-added node.
        currentNode.next = newNode
    }

    getCount() {
        let count = 0
        let currentNode = this.head

        // Traverse the list, keeping count of
        // the nodes that you visit,
        // until you’ve gone past the last node.
        while (currentNode) {
            currentNode = currentNode.next
            count++
        }

        return count
    }

    getElementAt(index) {
        let currentIndex = 0
        let currentNode = this.head

        // Traverse the list, keeping count of
        // the nodes that you visit,
        // until you’ve reached the specified node.
        while (currentNode) {
            if (currentIndex === index) {
                // We’re at the node at the given index!
                return currentNode.data
            }

            // We’re not there yet...
            currentNode = currentNode.next
            currentIndex++
        }

        // If you’re here, the given index is larger
        // than the number of elements in the list.
        return null
    }

    setElementAt(index, value) {
        let currentIndex = 0
        let currentNode = this.head

        // Traverse the list, keeping count of
        // the nodes that you visit,
        // until you’ve reached the specified node.
        while (currentNode) {
            if (currentIndex === index) {
                // We’re at the node at the given index!
                currentNode.data = value
                return true
            }

            // We’re not there yet...
            currentNode = currentNode.next
            currentIndex++
        }

        // If you’re here, the given index is larger
        // than the number of elements in the list.
        return false
    }

}
Wait…this “linked list” thing is beginning to look like a Python or JavaScript array, but not as fully-featured. What’s going on here?
The truth about linked lists
Here’s the truth: there’s a better-than-even chance that you’ll never use them…directly.
If you program in most languages from the 1990s or later (for example, Python was first released in 1991, PHP’s from 1994, Java and JavaScript came out in 1995), you’re working with arrays — or in Python’s case, lists, which are almost the same thing — that you can you can add elements to, remove elements from, perform searches on, and do all sorts of things with.
When you use one of these data types in a modern language…
- Python lists or a JavaScript arrays
- Dictionaries, also known as objects in JavaScript, hashes in Ruby, or associative arrays
- Stacks and queues
- React components
…there’s a linked list behind the scenes, moving data around by traversing, adding, and deleting nodes. There’s a pretty good chance that you’re indirectly using linked lists in your day-to-day programming; you’re just insulated from the details by layers of abstractions.
So why do they still pose linked list challenges in coding interviews?

History plays a major factor.
In older languages like FORTRAN (1957), Pascal (1970), and C (1972), arrays weren’t dynamic, but fixed in size. If you declared an array with 20 elements, it remained a 20-element array. You couldn’t add or remove elements at run-time.
But Pascal and C supported pointers from the beginning, and pointers make it possible to create dynamic data structures — the kind where you can add or delete elements at run-time. In those early pre-web days, when programming languages’ standard libraries weren’t as rich and complete as today’s, and you often had to “roll your own” dynamic data structures, such as trees, queues, stacks, and…linked lists.
If you majored in computer science in the ’70s, ’80s, and even the ’90s, you were expected to know how to build your own dynamic data structures from scratch, and they most definitely appeared on the exam. These computer science majors ended up in charge at tech companies, and they expected the people they hired to know this stuff as well. Over time, it became tradition, and to this day, you’ll still get the occasional linked list question in a coding interview.
What’s the point in learning about linked lists when we’re mostly insulated from having to work with them directly?
For starters, there’s just plain old pragmatism. As long as they’re still asking linked list questions in coding interviews, it’s a good idea to get comfortable with them and be prepared to answer all manner of questions about algorithms and data structures.
Secondly, it’s a good way to get better at the kind of problem solving that we need in day-to-day programming. Working with linked lists requires us to think about pointers/references, space and time efficiency, tradeoffs, and even writing readable, maintainable code. And of course, there’s always a chance that you might have to implement a linked list yourself, whether because you’re working on an IoT or embedded programming project with a low-level language like C or implementing something lower-level such as the reconciler in React.
Coming up next
- Adding a new element to the head of a linked list
- Adding a new element at a specific place in the middle of a linked list
- Deleting a specified element of a linked list
Previously in this series
- How to solve coding interview questions: Linked lists, part 1
- How to solve coding interview questions: Finding the first NON-recurring character in a string in Swift
- How to solve coding interview questions: Looking deeper into finding the first NON-recurring character in a string
- How to solve coding interview questions: The first NON-recurring character in a string
- Coding interview questions: “First recurring character” in Swift
- How to solve coding interview questions: The first recurring character in a string
- I Has the Dumb (or: How I Embarrassed Myself in My Interview with Google) — from way back in 2013
One reply on “How to solve coding interview questions: Linked lists, part 2”
[…] linked list exercises continue! In case you missed them, be sure to check out part 1 and part 2 of this linked list series before moving […]