
Regular readers of this blog or followers of my LinkedIn or Twitter accounts will know that I’m currently looking for a new job. I’ve been doing the requisite searching and networking, and have taken some less typical approaches such as publicizing my magnum opus job application (which was actually an application to a prospective employer, with information about that prospect sanitized out) and ramping up my activities at local events (such as the recent Makers Hustle Harder hackathon, and various local meetups).
In this article, I’m sharing a Python program that I wrote as my solution to a programming challenge issued to candidates for a developer marketer position. I didn’t land the job, but going through the challenge was still a worthwhile experience, and worth sharing here.
The position and the challenge
The position for which I was applying was that of Developer Marketing Manager at a company whose online service allows users to integrate or “glue” various web and other applications together to create new functionality, without programming, in a “when a certain event happens, perform this defined task in response” fashion. For example, you could use their service to tie together email and SMS so that you would be sent a text message whenever you received email from a specific email address. You’ve probably heard of this company.
They wanted someone who could wear both marketer and developer hats. To test the developer hat, part of the application required submitting a response to a programming challenge.
The challenge was to take a CSV file with the following contents…

…and write an application that does the following for each non-heading row:
- Perform a Google search for the item in the first column
- Write the link from the first result of that search into the second column
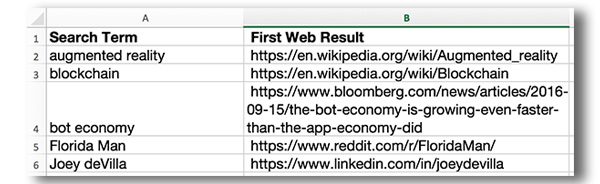
Once this has been done for all the rows, write the results into a new CSV file. For the example search terms, the resulting file should look like this:
They wanted it implemented in Python, which is the language they use to implement their main product. Although it’s been some time since I’ve done any Python coding — and even longer since I’ve written any Python code professionally, I was confident that my familiarity with its syntax and my knack for picking up programming languages I haven’t touched in ages (go to my GitHub account and see this repo, this repo, and this repo for examples) would serve me well.
Before you code: Determine what’s on their mind

Sigmund Freud, who turned reading things into what people do and say into an entire industry.
Before you even begin to think about how you’d tackle the programming problem given to you, think about the question that they’re trying to answer by giving you the assignment. That question will depend on where the company doing the hiring is on the spectrum:
- On one end of the spectrum are organizations like Google, Microsoft, and Amazon, who are in the business of making software, and have whole departments, complete with dedicated people and well-defined processes, dedicated to finding and evaluating prospective employees. They’re often looking to fill a specialized role on a larger team, and the question they’re asking is “Is this person someone with the developer skills to fill a very specific, well-defined role to meet our very specific, well-defined set of needs?”
- On the other end are businesses made up of a handful of people — or perhaps only one person — who have been given the task of finding a new programmer in addition to all their other day-to-day responsibilities. They’re often looking to find a techie who can wear many hats, and the question they’re asking is “Is this person someone with the developer skills to fill a number of related roles to meet our amorphous, general set of needs?”
You’ll need to determine where the people interviewing you are on this spectrum, and tailor your answer accordingly.

You should also think about the company’s “obsessions”, by which I mean the topics, issues, areas of expertise, and programming tools and technologies that are the driving forces behind their technology. Their obsessions will often dictate the sort of programming assignment that they give, and may even give you an idea of the sorts of problems they’re trying to solve and skills they’re looking for.
Here’s a short list of programming assignments I have been given in the course of job interviews and application processes. Note the connection between what a company does and the programming assignment it issues:
| Company description |
Programming assignment description |
| A large company (about 50,000 employees worldwide) in the search engine business. |
Build a class that stores an index of web pages by their urls, with methods for adding a web page and for returning only those web pages that contain a given search term. It would essentially be a very scaled-down version of their own application.
They didn’t care what programming language I used, although their preferred programming languages are C++, Java, JavaScript, Python, and a couple of programming languages they developed in-house. |
| A growing company (just under 1,500 employees) whose service lets you store and share files in the cloud, as well as synchronize those files in the cloud with your own local filesystems. |
Build a program that would let you create a nested hierarchical store of key-value data and write methods to create, read, update, and delete from this store. It would essentially be a very scaled-down version of their own application.
The application was to be written in Python, as this was their preferred programming language, adn used extensively on both the server and desktop client sides. |
| A training company with dozens of instructors that was looking for people to teach Windows/.NET desktop development to beginner/intermediate developers. |
Build an application that stores student information in a relational database. It should allow the user to create, read, update, and delete student information from the database. It would be the sort of application that graduates of their courses would need to learn how to write.
The application could be written in C# or Visual Basic, as these are preferred development languages for in-house line-of-business Windows desktop applications. |
| A consultancy of about 18 people that developed custom sites based on WordPress. |
Build a plugin that would display the 5 most recent blog comments and links to them in the sidebar. They have to customize WordPress for their clients on a regular basis, and having a library of reusable plugins would help shorten the time it took to build custom sites.
The plugin was to be written in PHP, which is what WordPress is written in. |
| A three-person shop who needed a developer to help lighten the load. |
FizzBuzz, that now-infamous programming exercise, which goes like this:
Write a program that prints the numbers from 1 to 100. But for multiples of three print “Fizz” instead of the number and for the multiples of five print “Buzz”. For numbers which are multiples of both three and five print “FizzBuzz”.
The guy who interviewed me had been burned by a couple of hires (and fires) who said that they could program, and interviewed well, but when it came time to actually code, they couldn’t. He was using it as a “can you program or not?” filter.
He didn’t care what programming language I used, so for maximum portability, I did it in JavaScript. |
In the case of this programming challenge, the company was about 50 people in size at the time, and as I said earlier, their main product was a “if a certain thing happens, perform a certain action in response” kind of online service. Many techies are familiar with their service, but not they’re not yet a “household brand”. The question they were trying to answer with this challenge was “Can this person program, and can he explain it to other developers?”, so I wrote my response with that in mind.
Eat the frog

This expression comes from Mark Twain, who said “If the first thing you do in the morning is eat a live frog, you can go through the rest of the day knowing that the worst is behind you.”
It’s a suggestion to tackle the worst, most unpleasant task of the day at the start. In the case of this programming assignment, I’m using it to suggest that you tackle the part about which you know the least.
This assignment breaks down into three major parts:
- Reading the given CSV file
- Performing the Google search
- Writing a new CSV file
Reading and writing files is pretty straightforward stuff, but until this assignment, I’d never needed to perform a Google search programatically. I declared that programmatic Googling would be the frog. It was time to do some research.

Google used to provide an API for web search, but they announced its cancellation in 2010 and its last day of operation was September 29, 2014. These days, they offer the Custom Search API, which won’t work for the purposes of this application, as it’s limited to either:
- Creating a search engine for a single site
- Creating a search engine that focuses on a particular topic, but searches across a collection of websites
Without an API, doing Google searches programmatically involves sending GET requests to Google and “screen scraping” the results page. Programming screen scrapers is tedious, trial-and-error work. Luckily for me, someone’s already done the work, and the result is the google Python package.
The simplest way to install this package is to use pip, the Python package manager. With pip, installing the google package is as simple as entering this at the command line:
pip install google
If for some reason you don’t have pip installed, you can go to the google Python package page, and download the tarred-and-gzipped package. At the time of this writing, its filename is google-1.9.3.tar.gz. Once you’ve downloaded it, you’ll have a new directory named google-1.9.3. From the command line, go into the directory and run setup.py using the following command:
python setup.py install
The google package function that I was interested in was search, whose signature is:
search(query, tld='com', lang='en', num=10, start=0, stop=None, pause=2.0)
The function returns a generator that yields found URLs. Here’s a quick run-down of the parameters:
query: The query string, which must not be url-encoded.tld: The top level domain, for which the default value is com.lang: The language for the results, for which the default value is en.num: Number of results per page.start: An integer specifying the first result to retrieve.stop: An integer specifying the last result to retrieve. The default is None, which means the search goes on forever.pause: Time (in seconds) to wait between HTTP requests. Setting this too high slows down the search greatly, but setting it too low will annoy Google and may cause them to block your IP.
I installed the package using pip, and then took search for a test drive by opening a Python REPL and entering:
def search_test(search_term):
  from google import search
  for url in search(search_term, start=0, stop=10):
    print(url)
I expected that this test function would return the URLs for the first ten Google results for the given search term. I entered this at the Python prompt…
search_test('fizzbuzz')
…and got this:
http://wiki.c2.com/?FizzBuzzTest
https://en.wikipedia.org/wiki/Fizz_buzz
https://blog.codinghorror.com/why-cant-programmers-program/
https://www.rosettacode.org/wiki/FizzBuzz
http://www.tomdalling.com/blog/software-design/fizzbuzz-in-too-much-detail/
http://ditam.github.io/posts/fizzbuzz/
https://www.hackerrank.com/challenges/fizzbuzz
http://codingbat.com/doc/practice/fizzbuzz-code.html
http://softwareengineering.stackexchange.com/questions/15623/fizzbuzz-really
https://imranontech.com/2007/01/24/using-fizzbuzz-to-find-developers-who-grok-coding/
It worked! Now it was time to code the function I actually needed: one that would return only the URL for the first Google result for the given search term:
def first_google_result_url(search_term):
  for url in search(search_term, start=0, stop=1):
    break
  return url
Remember, search doesn’t return a list, but a generator, so I set it to stop after one result, store the result in the variable url, and then return the value in that variable. The break statement is there because Python syntax doesn’t allow for empty loops, and to guarantee that the loop is exited after its first iteration.
I tested out the new function by entering…
first_google_result_url('fizzbuzz')
…and got this result:
'http://wiki.c2.com/?FizzBuzzTest'
The function works, but since it’s making an online request, it’s a good idea to put in some error handling. Since this is just a programming test assignment and not a production application, it doesn’t have to be a lot of error handling — just enough to make it clear to whoever’s evaluating your code that you’re mindful that this operation might fail.
Here’s what the function looks like with just enough error handing:
def first_google_result_url(search_term):
	from google import search
	try:
		for url in search(search_term, start=0, stop=1):
			break
		return url
	except Exception as e:
		print("Error getting results from Google: %s" % str(e))
		raise SystemExit
With the frog eaten, it was time to code the other parts of the program.
Reading search terms from the CSV file

I needed a method to read the CSV file, so I wrote this one. Given a filename for a two-column CSV file, it returns a list of two-element lists, each of which represents a row in the file:
def read_input_file(file):
	rows = []
	if os.path.exists(file):
		try:
			with open(file, 'r') as csvFile:
				for currentLine in list(csvFile):
					row = currentLine.strip().split(',')
					rows.append(row)
				return rows
		except IOError:
			print("I/O error -- Couldn't read from file \"%s\"." % input_file)
			raise SystemExit
	else:
		print("The file \"%s\" doesn't exist." % filename )
		raise SystemExit
The real work is done is the try block, where:
- The file is read line by line.
- Each line has any leading and trailing whitespace stripped from it, and then is converted into a list, with each element representing a column in our table.
- The newly-created list is added to our list of rows.
Once again, to communicate that I can write code that can deal with Murphy’s Law, I wrote the method with just enough error handling for this sort of assignment. It deals with cases where the file with the given name doesn’t exists, as well as general file I/O errors that may crop up from time to time.
Getting search results for the file
I now had…
- a method that reads the CSV file and returns a list of two-element lists (
read_input_file), and
- a method that given a search term, returns the URL for the first Google result (
first_google_result_url).
I could now write this method, which would be used to take the results of read_input_file and feed them to first_google_result_url:
def get_search_results(rows):
	for currentRow in rows[1:]:
		currentRow[1] = first_google_result_url(currentRow[0])
	return rows
This method returns a list of two-element lists, where the first element contains a search term, and the second element contains the URL for the first Google result for that search term.
Writing the results to a file

I needed a method that would write the results of get_search_results to a CSV file. Here’s what I wrote:
def write_search_results(rows, file):
	try:
		with open(file, 'w') as newCsvFile:
			for currentRow in rows:
				newCsvFile.write("%s,%s\n" % (currentRow[0], currentRow[1]))
	except IOError:
		print("I/O error -- Couldn't write to file \"%s\"." % output_file)
		raise SystemExit
It takes these two arguments:
- A list of two-element lists, which should be the result of
get_search_results, and
- the name for the file to be created.
Just as with read_input_file, I added just enough error handling to show that yes, I can write code that deals with the real world.
Tying it all together

I had all the methods I needed, so it was time to write a main method to tie them all together. I wanted the program to be called this way…
python search.py input_filename output_filename
…so I wrote it to accept two parameters when called…
def main():
	if len(sys.argv) != 3:
		print("Please provide an input and output file.")
		raise SystemExit
	(input_file, output_file) = (sys.argv[1], sys.argv[2])
	input_file_rows = read_input_file(input_file)
	search_result_rows = get_search_results(input_file_rows)
	write_search_results(search_result_rows, output_file)
…and once again, with just enough error handling.
With main defined, it was time to place this at the bottom of the file:
if __name__ == '__main__':
	main()
This is a Pythonism that states “If this file is being executed directly rather than being imported, run the main method.” It encourages developers to write code in such a way that defined functionality is separate from function, and it also encourages code reuse.
Here’s the complete file:
# Python3

import sys, os

def read_input_file(file):
	rows = []
	if os.path.exists(file):
		try:
			with open(file, 'r') as csvFile:
				for currentLine in list(csvFile):
					row = currentLine.strip().split(',')
					rows.append(row)
				return rows
		except IOError:
			print("I/O error -- Couldn't read from file \"%s\"." % input_file)
			raise SystemExit
	else:
		print("The file \"%s\" doesn't exist." % filename )
		raise SystemExit

def first_google_result_url(search_term):
	from google import search
	try:
		for url in search(search_term, start=0, stop=1):
			break
		return url
	except Exception as e:
		print("Error getting results from Google: %s" % str(e))
		raise SystemExit

def get_search_results(rows):
	for currentRow in rows[1:]:
		currentRow[1] = first_google_result_url(currentRow[0])
	return rows

def write_search_results(rows, file):
	try:
		with open(file, 'w') as newCsvFile:
			for currentRow in rows:
				newCsvFile.write("%s,%s\n" % (currentRow[0], currentRow[1]))
	except IOError:
		print("I/O error -- Couldn't write to file \"%s\"." % output_file)
		raise SystemExit

def main():
	if len(sys.argv) != 3:
		print("Please provide an input and output file.")
		raise SystemExit
	(input_file, output_file) = (sys.argv[1], sys.argv[2])
	input_file_rows = read_input_file(input_file)
	search_result_rows = get_search_results(input_file_rows)
	write_search_results(search_result_rows, output_file)


if __name__ == '__main__':
	main()
Are you looking for your next great hire?

I’m looking for my next great job! If you’re looking for someone with desktop, web, mobile, and IoT development skills who can also communicate to technical and non-technical audiences, or a marketer or evangelist who also has a technology background and can code, you should talk to me.
If you’d like to learn more, you can: