A new year, a new approach to the meetup, and tweaking the format
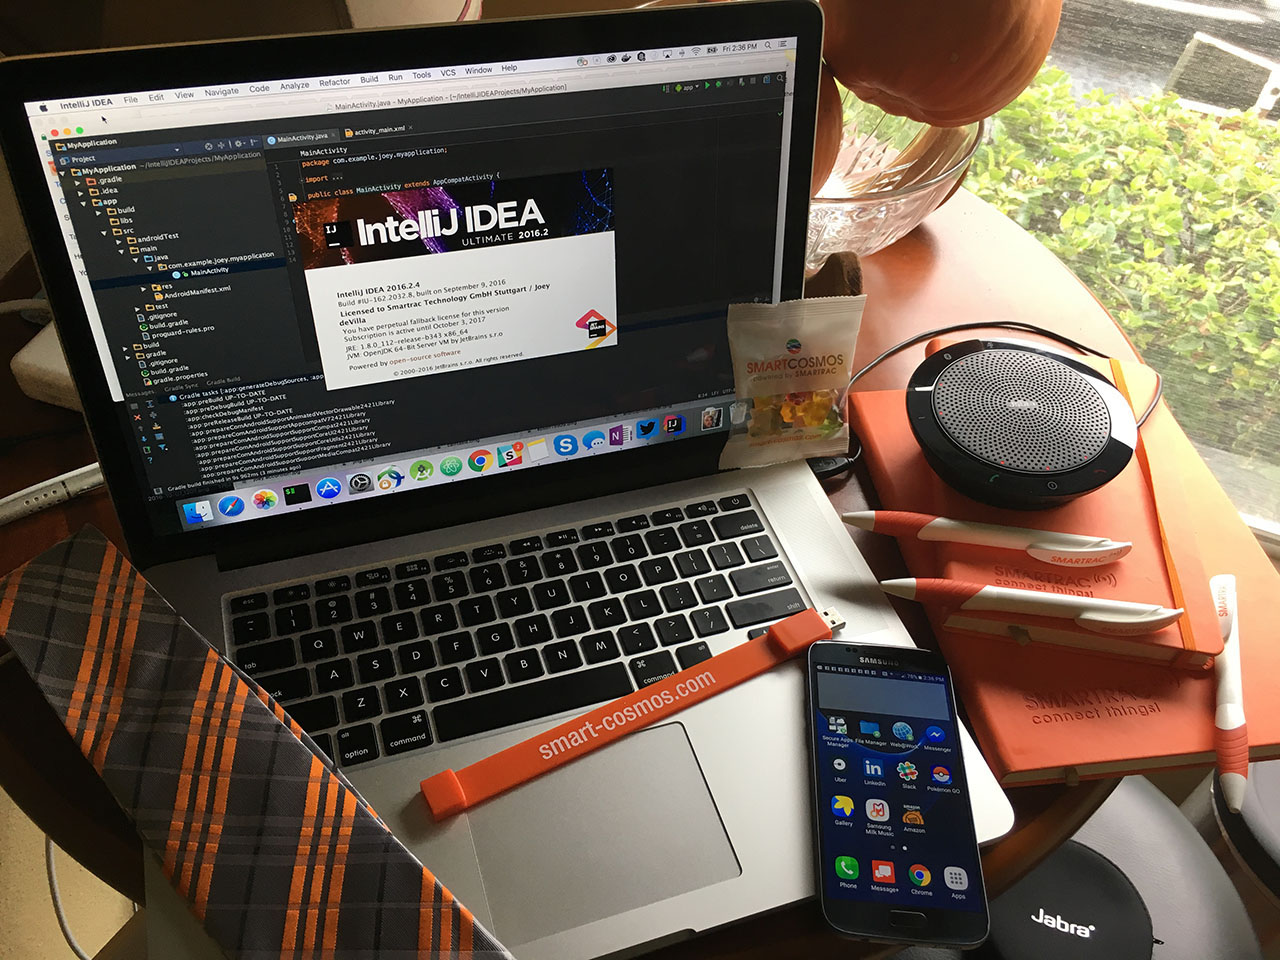
Photo by Deanna Gray.
 Tampa is lucky to have three iOS meetups. In addition to my group, Tampa iOS Meetup, we’ve got:
Suncoast iOS and Tampa Bay Cocoaheads cover topics better suited for intermediate- to expert-level iOS developers, and they do so quite well. This year, I decided shift the focus of Tampa iOS Meetup towards a different audience: people who were either new to iOS development or who were new to development in general.
With that in mind, the January 2017 session of Tampa iOS Meetup (which took place on Tuesday) was about developing a simple app: a tip calculator. While a tip calculator is a simple application, even the simplest of mobile apps have a lot going on underneath the hood, what with the programming language, the application development framework(s) involved, and the IDE. I covered a fair bit of ground in my presentation, and after a little review, have decided to tweak the format.
Future Tampa iOS Meetups will have two parts:
- A presentation part, where new concepts are introduced, followed by
- a workshop part, where those new concepts are applied.
I think that this approach will be more useful, especially to developers who are new to iOS programming or just programming in general. It would give attendees a chance to try out the concepts while they’re still fresh in their minds, as well as a chance for me to help people with their programming.

I’d like to thank Wolters Kluwer for providing the space in which to hold the meetup, as well as the food (excellent salads) and drinks! Special thanks to John Wang, my go-to guy at Wolters Kluwer, and source of valuable feedback for my presentations.
Building the dreaded tip calculator
Let’s start by building a simple app that will grow into the tip calculator. This one will be simple — it will be an app that says “Hi there” when the user taps on a button. Over a couple of articles, we’ll make changes to it, and in the end, it will be a tip calculator.
First step: Create a new project
Start by creating a new iOS project. Launch Xcode, then use File → New → Project…. This will take you to a dialog window where you’ll choose a template, which is a pre-made set of files that you can use as a starting point for your project.
Think of Xcode’s templates as being the coding answer to templates that Office-style apps provide when you create a new document. Just as PowerPoint lets you choose from pre-made templates so you don’t have to design your deck from scratch and have more time to focus on its content…
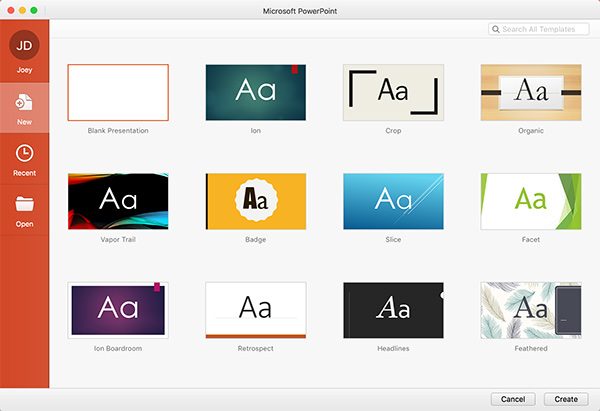
…Xcode lets you choose from pre-made templates of code, each one designed to be the basis for a different link of app.
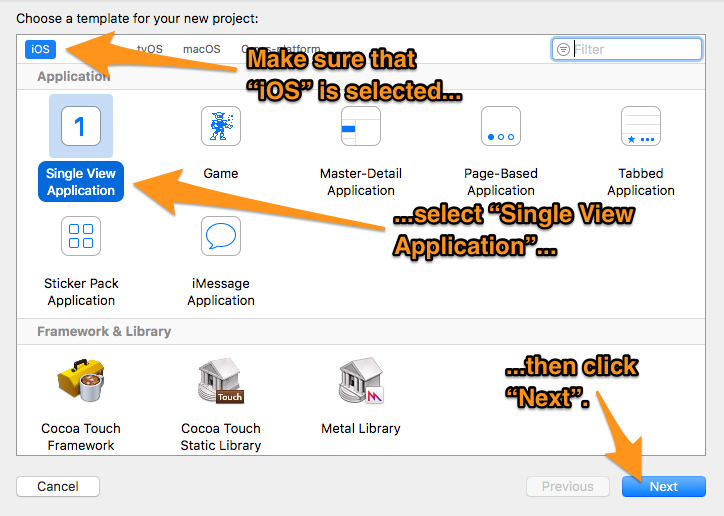
Here’s what the “Choose a template for your new project” windows looks like:
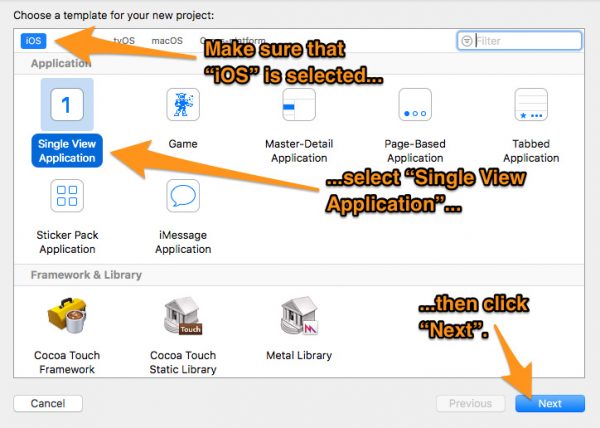
In this window, you should:
- Make sure that iOS is selected in the menu near the top of the window. Xcode can be used to write applications for a number of different platforms, and you want to be certain that the project you create will run on iOS.
- From the Application section, select Single View Application. This is a template for an app that features a single view, which corresponds to a “screen” in the app. The Single View Application template isn’t just for writing apps with single views; it’s just a template with a single view and its underlying code — a view controller — pre-defined.
- Click the Next button to go to the next window.

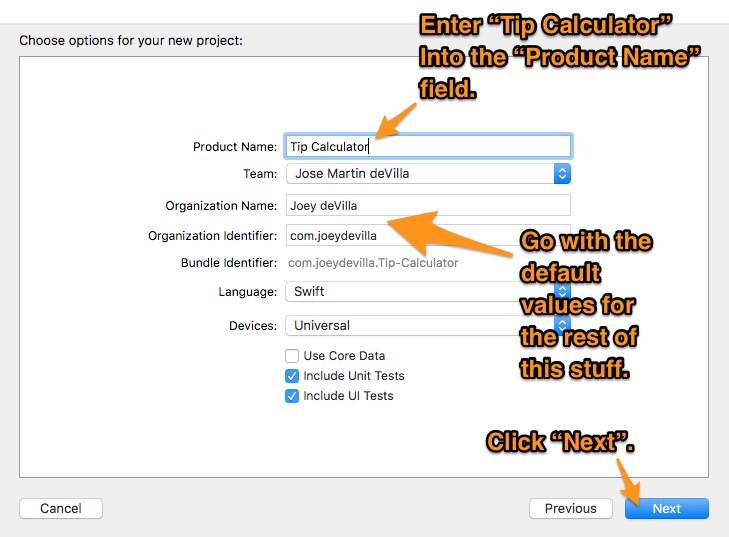
The “Choose options for your next project” window lets you specify a number of options for your project. For this project, we’ll use it to specify a name for your project, leaving the other settings at their default values.
In this window, you should:
- Enter the name of the app into the Product Name text field. I used Tip Calculator as the name for my app. This will not only be the name of the app, but the name of the folder in which its files will be stored.
- We’re leaving the other settings at their default values, so click the Next button.

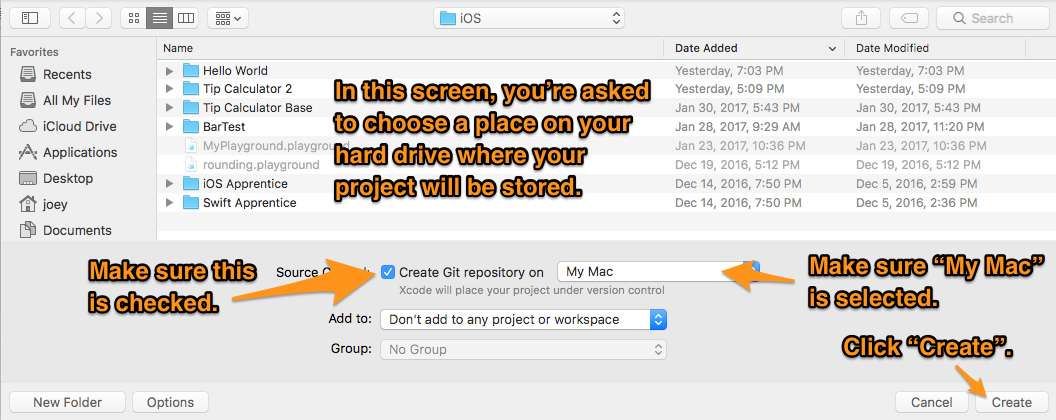
You’ll now be at the screen where you specify where the project should be saved. In this window, you should:
- Choose a place on your hard drive where your project’s folder will be stored.
- Make sure that the Create Git repository checkbox is checked, and that My Mac is selected from the drop-down list beside it.
- Click the Create button, which will start the process of generating the files and folders of your project.
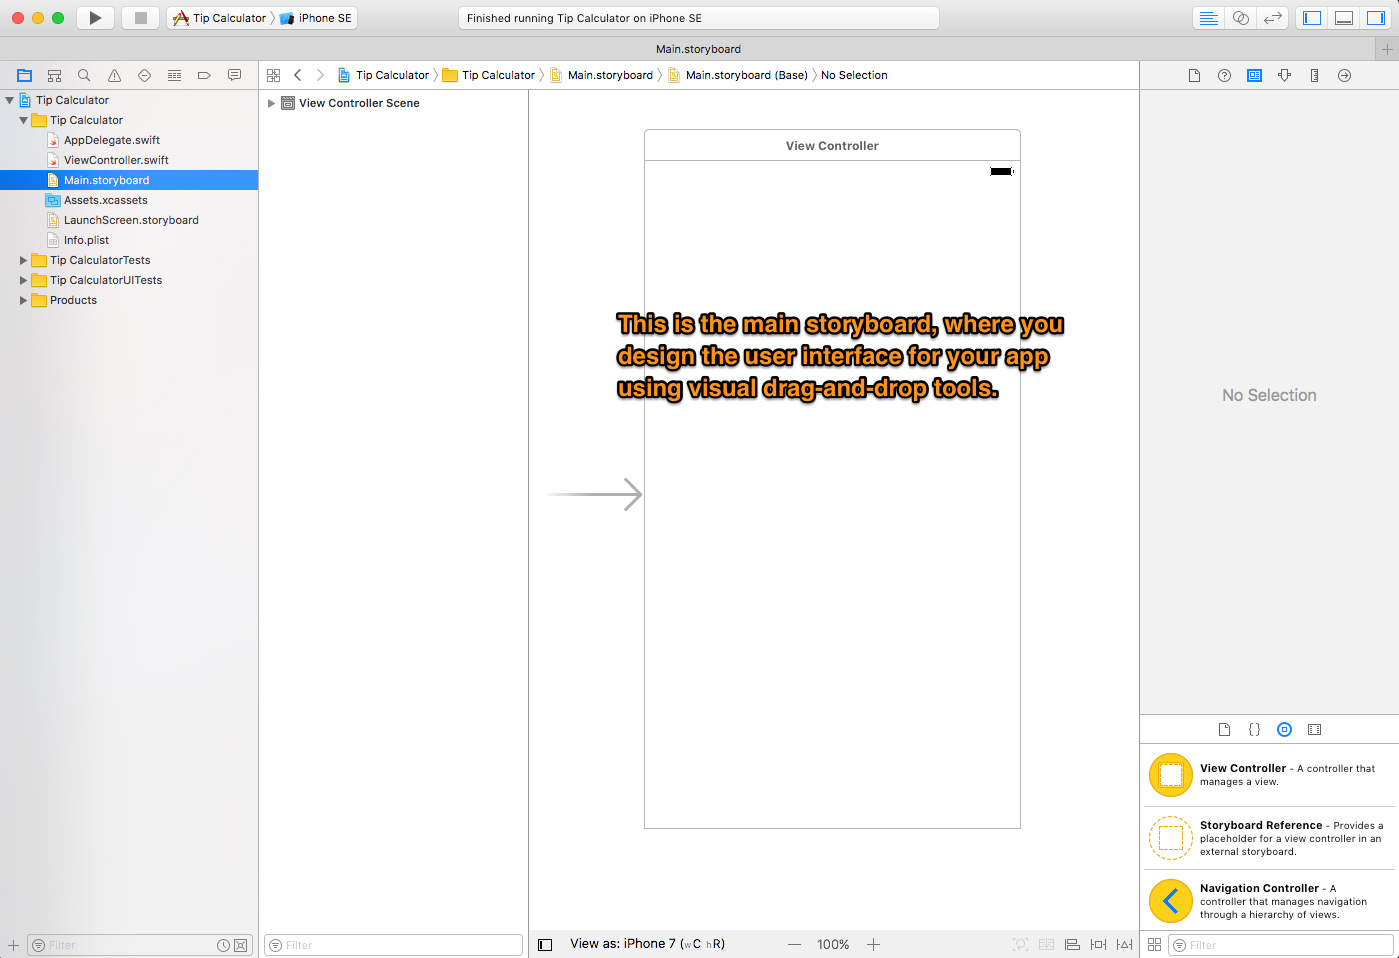
Xcode will spend a moment or two generating your project’s files and folders, after which you’ll be taken to a place where you’ll be spending a lot of time: the Xcode main interface.
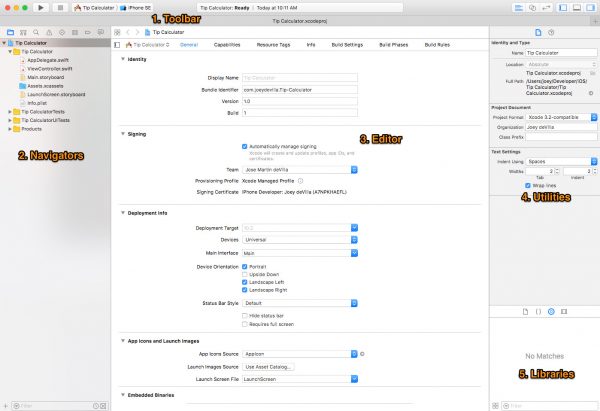
Xcode’s main interface is divided into 5 general areas:
- The toolbar, which contains a number of frequently-used controls, including those for running or stopping apps, and for changing the layout of the Xcode interface.
- The navigators, which take up the left column of the Xcode interface and provide a number of ways of navigating about your project.
- The editor area, which occupies the central area of the Xcode interface. It’s where you’ll do a lot of work, including writing code, designing your apps’ user interfaces, and editing your apps’ settings and configurations.
- The utilities area, where you can edit the properties and settings of things that you’re working on in the editor area.
- The libraries area, which is a repository for user interface controls that you’ll put on your apps’ screens, as well as files, code snippets, and media that you’ll include in your projects.
Right now, we’re going to focus on the toolbar because we’re going to run the app.
Even though you haven’t yet written a single line of code or created a single user interface, you already have a working app. The Single View Application template that your app is using as its basis already contains enough code for an application that will run.
We’ll run the app in the Simulator, which comes with Xcode and can simulate any supported Apple device. It’s useful for quickly testing an app without having to load it onto a device, and handy when you want to test your app on a type of device you don’t have.
To run the app:
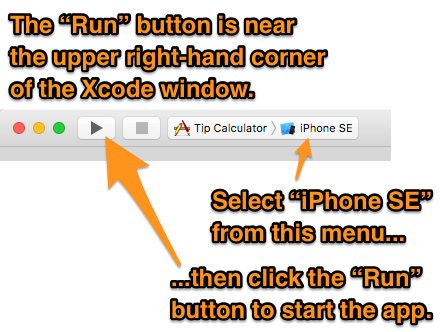
- Select iPhone SE from the menu to the right of the Run (the “play” triangle) and Stop (the “stop” square) buttons in the toolbar. This tells the Simulator to simulate an iPhone SE. It’s one of the smaller-screened iPhones, and as such, it’s good for testing interface designs. If your app is usable on an iPhone SE screen, there’s a very good chance it’ll also be usable on larger-screened devices like the iPhone 6 and 7, and especially the Plus versions.
- Click the Run button to start the app.
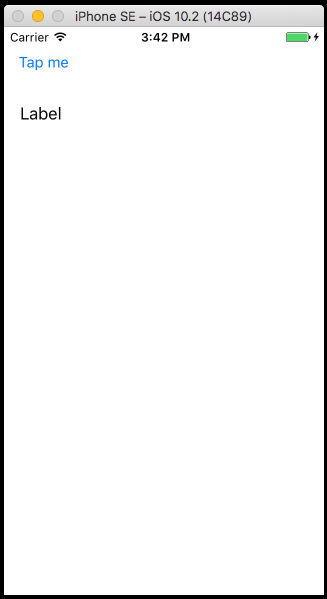
The simulator will take a couple of moments to start up, after which you should see this:
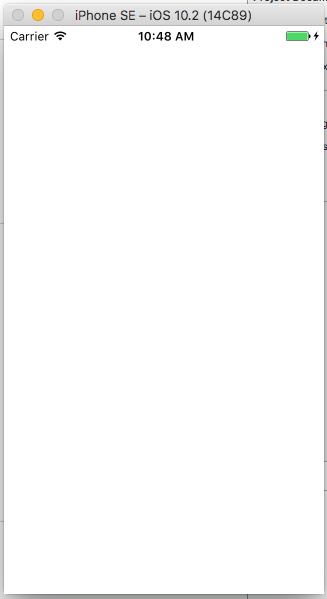
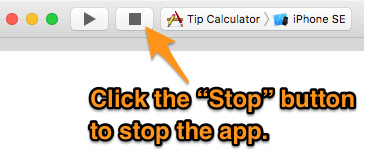
It’s not much to look at, but that’s because we haven’t built a user interface or added any code yet. Now that we’ve confirmed that our template runs, stop the app by clicking the Stop button:
Draw a simple user interface
It’s time to work on our app’s user interface. In order to do this, let’s take a closer look at the left column of the Xcode interface, which is where the navigators live. We’re interested in the Project Navigator, which lets us navigate through all the files that make up a project:
To show the Project Navigator, do the following:
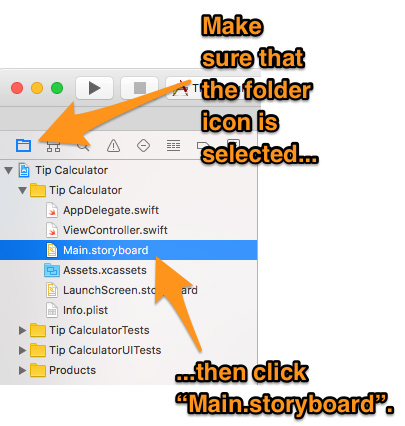
- Make sure that the Project Navigator is currently displayed. You can do this by clicking on the folder icon from the set of icons located at the top of the left column. The Project Navigator will display a set of files and folders that make up your project. For now, we’re interested only in the files in the Tip Calculator folder.
- You should be able to see the contents of the Tip Calculator folder — these are files such as AppDelegate.swift, ViewController.swift, Main.storyboard, and so on. If you can’t see them, make them visible by clicking on the disclosure triangle to the left of the Tip Calculator folder.
- Inside the Tip Calculator folder, you’ll see a file called Main.storyboard. Click on it once; this will cause the main storyboard to appear in the editing area in the center of the screen.
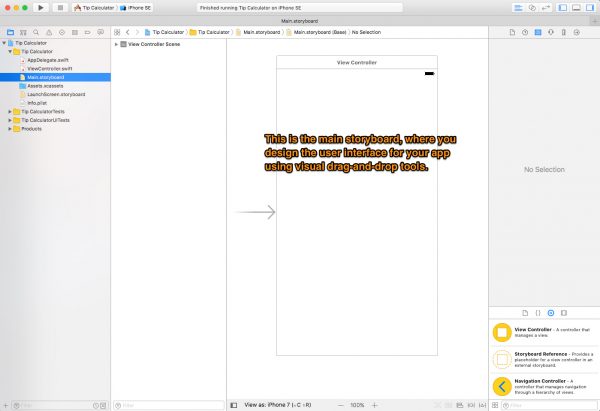
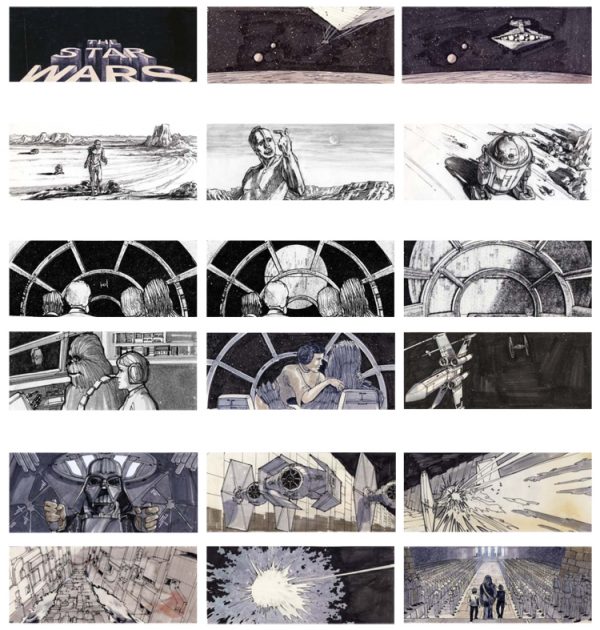
The storyboard is where you draw the user interfaces for the screens (or more accurately, views) of your apps. The term “storyboard” is borrowed from filmmaking; in that field, it’s a way of graphically organizing the scenes of a movie. Here’s an example — an early storyboard for a film that eventually became Star Wars: A New Hope…
In Xcode, a storyboard is a way of graphically organizing the views of your app. It’s where we’ll define the user interface of our app, once we’ve done a little housekeeping.
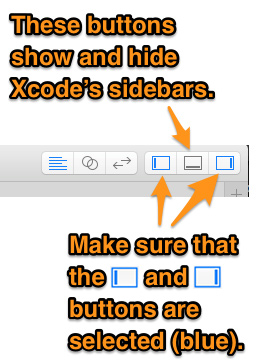
Near the upper right-hand corner of the Xcode interface, you’ll find a set of buttons that determine what the Xcode interface shows. We’ll want to make sure that the both the left and right sidebars are visible:
Do the following:
- Make sure that the left and right sidebars are visible by ensuring that their buttons (see the screenshot above) are selected. You’ll know that the buttons are selected when they’re highlighted blue. Feel free to click on them to see what happens, just as long as you’ve got the left and right sidebar buttons selected at the end:
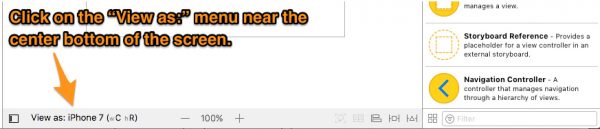
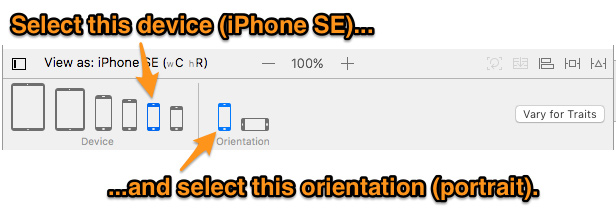
Now that we’ve set up Xcode’s sidebars, let’s set up the storyboard so that its views are iPhone SE-sized. Xcode has a feature that makes it easy to design for various screen sizes, and it’s located near the center of the bottom of the Xcode interface:

Do the following:
- Click on View as: near the center bottom of the Xcode interface. This will cause a menu of various devices to appear. If you hold the cursor over each device’s icon, its name will appear. Select the icon named iPhone SE.
- In the menu of orientations — located to the right of the menu of devices — choose the portrait orientation.
These steps will cause the storyboard to display iPhone SE-sized views in the portrait orientation.
Now that we’ve set up the view, let’s look at the objects we’ll put into it. Look at the libraries, located near the lower right-hand corner of the Xcode interface:
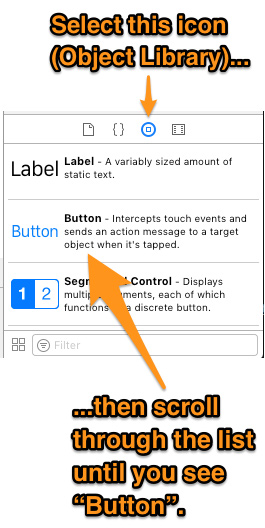
Of the libraries that are available, we want to make use of the Object Library, which contains user interface objects that we can put on our app’s views. Do the following:
- Make sure that the Object Library is selected. Click on its icon (the round one), to make sure it’s selected. Feel free to click on the other Library icons to see what happens, just as long as you’ve got Object Library selected at the end.
- Scroll through the Object Library, where you’ll see all the objects it contains, and their descriptions. When you’re done exploring it, scroll through the list so that you can see the Button object.
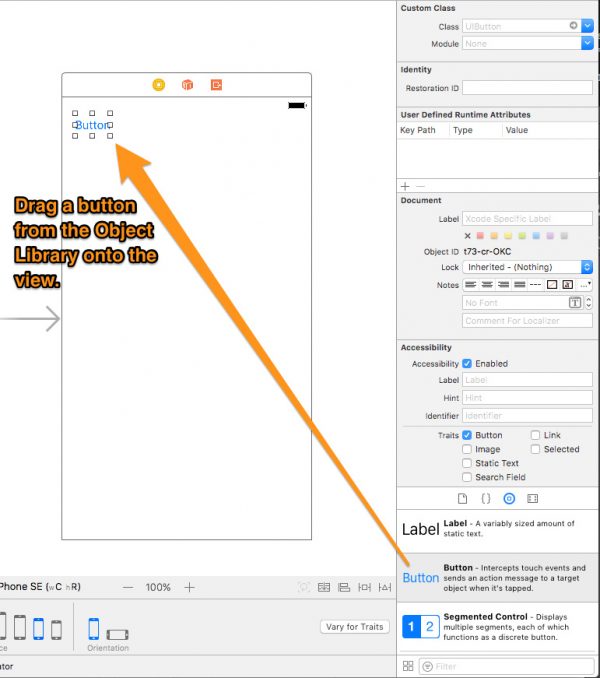
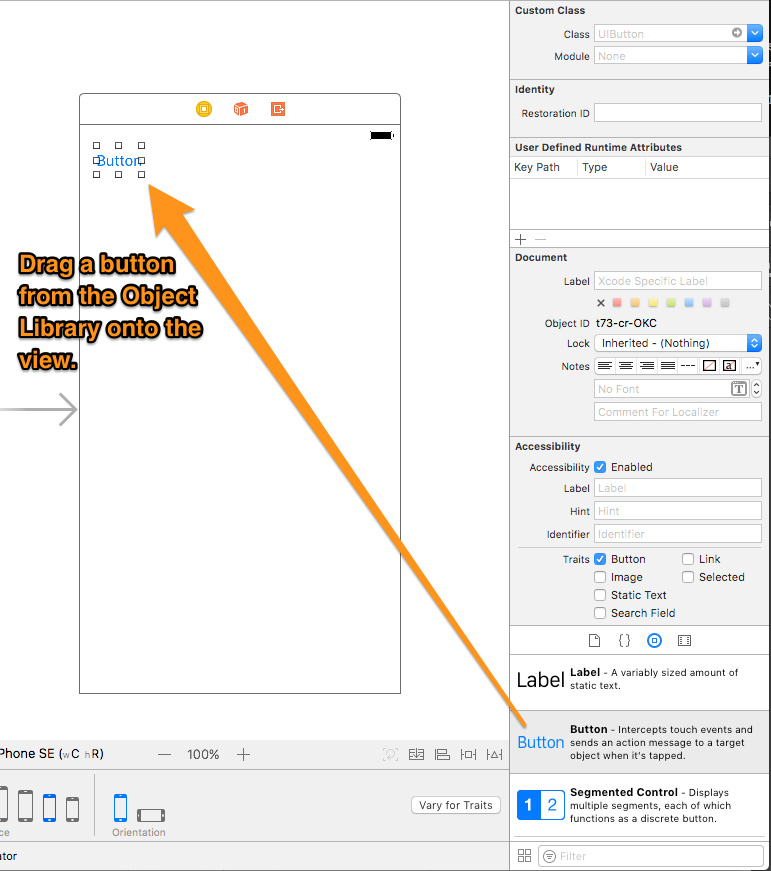
It’s time to put user interface items onto the view. The first user interface item is a button:
- Drag a Button from the Object Library and onto the view. Place it near the upper left-hand corner of the view. As you bring the button close to that corner, Xcode will cause a couple of guides to appear. Line the button up with those guides.
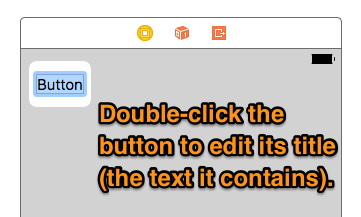
- Double-click on the button to edit its title. The text in the button will be highlighted, which indicates that you are editing it.
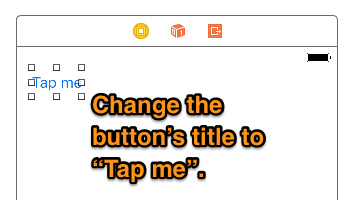
- Change the text in the button to Tap me.
- Click anywhere outside the button to stop editing it.
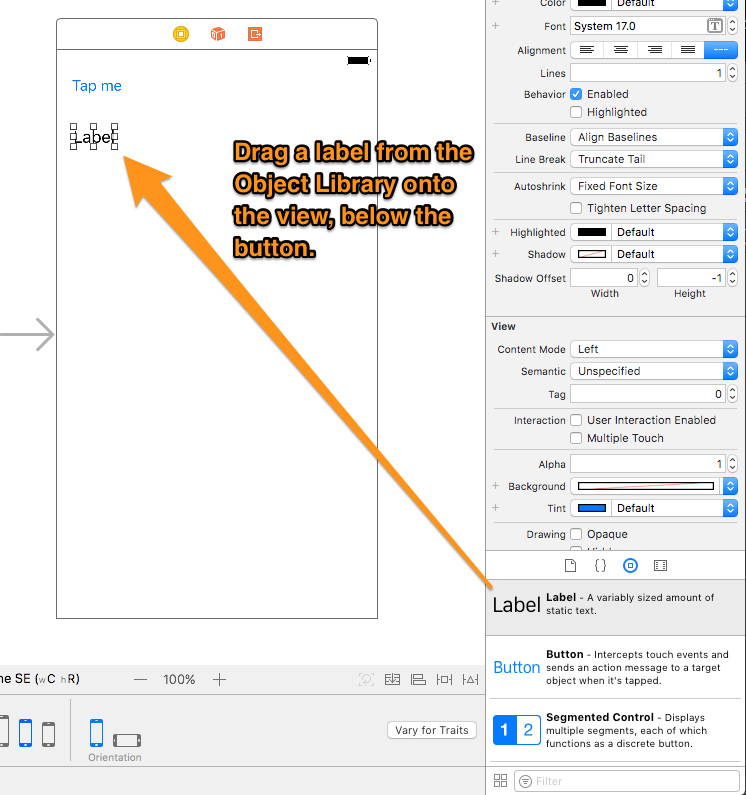
Let’s now add a label, which is a container for read-only text that can neither be selected nor edited by the user:

- Drag a Label from the Object Library and onto the view. Place it a short distance below the button. As you bring the label close to that view’s left edge, Xcode will cause a guide to appear. Line the label up with that guide, so that its left edge lines up with the left edge of the button.
Since this is a simple app, we’re done drawing its user interface. Time for the next step…
Connecting the interface to the underlying code
Run the app right now, and you’ll see this:
However, if you tap on the Tap me button, nothing happens. In our simple app, we want the text in the label to change to Hi there! when the user taps the Tap me button.
As its name implies, the Single View Application template that we’re building our app on comes with a single view. We just placed a button and label on that view. However, that view doesn’t do very much because we haven’t yet written any code to control that view. This view-controlling code that we’ll write will go into the view controller file, which is very conveniently named ViewController.swift in our project.
We’re going to connect the button and label in our view to the underlying view controller in this step. In order to do this, we’d like to have both the view (which lives the in Main.storyboard file) and the underlying view controller code (which lives in the ViewController.swift file) visible at the same time. This is possible with the Assistant Editor feature, which makes it possible to view two files side by side.
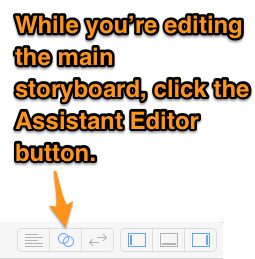
The Assistant Editor button is located near the upper right-hand corner of the Xcode interface. Do this:
- With the main storyboard visible in the editor area in the center of Xcode, click the Assistant Editor button. Xcode tries to be “smart” about which file you want to edit, and in this case, it should “assume” that you want to look at the app’s only view’s view controller code.
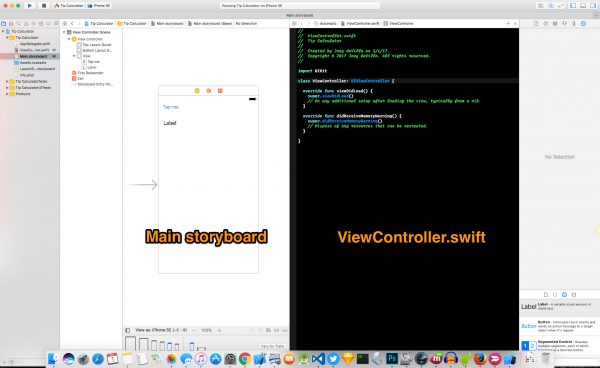
You should see something like the screenshot above. You may want to expand the Xcode window so that it takes up the entire screen.
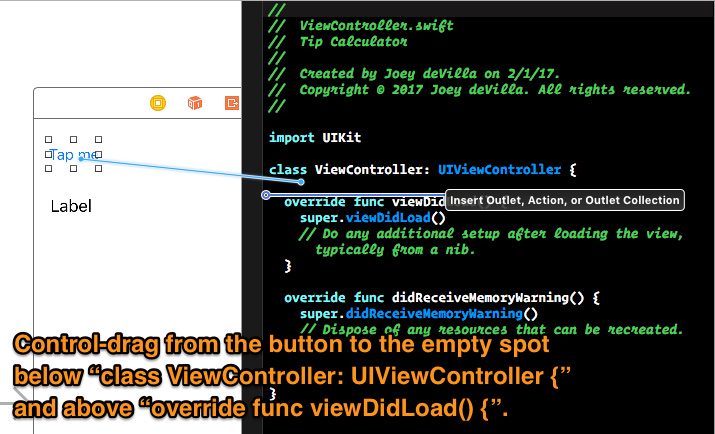
Let’s connect the button to the view controller code first:
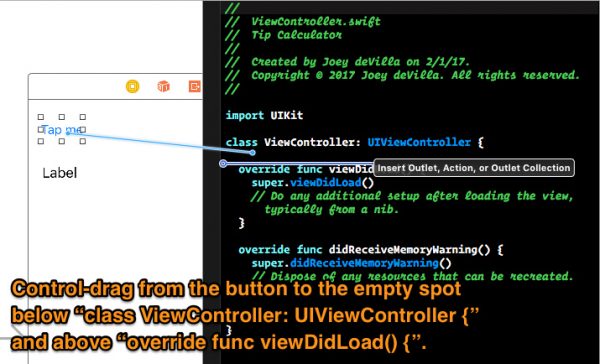
- Select the Tap me button on the view in the main storyboard, then control-drag (that is, drag while holding down the control key on the keyboard, or if you have a mouse, right-drag) from the view to the ViewController.swift code.
- Let go of the mouse in the empty spot between
ViewController: UIViewController {
and
override func viewDidLoad() {
A pop-up will appear. This pop-up lets you define the type and details of the connection between a user interface object and the underlying view controller code. There are two types of connection, and we’ll use both in this simple app:
- Actions: An action is some code that’s run in response to an event. In the case of this app, we’re going to define an action that runs some code when the Tap me is pressed.
- Outlets: An outlet is a reference to a user interface object, which allows the underlying code to affect that object. In this app, we’ll define an outlet that will allow us to refer to the label, which in turn will allow us to change its text.
Since we’re dealing with the button right now, we’re defining an action connection:
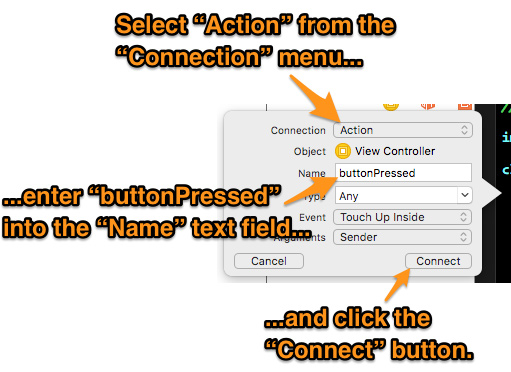
Do the following with the pop-up:
- Select Action from the Connection menu.
- Give the action a name: enter buttonPressed into the Name field.
- Note the default selection in the Event menu, but don’t change it: Touch Up Inside. This is one of the user interaction events that a button can respond to. Touch Up Inside is an event that gets raised when the user pushes down and then releases on a button with their finger still inside the button’s bounds (which is a very precise way of saying “when the user presses the button”).
- Click the Connect button.
The following code will appear in the view controller:
@IBAction func buttonPressed(_ sender: Any) {
}
This is a new method (that’s another term for a function) named buttonPressed, and it will be called whenever the user pressed the Tap me button.
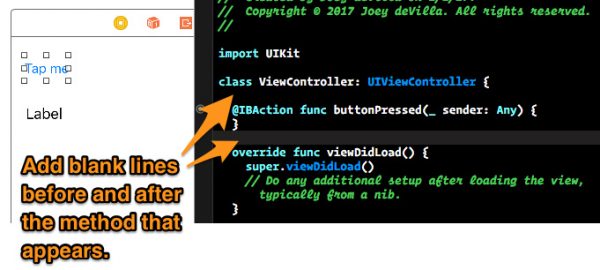
Do the following:
- To make the code easier to read, add blank lines before and after the newly-created method.
Let’s now define an outlet connection for the label:
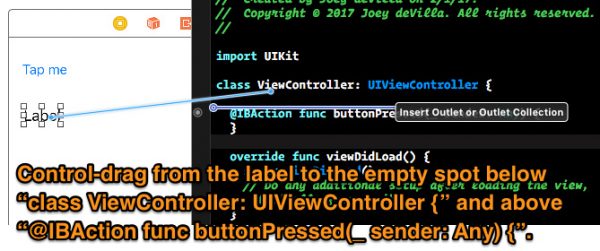
- Select the label on the view in the main storyboard, then control-drag (that is, drag while holding down the control key on the keyboard, or if you have a mouse, right-drag) from the view to the ViewController.swift code.
- Let go of the mouse in the empty spot between
ViewController: UIViewController {
and
@IBAction func buttonPressed(_ sender: Any) {
Another pop-up will appear:
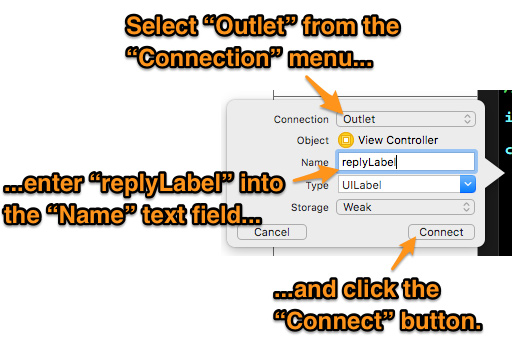
Do the following with the pop-up:
- Select Outlet from the Connection menu.
- Give the outlet a name: enter replyLabel into the Name field.
- Click the Connect button.
The following code will appear in the view controller:
@IBOutlet weak var replyLabel: UILabel!
This is a new variable named replyLabel, and it will be used to access the label in order to change its contents.
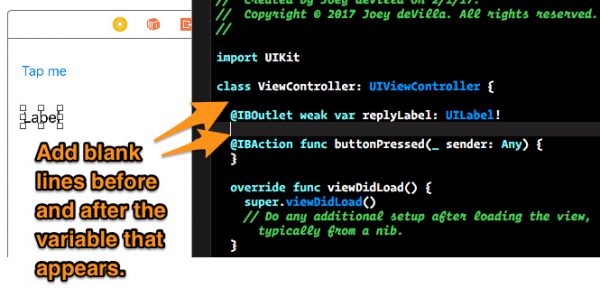
Do the following:
- To make the code easier to read, add blank lines before and after the newly-created variable.
Let’s make it work!
There’s just one thing left to do: write the code that changes the text of the Label to “Hi there!” when the user presses the Tap me button. We already have a method — buttonPressed — that gets called when the button is pressed; all we have to do write the body of that method.
All it takes is one line of code to get what we want. Add the following line to buttonPressed…
replyLabel.text = "Hi there!"
…so that the method in its entirety looks like this:
@IBAction func buttonPressed(_ sender: Any) {
  replyLabel.text = "Hi there!"
}
Run the app. It should look like this:
Now press the Tap me button. You should see this:
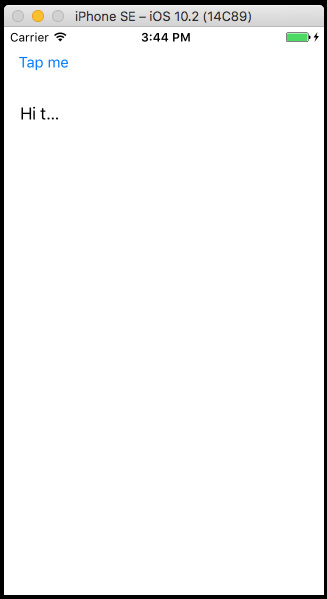
As you can see, Hi there! got shortened to Hi t…. That’s what happens when a label doesn’t have enough space to accommodate the text it contains. There’s a simple fix…
Do the following:
- Stop the app.
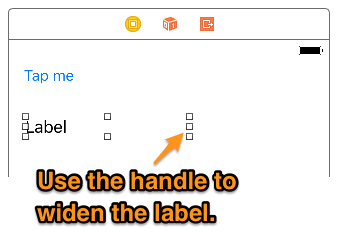
- In the main storyboard, select the label. Grab one of the “handles” (the squares that appear around the label) on the right side of the label and use it to widen the label.
- Run the app.
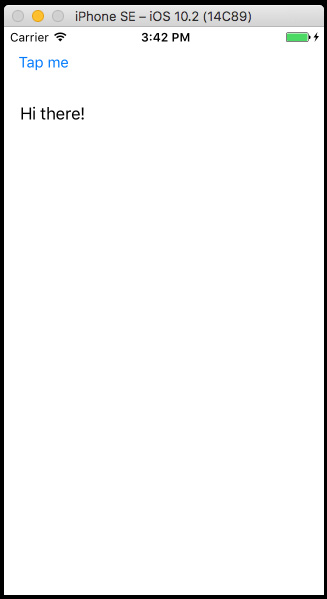
You should now see the full Hi there! when you press the Tap me button:
Wait, wasn’t this going to be a tip calculator? (or: What’s next?)
After all, the app’s name is Tip Calculator. Don’t worry — in the coming installments in this series, that’s exactly what this app will become. I thought it would be a good idea to start with a simple exercise first, in order to get you comfortable with Xcode and creating simple apps.
In the next article in the series, we’ll look at getting input from the user with text fields.
Download the project files
 Although this is an extremely simple project, I’ve made its files available for download — click here to get them!


