Check out this update (May 24, 2016)!
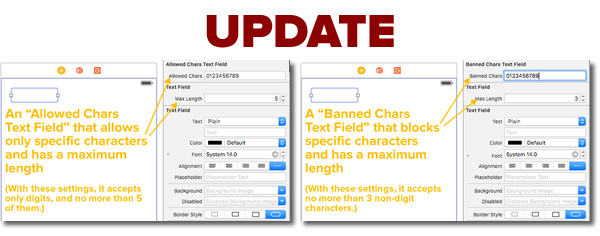
The material in this article is still applicable, but you’ll also want to read a newer one titled A better way to program iOS text fields that have maximum lengths and accept or reject specific characters, which shows you how to make text fields that let you specify the following in Interface Builder or using less code:
- The maximum number of characters that a text field will accept
- The only characters that can be entered into a text field
- The only characters that can’t be entered into a text field
I’m already using that material in a couple of projects, and I think you’ll find it handy, too. Check it out!
And now, the original article…
Constraining text fields
Click the image to see it at full size.
Update, August 26, 2015: I’ve updated this article so that its code works with Swift 2. It compiles under the latest version of Xcode 7, beta 6.
 A little while back, I published an article that covered constraining text fields so that they accepted only values that evaluated to numeric ones, and limited them to a specified maximum number of characters (don’t bother looking for it; it redirects to this article now). This article expands and improves on it by showing you how to create iOS text fields that:
- accept only numeric values,
- accept only characters that appear in a specified string,
- accept any characters except those that appear in a specified string, and
- combine any of the features listed above
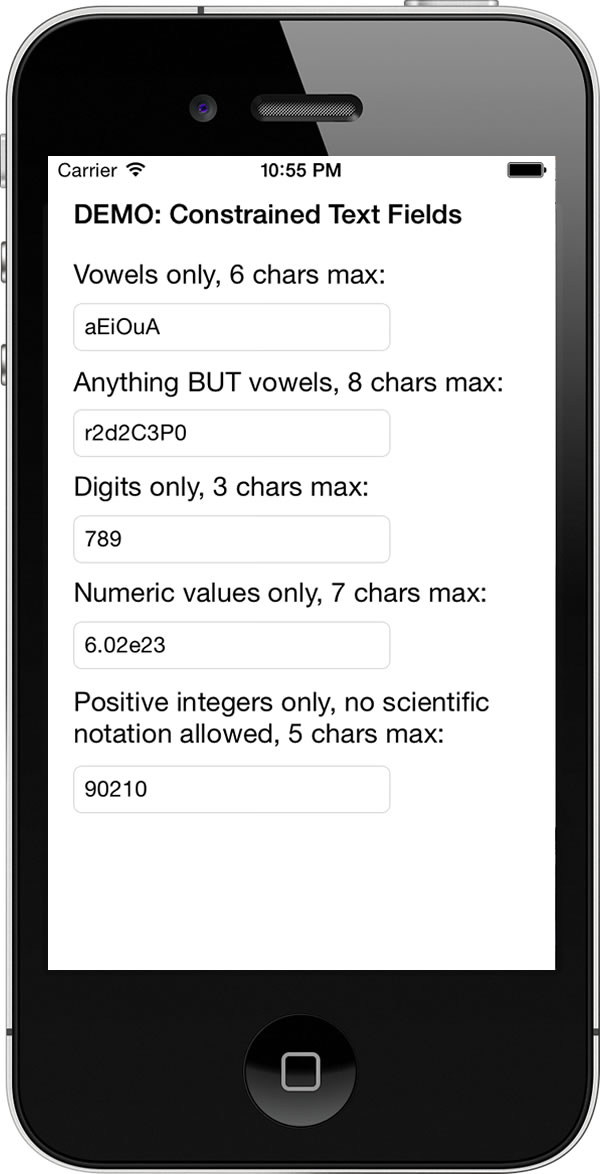
![]() In order to demonstrate this, I’ve created a quick sample app, ConstrainedTextFieldDemo. You can download it here [90K Xcode project and associated files, zipped]. When you run it, you’ll the screen pictured above. It contains a set of text fields, each one with its own set of constraints:
In order to demonstrate this, I’ve created a quick sample app, ConstrainedTextFieldDemo. You can download it here [90K Xcode project and associated files, zipped]. When you run it, you’ll the screen pictured above. It contains a set of text fields, each one with its own set of constraints:
- A text field that accepts only vowel characters (upper- and lowercase), and no more than 6 of them.
- A text field that accepts any character except vowels, and no more than 8 of them.
- A text field that accepts digits only, and no more than 3 of them.
- A text field that accepts only numeric values, as long as they’re 7 characters or fewer in length. Note that this field allows numbers in scientific notation.
- A text field that accepts only positive integers up to 5 characters in length.
In this article, I’ll walk you through the app and show you how to create your own constrained text fields in iOS. Better still, I’ll give you the project files so that you can experiment with the app.
Cut to the code (and the storyboard, too)!
Before we get into the explanations, let me cut to the chase and just give you the code.
For the purposes of discussing constrained text fields, we need to consider only two files:
- The view controller, ViewController.swift, and
- a set of string utility methods contained in StringUtils.swift.
Here’s ViewController.swift:
//
//  ViewController.swift
//

import UIKit

class ViewController: UIViewController, UITextFieldDelegate {

  // MARK: Outlets

  @IBOutlet weak var vowelsOnlyTextField: UITextField!
  @IBOutlet weak var noVowelsTextField: UITextField!
  @IBOutlet weak var digitsOnlyTextField: UITextField!
  @IBOutlet weak var numericOnlyTextField: UITextField!
  @IBOutlet weak var positiveIntegersOnlyTextField: UITextField!


  // MARK: View events and related methods

  override func viewDidLoad() {
    super.viewDidLoad()
    initializeTextFields()
  }

  // Designate this class as the text fields' delegate
  // and set their keyboards while we're at it.
  func initializeTextFields() {
    vowelsOnlyTextField.delegate = self
    vowelsOnlyTextField.keyboardType = UIKeyboardType.ASCIICapable

    noVowelsTextField.delegate = self
    noVowelsTextField.keyboardType = UIKeyboardType.ASCIICapable

    digitsOnlyTextField.delegate = self
    digitsOnlyTextField.keyboardType = UIKeyboardType.NumberPad

    numericOnlyTextField.delegate = self
    numericOnlyTextField.keyboardType = UIKeyboardType.NumbersAndPunctuation

    positiveIntegersOnlyTextField.delegate = self
    positiveIntegersOnlyTextField.keyboardType = UIKeyboardType.DecimalPad
  }

  override func didReceiveMemoryWarning() {
    super.didReceiveMemoryWarning()
  }

  // Tap outside a text field to dismiss the keyboard
  // ------------------------------------------------
  // By changing the underlying class of the view from UIView to UIControl,
  // the view can respond to events, including Touch Down, which is
  // wired to this method.
  @IBAction func userTappedBackground(sender: AnyObject) {
    view.endEditing(true)
  }


  // MARK: UITextFieldDelegate events and related methods

  func textField(textField: UITextField,
                 shouldChangeCharactersInRange range: NSRange,
                 replacementString string: String)
       -> Bool
  {
    // We ignore any change that doesn't add characters to the text field.
    // These changes are things like character deletions and cuts, as well
    // as moving the insertion point.
    //
    // We still return true to allow the change to take place.
    if string.characters.count == 0 {
      return true
    }

    // Check to see if the text field's contents still fit the constraints
    // with the new content added to it.
    // If the contents still fit the constraints, allow the change
    // by returning true; otherwise disallow the change by returning false.
    let currentText = textField.text ?? ""
    let prospectiveText = (currentText as NSString).stringByReplacingCharactersInRange(range, withString: string)

    switch textField {

      // Allow only upper- and lower-case vowels in this field,
      // and limit its contents to a maximum of 6 characters.
      case vowelsOnlyTextField:
        return prospectiveText.containsOnlyCharactersIn("aeiouAEIOU") &&
               prospectiveText.characters.count <= 6

      // Allow any characters EXCEPT upper- and lower-case vowels in this field,
      // and limit its contents to a maximum of 8 characters.
      case noVowelsTextField:
        return prospectiveText.doesNotContainCharactersIn("aeiouAEIOU") &&
               prospectiveText.characters.count <= 8

      // Allow only digits in this field,
      // and limit its contents to a maximum of 3 characters.
      case digitsOnlyTextField:
        return prospectiveText.containsOnlyCharactersIn("0123456789") &&
               prospectiveText.characters.count <= 3

      // Allow only values that evaluate to proper numeric values in this field,
      // and limit its contents to a maximum of 7 characters.
      case numericOnlyTextField:
        return prospectiveText.isNumeric() &&
               prospectiveText.characters.count <= 7

      // In this field, allow only values that evalulate to proper numeric values and
      // do not contain the "-" and "e" characters, nor the decimal separator character
      // for the current locale. Limit its contents to a maximum of 5 characters.
      case positiveIntegersOnlyTextField:
        let decimalSeparator = NSLocale.currentLocale().objectForKey(NSLocaleDecimalSeparator) as! String
        return prospectiveText.isNumeric() &&
               prospectiveText.doesNotContainCharactersIn("-e" + decimalSeparator) &&
               prospectiveText.characters.count <= 5

      // Do not put constraints on any other text field in this view
      // that uses this class as its delegate.
      default:
        return true
    }

  }

  // Dismiss the keyboard when the user taps the "Return" key or its equivalent
  // while editing a text field.
  func textFieldShouldReturn(textField: UITextField) -> Bool {
    textField.resignFirstResponder()
    return true;
  }

}
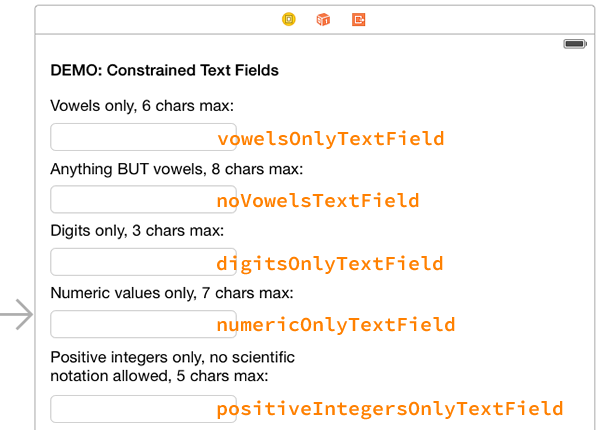
I gave the outlets for the text fields sensible names, but I thought that it might be helpful to show you an annotated storyboard that points out which outlet belongs to which text field:
The code in the view controller calls on some string utility methods that I decided to put into their own module: the StringUtils.swift file:
//
//  StringUtils.swift
//

import Foundation

extension String {

  // Returns true if the string has at least one character in common with matchCharacters.
  func containsCharactersIn(matchCharacters: String) -> Bool {
    let characterSet = NSCharacterSet(charactersInString: matchCharacters)
    return self.rangeOfCharacterFromSet(characterSet) != nil
  }

  // Returns true if the string contains only characters found in matchCharacters.
  func containsOnlyCharactersIn(matchCharacters: String) -> Bool {
    let disallowedCharacterSet = NSCharacterSet(charactersInString: matchCharacters).invertedSet
    return self.rangeOfCharacterFromSet(disallowedCharacterSet) == nil
  }

  // Returns true if the string has no characters in common with matchCharacters.
  func doesNotContainCharactersIn(matchCharacters: String) -> Bool {
    let characterSet = NSCharacterSet(charactersInString: matchCharacters)
    return self.rangeOfCharacterFromSet(characterSet) == nil
  }

  // Returns true if the string represents a proper numeric value.
  // This method uses the device's current locale setting to determine
  // which decimal separator it will accept.
  func isNumeric() -> Bool
  {
    let scanner = NSScanner(string: self)

    // A newly-created scanner has no locale by default.
    // We'll set our scanner's locale to the user's locale
    // so that it recognizes the decimal separator that
    // the user expects (for example, in North America,
    // "." is the decimal separator, while in many parts
    // of Europe, "," is used).
    scanner.locale = NSLocale.currentLocale()

    return scanner.scanDecimal(nil) && scanner.atEnd
  }

}
Let’s take a closer look at the code…
The delegate pattern and text fields
The delegate pattern in general
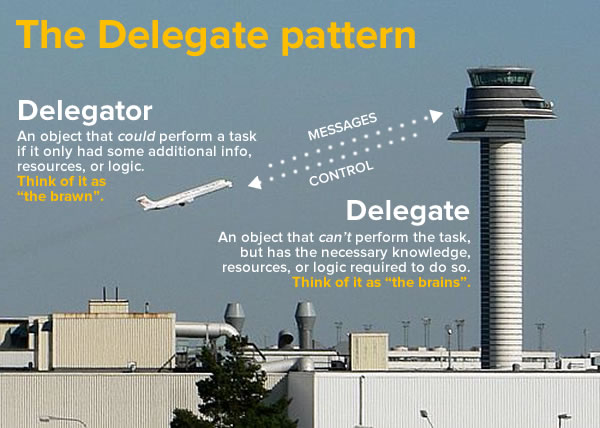
The Delegate pattern is a fundamental part of iOS app development. You’ll encounter it often when programming user interfaces, including those times when you want to your program to react to what the user does with text fields.
The delegate pattern involves two categories of object:
- A delegator, which needs to perform a task, but doesn’t have some needed information, resources, or logic to do so. It gets that needed information, resources, or logic from…
- A delegate. While it typically can’t do what the delegator does, it has the information, resources, or logic that the delegator needs to perform its task.
My pet analogy for the delegate pattern is pictured above: an airplane and air traffic control. Unlike the driver of a car, who’s controlled only by traffic signals and pretty much free to choose any destination and route s/he pleases, the pilot of a plane has to delegate a lot of those choices to air traffic control. The airplane, which does the actual flying, is the delegator, and air traffic control, which gives clearance for takeoff and landing and tells the plane the heading, speed, and altitude at which it should fly, is the delegate.
The delegate pattern in iOS
If you look at the delegate pattern in Wikipedia, you’ll see that there are a number of ways to implement it. Here’s how it’s done in iOS (and Cocoa), whether you’re doing it in Objective-C or Swift:
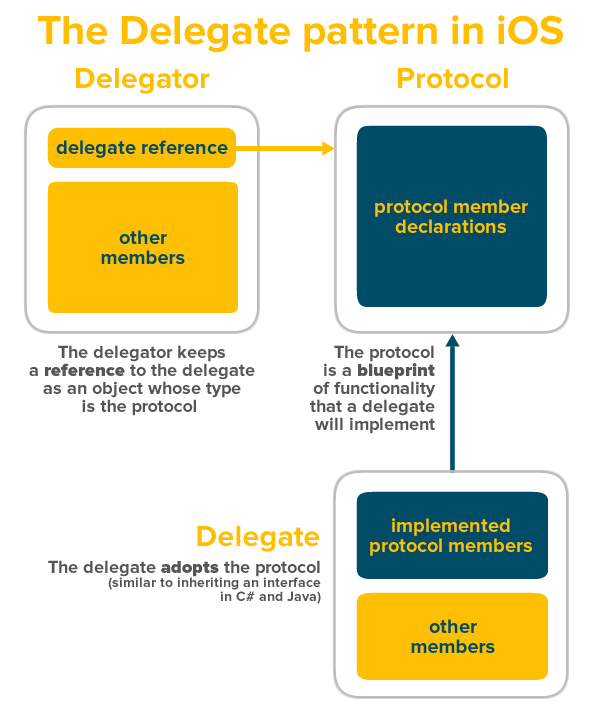
There are three things in play:
- The delegator, which keeps a reference to the delegate, which will end up having the task delegated to it,
- The delegate, which implements the methods and properties used to accomplish the delegated task, and
- The protocol, which connects the delegator and delegate by:
- giving the delegator a way to send messages to the delegate, and
- giving the delegate a way to perform actions on behalf of the delegator.
The delegate pattern with iOS’ text fields
Let’s make the above diagram a little more specific and talk about delegation in terms of iOS’ text fields:
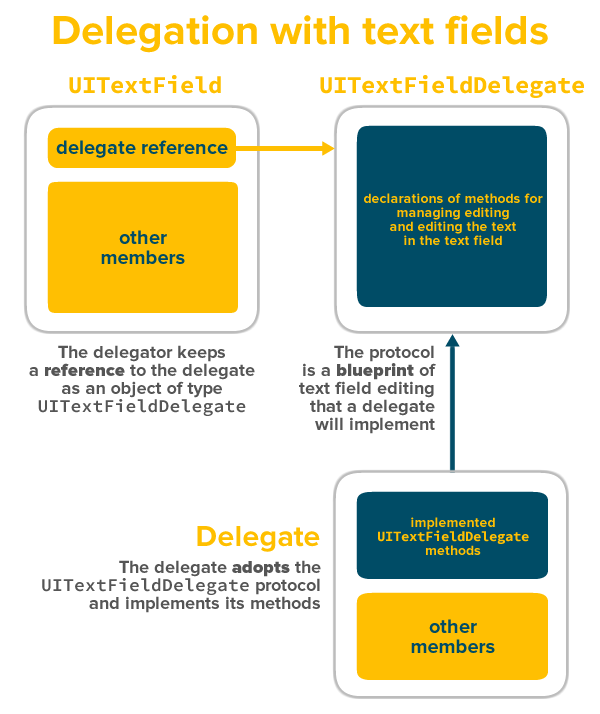
iOS text fields — that is, instances of the UITextField class — participate in a delegate pattern as delegators. They’ve got the power to control what happens when the user starts and stops editing their contents and what characters can be typed into them, but they offload the logic that handles those tasks to another object: the delegate.
A specific protocol, the UITextFieldDelegate protocol, connects the text field and its delegate together. A protocol is simply a set of declarations of class members — instance properties, instance methods, type methods, operators, and subscripts. These instance properties, instance methods, type methods, operators, and subscripts are implemented in the delegate (implementing a protocol’s members is called adopting the protocol), and the delegator calls on these implemented members.
The protocol: UITextFieldDelegate
Let’s look at the UITextFieldDelegate protocol. You can actually check it out for yourself; the simplest way is to control-click or right-click on any occurrence of UITextField in your code and then click on Jump to Definition in the contextual menu that appears:
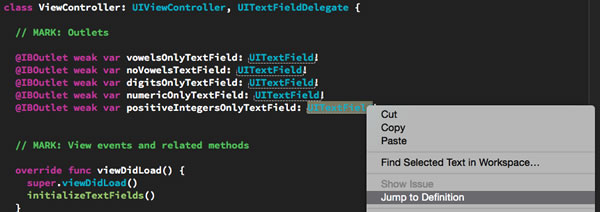
You’ll be taken to UITextField.h, a header file that allows Swift to connect to the Objective-C code on which UITextField is built. It contains the declarations for all the publicly-accessible parts of UITextField, including the UITextFieldDelegate protocol. You’ll find it near the end of the file. I’ve reproduced it below:
protocol UITextFieldDelegate : NSObjectProtocol {

    optional func textFieldShouldBeginEditing(textField: UITextField) -> Bool // return NO to disallow editing.
    optional func textFieldDidBeginEditing(textField: UITextField) // became first responder
    optional func textFieldShouldEndEditing(textField: UITextField) -> Bool // return YES to allow editing to stop and to resign first responder status. NO to disallow the editing session to end
    optional func textFieldDidEndEditing(textField: UITextField) // may be called if forced even if shouldEndEditing returns NO (e.g. view removed from window) or endEditing:YES called

    optional func textField(textField: UITextField, shouldChangeCharactersInRange range: NSRange, replacementString string: String) -> Bool // return NO to not change text

    optional func textFieldShouldClear(textField: UITextField) -> Bool // called when clear button pressed. return NO to ignore (no notifications)
    optional func textFieldShouldReturn(textField: UITextField) -> Bool // called when 'return' key pressed. return NO to ignore.
}
The delegate: ViewController
In order to become a delegate, a class has to adopt the protocol. If you’re familiar with languages like C# and Java, “adopting a protocol” is similar to “implementing an interface”: we add the protocol to a class’ definition, as if we’re inheriting it. In this case, we’ll have the view controller adopt the protocol:
class ViewController: UIViewController, UITextFieldDelegate {
This says that the ViewController class inherits from the UIViewController class and adopts the UITextFieldDelegate protocol. Having the view controller act as the delegate makes sense: it controls the user interface, and the text fields are part of the user interface.
Just as you have to implement the methods in an inherited interface in C# and Java, you have to implement the methods in an adopted protocol in Swift. There is a difference, however: in Swift, you can choose not to implement methods marked as optional.
You may have noticed that all the methods in the UITextFieldDelegate protocol are optional. This means that a delegate that adopts the protocol can implement as many or as few of its methods as necessary. For the purposes of our app, we’re implementing two of them in ViewController:
textField(textField: UITextField, shouldChangeCharactersInRange range: NSRange, replacementString string: String)-> Bool: The text field calls this whenever the user tries to change the contents of a text field, whether by typing in or deleting a character, or by cutting or pasting. The method should returntrueif the change is to be accepted, andfalseto reject the change and keep the contents of the text field the way they are. We’ll use it to limit the types of character that can be entered into the view’s text fields and set a maximum the number of characters that can be entered for each field.textFieldShouldReturn(textField: UITextField)-> Bool: The text field calls this whenever the user taps the Return key or its equivalent on the keyboard. We’ll use it to dismiss the keyboard when the user taps Return.
We’ll talk about the implementation of these methods in the next section. We have to take care of the delegators first.
The delegators: the text fields
We’ve got a protocol, and we’ve got a delegate that adopts it. Now we need to set up the delegators, which in this case, are the text fields — we need to tell them who their delegates are. We do this by setting each text field’s delegate property in the initializeTextFields method of the ViewController class:
  // Designate this class as the text fields' delegate
  // and set their keyboards while we're at it.
  func initializeTextFields() {
    vowelsOnlyTextField.delegate = self
    vowelsOnlyTextField.keyboardType = UIKeyboardType.ASCIICapable

    noVowelsTextField.delegate = self
    noVowelsTextField.keyboardType = UIKeyboardType.ASCIICapable

    digitsOnlyTextField.delegate = self
    digitsOnlyTextField.keyboardType = UIKeyboardType.NumberPad

    numericOnlyTextField.delegate = self
    numericOnlyTextField.keyboardType = UIKeyboardType.NumbersAndPunctuation

    positiveIntegersOnlyTextField.delegate = self
    positiveIntegersOnlyTextField.keyboardType = UIKeyboardType.DecimalPad
  }
By setting all the text fields’ delegate properties to self, we’re saying that this class is their delegate. Any events arising from editing the text fields will be handled by this class.
Constraining the text fields
The magic that constrains a text field so that it’s vowels-only, numbers-only and so on happens inside the protocol method with the very long signature, textField(textField: UITextField, shouldChangeCharactersInRange range: NSRange, replacementString string: String) -> Bool. This method needs to be coded so that it returns true if we want the user’s changes to be accepted (which then updates the text field), or false if we don’t want the user’s changes to be accepted (which leaves the text field unchanged).
Here’s its code:
  func textField(textField: UITextField,
                 shouldChangeCharactersInRange range: NSRange,
                 replacementString string: String)
       -> Bool
  {
    // We ignore any change that doesn't add characters to the text field.
    // These changes are things like character deletions and cuts, as well
    // as moving the insertion point.
    //
    // We still return true to allow the change to take place.
    if string.characters.count == 0 {
      return true
    }

    // Check to see if the text field's contents still fit the constraints
    // with the new content added to it.
    // If the contents still fit the constraints, allow the change
    // by returning true; otherwise disallow the change by returning false.
    let currentText = textField.text ?? ""
    let prospectiveText = (currentText as NSString).stringByReplacingCharactersInRange(range, withString: string)

    switch textField {

      // Allow only upper- and lower-case vowels in this field,
      // and limit its contents to a maximum of 6 characters.
      case vowelsOnlyTextField:
        return prospectiveText.containsOnlyCharactersIn("aeiouAEIOU") &&
               prospectiveText.characters.count <= 6

      // Allow any characters EXCEPT upper- and lower-case vowels in this field,
      // and limit its contents to a maximum of 8 characters.
      case noVowelsTextField:
        return prospectiveText.doesNotContainCharactersIn("aeiouAEIOU") &&
               prospectiveText.characters.count <= 8

      // Allow only digits in this field,
      // and limit its contents to a maximum of 3 characters.
      case digitsOnlyTextField:
        return prospectiveText.containsOnlyCharactersIn("0123456789") &&
               prospectiveText.characters.count <= 3

      // Allow only values that evaluate to proper numeric values in this field,
      // and limit its contents to a maximum of 7 characters.
      case numericOnlyTextField:
        return prospectiveText.isNumeric() &&
               prospectiveText.characters.count <= 7

      // In this field, allow only values that evalulate to proper numeric values and
      // do not contain the "-" and "e" characters, nor the decimal separator character
      // for the current locale. Limit its contents to a maximum of 5 characters.
      case positiveIntegersOnlyTextField:
        let decimalSeparator = NSLocale.currentLocale().objectForKey(NSLocaleDecimalSeparator) as! String
        return prospectiveText.isNumeric() &&
               prospectiveText.doesNotContainCharactersIn("-e" + decimalSeparator) &&
               prospectiveText.characters.count <= 5

      // Do not put constraints on any other text field in this view
      // that uses this class as its delegate.
      default:
        return true
    }

  }
This method takes three parameters:
textField: the text field that either had a character added to or removed from it.range: the range of the characters within the text field that are to be replaced.string: the replacement string.
Does the change add characters?
The first thing the method does is see if the change adds characters to the text field:
if string.characters.count == 0 {
  return true
}
- If the user has typed a character or pasted non-empty text into the text field,
stringis non-empty and has a length greater than zero. In this case, we’ll want to do more processing. - If the user has deleted a character, cut text, or simply moved the insertion point,
stringis empty and has a length of zero. In this case, we don’t want to do any more processing; removing characters means we don’t have to see if we want to disallow any added character or if the maximum number of characters for the text field has been exceeded. We’ll just exit the method, returning true so that the change still happens, whether it’s a deletion, a cut, or moving the insertion point.
What will the text field look like after the change?
We want to figure out what the text field would contain if the change were allowed. We’ll call that the prospective text, which we’ll assign to a local constant called prospectiveText. We can figure out what the prospective text is by using NSString‘s stringByReplacingCharactersInRange method on the contents of textField.text.
Here’s where we run into a problem:
- In order to use
NSString‘sstringByReplacingCharactersInRangemethod, we need to convert a SwiftStringinto anNSString. - The type of a text field’s
textproperty type isn’tString, butString?. That’s because a text field’s value can either be:- a string when it contains at least one character, or
nilwhen it’s empty
Stringcan be cast intoNSString;String?can’t.
To get around this problem, we’re going to create a String constant called currentText, which we’ll fill as follows:
- If the text field isn’t empty — that is, if its value isn’t
nil— we’ll simply assigncurrentTextthe value oftextField.text. - If the text field is empty — that is, if its value is
nil— we’ll assigncurrenttextthe value"", the empty string. There’s a difference betweennil(which denotes no value) and the empty string (which is a value, just one that has a length of 0 characters).
Here’s the code:
 let currentText = textField.text ?? ""
 let prospectiveText = (currentText as NSString).stringByReplacingCharactersInRange(range, withString: string)
As we’ll see shortly, having prospectiveText lets us set a maximum number of characters that can be put into a text field.
Taking care of business
Now that we’ve dealt with cases where the change to the text field deletes characters and have created prospectiveText, we can now start constraining text fields. This is handled in the switch statement, which we use to separate the constraining logic for each text field:
switch textField {

      // Allow only upper- and lower-case vowels in this field,
      // and limit its contents to a maximum of 6 characters.
      case vowelsOnlyTextField:
        return prospectiveText.containsOnlyCharactersIn("aeiouAEIOU") &&
               prospectiveText.characters.count <= 6

      // Allow any characters EXCEPT upper- and lower-case vowels in this field,
      // and limit its contents to a maximum of 8 characters.
      case noVowelsTextField:
        return prospectiveText.doesNotContainCharactersIn("aeiouAEIOU") &&
               prospectiveText.characters.count <= 8

      // Allow only digits in this field,
      // and limit its contents to a maximum of 3 characters.
      case digitsOnlyTextField:
        return prospectiveText.containsOnlyCharactersIn("0123456789") &&
               prospectiveText.characters.count <= 3

      // Allow only values that evaluate to proper numeric values in this field,
      // and limit its contents to a maximum of 7 characters.
      case numericOnlyTextField:
        return prospectiveText.isNumeric() &&
               prospectiveText.characters.count <= 7

      // In this field, allow only values that evalulate to proper numeric values and
      // do not contain the "-" and "e" characters, nor the decimal separator character
      // for the current locale. Limit its contents to a maximum of 5 characters.
      case positiveIntegersOnlyTextField:
        let decimalSeparator = NSLocale.currentLocale().objectForKey(NSLocaleDecimalSeparator) as! String
        return prospectiveText.isNumeric() &&
               prospectiveText.doesNotContainCharactersIn("-e" + decimalSeparator) &&
               prospectiveText.characters.count <= 5

      // Do not put constraints on any other text field in this view
      // that uses this class as its delegate.
      default:
        return true
    }
The cases for each text field are listed in the order in which they appear onscreen. Let’s look at them one by one:
The “Vowels only” text field
In this text field, we want the user to be able to enter only vowels — the upper- and lower-case versions of the letters a, e, i, o, and u. We also want to limit its contents to a maximum of 6 characters. Here’s the code that does this:
      // Allow only upper- and lower-case vowels in this field,
      // and limit its contents to a maximum of 6 characters.
      case vowelsOnlyTextField:
        return prospectiveText.containsOnlyCharactersIn("aeiouAEIOU") &&
               prospectiveText.characters.count <= 6
This code makes use of the String extension method containsOnlyCharactersIn, which I defined in StringUtils.swift. It returns true if the String contains only characters in the provided parameter.
If both conditions in the return statement evaluate to true — prospectiveText contains only vowels and has 6 characters or fewer — the method returns true, the change to the text field is allowed, and the text field is updated. If both conditions don’t evaluate to true, the method returns false, the change to the text field is not allowed, and the text field’s contents remain the same.
The “Anything BUT vowels” text field
In this text field, we want the user to be able to enter any character except vowels and limit its contents to a maximum of 8 characters. Here’s the code that does this:
      // Allow any characters EXCEPT upper- and lower-case vowels in this field,
      // and limit its contents to a maximum of 8 characters.
      case noVowelsTextField:
        return prospectiveText.doesNotContainCharactersIn("aeiouAEIOU") &&
               prospectiveText.characters.count <= 8
This code is similar to the code for the “Vowels only” text field. The major difference is that it makes use of another String extension method defined in StringUtils.swift: doesNotContainCharactersIn, which returns true if the String doesn’t contain any of the characters in the provided parameter.
The “Digits only” text field
In this text field, we want the user to be able to enter only digits, and no more than three of them at most. Here’s the code that does this:
      // Allow only digits in this field,
      // and limit its contents to a maximum of 3 characters.
      case digitsOnlyTextField:
        return prospectiveText.containsOnlyCharactersIn("0123456789") &&
               prospectiveText.characters.count <= 3
This code is almost the same as the code for the “Vowels only” text field.
The “Numeric values only” text field
Here’s an interesting one: a text field that accepts only user input that evaluates to a proper numeric value. That means it will accept the following characters:
- The digits 0 through 9
- The – (negative) symbol
- The decimal separator, which is either . or , depending on the user’s locale settings
- The letter e, which is used for numbers specified in scientific notation
Even when limiting the user to these characters, it’s possible for non-numeric values to be entered. Here are a couple of example non-numeric values that we don’t want the user to be able to enter:
- More than one decimal separator, such as 1.2.3 or 1,2,3, depending on the user’s locale settings
- The unary minus being placed anywhere other than the start, such as 4-5
We also want to limit the text field to a maximum of 7 characters.
Here’s the code:
      // Allow only values that evaluate to proper numeric values in this field,
      // and limit its contents to a maximum of 7 characters.
      case numericOnlyTextField:
        return prospectiveText.isNumeric() &&
               prospectiveText.characters.count <= 7
This code makes use of the String extension method isNumeric, which I defined in StringUtils.swift. It returns true if the String contains a value that evaluates to a numeric value. It’s powered by NSScanner, a class that’s handy for going through strings and extracting useful data from them, and its scanDecimal method, which returns true if it finds a value that can be evaluated as an NSDecimal value.
If both conditions in the return statement evaluate to true — prospectiveText evaluates to a numeric value and has 7 characters or fewer — the method returns true, the change to the text field is allowed, and the text field is updated. If both conditions don’t evaluate to true, the method returns false, the change to the text field is not allowed, and the text field’s contents remain the same.
The “Positive integers only” text field
This is a more strict version of the “Numeric values only” text field. It requires that anything entered into it needs to evaluate as a proper numeric value, but it also requires that the value be a positive integer and not be stated in scientific notation. It has a maximum length of 5 characters. Here’s the code:
      // In this field, allow only values that evalulate to proper numeric values and
      // do not contain the "-" and "e" characters, nor the decimal separator character
      // for the current locale. Limit its contents to a maximum of 5 characters.
      case positiveIntegersOnlyTextField:
        let decimalSeparator = NSLocale.currentLocale().objectForKey(NSLocaleDecimalSeparator) as! String
        return prospectiveText.isNumeric() &&
               prospectiveText.doesNotContainCharactersIn("-e" + decimalSeparator) &&
               prospectiveText.characters.count <= 5
In order to disallow negative numbers, we use the String extension method doesNotContainCharactersIn to block out – characters. We disallow scientific notation by using the same method to block out e characters. The tricky part is disallowing the decimal separator, which can be either . or , depending on the user’s locale. We identify it with NSLocale.currentLocale().objectForKey(NSLocaleDecimalSeparator), which we add to the parameter for doesNotContainCharactersIn.
Any other text fields that might be on the screen
Finally, we handle the default case: any other text fields that might be on the screen, which we won’t constrain:
      default:
        return true
Other UI goodies
This app has a couple of UI features that I’ll cover in a subsequent article:
- specifying the keyboard for a specific text field,
- dismissing the keyboard when the user taps the Return key or its equivalent, and
- dismissing the keyboard when the user taps on the view
It’s all in the code, so if you’d like to jump in and learn how it works on your own, go right ahead!
Resources
![]() In case you missed it, here are the zipped project files for the demo project, ConstrainedTextFieldDemo [90K Xcode project and associated files, zipped].
In case you missed it, here are the zipped project files for the demo project, ConstrainedTextFieldDemo [90K Xcode project and associated files, zipped].
26 replies on “How to program an iOS text field that takes only numeric input or specific characters with a maximum length [Updated]”
[…] constrained text fields in iOS with improved features, point your browser at the revised article, How to program an iOS text field that takes only numeric input or specific characters with a maximum…. It even comes with a sample app that you can […]
[…] A couple of weeks ago, I posted an article that showed how to program an iOS text field that takes only numeric input or specific ch…. […]
[…] A couple of weeks ago, I posted an article that showed how to program an iOS text field that takes only numeric input or specific ch… […]
[…] I followed the tutorial at this site: http://www.globalnerdy.com/2015/04/27/how-to-program-an-ios-text-field-that-takes-only-numeric-input… […]
[…] I followed the tutorial at this site: http://www.globalnerdy.com/2015/04/27/how-to-program-an-ios-text-field-that-takes-only-numeric-input… […]
Query posted here: Your code throws an error :/ I’m trying to follow your code.
http://stackoverflow.com/questions/31552674/xcode-swift-limit-textfield-entry-to-numerical-entries-of-set-length/31553230#31553230
[…] I followed the tutorial at this site: http://www.globalnerdy.com/2015/04/27/how-to-program-an-ios-text-field-that-takes-only-numeric-input… […]
Thevesh: The code didn’t work with Swift 2; I’ve since updated it.
[…] How to program an iOS text field that takes only numeric input or specific characters with a maximum… One of the most popular tutorials on this blog, this covers a way to constraint text fields so that they accept only numeric input or specific characters, and limits the number of characters they will accept. […]
Hey, i followed your code with the latest version of Xcode, it does not work as give me a error at fund initializeTextFields
noVowelsTextField.delegate = self
noVowelsTextField.keyboardType = UIKeyboardType.ASCIICapable
numericOnlyTextField.delegate = self
numericOnlyTextField.keyboardType = UIKeyboardType.NumbersAndPunctuation
positiveIntegersOnlyTextField.delegate = self
positiveIntegersOnlyTextField.keyboardType = UIKeyboardType.DecimalPad
Sorry, i made a mistake at the code… the code is working fine
How will you change the code to work on osx for the Mac. I try tweaking it, but couldnt make it work.
Hi, great tutorial! One question tough. In my app i have got 40 uitextfields, and i want all of them to only accept letters from a-z. After reading this tutorial i now know how to do it. But is it a way to program them all at once, or do I have to program them one by one?
Thanks
Never mind, i just figured out it is not that big of a job after all. But I do have another question. I know it is possible to customise a keyboard to only display numbers, but is it possible to customise a keyboard to only display capital letters?
Hi, fantastic toot. Covers a lot of intermediate Swift all in one project. Use of the extension was cool too. I actually used your toot to simply restrict text field input to numbers and cut out the rest. The code is the same for every block so even though I only used the code related to UIKeyboardType.NumberPad I learned just as much as if I had used everything.
One question. I want to use the userTappedBackground function. It’s an IBAction so what is it hooked up to? The main View? I just drag from the storyboard View to ViewController.swift?
Thanks!
EDIT: What I mean is I want to use your “view.endEditing(true)”. Where can I put it? I put it inside my own IBAction submit button function but it didn’t work. So that’s why I was thinking I had to create a new IBAction for the main View but when I tried that it only gave me an Outlet option and not an Action option.
EDIT: Sorry. I see now. You simply added a new View before adding other elements. It contains all of your elements. then you created the action.
Thanks
You changed the Custom Class to UIControl!!! I did read your comment in the swift feel before but didn’t get it. Now I get it. You cannot create that action for the View until you change the class! I learned something new !!!
In Xcode 7 I assumed setting the “capitalisation” and “keyboard type” in the attributes inspector of a UITextfield will work quickly instead of applying your tutorial into my code. Well, it does not work. Why? Am I missing something so simple? I’m a newbie at Xcode and Swift. In Android studio, it is as simple as adding a single line of code into the XML to control the input or keyboard type, or it can be done on the inspector.
Is there a proper way to handle speech to text from tapping on the microphone on the keyboard? When I do this in the first example, vowels, a space can be inserted and then the user needs to tap the delete key.
I was loooking for an easy explaination for the delegation in swift , I have read many articles and I’m happy that I eventually ended here because I understood the delegation oin swift by following this tutorial the using UITextField to explain the delegate really made it easy to understand , thanks a lot
[…] If you’re curious, I covered this in an earlier article, How to program an iOS text field that takes only numeric input or specific characters with a maximum… […]
[…] That got me thinking: could I apply @IBInspectable to the text field tricks I covered in my April 2015 article, How to program an iOS text field that takes only numeric input or specific characters with a maximum… […]
This is the best explanation of the delegate pattern I have ever seen online. Great article in general. Thank you so much for taking the time to share your knowledge :)
[…] How to program an iOS text field that takes only numeric input or specific characters with a maxim… […]
Hello, is it possible to automatically add in a decimal point after 2 numbers have been entered? without the user having to do so themselves? like how when you enter numbers into a banking app, it starts off as 0.00 and then increases to be 12.99 and so forth?