While the Empire in Star Wars had a lot of fearsome war machinery, a rag-tag gaggle of rebels was able to defeat them thanks to their terrible computer and network security. The folks at the security company CyberPoint have taken clips from A New Hope (a.k.a. Episode IV, a.k.a. “The Original”) and used them to make a funny video that illustrates the many security mistakes that even the biggest organizations make with securing — or more accurately, failing to secure — their systems.
I know of a number of places whose systems were bamboozled by the system equivalent of the Jedi mind trick…
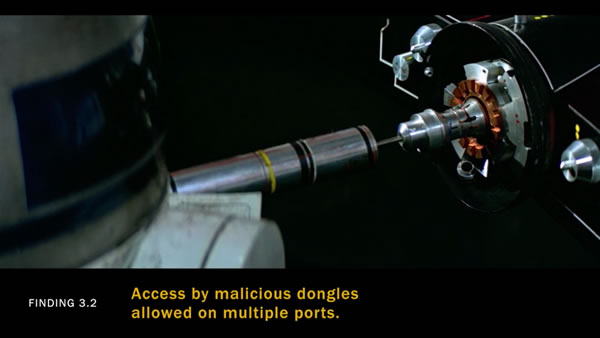
…and it’s amusing how many open USB ports there are in the Star Wars universe for R2-D2 to plug into and start injecting malware…
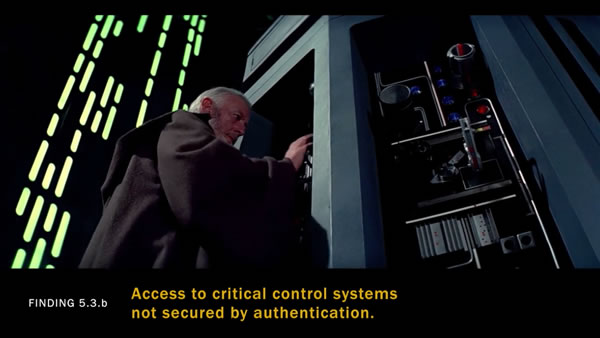
…and while it’s forgivable for a 1970s screenwriter to not think that the Death Star’s tractor beam controls wouldn’t have some kind of way of preventing use by unauthorized parties, I’ve seen real-world, 21st-century organizations who should know better do exactly the same thing:
In the spirit of all the current nerd hoopla about the new Star Wars movie (and yes, I’ve already seen it, and will probably see it again over the holidays), go watch the video and have a laugh at the Empire’s woefully inadequate security. Then go patch up your own organization’s weak spots. Kudos to CyberPoint for putting together the video, and here’s hoping Disney’s lawyers don’t send them a takedown notice.
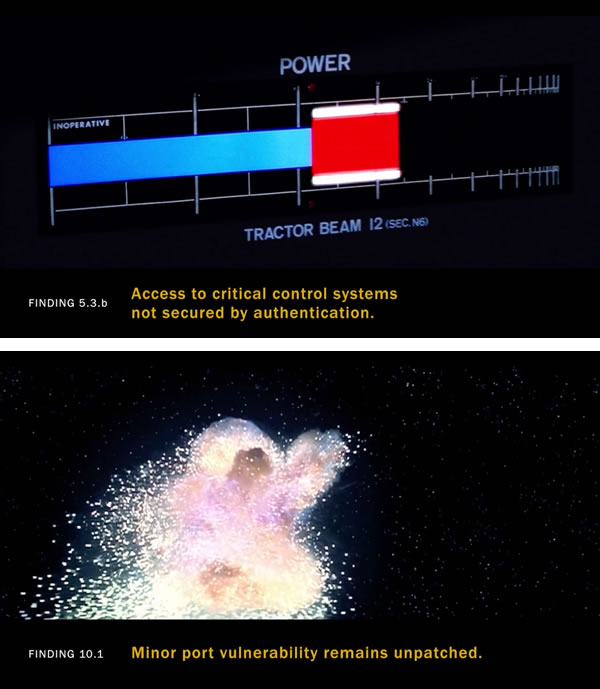
I’ve got to give CyberPoint bonus points for using video from the original, non-special-edition version of Episode IV, complete with the English labels on the tractor beam controls (the Special Editions show all text in Aurebesh, the space alphabet), and theold-school ring-free Death Star explosion:
Note the sticker on its chassis, which reads: “This machine is a server. DO NOT POWER DOWN!” Creative Commons photo by “Coolcaesar” at Wikipedia. Click the photo to see the source.
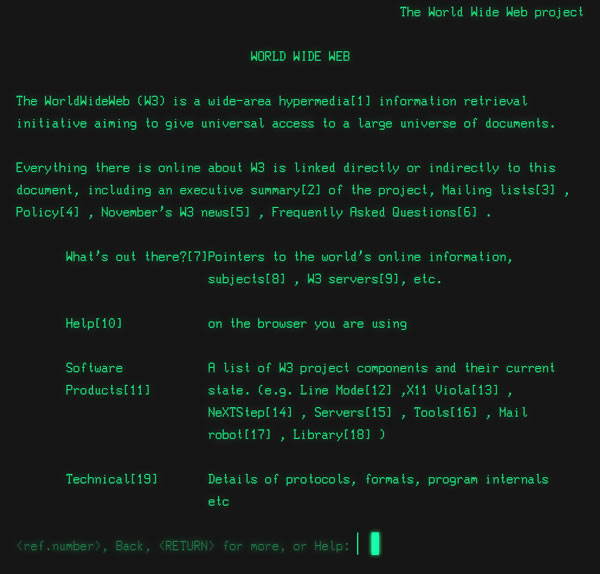
In this weekend’s collective geeky euphoria over Star Wars: The Force Awakens, the 25th anniversary of the first web page has gone largely unreported. It was on December 20, 1990 when the NeXT computer pictured above served it, kicking off what I consider to be the world’s most successful side project.
The folks at CERN tweeted about the anniversary in the wee hours of the Eastern Time Zone…
It’s more of a platform than a bunch of documents, and it’s now available on everything from the phone in your pocket to a display on your head. However, its core remains the same: it’s a vital, dynamic tool for sharing information around the planet. Barring surprises, you’ll likely be surfing the web by the time the first site marks its 50th birthday.
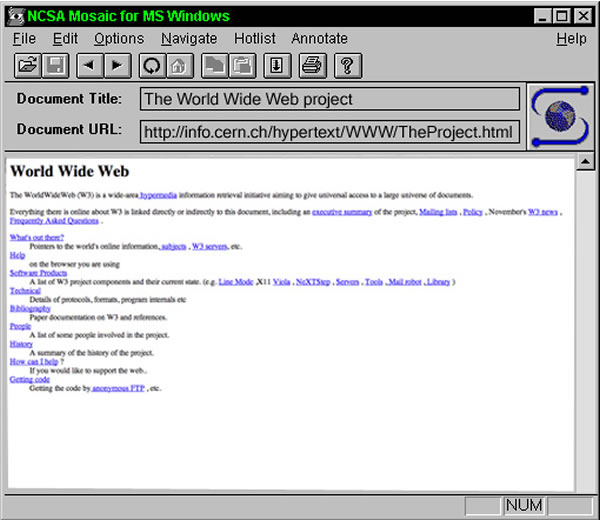
My first experience with the Web was in the fall of 1994 on the NCSA Mosaic browser at Queen’s University on a terminal running X, followed soon by Mosaic running on my Mac Quadra 660AV. A number of my friends first experienced it on Windows 3.1, where the first web page looked like this:
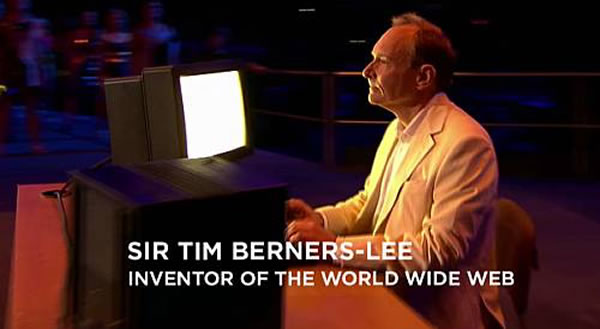
As for the inventor of the web, he’s done quite well for himself. How many developers get to take part in the opening ceremonies of the Olympics, never mind for their technological achievements?
Here’s a quick video featuring Sir Tim talking about how the web went from idea to reality, and his continuing hopes for the platform:
To close this article, I’ll leave you with Sir Tim’s TED talk from last year, A Magna Carta for the Web, in which he reminds us that the fight for openness and access, for net neutrality and against filter bubbles and centralized corporate control, continues:
There are still some areas of the world that will see double-digit growth. While sales growth is slowing in most of Asia/Pacific, Western Europe, and Latin America, the hot spots are in the middle east, Africa, India, and Indonesia.
Cheap phones are expected to drive faster replacement cycles. As they put it in their press release, “the components that comprise a sub-$100 smartphone simply do not have the ability to survive two years.”
More higher-end devices will be sold through financing plans. One example they cite is of Apple taking the reins by introducing their own financing: “Apple has taken the lead with its iPhone Upgrade Program, and several other vendors are expected to implement similar plans in the months ahead. These plans could represent the most effective way to get flagship devices into the hands of consumers while speeding up the upgrade cycle through trade-in and incentives.”
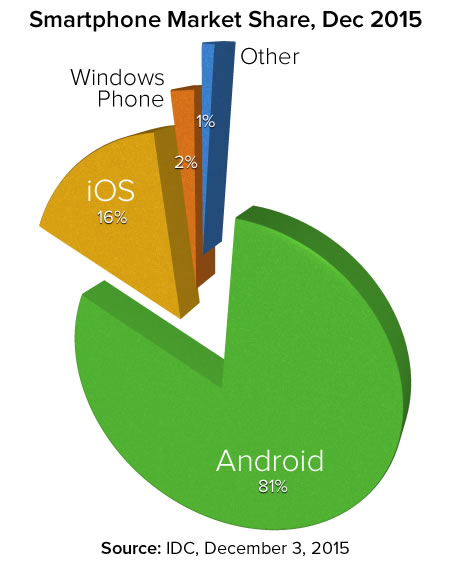
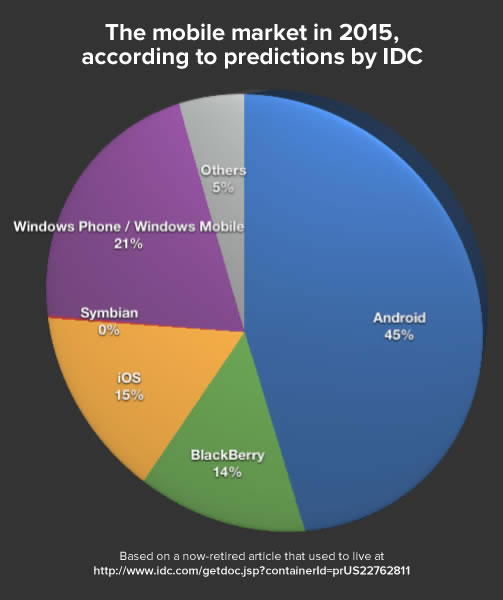
Here’s how the smartphone market share for mobile OS vendors looks like, according to IDC’s numbers:
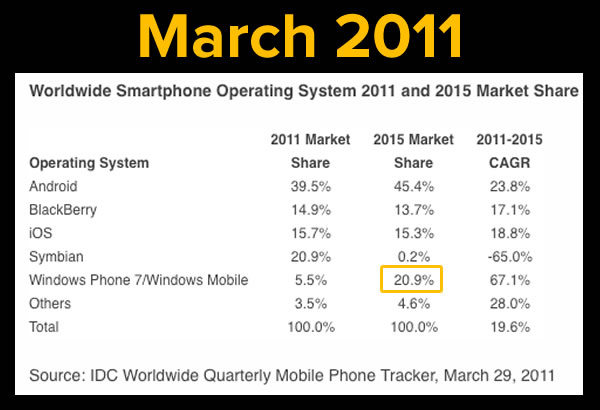
They were so sure that the combination of two industry giants, Microsoft and Nokia, would create a juggernaut that would bring the Windows Phone OS to the number two position, ahead of iOS and BlackBerry.
“The new alliance brings together Nokia’s hardware capabilities and Windows Phone’s differentiated platform. We expect the first devices to launch in 2012. By 2015, IDC expects Windows Phone to be number 2 operating system worldwide behind Android.”
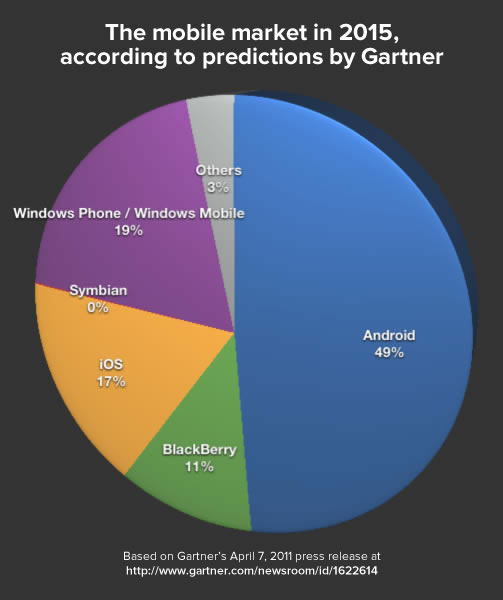
Gartner’s 2011 predictions for the 2015 smartphone market weren’t all that different:
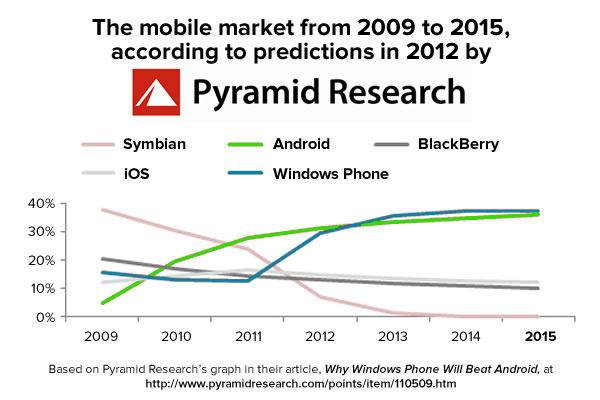
But the prize for the most comically-wrong prediction about the 2015 smartphone market has to go to Pyramid Research, who predicted that Windows Phone would take over the number one spot:
As the late great Yogi Berra said: “It’s tough to make predictions, especially about the future”.
It was just five summers ago, but it was a different time: the first-gen iPad and iPhone 4 had just been released, Android was just emerging from being awful to not-too-bad with version 2.2, a.k.a. “Froyo”, and Windows Phone 7 was still in beta. If I were to make the video today, I’d change its take-away message to “Sometime is now. Ditch the RIAs.”
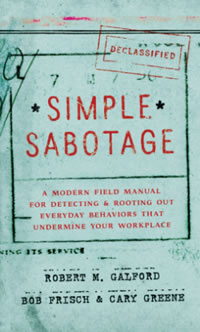
In 1944, the OSS (Office of Strategic Services, the predecessor to the CIA) published the Simple Sabotage Field Manual,a “Sabotage for Dummies” guide filled with handy tips for resistance members in Europe. In 32 pages, it listed a number of acts of anti-Nazi disruption that could be carried out by ordinary people without military or spy training.
CIA employees Don Burke and Sean Dennehey, who revealed the connection between 1944 sabotage practices and 2015 office behavior.
What the CIA’s predecessor considered to be office sabotage techniques during World War II are normal office behaviors today.
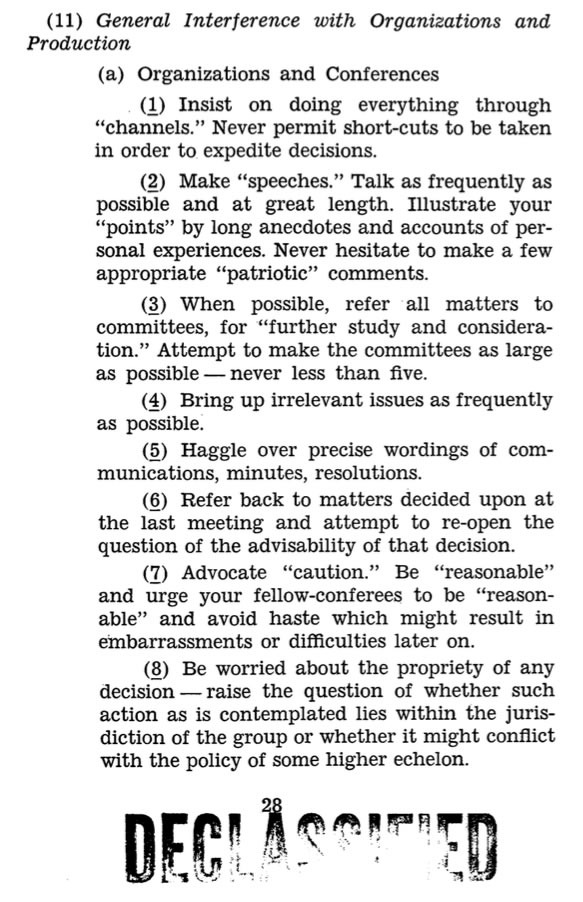
Take a look at the sabotage tactics from the section titled General Interference with Organizations:
Here’s the text from that page:
(1) Insist on doing everything through “channels.” Never permit short-cuts to be taken in order to expedite decisions.
(2) Make “speeches.” Talk as frequently as possible and at great length. Illustrate your “points” by long anecdotes and accounts of per sonal experiences. Never hesitate to make a few appropriate “patriotic” comments.
(3) When possible, refer all matters to committees, for “further study and consideration.” Attempt to make the committees as large as possible — never less than five.
(4) Bring up irrelevant issues as frequently as possible.
(5) Haggle over precise wordings of communications, minutes, resolutions.
(6) Refer back to matters decided upon at the last meeting and attempt to re-open the question of the advisability of that decision.
(7) Advocate “caution.” Be “reasonable” and urge your fellow-conferees to be “reasonable” and avoid haste which might result in embarrassments or difficulties later on.
(8) Be worried about the propriety of any decision — raise the question of whether such action as is contemplated lies within the jurisdiction of the group or whether it might conflict with the policy of some higher echelon.
If you’ve worked in an office for even one day, the odds are pretty good that you’ve seen at least one of these acts of sabotage.
Another office sabotage tip from the manual involved misusing carbon copies to slow things down: “In making carbon copies, make one too few, so that an extra copying job will have to be done”.
For you younger folks, carbon copying was a method of producing multiple copies of a typed letter in the days before photocopiers, never mind computers. This video shows how it was done (as well as why you should be thankful that we don’t live in the dark ages anymore):
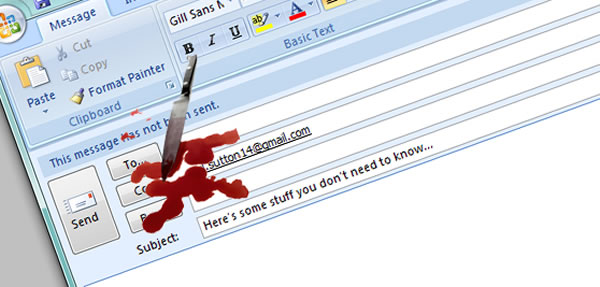
Today, carbon copies live on in their descendant, the cc: field of emails (“cc” is short for “carbon copy”). And instead of making too few copies, the internet-era version is to send emails that are cc’d to as many people as possible. In its more innocent form, the sender is just trying to be inclusive, but is likely filling other people’s inboxes with messages that don’t necessarily apply to them. In its nastier version, it’s a way to snitch on someone or throw them under the bus by cc:ing their boss and ensuring that “the wrong words go in the right ears”. No matter the intent, the effect is the same: it disrupts work.
Saboteurs make you think that what they’re talking about is relevant and important when in reality what they’re saying is tangential, unimportant, or even inappropriate. They don’t know they’re doing it, so their earnestness and honesty helps make their case. And the people on the receiving end are instantly, innocently swept off course because they believe what they think they see or hear.
It’s not 1940s occupied Europe, so we can’t simply turn over our work saboteurs to our neighborhood friendly occupying army or take them behind the office and have them quietly shot, as tempting as it may seem. After all, we’re supposed to be more enlightened these days, and besides: we probably report to some of those saboteurs. The first step toward making our workplaces more productive is to recognize these behaviors for what they truly are.
If you’re not spooked out by downloading a file from the CIA (and likely adding another item to their file on you), you can download a scan of the book from them. It’s a 2.5 MB PDF file.