 In the previous article in this series on working with dates and times in Swift 5, we looked at three key structs for date and time programming in Swift:
Daterepresents a single point in time, using a format that can easily be translated into just about any calendar and time-reckoning system: a number of seconds relative to the start of the Third Millennium (January 1, 2001, 00:00:00 UTC).DateComponentsspecifies time units like year, month, day, hour, minute, and more to represent either a point in time or a duration of time.Calendarprovides a context forDates, and convertsDates toDateComponentsandDateComponentstoDates.
These structs all deal with the internal representation of dates and times in Swift 5.
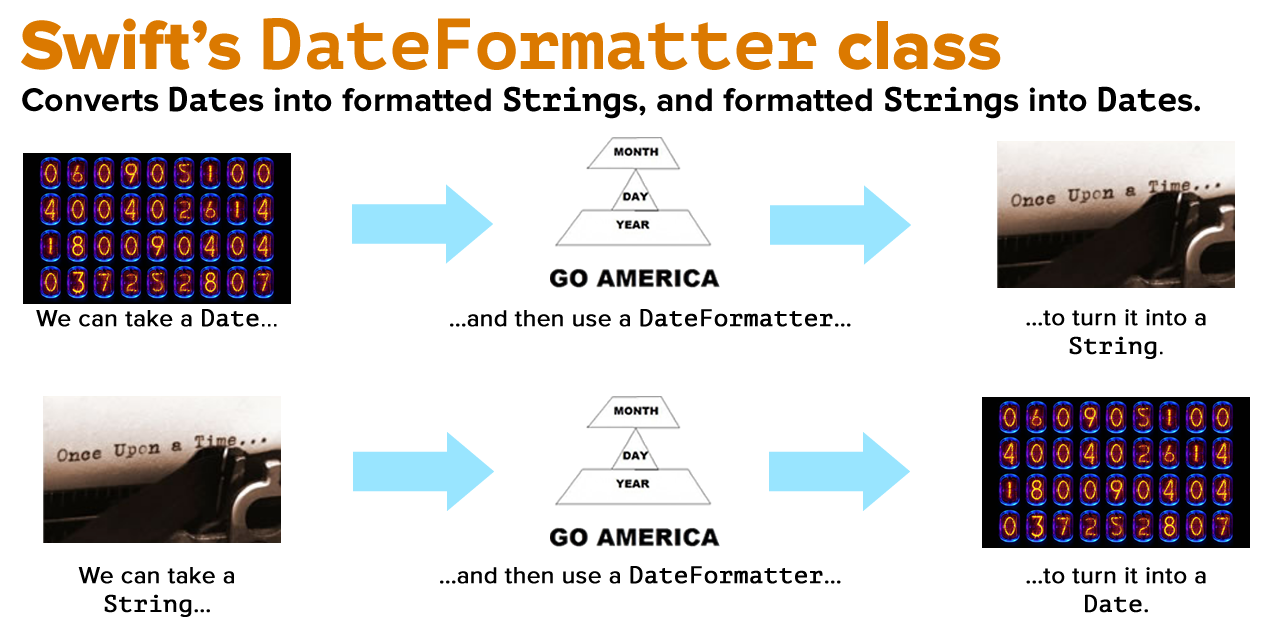
In this article, we’ll look at the DateFormatter class, which allows us to deal with the external representation of dates and times in Swift 5 as strings to be presented to the user. We use this class to convert Dates into formatted Strings that match the user’s language and locale, and properly-formatted Strings into Dates.
Tap the image to see it at full size.
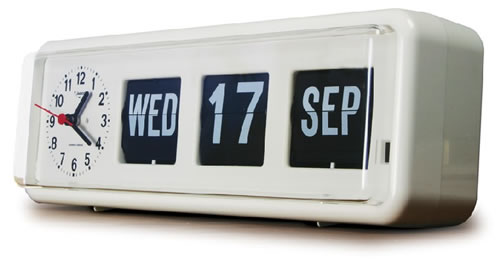
We’ve already used the Date struct’s description property and description(with:) method to print its value in a human-readable form, but they’re meant for debugging purposes only, and not for presenting date and time information to the user. When presenting dates to the user in string form, use strings that have been created by DateFormatter.
Let’s convert a Date into a String, part 1: Just the date
Start a new playground and enter the following code, which gives us a Date that we can format — June 2, 2014, the day when the Swift programming language was first released:
// The user's calendar incorporates the user's locale and
// time zone settings, which means it's the one you'll use
// most often.
// 1
let userCalendar = Calendar.current

// The Swift programming language was first released on
// June 2, 2014.
// 2
let swiftDebutDateComponents = DateComponents(
  year: 2014,
  month: 6,
  day: 2
)

// 3
let swiftDebutDate = userCalendar.date(from: swiftDebutDateComponents)!
This code is similar to code we entered in the previous article:
- Get the user’s current
Calendar. - Create a
DateComponentsstruct,swiftDebutDateComponents, providing theyear:,month:, andday:parameters that correspond to the date June 2, 2014. - Use the user’s
Calendarto createswiftDebutDateusingswiftDebutDateComponents.
Let’s try turning this date into a string with a DateFormatter.
Add the following to the playground, then run it:
let myFormatter = DateFormatter()
print("Swift’s debut date, via the DateFormatter: \(myFormatter.string(from: swiftDebutDate))")
The output should look like this:
Swift’s debut date, via the DateFormatter:
You may be surprised that the result is an empty String. That’s because you need to specify a dateStyle, which specifies which pre-defined format should be used for the date. We’ll start with the short style.
Add the following to the playground, then run it:
myFormatter.dateStyle = .short
print("Swift’s debut date, “short” style: \(myFormatter.string(from: swiftDebutDate)).")
The output should look like this:
Swift’s debut date, “short” style: 6/2/14.
Let’s try the other styles: medium, long, full, and none.
Add the following to the playground, then run it:
myFormatter.dateStyle = .medium
print("Swift’s debut date, “medium” style: \(myFormatter.string(from: swiftDebutDate))")

myFormatter.dateStyle = .long
print("Swift’s debut date, “long” style: \(myFormatter.string(from: swiftDebutDate))")

myFormatter.dateStyle = .full
print("Swift’s debut date, “full” style: \(myFormatter.string(from: swiftDebutDate))")

myFormatter.dateStyle = .none
print("Swift’s debut date, “none” style: \(myFormatter.string(from: swiftDebutDate))")
The output should look like this:
Swift’s debut date, “medium” style: Jun 2, 2014.
Swift’s debut date, “long” style: June 2, 2014.
Swift’s debut date, “full” style: Monday, June 2, 2014.
Swift’s debut date, “none” style: .
If turns out that the default dateStyle is none. Why would there be a dateStyle called .none? I’ll explain in the next section.
Let’s convert a Date into a String, part 2: A date and a time
Let’s create a date and approximate known time: When SwiftUI was announced at WWDC 2019. It’s introduced 2 hours and 8 minutes into a keynote that started at 10:00 a.m. Pacific Daylight Time, so we’ll say it debuted at 12:08 p.m. PDT on June 3, 2019.
Add the following to the playground, then run it:
// SwiftUI was introduced at WWDC 2019 on
// June 3, 2019 at 12:08 p.m. Pacific Daylight Time.
let swiftUIDebutDateComponents = DateComponents(
  timeZone: TimeZone(abbreviation: "PDT"),
  year: 2019,
  month: 6,
  day: 3,
  hour: 12,
  minute: 8
)
let swiftUIDebutDate = userCalendar.date(from: swiftUIDebutDateComponents)!
print("The newly-created date: \(swiftUIDebutDate.description(with: Locale(identifier: "en-US"))).")
On my computer, the output looked like this:
The newly-created date: Monday, June 3, 2019 at 3:08:00 PM Eastern Daylight Time.
The date and time you’ll see will be determined your system calendar settings.
Now that we have a date and time, let’s format it using the dateStyle property to style the date part, and timeStyle property to style the time part.
Add the following to the playground, then run it:
myFormatter.dateStyle = .short
myFormatter.timeStyle = .short
print("Swift’s debut date and time, “short” style: \(myFormatter.string(from: swiftUIDebutDate)).")

myFormatter.dateStyle = .medium
myFormatter.timeStyle = .medium
print("Swift’s debut date and time, “medium” style: \(myFormatter.string(from: swiftUIDebutDate)).")

myFormatter.dateStyle = .long
myFormatter.timeStyle = .long
print("Swift’s debut date and time, “long” style: \(myFormatter.string(from: swiftUIDebutDate)).")

myFormatter.dateStyle = .full
myFormatter.timeStyle = .full
print("Swift’s debut date and time, “full” style: \(myFormatter.string(from: swiftUIDebutDate)).")
On my computer, the output looked like this:
Swift’s debut date and time, “short” style: 6/3/19, 3:08 PM.
Swift’s debut date and time, “medium” style: Jun 3, 2019 at 3:08:00 PM.
Swift’s debut date and time, “long” style: June 3, 2019 at 3:08:00 PM EDT.
Swift’s debut date and time, “full” style: Monday, June 3, 2019 at 3:08:00 PM Eastern Daylight Time.
You can mix and match dateStyle and timeStyle settings. Add the following to the playground, then run it:
myFormatter.dateStyle = .full
myFormatter.timeStyle = .short
print("Swift’s debut date and time, with “full” style date and “short” style time: \(myFormatter.string(from: swiftUIDebutDate)).")
On my computer, the output looked like this:
Swift’s debut date and time, with “full” style date and “short” style time: Monday, June 3, 2019 at 3:08 PM.
Now that we’re working with a date and time, I can tell you what the .none style is for: for suppressing the display of the date or time in a formatted date string.
Add the following to the playground, then run it:
// Show only the time
myFormatter.dateStyle = .none
myFormatter.timeStyle = .medium
print("Swift’s debut time: \(myFormatter.string(from: swiftUIDebutDate)).")

// Show only the date
myFormatter.dateStyle = .full
myFormatter.timeStyle = .none
print("Swift’s debut date: \(myFormatter.string(from: swiftUIDebutDate)).")
Remember that the Date struct represents a single point in time, which has both a date and a time. The .none style for DateFormatter‘s dateStyle and timeStyle properties allows us to create a String representation of a Date that shows only its date or time part.
This table summarizes the different dateStyle and timeStyle settings for the US English language setting:
| Setting | dateStyle | timeStyle |
.none |
[ empty string ] | [ empty string ] |
.short |
6/3/19 | 3:08 PM |
.medium |
Jun 3, 2019 | 3:08:00 PM |
.long |
June 3, 2019 | 3:08:00 PM EDT |
.full |
Monday, June 3, 2019 | 3:08:00 PM Eastern Daylight Time |
Let’s convert a Date into a String, part 3: Displaying dates and times in other languages

DateFormatter defaults to the user’s preferred language, as specified in their settings. In my case, that’s US English. By setting the locale property of the DateFormatter, I can specify the language for my formatted date strings. Add the following to the playground, then run it:
// We want to see as much of these languages as possible,
// so let’s set both dateStyle and timeStyle to .full.
myFormatter.dateStyle = .full
myFormatter.timeStyle = .full

myFormatter.locale = Locale(identifier: "fr")
print("International French: \(myFormatter.string(from: swiftUIDebutDate)).")

myFormatter.locale = Locale(identifier: "fr-CA")
print("Canadian French: \(myFormatter.string(from: swiftUIDebutDate)).")

myFormatter.locale = Locale(identifier: "hr")
print("Croatian: \(myFormatter.string(from: swiftUIDebutDate)).")

myFormatter.locale = Locale(identifier: "ko_KR")
print("Korean: \(myFormatter.string(from: swiftUIDebutDate)).")
On my computer, the output looked like this:
International French: lundi 3 juin 2019 à 15:08:00 heure d’été de l’Est.
Canadian French: lundi 3 juin 2019 à 15:08:00 heure avancée de l’Est.
Croatian: ponedjeljak, 3. lipnja 2019. u 15:08:00 (istočno ljetno vrijeme).
Korean: 2019년 6월 3일 월요일 오후 3시 8분 0초 미 동부 하계 표준시.
Let’s convert a Date into a String, part 4: Custom date/time formats
In addition to the built-in formats for dates, you can tell DateFormatter to use a custom format.
Before we begin working with custom date/time formats, I should point out that if you need to display a Date as a String to the user, it’s best if you use Swift’s built-in dateStyle and timeStyle values. They display dates and times properly, according to the user’s settings, which include country and language. You’d be surprised how date formats differ from culture to culture, and it’s better to let Swift do the formatting work.
However, there are times when you need to format dates and times in a specific way that doesn’t match the styles provided by DateFormatter’s dateStyle and timeStyle properties, such as when dealing with certain APIs. That’s where DateFormatter’s dateFormat property comes in handy.
To be certain that the DateFormatter will use your custom date format, set its locale property to POSIX, then define the custom date format string in dateFormat.
Add the following to the playground, then run it:
// Setting the locale to POSIX ensures that the user's locale
// won't be used to format the Date.
myFormatter.locale = Locale(identifier: "en_US_POSIX")

// DateFormatter's format string uses the date format specifiers
// spelled out in Unicode Technical Standard #35 (located at
// http://www.unicode.org/reports/tr35/tr35-25.html#Date_Format_Patterns)
myFormatter.dateFormat = "y-MM-dd"
print("Swift’s debut date and time, y-MM-dd format: \(myFormatter.string(from: swiftUIDebutDate)).")
You can use the date format specifiers listed in Appendix F of the Unicode Technical Standard #35 to define the formatting String for the dateFormat property. Here are some examples (Add the following to the playground, then run it):
// DateFormatter's format string uses the date format specifiers
// spelled out in Unicode Technical Standard #35 (located at
// http://www.unicode.org/reports/tr35/tr35-25.html#Date_Format_Patterns)
myFormatter.dateFormat = "y-MM-dd"
print("Swift’s debut date and time, y-MM-dd format: \(myFormatter.string(from: swiftUIDebutDate)).")

myFormatter.dateFormat = "'Year: 'y' Month: 'M' Day: 'd"
print("Swift’s debut date and time, in labeled y M d format: \(myFormatter.string(from: swiftUIDebutDate)).")

myFormatter.dateFormat = "MM/dd/yy"
print("Swift’s debut date and time, MM/dd/yy format: \(myFormatter.string(from: swiftUIDebutDate)).")

myFormatter.dateFormat = "MMM dd, yyyy"
print("Swift’s debut date and time, MMM dd, yyyy format: \(myFormatter.string(from: swiftUIDebutDate)).")

myFormatter.dateFormat = "E MMM dd, yyyy"
print("Swift’s debut date and time, E MMM dd, yyyy format: \(myFormatter.string(from: swiftUIDebutDate)).")

myFormatter.dateFormat = "EEEE, MMMM dd, yyyy' at 'h:mm a"
print("Swift’s debut date and time, EEEE, MMMM dd, yyyy' at 'h:mm a. format: \(myFormatter.string(from: swiftUIDebutDate)).")

myFormatter.dateFormat = "EEEE, MMMM dd, yyyy' at 'h:mm a zzzz"
print("Swift’s debut date and time, EEEE, MMMM dd, yyyy' at 'h:mm a zzzz. format: \(myFormatter.string(from: swiftUIDebutDate)).")
Let’s convert a String into a Date
DateFormatter works the other way — just as it can convert Dates to Strings, it can also convert Strings to Dates. By setting its dateFormat to the format of the String it should expect, you can use its date(from:) method to convert a String into a Date.
Once again, use the date format specifiers listed in Appendix F of the Unicode Technical Standard #35 to define the formatting String for the dateFormat property.
Add the following to the playground, then run it:
// Let’s define the format for date strings we want to parse:
myFormatter.dateFormat = "yyyy/MM/dd hh:mm Z"

// Here's a date in the specified format.
// DateFormatter’s date(from:) method will be able to parse it.
let newDate1 = myFormatter.date(from: "2019/06/03 12:08 -0700")
print("newDate1’s value is: \(newDate1?.description ?? "nil").")

// And here's the same date, but in a different format:
let newDate2 = myFormatter.date(from: "Jun 6, 2019, 12:08 PM PDT")
print("newDate2’s value is: \(newDate2?.description ?? "nil").")
On my computer, the output looked like this:
newDate1’s value is: 2019-06-03 07:08:00 +0000.
newDate2’s value is: nil.
Let’s change the dateFormat string and try it again. Add the following to the playground, then run it:
// Let's change the date format strings and try
// date(from:) with the same two strings:
myFormatter.dateFormat = "MMM d, yyyy, hh:mm a zz"

let newDate3 = myFormatter.date(from: "2019/06/03 12:08 -0700")
print("newDate3’s value is: \(newDate3?.description ?? "nil").")

let newDate4 = myFormatter.date(from: "Jun 6, 2019, 12:08 PM PDT")
print("newDate4’s value is: \(newDate4?.description ?? "nil").")
On my computer, the output looked like this:
newDate3’s value is: nil.
newDate4’s value is: 2019-06-06 19:08:00 +0000.
If you’re trying to parse a weird date format, use a weird date format string. Add the following to the playground, then run it:
// Don’t forget that you can get weird if you expect to
// parse dates in weird formats!
// (D is the format string for “day of year”, which can be 1...366)
myFormatter.dateFormat = "y 😍 D"
let weirdEmojiDate = myFormatter.date(from: "2020 😍 333")
print("weirdEmojiDate’s value is: \(weirdEmojiDate?.description ?? "nil").")
On my computer, the output looked like this:
weirdEmojiDate’s value is: 2020-11-28 05:00:00 +0000.
Wrapping it all up
Here’s the complete code for the playground containing all the code we just worked with:
import UIKit


// Let’s convert a Date into a String, part 1: Just the date
// =========================================================

// The user's calendar incorporates the user's locale and
// time zone settings, which means it's the one you'll use
// most often.
// 1
let userCalendar = Calendar.current

// The Swift programming language was first released on
// June 2, 2014.
// 2
let swiftDebutDateComponents = DateComponents(
  year: 2014,
  month: 6,
  day: 2
)

// 3
let swiftDebutDate = userCalendar.date(from: swiftDebutDateComponents)!

let myFormatter = DateFormatter()
print("Swift’s debut date, via the DateFormatter: \(myFormatter.string(from: swiftDebutDate))")
// Hey, what gives?

myFormatter.dateStyle = .short
print("Swift’s debut date, “short” style: \(myFormatter.string(from: swiftDebutDate)).")

myFormatter.dateStyle = .medium
print("Swift’s debut date, “medium” style: \(myFormatter.string(from: swiftDebutDate)).")

myFormatter.dateStyle = .long
print("Swift’s debut date, “long” style: \(myFormatter.string(from: swiftDebutDate)).")

myFormatter.dateStyle = .full
print("Swift’s debut date, “full” style: \(myFormatter.string(from: swiftDebutDate)).")

myFormatter.dateStyle = .none
print("Swift’s debut date, “none” style: \(myFormatter.string(from: swiftDebutDate)).")


// Let’s convert a Date into a String, part 2: A date and a time
// =============================================================

// SwiftUI was introduced at WWDC 2019 on
// June 3, 2019 at 12:08 p.m. Pacific Daylight Time.
let swiftUIDebutDateComponents = DateComponents(
  timeZone: TimeZone(identifier: "America/Los_Angeles"),
  year: 2019,
  month: 6,
  day: 3,
  hour: 12,
  minute: 8
)
let swiftUIDebutDate = userCalendar.date(from: swiftUIDebutDateComponents)!
print("The newly-created date: \(swiftUIDebutDate.description(with: Locale(identifier: "en-US"))).")

myFormatter.dateStyle = .short
myFormatter.timeStyle = .short
print("Swift’s debut date and time, “short” style: \(myFormatter.string(from: swiftUIDebutDate)).")

myFormatter.dateStyle = .medium
myFormatter.timeStyle = .medium
print("Swift’s debut date and time, “medium” style: \(myFormatter.string(from: swiftUIDebutDate)).")

myFormatter.dateStyle = .long
myFormatter.timeStyle = .long
print("Swift’s debut date and time, “long” style: \(myFormatter.string(from: swiftUIDebutDate)).")

myFormatter.dateStyle = .full
myFormatter.timeStyle = .full
print("Swift’s debut date and time, “full” style: \(myFormatter.string(from: swiftUIDebutDate)).")

myFormatter.dateStyle = .full
myFormatter.timeStyle = .short
print("Swift’s debut date and time, with “full” style date and “short” style time: \(myFormatter.string(from: swiftUIDebutDate)).")

// Show only the time
myFormatter.dateStyle = .none
myFormatter.timeStyle = .medium
print("Swift’s debut time: \(myFormatter.string(from: swiftUIDebutDate)).")

// Show only the date
myFormatter.dateStyle = .full
myFormatter.timeStyle = .none
print("Swift’s debut date: \(myFormatter.string(from: swiftUIDebutDate)).")


// Let’s convert a Date into a String, part 3: Displaying dates and times in other languages
// =========================================================================================

// We want to see as much of these languages as possible,
// so let’s set both dateStyle and timeStyle to .full.
myFormatter.dateStyle = .full
myFormatter.timeStyle = .full

myFormatter.locale = Locale(identifier: "fr")
print("International French: \(myFormatter.string(from: swiftUIDebutDate)).")

myFormatter.locale = Locale(identifier: "fr-CA")
print("Canadian French: \(myFormatter.string(from: swiftUIDebutDate)).")

myFormatter.locale = Locale(identifier: "hr")
print("Croatian: \(myFormatter.string(from: swiftUIDebutDate)).")

myFormatter.locale = Locale(identifier: "ko_KR")
print("Korean: \(myFormatter.string(from: swiftUIDebutDate)).")


// Let’s convert a Date into a String, part 4: Custom date/time formats
// ====================================================================

// Setting the locale to POSIX ensures that the user's locale
// won't be used to format the Date.
myFormatter.locale = Locale(identifier: "en_US_POSIX")

// DateFormatter's format string uses the date format specifiers
// spelled out in Unicode Technical Standard #35 (located at
// http://www.unicode.org/reports/tr35/tr35-25.html#Date_Format_Patterns)
print("Custom date and time formats:")

myFormatter.dateFormat = "y-MM-dd"
print("Swift’s debut date and time, y-MM-dd format: \(myFormatter.string(from: swiftUIDebutDate)).")

myFormatter.dateFormat = "'Year: 'y' Month: 'M' Day: 'd"
print("Year: y Month: M Day: d format: \(myFormatter.string(from: swiftUIDebutDate)).")

myFormatter.dateFormat = "MM/dd/yy"
print("MM/dd/yy format: \(myFormatter.string(from: swiftUIDebutDate)).")

myFormatter.dateFormat = "MMM dd, yyyy"
print("MMM dd, yyyy format: \(myFormatter.string(from: swiftUIDebutDate)).")

myFormatter.dateFormat = "E MMM dd, yyyy"
print("E MMM dd, yyyy format: \(myFormatter.string(from: swiftUIDebutDate)).")

myFormatter.dateFormat = "EEEE, MMMM dd, yyyy' at 'h:mm a"
print("EEEE, MMMM dd, yyyy' at 'h:mm a. format: \(myFormatter.string(from: swiftUIDebutDate)).")

myFormatter.dateFormat = "EEEE, MMMM dd, yyyy' at 'h:mm a zzzz"
print("EEEE, MMMM dd, yyyy' at 'h:mm a zzzz. format: \(myFormatter.string(from: swiftUIDebutDate)).")


// Let’s convert a String into a Date
// ==================================

// Let’s define the format for date strings we want to parse:
myFormatter.dateFormat = "yyyy/MM/dd hh:mm Z"

// Here's a date in the specified format.
// DateFormatter’s date(from:) method will be able to parse it.
let newDate1 = myFormatter.date(from: "2019/06/03 12:08 -0700")
print("newDate1’s value is: \(newDate1?.description ?? "nil").")

// And here's the same date, but in a different format:
let newDate2 = myFormatter.date(from: "Jun 6, 2019, 12:08 PM PDT")
print("newDate2’s value is: \(newDate2?.description ?? "nil").")

// Let's change the date format strings and try
// date(from:) with the same two strings:
myFormatter.dateFormat = "MMM d, yyyy, hh:mm a zz"

let newDate3 = myFormatter.date(from: "2019/06/03 12:08 -0700")
print("newDate3’s value is: \(newDate3?.description ?? "nil").")

let newDate4 = myFormatter.date(from: "Jun 6, 2019, 12:08 PM PDT")
print("newDate4’s value is: \(newDate4?.description ?? "nil").")

// Don’t forget that you can get weird if you expect to
// parse dates in weird formats!
// (D is the format string for “day of year”, which can be 1...366)
myFormatter.dateFormat = "y 😍 D"
let weirdEmojiDate = myFormatter.date(from: "2020 😍 333")
print("weirdEmojiDate’s value is: \(weirdEmojiDate?.description ?? "nil").")
You can download the playground here (3KB, zipped Xcode playground file).
In the next installment on dates and times in Swift 5, we’ll look at date calculations.
The How to work with dates and times in Swift 5 series
Here are the articles in this series: