When we say “internet of things,” we’re really talking about the combination of computing power and sensor technologies in places where they haven’t traditionally been, including that most traditional of everyday technologies, the car. While cars have been “hackable” for decades, only now are they getting computing platforms that third-party developers can build on: Android Auto, Apple CarPlay, and now, GM’s Next Generation Infotainment, or NGI for short.
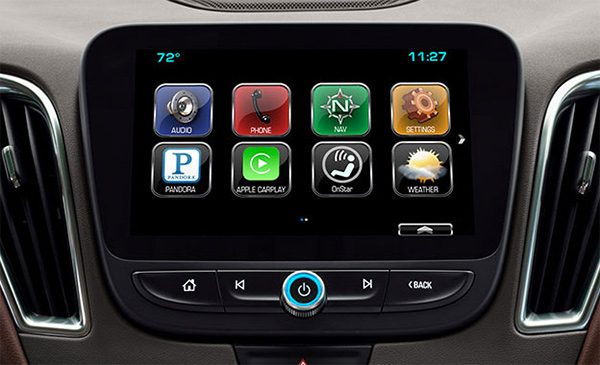
NGI gives developers the ability to write apps for the in-car infotainment consoles located in the center dashboard of a number of GM vehicles, like the one pictured above. Using the NGI SDK, developers have access to:
- An 800-pixel high by 390-pixel wide touchscreen to receive input from and display information to the user
- The voice system to respond to user commands and provide spoken responses to the user
- Data from nearly 400 sensors ranging from the state of controls (buttons and the big dial) to instrumentation (such as speed, trip odometer, orientation) to car status information (Are there passengers in the car? Are the windows open or closed?) and more.
- The navigation system to get and set navigation directions
- The media system to play or stream audio files
- The file system to create, edit, and delete files on the system
- An inter-app communication system so that apps can send messages to each other
The SDK allows you to build and test apps for GM cars on your own computer. It comes with an emulator that lets you see your apps as they would appear on the car’s display, simulate sensor readings, and debug your app with a specialized console.
Best of all, you probably already have the skills to build apps with the NGI SDK: you write apps using HTML5, CSS, and JavaScript.
Getting and installing GM’s NGI SDK
![]()
First: if you don’t already have Node.js installed on your computer, do it now. The SDK uses it (as does just about every web development framework that matters these days, so you might as well install it).
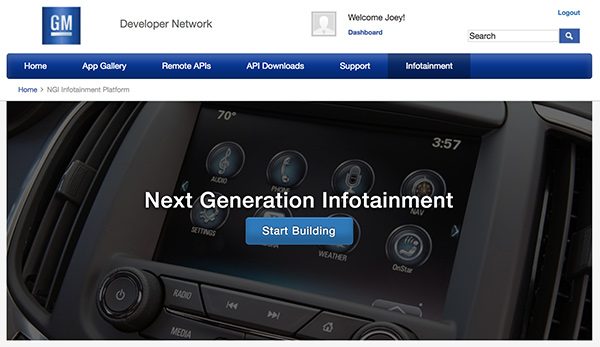
To start developing apps for GM’s new cars, go to the NGI SDK site — developer.gm.com/ngi — and register:
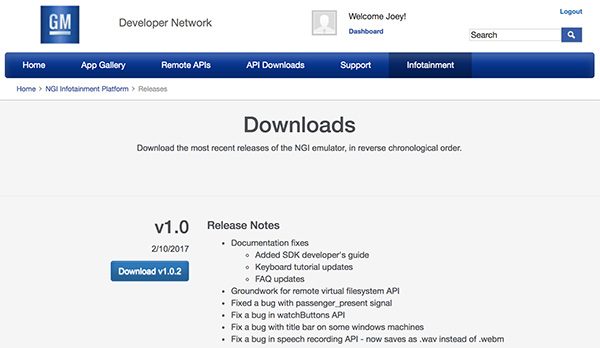
Once you’ve registered, log into the site, and download the latest version of the SDK install package from the downloads page:
The download will be a compressed .tgz file. Uncompress it; it will uncompress into a directory named package.
Open a terminal and install the SDK by entering the following on the command line:
npm install -g <PATH_TO_INSTALL_PACKAGE>
(…and no, don’t enter <PATH_TO_INSTALL_PACKAGE> literally — replace that with the full directory path where you downloaded the SDK install package. In my case, that full directory path was /Users/joey/Downloads/package, so I typed npm install -g/Users/joey/Downloads/package on my command line.)
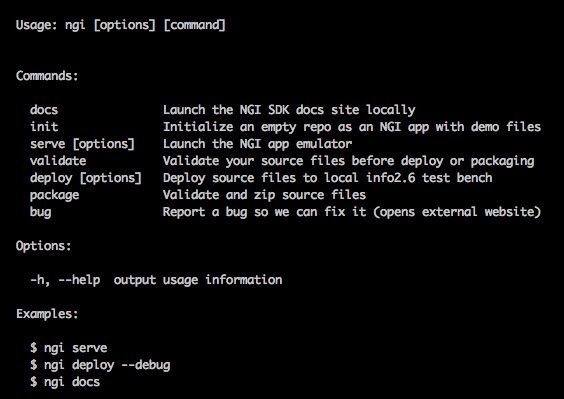
Once the installer has done its dance, you can confirm that it installed successfully by entering this on the command line:
ngi --help
…which should result in the following being displayed on your terminal window:
Now you’re ready to start building NGI apps!
Getting started building NGI apps
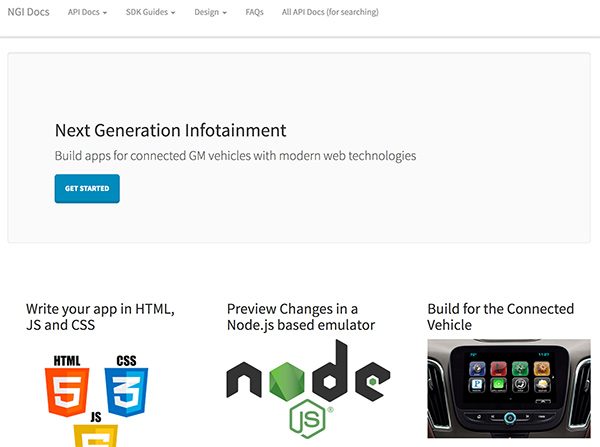
If you’re like me, you’re probably itching to see the docs. You can fire up a local copy of the NGI documentation via the command line by entering the following:
ngi docs
This will open a new browser window that will look like this:
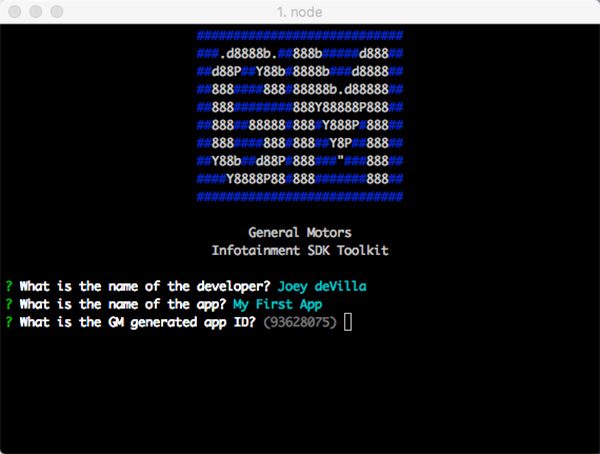
Starting a new project is pretty simple and not all that different from the way that many web development frameworks do it. You create a new directory, navigate to that directory, and run ngi init:
mkdir hello-gm
cd hello-gm
ngi init
This will appear in your terminal:
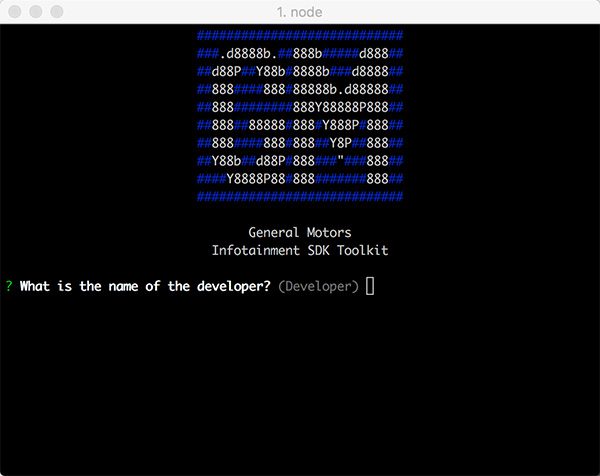
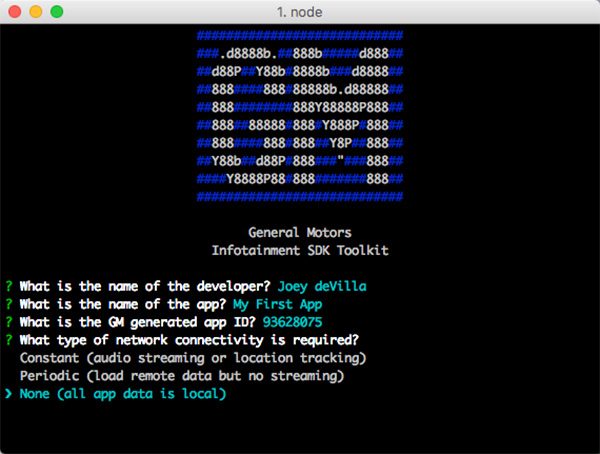
Answer the short list of questions that appear. You can either type in your own response, or just press Return to accept the default value (displayed in parentheses in gray text):
When you reach the “What type of network connectivity is required?” question, use the arrow keys to select the “None (all app data is local)” option. This is a simple example, after all:
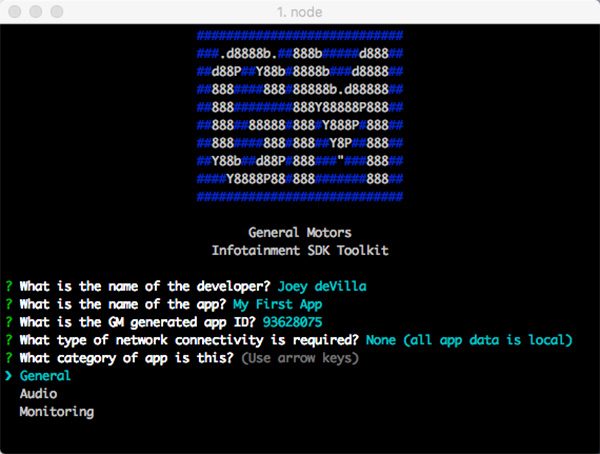
When you reach the “What category of app is this?” question, use the arrow keys to select the “General” option:
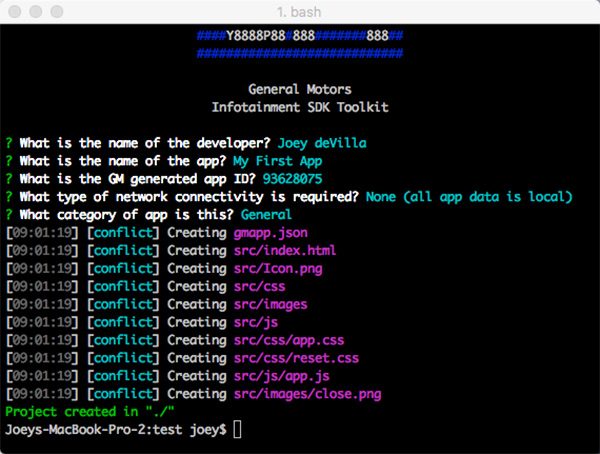
After this step, you’ll have an empty project, ready for coding. You should see something like this in your terminal:
You now have a working project. You can run it in the emulator by staying in your project directory and entering this on the command line:
ngi serve
An emulator named Electron will appear. It has this icon:
![]()
and the emulator should look like this:
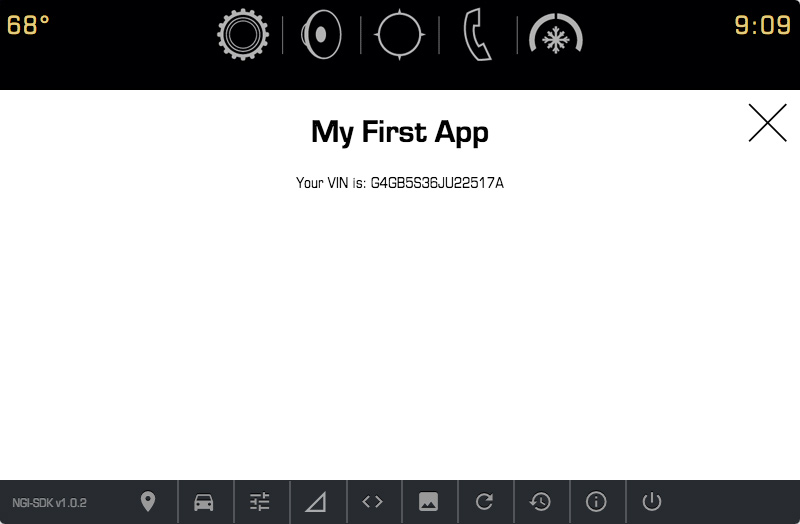
You’ll find the HTML source for this screen in the /src directory — it’s the index.html file. Here are its contents:
<!DOCTYPE html>
<html>
  <head>
    <title>My First App</title>
    <meta http-equiv="Content-Type" content="text/html; charset=UTF-8">

    <!-- Base css, but you'll likely want to keep them -->
    <link rel="stylesheet" href="css/reset.css" type="text/css">

    <!-- Your custom files -->
    <link rel="stylesheet" href="css/app.css" type="text/css">

    <script src="GMLIB/system.js"></script>
    <script src="GMLIB/info.js"></script>
    <!-- Uncomment libraries as you need them: -->
    <!-- <script src="GMLIB/comm.js"></script> -->
    <!-- <script src="GMLIB/io.js"></script> -->
    <!-- <script src="GMLIB/media.js"></script> -->
    <!-- <script src="GMLIB/monitor.js"></script> -->
    <!-- <script src="GMLIB/nav.js"></script> -->
    <!-- <script src="GMLIB/phone.js"></script> -->
    <!-- <script src="GMLIB/ui.js"></script> -->
    <!-- <script src="GMLIB/util.js"></script> -->
    <!-- <script src="GMLIB/voice.js"></script> -->

  </head>
  <body>
    <div id="wrapper">
      <div id="close"><img src="images/close.png" onclick="gm.system.closeApp()" alt="close"></div>
      <div id="main">

        <!-- Remove all code inside #main and add your own! -->
        <h1>My First App</h1>
        <p>
          Your VIN is: <span id="vin"></span>
        </p>

      </div>
    </div>

    <!-- Your app code: -->
    <script src="js/app.js"></script>
  </body>
</html>
As you can see, all visible markup goes in the main div.
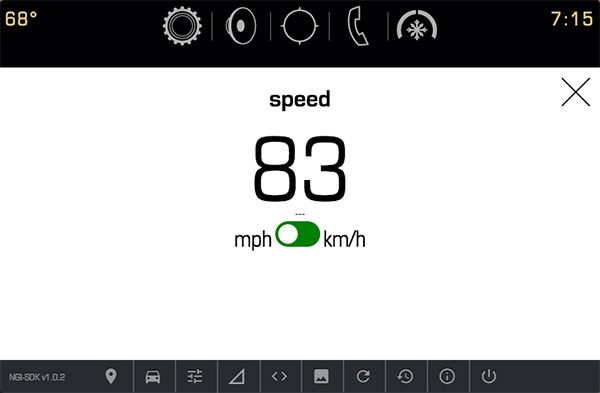
Let’s build a simple speedometer app. It will receive speed data and display it as shown below:
We’ll need to make changes in 3 files: HTML, CSS, and JavaScript.
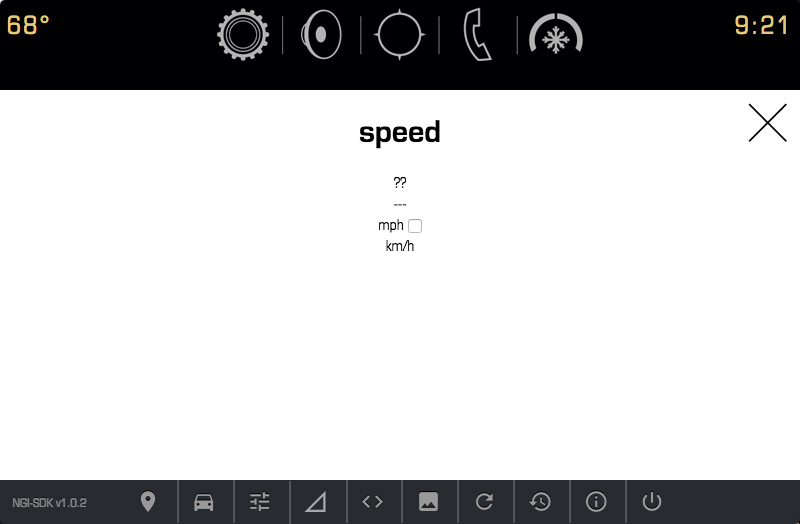
Leave the emulator running, and let’s start with the HTML file, /src/index.html. Change its contents to the following:
<!DOCTYPE html>
<html>
  <head>
    <title>Hello World</title>
    <meta http-equiv="Content-Type" content="text/html; charset=UTF-8">

    <!-- Base css, but you'll likely want to keep them -->
    <link rel="stylesheet" href="css/reset.css" type="text/css">

    <!-- Your custom files -->
    <link rel="stylesheet" href="css/app.css" type="text/css">

    <script src="GMLIB/system.js"></script>
    <script src="GMLIB/info.js"></script>
    <!-- Uncomment libraries as you need them: -->
    <!-- <script src="GMLIB/comm.js"></script> -->
    <!-- <script src="GMLIB/io.js"></script> -->
    <!-- <script src="GMLIB/media.js"></script> -->
    <!-- <script src="GMLIB/monitor.js"></script> -->
    <!-- <script src="GMLIB/nav.js"></script> -->
    <!-- <script src="GMLIB/phone.js"></script> -->
    <!-- <script src="GMLIB/ui.js"></script> -->
    <!-- <script src="GMLIB/util.js"></script> -->
    <!-- <script src="GMLIB/voice.js"></script> -->

  </head>
  <body>
    <div id="wrapper">
      <div id="close"><img src="images/close.png" onclick="gm.system.closeApp()" alt="close"></div>
      <div id="main">

        <h1>speed</h1>
        <div class="instruments">
          <div id="speed">??</div>
          <div id="units">---</div>
        </div>

        <span id="mph">mph</span>
        <label class="switch">
          <input id="unitSwitch" type="checkbox" onclick='changeUnits(this);'>
          <div class="slider round"></div>
        </label>
        <span id="kmh">km/h</span>

      </div>
    </div>

    <!-- Your app code: -->
    <script src="js/app.js"></script>
  </body>
</html>
Save the file. The emulator should now look like this:
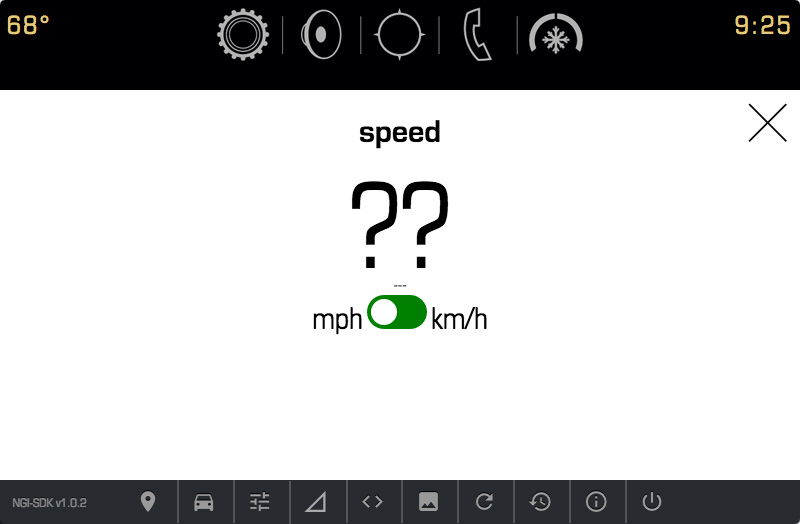
Let’s now edit the app’s CSS file, /src/css/app.css. Change its contents to the following:
#main {
  text-align: center;
}

#close {
  position: absolute;
  top: 90px;
  right: 0;
  width: 64px;
  height: 64px;
  overflow: hidden;
  z-index: 1000;
}
#close img {
  width: 100%;
}

@media (min-width: 801px) {
  #close {
    top: 104px;
  }
}

#speed {
 font-size: 8em;
 line-height: .8em;
}

#mph {
  font-size: 2em;
}

#kmh {
  font-size: 2em;
}

/* The switch - the box around the slider */
.switch {
  position: relative;
  display: inline-block;
  width: 60px;
  height: 34px;
}

/* Hide default HTML checkbox */
.switch input {display:none;}

/* The slider */
.slider {
  position: absolute;
  cursor: pointer;
  top: 0;
  left: 0;
  right: 0;
  bottom: 0;
  background-color: green;
  -webkit-transition: .4s;
  transition: .4s;
}

.slider:before {
  position: absolute;
  content: "";
  height: 26px;
  width: 26px;
  left: 4px;
  bottom: 4px;
  background-color: white;
  -webkit-transition: .4s;
  transition: .4s;
}

input:checked + .slider {
  background-color: #2196F3;
}

input:focus + .slider {
  box-shadow: 0 0 1px #2196F3;
}

input:checked + .slider:before {
  -webkit-transform: translateX(26px);
  -ms-transform: translateX(26px);
  transform: translateX(26px);
}

/* Rounded sliders */
.slider.round {
  border-radius: 34px;
}

.slider.round:before {
  border-radius: 50%;
}
Save the file. The emulator should now look like this:
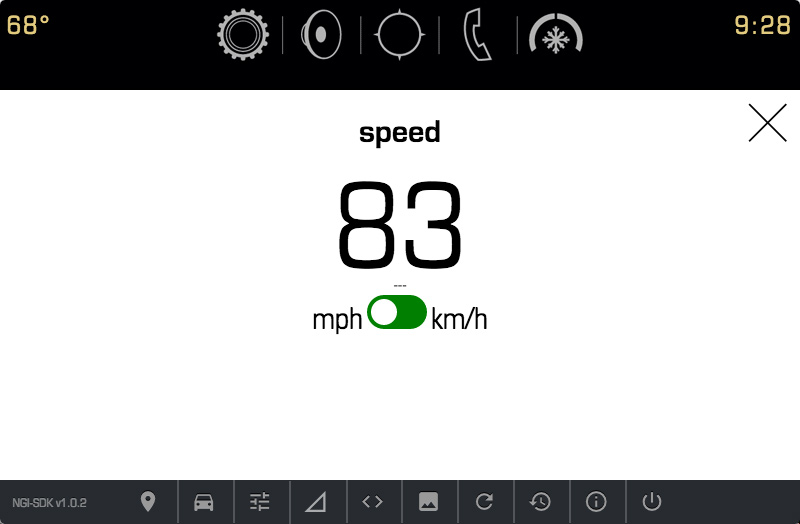
And finally, let’s edit the app’s Javascript, located in /src/js/app.js. Change its contents to the following:
var useMetricUnits = true
changeUnits(document.getElementById('unitSwitch'))

function showSpeed(data) {
  console.log("showSpeed - metric? " + useMetricUnits)
  var speed = data.average_speed
  if ( speed !== undefined ) {
    var speedText = document.getElementById('speed')
    speed = useMetricUnits ? speed : Math.round(speed * 0.621)
    speedText.innerHTML = speed
  }
}

function changeUnits(checkbox) {
  console.log("Changed!" + checkbox.checked)
  useMetricUnits = checkbox.checked
  gm.info.getVehicleData(showSpeed, ['average_speed'])
}

gm.info.watchVehicleData(showSpeed, ['average_speed'])
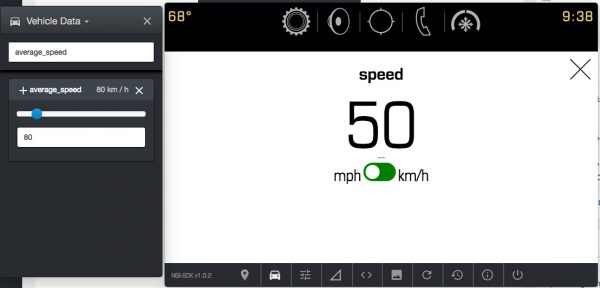
Save the file. The emulator should now look like this (the speed reported my be different):
It’s time to simulate some car sensor data. You can do this by using the Signal Panel, which you access by clicking on this icon, located in the row of icons at the bottom of the emulator:
![]()
This window will appear:
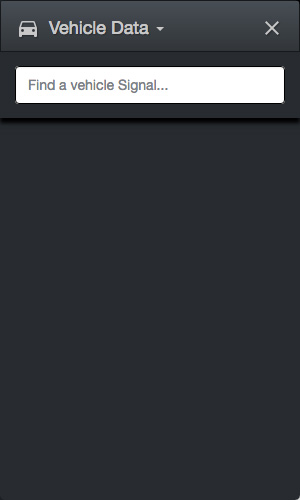
This panel will let you simulate the nearly 400 data signals available to NGI. The one we want is called average_speed. Search for it by typing average_speed into the Find a vehicle Signal… text box:
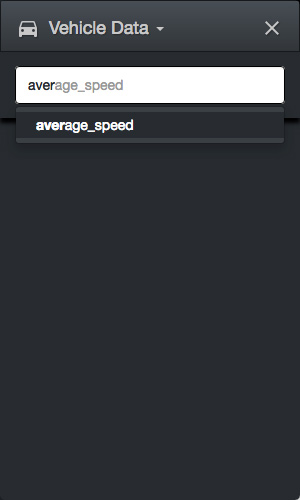
…and click on the average_speed selection when it appears. An average_speed panel will appear, which will let you enter a speed reading via a slider or text box:
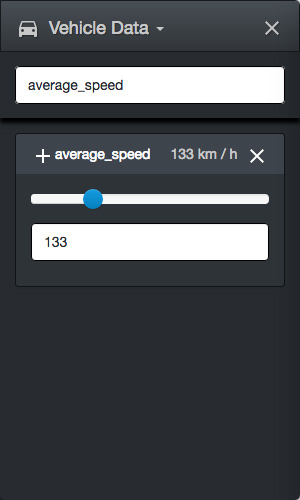
Note that average_speed reports its speeds in kilometers/hour. I’ve done the metric math for you and provided a CSS toggle switch that lets you change the display between miles and kilometers per hour.
Play around with the average_speed values, and see how that affects what you see on the screen.
If you’ve done even the smallest bit of JavaScript coding, everything in /src/js/app.js should be familiar to you except for two function calls, namely…
1. gm.info.getVehicleData(success [, failure], signals)
This method does a one-time query of the car’s systems for one or more “signal values” — that is, readings from the nearly 400 readings that the car can provide, including speed. It takes these arguments:
success: The method to call if the signal values can be retrieved. This method should accept a single parameter: a JavaScript object containing the retrieved values.failure(optional): The method to call if the signal values cannot be retrieved.signals: An array of strings containing the names of the signal values to be retrieved.
2. gm.info.watchVehicleData(success [, failure][, signals][, options])
Where gm.info.getVehicleData() does a one-time query of the car’s systems for signal values, gm.info.watchVehicleData() makes a continuous query. You can think of it as setting up a method as a “listener” for signal values. It takes these arguments:
success: The method to call if the signal values can be retrieved. This method should accept a single parameter: a JavaScript object containing the retrieved values.failure(optional): The method to call if the signal values cannot be retrieved.signals: An array of strings containing the names of the signal values to be retrieved.options: An instance of the vehicleDataOptions object. One property ofvehicleDataOptionsiswait, which specifies the number of milliseconds between success callbacks. The default value forwaitis 2000.
gm.info.getVehicleData() returns an integer value that identifies the “watch” operation that it was used to initiate. You can use that ID to cancel the “watch” operation with the gm.info.clearVehicleData(watchID) method, where watchID is the ID of the “watch” operation that you want to cancel.
And there you have it — your first NGI app!

And in case you were wondering: of course I set up a GitHub repo for this project! It’s called hello-gm and it lives on my GitHub.
Join us at the Makers Hustle Harder Hackathon in Tampa, February 27 – March 4, 2017!

If you’d like to find out more about the NGI SDK, building apps for GM’s in-car infotainment systems, and win prizes, come to the Makers Hustle Harder hackathon, which takes place in Tampa on the week of February 27th, 2017!
Tampa is the first of 3 U.S. cities where GM will be hosting Makers Hustle Harder, and it’s a chance for you to learn more about GM’s in-car IoT platform and see what you can do with it. There’ll be a kickoff meeting tonight at Tampa Hackerspace, remote work all week, and a final all-day session at Tampa Hackerspace on Saturday, March 4.
For more details, see my previous post, or visit the Tampa Hackerspace Meetup page for this event. I’ll be there — will you?
3 replies on “Build your first app for GM’s Next Generation Infotainment (NGI) in-car platform”
[…] Build your first app for GM’s Next Generation Infotainment (NGI) in-car platform […]
[…] Build your first app for GM’s Next Generation Infotainment (NGI) in-car platform […]
[…] If you’d like to try your hand at building apps for NGI, check out my introductory tutorial, Build your first app for GM’s Next Generation Infotainment (NGI) in-car platform. […]