
I’ll admit it: I cheered when Steph Saad Cuthbertson, Android Project Management Director (and Program Manager for Visual Studio during my time with The Empire), announced that Kotlin is now a first-class Android development language. This is fantastic news, especially for people like me, who wince every time they have to switch from iOS development in Swift to Android development in Java.
 Kotlin is the creation of JetBrains, who have released a number of nice development tools over the years. Many of you from the .NET world live and die by ReSharper, the add-on that supercharges Visual Studio and takes a lot of drudgery and donkey-work out of .NET development. If you’re a Java developer tired of the nightmare of self-flagellation that is Eclipse, you probably use IntelliJ IDEA. And if you’re building Android apps, you probably are still giving thanks for Android Studio, which was built on IntelliJ, and has spared you the horrors of Eclipse.
 Six years ago, JetBrains embarked on a project to build a new programming language named Kotlin (whose namesake is an island near St. Petersburg, Russia, where one of their development teams is based). It borrows from Scala, has a number of notable similarities to Swift, and is — in my personal opinion — so much nicer to work with than Java. It’s also seen real-world heavy-duty actual-software-in-production use not just by JetBrains for building their own products, but in Flipboard, Pinterest, Square, and Expedia.
If you’re feeling iffy about trying out Kotlin, you don’t have to dive in all at once. Kotlin integrates seamlessly with Java and vice versa — you can call Kotlin code from Java and Java code from Kotlin. You can start by adding a single Kotlin class to a Java project and work from there.
But if you’re like most of this blog’s readers, you’re not feeling iffy about trying out Kotlin. This article is for you! In it, I’ll walk you through building an incredibly simple Kotlin app to give you a small taste of the Kotlin language and developer experience: Oblique Strategies.
What is Oblique Strategies?
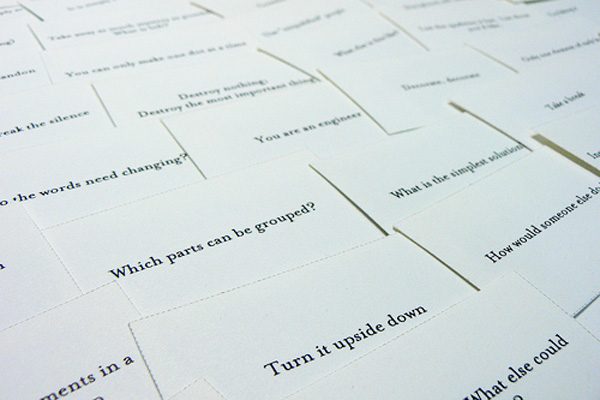
Oblique Strategies is a “press a button and get a random response” app based on Brian Eno (as in the avant-garde musician and producer) and Peter Schmidt’s (the visual artist) creativity tool.
Eno and Schmidt created Oblique Strategies in late 1974 as a tool to help artists, writers, musicians, and other creative types overcome creative blocks. The original version was a deck of cards, each with a constraint, question, or suggestion that encouraged what was then called “lateral thinking” and now called “thinking outside the box”. If you were feeling creatively blocked, you’d shuffle the deck and then draw one or more cards, each of which would say something such as:
- Abandon one stricture.
- Emphasize repetitions.
- Is there something missing?
- What would your closest friend do?
- Use an old idea.
If you’d like to try out Oblique Strategies, there are a number of web versions: here, here, here, and here, for starters.
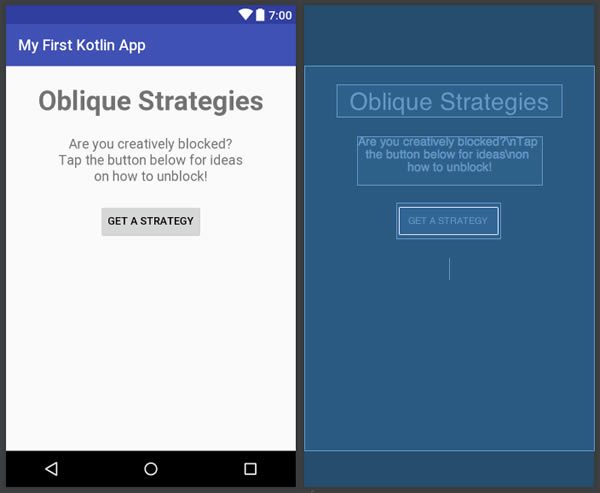
In this exercise, we’ll remake Oblique Strategies as an app. Here’s what the end result will look like:

(If you’re experiencing deja vu, it’s because I posted an article on building Oblique Strategies for iOS with Swift back in March.)
Creating a new Kotlin Android project

The shaving yak from Ren and Stimpy.
Before Android Studio 3.0, creating a new Kotlin-based Android project required a little yak-shaving to configure Android to work with the language. Now that it’s a first-class Android language, it’s not just a simple process — it’s the out-of-the-box default.
![]() From here on in, you’re going to need Android Studio 3.0 (the latest version at the time of writing is Canary 1), which you can download here. It can coexist on the same machine as any 2.x version of Android studio.
From here on in, you’re going to need Android Studio 3.0 (the latest version at the time of writing is Canary 1), which you can download here. It can coexist on the same machine as any 2.x version of Android studio.
Open Android Studio 3.0 and select File → New → New Project. You’ll see this:
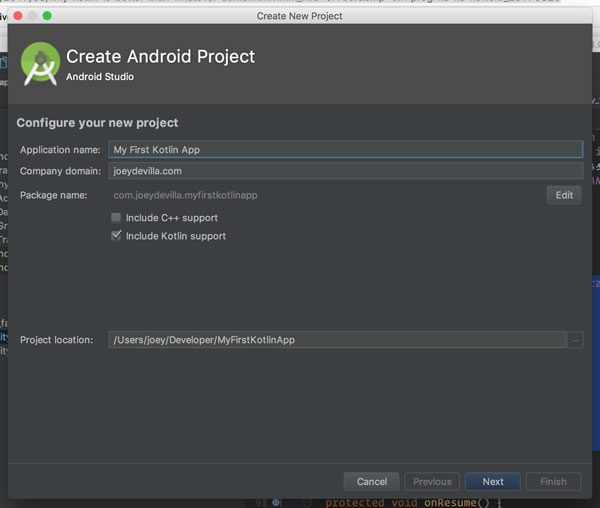
Do the following:
- Provide a name for the application in the Application name: text field. I chose My First Kotlin App, but you can name yours whatever you like.
- Make a note of the fact that the Include Kotlin support checkbox is checked by default. We’ll cover the significance of this once we’re done creating the new project.
- Click the Next button.
You’ll be taken to the next screen:
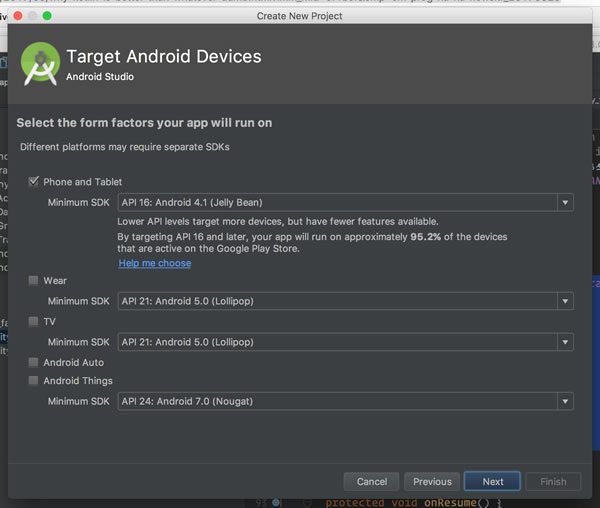
Click the Next button, which takes you this screen:
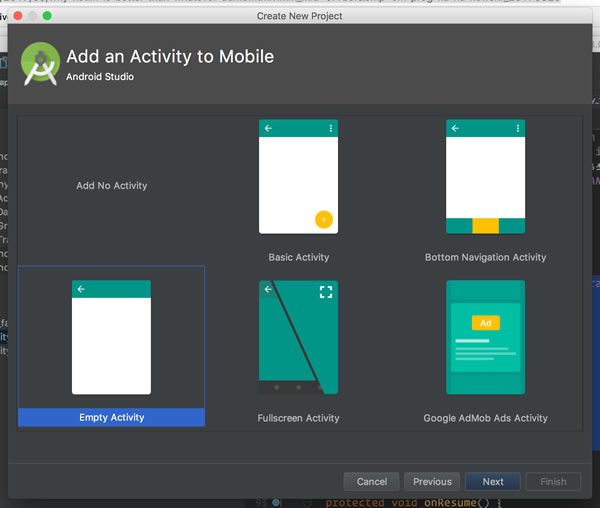
Make sure Empty Activity is selected, then click Next, which takes you to the final screen:
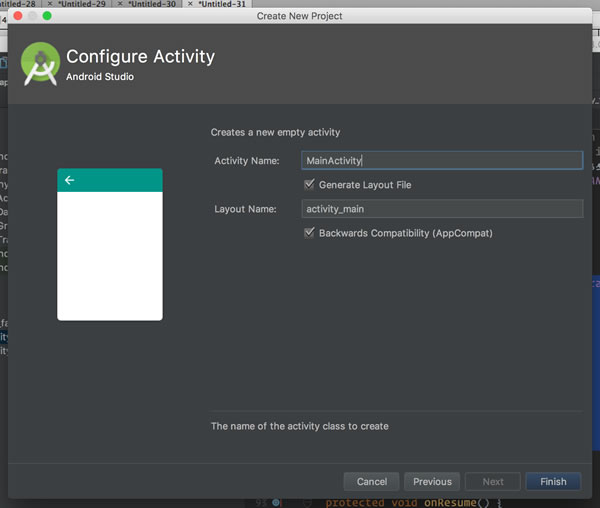
I went with the default activity name, MainActivity, but you can rename it if you like. Then click Finish. Android Studio will do some crunching, after which you’ll be taken to your newly-created Android project.
The significance of “Include Kotlin support” as the default option
Before we put together the app, allow me to make one side trip.
Let’s take a closer look at the code for the main activity:
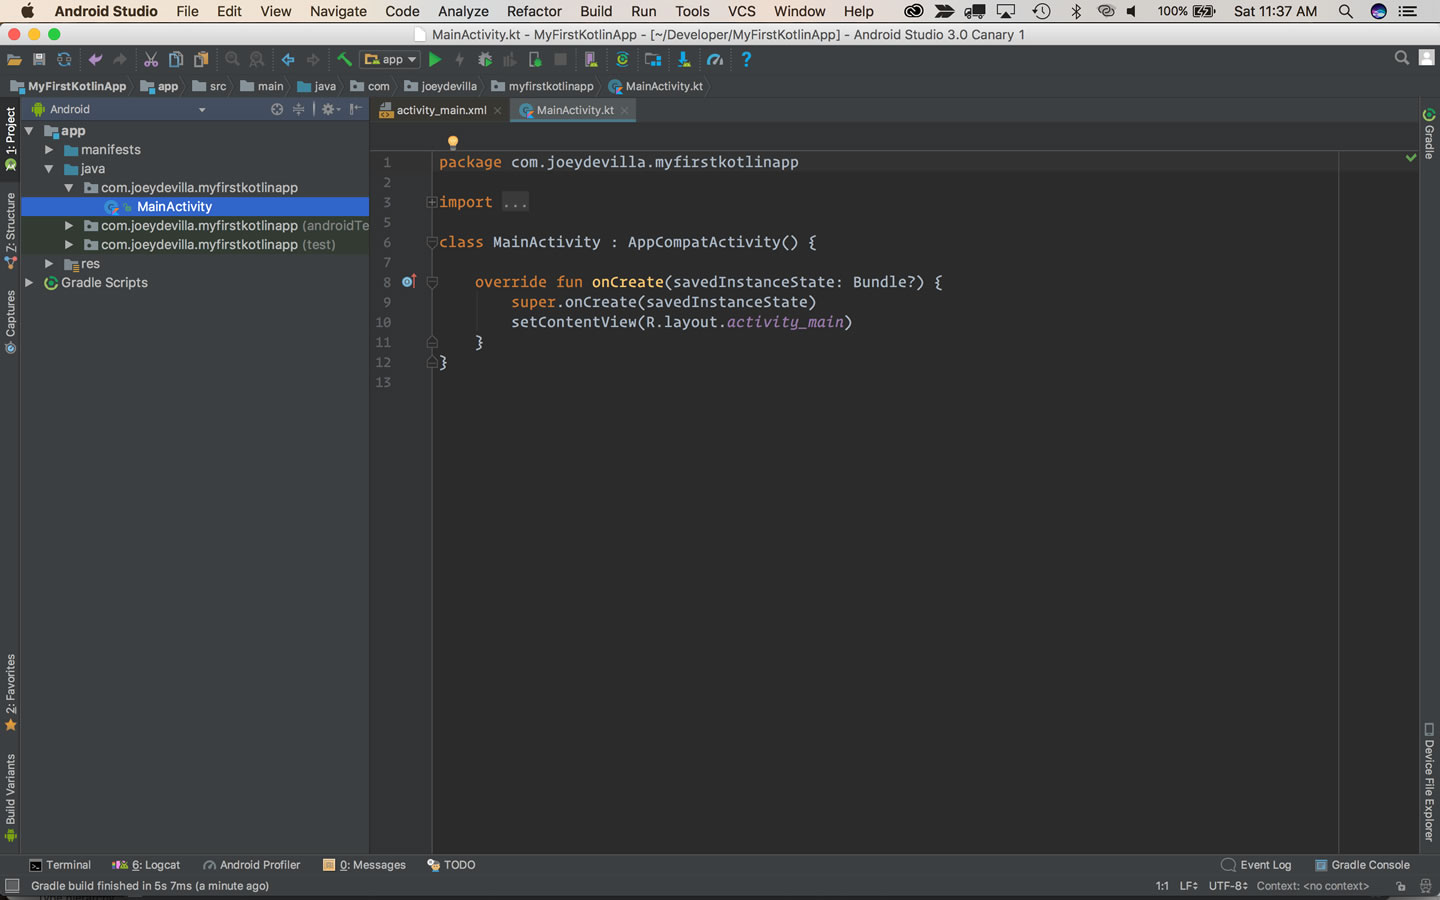
Even though the main activity is contained within the java folder (which is where you’d expect to find it), its filename is MainActivity.kt (.kt being the Kotlin code filename extension) and its code is in Kotlin.
If you’re in the mood to experiment, go ahead and create a new project with the Include Kotlin support option unchecked. You don’t have to, but if you do, you’ll find that the main activity file is named MainActivity.java and that its code is in Java. You’ll also find even though you’d explicitly refused Kotlin support by not checking that box, File → New still gives you the option of adding a Kotlin file to the project. When you do that, Android Studio will drop this hint near the lower right-hand corner of its window…

…and if you follow the easy steps provided — a couple of clicks — it’ll make the necessary changes to build.gradle (Module: app) to add Kotlin support to your project.

If these tea leaves aren’t obvious enough, I’ll simply spell it out: The future of Android development is Kotlin.
This shouldn’t be surprising. First, there’s the legal incentive to move away from Java. Despite various rulings in Google’s favor, Oracle apparently won’t rest until they’ve made a cash cow out of Google over their use of Java. Oracles’s continual lawsuit filings against Google are a very strong incentive to move away from Java.
Then there’s the toolmaker. Both Kotlin and Android Studio are creations of JetBrains, who have become increasingly cosy with Google. There some great quid pro quo in this relationship: Google gives JetBrains, its tools, and Kotlin the kind of exposure that only Google can provide, and in exchange, JetBrains provides Google with fantastic tools, and a language that’s both great and a way out of the toxic Oracle/Java situation. As long as that strong JetBrains/Google symbiosis exists, so does the incentive to support Kotlin as the preferred Android development language.
And finally — and most importantly, in my opinion — there’s developer love. There’s lots of love for more easily-read, powerful modern languages like Rust, Swift, and Google’s own Go, as seen in the most recent Stack Overflow developer survey, and Kotlin is among them — developers love it.
However, it’s not enough for a programming language to simply be loved by developers. It also needs a killer app, and Android — which runs on 2 billion devices today — is Kotlin’s killer app. Just as Rails moved Ruby from from obscurity to TIOBE’s top 20 and iOS did the same for Swift, expect Android to take Kotlin from relative obscurity to the mainstream. In fact, I don’t think I’m going out on a limb by making the prediction: Kotlin will break into TIOBE’s top 20 sometime in 2018.
A little setup
Before we can start coding the app, we need to do a little setup. Don’t worry — there isn’t much setting up to do.
First, let’s define the user interface. Open the main activity layout file, activity_main.xml, in Text view and replace its contents with the XML shown below:
<?xml version="1.0" encoding="utf-8"?>
<RelativeLayout
  xmlns:android="http://schemas.android.com/apk/res/android"
  xmlns:app="http://schemas.android.com/apk/res-auto"
  xmlns:tools="http://schemas.android.com/tools"
  android:layout_width="match_parent"
  android:layout_height="match_parent"
>

  <TextView
    android:id="@+id/title"
    android:text="Oblique Strategies"
    android:layout_width="wrap_content"
    android:layout_height="wrap_content"
    android:textStyle="bold"
    android:textSize="36dp"
    android:textAlignment="center"
    android:layout_marginTop="25dp"
    android:layout_centerHorizontal="true"
  />

  <TextView
    android:id="@+id/subtitle"
    android:text="Are you creatively blocked?\nTap the button below for ideas\non how to unblock!"
    android:layout_width="wrap_content"
    android:layout_height="wrap_content"
    android:textStyle="normal"
    android:textSize="18dp"
    android:textAlignment="center"
    android:layout_marginTop="25dp"
    android:layout_centerHorizontal="true"
    android:layout_below="@+id/title"
  />

  <Button
    android:id="@+id/getStrategyButton"
    android:text="Get a strategy"
    android:layout_width="wrap_content"
    android:layout_height="wrap_content"
    android:layout_marginTop="25dp"
    android:layout_centerHorizontal="true"
    android:layout_below ="@+id/subtitle"
  />

  <TextView
    android:id="@+id/strategyTextView"
    android:text=""
    android:layout_width="wrap_content"
    android:layout_height="wrap_content"
    android:textStyle="normal"
    android:textSize="24dp"
    android:textAlignment="center"
    android:layout_marginTop="25dp"
    android:layout_marginLeft="15dp"
    android:layout_marginRight="15dp"
    android:layout_centerHorizontal="true"
    android:layout_below="@+id/getStrategyButton"
  />

</RelativeLayout>
(Yes, I know I’m breaking a few Android rules by directly defining text and textSize values right in the activity layout instead of doing so in various values files, but I’m trying to keep the amount of setting up to a minimum so we can concentrate on Kotlin.)
Once you’ve pasted in the XML, you should be able to switch to the main activity’s Design view and it should look like this:
We’ll also need to provide the app with a set of strategies to select from at random and present to the user. We’ll do this by creating a string values resource file. In your project, expand the res folder, and then add a new values resource file by right-clicking on the values folder and selecting New → Values resource file:
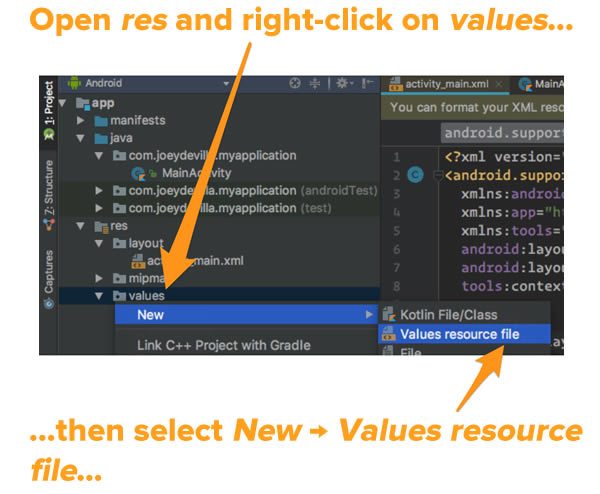
You’ll be presented with the dialog box shown below:
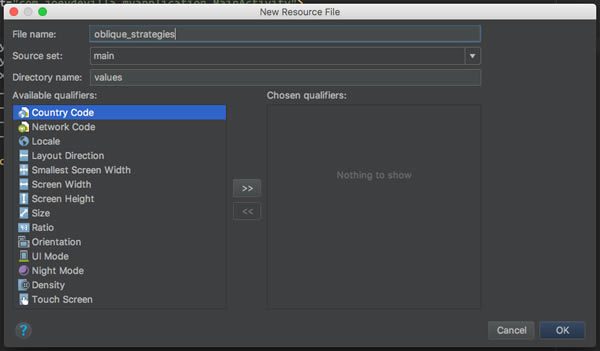
Simply enter oblique_strategies into the File name: field and click OK. You’ll now be viewing the contents of a newly-created resource file named oblique_strategies.xml, and its contents should be:
<?xml version="1.0" encoding="utf-8"?>
<resources></resources>
Replace those contents with the following:
<?xml version="1.0" encoding="utf-8"?>
<resources>
  <string-array name="oblique_strategies">
    <item>Remove specifics and convert to ambiguities.</item>
    <item>Think of the radio.</item>
    <item>Don’t be frightened of clichés.</item>
    <item>Abandon one stricture.</item>
    <item>What is the reality of the situation?</item>
    <item>Simple subtraction.</item>
    <item>Are there sections? Consider transitions.</item>
    <item>Turn it upside down.</item>
    <item>Go slowly all the way round the outside.</item>
    <item>Remember: a line has two sides.</item>
    <item>Two words: Infinitesimal gradations.</item>
    <item>Make a list of everything you might do, do last item on list.</item>
    <item>Change instrument roles.</item>
    <item>Into the impossible.</item>
    <item>One word: accretion.</item>
    <item>Ask people to work against their better judgement.</item>
    <item>Disconnect from desire.</item>
    <item>Take away the elements in order of apparent non-importance.</item>
    <item>Emphasize repetitions.</item>
    <item>Don’t be afraid of things because they’re easy to do.</item>
    <item>Is there something missing?</item>
    <item>Don’t be frightened to display your talents.</item>
    <item>Use unqualified people.</item>
    <item>Breathe more deeply.</item>
    <item>How would you have done it?</item>
    <item>Honor thy error as a hidden intention.</item>
    <item>Emphasize differences.</item>
    <item>Only one element of each kind.</item>
    <item>Do nothing for as long as possible.</item>
    <item>Bridges. Build? Burn?</item>
    <item>One word: water.</item>
    <item>You don’t have to be ashamed of using your own ideas.</item>
    <item>Make a sudden, destructive unpredictable action; incorporate.</item>
    <item>Tidy up.</item>
    <item>Consult other sources.</item>
    <item>Do the words need changing?</item>
    <item>Use an unacceptable color.</item>
    <item>Ask your body.</item>
    <item>Humanize something free of error.</item>
    <item>Use filters.</item>
    <item>Balance the consistency principle with the inconsistency principle.</item>
    <item>Fill every beat with something.</item>
    <item>Discard an axiom.</item>
    <item>Listen to the quiet voice.</item>
    <item>What wouldn’t you do?</item>
    <item>Is it finished?</item>
    <item>Decorate, decorate!</item>
    <item>Put in earplugs.</item>
    <item>Give the game away.</item>
    <item>Reverse.</item>
    <item>Abandon normal instruments.</item>
    <item>Trust in the you of now.</item>
    <item>Use fewer notes.</item>
    <item>What would your closest friend do?</item>
    <item>Repetition is a form of change.</item>
    <item>Two words: distorting time.</item>
    <item>Give way to your worst impulse.</item>
    <item>Make a blank valuable by putting it in an exquisite frame.</item>
    <item>The inconsistency principle.</item>
    <item>Ghost echoes.</item>
    <item>Don’t break the silence.</item>
    <item>You can only make one dot at a time.</item>
    <item>Discover the recipes you are using and abandon them.</item>
    <item>Just carry on.</item>
    <item>Comrades.</item>
    <item>(Organic) machinery.</item>
    <item>Courage!</item>
    <item>What mistakes did you make last time?</item>
    <item>You are an engineer.</item>
    <item>Consider different fading systems.</item>
    <item>Remove ambiguities and convert to specifics.</item>
    <item>Mute and continue.</item>
    <item>Look at the order in which you do things.</item>
    <item>It is quite possible (after all).</item>
    <item>Go outside. Shut the door.</item>
    <item>Don’t stress one thing more than another.</item>
    <item>Do we need holes?</item>
    <item>Two words: cluster analysis.</item>
    <item>Work at a different speed.</item>
    <item>Do something boring.</item>
    <item>Look closely at the most embarrassing details and amplify them.</item>
    <item>Define an area as ‘safe’ and use it as an anchor.</item>
    <item>Mechanicalize something idiosyncratic.</item>
    <item>Overtly resist change.</item>
    <item>Emphasize the flaws.</item>
    <item>Accept advice.</item>
    <item>Remember those quiet evenings.</item>
    <item>Take a break.</item>
    <item>Imagine the music as a moving chain or caterpillar.</item>
    <item>Use an old idea.</item>
    <item>Imagine the music as a set of disconnected events.</item>
    <item>Change nothing and continue with immaculate consistency.</item>
    <item>What are you really thinking about just now? Incorporate.</item>
    <item>Look at a very small object, look at its center.</item>
    <item>Not building a wall, but making a brick.</item>
    <item>The most important thing is the thing most easily forgotten.</item>
    <item>Always first steps.</item>
    <item>Question the heroic approach.</item>
    <item>Be extravagant.</item>
    <item>State the problem in words as clearly as possible.</item>
    <item>Faced with a choice, do both.</item>
    <item>Retrace your steps.</item>
    <item>Convert a melodic element into a rhythmic element.</item>
    <item>Go to an extreme, move back to a more comfortable place.</item>
    <item>Once the search is in progress, something will be found.</item>
    <item>Only a part, not the whole.</item>
    <item>From nothing to more than nothing.</item>
    <item>Be less critical more often.</item>
    <item>When is it for? Who is it for?</item>
    <item>Destroy nothing. Destroy the most important thing.</item>
    <item>Take away as much mystery as possible. What’s left?</item>
    <item>What most recently impressed you? How is it similar? What can you learn from it? What could you take from it?</item>
    <item>First work alone, then work in unusual pairs.</item>
    <item>What do you do? Now, what do you do best?</item>
    <item>Back up a few steps. What else could you have done?</item>
    <item>What were the branch points in the evolution of this entity?</item>
    <item>Try faking it.</item>
    <item>How would you explain this to your parents?</item>
    <item>Who would make this really successful?</item>
    <item>What would make this really successful?</item>
    <item>Instead of changing the thing, change the world around it.</item>
    <item>List the qualities it has. List those you’d like.</item>
    <item>What else is this like?</item>
    <item>Describe the landscape in which this belongs.</item>
    <item>Steal a solution.</item>
    <item>Assemble some of the elements in a group and treat the group.</item>
    <item>Be dirty.</item>
    <item>Lost in useless territory.</item>
    <item>Lowest common denominator.</item>
  </string-array>
</resources>
At this point, you now have:
- A user interface for the app
- A set of responses that the app will provide
The last bit of setup is adding the Kotlin Android Extensions plugin to the project. Open build.gradle (Module.app). You’ll see that it starts with these lines:
apply plugin: 'com.android.application'

apply plugin: 'kotlin-android'
As may may have reasoned, the first line adds a plugin that makes it possible for Gradle to build Android applications, and the second line adds Kotlin language support. Before Kotlin became a fully-supported language in Android Studio, you had to add this plugin yourself and do some additional setup.
To add the Kotlin Android Extensions plugin, add one more line to the file so that the start of build.gradle (Module.app) looks like this:
apply plugin: 'com.android.application'

apply plugin: 'kotlin-android'
apply plugin: 'kotlin-android-extensions'
You’ll see what this plugin does for you in the next section, titled Getting references to widgets.
Now that we’ve done our setup, it’s time to start coding!
Getting references to widgets
If you look at activity_main.xml, you’ll see that there are two widgets that account for all the interactivity in our app:

They are:
getStrategyButton, aButtonthat the user presses to get a randomly-selected strategy for overcoming a creative block, andstrategyTextView, aTextViewthat is used to display the randomly-selected strategy.
If this were a Java project, you’d need to write the following code in order to be able to programmatically refer to these widgets:
Button getStrategyButton = (Button)findViewById(R.id.getStrategyButton);
TextView strategyTextView = (TextView)strategyTextView(R.id.strategyTextView);
This is a Kotlin project, so it’s a little different, and rather than tell you how it’s different, let me show you. Go to the code for the main activity, MainActivity.kt. The body of the MainActivity class should look like this:
class MainActivity : AppCompatActivity() {

    override fun onCreate(savedInstanceState: Bundle?) {
        super.onCreate(savedInstanceState)
        setContentView(R.layout.activity_main)
    }

}
Let’s do a little experimenting. First, add some blank lines at the end of the onCreate method…
    override fun onCreate(savedInstanceState: Bundle?) {
        super.onCreate(savedInstanceState)
        setContentView(R.layout.activity_main)


    }
…and then in that space, start typing getStrategyButton. You’ll notice that even though you haven’t done the traditional findViewById dance, getStrategyButton is already defined:
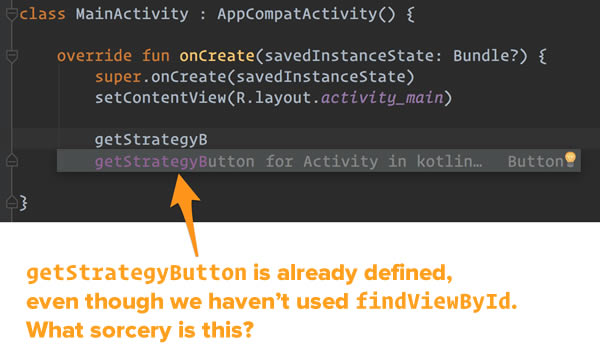
Once you complete typing in getStrategyButton, you might notice that Android Studio has added an extra import statement at the top of the file:
import kotlinx.android.synthetic.main.activity_main.*
Here’s what’s happening: the Kotlin Android Extensions plugin gives Kotlin activities a set of synthetic properties that let you access any widget by its id. You no longer need to use findViewById!
Lambdas in Kotlin
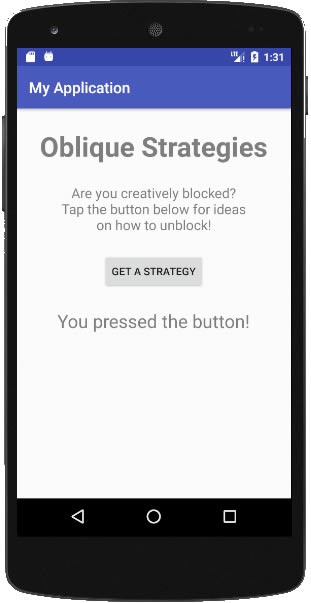
Now that Kotlin Android Extensions automatically gives you references to activity widgets, let’s do something with those widgets by having the app respond with You pressed the button! whenever the user presses the Get a strategy button. Update the onCreate method so that it looks like this:
override fun onCreate(savedInstanceState: Bundle?) {
  super.onCreate(savedInstanceState)
    setContentView(R.layout.activity_main)

    getStrategyButton.setOnClickListener {
       strategyTextView.text = "You pressed the button!"
    }
}
Run the app, and click the Get a strategy button. You should see this:
Let’s take a closer look at the setOnClickListener method in Kotlin. Here’s its method signature:
fun setOnClickListener(l: (View) -> Unit)
Note the following:
- Function declarations begin with the keyword
fun. - Variable and parameter declarations use this format:
variableName: type. In the case ofsetOnClickListener, it accepts a single parameter,l, whose type is(View) -> Unit, which specifies a function that accepts aViewas its argument, and does not return a value (Unitis Kotlin’s equivalent ofvoid).
With setOnClickListener’s method signature and these two points in mind, you’d think that we’d have used code that looked like this:
getStrategyButton.setOnClickListener({
  strategyTextView.text = "You pressed the button!}
})
This is perfectly valid Kotlin syntax, but there are ways to streamline this code (which is already more streamlined than its Java counterpart). First, if the last argument is a function, it can go outside the parentheses:
getStrategyButton.setOnClickListener() {
  v -> strategyTextView.text = "You pressed the button!"
}
If you code in Swift, this will be familiar to you, as it’s a commonly-used idiom in that language.
We can streamline the code further. If a function takes only one parameter, and that parameter is a function, you can skip the parentheses entirely:
getStrategyButton.setOnClickListener {
  v -> strategyTextView.text = "You pressed the button!"
}
We’re not done streamlining yet — since we’re not using the lambda’s parameter, we can omit its left side entirely:
getStrategyButton.setOnClickListener {
  strategyTextView.text = "You pressed the button!"
}
Goodbye getters and setters, hello properties!
You may have noticed that we didn’t set the text of strategyTextView this way:
getStrategyButton.setOnClickListener {
  strategyTextView.setText("You pressed the button!")
}
The code above compiles and works, but getters and setters are idioms from Java, not Kotlin, and Android Studio will remind you of that fact:

Instead of the setText and getText methods, simply use the text property:
getStrategyButton.setOnClickListener {
  strategyTextView.text = "You pressed the button!"
}
Under the hood, Kotlin implements getter and setter methods, but all you taste is the sweet and concise syntactic sugar of property access.
Declaring variables and instantiating objects
Our app randomly selects from a list of strings, which means that we’ll need an instance of the Random class:
val random = Random()
Note the following:
- The keyword
valdeclares random as read-only. If you want to declare something as both readable and writable, use thevarkeyword instead. - We didn’t have to specify
random’s type. Kotlin infers it from the value thatRandom()returns. - We didn’t use the
newkeyword to create a new instance ofRandom; we simply usedRandom(), which is a reference toRandom’sno-parameter constructor.
You probably notices that with Kotlin, you no longer have to deal with this sort of redundancy:

We’ll also need to read the contents of oblique_strategies.xml into an array, which we can do with this line:
val strategies = resources.getStringArray(R.array.oblique_strategies)
Note the following:
- Since we’re only going to read from this array and not write to it, we declare it using the
valkeyword, as opposed to thevarkeyword. Remember this mantra that Swift programmers have taken to heart (using slightly different keywords):valwhere possible, otherwise usevar. - Again, we don’t have to specify the type of
strategies; it’s inferred fromgetStringArray’s return type.
Now that we’ve got…
- random, a random number generator,
- strategies, an array containing strategies, and
- strategyTextView, a reference to the textView where randomly-selected text strategies should be displayed…
…choosing a random strategy and displaying it is as simple as this…
strategyTextView.text = strategies[random.nextInt(strategies.size)]
…and the MainActivity class is as simple as this:
class MainActivity : AppCompatActivity() {

  override fun onCreate(savedInstanceState: Bundle?) {
    super.onCreate(savedInstanceState)
    setContentView(R.layout.activity_main)

    val random = Random()
    val strategies = resources.getStringArray(R.array.oblique_strategies)

    getStrategyButton.setOnClickListener {
       strategyTextView.text = strategies[random.nextInt(strategies.size)]
    }
  }

}
For comparison’s sake, here’s what the app’s code would’ve been, had it been written in Java:
public class MainActivity extends AppCompatActivity {

  @Override
  protected void onCreate(Bundle savedInstanceState) {
    super.onCreate(savedInstanceState);
    setContentView(R.layout.activity_main);

    final Random random = new Random();
    final String[] strategies = getResources().getStringArray(R.array.oblique_strategies);
    Button getStrategyButton = (Button)findViewById(R.id.getStrategyButton);
    final TextView strategyTextView = (TextView)findViewById(R.id.strategyTextView);

    getStrategyButton.setOnClickListener(new View.OnClickListener() {
      @Override
      public void onClick(View v) {
        strategyTextView.setText(strategies[random.nextInt(strategies.length)]);
      }
    });
  }

}
Before you dismiss this example as a toy app…
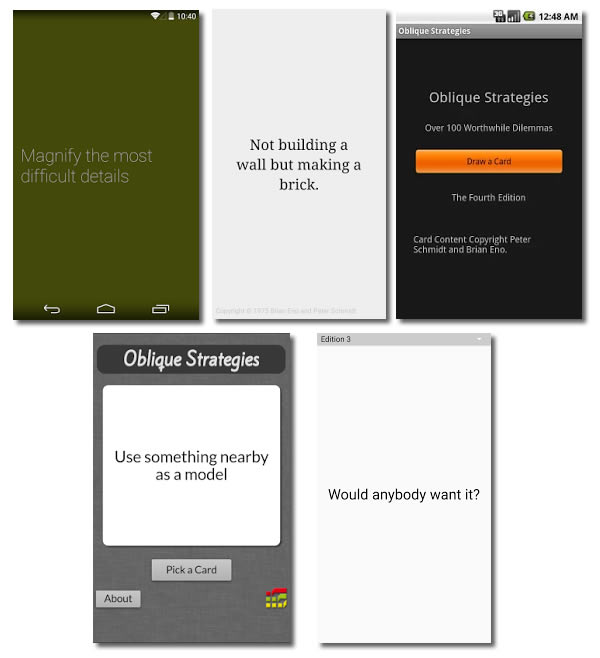
…do a search for “Oblique Strategies” in the Play Store. You’ll be amazed at how many implementations there are — and now you can do one with a mere four lines of code.
Watch this blog for more Android development in Kotlin!

In addition to my regular articles about iOS development in Swift, Global Nerdy will also start featuring regular articles on Android development in Kotlin. Watch this blog — there’s lots of interesting stuff coming soon!
One reply on “Your first Android app in Kotlin: Oblique Strategies”
Thank you for this tutorial. A small note: Android Studio Canary uses Constraint Layout by default. I find it a lot more freeing that fussing with RelativeLayouts in XML. You might wish to simplify your UI sample code and illustrations this way…