 In the last installment, we laid out the foundation for a simple “notepad”-style app where the user can type in some text, save it with the press of a “Save” button, and then retrieve the saved text of by pressing the “Load” button.
The recap
Here’s what we did in the previous article: we built a simple app with only three controls…
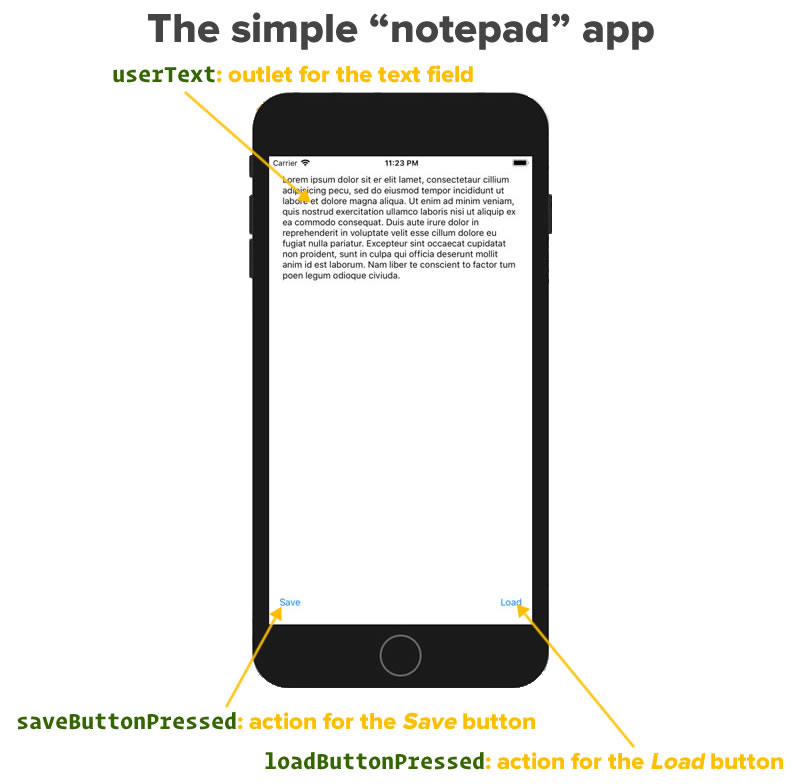
- A text view, where the user enters and edits text,
- A Save button, which will eventually save the text currently in the text view, and
- A Load button, which will eventually retrieve the saved text and put it into the text view.
We applied constraints to the control and wired them up with an outlet and actions as shown below:
Click the diagram to see it at full size.
At the end of the last article, the Save and Load buttons didn’t save or load — they simply changed the contents of the text view. Clicking the Save button changes the contents of the text view to this:
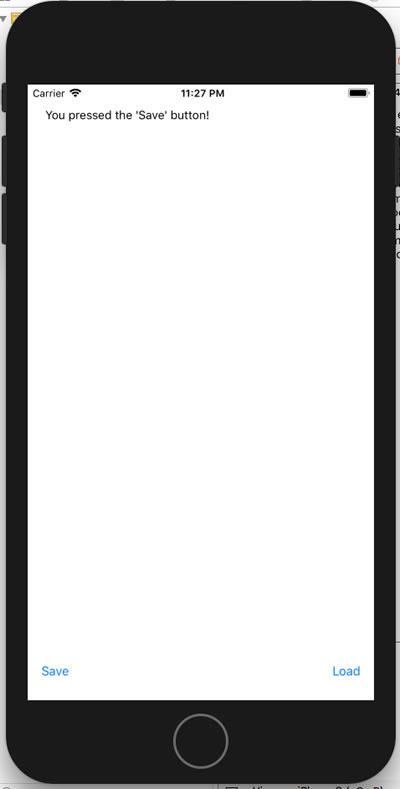
Here’s the code for the Save button action:
@IBAction func saveButtonPressed(_ sender: UIButton) {
  userText.text = "You pressed the 'Save' button!"
}
Clicking the Load button changes the contents of the text view to this…
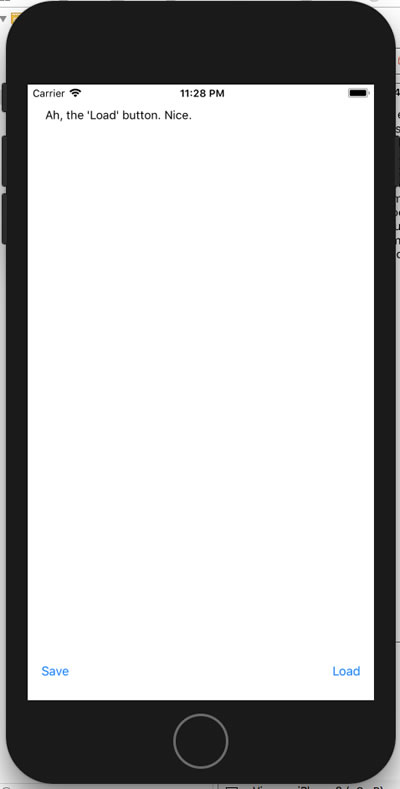
…and here’s the code for its action:
@IBAction func loadButtonPressed(_ sender: UIButton) {
  userText.text = "Ah, the 'Load' button. Nice."
}
In this article, we’ll make the Save and Load buttons do what they’re supposed to do: save and load the user’s text.
But before we do that, we need to look at accessing files in iOS.
The iOS filesystem
An iOS app’s access to its iDevice’s filesystem isn’t like the access a desktop application have to its computer’s filesystem. Every iOS app is cordoned off to its own space in the filesystem that only it can access: its sandbox. For two apps — we’ll call them App A and App B — App A’s filesystem access is limited to the App A sandbox, and App B’s is limited to the App B sandbox.
I’ve taken the filesystem sandbox diagram from Apple’s File System Programming Guide and added a few details to it:
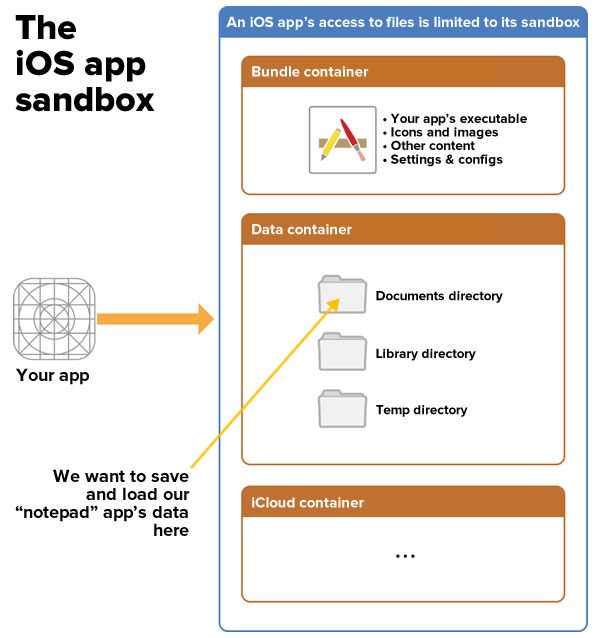
For our notepad app, we’re going to store the data that the user types inside a directory in the Data container, which is the part of the sandbox specifically for storing user- and application-related data.
The data container contains a number of subdirectories, one of which is the Documents directory, the designated directory for files that the user will create, import, delete or edit. As an added bonus, unless you specify otherwise, files in this directory are backed up by default.
What we want to do now

We want to change the code in our app’s saveButtonPressed and loadButtonPressed methods so that they do the following:
saveButtonPressed: Take the contents of theuserTexttext view and save them in the Documents directory in a file named savefile.txt.loadButtonPressed: Take the contents of the file named savefile.txt in the Documents directory and put them into theuserTexttext view.
Getting our hands on the Documents directory
We’ll store and retrieve our notepad app’s data to and from a file in the Documents directory, which we’ll access with the help of…
- The
FileManager.defaultobject, which is a one-stop object for working with the file system that should work for most common file system operations, including reading and writing files, and FileManager’surlmethod, which we use to access specific directories in the sandbox. If we pass it a parameter that we want the user’s Documents directory for the app, we get anURLstruct representing the location of that directory.
Here’s code that gets the Documents directory for the current app and stores it in a constant named documentsDirectoryURL (don’t bother entering this right now):
let documentsDirectoryURL = try! FileManager.default.url(for: .documentDirectory,
                                                         in: .userDomainMask,
                                                         appropriateFor: nil,
                                                         create: false)
What powers this code is the url(for:in:appropriateFor:create:) method, which can locates and returns the URL for a directory in a given domain. It can even create a directory. It has these parameters:
for: The directory to search for, which we specify with a value of the enumFileManager.SearchPathDirectory. In this case, we’re looking for the Documents directory, so we’ll use the valueFileManager.SearchPathDirectory.documentDirectory, or.documentDirectoryfor short.in: Where to look for the directory, which we specify with a value of the enumFileManager.SearchPathDomainMask. In this case, we’re searching the user’s filespace, so we’ll use the valueFileManager.SearchPathDomainMask.userDomainMask, or.userDomainMaskfor short.appropriateFor: This is often used to specify a temporary directory to be created, which we’re not doing here. As a result, we’re simply setting this tonil, which says “No, we’re not creating a temporary directory”.create: A boolean value that specifies if the directory should be created if it doesn’t already exist. In this case, we don’t want to do that, so we’ll set this value tofalse.
Now that we have the URL for the documents directory, we now need an URL for the file where we’ll save and retrieve our notepad data from.
Get the URL for the file we want to save our data in, savefile.txt
Once we have the Documents directory, we can create an URL that refers to a file in that directory by using the URL struct’s URL(fileURLWithPath:relativeTo:)method and store it in saveFileURL (again, don’t bother entering this right now; we’ll do some coding very soon):
let saveFileURL = URL(fileURLWithPath: "savefile.txt",
                      relativeTo: documentsDirectoryURL)
The method has these parameters:
fileURLWithPath: The name of the file path.relativeTo: The base URL for the file path. Note that we’re using thedocumentsDirectoryURLconstant that we created in the previous section.
Now let’s enter some code — a computed property that gives us the URL for the file where we want to save data, saveFileURL. Put this inside the ViewController class, outside any methods:
private var saveURL: URL {
  let documentsDirectoryURL = try! FileManager.default.url(for: FileManager.SearchPathDirectory.documentDirectory,
                                                           in: .userDomainMask,
                                                           appropriateFor: nil,
                                                           create: false)
  return URL(fileURLWithPath: "savefile.txt",
             relativeTo: documentsDirectoryURL)
}
With this property, we can now make the Save and Load buttons do what they’re supposed to.
Making the Save button save notepad data
Change the saveButtonClicked(_:) method so that it looks like this:
@IBAction func saveButtonClicked(_ sender: Any) {
  try! userText.text.write(to: saveURL,
                           atomically: true,
                           encoding: .utf8)
}
In our reformulated method, we take the text property of the userText text area — an instance of String that contains the text inside the text area — and use String’s write(to:atomically:encoding:) method to write the text property’s contents to file referenced by our saveURL computer property. Here’s what the other parameters are for:
atomically: A boolean, that if set totrue, has thewrite(to:atomically:encoding:)method first write the string to a temporary file, and then once done, rename the temporary file to its final name. This ensures that if the iPhone or iPad crashes during thewriteprocess, you won’t end up with a corrupted file.encoding: The way in which the string we’re saving should be encoded, which we specify with a value of the enumString.Encoding. We want to save the string in the preferred string format of the web, UTF-8, so we’ll use the valueString.Encoding.utf8, or.utf8for short.
The Save button now does what it’s supposed to do: save the contents of the text area to a save file.
Making the Load button load saved data
Change the loadButtonClicked(_:) method so that it looks like this:
@IBAction func loadButtonClicked(_ sender: Any) {
  do {
    try userText.text = String(contentsOf: saveURL)
  } catch {
    userText.text = "Encountered an error while trying to load saved data."
  }
}
In our reformulated method, we take the text property of the userText text area — an instance of String that contains the text inside the text area — and use String’s init(contentsOf:) method to fill it with the contents of the file referenced by our saveURL computer property. The Load button now does what it’s supposed to do: load the contents of the save file into a text area.
Take a look at your view controller code
The code in ViewController.swift should look like this now:
import UIKit

class ViewController: UIViewController {

  @IBOutlet weak var userText: UITextView!


  // View controller events
  // ======================

  override func viewDidLoad() {
    super.viewDidLoad()
  }

  override func didReceiveMemoryWarning() {
    super.didReceiveMemoryWarning()
    // Dispose of any resources that can be recreated.
  }


  // Save and load button events
  // ===========================

  @IBAction func saveButtonClicked(_ sender: Any) {
    try! userText.text.write(to: saveURL,
                             atomically: true,
                             encoding: String.Encoding.utf8)
  }

  @IBAction func loadButtonClicked(_ sender: Any) {
    do {
      try userText.text = String(contentsOf: saveURL)
    } catch {
      userText.text = "Encountered an error while trying to load saved data."
    }
  }

  private var saveURL: URL {
    let documentsDirectoryURL = try! FileManager.default.url(
      for: FileManager.SearchPathDirectory.documentDirectory,
      in: .userDomainMask,
      appropriateFor: nil,
      create: false)
    return URL(fileURLWithPath: "savefile.txt",
               relativeTo: documentsDirectoryURL)
  }

}
If your code looks like this, it’s ready to run.

If you like, you can download the finished project here [37K .zip].
Run the app!
If you’ve followed the steps in this article and the previous one, the app should work as expected. You should be able to:
- Type into the text view.
- Save the contents of the text view by pressing the Save button.
- Change the contents of the text view.
- Restore the contents of the text view to the saved text by pressing the Load button.
Let’s change up the controls whose value we’re saving (or: “What if we changed the text view to a slider?”)
 The project that we just covered was the one that I used in the last Tampa iOS Meetup. At the end of the session, one of the attendees asked an interesting question:
“What if we changed the text view to something else? Maybe a slider?”
“Why don’t we give it a try right now?” I replied. “Let’s change the app so that the Save button saves the current position of the slider, and the Load button restores the slider to the saved position.”
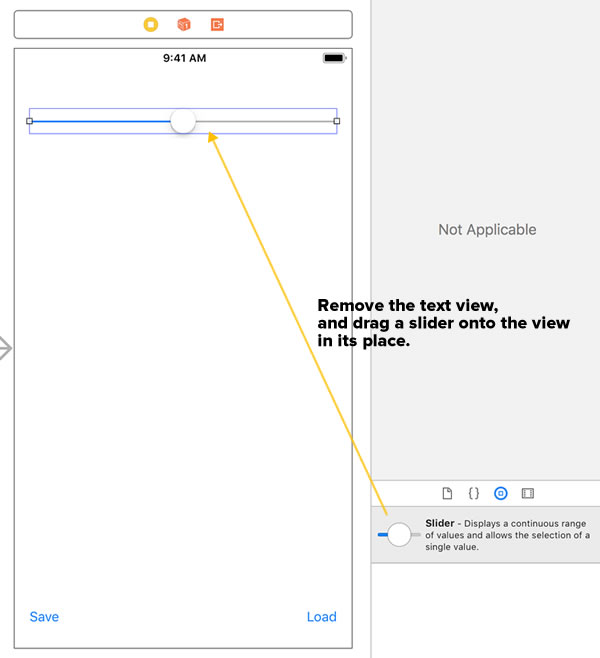
I opened Main.storyboard, deleted the text view, and then dragged a slider into its place.
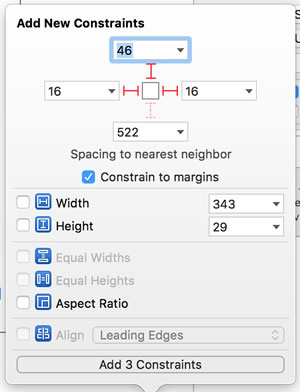
With the slider still selected, I set its constraints as shown above.
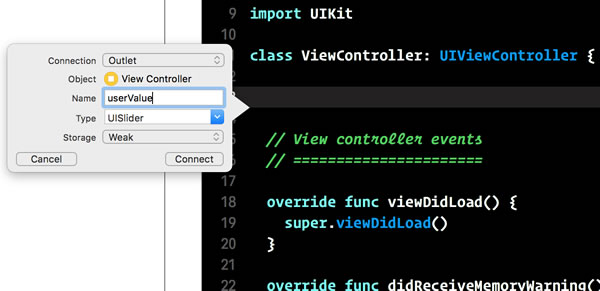
Then, I created an outlet for the slider. Using the Assistant Editor, I:
- Deleted the old text view outlet,
- Control-dragged from the slider into ViewController.swift, and
- Gave the outlet the name userValue.
It’s now time to change the code behind the Save and Load buttons.
Making the Save button save the slider position
Here’s the revised saveButtonClicked(_:) method:
@IBAction func saveButtonClicked(_ sender: Any) {
  let sliderValue = String(userValue.value)
  print("Saving slider value: \(sliderValue)")
  try! sliderValue.write(to: saveURL,
                         atomically: true,
                         encoding: String.Encoding.utf8)
}
Here’s what’s happening inside this method:
- We convert the slider’s
valueproperty — by default, aFloatwhose value can range from 0 (all the way to the left) to 1 (all the way to the right) — and convert it to into aString. - For debugging’s sake, we print the
String-ified slider value. - We take the
String-ified slider value and useString’swrite(to:atomically:encoding:)method to write its value to savefile.txt.
Making the Load button restore the slider position
Here’s the revised loadButtonClicked(_:) method:
@IBAction func loadButtonClicked(_ sender: Any) {
  do {
    let sliderValue = try String(contentsOf: saveURL)
    print("Loading slider value: \(sliderValue)")
    userValue.value = Float(sliderValue)!
  } catch {
    print("Encountered an error while trying to load saved data.")
  }
}
Here’s what’s happening inside this method:
- We take the contents of the file referenced by our
saveURLcomputer property and put it inside the constantsliderValue. - For debugging’s sake, we print
sliderValue. - We convert
sliderValueinto a Float and use that value to set the position of the slider.
Once again, take a look at your view controller code
The code in ViewController.swift should look like this now:
import UIKit

class ViewController: UIViewController {

  @IBOutlet weak var userValue: UISlider!

  // View controller events
  // ======================

  override func viewDidLoad() {
    super.viewDidLoad()
  }

  override func didReceiveMemoryWarning() {
    super.didReceiveMemoryWarning()
    // Dispose of any resources that can be recreated.
  }


  // Save and load button events
  // ===========================

  @IBAction func saveButtonClicked(_ sender: Any) {
    let sliderValue = String(userValue.value)
    print("Saving slider value: \(sliderValue)")
    try! sliderValue.write(to: saveURL,
                           atomically: true,
                           encoding: String.Encoding.utf8)
  }

  @IBAction func loadButtonClicked(_ sender: Any) {
    do {
      let sliderValue = try String(contentsOf: saveURL)
      print("Loading slider value: \(sliderValue)")
      userValue.value = Float(sliderValue)!
    } catch {
      print("Encountered an error while trying to load saved data.")
    }
  }

  private var saveURL: URL {
    let documentsDirectoryURL = try! FileManager.default.url(
      for: FileManager.SearchPathDirectory.documentDirectory,
      in: .userDomainMask,
      appropriateFor: nil,
      create: false)
    return URL(fileURLWithPath: "savefile.txt",
               relativeTo: documentsDirectoryURL)
  }

}
If your code looks like this, it’s ready to run.
If you like, you can download the finished project here [37K .zip].
What we’ve done so far
In this exercise, we have, over two articles:
- Created a single-view app and added controls to the app’s single view.
- Constrained the controls so that they stay in the proper place, regardless of screen size and orientation.
- Connected the controls to the underlying view controller code using outlets and actions.
- Added code to use the buttons’ actions to respond to being pressed, and to use the text view’s outlet to change its contents.
- Learned about the iOS filesystem.
- Learned how to access the Documents directory in an app’s sandbox.
- Changed the code behind the app’s buttons so that the Save button saves the contents of the text view, and the Load button loads the text view with the saved data.
- Changed the control from a text view to a slider, and made the modifications to the Save and Load button code to save and load the position of the slider.
What now?

If you’re in the Tampa Bay area, come to Tampa iOS Meetup next Tuesday, May 22nd, when I’ll walk you through the process of building a “to-do list” app, and in the process cover:
- Tables, which is how you present lists in iOS,
- the Codable protocol, another way to save data in iOS,
- and finally (and most importantly), getting into the mindset of applying what you know to actually write apps.
After the meetup, I’ll write it up here. Stay tuned!
One reply on “Saving data in iOS apps / How do you actually write an app?, part 2”
[…] Saving data in iOS apps / How do you actually write an app?, part 2 […]