
But they’re close!
If you’re interviewing for a position that requires you to code, the odds are pretty good that you’ll have to face a coding interview. This series of articles is here to help you gain the necessary knowledge and skills to tackle them!
Over the next couple of articles in this series, I’ll walk you through a classic computer science staple: linked lists. And by the end of these articles, you’ll be able to handle this most clichéd of coding interview problems, satirized in the meme below:

You’ve probably seen the ads for AlgoExpert with the woman pictured above, where she asks you if you want a job at Google and if you know how to reverse a linked list.
But before you learn about reversing linked lists — or doing anything else with them — let’s first answer an important question: what are they?
What are linked lists?
A linked list is a data structure that holds data as a list of items in a specific order. Linked lists are simple and flexible, which is why they’re the basis of many of the data structures that you’ll probably use in your day-to-day programming.
Linked list basics
Nodes
The basic component of a linked list is a node, which is diagrammed below:
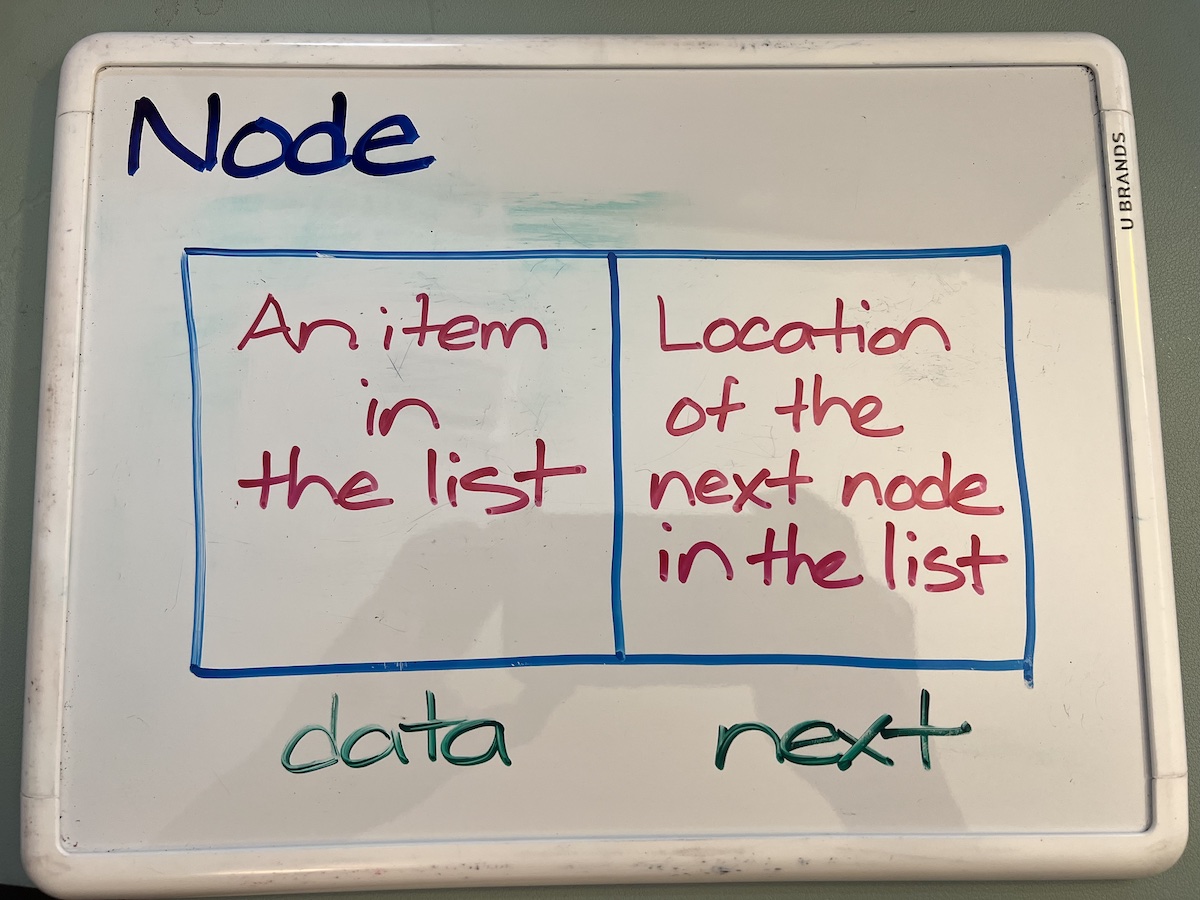
Tap to view at full size.
In its simplest form, a node is a data structure that holds two pieces of information:
data: This holds the actual data of the list item. For example, if the linked list is a to-do list, the data could be a string representing a task, such as “clean the bathroom.”next: A linked list is simply a set of nodes that are linked together. In addition to the data it holds, a node should also know where the next node is, and that’s what itsnextproperty is for: it points to the next item in the list. In languages like C and Go, this would be a pointer, while in languages like C#, Java, JavaScript, Kotlin, Python, and Swift, this would be a reference.
Here’s a Python implementation of a node. We’ll use it to implement a linked list:
# Python

class Node:

    def __init__(self, data):
        self.data = data
        self.next = None

    def __str__(self):
        return f"{self.data}"
With Node defined, you can create a new node containing the data “Hello, world!” with this line of code:
new_node = Node("Hello, world!")To print the data contained inside a node, call Node’s print() method, which in turn uses the value returned by its __str__() method:
print(new_node)
# Outputs “Hello, world!”
Assembling nodes into a linked list
You create a linked list by connecting nodes together using their next properties. For example, the linked list in the diagram below represents a list of the first four letters of the alphabet: a, b, c, and d, in that order:
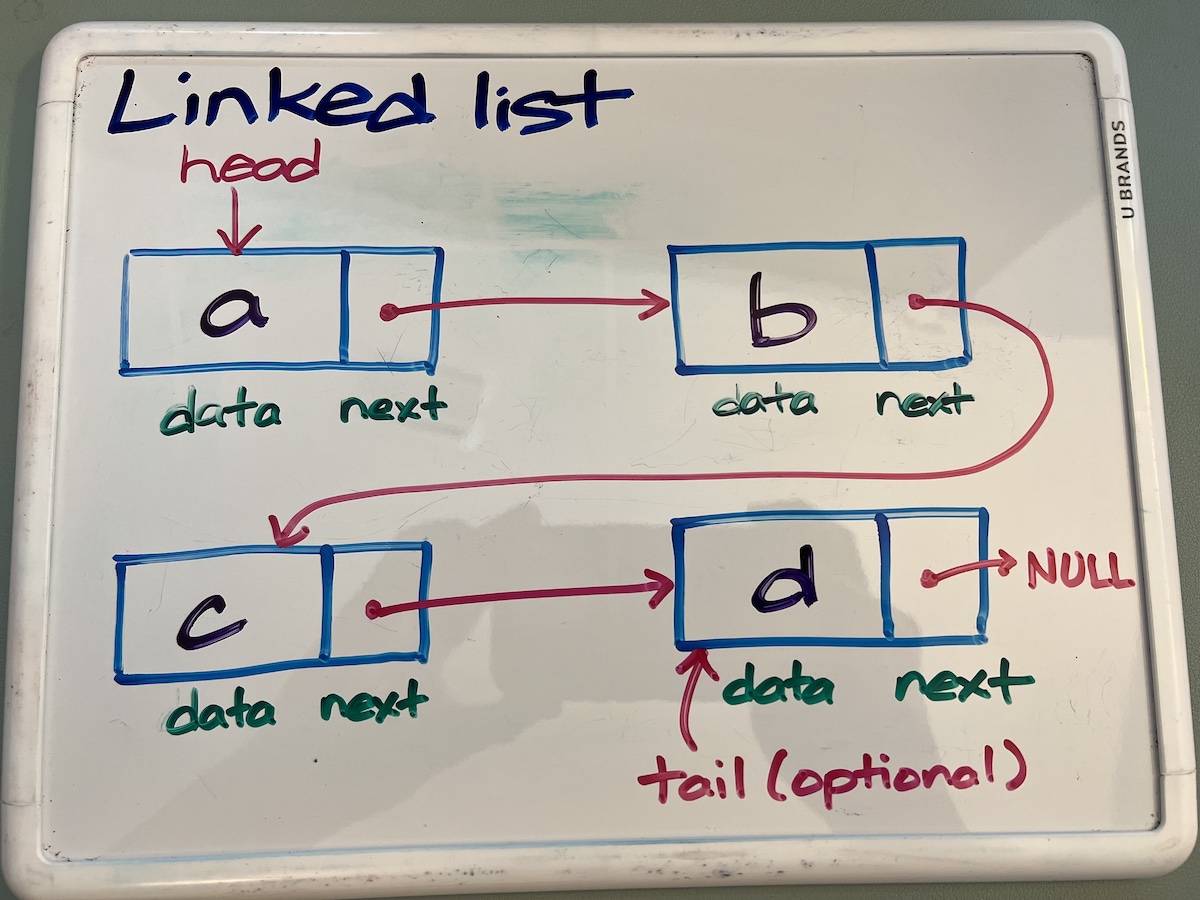
Tap to view at full size.
The diagram above features the following:
- Four nodes, each one for a letter in the list.
- A variable called
head, which is a pointer or reference to the first item in the list. It’s the entry point to the list, and it’s a necessary part of the list — you can’t access a linked list if you can’t access its head. - An optional variable called
tail, which is a pointer or reference to the last item in the list. It’s not absolutely necessary, but it’s convenient if you use the list like a queue, where the last element in the list is also the last item that was added to the list.
Let’s build the linked list pictured above by putting some nodes together:
# Python

# Let’s build this linked list:
# a -> b -> c -> d

head = Node("a")
head.next = Node("b")
head.next.next = Node("c")
head.next.next.next = Node("d")
That’s a lot of nexts. Don’t worry; we’ll come up with a better way of adding items to a linked list soon.
Here’s an implementation that creates the same list but doesn’t rely on chaining nexts:
# Python

# Another way to build this linked list:
# a -> b -> c -> d

head = Node("a")

node_b = Node("b")
head.next = node_b

node_c = Node("c")
node_b.next = node_c

node_d = Node("d")
node_c.next = node_d
To see the contents of the list, you traverse it by visiting each node. This is possible because each node points to the next one in the list:
# Python

print(head)
print(head.next)
print(head.next.next)
print(head.next.next.next)
print(head.next.next.next.next)
Here’s the output for the code above:
a
b
c
d
None
Of course, the code above becomes impractical if you don’t know how many items are in the list or as the list grows in size.
Fortunately, the repetition in the code — all those prints and nexts — suggests that we can use a loop to get the same result:
# Python

current = head

while current is not None:
    print(current)
    current = current.next
Here’s the output for the code above:
a
b
c
d
A linked list class
Working only with nodes is a little cumbersome. Let’s put together a linked list class that makes use of the Node class:
# Python

class LinkedList:

    def __init__(self):
        self.head = None

    def __str__(self):
        if self.head is None:
            return('Empty list.')

        result = ""
        current_node = self.head
        while current_node is not None:
            result += f'{current_node}\n'
            current_node = current_node.next
        return result.strip()

    def add_last(self, data):
        new_node = Node(data)

        # If the list is empty,
        # point `head` to the newly-added node
        # and exit.
        if self.head is None:
            self.head = new_node
            return

        # If the list isn’t empty,
        # traverse the list by going to each node’s
        # `next` node until there isn’t a `next` node...
        current_node = self.head
        while current_node.next:
            current_node = current_node.next

        # If you’re here, `current_node` is
        # the last node in the list.
        # Point `current_node` at
        # the newly-added node.
        current_node.next = new_node
This LinkedList class has the following members:
head: A property containing a pointer or reference to the first item in the list, orNoneif the list is empty.__init__(): The class initializer, which initializesheadtoNone, meaning that any newly createdLinkedListinstance is an empty list.__str__(): Returns a string representation of the contents of the linked list for debugging purposes. If the list contains at least one item, it returns the contents of the list. If the list is empty, it returns the stringEmpty list.add_last(): Given a value, it creates a newNodecontaining that value and adds thatNodeto the end of the list.
With this class defined, building a new list requires considerably less typing…
# Python

list = LinkedList()
list.add_last("a")
list.add_last("b")
list.add_last("c")
list.add_last("d")
…and displaying its contents is reduced to a single function call, print(list), which produces this output:
a
b
c
d
Coming up next:
- JavaScript implementations
- Adding an item to the start of a linked list
- Finding an item in a linked list
- Will you ever use a linked list, and why do they ask linked list questions in coding interviews?
Previously in this series
- How to solve coding interview questions: Finding the first NON-recurring character in a string in Swift
- How to solve coding interview questions: Looking deeper into finding the first NON-recurring character in a string
- How to solve coding interview questions: The first NON-recurring character in a string
- Coding interview questions: “First recurring character” in Swift
- How to solve coding interview questions: The first recurring character in a string
- I Has the Dumb (or: How I Embarrassed Myself in My Interview with Google) — from way back in 2013
3 replies on “How to solve coding interview questions: Linked lists, part 1”
[…] Before you continue reading, be sure to check out part 1! It’s where I explain what a linked list is, and provide a couple of basic classes that we’ll build on in this article. […]
[…] linked list exercises continue! In case you missed them, be sure to check out part 1 and part 2 of this linked list series before moving […]
[…] interview linked list: A recent (from last month) article of mine, How to solve coding interview questions: Linked lists, part 1, is on the first page of results for this search […]