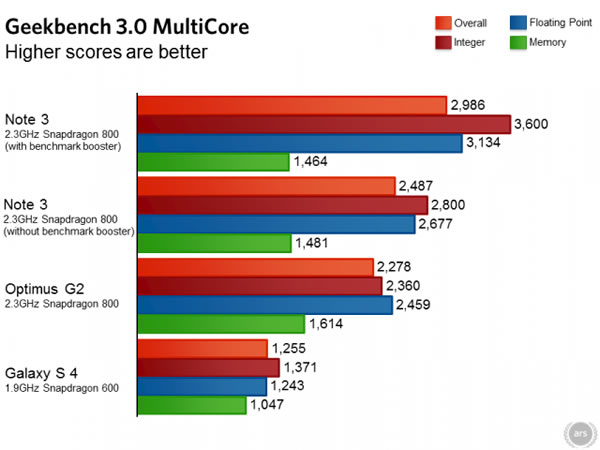
Once again, I’m on vacation — with the same lovely lady as last time, even! — and will return with regular postings on Monday, July 8th.

Once again, I’m on vacation — with the same lovely lady as last time, even! — and will return with regular postings on Monday, July 8th.
Here’s a little promo that Pete Ashton found in the Yellow Pages. It explains two ways to get their app: via QR code or typing in an URL. Guess which one is simpler:
Click the photo to see the full-size original.
Pete calls it “the most damning piece of anti-QR code copy ever”, and I think he’s got a point. At the very least, you shouldn’t use a QR code when a simple, easy-to-remember URL is available.
Again, I remind you:

Apple’s been working hard on iOS 7 and its developer tools over the past little while, and the result is a couple of new versions of their beta software:
In this article, we’ll show you how to get both.
If you have the first beta on your iPhone or iPod Touch, you can get it the easy way: the built-in Software Update. Fire up Settings, choose General, and then choose Software Update. You should see a screen that looks like this:

Tap the Download and Install button to do just that, and follow the screen prompts.
Point your browser at the iOS Dev Center. If you’re properly registered in the iOS Developer Program, you should have the options of looking at resources for iOS 6.1 and iOS 7. Naturally, you should select iOS 7 SDK beta, after which the page should look like the screen capture below:

You can click on the Downloads link under the Resources for iOS 7 beta heading, or simply scroll down. Either way, you’ll end up in the same place, where you’ll see this:

Download the one that’s appropriate for your iDevice. I’ve included direct links to the available packages below:
The file that you’re downloading is a disk image. Double-click it to mount the image. You should see one file that looks something like this:

Connect your iDevice via USB to your Mac and start up iTunes. Let the sync complete. Click the iPhone or iPad button near the upper right-hand corner of the iTunes window:

The iTunes window should look something like this:

If you haven’t done so already, back up your iPhone.
And now, the important part of the process. I’m going to spell this out in large text:
While holding down the option or alt key on your keyboard, click the Restore iPhone… button. This allows you to choose a specific file to use when restoring your iPhone or iPod Touch. Choose the .ipsw file contained within the disk image you just mounted.
(That’s how you get iOS 7 on your iPhone or iPod Touch at this early point in the game: you’re restoring it from an image that has iOS 7 on it.)
Once you’ve done that, the uploading and installing process will take about 10 to 15 minutes. Your iPhone or iPod Touch will reboot once or twice during this time.
If you want to develop for iOS 7 Beta 2, you’ll need the latest version of Xcode 5 and the iOS 7 Beta 2 SDK. Here’s how you get it:
Point your browser at the iOS Dev Center. If you’re properly registered in the iOS Developer Program, you should have the options of looking at resources for iOS 6.1 and iOS 7. Naturally, you should select iOS 7 SDK beta, after which the page should look like the screen capture below:

You can click on the Downloads link under the Resources for iOS 7 beta heading, or simply scroll down. Either way, you’ll end up in the same place, where you’ll see this:

Click the Xcode 5 and iOS 7 SDK beta 2 link to start the download. It’s a .dmg file that’s about 1.7 GB in size, and when double-clicked, mounts a disk image and opens the window shown in the screen capture below:

It’s a straight-forward drag-the-app-to-the-Applications-folder-alias install, and you’re done!

Cisco have come up with a term called “Comprehensive BYOD” as well as the eight things it comprises, and the idea’s so good that we’re going to borrow it. We’ve taken their eight points — they called them “foundational capabilities” — improved on them with a little re-ordering, re-wording and a jauntier name because we think that doing so makes them more effective. Here are our 8 Simple Rules for Bringing Your Own Device, or what organizations implementing BYOD need to do:
Through the strategic and judicious use of mobile device management (MDM), container applications, back office integration, and good practices and policies, you can follow the 8 Simple Rules, give your company’s employees the ability to use the devices they know and love, and get the most out of your BYOD program.
According to Cisco’s survey of 2,415 mobile users in 6 countries (Brazil, China, Germany, India, United Kingdom, and United States), as much as $3,150 per employee can be saved through “Comprehensive BYOD”. Cisco says that under a Comprehensive BYOD plan, employees will spend an average of $965 on their devices, plus another $734 in annual data plans, or a total of $1699 that they no longer have to spend since they’ve offloaded that cost onto their employees.
We beg to differ with Cisco. While there are some cost savings that can come from BYOD, we feel that employers should help employees cover the costs of work-related use of their devices through stipends or some other compensation plan. In our opinion, the really big wins that come from BYOD are employee productivity (up to 81 minutes of time saved every week, for every employee, according to Cisco’s survey) and satisfaction.
In the previous article in this series, I showed you how to get the Xcode 5 preview and the iOS beta SDK up and running on your Mac. That enables you to start writing apps and testing them out on the Simulator.
Of course, it’s one thing to test an app on the Simulator, and it’s another thing to test it on a real iDevice. Running iOS 7 on your device lets you try out your apps in a closer-to-real-world situation, and it also lets you get a better feel for what the new version of the OS looks and feels like. Let’s face it, if you’re going to be developing apps for iOS 7, you’ve got to experience it on a regular basis, so that the apps you write look, feel, and function as though they belong.
Currently, the iOS 7 beta works only on:
You’re going to have to wait if you want to run iOS 7 on an iPad.

iOS 7, in its current state is not something for everyone to try. It’s a work in progress that’s being given exposure to developers, designers, and other people in the business of making iOS apps a much-needed advance trial. Since it’s still in development, not all the features are final, it hasn’t yet been fully optimized, and there’s no guarantee that all the known issues have been fixed. A lot of its features may still be subject to change, and any material on it that wasn’t released to the general public by Apple is covered by an NDA (non-disclosure agreement).
The question you must ask yourself is: “Am I a person in the business (or planning to be in the business) of making iOS apps?”
If the answer is “yes”, carry on. If the answer is “no”, and you just want a sneak peek, I suggest waiting.
You should make sure that you can answer yes to all the following questions:
Point your browser at the iOS Dev Center. If you’re properly registered in the iOS Developer Program, you should have the options of looking at resources for iOS 6.1 and iOS 7. Naturally, you should select iOS 7 SDK beta, after which the page should look like the screen capture below:

You can click on the Downloads link under the Resources for iOS 7 beta heading, or simply scroll down. Either way, you’ll end up in the same place, where you’ll see this:

Download the one that’s appropriate for your phone. I’ve included direct links to the currently available packages below:
The file size might vary from model to model; mine was 1.16 GB.
The file that you’re downloading is a disk image. Double-click it to mount the image. You should see one file:

Connect your iPhone or iPod Touch via USB to your Mac and start up iTunes. Let the sync complete. Click the iPhone button near the upper right-hand corner of the iTunes window:

The iTunes window should look something like this:

If you haven’t done so already, back up your iPhone.
And now, the important part of the process. I’m going to spell this out in large text:
While holding down the option or alt key on your keyboard, click the Restore iPhone… button. This allows you to choose a specific file to use when restoring your iPhone or iPod Touch. Choose the .ipsw file contained within the disk image you just mounted.
(That’s how you get iOS 7 on your iPhone or iPod Touch at this early point in the game: you’re restoring it from an image that has iOS 7 on it.)
Once you’ve done that, the uploading and installing process will take about 10 to 15 minutes. Your iPhone or iPod Touch will reboot once or twice during this time.
Since most discussion of iOS 7 is still under non-disclosure agreement — you can talk about it all you want within the forums inside Apple’s developer site, but not out in public just yet — the best way to show you iOS 7 development is through showing you iOS 6 development. Until the embargo on showing iOS 7 in action is lifted, I’ll show you iOS 6 development, most of which is applicable to developing for iOS 7.
In order to do iOS 6 development, you’ll need the current version of Xcode, version 4.6.3 at the time of this writing. Getting the current version of Xcode is easy: you get it via the Mac App Store, and it’s free-as-in-beer. As I mentioned in the previous article, the current version of Xcode and the Xcode 5 beta can coexist on the same machine. In our explorations of iOS 7 development, I’ll show you iOS 6 code, which you can first try on the current Xcode, and then try out on Xcode 5.