Categories
Uncategorized

iOS 7 Development Tutorials Aplenty

ios 7 developmentNow that iOS 7 has hit the streets, the non-disclosure agreement that all registered iOS developers is no longer under effect. This means that all of us who’ve been playing with the various beta versions of iOS 7 and Xcode 5 can finally talk about them, as well as their APIs, and their experiences developing for Apple’s new-look operating system. Over the next few weeks, I’m going to talk about as many of the changes to Xcode and iOS as I can, as well as point you to other writers who are covering these topics.

Here’s a look at the iOS 7 reading I’m doing these days:

NSHipster on the New Goodies in iOS 7’s APIs

Banner for NSHipster on iOS 7 APIs, with NSHipster's 'moustache' logo.

NSHipster bills itself as “a journal of the overlooked bits in Objective-C and Cocoa”, and it does a good job at that. As with Global Nerdy, they’re going to spend the next few weeks covering what’s new for developers in iOS 7. In this week’s installment, NSHipster covers the following:

  • NSData Base64 encoding
  • NSURLComponents – “Think of it as NSMutableURL.”
  • NSProgress – “…a tough class to describe. It acts as both an observer and a delegate / coordinator, acting as a handle for reporting and monitoring progress.”
  • NSArray::firstObject – We’ve got NSArray::lastObject, so why not this?
  • CIDetectorSmile – Detects smiling faces within an image
  • CIDetectorEyeBlink – Detects blinking eyes within an image
  • SSReadingList – “Even though the number of people who have actually read something saved for later is only marginally greater than the number of people who have ever used a QR code, it’s nice that iOS 7 adds a way to add items to the Safari reading list…”
  • AVCaptureMetaDataOutput – “Scan UPCs, QR codes, and barcodes of all varieties with AVCaptureMetaDataOutput, new to iOS 7.”
  • AVSpeechSynthesizer – “iOS 7 brings the power of Siri with the convenience of a Speak & Spell in a new classAVSpeechSynthesizer..."
  • MKDistanceFormatter – “MKDistanceFormatter provides a way to convert distances into localized strings using either imperial or metric units.”

iOS 7 By Tutorials, by Ray Wenderlich & Co.

Banner for iOS 7 by Tutorials

Ray Wenderlich’s site is one of the go-to resources for iOS developer tutorials, from the articles to the books produced by its writers, including their iOS by Tutorials series. They’ve just released the latest in the series, iOS 7 by Tutorials, a PDF book for intermediate and advanced developers that gets updated often and will feature 25 chapters and hundreds of pages of material. This edition covers features such as UIKit Dynamics, Text Kit, background fetch, and the new “flat” design of IOS 7. Highly recommended if you’ve become comfortable with iOS development and want to make the leap past the beginner level.

iOS 7 by Tutorials is available right now for US$54.00.

iOS Games By Tutorials, by Ray Wenderlich & Co.

If you want to get into iOS game development using Apple’s new game framework, Sprite Kit, iOS Games by Tutorials is for you! It’s aimed at developers from all levels, from beginner to advanced.

iOS Games by Tutorials is available right now for $54.00.

The iOS 7 Feast

ios 7 feast

One more Ray Wenderlich goodie, and this one’s free! It’s the “iOS 7 Feast”, a series of articles covering some of the new features in iOS 7, including:

Categories
Uncategorized

iOS Fortnightly Tutorial: A Simple Weather App, Part 1

simpleweather running 4

Welcome to the second installment of iOS Fortnightly, Global Nerdy’s iOS programming tutorial series! If you’ve got a little experience with an object-oriented programming languages, whether it’s client-side JavaScript, server-side Perl, PHP, Python, or Ruby, or desktop Java, C#, or Visual Basic, this series is for you. Every fortnight — that’s a not-so-common word for “two weeks”, I’ll post a tutorial showing you how to write a simple but useful app that you can use as the launching point for your own iOS development projects. The idea behind iOS Fortnightly is to help you become familiar with mobile app development, the Objective-C programming language, the Cocoa Touch programming framework, and iOS application design.

ios fortnightly tutorials

In case you missed the previous iOS Fortnightly installment, go check it out. It’s a simple “Magic 8-Ball” app, but it’s the perfect starter app for someone who’s new to iOS development.

With the introduction out of the way, let’s move on to this fortnight’s app, a simple weather app. Let me start with what I think will be an iOS Fortnightly tradition — the video:

Question 1: Where Will the Weather Data Come From?
open weather map

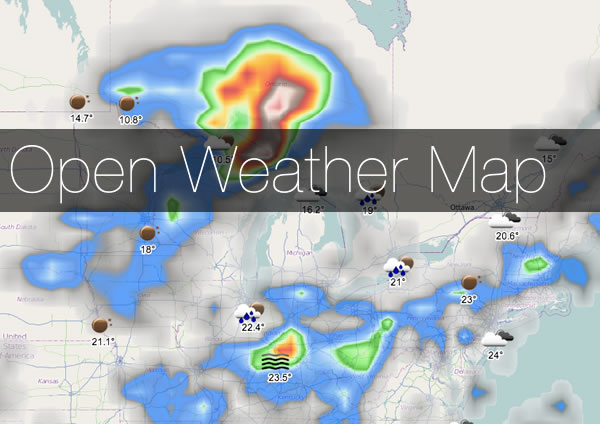
I decided to go with Open Weather Map, a free-as-in-beer/free-as-in-speech weather data and forecast API in the spirit of Wikipedia and OpenStreetMap. While they recommend the use of a key to access the API (also free), it’s not absolutely necessary, which means that you can get started writing a weather app without having to sign up for an API key and waiting for approval. With a simple HTTP GET call, you can use it to get the current weather for a location that you can specify by:

  • City name,
  • Latitude and longitude, or
  • Numeric city ID

Here’s a sample call to Open Weather Map’s API for the current weather in my current location, Toronto, Canada:

http://api.openweathermap.org/data/2.5/weather?q=Toronto,CA

Here’s the resulting JSON object that came back when I wrote this article. Your results may vary, seeing as you’ll be making the call at a different day and time, but the format will be the same. It comes out as one long, continuous string; I’ve reformatted it so that it’s easier to read:

{"coord":{"lon":-79.416298,
          "lat":43.700111},
"sys":{"country":"CA",
       "sunrise":1378032138,
       "sunset":1378079546},
"weather":[{"id":701,
            "main":"Mist",
            "description":"mist",
            "icon":"50n"}],
"base":"gdps stations",
"main":{"temp":294.11,
        "humidity":93,
        "pressure":1009,
        "temp_min":292.59,
        "temp_max":295.15},
"wind":{"speed":1.3,
        "deg":187.501},
"rain":{"3h":0},
"clouds":{"all":0},
"dt":1378007487,
"id":6167865,
"name":"Toronto",
"cod":200}

Here’s a run-down of the returned object’s keys and values:

Element Description
cod The HTTP status code.
clouds The cloudiness, expressed as an object with a single key:

  • all: The cloud cover, expressed as a percentage (0 – 100).
coord The coordinates of the location for the weather report, expressed as an object with two keys:

  • lat: The location’s latitude, expressed in degrees (- is west, + is east)
  • lon: The location’s longitude, expressed in degrees (- is south, + is north)
dt Time the weather report was sent in the GMT time zone, expressed in Unix time.
main The quantitative weather, expressed as an object with these keys:

  • humidity: The humidity, expressed as a percentage (0 – 100).
  • pressure: The air pressure, in hectopascals (hundreds of pascals; 1 hectopascal is equal to one millibar).
  • temp: The current temperature, in degrees kelvin (1 degree kelvin = 1 degree celsius, 0 degrees C = 273.15 K).
  • temp_max: The predicted maximum temperature, in degrees kelvin.
  • temp_min: The predicted minimum temperature, in degrees kelvin.
name The name of the town or city closest to the location for the weather report.
rain The amount of rain expected to fall, expressed an object with this key:

  • 3h: Expected rainfall over the next 3 hours, in millimetres.
snow The amount of snow expected to fall, expressed as an object with this key:

  • 3h: Expected snowfall over the next 3 hours, in millimetres.
sys Other time and location data, expressed as an object with these keys:

  • country: The country in which the location for the weather report is located, expressed as an ISO two-letter country code.
  • sunrise: The time when sunrise will occur at the location for the weather report, expressed in Unix time.
  • sunset: The time when sunset will occur at the location for the weather report, expressed in Unix time.
weather The qualitative weather, expressed as an array containing one or more objects with the following keys:

  • description: A plain English description of the weather.
  • icon: The filename of the icon corresponding to the current weather. The full URL of the icon is http://openweathermap.org/img/w/filename.png.
  • id: The weather condition code, expressed as a three-digit number. See Open Weather Map’s “weather condition codes” page for an explanation of the codes.
wind The wind, expressed as an object with the following keys:

  • deg: Wind direction in meteorological degrees (0 is a north wind — that is, coming from the north, 90 is east, 180 is south, 270 is west).
  • speed: Wind speed in metres per second.

Question 2: How Will Open Weather Map’s Data be Accessed?

afnetworkingApple’s Cocoa Touch framework has its own class for downloading the contents of an URL — NSURLConnection — but we’ll use a third-party library that’s even simpler to use: AFNetworking, which describes itself as “a delightful networking framework for iOS and OSX” and is used at fine institutions such as Github, Heroku, and Pinterest.

Question 3: How Do We Include AFNetworking in an iOS Project?

cocoapodsAFNetworking can be manually included in a project, but I thought this would be a good opportunity to show the use of CocoaPods, the easy Ruby-based library dependency manager.

To install Cocoapods, fire up Terminal and type in the following lines:

$ sudo gem install cocoapods
$ pod setup

Create the Project

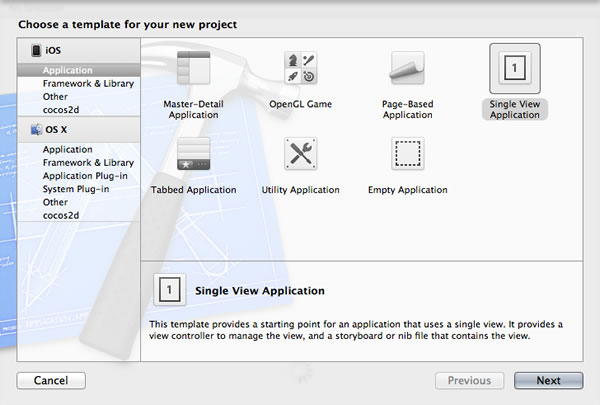
As with the previous project, we start with From the menu bar, choose File → New → Project…. You’ll see this:
single view application

Once again, this application will happen on a single screen, so we’ll go with a single-view application:

  • In the left column, under iOS, make sure that Application is selected.
  • In the big area on the right, select Single View Application.

Click Next to proceed to the next step:
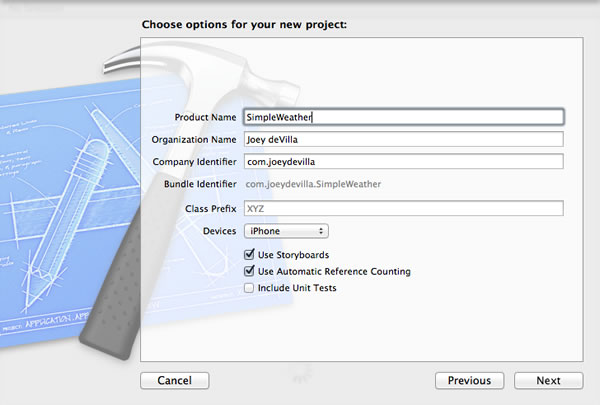
choose options for project

On the “Choose options” screen…

  • Give your app a name by entering one into the Product Name field. I’m going with SimpleWeather.
  • Make sure that in the Devices menu, iPhone is selected.
  • Check the Use Storyboards checkbox.
  • Make sure that the Use Automatic Reference Counting checkbox is checked.

Click Next to proceed to the next step:
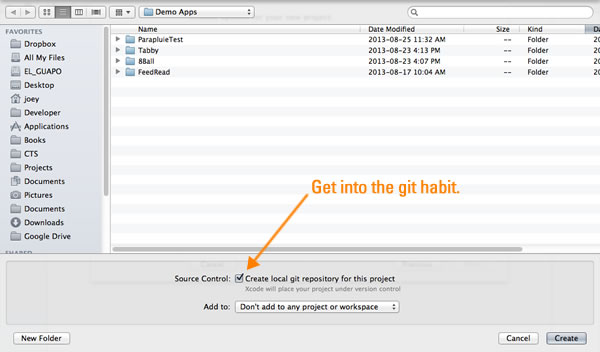
save project

Do this:

  • Choose the directory where your project will be saved. Your project will be saved in a directory inside the directory you chose.
  • Check the Create local git repository for this project checkbox. Git’s a good habit to get into, and there’ll come a time when being able to backtrack to a previous version of your code will save your bacon.
  • Make sure that the selection in the Add to: menu is Don’t add to any project or workspace.
  • Click the Create button.

So far, this isn’t all that different from the setup for the previous project. Here’s where it’s different — first, close the project. That’s right; close the project. We’re going to set up Cocoapods to bring AFNetworking into the project. Open the text editor of your choice and enter the following:

platform :ios, '6.0'
pod 'AFNetworking', '~> 1.3.2'

Save the file in your project directory. Double-check that it’s in the right place:

$ pwd
/Users/joey/Developer/iOS/Demo Apps/SimpleWeather
$ ls
Podfile			SimpleWeather		SimpleWeather.xcodeproj
$ cat Podfile
platform :ios, '6.0'
pod 'AFNetworking', '~> 1.3.2'

Once you’ve confirmed that the files are in the right place, install AFNetworking by entering pod install at the command line while in your project’s directory:

$ pod install
Analyzing dependencies
Downloading dependencies
Installing AFNetworking (1.3.2)
Generating Pods project
Integrating client project

[!] From now on use `SimpleWeather.xcworkspace`.

As the command-line output states, you should now open the project using SimpleWeather.xcworkspace, the full workspace file:
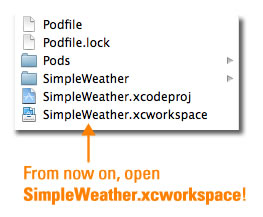
simpleweather.xcworkspace

Open the project by double-clicking on SimpleWeather.xcworkspace:

projects

If you look at the Project Navigator on the left side of Xcode’s window, you’ll see that the workspace is made up of two projects:

  • SimpleWeather, our weather app project, where we’ll be doing our work, and
  • Pods, which contains the AFNetworking code. We won’t touch it, but we’ll use its functionality to grab the weather info from Open Weather Map.

(If you want to find out more about workspaces, see this section of Apple’s documentation.)

Next step: drawing a quick user interface.

Draw the User Interface

In the Project Navigator on the left side of the Xcode window, select MainStoryboard.storyboard. Once again, we’re not going to bother with autolayout — we’re not quite at the fancy UI phase yet — so select the File Inspector on the right side of the window, and uncheck the Autolayout box:
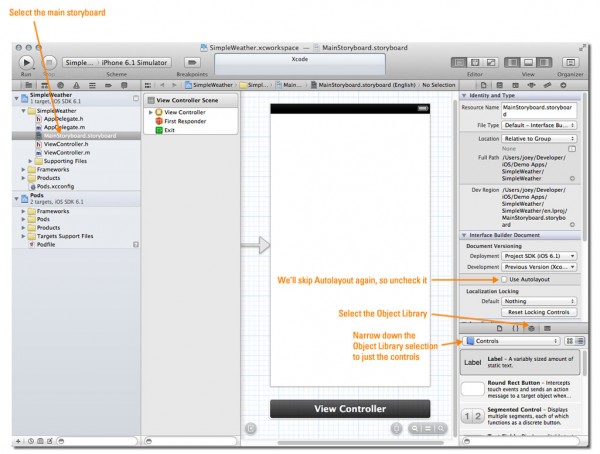
screen 1

Click the screen capture to see it at full size.

Now to draw some controls on the view. In the Object Library, select Controls from the drop-down menu to narrow down the selection in the Object Library to just the UI controls. Drag the following from the Object Library onto the view:

  • A Label to a spot to near the top of the screen. Double-click it to edit its text, and change it to Where’s the weather in:.
  • A Text Field to just below the label, and stretch it to nearly the full width of the view.
  • A Round Rect Button to just below the text field. Double-click it to edit its text, and change it to Tell Me.
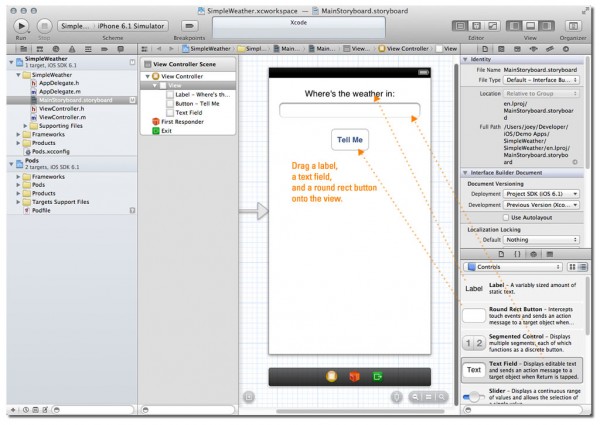
screen 2

Click the screen capture to see it at full size.

Connect the Controls to Code

First, let’s create an action for the Tell Me button:

  • Select the Assistant Editor so that both the storyboard and view controller header code in ViewController.h are both on display.
  • Select the Tell Me button, and then either right-click or control-click it. A grey window will pop up beside it, which will display actions and outlets.
  • Drag from the circle beside Touch Up Inside into the view controller header code, anywhere between @interface and @end.
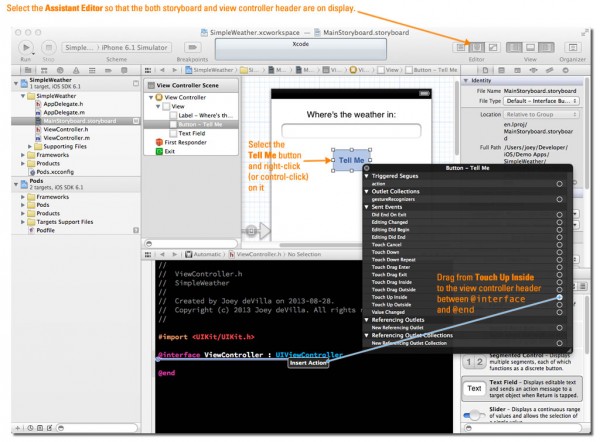
screen 3

Click the screen capture to see it at full size.

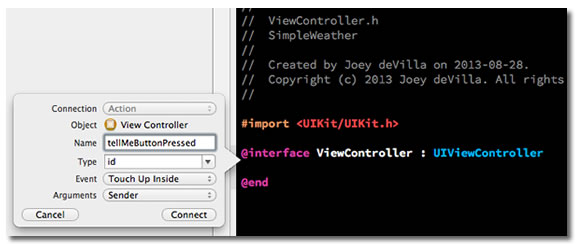
In the little window that pops up:

  • Give the action a name. I used tellMeButtonPressed.
  • Make sure that the Event is Touch Up Inside.
  • Click the Connect button.

tellmebuttonpressed

You should now have the following line in the view controller header:

- (IBAction)tellMeButtonPressed:(id)sender;

First, let’s create an outlet for the text field:

  • Select the text field, and as we did with the button, right-click or control-click it. As with the button, a grey window will pop up beside it, which will display actions and outlets.
  • Drag from the circle beside New Referencing Outlet into the view controller header code, anywhere between @interface and @end.
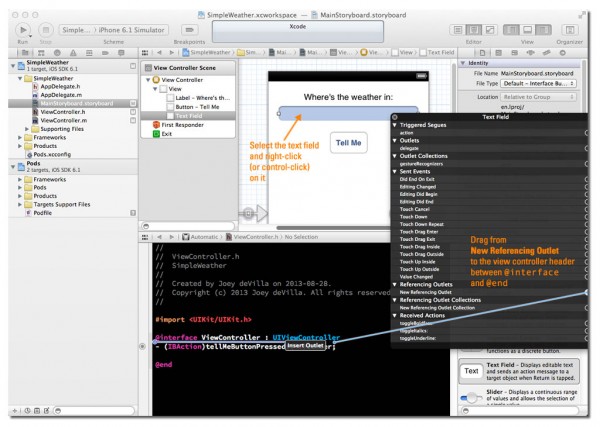
screen 4

Click the screen capture to see it at full size.
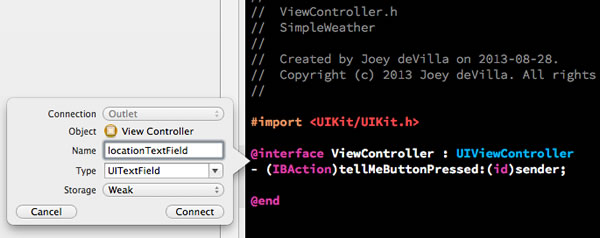
locationtextField

In the little window that pops up:

  • Give the outlet a name. I used locationTextField.
  • Make sure that the Type is UITextField and that the Storage is Weak.
  • Click the Connect button.

You should now have the following line in the view controller header:

- (IBAction)tellMeButtonPressed:(id)sender;

With the action and outlet code inserted into the header, I did a little rearranging so that it looks like this:

#import <UIKit/UIKit.h>

@interface ViewController : UIViewController

// Outlets
// =======
@property (weak, nonatomic) IBOutlet UITextField *locationTextField;

// Actions
// =======
- (IBAction)tellMeButtonPressed:(id)sender;

@end

Commit the Changes

Now’s a good time to commit the changes to git. Choose File → Source Control → Commit… from the menu bar. The “diffs” window will appear, which lets you see the changes you’re about to commit:
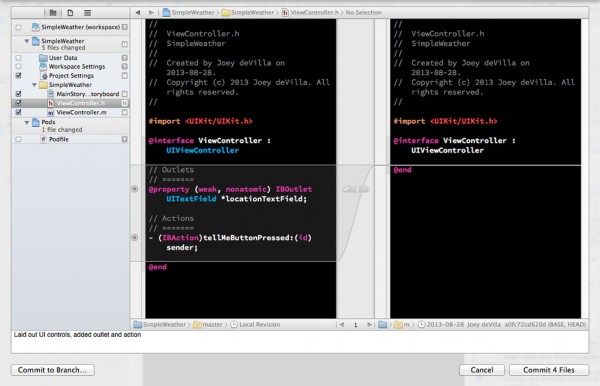
commit 1

Click the screen capture to see it at full size.

Enter a commit message — something like “Added controls and their actions and outlets”, then click the Commit 4 Files button to commit the changes.

Create a Model Class for the Weather Data

As I mentioned in the last article in the series, iOS apps are built on the Model-View-Controller pattern. Here’s how we’ll apply the pattern in this app:
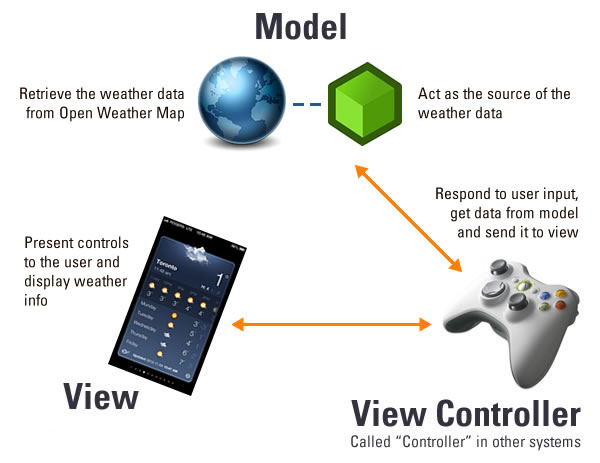
simpleweather mvc

We’ve already got a view and view controller from the project setup work we’ve done — let’s create a model class. From the menu bar, File → New → File…. You’ll be presented with this dialog box:
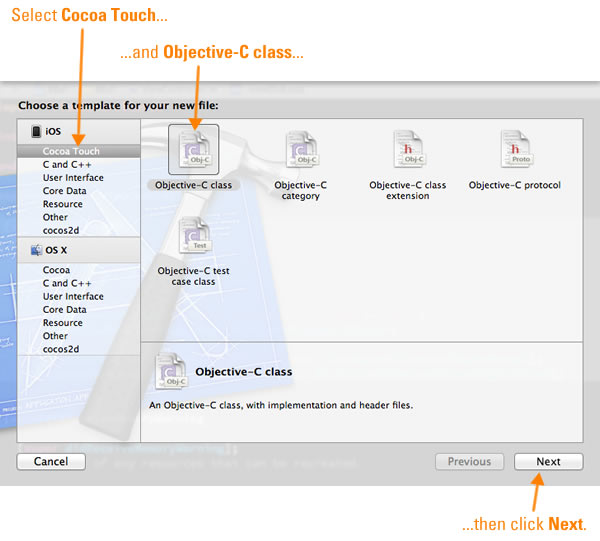
Select Cocoa Touch from the sidebar on the left, then select Objective-C class, then click Next. You’ll see this:
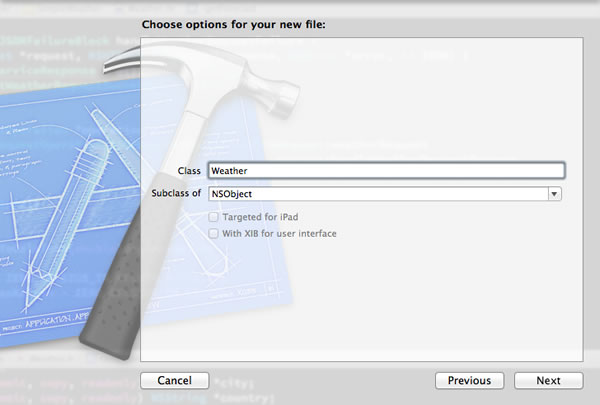
create weather

Provide a name for the class. I gave mine the name Weather and made it a subclass of NSObject, the ultimate base class for every class in Objective-C. Once that’s done, click Next. You’ll be taken to the dialog box to save the class:
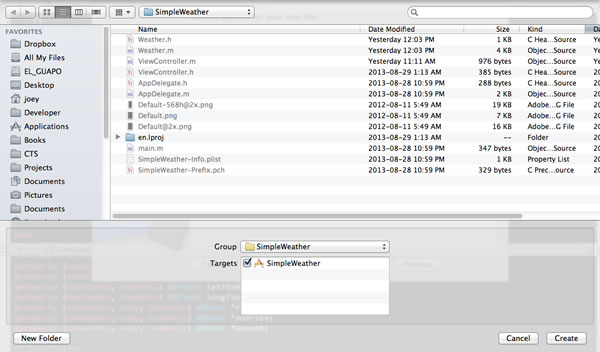
save class

Click Create to save the new class files. You can see them in the Project Navigator, marked with the letter A, denoting files that have been added since the last commit:
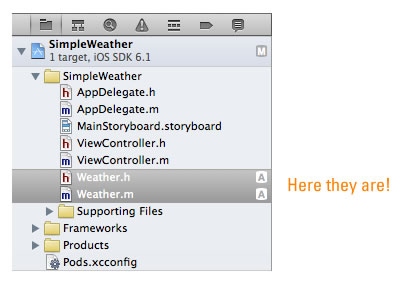
weather.h and weather.m

Now that we’ve got files for the Weather class’ interface (the header file, Weather.h) and implementation (the module file, Weather.m), let’s code! Let’s take care of the header first, where we specify the properties and methods that our model exposes:

Weather.h

#import <Foundation/Foundation.h>

@interface Weather : NSObject

// Properties
// ==========

// Place and time
@property (nonatomic, copy, readonly) NSString *city;
@property (nonatomic, copy, readonly) NSString *country;
@property (nonatomic, readonly) CGFloat latitude;
@property (nonatomic, readonly) CGFloat longitude;
@property (nonatomic, copy, readonly) NSDate *reportTime;
@property (nonatomic, copy, readonly) NSDate *sunrise;
@property (nonatomic, copy, readonly) NSDate *sunset;

// Qualitative
@property (nonatomic, copy, readonly) NSArray *conditions;

// Quantitative
@property (nonatomic, readonly) NSInteger cloudCover;
@property (nonatomic, readonly) NSInteger humidity;
@property (nonatomic, readonly) NSInteger pressure;
@property (nonatomic, readonly) NSInteger rain3hours;
@property (nonatomic, readonly) NSInteger snow3hours;
@property (nonatomic, readonly) CGFloat tempCurrent;
@property (nonatomic, readonly) CGFloat tempMin;
@property (nonatomic, readonly) CGFloat tempMax;
@property (nonatomic, readonly) NSInteger windDirection;
@property (nonatomic, readonly) CGFloat windSpeed;

// Methods
// =======

- (void)getCurrent:(NSString *)query;

@end

Note that what the model exposes is mostly properties and a single method, getCurrent. The idea is to call getCurrent with a query term, which can be a city name, a latitude/longitude pair, or a numeric city code. The model makes a call to Open Weather Maps using the query term, and uses the result to populate the model’s properties, which are then access by the view controller.

I’ll cover what all the @property stuff means in an article to follow.

Now that we have an interface, let’s code up the implementation:

Weather.m

#import "Weather.h"
#import "AFNetworking.h"

@implementation Weather {
    NSDictionary *weatherServiceResponse;
}

- (id)init
{
    self = [super init];

    weatherServiceResponse = @{};

    return self;
}

- (void)getCurrent:(NSString *)query
{
    NSString *const BASE_URL_STRING = @"http://api.openweathermap.org/data/2.5/weather";

    NSString *weatherURLText = [NSString stringWithFormat:@"%@?q=%@",
                                BASE_URL_STRING, query];
    NSURL *weatherURL = [NSURL URLWithString:weatherURLText];
    NSURLRequest *weatherRequest = [NSURLRequest requestWithURL:weatherURL];

    AFJSONRequestOperation *operation =
    [AFJSONRequestOperation JSONRequestOperationWithRequest:weatherRequest
                                                    success:^(NSURLRequest *request, NSHTTPURLResponse *response, id JSON) {
                                                        weatherServiceResponse = (NSDictionary *)JSON;
                                                        [self parseWeatherServiceResponse];
                                                    }
                                                    failure:^(NSURLRequest *request, NSHTTPURLResponse *response, NSError *error, id JSON) {
                                                        weatherServiceResponse = @{};
                                                    }
     ];

    [operation start];
}

- (void)parseWeatherServiceResponse
{
    // clouds
    _cloudCover = [weatherServiceResponse[@"clouds"][@"all"] integerValue];

    // coord
    _latitude = [weatherServiceResponse[@"coord"][@"lat"] doubleValue];
    _longitude = [weatherServiceResponse[@"coord"][@"lon"] doubleValue];

    // dt
    _reportTime = [NSDate dateWithTimeIntervalSince1970:[weatherServiceResponse[@"dt"] doubleValue]];

    // main
    _humidity = [weatherServiceResponse[@"main"][@"humidity"] integerValue];
    _pressure = [weatherServiceResponse[@"main"][@"pressure"] integerValue];
    _tempCurrent = [Weather kelvinToCelsius:[weatherServiceResponse[@"main"][@"temp"] doubleValue]];
    _tempMin = [Weather kelvinToCelsius:[weatherServiceResponse[@"main"][@"temp_min"] doubleValue]];
    _tempMax = [Weather kelvinToCelsius:[weatherServiceResponse[@"main"][@"temp_max"] doubleValue]];

    // name
    _city = weatherServiceResponse[@"name"];

    // rain
    _rain3hours = [weatherServiceResponse[@"rain"][@"3h"] integerValue];

    // snow
    _snow3hours = [weatherServiceResponse[@"snow"][@"3h"] integerValue];

    // sys
    _country = weatherServiceResponse[@"sys"][@"country"];
    _sunrise = [NSDate dateWithTimeIntervalSince1970:[weatherServiceResponse[@"sys"][@"sunrise"] doubleValue]];
    _sunset = [NSDate dateWithTimeIntervalSince1970:[weatherServiceResponse[@"sys"][@"sunset"] doubleValue]];

    // weather
    _conditions = weatherServiceResponse[@"weather"];

    // wind
    _windDirection = [weatherServiceResponse[@"wind"][@"dir"] integerValue];
    _windSpeed = [weatherServiceResponse[@"wind"][@"speed"] doubleValue];
}

+ (double)kelvinToCelsius:(double)degreesKelvin
{
    const double ZERO_CELSIUS_IN_KELVIN = 273.15;
    return degreesKelvin - ZERO_CELSIUS_IN_KELVIN;
}

@end

As with the .h file, I’ll explain what’s in the .m file in an article to follow.

Connect the Model to the View Controller

We’ve got a functioning model, and a view controller connected to a view. It’s now time to make the final MVC connection: the one that links the model to the view controller. Change the code in ViewController.m to:

ViewContoller.m

#import "ViewController.h"
#import "Weather.h"

@interface ViewController ()

@end

@implementation ViewController {
    Weather *theWeather;
}

- (void)viewDidLoad
{
    [super viewDidLoad];
    theWeather = [[Weather alloc] init];
}

- (void)didReceiveMemoryWarning
{
    [super didReceiveMemoryWarning];
}

- (IBAction)tellMeButtonPressed:(id)sender
{
    [theWeather getCurrent:self.locationTextField.text];

    NSString *report = [NSString stringWithFormat:
                        @"Weather in %@:\n"
                        @"%@\n"
                        @"Current temp.: %2.1f C\n"
                        @"High: %2.1f C\n"
                        @"Low: %2.1f C\n",
                        theWeather.city,
                        theWeather.conditions[0][@"description"],
                        theWeather.tempCurrent,
                        theWeather.tempMax,
                        theWeather.tempMin
                        ];
    UIAlertView *alert = [[UIAlertView alloc] initWithTitle:@"Current Weather"
                                                    message:report
                                                   delegate:nil
                                          cancelButtonTitle:@"OK"
                                          otherButtonTitles:nil];
    [alert show];
}

@end

I’ll explain more about this code in a later article.

Run the App

We’ve got all the code we need for a working weather app. It won’t be slick, but it will work. When you run the app, you should see this:
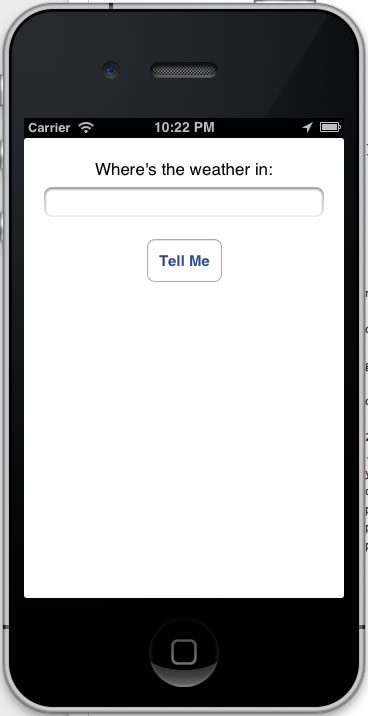
simpleweather running 1

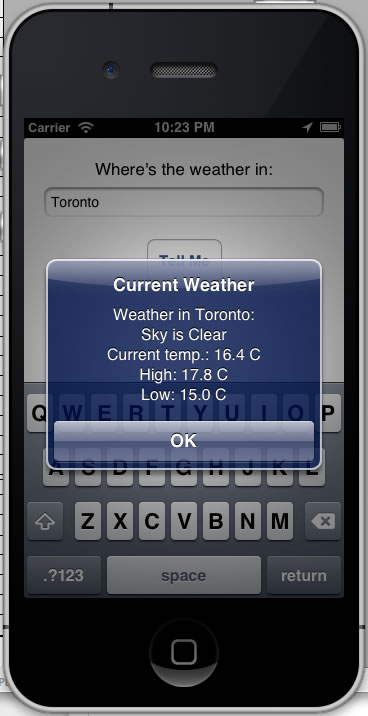
Enter the name of a city into the text field. In my case, I used my own city, Toronto, then tapped the Tell Me button:
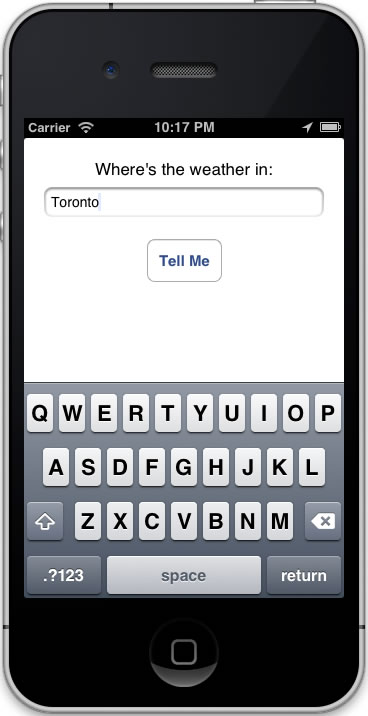
simpleweather running 2

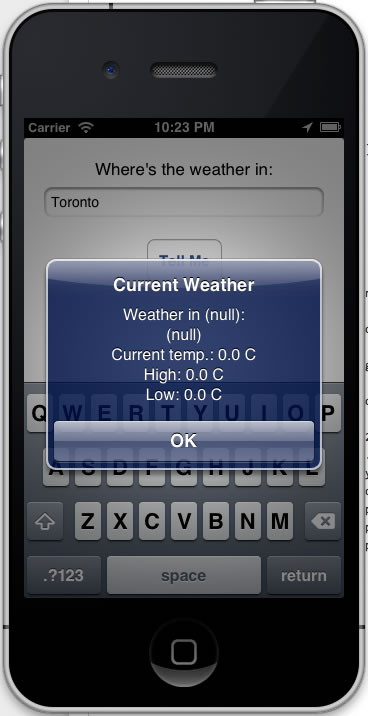
The first time you do this, you’ll most likely see a result like the one below. Don’t let it bother you for the time being:
simpleweather running 3

Don’t worry about this for now. I’ll explain why this happens in a follow-up article.

Dismiss the alert box by tapping the OK button, then tap the Tell Me button again. You should see some better results this time:

simpleweather running 4

That’s It for Now

Congratulations! You now have a working weather app. I’ll post a few follow-up articles featuring tweaks to the app, as well as explanations of the code behind it. In the meantime, commit your changes, and more importantly, play around with the code. Experiment. Tweak. Look up anything that seems odd, unfamilair or interesting!

If you have any questions or comments, or got stuck or encountered an error while doing this tutorial, let me know — either in the comments or by dropping me a line!

Categories
Uncategorized

iOS 7 Development: Tutorials to Get You Started

iOS 7 development (by way of iOS 6)The Story So Far

So far in this series on iOS 7 development for people new to iOS development, we’ve looked at:

At this point, you’re probably raring to go and start coding.

Learning iOS 7 By Way of iOS 6

As I write this, only developers registered in the iOS Developer Program have access to iOS 7 and Xcode 5. These developers — of whom I am one — are under a non-disclosure agreement (NDA) where they’ve promised not to share screenshots or any other information about iOS 7 until it’s out of beta and made available to the general public. We’re allowed to discuss iOS 7 and Xcode 5 within the confines of the developer forums inside the members-only Apple Developer site, and nowhere else.

As long as the NDA’s in effect, I can’t cover specifics about iOS 7 development in this series. What I can do is talk about developing for iOS 6, which should be good enough for the developer who’s new to iOS. Until iOS 7 is finally released and the NDA is lifted, this series of articles will cover learning developing iOS 7 apps by way of learning iOS 6.

Ray Wenderlich and How to Get Part One of their iOS Apprentice Course for Free

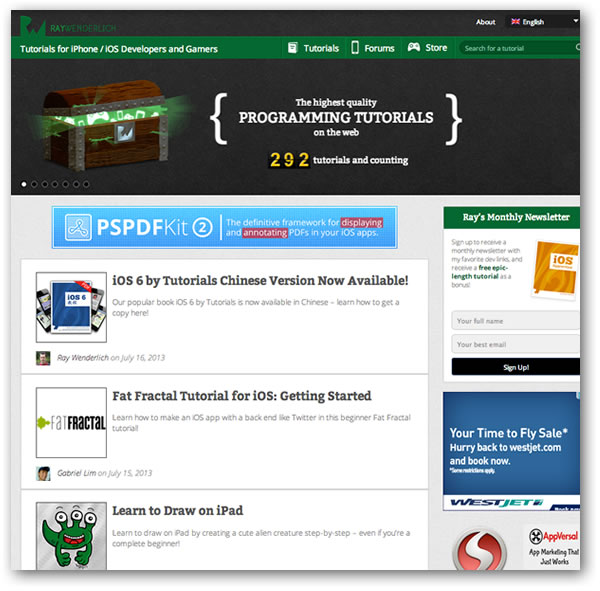
raywenderlich.com

Ray Wenderlich’s blog is the 800-pound gorilla of iOS programming sites, with almost 300 iOS and iOS-related programming tutorial articles as well as a number of great for-pay courses you can buy. I can’t recommend their four-part course, The iOS Apprentice, strongly enough. Spanning hundreds of pages, this set of extremely detailed tutorials teaches iOS development through the building of four different apps:

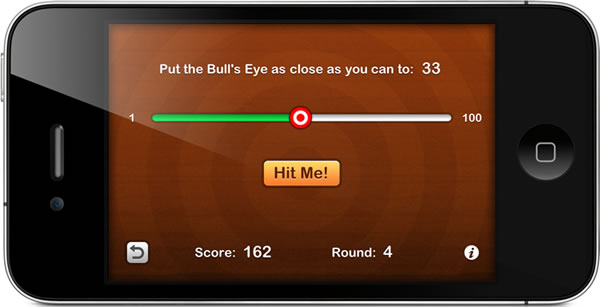
  • Bullseye: Learn the basics of iOS interface programming by building a game.
  • Checklists: Build a “to-do list” app and learn about table views at the same time.
  • MyLocations: This is a biggie in which you build a location-based app that saves its data using Core Data and takes advantage of the camera and photo library.
  • StoreSearch: Build an app that accesses data from a web service.

Each tutorial sells for $24 each, or you can buy all 4 for a mere $54.

Better yet, there’s a way to get the first tutorial for free! If you sign up for the Ray Wenderlich newsletter, they’ll give you the first iOS Apprentice tutorial, which will show you how to build this game:

The AppCoda Blog and its Free iOS Programming Course

appcoda

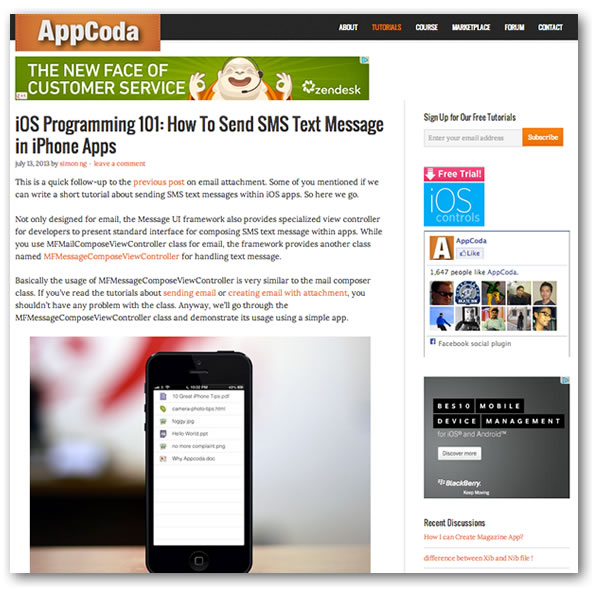
AppCoda is a beautifully-designed blog devoted to the topic of iOS programming. They regularly post “how to” articles for developers, and a good number of these articles put together form a cohesive and free iOS development course. The iOS Programming Course listed on their Course page is currently made up of 28 tutorial articles, a good number of which introduce iOS development through the building of a recipe app.

Local Hero: Ash Furrow and Your First iOS App

your first ios app

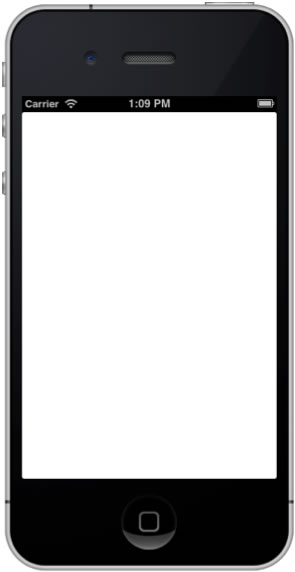
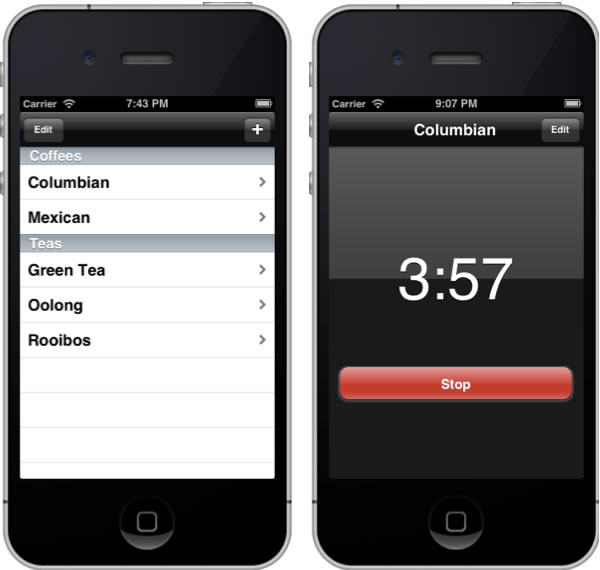
Your First iOS App is an ebook created by Ash Furrow, creator of 500px’s iPad app and an iOS developer at the Toronto-based (and world-famous) design firm Teehan+Lax. Written as a book for people with experience programming but who are new to iOS development, the book introduces iOS development topics by walking you through the development of an app called “Coffee Timer”, from rudimentary program that simply displays a blank screen like this…

blank ios app

…to a fully-fledged app ready for submission to the App Store like this:

completed coffee timer app

…and all in just over 200 pages. It’s well-written and explains iOS programming quite clearly. You can see for yourself; chapter 1 is posted online.

Ash raised the funds for writing the book with an Indiegogo campaign, beat his CDN$5,000 goal by raising $5,542, and published it on LeanPub in DRM-free PDF, ePub and Mobi formats. Your First iOS App is available at a variable price, starting at the low, low, low price of $9.99…

9.99

…with a suggested price of $14.99. I bought my copy at the suggested price to show my appreciation for Ash’s work.

Categories
Uncategorized

iOS 7 Development: Getting iOS 7 on Your iPhone or 5th-Gen iPod Touch / Getting Xcode 4.6.3

ios 7 developmentIn the previous article in this series, I showed you how to get the Xcode 5 preview and the iOS beta SDK up and running on your Mac. That enables you to start writing apps and testing them out on the Simulator.

Of course, it’s one thing to test an app on the Simulator, and it’s another thing to test it on a real iDevice. Running iOS 7 on your device lets you try out your apps in a closer-to-real-world situation, and it also lets you get a better feel for what the new version of the OS looks and feels like. Let’s face it, if you’re going to be developing apps for iOS 7, you’ve got to experience it on a regular basis, so that the apps you write look, feel, and function as though they belong.

Currently, the iOS 7 beta works only on:

  • iPhone 5
  • iPhone 4S
  • iPhone 4
  • iPod Touch (5th -generation only)

You’re going to have to wait if you want to run iOS 7 on an iPad.

Before You Install the iOS 7 Beta on Your iPhone or iPod Touch, Ask Yourself this Question

dirty harry

iOS 7, in its current state is not something for everyone to try. It’s a work in progress that’s being given exposure to developers, designers, and other people in the business of making iOS apps a much-needed advance trial. Since it’s still in development, not all the features are final, it hasn’t yet been fully optimized, and there’s no guarantee that all the known issues have been fixed. A lot of its features may still be subject to change, and any material on it that wasn’t released to the general public by Apple is covered by an NDA (non-disclosure agreement).

The question you must ask yourself is: “Am I a person in the business (or planning to be in the business) of making iOS apps?”

If the answer is “yes”, carry on. If the answer is “no”, and you just want a sneak peek, I suggest waiting.

Prerequisites

You should make sure that you can answer yes to all the following questions:

  1. Are you enrolled in the iOS Developer Program? You can’t get to the download page for the iOS 7 beta without one. It’s a mere US$99 for individual developers.
  2. Are you running the latest version of MacOS? You should be running the latest version of Mountain Lion, a.k.a. version 10.8. I’m running version 10.8.4, and that seems to have worked for me, as my iPhone 4S is running iOS 7 right now.
  3. Are you running the latest version of iTunes? There’s no getting away from iTunes as the go-between for your Mac and your iPhone or iPod Touch, and you’ll need it to transfer iOS 7. I’m running version 11.0.4.
  4. Is your iPhone’s or iPod Touch’s battery charged? Call me paranoid, but I don’t upgrade OSs on my mobile devices unless they’re fully charged. You just want enough charge so that it doesn’t run out during the upgrade process.

Getting the Package

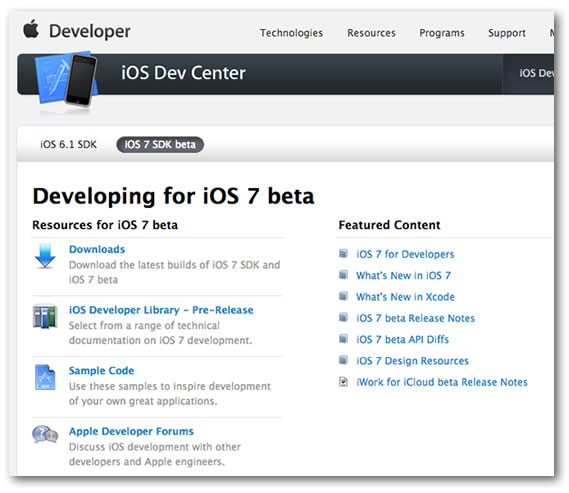
Point your browser at the iOS Dev Center. If you’re properly registered in the iOS Developer Program, you should have the options of looking at resources for iOS 6.1 and iOS 7. Naturally, you should select iOS 7 SDK beta, after which the page should look like the screen capture below:

ios dev center - ios 7 beta

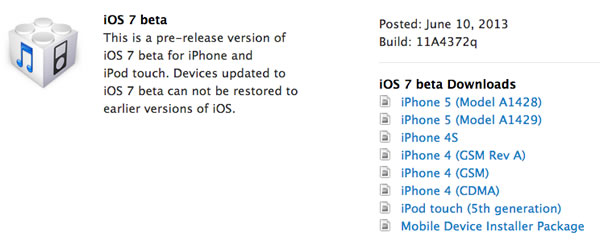
You can click on the Downloads link under the Resources for iOS 7 beta heading, or simply scroll down. Either way, you’ll end up in the same place, where you’ll see this:

ios 7 beta

Download the one that’s appropriate for your phone. I’ve included direct links to the currently available packages below:

The file size might vary from model to model; mine was 1.16 GB.

Installing the Package

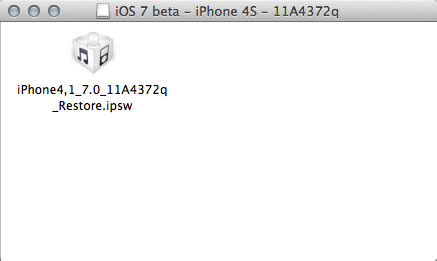
The file that you’re downloading is a disk image. Double-click it to mount the image. You should see one file:

ipsw

Connect your iPhone or iPod Touch via USB to your Mac and start up iTunes. Let the sync complete. Click the iPhone button near the upper right-hand corner of the iTunes window:

iphone button

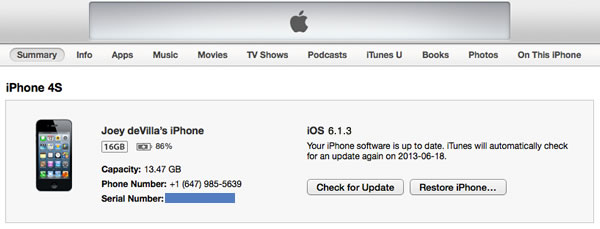
The iTunes window should look something like this:

itunes 01

If you haven’t done so already, back up your iPhone.

And now, the important part of the process. I’m going to spell this out in large text:

While holding down the option or alt key on your keyboard, click the Restore iPhone… button. This allows you to choose a specific file to use when restoring your iPhone or iPod Touch. Choose the .ipsw file contained within the disk image you just mounted.

(That’s how you get iOS 7 on your iPhone or iPod Touch at this early point in the game: you’re restoring it from an image that has iOS 7 on it.)

Once you’ve done that, the uploading and installing process will take about 10 to 15 minutes. Your iPhone or iPod Touch will reboot once or twice during this time.

Getting Xcode 4

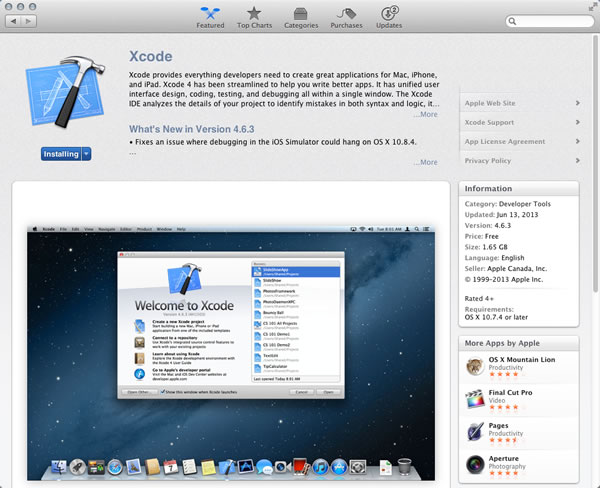
xcode in the app store

Since most discussion of iOS 7 is still under non-disclosure agreement — you can talk about it all you want within the forums inside Apple’s developer site, but not out in public just yet — the best way to show you iOS 7 development is through showing you iOS 6 development. Until the embargo on showing iOS 7 in action is lifted, I’ll show you iOS 6 development, most of which is applicable to developing for iOS 7.

In order to do iOS 6 development, you’ll need the current version of Xcode, version 4.6.3 at the time of this writing. Getting the current version of Xcode is easy: you get it via the Mac App Store, and it’s free-as-in-beer. As I mentioned in the previous article, the current version of Xcode and the Xcode 5 beta can coexist on the same machine. In our explorations of iOS 7 development, I’ll show you iOS 6 code, which you can first try on the current Xcode, and then try out on Xcode 5.

Categories
Uncategorized

iOS 7 Development: Getting and Setting Up Xcode 5 and the iOS 7 SDK

For You, the New-to-iOS Developer, Change is Good

ios 7 developmentAs I mentioned in my previous article, iOS 7 represents more than a change in Apple’s approach to their mobile device user interfaces; it also represents an opportunity for developers who’ve been putting off learning how to build native iOS apps to get started. iOS 7 is the latest in a series of changes that makes the present time the best time for a new developer to try their hand at making apps for the iPhone, iPad and iPod Touch, which include:

Changes at Apple, which in turn will be reflected in their products and technology.

This is only the start of the first wave of products that come after the era of Steve Jobs (the tastemaker) and Scott-Forstall (the technologist), who both brought their own set of design and technology decisions to iOS. Jony Ive, who’s been responsible for Apple’s brilliant chassis designs, is now doing overall design, which includes user interfaces. On the technology side, Craig “Hair Force One” Federighi’s role has expended from just Mac OS to include iOS. While both the old and new guard seem to follow the Apple credo of “a thousand no’s for every yes”, Ive’s and Federighi’s decisions will likely be quite different from those that Jobs and Forstall would’ve made.

Changes in the tools and technology used to build iOS apps.

One of the reasons many people stay away from native iOS app development is that it looks hard. It didn’t help that iOS development required two separate applications, Xcode for code writing and Interface Builder for laying out and setting up user interfaces. Interface Builder is now built into Xcode, and this new, unified application has been refined so that it seems odd to think that they were once separate programs. At the same time, the Objective-C programming language and compiler have undergone a fair amount of modernization. If you have some experience with any currently popular object-oriented programming language, whether it’s C#, Java, JavaScript, PHP, Python, Ruby or Visual Basic, you shouldn’t have too much difficulty making the leap to Objective-C.

Changes in the design philosophy and user interface of iOS.

Before the iPhone’s introduction in 2007, smartphone interaction took place on a physical keyboard, with a trackball, stylus, or wheel acting as a secondary pointing device. iOS veered away from this familiar interface and made the touchscreen the primary input device. This new touch-based interface needed controls that clearly gave away their purpose, and this led to making them look like their physical counterparts: push buttons, toggle switches, dials, and so on. Six years have passed since the introduction of the iPhone, and most mobile devices use the touchscreen as their primary interface. While iOS’s user interface made sense in the world of 2007, in 2013, iOS’ user interface can cast off the “training wheels” it provided to users.

All these changes, taken together, mean that you can approach iOS it as if it were a completely new platform — one that just happens to have a large (and the most active) user base. This “perfect storm” of changes doesn’t happen often — perhaps once a decade — so if you’ve been putting learning iPhone and iPad native app development for “the right moment”, I have news for you: that right moment is now.

You’ll Need to Enroll in the iOS Developer Program

ios developer program enrollment page

You can get the tools for the current version of iOS simply by being enrolled in Apple’s free developer program, but in order to get an early developer look at iOS 7, you need to be registered in the iOS Developer Program. It’s only US$99 a year for individual developers, and it gives you access to all the advance information about iOS 7, as well as the ability to submit your apps for sale in the App Store. The sign-up process is fairly quick, and you can start it at Apple’s iOS Developer Program enrollment page.

Once you’re enrolled, you can start downloading the development tools and iOS 7 for your iDevice, as well as access the resources that they’ve made available to developers.

Getting the Xcode 5 Preview and iOS 7 SDK

xcode preview iconIn order to build iOS 7 apps, you’ll need the Preview version of Xcode 5, the next version of Apple’s IDE. It comes with the iOS 7 beta SDK, which includes the iOS Simulator, which lets you test your apps before deploying them to a real device (or try them out if you don’t have an iPhone, iPad or iPod Touch handy). It has a different name from the current version of Xcode (the current version is Xcode, the preview is called Xcode5-DP), and both versions can be on the same Mac at the same time.

Normally, you would simply get Xcode by downloading it for free from the Mac App Store. However, Xcode 5 is a preview and has not yet been released; you have to download it from the Apple Developer site.

Point your browser at the iOS Dev Center. If you’re properly registered in the iOS Developer Program, you should have the options of looking at resources for iOS 6.1 and iOS 7. Naturally, you should select iOS 7 SDK beta, after the page should look like the screen capture below:

ios dev center - ios 7 beta

You can click on the Downloads link under the Resources for iOS 7 beta heading, or simply scroll down. Either way, you’ll end up in the same place, where you’ll see this:

xcode 5 developer preview Click the Xcode 5 and iOS 7 SDK beta link to start the download. It’s a .dmg file that’s 1.73 GB in size, and when double-clicked, mounts a disk image and opens the window shown in the screen capture below:
xcode dmg window

It’s a straight-forward drag-the-app-to-the-Applications-folder-alias install, and you’re done!

Categories
Uncategorized

New iOS, New Interface, New Opportunity, New Developer Tutorial Series!

iphone running ios 7

The New iOS

iOS 7 was saved for last at Apple’s WWDC 2013 keynote, and rightfully so: it was the announcement that the iFaithful were waiting for. In case you’ve been busy and haven’t yet had a chance to see it in action, here are a couple of videos to get you started. First, the trailer: a 7-minute 29-second promo video with Apple’s “right brain” Sir Jony Ive tackling the visual design aspects and Apple’s new “left brain” Craig Federighi describing the new functionality.

Few companies know how to send subtle messages the way Apple does, whether in their user interfaces or their marketing, so the contrast between Ive (the visual design guy; with no hair, V-neck T-shirt, and an English accent) and Federighi (the software guy; with the coiff that earned him the nickname “Hair Force One”, collared shirt, and an American accent) is an interesting one. I’m certain that “has a personal style that’s quite different from Jony’s” wasn’t the reason they picked Craig to be Senior Vice President of Software Design, but it would be very un-Apple not to play it up. It says “We’ve got looks and brains; a beautiful, usable interface, and some great underlying technology to boot”.

If you’d rather watch the actual WWDC presentation, here are those 33 minutes that were devoted to iOS 7. Jony’s not into doing keynotes, so Craig took the reins. He’s a solid presenter; I’m looking forward to seeing him do more demos in future Apple announcements:

The Changes in iOS 7

ios 7

This is the first post-Seve Jobs/Scott Forstall version of iOS, and it shows. As Jon “Daring Fireball” Gruber wrote in his post-keynote article:

…in some ways Apple’s software design has gotten better, because it was Jobs (and Forstall) who had a penchant for exuberant textures and gimmickry. Jobs’s taste in hardware was nearly perfect, but his taste in software had a weakness for the saccharine. Wood grain, linen, Rich Corinthian leather, etc. It was all just sugar for the eyes. This is a weakness Jony Ive’s software taste clearly does not suffer.

Application designers and developers generally take their cues from the designers of their target operating systems. iOS shared Steve Jobs’ taste for skeuomorphic, and it showed in app such as the built in Compass, with its polished wood and brass UI:

old ios compass

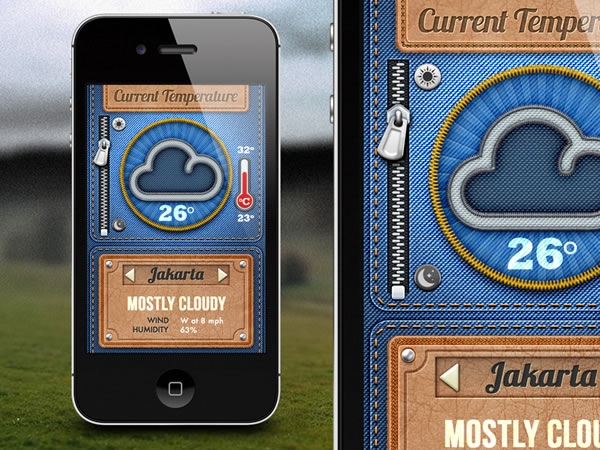
Many iOS developers took that fascination with simulated three-dimenisonality, real-world objects, and realistic textures to strange new heights. If you want to see some of the most over-the-top examples of these designs, point your browser at the Skeu It! site and be prepared to facepalm:

denim weather app

It’s hot and humid today…in my pants!
A lot of apps feature texture for texture’s sake.

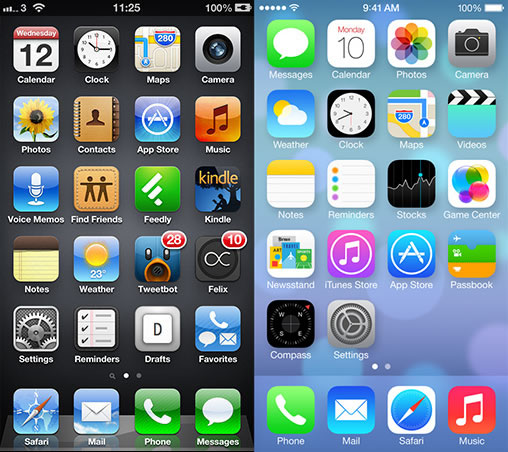
The new iOS represents a step away from the simulated 3-D, literalist approach to user interfaces and towards a flatter, simpler, brighter look. Note the differences between the icons for standard apps in iOS 6 and 7:

home screens ios 6 and 7

iOS 6 / 7 screen comparison from Matt Gammel’s writeup.

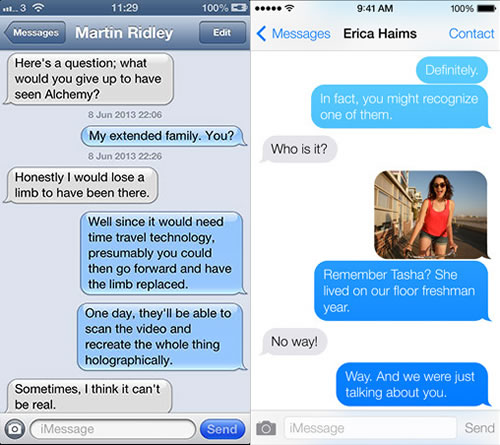
Here’s one of the most-used built-in apps, Messages, in iOS 6 and 7.:

messages in ios 6 and 7

iOS 6 / 7 screen comparison from Matt Gammel’s writeup.

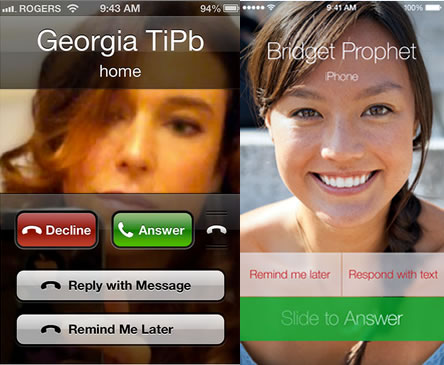
This is what you see when you get a phone call in iOS 6 and 7:

phone screens ios 6 and 7

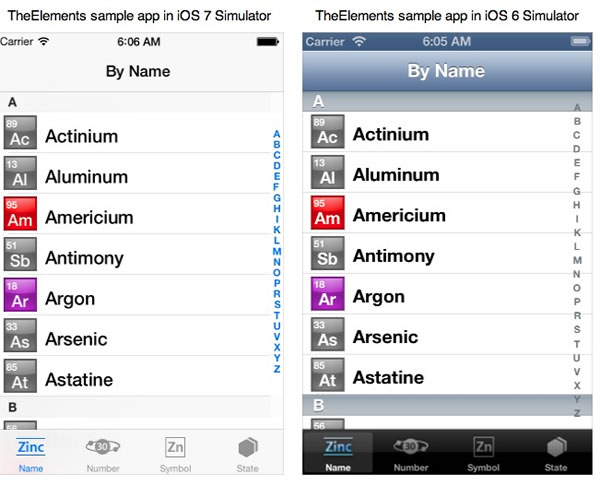
…and here’s a side-by-side comparison of the sample “periodic table” app, “TheElements”, in iOS 6 and 7:

elements sample app in ios 6 and 7

As you can see (and as the tech press has been reporting), they’ve gone to a “flatter” interface, with a greater emphasis on text and the removal of a lot of UI “chrome”.

The best writeup covering the user interface changes in iOS 7 that I’m aware of it Matt Gemmell’s. Published a mere two days after the WWDC keynote and the availability the iOS 7 beta to developers, it’s as a complete an overview of the changes as we’ll see for the time being. If you plan on designing applications for iOS 7, it’s a worthwhile read.

The Developer Opportunity

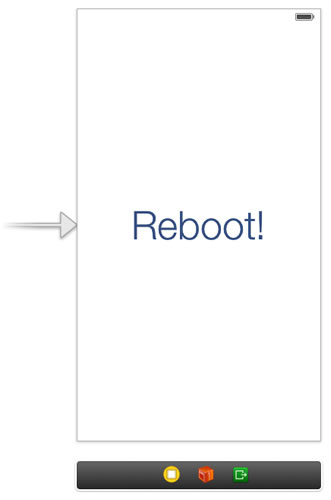
reboot

If you’re a developer who’s been meaning to get into iOS development but worry that you’re starting from way behind the curve, the redesign in iOS 7 is a disruption that works in your favour. While apps written for previous versions should work, they’ll seem out of place and maybe even archaic in iOS 7’s new UI. Marco Arment, in a post titled Fertile Ground says that this is great news for you:

Apple has set fire to iOS. Everything’s in flux. Those with the least to lose have the most to gain, because this fall, hundreds of millions of people will start demanding apps for a platform with thousands of old, stale players and not many new, nimble alternatives. If you want to enter a category that’s crowded on iOS 6, and you’re one of the few that exclusively targets iOS 7, your app can look better, work better, and be faster and cheaper to develop than most competing apps.

This big of an opportunity doesn’t come often — we’re lucky to see one every 3–5 years. Anyone can march right into an established category with a huge advantage if they have the audacity to be exclusively modern.

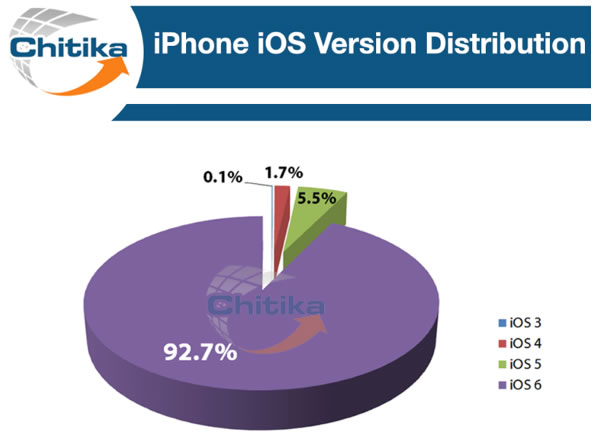
Another thing to keep in mind is that iOS users tend to upgrade quickly. In a world where it’s still not all that unusual to see a machine running Windows XP or where a third of the Android devices out there are running version 2.3, iOS users set themselves apart by keeping up to date. According to Chitika, almost 93% of iPhone users are running the current version of iOS:

iphone ios version distribution

Click the graph to see the source article.

All this means is that it’s not too late to learn how to develop for iOS, especially if you start now.

Regular iOS Developer Articles, Here on Global Nerdy

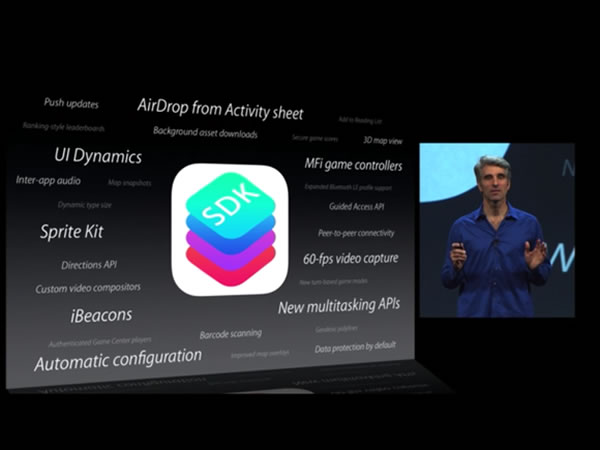
new ios features at wwdc

If you search around the web for developer courses or “boot camps” for iOS and Android, you’ll find that they’re

  • Quite short, running anywhere from 2 to 5 days, and
  • Quite expensive, running anywhere from $900 to almost $4000

iOS 7 developmentThere are some people who benefit from getting started by taking a course: perhaps they need the structure of a classroom to give them initial momentum, or perhaps it’s the idea of having to pay for a course that motivates them (just a smokers who pay to join a “quit smoking” program have been observed to be more successful in quitting than those who spent no money). If you feel that classes would help you get started and you have the money — or someone, perhaps your employer, does — by all means, take them.

However, if you don’t have the money to attend an iOS development course or boot camp, or if you want to supplement your courses, keep coming back to Global Nerdy. I’ll be posting articles on iOS 7 development on a regular basis, sharing tips and tricks, pointing you to valuable resources, and generally presenting information that you, the developer new to iOS 7, will find useful. Watch this space!