I’ll admit it: I’ve gotten a little used to working at smaller companies, where there’s no monitoring of company computers, and it’s the Wild West as far as what you can install on them.
![]() That’s no longer the case for me. I now work at Auth0, a company with a headcount that’s quickly approaching 800, with unicorn status and Series F funding, and it’s in the security industry. Naturally, there’s a full-fledged security team that monitors company-issued computers.
That’s no longer the case for me. I now work at Auth0, a company with a headcount that’s quickly approaching 800, with unicorn status and Series F funding, and it’s in the security industry. Naturally, there’s a full-fledged security team that monitors company-issued computers.

In my excitement to take the new version of macOS — Big Sur — out for a spin, I’d forgotten that the Security team hasn’t yet approved it for use. They very quickly (and I should add, nicely) contacted me and let me know that I needed to reinstall macOS Catalina as soon as possible.
There are other reasons why you might need to go back to Catalina after installing Big Sur:
- It’s still very new, and very new versions of operating systems always have some set of issues, whose effects can run the gamut from mildly annoying to catastrophic. If you can’t afford to lose time dealing with these issues, you should wait for the updates.
- There are reports that the current version can “brick” MacBook Pros from the 2013 / 2014 era. This isn’t a problem if you’re keeping your old 2013 / 2014 machine around as a backup, but more serious if you’re still using it as your main computer (and yes, a 2013 / 2014 Mac is still a perfectly good machine, even for development work).
- If you’re a DJ or music producer, Big Sur currently has compatibility problems with some of the hardware and software. If you want to keep DJing, producing, or mixing on your Mac, stay on Catalina for a little bit.
For the benefit of any who need to downgrade, here’s a step-by-step guide to reinstalling Catalina after you’ve installed Big Sur. You’ll need a USB key and the better part of an afternoon.
Step 1: The preliminaries
1a: Start downloading the Catalina installer from the App store
The first thing you’ll need is the macOS Catalina installer.
Here’s the link to the Catalina installer on the App Store.
It’ll take up around 9 gigabytes of space on your hard drive, and the App Store will put in your Applications folder.
Once it’s completely downloaded from the App Store, the installer will start automatically. When this happens, close the installer. You’ll make use of it later.
The installer will take some time to download. Apple’s servers will be busier than usual, as many users are downloading Big Sur and other upgrades.
1b: Back up your files!
In the process of reinstalling Catalina, you’ll need to completely erase your Mac’s hard drive. If you have any files that you can’t live without, this is the time to back them up.
I didn’t have to worry about this, since:
- All my work product is either code (which lives on GitHub) or content (which lives on GitHub or Google Docs), and
- I’ve been at Auth0 less than a month, and between onboarding and offsites, there just hasn’t been that much of a chance for me to accumulate that many files on my hard drive!
1c: Get a nice fast USB key that stores at least 16 GB
The process will involve booting your Mac from a USB key containing the macOS Catalina installer, so you’ll need a key with enough space. An 8 GB USB key won’t be big enough. Because digital storage is all about powers of 2, the next size up will be 16 GB.
I strongly recommend that you use a USB 3 key, especially one with read speeds of 300 megabits/second or better, such as the Samsung Fit Plus. Doing so will greatly speed up the process. Don’t use a USB key that you got as conference swag — it may have the space, but more often than not, they tend to be slow, because they’re cheap.
If the USB key contains files that you want to keep, back them up. You’re going to erase the key in the next step.
Step 2: Make a bootable USB key containing the macOS Catalina installer
2a: Format the USB key
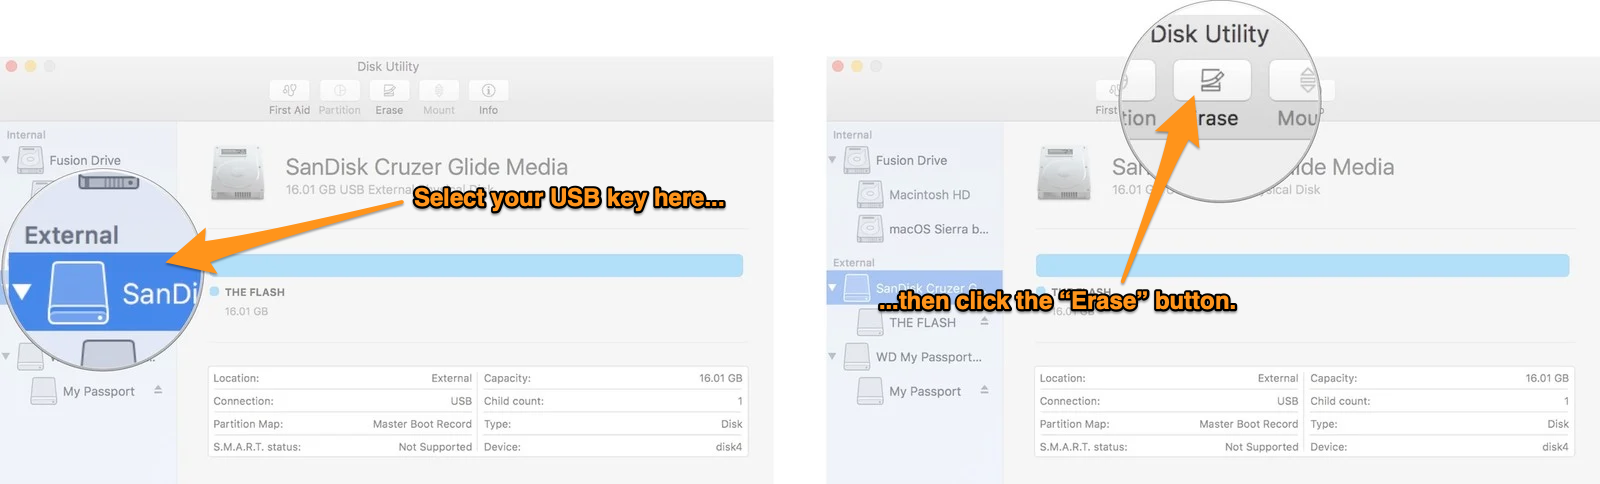
Plug the USB key into your Mac, then launch Disk Utility.
Select the USB key in Disk Utility’s left column, then click the Erase button:
You’ll be presented with this dialog box:
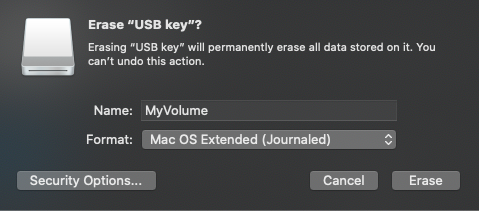
Enter MyVolume into the Name field, and for Format, select Mac OS Extended (Journaled). Click the Erase button. This will format the USB key with the volume name of MyVolume.
2b: Install the macOS Catalina installer onto the USB key
In Step 1a, you downloaded the macOS Catalina installer and closed it after it started automatically. In this step, you’ll transfer it to your freshly-formatted USB key.
Open a terminal window and paste the following command into it:
sudo /Applications/Install\ macOS\ Catalina.app/Contents/Resources/createinstallmedia --volume /Volumes/MyVolume
(The command above assumes that you gave the USB key the volume name MyVolume.)
Once you’ve provided sudo with your password, you’ll be asked if you want to erase the USB key. Entering Y in response will start the process of making the USB key a bootable drive and copying the macOS Catalina installer onto it:
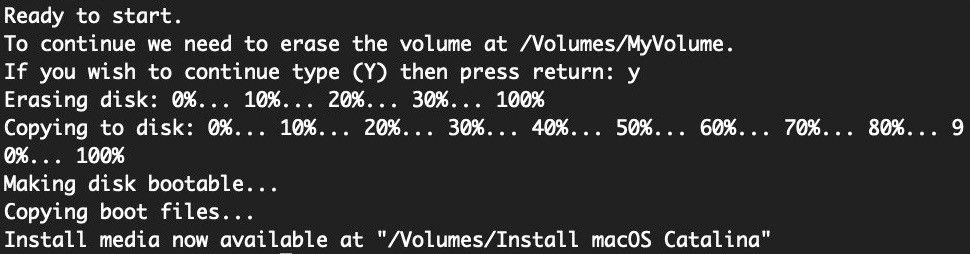
The Erasing disk process will be relatively quick, but the Copying to disk process may take a while. This is where using a nice, fast USB 3 key will pay off.
Be patient and let it get to 100%, and wait for the Install media now available message to appear and the command line prompt to return.
2c: If your Mac is from 2018 or later, set it up to boot from external media
Check the year of your Mac’s manufacture by selecting About This Mac under the Apple menu:
- If your Mac year is 2017 or earlier, you don’t need to follow the rest of this step. Proceed to Step 3.
- If your Mac’s year is 2018 or later, you’ll need to change its security settings to allow it to boot from an external drive.
Here’s how you change the security settings:
- Restart your Mac and hold down the ⌘ and R keys when you see the Apple logo. This puts the computer into recovery mode, which provides many setup options.
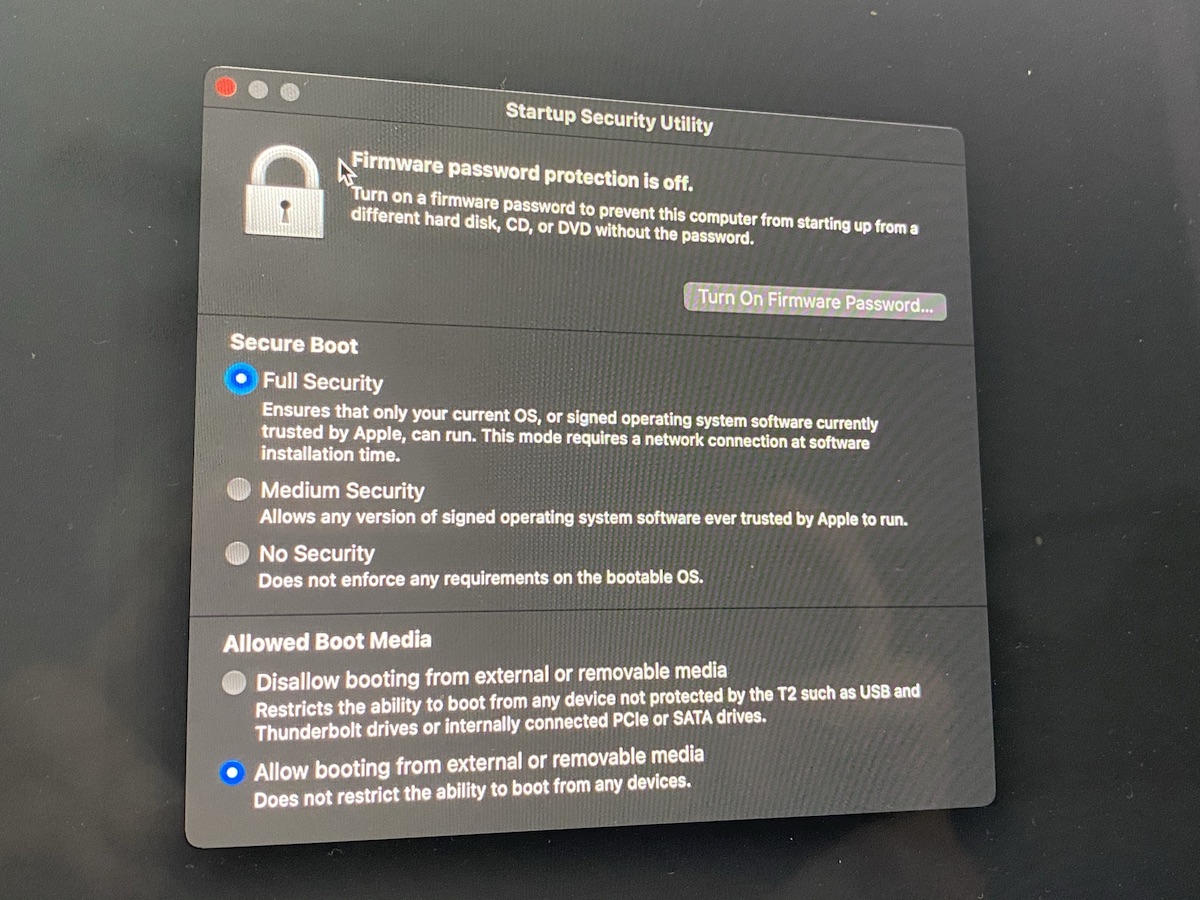
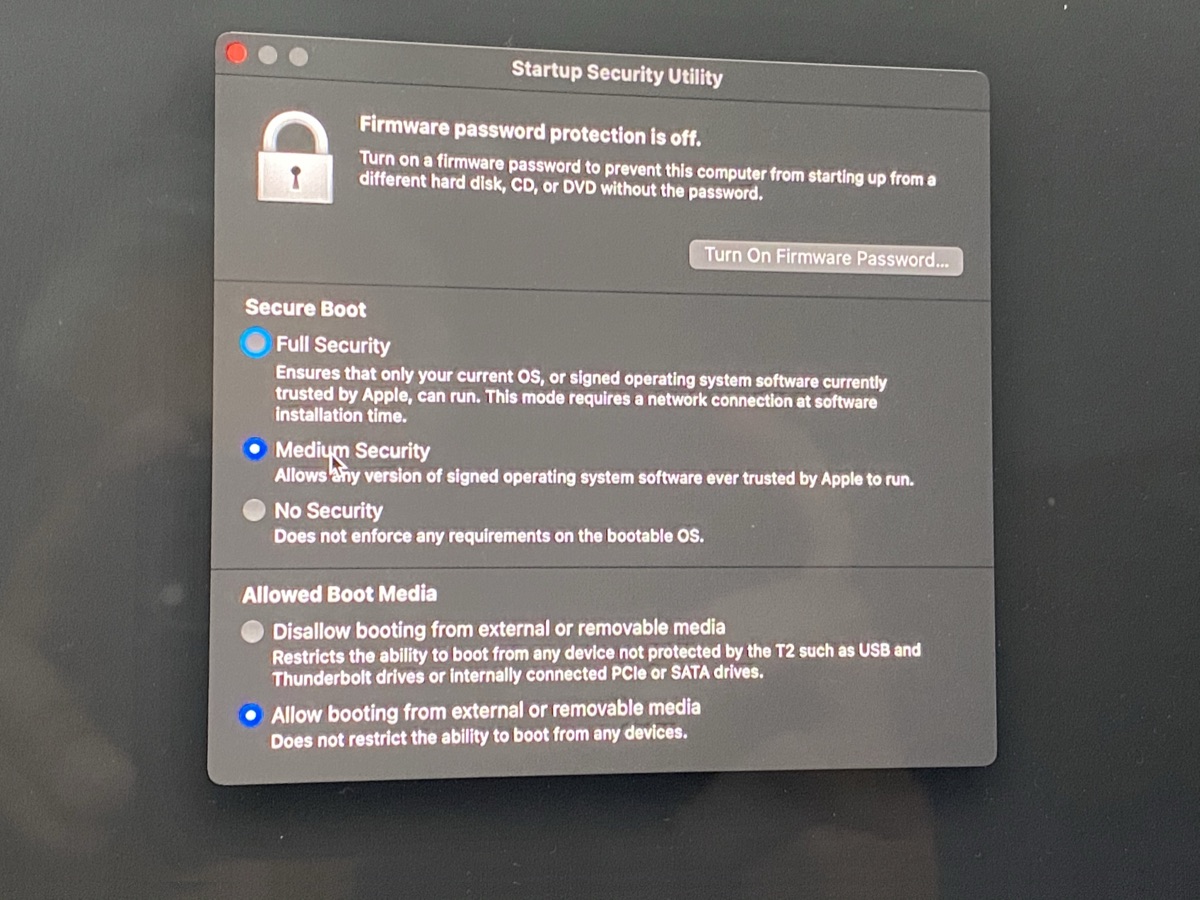
- In the menu bar, select Utilities, and then select Startup Security Utility from the list that appears.
- The Startup Security Utility window will appear:
- Under the Secure Boot section, select Medium Security. This will allow you to install Catalina without having to connect to a network.
- Under the External Boot section, select Allow booting from external media. This will allow you to install Catalina from a USB key or disk drive.
Step 3: Install macOS Catalina
Restart your Mac, and hold down the Option key while it restarts. Your Mac will present you with a choice of startup disks.
Choose the USB key. Your Mac will boot up and you’ll be presented with the macOS Catalina installer screen:
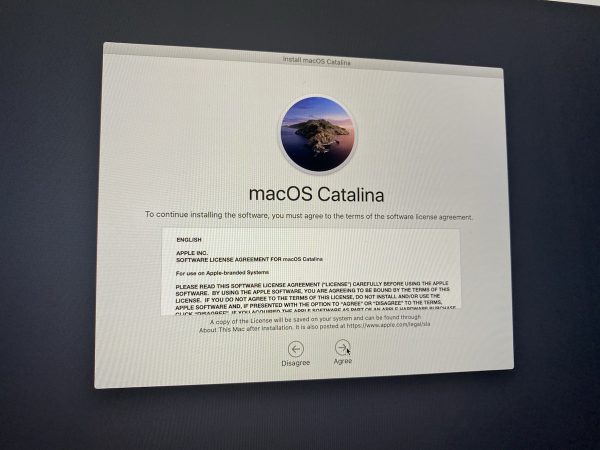
Go ahead and install Catalina.
Once Catalina is installed, you can proceed reinstalling your other software.
Once that’s complete:
- If your Mac’s year is 2017 or earlier, you’re done installing Catalina. You can now go about reinstalling your software and restoring your backed up files.
- If your Mac’s year is 2018 or later, you’ll need to restore its original security settings. The process is described in Step 4, below.
Step 4: If your Mac is from 2018 or later, restore the original security settings
If your Mac is from 2018 or later, follow these steps to restore the original security settings once Catalina has been installed:
- Restart your Mac and hold down the ⌘ and R keys when you see the Apple logo. This puts the computer into recovery mode, which provides many setup options.
- In the menu bar, select Utilities, and then select Startup Security Utility from the list that appears.
- The Startup Security Utility window will appear:
- Under the Secure Boot section, select Full Security.
- Under the External Boot section, select Disallow booting from external media.