Categories
Meetups Mobile Programming What I’m Up To

This Monday: Build a “Magic 8-Ball” app at the Tampa Bay Apple Coders Meetup!

This Monday — Monday, July 31st — I’ll hold another Tampa Bay Apple Coding Meetup at Computer Coach, where we’ll continue our exploration of building iOS apps by building an app that mimics the classic toy, the Magic 8-Ball.

Join us at Computer Coach on Monday, July 31st at 6:00 p.m. and learn how to build simple but interesting iOS apps! Register here — it’s free, and we’ll provide food as well!

A little practice exercise before the meetup

Don’t worry, this isn’t mandatory, but if you’re new to Xcode (or new-ish), you might want to try out this simple app exercise beforehand, just to get comfortable with the tools.

In order to do the exercise below — as well as the exercises at the meetup — you’ll need Xcode, the development tool for building applications for all things Apple. The simplest way to get it is to the Mac App Store. Follow this link, and you’ll be on your way to downloading and installing Xcode.

Once you’ve installed Xcode, launch it and follow the steps below. The app you’ll make is simple, but the exercise will get you used to working with the tools.

Create a new project

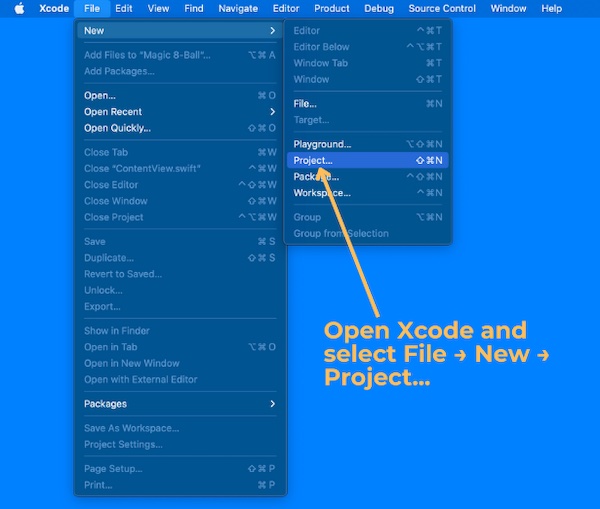
Open Xcode. From the File menu, select New, then Project.

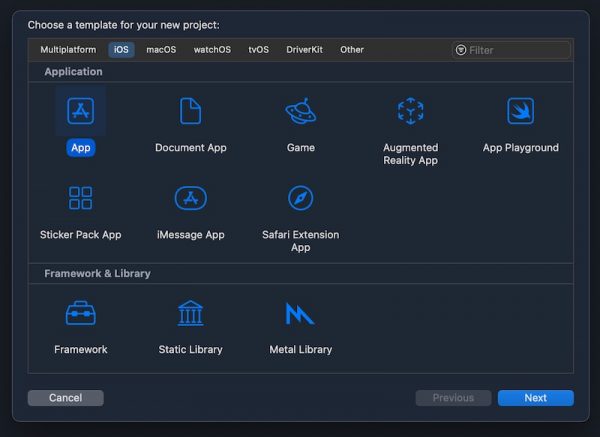
You’ll see this window pop up:

The “Choose a new template” window in Xcode. The “iOS” tab and “App” icon are selected.

This window lists templates for the different kinds of projects that you can build using Xcode. Templates are starting points for projects that contain just enough code to actually work, but they do little more than display a blank (or mostly blank) screen.

Make sure that the selected template category near the top of the window is iOS and that App is the selected template. Then click the Next button.

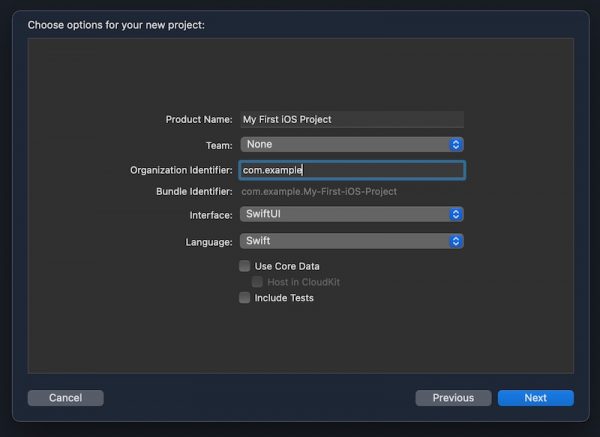
The contents of the window will change to this:

The “Choose options for your new project” window in Xcode. The “Product Name” text field contains “My First iOS Project”, the selected Team is “None”, and the “Organization Identifier” text field contains “com.example”.

This window lets you choose options for the project you’re creating. For simplicity’s sake, we’ll take the approach you might take if you’d just installed Xcode and don’t have an Apple Developer account. Here’s how you should fill out this screen:

  • Product Name: My First iOS Project
  • Team: Select None.
  • Organization Identifier: Use com.example (or, if you own your own domain, use it, but in reverse — for example, if you own the domain abcde.net, you’d enter net.abcde into this field).
  • Interface: Go with the default SwiftUI.
  • Language: Go with the default Swift.
  • Leave the Use Core Data and Include Tests checkboxes unchecked.

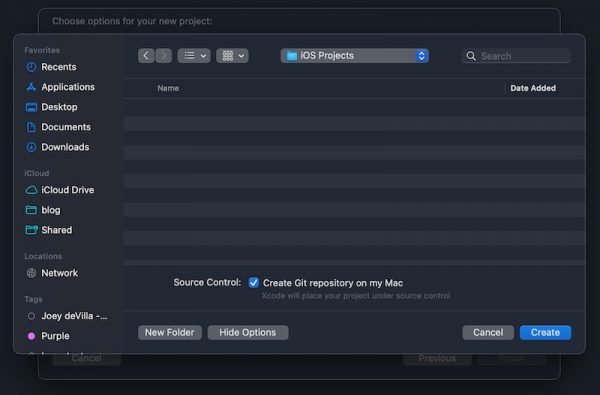
Click the Next button, and you’ll see this:

The file dialog box.

Select a place to save the project, then click Create.

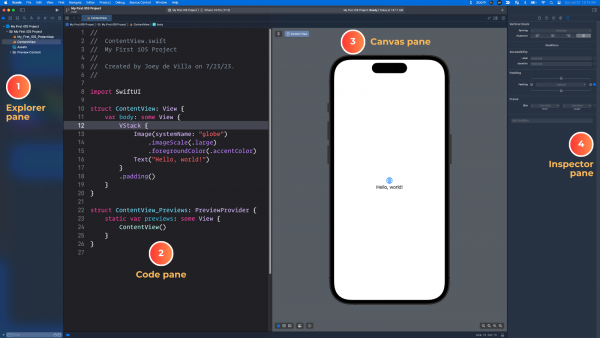
Xcode now has all the information it needs to build a basic iOS app project. It will build this project and then present the full Xcode interface, as shown below:

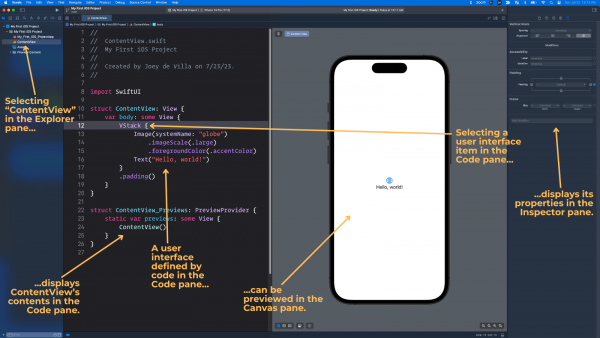
The Xcode window has four general areas, which I’ve numbered in the screenshot above:

  1. The Explorer pane. The leftmost pane of the Xcode window contains a set of Explorers, which is a set of menus that let you look at different aspects of your project. The one you’ll probably use most is the Project Explorer, which lists the project’s files and allows you to select the file you want to view or edit.
  2. The Code pane. This is where you’ll read, enter, and edit code. You’ll use this pane a lot.
  3. The Canvas pane. This pane lets you preview what the user interface will look like in real time, as you enter code that defines the it.
  4. The Inspector pane. The rightmost pane lets you get details about any code or user interface element that you currently have selected.

As I said earlier, when you create a new Xcode project, Xcode builds in enough code for a very bare-bones application.

Run the project

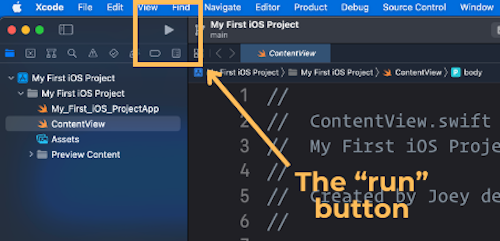
Take a look at that application in action — click the Run button (located near the top of the screen; it looks like a ▶️ or “play” button)…

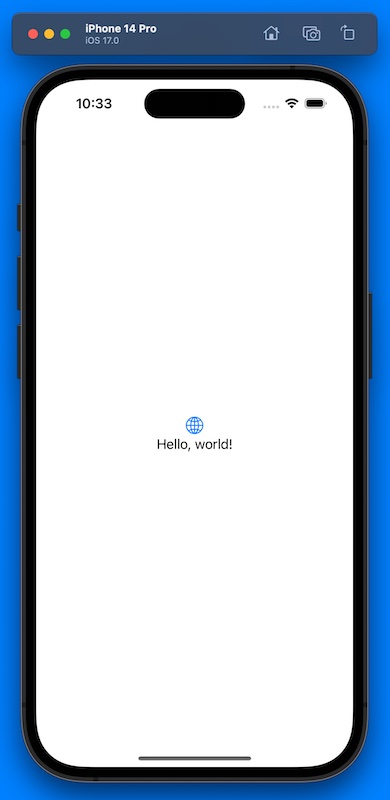
…and Xcode will launch the iOS simulator, which imitates an iOS device. Give it a few seconds to launch, and then you’ll see this:

The app doesn’t do anything other than display a 🌐 icon and the text “Hello, world!” In this exercise, we’ll take this starter app and make it do a little more, adding user interface elements along the way.

The ContentView file

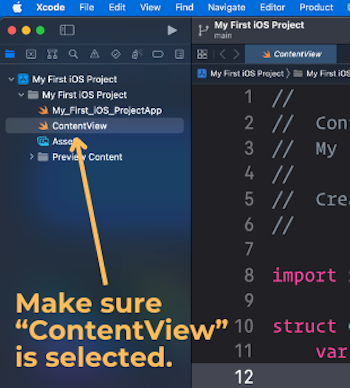
Let’s take a closer look at the code. First, look at the Explorer pane and make sure that ContentView is selected:

ContentView is a file, and the code inside it defines the app’s one and only screen looks and works.

Here’s the code inside ContentView:

struct ContentView: View {
    var body: some View {
        VStack {
            Image(systemName: "globe")
                .imageScale(.large)
                .foregroundColor(.accentColor)
            Text("Hello, world!")
        }
        .padding()
    }
}

struct ContentView_Previews: PreviewProvider {
    static var previews: some View {
        ContentView()
    }
}

Structs

You’ll see that the code is divided into two blocks, each beginning with a keyword: struct, which is short for “structure.” If you’re familiar with object-oriented programming languages like Python or JavaScript, you should think of Swift’s structs as being like classes: they’re “blueprints” for objects, and can have properties and methods.

There are two structs in the ContentView file:

  1. ContentView, which defines what appears on the screen when you run the app.
  2. ContentView_Previews, which displays ContentView in the Canvas pane, allows you to see what ContentView will look like while you’re coding the app.

For now, let’s just look at ContentView.

The ContentView struct

When you create a new iOS app project in Xcode, Xcode creates a “starter” project for an app with a single screen. Xcode gives this screen a default name: ContentView.

The name ContentView is arbitrary. You could rename it MainScreen or HelloWorldDisplay, and it would still work. Many developers change the name of ContentView immediately after they start a new iOS app project, but for this exercise, we’ll just stick with the name.

Let’s take a look at the first line of ContentView:

struct ContentView: View {
  • The struct ContentView part of the line declares ContentView as a struct.
  • The : View part says that ContentView adopts or conforms to the View protocol:
    • If you’ve programmed in C#, Go, Java, PHP, or Python 3.8 and later, think of a Swift protocol as being similar to an interface.
    • If you’re not familiar with interfaces but have programmed in an object-oriented programming language like JavaScript or Python prior to version 3.8, think of protocols as a loose form of inheritance.

You can think of the line struct ContentView: View { as saying “This is a struct named ContentView, which includes the properties and methods of a View object.”

Now let’s look at what’s inside ContentView:

var body: some View {
    VStack {
        Image(systemName: "globe")
            .imageScale(.large)
            .foregroundColor(.accentColor)
        Text("Welcome to the app!")
    }
    .padding()
}

Pay particular attention to that first line:

var body: some View {

ContentView contains just one thing: a variable. That’s it!

  • The var body part of the line declares body as a variable.
  • The : some View part says that body contains some kind of object that adopts the View protocol.

You can think of the line var body: some View { as saying “This is a var named body, which contains some kind of View object.”

The View protocol

The term “view” has a specific meaning in non-web GUI programming. It’s used to refer to any of the following:

  • A user interface element such as static text, a text field, a button, a switch, an image, and so on, or
  • A container for other user interface elements.

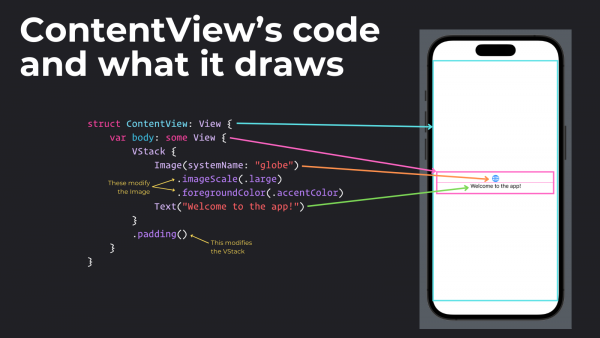
Here’s the code for ContentView and the resulting screen that shows the connections between the code and the views it creates:

Tap to view at full size.
  • ContentView is a plain View. It functions as the app’s one and only screen, and it contains that screen’s views.
  • Inside the ContentView is a VStack, which is a kind of View whose name is short for “vertical stack.” Like ContentView, VStack is a view that contains other views, but the views it contains are arranged in…you guessed it: a vertical stack or column.
  • Inside the VStack are two other views whose purposes you can get from their names:
    • Image: This view displays images.
    • Text: This view displays static text — the kind that the user can’t edit.

All of these things listed above adopt the View protocol, which means:

  • They are either a user interface element or a container for user interface elements, and
  • They include the properties and methods of a View object.

Let’s talk about that second point: that in order to adopt the View protocol (or more loosely, to be a kind of View), a struct includes the properties and methods of a View object.

There’s only one required property an object needs to adopt the View protocol: it just needs to have a variable named body, whose type is some View. body is a property that contains some kind of user interface element or a container for user interface elements.

In the case of ContentView, which adopts the View protocol, its body property contains a VStack. That VStack contains an Image view and a Text view.

The Text view

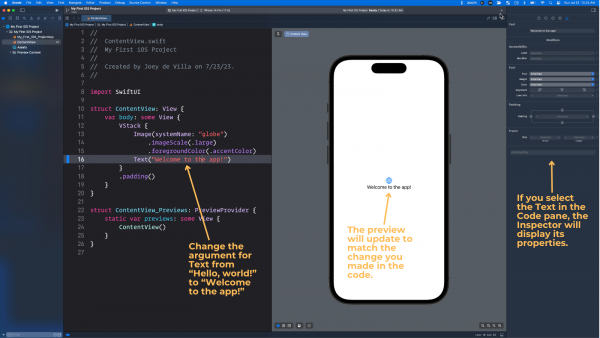
Let’s play around with the Text view first. Find the line inside ContentView that looks like this:

Text("Hello, world!")

And change it to this:

Text("Welcome to the app!")

You should see the preview in the Canvas pane update to match the change you made:

Tap to view at full size.

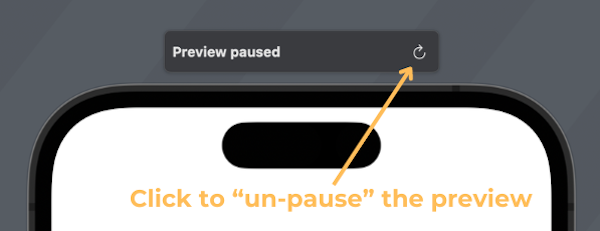
If for some reason the preview didn’t update, look for the text “Preview paused” at the top of the preview and click the “refresh” icon to “un-pause” it:

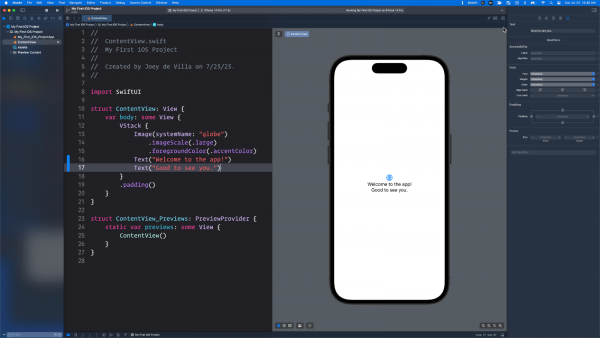
Add a new line after the Text:

Text("Good to see you.")

This should add a new Text view to ContentView, and Xcode’s preview should update to reflect the change:

Tap to view at full size.

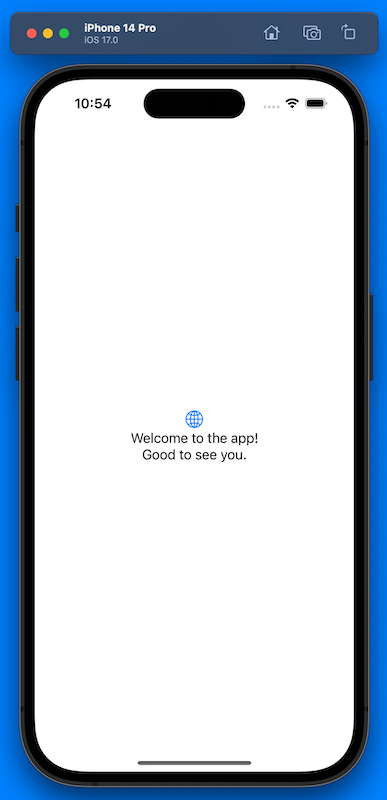
Run the app. The preview will pause and the Simulator will start up and launch the app, which will look like this:

Notice that running the app in the Simulator pauses the preview. Running the app in the Simulator or making big changes to the code causes the preview to pause, but you can always restart it by either:

  • Clicking on the “refresh” icon at the top of the preview, or
  • Using the keyboard shortcut command + option + p

Text view modifiers

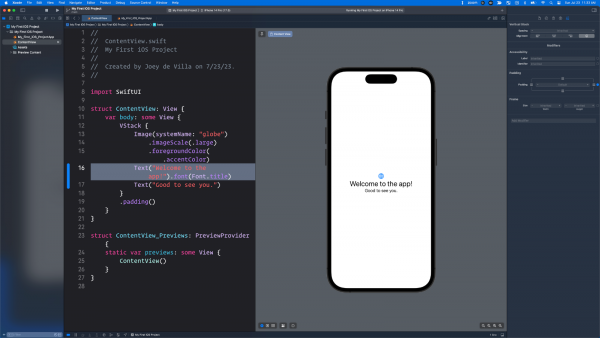
Let’s make the “Welcome to the app!” message on the screen larger — it should be the size of a title. Do this by changing the line that creates that Text view to the following:

Text("Welcome to the app!").font(Font.title)

Run the app or restart the preview — it should look like this:

I’ll cover more in Monday’s session, but feel free to experiment!

Categories
Mobile Programming

My “Working with dates and times in Swift” articles on the Auth0 blog

Swift (or more accurately, the Foundation framework from which Swift gets its date and time classes) gets a bad rap for complex date and time programming, but that’s because date and time programming is complex, and many programmers have erroneous ideas on the topic.

This blog used to be home to a four-part series on date and time programming in Swift. I’ve recently updated that series and moved it to the Auth0 Developer Blog (the one that has much greater reach and also pays my mortgage). It’s also a four-parter:

  1. Introduction to Date and Time Programming in Swift, Part 1: Learn how to create dates and times using Swift’s powerful date and time objects.
  2. Introduction to Date and Time Programming in Swift, Part 2: Now that you can create dates and times in Swift, learn how to display date and time values to your users.
  3. Date and Time Calculations in Swift, Part 1: Learn how to perform date and time calculations with Swift’s powerful date and time objects.
  4. Date and Time Calculations in Swift, Part 2: Improve your Swift date and time calculations with syntactic magic.

With these articles, you’ll be able to answer questions like:

  • What will the day and time be 10,000 hours into 2023?
  • What date is the first Friday of 2024?
  • What date is the first National Donut Day of 2023?
  • What date is the Thursday of the 33rd week of the year?
  • What is the actual date of September 50, 2023?
  • What day of the week and week of the year will April Fools’ Day 2023 fall on?
  • What’s 3:30 p.m. Pacific on the 3rd Thursday of July in the Coptic Calendar system in Melbourne, Australia’s time zone?
  • When does a 90-day warranty that starts today expire?
  • What is the date of the next Sunday? Or the previous Sunday?
  • When is the next Friday the 13th? How many Friday the 13ths will there be in 2024?
  • Can you write code like this:
let futureDate = (2.months + 3.days + 4.hours + 5.minutes + 6.seconds).fromNow

I answer all of these questions in this series, so check these articles out!

Categories
Programming Reading Material

My tutorial on iOS authentication using SwiftUI and Auth0

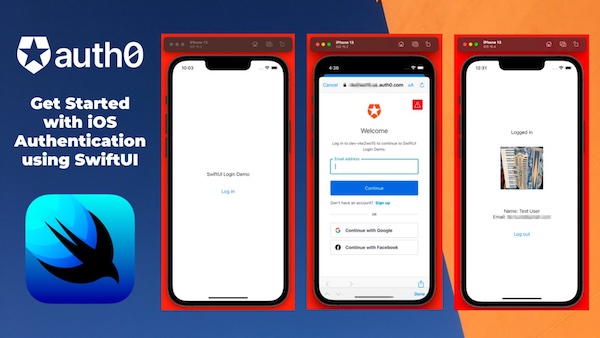
Banner: Get Started with iOS Authentication using SwiftUI

Hey, iOS developers! My latest tutorial article on the Auth0 blog shows you how to easily add authentication (that is, login and logout) to SwiftUI apps and display information from their user profile.

The article demonstrates the most basic use of the Auth0.swift SDK, the Auth0 SDK for all Apple platforms — not just iOS, but macOS, iPadOS, watchOS, and tvOS. It’s Auth0’s third most-used SDKs, accounting for more than one in ten API requests to Auth0 systems!

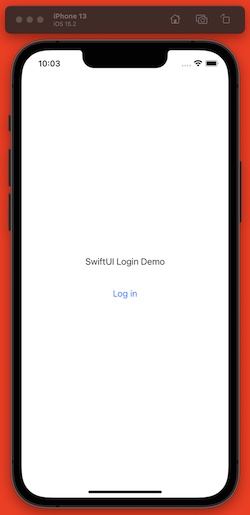
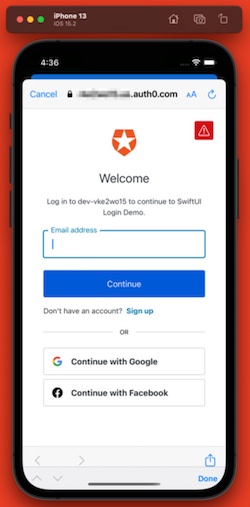
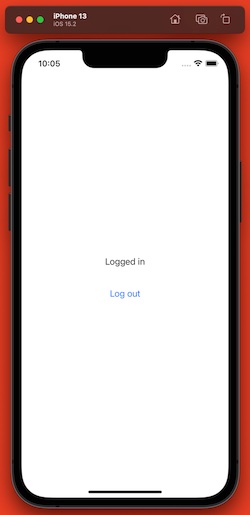
It’s a two-part tutorial. Part 1 of the tutorial starts with File → New Project…, adds some basic interactivity, adds the Auth0.swift package, walks you through setup on the Auth0 side, and finally enables login and logout:

iOS Simulator screen shot: Screen with title “SwiftUI Login Demo” and “Log in” button.
The app’s “logged out” screen.
iOS Simulator screen shot: Auth0 Universal Login screen.
Auth0’s Universal Login.
iOS Simulator screen shot: Screen with title “Logged in” and “Log out” button.
The app’s “logged in” screen.

Part 2 of the tutorial takes your basic login/logout app and gives it the ability to read user information from the user profile and display it onscreen:

iOS Simulator screen shot: Screen with title “Logged in”, photo of user, user]s name and email address, and “Log out” button.
The revised “logged in” screen.
Categories
Mobile

Possible uses for unlisted apps in the Apple App Store

Apple’s announcement of a support for unlisted apps in the App Store opens up some interesting possibilities. Here are a few that I can think of.

What are unlisted apps?

Apple’s new way to distribute apps via the App Store is an interesting one: unlisted app distribution. The simplest way to describe them is that they’re like unlisted YouTube videos, but for apps.

In other words, you can only get an unlisted app if you have its link. You won’t find it by browsing the App Store or using its search feature. They won’t appear as featured apps or recommended app. They will be accessible via Apple Business Manager and Apple School Manager. But for the most part, they’re invisible and inaccessible to the general public unless you have their link.

Keep in find that “unlisted” doesn’t mean “unexamined”. Unlisted apps are still subject to the regular the app review process; the unlisted status only affects how they can be found. This means that you can’t use it as a replacement for TestFlight or beta testing — unlisted apps must be ready for final distribution.

It also appears that you can convert any of your apps that are already in the App Store into unlisted apps.

How can you use unlisted apps?

1. Employee apps for smaller companies

Many companies produce dedicated, proprietary custom internal-use apps for their employees to use in order to get their work done. If your company has the required budget and people to do so, it can distribute those apps through the Apple Developer Enterprise Program.

The Apple Developer Enterprise Program be overkill for a lot of smaller organizations, who might just want to limit the availability and findability of their apps to their employees. This is where unlisted apps come in — the company could just send employees the link to the app.

2. School apps for students and teachers

Take the above scenario and replace “companies” with “schools” — especially smaller ones — and the same use case arises. It could be a simple way to limit the distribution of school-specific apps mostly to students, teachers, and staff.

3. Limited-time conference/convention/concert companion apps

Many conferences and concerts like to have their own custom apps, and it’s not unusual for developers to create conference apps that they wish existed (for example, Tampa’s 2020 Synapse Summit didn’t have its own watch app, so I created one).

These apps have a limited lifetime, and once the conference has come and gone, they just litter the App Store. Unlisted apps would be a good solution.

4. Limited-time research apps

Since smartphones and smartwatches are essentially sensor-laden, constantly-networked, always-on supercomputers that people keep within arm’s reach most of the time, they are useful tools for research project apps that either monitor test subjects or get input from them. These apps could easily be distributed as unlisted apps.

5. Portfolio/resume apps

There are times when a developer might want to present their portfolio in a memorable way, and an app that functioned as a portfolio would certainly be memorable! A portfolio app would be a good use case for unlisted apps.

Categories
Programming

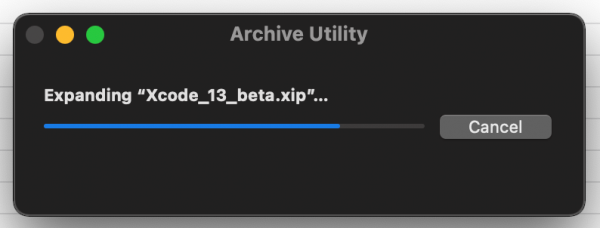
Xcode 13 beta is available now!

Tap to view at full size.

The first day of WWDC ’21 has come and gone, which means that the beta for the upcoming version of Xcode is available now!

If you’ve been itching to try out the new Xcode (and especially the new SwiftUI), you can get it at Apple’s Developer site’s Downloads page. It’s currently installing on my machine as I write this.

Let’s do this.

Just a quick warning if this is your first time working with Xcode: the installation process can take a while. On my Auth0-issued 2019 MacBook Pro (2.6 GHz 6-core i7, 16 GB RAM), it took about a half hour or so to unzip itself into a functioning application.

Categories
Programming

How to program an iOS text field that takes only numeric input or specific characters with a maximum length [Updated]

Check out this update (May 24, 2016)!

update

The material in this article is still applicable, but you’ll also want to read a newer one titled A better way to program iOS text fields that have maximum lengths and accept or reject specific characters, which shows you how to make text fields that let you specify the following in Interface Builder or using less code:

  • The maximum number of characters that a text field will accept
  • The only characters that can be entered into a text field
  • The only characters that can’t be entered into a text field

I’m already using that material in a couple of projects, and I think you’ll find it handy, too. Check it out!


And now, the original article…

Constraining text fields

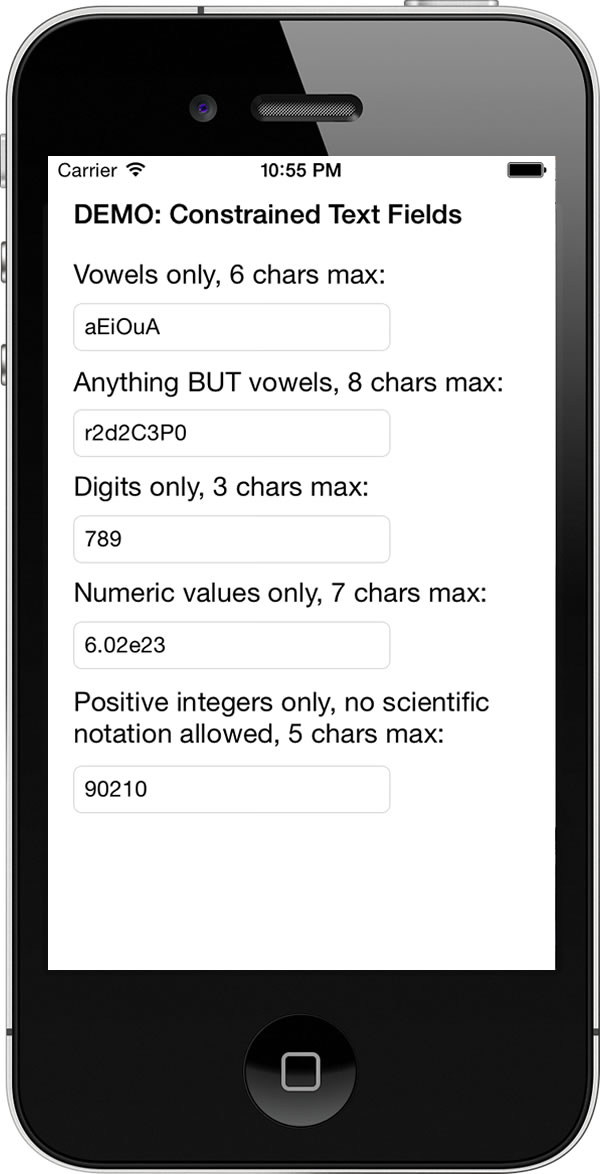
constrained text fields demo app

Click the image to see it at full size.

Update, August 26, 2015: I’ve updated this article so that its code works with Swift 2. It compiles under the latest version of Xcode 7, beta 6.
swift kickA little while back, I published an article that covered constraining text fields so that they accepted only values that evaluated to numeric ones, and limited them to a specified maximum number of characters (don’t bother looking for it; it redirects to this article now). This article expands and improves on it by showing you how to create iOS text fields that:

  • accept only numeric values,
  • accept only characters that appear in a specified string,
  • accept any characters except those that appear in a specified string, and
  • combine any of the features listed above

zip file iconIn order to demonstrate this, I’ve created a quick sample app, ConstrainedTextFieldDemo. You can download it here [90K Xcode project and associated files, zipped]. When you run it, you’ll the screen pictured above. It contains a set of text fields, each one with its own set of constraints:

  1. A text field that accepts only vowel characters (upper- and lowercase), and no more than 6 of them.
  2. A text field that accepts any character except vowels, and no more than 8 of them.
  3. A text field that accepts digits only, and no more than 3 of them.
  4. A text field that accepts only numeric values, as long as they’re 7 characters or fewer in length. Note that this field allows numbers in scientific notation.
  5. A text field that accepts only positive integers up to 5 characters in length.

In this article, I’ll walk you through the app and show you how to create your own constrained text fields in iOS. Better still, I’ll give you the project files so that you can experiment with the app.

Cut to the code (and the storyboard, too)!

Before we get into the explanations, let me cut to the chase and just give you the code.

For the purposes of discussing constrained text fields, we need to consider only two files:

  1. The view controller, ViewController.swift, and
  2. a set of string utility methods contained in StringUtils.swift.

Here’s ViewController.swift:

//
//  ViewController.swift
//

import UIKit

class ViewController: UIViewController, UITextFieldDelegate {

  // MARK: Outlets
  
  @IBOutlet weak var vowelsOnlyTextField: UITextField!
  @IBOutlet weak var noVowelsTextField: UITextField!
  @IBOutlet weak var digitsOnlyTextField: UITextField!
  @IBOutlet weak var numericOnlyTextField: UITextField!
  @IBOutlet weak var positiveIntegersOnlyTextField: UITextField!
  
  
  // MARK: View events and related methods
  
  override func viewDidLoad() {
    super.viewDidLoad()
    initializeTextFields()
  }

  // Designate this class as the text fields' delegate
  // and set their keyboards while we're at it.
  func initializeTextFields() {
    vowelsOnlyTextField.delegate = self
    vowelsOnlyTextField.keyboardType = UIKeyboardType.ASCIICapable

    noVowelsTextField.delegate = self
    noVowelsTextField.keyboardType = UIKeyboardType.ASCIICapable
    
    digitsOnlyTextField.delegate = self
    digitsOnlyTextField.keyboardType = UIKeyboardType.NumberPad
    
    numericOnlyTextField.delegate = self
    numericOnlyTextField.keyboardType = UIKeyboardType.NumbersAndPunctuation
    
    positiveIntegersOnlyTextField.delegate = self
    positiveIntegersOnlyTextField.keyboardType = UIKeyboardType.DecimalPad
  }
  
  override func didReceiveMemoryWarning() {
    super.didReceiveMemoryWarning()
  }
  
  // Tap outside a text field to dismiss the keyboard
  // ------------------------------------------------
  // By changing the underlying class of the view from UIView to UIControl,
  // the view can respond to events, including Touch Down, which is
  // wired to this method.
  @IBAction func userTappedBackground(sender: AnyObject) {
    view.endEditing(true)
  }
  
  
  // MARK: UITextFieldDelegate events and related methods
  
  func textField(textField: UITextField,
                 shouldChangeCharactersInRange range: NSRange,
                 replacementString string: String)
       -> Bool
  {
    // We ignore any change that doesn't add characters to the text field.
    // These changes are things like character deletions and cuts, as well
    // as moving the insertion point.
    //
    // We still return true to allow the change to take place.
    if string.characters.count == 0 {
      return true
    }
    
    // Check to see if the text field's contents still fit the constraints
    // with the new content added to it.
    // If the contents still fit the constraints, allow the change
    // by returning true; otherwise disallow the change by returning false.
    let currentText = textField.text ?? ""
    let prospectiveText = (currentText as NSString).stringByReplacingCharactersInRange(range, withString: string)
  
    switch textField {
    
      // Allow only upper- and lower-case vowels in this field,
      // and limit its contents to a maximum of 6 characters.
      case vowelsOnlyTextField:
        return prospectiveText.containsOnlyCharactersIn("aeiouAEIOU") &&
               prospectiveText.characters.count <= 6

      // Allow any characters EXCEPT upper- and lower-case vowels in this field,
      // and limit its contents to a maximum of 8 characters.
      case noVowelsTextField:
        return prospectiveText.doesNotContainCharactersIn("aeiouAEIOU") &&
               prospectiveText.characters.count <= 8
        
      // Allow only digits in this field, 
      // and limit its contents to a maximum of 3 characters.
      case digitsOnlyTextField:
        return prospectiveText.containsOnlyCharactersIn("0123456789") &&
               prospectiveText.characters.count <= 3
        
      // Allow only values that evaluate to proper numeric values in this field,
      // and limit its contents to a maximum of 7 characters.
      case numericOnlyTextField:
        return prospectiveText.isNumeric() &&
               prospectiveText.characters.count <= 7
        
      // In this field, allow only values that evalulate to proper numeric values and
      // do not contain the "-" and "e" characters, nor the decimal separator character
      // for the current locale. Limit its contents to a maximum of 5 characters.
      case positiveIntegersOnlyTextField:
        let decimalSeparator = NSLocale.currentLocale().objectForKey(NSLocaleDecimalSeparator) as! String
        return prospectiveText.isNumeric() &&
               prospectiveText.doesNotContainCharactersIn("-e" + decimalSeparator) &&
               prospectiveText.characters.count <= 5
        
      // Do not put constraints on any other text field in this view
      // that uses this class as its delegate.
      default:
        return true
    }
    
  }
  
  // Dismiss the keyboard when the user taps the "Return" key or its equivalent
  // while editing a text field.
  func textFieldShouldReturn(textField: UITextField) -> Bool {
    textField.resignFirstResponder()
    return true;
  }
  
}

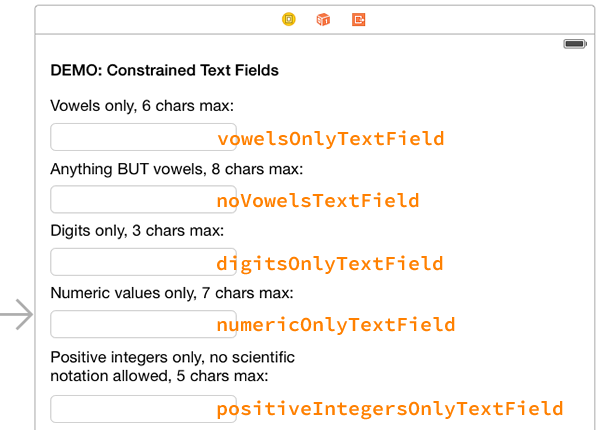
I gave the outlets for the text fields sensible names, but I thought that it might be helpful to show you an annotated storyboard that points out which outlet belongs to which text field:

constrained text fields screenshot

The code in the view controller calls on some string utility methods that I decided to put into their own module: the StringUtils.swift file:

//
//  StringUtils.swift
//

import Foundation

extension String {
  
  // Returns true if the string has at least one character in common with matchCharacters.
  func containsCharactersIn(matchCharacters: String) -> Bool {
    let characterSet = NSCharacterSet(charactersInString: matchCharacters)
    return self.rangeOfCharacterFromSet(characterSet) != nil
  }
  
  // Returns true if the string contains only characters found in matchCharacters.
  func containsOnlyCharactersIn(matchCharacters: String) -> Bool {
    let disallowedCharacterSet = NSCharacterSet(charactersInString: matchCharacters).invertedSet
    return self.rangeOfCharacterFromSet(disallowedCharacterSet) == nil
  }
  
  // Returns true if the string has no characters in common with matchCharacters.
  func doesNotContainCharactersIn(matchCharacters: String) -> Bool {
    let characterSet = NSCharacterSet(charactersInString: matchCharacters)
    return self.rangeOfCharacterFromSet(characterSet) == nil
  }
  
  // Returns true if the string represents a proper numeric value.
  // This method uses the device's current locale setting to determine
  // which decimal separator it will accept.
  func isNumeric() -> Bool
  {
    let scanner = NSScanner(string: self)
    
    // A newly-created scanner has no locale by default.
    // We'll set our scanner's locale to the user's locale
    // so that it recognizes the decimal separator that
    // the user expects (for example, in North America,
    // "." is the decimal separator, while in many parts
    // of Europe, "," is used).
    scanner.locale = NSLocale.currentLocale()
    
    return scanner.scanDecimal(nil) && scanner.atEnd
  }

}

Let’s take a closer look at the code…

The delegate pattern and text fields

The delegate pattern in general

the delegate pattern

The Delegate pattern is a fundamental part of iOS app development. You’ll encounter it often when programming user interfaces, including those times when you want to your program to react to what the user does with text fields.

The delegate pattern involves two categories of object:

  • A delegator, which needs to perform a task, but doesn’t have some needed information, resources, or logic to do so. It gets that needed information, resources, or logic from…
  • A delegate. While it typically can’t do what the delegator does, it has the information, resources, or logic that the delegator needs to perform its task.

My pet analogy for the delegate pattern is pictured above: an airplane and air traffic control. Unlike the driver of a car, who’s controlled only by traffic signals and pretty much free to choose any destination and route s/he pleases, the pilot of a plane has to delegate a lot of those choices to air traffic control. The airplane, which does the actual flying, is the delegator, and air traffic control, which gives clearance for takeoff and landing and tells the plane the heading, speed, and altitude at which it should fly, is the delegate.

The delegate pattern in iOS

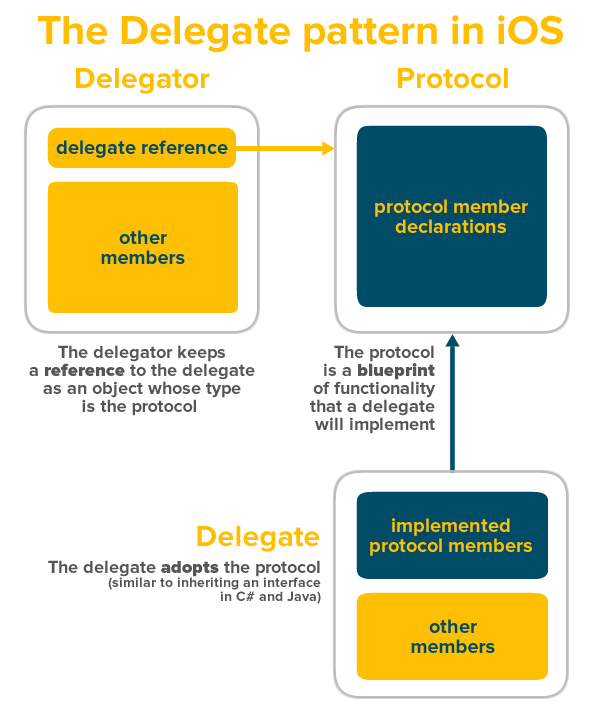
If you look at the delegate pattern in Wikipedia, you’ll see that there are a number of ways to implement it. Here’s how it’s done in iOS (and Cocoa), whether you’re doing it in Objective-C or Swift:

delegate pattern in iOS

There are three things in play:

  • The delegator, which keeps a reference to the delegate, which will end up having the task delegated to it,
  • The delegate, which implements the methods and properties used to accomplish the delegated task, and
  • The protocol, which connects the delegator and delegate by:
    • giving the delegator a way to send messages to the delegate, and
    • giving the delegate a way to perform actions on behalf of the delegator.

The delegate pattern with iOS’ text fields

Let’s make the above diagram a little more specific and talk about delegation in terms of iOS’ text fields:

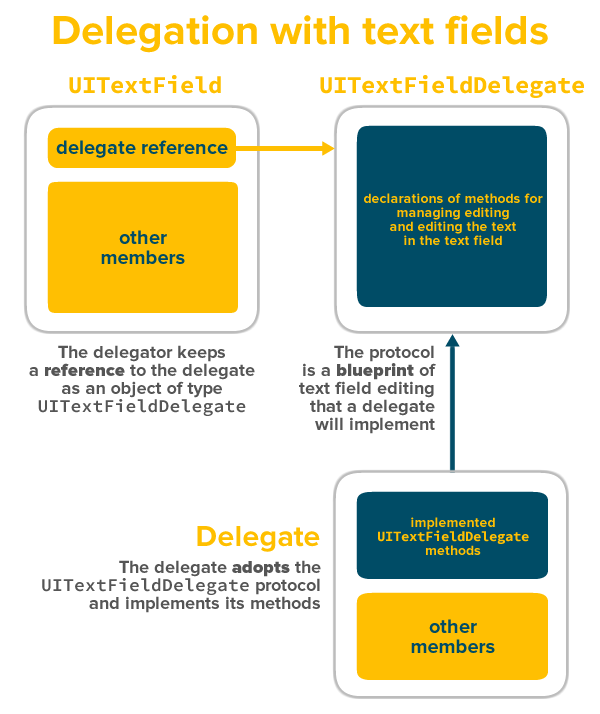
delegation with text fields

iOS text fields — that is, instances of the UITextField class — participate in a delegate pattern as delegators. They’ve got the power to control what happens when the user starts and stops editing their contents and what characters can be typed into them, but they offload the logic that handles those tasks to another object: the delegate.

A specific protocol, the UITextFieldDelegate protocol, connects the text field and its delegate together. A protocol is simply a set of declarations of class members — instance properties, instance methods, type methods, operators, and subscripts. These instance properties, instance methods, type methods, operators, and subscripts are implemented in the delegate (implementing a protocol’s members is called adopting the protocol), and the delegator calls on these implemented members.

The protocol: UITextFieldDelegate

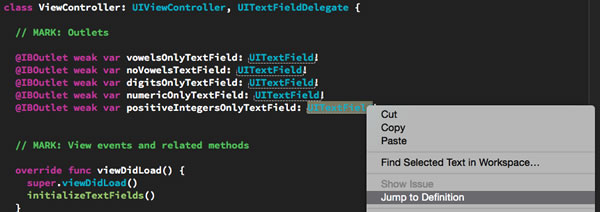
Let’s look at the UITextFieldDelegate protocol. You can actually check it out for yourself; the simplest way is to control-click or right-click on any occurrence of UITextField in your code and then click on Jump to Definition in the contextual menu that appears:

getting to uitextfielddelegate

You’ll be taken to UITextField.h, a header file that allows Swift to connect to the Objective-C code on which UITextField is built. It contains the declarations for all the publicly-accessible parts of UITextField, including the UITextFieldDelegate protocol. You’ll find it near the end of the file. I’ve reproduced it below:

protocol UITextFieldDelegate : NSObjectProtocol {
    
    optional func textFieldShouldBeginEditing(textField: UITextField) -> Bool // return NO to disallow editing.
    optional func textFieldDidBeginEditing(textField: UITextField) // became first responder
    optional func textFieldShouldEndEditing(textField: UITextField) -> Bool // return YES to allow editing to stop and to resign first responder status. NO to disallow the editing session to end
    optional func textFieldDidEndEditing(textField: UITextField) // may be called if forced even if shouldEndEditing returns NO (e.g. view removed from window) or endEditing:YES called
    
    optional func textField(textField: UITextField, shouldChangeCharactersInRange range: NSRange, replacementString string: String) -> Bool // return NO to not change text
    
    optional func textFieldShouldClear(textField: UITextField) -> Bool // called when clear button pressed. return NO to ignore (no notifications)
    optional func textFieldShouldReturn(textField: UITextField) -> Bool // called when 'return' key pressed. return NO to ignore.
}

The delegate: ViewController

In order to become a delegate, a class has to adopt the protocol. If you’re familiar with languages like C# and Java, “adopting a protocol” is similar to “implementing an interface”: we add the protocol to a class’ definition, as if we’re inheriting it. In this case, we’ll have the view controller adopt the protocol:

class ViewController: UIViewController, UITextFieldDelegate {

This says that the ViewController class inherits from the UIViewController class and adopts the UITextFieldDelegate protocol. Having the view controller act as the delegate makes sense: it controls the user interface, and the text fields are part of the user interface.

Just as you have to implement the methods in an inherited interface in C# and Java, you have to implement the methods in an adopted protocol in Swift. There is a difference, however: in Swift, you can choose not to implement methods marked as optional.

You may have noticed that all the methods in the UITextFieldDelegate protocol are optional. This means that a delegate that adopts the protocol can implement as many or as few of its methods as necessary. For the purposes of our app, we’re implementing two of them in ViewController:

  • textField(textField: UITextField, shouldChangeCharactersInRange range: NSRange, replacementString string: String) -> Bool: The text field calls this whenever the user tries to change the contents of a text field, whether by typing in or deleting a character, or by cutting or pasting. The method should return true if the change is to be accepted, and false to reject the change and keep the contents of the text field the way they are. We’ll use it to limit the types of character that can be entered into the view’s text fields and set a maximum the number of characters that can be entered for each field.
  • textFieldShouldReturn(textField: UITextField) -> Bool: The text field calls this whenever the user taps the Return key or its equivalent on the keyboard. We’ll use it to dismiss the keyboard when the user taps Return.

We’ll talk about the implementation of these methods in the next section. We have to take care of the delegators first.

The delegators: the text fields

We’ve got a protocol, and we’ve got a delegate that adopts it. Now we need to set up the delegators, which in this case, are the text fields — we need to tell them who their delegates are. We do this by setting each text field’s delegate property in the initializeTextFields method of the ViewController class:

  // Designate this class as the text fields' delegate
  // and set their keyboards while we're at it.
  func initializeTextFields() {
    vowelsOnlyTextField.delegate = self
    vowelsOnlyTextField.keyboardType = UIKeyboardType.ASCIICapable

    noVowelsTextField.delegate = self
    noVowelsTextField.keyboardType = UIKeyboardType.ASCIICapable
    
    digitsOnlyTextField.delegate = self
    digitsOnlyTextField.keyboardType = UIKeyboardType.NumberPad
    
    numericOnlyTextField.delegate = self
    numericOnlyTextField.keyboardType = UIKeyboardType.NumbersAndPunctuation
    
    positiveIntegersOnlyTextField.delegate = self
    positiveIntegersOnlyTextField.keyboardType = UIKeyboardType.DecimalPad
  }

By setting all the text fields’ delegate properties to self, we’re saying that this class is their delegate. Any events arising from editing the text fields will be handled by this class.

Constraining the text fields

The magic that constrains a text field so that it’s vowels-only, numbers-only and so on happens inside the protocol method with the very long signature, textField(textField: UITextField, shouldChangeCharactersInRange range: NSRange, replacementString string: String) -> Bool. This method needs to be coded so that it returns true if we want the user’s changes to be accepted (which then updates the text field), or false if we don’t want the user’s changes to be accepted (which leaves the text field unchanged).

Here’s its code:

  func textField(textField: UITextField,
                 shouldChangeCharactersInRange range: NSRange,
                 replacementString string: String)
       -> Bool
  {
    // We ignore any change that doesn't add characters to the text field.
    // These changes are things like character deletions and cuts, as well
    // as moving the insertion point.
    //
    // We still return true to allow the change to take place.
    if string.characters.count == 0 {
      return true
    }
    
    // Check to see if the text field's contents still fit the constraints
    // with the new content added to it.
    // If the contents still fit the constraints, allow the change
    // by returning true; otherwise disallow the change by returning false.
    let currentText = textField.text ?? ""
    let prospectiveText = (currentText as NSString).stringByReplacingCharactersInRange(range, withString: string)
  
    switch textField {
    
      // Allow only upper- and lower-case vowels in this field,
      // and limit its contents to a maximum of 6 characters.
      case vowelsOnlyTextField:
        return prospectiveText.containsOnlyCharactersIn("aeiouAEIOU") &&
               prospectiveText.characters.count <= 6

      // Allow any characters EXCEPT upper- and lower-case vowels in this field,
      // and limit its contents to a maximum of 8 characters.
      case noVowelsTextField:
        return prospectiveText.doesNotContainCharactersIn("aeiouAEIOU") &&
               prospectiveText.characters.count <= 8
        
      // Allow only digits in this field, 
      // and limit its contents to a maximum of 3 characters.
      case digitsOnlyTextField:
        return prospectiveText.containsOnlyCharactersIn("0123456789") &&
               prospectiveText.characters.count <= 3
        
      // Allow only values that evaluate to proper numeric values in this field,
      // and limit its contents to a maximum of 7 characters.
      case numericOnlyTextField:
        return prospectiveText.isNumeric() &&
               prospectiveText.characters.count <= 7
        
      // In this field, allow only values that evalulate to proper numeric values and
      // do not contain the "-" and "e" characters, nor the decimal separator character
      // for the current locale. Limit its contents to a maximum of 5 characters.
      case positiveIntegersOnlyTextField:
        let decimalSeparator = NSLocale.currentLocale().objectForKey(NSLocaleDecimalSeparator) as! String
        return prospectiveText.isNumeric() &&
               prospectiveText.doesNotContainCharactersIn("-e" + decimalSeparator) &&
               prospectiveText.characters.count <= 5
        
      // Do not put constraints on any other text field in this view
      // that uses this class as its delegate.
      default:
        return true
    }
    
  }

This method takes three parameters:

  • textField: the text field that either had a character added to or removed from it.
  • range: the range of the characters within the text field that are to be replaced.
  • string: the replacement string.

Does the change add characters?

The first thing the method does is see if the change adds characters to the text field:

if string.characters.count == 0 {
  return true
}
  • If the user has typed a character or pasted non-empty text into the text field, string is non-empty and has a length greater than zero. In this case, we’ll want to do more processing.
  • If the user has deleted a character, cut text, or simply moved the insertion point, string is empty and has a length of zero. In this case, we don’t want to do any more processing; removing characters means we don’t have to see if we want to disallow any added character or if the maximum number of characters for the text field has been exceeded. We’ll just exit the method, returning true so that the change still happens, whether it’s a deletion, a cut, or moving the insertion point.

What will the text field look like after the change?

We want to figure out what the text field would contain if the change were allowed. We’ll call that the prospective text, which we’ll assign to a local constant called prospectiveText. We can figure out what the prospective text is by using NSString‘s stringByReplacingCharactersInRange method on the contents of textField.text.

Here’s where we run into a problem:

  • In order to use NSString‘s stringByReplacingCharactersInRange method, we need to convert a Swift String into an NSString.
  • The type of a text field’s text property type isn’t String, but String?. That’s because a text field’s value can either be:
    • a string when it contains at least one character, or
    • nil when it’s empty
  • String can be cast into NSString; String? can’t.

To get around this problem, we’re going to create a String constant called currentText, which we’ll fill as follows:

  • If the text field isn’t empty — that is, if its value isn’t nil — we’ll simply assign currentText the value of textField.text.
  • If the text field is empty — that is, if its value is nil — we’ll assign currenttext the value "", the empty string. There’s a difference between nil (which denotes no value) and the empty string (which is a value, just one that has a length of 0 characters).

Here’s the code:

 let currentText = textField.text ?? ""
 let prospectiveText = (currentText as NSString).stringByReplacingCharactersInRange(range, withString: string)

As we’ll see shortly, having prospectiveText lets us set a maximum number of characters that can be put into a text field.

Taking care of business

Now that we’ve dealt with cases where the change to the text field deletes characters and have created prospectiveText, we can now start constraining text fields. This is handled in the switch statement, which we use to separate the constraining logic for each text field:

switch textField {
    
      // Allow only upper- and lower-case vowels in this field,
      // and limit its contents to a maximum of 6 characters.
      case vowelsOnlyTextField:
        return prospectiveText.containsOnlyCharactersIn("aeiouAEIOU") &&
               prospectiveText.characters.count <= 6

      // Allow any characters EXCEPT upper- and lower-case vowels in this field,
      // and limit its contents to a maximum of 8 characters.
      case noVowelsTextField:
        return prospectiveText.doesNotContainCharactersIn("aeiouAEIOU") &&
               prospectiveText.characters.count <= 8
        
      // Allow only digits in this field, 
      // and limit its contents to a maximum of 3 characters.
      case digitsOnlyTextField:
        return prospectiveText.containsOnlyCharactersIn("0123456789") &&
               prospectiveText.characters.count <= 3
        
      // Allow only values that evaluate to proper numeric values in this field,
      // and limit its contents to a maximum of 7 characters.
      case numericOnlyTextField:
        return prospectiveText.isNumeric() &&
               prospectiveText.characters.count <= 7
        
      // In this field, allow only values that evalulate to proper numeric values and
      // do not contain the "-" and "e" characters, nor the decimal separator character
      // for the current locale. Limit its contents to a maximum of 5 characters.
      case positiveIntegersOnlyTextField:
        let decimalSeparator = NSLocale.currentLocale().objectForKey(NSLocaleDecimalSeparator) as! String
        return prospectiveText.isNumeric() &&
               prospectiveText.doesNotContainCharactersIn("-e" + decimalSeparator) &&
               prospectiveText.characters.count <= 5
        
      // Do not put constraints on any other text field in this view
      // that uses this class as its delegate.
      default:
        return true
    }

The cases for each text field are listed in the order in which they appear onscreen. Let’s look at them one by one:

The “Vowels only” text field

In this text field, we want the user to be able to enter only vowels — the upper- and lower-case versions of the letters a, e, i, o, and u. We also want to limit its contents to a maximum of 6 characters. Here’s the code that does this:

      // Allow only upper- and lower-case vowels in this field,
      // and limit its contents to a maximum of 6 characters.
      case vowelsOnlyTextField:
        return prospectiveText.containsOnlyCharactersIn("aeiouAEIOU") &&
               prospectiveText.characters.count <= 6

This code makes use of the String extension method containsOnlyCharactersIn, which I defined in StringUtils.swift. It returns true if the String contains only characters in the provided parameter.

If both conditions in the return statement evaluate to trueprospectiveText contains only vowels and has 6 characters or fewer — the method returns true, the change to the text field is allowed, and the text field is updated. If both conditions don’t evaluate to true, the method returns false, the change to the text field is not allowed, and the text field’s contents remain the same.

The “Anything BUT vowels” text field

In this text field, we want the user to be able to enter any character except vowels and limit its contents to a maximum of 8 characters. Here’s the code that does this:

      // Allow any characters EXCEPT upper- and lower-case vowels in this field,
      // and limit its contents to a maximum of 8 characters.
      case noVowelsTextField:
        return prospectiveText.doesNotContainCharactersIn("aeiouAEIOU") &&
               prospectiveText.characters.count <= 8

This code is similar to the code for the “Vowels only” text field. The major difference is that it makes use of another String extension method defined in StringUtils.swift: doesNotContainCharactersIn, which returns true if the String doesn’t contain any of the characters in the provided parameter.

The “Digits only” text field

In this text field, we want the user to be able to enter only digits, and no more than three of them at most. Here’s the code that does this:

      // Allow only digits in this field, 
      // and limit its contents to a maximum of 3 characters.
      case digitsOnlyTextField:
        return prospectiveText.containsOnlyCharactersIn("0123456789") &&
               prospectiveText.characters.count <= 3

This code is almost the same as the code for the “Vowels only” text field.

The “Numeric values only” text field

Here’s an interesting one: a text field that accepts only user input that evaluates to a proper numeric value. That means it will accept the following characters:

  • The digits 0 through 9
  • The (negative) symbol
  • The decimal separator, which is either . or , depending on the user’s locale settings
  • The letter e, which is used for numbers specified in scientific notation

Even when limiting the user to these characters, it’s possible for non-numeric values to be entered. Here are a couple of example non-numeric values that we don’t want the user to be able to enter:

  • More than one decimal separator, such as 1.2.3 or 1,2,3, depending on the user’s locale settings
  • The unary minus being placed anywhere other than the start, such as 4-5

We also want to limit the text field to a maximum of 7 characters.

Here’s the code:

      // Allow only values that evaluate to proper numeric values in this field,
      // and limit its contents to a maximum of 7 characters.
      case numericOnlyTextField:
        return prospectiveText.isNumeric() &&
               prospectiveText.characters.count <= 7

This code makes use of the String extension method isNumeric, which I defined in StringUtils.swift. It returns true if the String contains a value that evaluates to a numeric value. It’s powered by NSScanner, a class that’s handy for going through strings and extracting useful data from them, and its scanDecimal method, which returns true if it finds a value that can be evaluated as an NSDecimal value.

If both conditions in the return statement evaluate to trueprospectiveText evaluates to a numeric value and has 7 characters or fewer — the method returns true, the change to the text field is allowed, and the text field is updated. If both conditions don’t evaluate to true, the method returns false, the change to the text field is not allowed, and the text field’s contents remain the same.

The “Positive integers only” text field

This is a more strict version of the “Numeric values only” text field. It requires that anything entered into it needs to evaluate as a proper numeric value, but it also requires that the value be a positive integer and not be stated in scientific notation. It has a maximum length of 5 characters. Here’s the code:

      // In this field, allow only values that evalulate to proper numeric values and
      // do not contain the "-" and "e" characters, nor the decimal separator character
      // for the current locale. Limit its contents to a maximum of 5 characters.
      case positiveIntegersOnlyTextField:
        let decimalSeparator = NSLocale.currentLocale().objectForKey(NSLocaleDecimalSeparator) as! String
        return prospectiveText.isNumeric() &&
               prospectiveText.doesNotContainCharactersIn("-e" + decimalSeparator) &&
               prospectiveText.characters.count <= 5

In order to disallow negative numbers, we use the String extension method doesNotContainCharactersIn to block out characters. We disallow scientific notation by using the same method to block out e characters. The tricky part is disallowing the decimal separator, which can be either . or , depending on the user’s locale. We identify it with NSLocale.currentLocale().objectForKey(NSLocaleDecimalSeparator), which we add to the parameter for doesNotContainCharactersIn.

Any other text fields that might be on the screen

Finally, we handle the default case: any other text fields that might be on the screen, which we won’t constrain:

      default:
        return true

Other UI goodies

This app has a couple of UI features that I’ll cover in a subsequent article:

  • specifying the keyboard for a specific text field,
  • dismissing the keyboard when the user taps the Return key or its equivalent, and
  • dismissing the keyboard when the user taps on the view

It’s all in the code, so if you’d like to jump in and learn how it works on your own, go right ahead!

Resources

zip file iconIn case you missed it, here are the zipped project files for the demo project, ConstrainedTextFieldDemo [90K Xcode project and associated files, zipped].

Categories
Swift Kick

How to work with dates and times in Swift, part one [Updated for Swift 2]

i just want to use dates

Update, August 26, 2015: I’ve updated this article so that its code works with Swift 2. It compiles under the latest version of Xcode 7, beta 6.

swift kickIf you’re just getting started with date and time programming in Swift, chances are that you probably did some Googling, found NSDate and its companion classes in Apple’s documentation and promptly got confused. Let me reassure you that it isn’t your fault. Apple’s Date and Time Programming Guide isn’t set up in the most helpful way, and its examples are in Objective-C, which can throw you off if you’re not familiar with its [instance method] calling syntax.

If you’re coming to Swift from JavaScript, which makes do with a single object type called Date, the idea of having this set of classes just to handle dates and times looks like overkill:

cocoa date time class chart

Click the chart to see it at full size.

This is the first article in a short series on programming dates and times in Swift. It’ll help you make sense of working with NSDate and its companion classes.

What is UTC? (or: “It’s 5 o’clock somewhere!”)

what time is it right now

People who like to drink are fond of saying “Well, it’s five o’clock somewhere!“, and it’s my favorite way of illustrating that what time it is depends on where you are. It’s why we have UTC — Coordinated Universal Time — the “One True Time” on which every other time zone is based. UTC replaced GMT (Greenwich Meridian Time, the time as observed at the Royal Observatory in Greenwich, London), and it doesn’t change for daylight savings. By having this standard, we eliminate the confusion that comes up when discussing times.

While most places have some names to refer to time zones in everyday conversation — such as Pacific, Mountain, Central, and Eastern in North America — the clearest way to indicate time zones is to express them as negative or positive offsets from UTC. For example, the North American time zone known as “Eastern” is 5 hours behind UTC, so it’s expressed as UTC-05:00. There are certain time zones where the offset isn’t whole hours, such as Newfoundland’s, which is UTC-03:30, and Nepal’s, which for some reason is UTC+05:45.

NSDate: Cocoa standard time

When you want to represent a date or time in Cocoa, you do so with an instance of the NSDate class. Here’s a nice, simple description of what NSDate is:
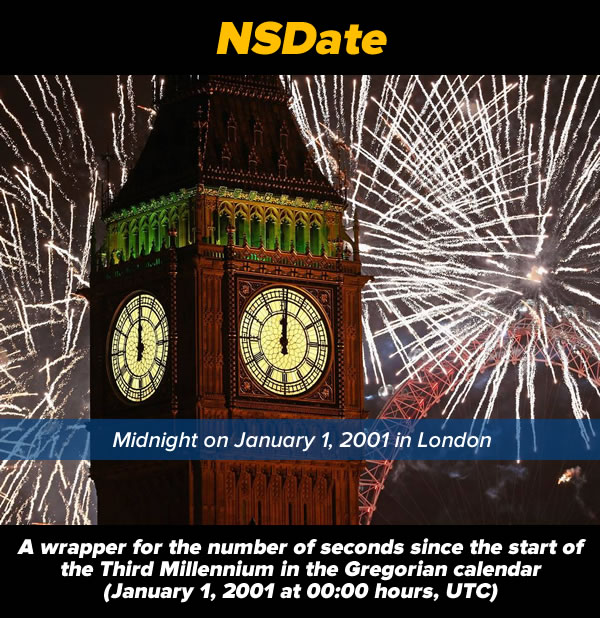
nsdate

When you’re measuring time, you need a reference point. The Gregorian calendar — the one that I’m 99.999999% sure that you’re using right now — uses what is said to be the year of the birth of Christ as its reference point. Your age uses the date of your birth as a reference point. A time trial race uses the time at the start of the race as its reference point.

NSDate‘s reference point is the start of the third millennium: January 1, 2001 at midnight UTC. It stores time as an NSTimeInterval, a 64-bit floating point value representing a number of seconds. Negative values represent a number seconds before January 1, 2001, 00:00 UTC, and positive values represent a number seconds after that time. According to Apple’s documentation, this representation of time “yields sub-millisecond precision over a range of 10,000 years”, which means that an NSDate instance can represent any point in time from about 3000 BC/BCE to 7000 AD/CE.

Here are 4 historical dates, as seen from NSDate‘s perspective:
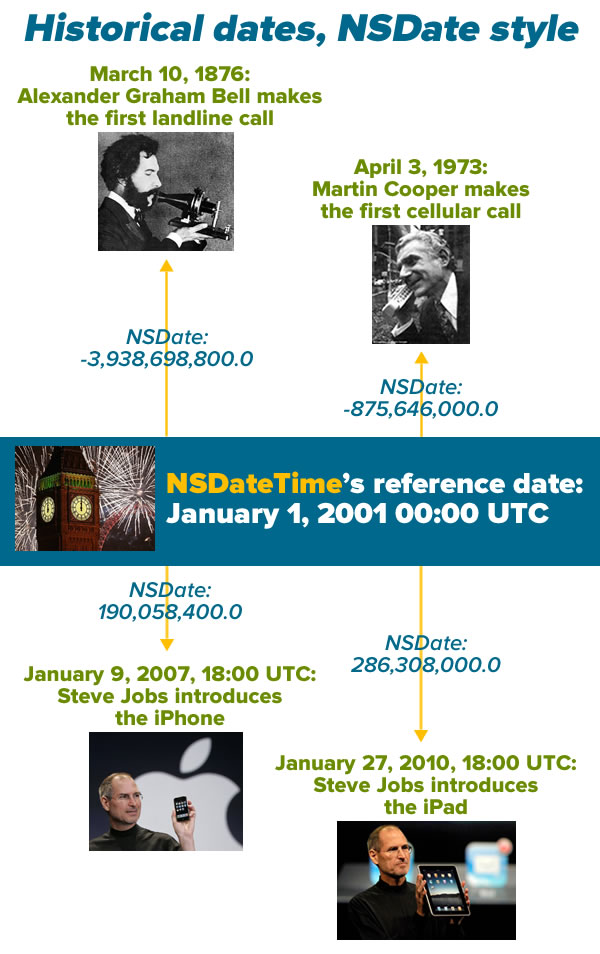
historical dates nsdate style

There are some consequences to the fact that NSDate treats time as an offset of seconds:

  • All NSDate values refer to both a date and a time. If you want to use an NSDate to store a date only, you ignore the time portion, and vice versa.
  • NSDate has no concept of time zones or any time unit other than seconds. That means you can’t ask it what year, month, day, hour, or minute correspond to the time it’s storing. As far as it’s concerned, there are no calendars; you work with NSDate‘s representation of time, when it’s time to display a date, time, or both, you format it to use the calendar and time zone that’s appropriate for the user.

There’s a method to this madness: it allows us to use and store dates and times in a way that’s independent of calendar systems, time zones, languages, and date formats. As I write this, it’s the year 2015 in the Gregorian calendar, but the Buddhist calendar says it’s 2558, and if you go by the Hebrew Calendar, it’s 5775. I may say it’s 9:45 a.m. as I write this in Tampa, but if you’re in California, it’s 6:45, and if you’re a soldier, you might call it 14:45 Zulu Time. I call the current month January, but you might call it Enero or Janvier. It’s all the same as far as NSDate is concerned, which makes it incredibly flexible.

Creating NSDates without any helper classes: now is easy, other dates ain’t so pretty

Let’s create some NSDates right now. Fire up Xcode, open a new playground, and enter the following code so that it looks like this:

// Playground - noun: a place where people can play

import UIKit

let now = NSDate()
print(now)
now.timeIntervalSinceReferenceDate

You should see results in the sidebar that look similar to this:

playground 01

If you create an NSDate without any parameters, you get an instance representing the date and time at the moment it was created. That’s what we’ve done by creating the instance named now.

Note that in the sidebar beside line 5, where we created now, the result displayed in the sidebar is Jan 19, 2015, 8:52 AM. While the internal representation of the current time is a 64-bit floating point value, Xcode’s doing us a favor by representing it in a more readable format and using the local time zone. It’s doing this by making use of a date formatter, which we’ll cover later.

In line 6, we’re using the println function to display the default string representation of an NSDate, which is a completely numeric one. It’s more readable than a 64-bit floating point value, but it might not be in the format or time zone (or even the calendar system) that you want. Once again, this output comes courtesy of a date formatter.

Finally, in line 7, we use the timeIntervalSinceReferenceDate property to display now‘s internal representation of the date and time it’s storing: about 443 million seconds after January 1, 2001 at midnight UTC.

Let’s create the dates from the Historical dates, NSDate style picture above. Enter or paste the highlighted code below so that your playground looks like this:

// Playground - noun: a place where people can play

import UIKit

let now = NSDate()
println(now)
now.timeIntervalSinceReferenceDate

// March 10, 1876 was 3,938,698,800 seconds before the third millennium (January 1, 2001 midnight UTC)
let firstLandPhoneCallDate = NSDate(timeIntervalSinceReferenceDate: -3_938_698_800.0)

// April 3, 1973 was 875,646,000 seconds before the third millennium
let firstCellPhoneCallDate = NSDate(timeIntervalSinceReferenceDate: -875_646_000.0)

// January 9, 2007, 18:00 UTC was 190,058,400 seconds after the third millennium
let iPhoneAnnouncementDate = NSDate(timeIntervalSinceReferenceDate: 190_058_400.0)

// January 27, 2010, 18:00 UTC was 286,308,000 seconds after the third millennium
let iPadAnnouncementDate = NSDate(timeIntervalSinceReferenceDate: 286_308_000.0)

Note my use of the underscore character, _, to act as a “thousands” separator. It’s not required; it just makes large numbers easier to read.

In the sidebar, you should see nicely-formatted dates beside the NSDates you created:
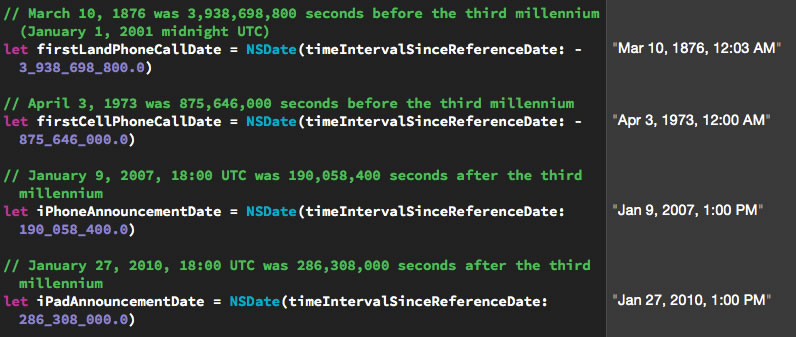
playground 02

Click the screenshot to see it at full size.

NSDate has four initializers for creating specified dates and times:

Initializer Description
init(timeIntervalSinceReferenceDate:) Create an NSDate instance representing a time specified by a number of seconds before or after January 1, 2001 00:00 UTC.
init(timeIntervalSinceNow:) Create an NSDate instance representing a time specified by a number of seconds before or after the current date and time.
init(timeIntervalSince1970:) Create an NSDate instance representing a time specified by a number of seconds before or after January 1, 1970 00:00 UTC. This method exists not because Apple’s founders were California hippies nostalgic for the era of their youth, but for compatibility with Unix time.
init(timeInterval:sinceDate:) Create an NSDate instance representing a time specified by a number of seconds before or after a given NSDate.

You’ve probably noticed that none of these initializers lets you create an NSDate by giving it something convenient like a year, month, day, time zone and so on. Luckily, there are classes that will help us do this.

Creating NSDates with the help of NSCalendar and NSDateComponents

If you’re like most people, you’d probably much rather initialize a date object using a day, month, year, and time instead of some number of seconds before and after midnight on January 1, 1970, January 1, 2001, or any other arbitrary date. For this, we’ll need a couple of additional classes:
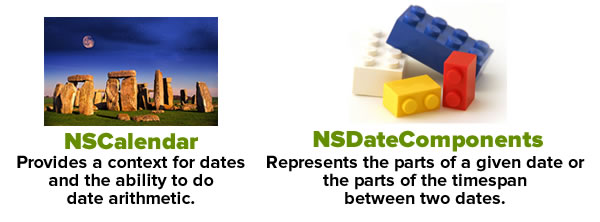
nscalendar and nsdatecomponents

First, there’s the NSCalendar class, which among other things, gives us a context for converting NSDate‘s “seconds before or after the third millennium” measurements into a familiar time system with years, months, days, hours, and minutes, and it accounts for time zones as well. Most of the time, the date and time system will be the Gregorian calendar, but iOS also lets you choose from 15 other calendar systems, including Hebrew and Buddhist.

Next, there’s the NSDateComponents class, which is an assembly of properties that make up a date, such as year, month, date, hour, minute, second, and so on. An NSDateComponents instance can be used to represent either:

  • A specific point in time, or
  • a duration of time.

To create an NSDate by specifying things like a year, month, day, and time, we’ll do the following:

  • Create an NSCalendar instance pointing to the user’s calendar
  • Specify a date using an NSDateComponents instance
  • Create the NSDate by passing the NSDateComponents instance to NSCalendar‘s dateFromComponents instance method

nsdatecomponents to nsdate

Let’s go back to our playground and create our first historical date: that of Alexander Graham Bell’s first phone call. We know it took place on March 10, 1876. While we don’t know the exact time it happened, we do know that it happened in North America’s Eastern time zone, as opposed to something like Kiritimati, a.k.a. Christmas Island. That place is 19 hours ahead and would’ve resulted in historians recording that day as March 11th rather than the 10th.

Enter or paste the highlighted code below so that your playground looks like this:

// Playground - noun: a place where people can play

import UIKit

// The user's calendar incorporates the user's locale and
// time zones settings, so we'll often use it.
let userCalendar = NSCalendar.currentCalendar()


// March 10, 1876
// In this case, we're using an NSDatesComponents instance
// to represent a date rather than a duration of time.
let firstLandPhoneCallDateComponents = NSDateComponents()

// We don't know the time when Alexander Graham Bell made
// his historic phone call, so we'll simply provide the
// year, month and day. 
// We *do* know that he made that call in North America's
// eastern time zone, so we'll specify that.
firstLandPhoneCallDateComponents.year = 1876
firstLandPhoneCallDateComponents.month = 3
firstLandPhoneCallDateComponents.day = 10
firstLandPhoneCallDateComponents.timeZone = NSTimeZone(name: "US/Eastern")

Any calendar, regardless of its time zone, to turn date components into dates using its calendar system. If you specify a time zone in the date components, it will take that time zone into account; if you don’t specify one, the date will be created using the calendar’s time zone. We created an instance of the user’s calendar, which incorporates the user’s local and time zone settings, because it’ll be useful later when we want to go in the opposite direction and convert dates into date components.

Note that after setting the year, month, and day properties of firstLandPhoneCallComponents, we set the timeZone component using the preferred initializer, init(name:), which lets you specify a time zone by any of the standard string identifiers listed in the tz database of time zones. I could’ve used one of the city names such as America/New_York (or for those of you familiar with Canada, America/Toronto, America/MontrealAmerica/Atikokan, or America/Pangnirtung) to specify the Eastern time zone. It’s far clearer — especially to people not from the U.S. — to use the time zone names that begin with US or Canada, such as US/Eastern, US/Central, US/Mountain, and US/Pacific rather than city names.

Once we’ve set up the date components, we use the calendar’s dateFromComponents instance method to convert them into a date. I’m in the US/Eastern time zone, the same one as the one specified in the date components, so the result in the sidebar beside this line of code shows as “Mar 10, 1876, 12:00 AM” (we didn’t specify a time in the date components, so the resulting date has the default time of 00:00). The date displayed in the sidebar uses your system settings, which may be different from mine.

Let’s enter the other three historic dates. Enter or paste the highlighted code below so that your playground looks like this:

// Playground - noun: a place where people can play

import UIKit

// The user's calendar incorporates the user's locale and
// time zones settings, so we'll often use it.
let userCalendar = NSCalendar.currentCalendar()


// March 10, 1876
// In this case, we're using an NSDatesComponents instance
// to represent a date rather than a duration of time.
let firstLandPhoneCallDateComponents = NSDateComponents()

// We don't know the time when Alexander Graham Bell made
// his historic phone call, so we'll simply provide the
// year, month and day. 
// We *do* know that he made that call in North America's
// eastern time zone, so we'll specify that.
firstLandPhoneCallDateComponents.year = 1876
firstLandPhoneCallDateComponents.month = 3
firstLandPhoneCallDateComponents.day = 10
firstLandPhoneCallDateComponents.timeZone = NSTimeZone(name: "US/Eastern")

// We have a calendar and date components. We can now make a date!
// On my system (US/Eastern time zone), the result for the line below is
// "Mar 10, 1876, 12:00 AM"
let firstLandPhoneCallDate = userCalendar.dateFromComponents(firstLandPhoneCallDateComponents)!


// April 3, 1973
let firstCellularPhoneCallDateComponents = NSDateComponents()
firstCellularPhoneCallDateComponents.year = 1973
firstCellularPhoneCallDateComponents.month = 4
firstCellularPhoneCallDateComponents.day = 3
firstCellularPhoneCallDateComponents.timeZone = NSTimeZone(name: "US/Eastern")
// On my system (US/Eastern time zone), the result for the line below is
// "Apr 3, 1973, 12:00 AM"
let firstCellularPhoneCallDate = userCalendar.dateFromComponents(firstCellularPhoneCallDateComponents)!


// January 9, 2007, 18:00 UTC
let iPhoneAnnouncementDateComponents = NSDateComponents()
// We know that the "Stevenote" when the iPhone was announced
// started at 10:00 am Pacific time.
iPhoneAnnouncementDateComponents.year = 2007
iPhoneAnnouncementDateComponents.month = 1
iPhoneAnnouncementDateComponents.day = 9
iPhoneAnnouncementDateComponents.hour = 13
iPhoneAnnouncementDateComponents.minute = 0
iPhoneAnnouncementDateComponents.timeZone = NSTimeZone(name: "US/Eastern")
// On my system (US/Eastern time zone), the result for the line below is
// "Jan 9, 2007, 1:00 PM"
let iPhoneAnnouncementDate = userCalendar.dateFromComponents(iPhoneAnnouncementDateComponents)!


// January 27, 2010, 18:00 UTC
// We know that the "Stevenote" when the iPad was announced
// started at 10:00 am Pacific time.
let iPadAnnouncementDateComponents = NSDateComponents()
iPadAnnouncementDateComponents.year = 2010
iPadAnnouncementDateComponents.month = 1
iPadAnnouncementDateComponents.day = 27
// Let's set the clock using Pacific Time
iPadAnnouncementDateComponents.hour = 10
iPadAnnouncementDateComponents.minute = 0
iPadAnnouncementDateComponents.timeZone = NSTimeZone(name: "US/Pacific")
// On my system (US/Eastern time zone), the result for the line below is
// "Jan 27, 2010, 1:00 PM"
let iPadAnnouncementDate = userCalendar.dateFromComponents(iPadAnnouncementDateComponents)!

Note that we used different time zones for the “Stevenotes”. Both took place at the same time, 10:00 a.m. Pacific, but we set the time for the iPhone announcement as 1:00 p.m. US/Eastern, and the time for the iPad announcement as 10:00 a.m. US/Pacific. Both results in the sidebar appear at the same time; on my machine, they appear as Jan 27, 2010, 1:00 PM.

dateFromComponents works with what you give it

Suppose we want to create a date just by specifying that it’s 11:00 a.m. on the first Saturday of March 2015 in the US/Eastern time zone. Here’s how it’s done:

// (Previous code goes here)

// First Saturday of March 2015, US/Eastern
let firstSaturdayMarch2015DateComponents = NSDateComponents()
firstSaturdayMarch2015DateComponents.year = 2015
firstSaturdayMarch2015DateComponents.month = 3
firstSaturdayMarch2015DateComponents.weekday = 7
firstSaturdayMarch2015DateComponents.weekdayOrdinal = 1
firstSaturdayMarch2015DateComponents.hour = 11
firstSaturdayMarch2015DateComponents.minute = 0
firstSaturdayMarch2015DateComponents.timeZone = NSTimeZone(name: "US/Eastern")
// On my system (US/Eastern time zone), the result for the line below is
// "Mar 7, 2015, 11:00 AM"
let firstSaturdayMarch2015Date = userCalendar.dateFromComponents(firstSaturdayMarch2015DateComponents)!

NSDateComponentsweekday property lets you specify a weekday numerically. In Cocoa’s Gregorian calendar, the first day is Sunday, and is represented by the value 1. Monday is represented by 2, Tuesday is represented by 3, all the way to Saturday, which is represented by 7.

The weekdayOrdinal property lets you specify which specified weekday of the month. By setting weekday to 7, we’re specifying a Saturday; by then setting weekdayOrdinal to 1, we’re specifying the first Saturday of the month.

Here’s another example, where we get the date for the Thursday on the 18th week of 2015:

// (Previous code, including the definition of calendar,
// goes here)

// Thursday of the 18th week of 2015, US/Eastern
let thursday18thWeekOf2015DateComponents = NSDateComponents()
thursday18thWeekOf2015DateComponents.year = 2015
thursday18thWeekOf2015DateComponents.weekOfYear = 18
thursday18thWeekOf2015DateComponents.weekday = 5
thursday18thWeekOf2015DateComponents.timeZone = NSTimeZone(name: "US/Eastern")
// On my system (US/Eastern time zone), the result for the line below is
// ""Apr 30, 2015, 12:00 AM""
let thursday18thWeekOf2015Date = userCalendar.dateFromComponents(thursday18thWeekOf2015DateComponents)!

The other way around: getting NSDateComponents from NSDates

Right now, your playground should look like this, with a number of dates being created from date components:

// Playground - noun: a place where people can play

import UIKit

// The user's calendar incorporates the user's locale and
// time zones settings, so we'll often use it.
let userCalendar = NSCalendar.currentCalendar()


// March 10, 1876
// In this case, we're using an NSDatesComponents instance
// to represent a date rather than a duration of time.
let firstLandPhoneCallDateComponents = NSDateComponents()

// We don't know the time when Alexander Graham Bell made
// his historic phone call, so we'll simply provide the
// year, month and day. 
// We *do* know that he made that call in North America's
// eastern time zone, so we'll specify that.
firstLandPhoneCallDateComponents.year = 1876
firstLandPhoneCallDateComponents.month = 3
firstLandPhoneCallDateComponents.day = 10
firstLandPhoneCallDateComponents.timeZone = NSTimeZone(name: "US/Eastern")

// We have a calendar and date components. We can now make a date!
// On my system (US/Eastern time zone), the result for the line below is
// "Mar 10, 1876, 12:00 AM"
let firstLandPhoneCallDate = userCalendar.dateFromComponents(firstLandPhoneCallDateComponents)!


// April 3, 1973
let firstCellularPhoneCallDateComponents = NSDateComponents()
firstCellularPhoneCallDateComponents.year = 1973
firstCellularPhoneCallDateComponents.month = 4
firstCellularPhoneCallDateComponents.day = 3
firstCellularPhoneCallDateComponents.timeZone = NSTimeZone(name: "US/Eastern")
// On my system (US/Eastern time zone), the result for the line below is
// "Apr 3, 1973, 12:00 AM"
let firstCellularPhoneCallDate = userCalendar.dateFromComponents(firstCellularPhoneCallDateComponents)!


// January 9, 2007, 18:00 UTC
let iPhoneAnnouncementDateComponents = NSDateComponents()
// We know that the "Stevenote" when the iPhone was announced
// started at 10:00 am Pacific time.
iPhoneAnnouncementDateComponents.year = 2007
iPhoneAnnouncementDateComponents.month = 1
iPhoneAnnouncementDateComponents.day = 9
iPhoneAnnouncementDateComponents.hour = 13
iPhoneAnnouncementDateComponents.minute = 0
iPhoneAnnouncementDateComponents.timeZone = NSTimeZone(name: "US/Eastern")
// On my system (US/Eastern time zone), the result for the line below is
// "Jan 9, 2007, 1:00 PM"
let iPhoneAnnouncementDate = userCalendar.dateFromComponents(iPhoneAnnouncementDateComponents)!


// January 27, 2010, 18:00 UTC
// We know that the "Stevenote" when the iPad was announced
// started at 10:00 am Pacific time.
let iPadAnnouncementDateComponents = NSDateComponents()
iPadAnnouncementDateComponents.year = 2010
iPadAnnouncementDateComponents.month = 1
iPadAnnouncementDateComponents.day = 27
// Let's set the clock using Pacific Time
iPadAnnouncementDateComponents.hour = 10
iPadAnnouncementDateComponents.minute = 0
iPadAnnouncementDateComponents.timeZone = NSTimeZone(name: "US/Pacific")
// On my system (US/Eastern time zone), the result for the line below is
// "Jan 27, 2010, 1:00 PM"
let iPadAnnouncementDate = userCalendar.dateFromComponents(iPadAnnouncementDateComponents)!


// First Saturday of March 2015, US/Eastern
let firstSaturdayMarch2015DateComponents = NSDateComponents()
firstSaturdayMarch2015DateComponents.year = 2015
firstSaturdayMarch2015DateComponents.month = 3
firstSaturdayMarch2015DateComponents.weekday = 7
firstSaturdayMarch2015DateComponents.weekdayOrdinal = 1
firstSaturdayMarch2015DateComponents.hour = 11
firstSaturdayMarch2015DateComponents.minute = 0
firstSaturdayMarch2015DateComponents.timeZone = NSTimeZone(name: "US/Eastern")
// On my system (US/Eastern time zone), the result for the line below is
// "Mar 7, 2015, 11:00 AM"
let firstSaturdayMarch2015Date = userCalendar.dateFromComponents(firstSaturdayMarch2015DateComponents)!


// Thursday of the 18th week of 2015, US/Eastern
let thursday18thWeekOf2015DateComponents = NSDateComponents()
thursday18thWeekOf2015DateComponents.year = 2015
thursday18thWeekOf2015DateComponents.weekOfYear = 18
thursday18thWeekOf2015DateComponents.weekday = 5
thursday18thWeekOf2015DateComponents.timeZone = NSTimeZone(name: "US/Eastern")
// On my system (US/Eastern time zone), the result for the line below is
// "Apr 30, 2015, 12:00 AM"
let thursday18thWeekOf2015Date = userCalendar.dateFromComponents(thursday18thWeekOf2015DateComponents)!

Now it’s time to go the other way around, and extract date components from those dates. Once again, it’s the calendar that provides the method for making the conversion.

To extract NSDateComponents from an NSDate, we’ll do the following:

  • Create NSCalendar instances, if needed
  • Specify a set of date components using NSCalendarUnit bitmasks
  • Create the NSDateComponents by passing the NSDate instance to NSCalendar‘s components instance method

nsdate to nsdatecomponents

We already have a calendar instance: userCalendar, which is associated with the user’s time zone. If we use it to extract date components from a given date, the dates and times will be interpreted in the context of its time zone.

Let’s create two more calendars with two different time zones:

  • The US/Pacific time zone (UTC-08:00)
  • The Japan time zone (UTC+09:00)

Here’s what the code looks like:

// (Previous code goes here)

let pacificCalendar = NSCalendar(calendarIdentifier: NSCalendarIdentifierGregorian)!
pacificCalendar.timeZone = NSTimeZone(name: "US/Pacific")!

let japanCalendar = NSCalendar(calendarIdentifier: NSCalendarIdentifierGregorian)!
japanCalendar.timeZone = NSTimeZone(name: "Asia/Tokyo")!

Extracting all the possible date components from a date can be computationally costly, so NSCalendar‘s components instance method requires you to specify the components you want to extract. We want to extract these components from our dates:

  • year
  • month
  • day
  • hour
  • minute
  • weekday
  • weekdayOrdinal

Here’s the code that specifies this:

// (Previous code goes here)

let requestedDateComponents: NSCalendarUnit = [.Year,
                                               .Month,
                                               .Day,
                                               .Hour,
                                               .Minute,
                                               .Weekday,
                                               .WeekdayOrdinal]

Now that we’ve done that, we can start extracting date components:

// (Previous code goes here)

// Date components in the user's time zone
let jan9_2007Components = userCalendar.components(requestedDateComponents,
                                                  fromDate: iPhoneAnnouncementDate)
jan9_2007Components.year
jan9_2007Components.month
jan9_2007Components.day
jan9_2007Components.hour
jan9_2007Components.minute
jan9_2007Components.weekday
jan9_2007Components.weekdayOrdinal

// Date components in the US/Pacific time zone
let march10_1876PacificComponents = pacificCalendar.components(requestedDateComponents,
                                                               fromDate: iPhoneAnnouncementDate)
march10_1876PacificComponents.year
march10_1876PacificComponents.month
march10_1876PacificComponents.day
march10_1876PacificComponents.hour
march10_1876PacificComponents.minute
march10_1876PacificComponents.weekday
march10_1876PacificComponents.weekdayOrdinal

// Date components in Japan's time zone
let march10_1876JapanComponents = japanCalendar.components(requestedDateComponents,
                                                           fromDate: iPhoneAnnouncementDate)
march10_1876JapanComponents.year
march10_1876JapanComponents.month
march10_1876JapanComponents.day
march10_1876JapanComponents.hour
march10_1876JapanComponents.minute
march10_1876JapanComponents.weekday
march10_1876JapanComponents.weekdayOrdinal

In your playground’s sidebar, you should see results similar to those listed in the table below:

Component My user calendar Pacific calendar Japan calendar
year 2007 2007 2007
month 1 1 1
day 9 9 10
hour 13 10 3
minute 0 0 0
weekday 3 3 4
weekdayOrdinal 2 2 2

As you can see, January 9, 2007 at 10:00 a.m. in the US/Pacific time zone is January 9, 2007 at 1:00 p.m. in my time zone (US/Eastern) and January 10, 2007 at 3:00 a.m. in Japan. In the US, that date was the second Tuesday in January 2007; in Japan, it was the second Wednesday.

Turning dates into strings (and vice versa) with NSDateFormatter

nsdate - nsdateformatter - stringJust as you use an calendar to convert date components into dates and vice versa, you use a date formatter — an instance of the NSDateFormatter — to do the conversions.

Formatting date strings for the user

If you need to display a date as text for the user, it’s best if you use Cocoa’s built-in date styles. These are a set of predefined styles for formatting dates and times based on the user’s preferred settings. These styles, which are all values of the NSDateFormatterStyle enumeration, come in a selection of lengths — short, medium, long, and full — and using them is the preferred way to create date strings for the user to read.

Add the following code to your playground:

// (Previous code goes here)

let formatter = NSDateFormatter()

// No date style or time style defined:
// The result for the line below is
// ""
formatter.stringFromDate(firstLandPhoneCallDate)

// Only the date style is defined:
formatter.dateStyle = .MediumStyle
// The result for the line below is
// "Mar 10, 1876"
formatter.stringFromDate(firstLandPhoneCallDate)

// The date style and time style have been defined:
formatter.timeStyle = .ShortStyle
// The result for the line below is
// "Mar 10, 1876, 12:00 AM"
formatter.stringFromDate(firstLandPhoneCallDate)

Here’s how the various date and time formatter styles get rendered:

If dateStyle and timeStyle are both set to… the date formatter’s output looks like…
NoStyle
ShortStyle 1/27/10, 1:00 PM
MediumStyle Jan 27, 2010, 1:00:00 PM
LongStyle January 27, 2010 at 1:00:00 PM EST
FullStyle Wednesday, January 27, 2010 at 1:00:00 PM Eastern Standard Time

What’s up with NoStyle? It’s there so you can limit the resulting string so that it shows only the date or only the time.

NSDateFormatter has a timeZone property so that you can ensure that the date string reflects a specific time zone:

// (Previous code goes here)

formatter.dateStyle = .MediumStyle
formatter.timeStyle = .ShortStyle
formatter.timeZone = NSTimeZone(name: "US/Pacific")

// The result for the line below is
// "Jan 27, 2010, 10:00 AM"
formatter.stringFromDate(iPadAnnouncementDate)

Formatting date strings for other computers

As I wrote earlier, if you’re formatting dates for the user, it’s strongly recommended that you use NSDateFormatter‘s dateStyle and timeStyle properties, which will format dates and times according to the user’s settings. However, if you need to need your date strings to be in a specific format (for an API, for example), you can provide NSDateFormatter with a format string:

// (Previous code goes here)

// Setting the locale to POSIX ensures that
// the user's locale won't be used
formatter.locale = NSLocale(localeIdentifier: "en_US_POSIX")

// NSDateFormatter's format string uses the date format specifiers
// spelled out in Unicode Technical Standard #35 (located at
// http://www.unicode.org/reports/tr35/tr35-25.html#Date_Format_Patterns)
formatter.dateFormat = "y-MM-dd"

// The result for the line below is
// "2007-01-09"
formatter.stringFromDate(iPhoneAnnouncementDate)

While you can browse through Appendix F of the Unicode Technical Standard #35 to look at all the date format specifiers supported by NSDateFormatter, you might find it easier to use the table below. It shows a number of format strings applied to the iPhone announcement date (January 9, 2007 at 10:00 a.m. Pacific):

Format string Result
'Year: 'y' Month: 'M' Day: 'd Year: 2007 Month: 1 Day: 9
MM/dd/yy 01/09/07
MMM dd, yyyy Jan 09, 2007
E MMM dd, yyyy Tue Jan 09, 2007
EEEE, MMMM dd, yyyy' at 'h:mm a. Tuesday, January 09, 2007 at 10:00 AM.
EEEE, MMMM dd, yyyy' at 'h:mm a zzzz. Tuesday, January 09, 2007 at 10:00 AM Pacific Standard Time.

Turning strings into dates

If you specify a date format string, you can use NSDateFormatter to take a string following that format to turn it into an NSDate. For example:

// (Previous code goes here)

formatter.dateFormat = "yyyy/MM/dd hh:mm Z"
// This string will be converted to a date because
// it's in the same format as the dateFormat string:
formatter.dateFromString("2015/03/07 11:00 -0500")!
// This string will NOT be converted to a date because
// it's NOT in the same format as the dateFormat string;
// its result will be nil:
formatter.dateFromString("Mar 7, 2015 11:00 AM EST")

// Let's change the date format strings and try
// dateFromString with the same two strings:
formatter.dateFormat = "MMM d, yyyy hh:mm a zz"
// This results in an NSDate:
formatter.dateFromString("Mar 7, 2015 11:00 AM EST")!
// This results in nil:
formatter.dateFromString("2014/11/05")

Tying it all together

If you’ve made it to this point in the article, this chart should now make sense:

cocoa date time class chart

Once again, click the chart to see it at full size.

You should now be able to:

  • Create dates “from scratch” (that is, create them using an offset of a number of  seconds from the start of the third millennium)
  • Create dates from date components (that is, from numbers representing a day, month, and year)
  • Convert between dates and date components
  • Convert dates into string representations and string representations of dates into dates

In the next article in this series, we’ll look at date calculations and some handy functions that let you harness Swift’s expressive power and make working with dates easier.
dates and times in swift - smallRelated articles

A very brief introduction to date formatting in Swift and iOS: The oversight in a mostly-good book on Swift programming led me down the path of writing articles about dates and times in Swift, starting with this one, where I look atNSDateFormatter.

How to work with dates and times in Swift, part two: Calculations with dates: Now that we’ve got the basics, it’s time to do some date arithmetic: comparing two dates to see which one is the earlier and later one, finding out how far apart two dates are, and adding and subtracting from dates.

How to work with dates and times in Swift, part three: Making date arithmetic more Swift-like: Cocoa’s date and time classes have an Objective-C heritage, which in the Swift context, feel kind of clunky. In this article, I look at ways — and by ways, I mean helper functions and class extensions — to make date calculations feel more like Swift.

How to work with dates and times in Swift, part four: A more Swift-like way to get the time interval between two dates: This quick article shows you how to make an operator overload that makes getting the time interval between two dates more like subtraction.