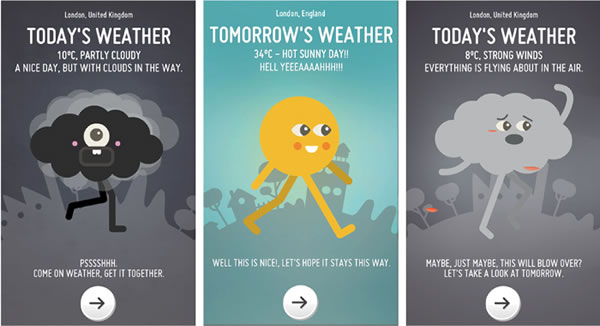
Screenshots from the Optimistic Weather app. Click the image to see the app in the App Store.
According to comScore, two of the top 25 most-used mobile apps were weather apps, namely the Weather Channel app (#16) and the Weather Channel widget (#20). This makes sense, as a weather app fits at least two, if not three, of the book Tapworthy says are the mobile users’ mindsets when they launch an app:
- I’m bored
- I’m local
- I’m micro-tasking
Weather apps are great programming exercises, as they combine a number of different features, including fetching information from online sources, and geolocation. In this series, we’ll build a weather app from scratch, starting with a simple, no-user-interface, only-developers-could-love, bare-bones weather app, and over time, turn it into something better.
This first article looks at where we’ll get the weather data for our app and signing up for a free subscription to that weather source. We’ll then retrieve weather data from that source, first manually, then programatically. At the end of this article, you’ll have a very basic weather app; it won’t have a user interface, and the way it presents information is more developer-friendly than user-friendly, but it will perform a key task: retrieve the current weather for a specified location.
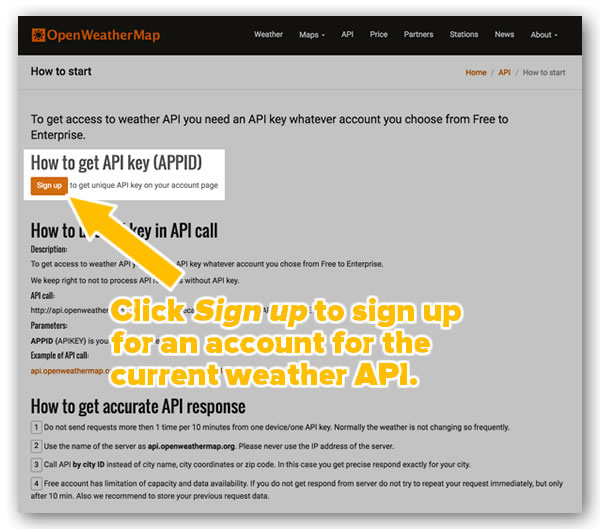
Step 1: Get an OpenWeatherMap API key for current weather data
There are a number of weather APIs to choose from, and for this tutorial, we’ll use OpenWeatherMap’s API. It’s simple to use, and you can make up to 60 calls a minute on their free API subscription plan, which should be more than enough for testing purposes and personal use.
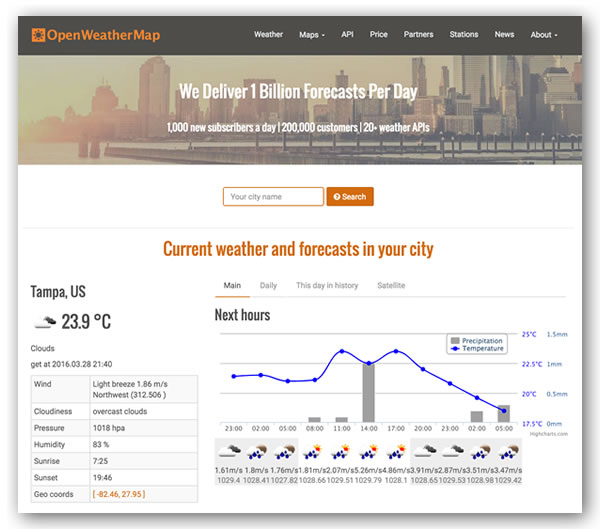
If you go to OpenWeatherMap’s API page (pictured below), you’ll see that they offer all sorts of weather data. For this app, which answers the question “What’s the weather like right now for a given place?”, we’ll use their current weather data API. Click on the API doc button under Current weather data:
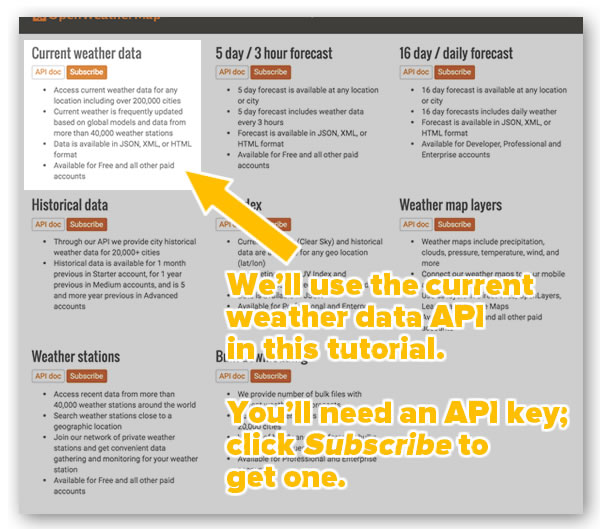
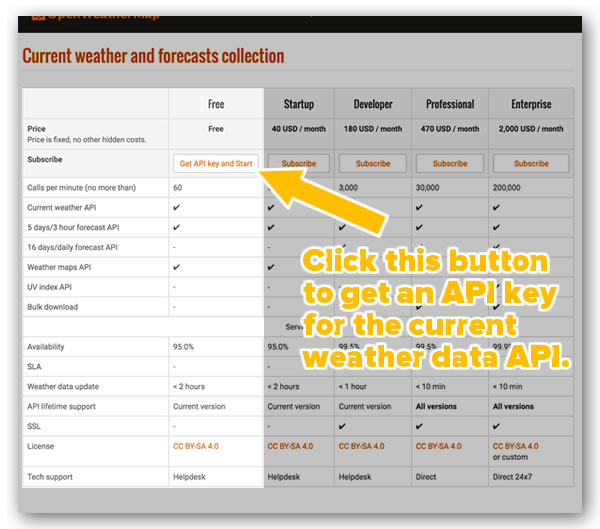
and you’ll be taken to this page. Under the Free column, click the Get API key and Start button:
which will take you to yet another page. Click the Sign up button…
…which takes you to a page where you provide a little info:
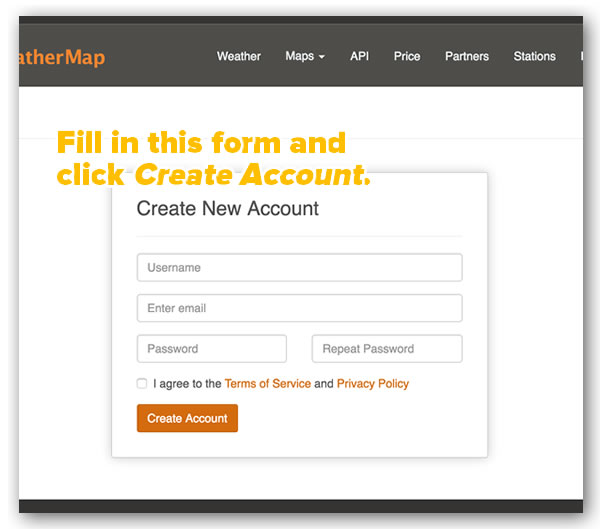
Once you’ve submitted your info, you’ll have created an OpenWeatherMap account. You’ll be sent to a page that shows your API key (pictured below). If you ever need to look up this hey again, you can log into the site and click on the Home link near the upper right-hand corner of the page, which will take you to your account information, which includes your API key.
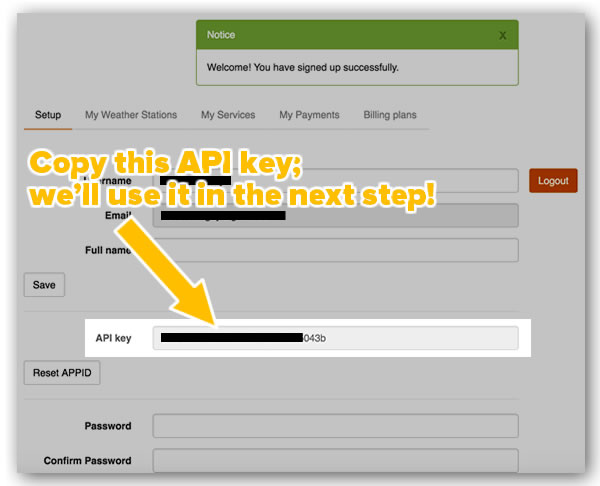
Copy the API key, and get ready to use it in the next step!
Step 2: Test your API key using your browser
OpenWeatherMap’s current weather data API accepts calls in the format shown below:
http://api.openweathermap.org/data/2.5/weather?q=\CityNameGoesHere&APPID=YourAPIKeyGoesHere
Note the parts in italics; you’ll replace those:
CityNameGoesHereis replaced with the name of the city whose current weather data you want to fetch, andYourAPIKeyGoesHereis replaced with your API key.
For example, if you want the weather for Tampa, and your API key is abcdef1234567890 (don’t bother using this key; it’s not real and for example purposes only), you’d use this call:
http://api.openweathermap.org/data/2.5/weather?q=\Tampa&APPID=abcdef1234567890
Try constructing your own call, using the format above, along with Tampa for the city and your API key after the part that goes APPID=, and enter it into your browser’s address bar. You should be taken to a very plain page displaying something that looks something like the text below:
{"coord":{"lon":-82.46,"lat":27.95},"weather":[{"id":803,"main":"Clouds","description":"broken clouds","icon":"04n"}],"base":"cmc stations","main":{"temp":296.75,"pressure":1018,"humidity":94,"temp_min":295.15,"temp_max":298.15},"wind":{"speed":1.5},"clouds":{"all":75},"dt":1459224301,"sys":{"type":1,"id":721,"message":0.0078,"country":"US","sunrise":1459250563,"sunset":1459295181},"id":4174757,"name":"Tampa","cod":200}
What you’re looking is current weather data, formatted in JSON. Here’s the same data, reformatted so that it’s a little bit easier to read:
{
"coord": {"lon": -82.46, "lat": 27.95},
"weather": [{"id": 803,
             "main": "Clouds",
             "description": "broken clouds",
             "icon": "04n"}],
"base": "cmc stations",
"main": {"temp": 296.75,
        "pressure": 1018,
        "humidity": 94,
        "temp_min": 295.15,
        "temp_max": 298.15},
"wind": {"speed": 1.5},
"clouds": {"all": 75},
"dt": 1459224301,
"sys": {"type": 1,
        "id": 721,
        "message": 0.0078,
        "country": "US",
        "sunrise": 1459250563,
        "sunset": 1459295181},
"id": 4174757,
"name":"Tampa",
"cod": 200
}
The data that OpenWeatherMap returns is a JSON dictionary. Its keys are:
coord: A dictionary containing the geographic coordinates for the weather data, with the following keys:lon: Longitude, in degreeslat: Latitude, in degrees
weather: An array that usually contains a single dictionary containing the qualitative data about the weather. The dictionary contains the following keys:id: The condition code for the current weather. You can find a list of weather condition codes on this page (you’ll need to scroll down to the section marked Weather condition codes).main: The general category for the current weather. This is usually a single word such asClear,Clouds,Rain,Thunderstorm,Snow, and so on.description: A slightly longer description of the current weather. Wheremainmay specifyClouds, this value may befew clouds,broken clouds,scattered clouds, etc.icon: The name of the icon for the current weather. You can find a list of icons and their names on this page (you’ll need to scroll down to the section marked Weather icons).
base: This is described in the API documentation as an “internal parameter” and probably useful only to OpenWeatherMap’s developers.main: A dictionary containing the quantitative data about the weather. The dictionary contains the following keys:temp: The current temperature, expressed in Kelvin by default.pressure: Atmospheric pressure, expressed in hPa (hectopascal, which is equivalent to 1 millibar). This is the pressure at sea level, if there’s no data for the atmospheric pressure at sea level or ground level.humidity: Humidity, expressed as a percentage.temp_min: Minimum temperature at the moment — the deviation from the current temperature, which you’ll find in large metropolitan areas, expressed in Kelvin by default.temp_max: Maximum temperature at the moment — the deviation from the current temperature, which you’ll find in large metropolitan areas, expressed in Kelvin by default.sea_level: Atmospheric pressure at sea level, expressed in hPa (hectopascal, which is equivalent to 1 millibar).grnd_level: Atmospheric pressure at ground level, expressed in hPa (hectopascal, which is equivalent to 1 millibar).
wind: A dictionary containing data about the wind, with the following keys:speed: The wind speed, expressed in meters per second by default.deg: The direction that the wind is coming from, expressed in degrees.
clouds: A dictionary containing data about cloud cover, with the following keys:all: The amount of cloud cover, expressed as a percentage.
dt: The time when the weather data was provided, in UTC, formatted as Unix time (number of seconds since January 1, 1970, 00:00:00 UTC).sys: A dictionary containing system information, as well as a number of useful items. It contains these keys:type: This is described in the API documentation as an “internal parameter” and probably useful only to OpenWeatherMap’s developers.id: This is described in the API documentation as an “internal parameter” and probably useful only to OpenWeatherMap’s developers.message: This is described in the API documentation as an “internal parameter” and probably useful only to OpenWeatherMap’s developers.country: The two-letter ISO country code for the weather data’s location. Useful when you want to be sure that you’re getting the weather for St. Petersburg in the U.S. or in Russia.sunrise: The time when the sun will rise at the weather data’s location, in UTC, formatted as Unix time (number of seconds since January 1, 1970, 00:00:00 UTC).sunset: The time when the sun will set at the weather data’s location, in UTC, formatted as Unix time (number of seconds since January 1, 1970, 00:00:00 UTC).
id: OpenWeatherMap’s internal ID number for the city corresponding to the weather data’s location.name: OpenWeatherMap’s internal name for the city corresponding to the weather data’s location.cod: This is described in the API documentation as an “internal parameter” and probably useful only to OpenWeatherMap’s developers.
Once you’ve confirmed that you can manually get current weather forecasts using your API key and browser, let’s do it programatically with an app.
Step 3: Create a basic app to get the data from OpenWeatherMap
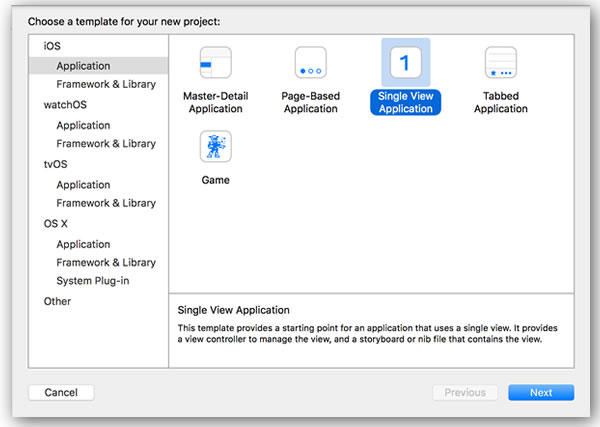
Start a new project by doing the File → New → Project… dance and then selecting Single View Application.
Our first iteration won’t have any user interface. It’ll simply try to communicate with OpenWeatherMap, and print the results to the console. Once we’ve confirmed that we’ve got our API communications code working, we’ll add a simple user interface, and I’ll leave making it fancier as an exercise for you.
Many tutorials are happy to stick all the code in a view controller in order to keep the tutorial simple. While it may make writing the tutorial simpler, I think it results in cluttered view controllers and teaches bad programming habits. I’d much rather keep the code in the view controller limited to handling user interactions and put what some people call the “business logic” of our app — in this case, the code that communicates with OpenWeatherMap and extracts weather data from what it sends back — into a separate model class.
With that in mind, we’ll create a new class by selecting File → New → File… from the menu bar, then selecting Swift File:

Give the new file the name WeatherGetter.swift. It will be the home of a class we’ll call WeatherGetter, which will house the code to communicate with OpenWeatherMap and provide the weather data that the view controller will eventually use.
Change the contents of WeatherGetter.swift so that it contains the following code:
import Foundation

class WeatherGetter {

  private let openWeatherMapBaseURL = "http://api.openweathermap.org/data/2.5/weather"
  private let openWeatherMapAPIKey = "YOUR API KEY HERE"

  func getWeather(city: String) {

    // This is a pretty simple networking task, so the shared session will do.
    let session = NSURLSession.sharedSession()

    let weatherRequestURL = NSURL(string: "\(openWeatherMapBaseURL)?APPID=\(openWeatherMapAPIKey)&q=\(city)")!

    // The data task retrieves the data.
    let dataTask = session.dataTaskWithURL(weatherRequestURL) {
      (data: NSData?, response: NSURLResponse?, error: NSError?) in
      if let error = error {
        // Case 1: Error
        // We got some kind of error while trying to get data from the server.
        print("Error:\n\(error)")
      }
      else {
        // Case 2: Success
        // We got a response from the server!
        print("Data:\n\(data!)")
      }
    }

    // The data task is set up...launch it!
    dataTask.resume()
  }

}
You’ve probably figured out that you should replace the string YOUR API KEY HERE with the API key that you got in step 1 and used in step 2. You’re probably eager to see this code in action, so we’ll defer the explanation of how it works until we’ve got the app up and running.
We now need to create an instance of the WeatherGetter class and call its getWeather() method. We’ll do it in the viewDidLoad() method of the view controller:
override func viewDidLoad() {
  super.viewDidLoad()

  let weather = WeatherGetter()
  weather.getWeather("Tampa")
}
Now that we’ve got the WeatherGetter class and a way to instantiate and use it, let’s run the app. Remember that right now, it doesn’t have a user interface, and outputs everything using print statements, which will appear in the output pane of XCode’s debug area:
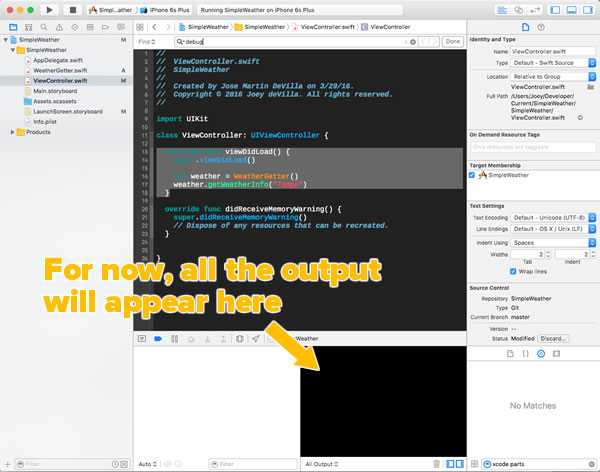
Step 4: Run the app (and tweak it)
Run the app. You’ll see some disappointing text in the debug area’s output pane that will be similar to this:
2016-04-02 09:03:42.316 SimpleWeather[51150:6547853] App Transport Security has blocked a cleartext HTTP (http://) resource load since it is insecure. Temporary exceptions can be configured via your app's Info.plist file.

Error:

Error Domain=NSURLErrorDomain Code=-1022 "The resource could not be loaded because the App Transport Security policy requires the use of a secure connection." UserInfo={NSUnderlyingError=0x7f89ab201e20 {Error Domain=kCFErrorDomainCFNetwork Code=-1022 "(null)"}, NSErrorFailingURLStringKey=http://api.openweathermap.org/data/2.5/weather?q=Tampa&APPID=***YOUR_APP_ID_HERE***, NSErrorFailingURLKey=http://api.openweathermap.org/data/2.5/weather?q=Tampa&APPID=***YOUR_APP_ID_HERE***, NSLocalizedDescription=The resource could not be loaded because the App Transport Security policy requires the use of a secure connection.}
We’ve just run into a security feature of iOS networking that by default requires HTTP connections to be of the secure and encrypted HTTPS variety. Someday, all HTTP communication will be done as HTTPS, but that day hasn’t come yet.
The first thing we should do is see if we can communicate with OpenWeatherMap using HTTPS. Let’s try changing the URL in WeatherGetter.swift so that it starts with https: instead of http:…
let weatherRequestURL = NSURL(string: "https://api.openweathermap.org/data/2.5/weather?q=\(city)&APPID=\(openWeatherMapAPIKey)")!
If we run the app again, we get a different, but equally disappointing message in the debug output pane:
Error:

Error Domain=NSURLErrorDomain Code=-1004 "Could not connect to the server." UserInfo={NSUnderlyingError=0x7fd6940016c0 {Error Domain=kCFErrorDomainCFNetwork Code=-1004 "(null)" UserInfo={_kCFStreamErrorCodeKey=61, _kCFStreamErrorDomainKey=1}}, NSErrorFailingURLStringKey=https://api.openweathermap.org/data/2.5/weather?q=Tampa&APPID=***YOUR_APP_ID_HERE***, NSErrorFailingURLKey=https://api.openweathermap.org/data/2.5/weather?q=Tampa&APPID=***YOUR_APP_ID_HERE***, _kCFStreamErrorDomainKey=1, _kCFStreamErrorCodeKey=61, NSLocalizedDescription=Could not connect to the server.}
So now we know that OpenWeatherMap doesn’t accept HTTPS connection requests. Luckily for us, we can change the default connection security policy for our app so that iOS allows it to communicate using plain HTTP. We can do this by adding a couple of extra rows to Info.plist:
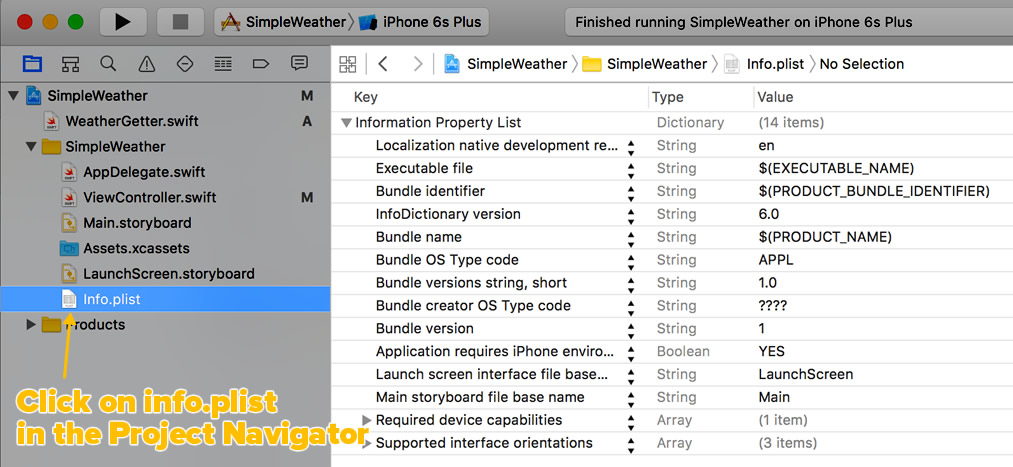
Click the screen shot to see it at full size.
Info.plist is an XML file that contains configuration information, and it’s included in every iOS project. In order to make it more readable, Xcode presents it in a nice list interface. If you prefer, you can edit it in its plain XML form by right-clicking on Info.plist in the Project Navigator and selecting Open As → Source Code in the menu that appears.
To enable our app to use plain HTTP communication, we want to do two things in Info.plist:
- Add a new dictionary item with the key App Transport Security Settings
- Add an item to the App Transport Security Settings dictionary with the key Allow Arbitrary Loads and the boolean value YES
Rather than describe how you do this, I made a video of the process that should be pretty easy to follow:
In the end, you should have this as part of your Info.plist:

Once that’s done, don’t forget to change the URL in WeatherGetter.swift so that it starts with http: and not https:…
let weatherRequestURL = NSURL(string: "http://api.openweathermap.org/data/2.5/weather?q=\(city)&APPID=\(openWeatherMapAPIKey)")!
Now try running the app. If you’re connected to the internet and OpenWeatherMap.org’s server is running normally, you should see something like the following in the debug output pane:
Data:

<7b22636f 6f726422 3a7b226c 6f6e223a 2d38322e 34362c22 6c617422 3a32372e 39357d2c 22776561 74686572 223a5b7b 22696422 3a323131 2c226d61 696e223a 22546875 6e646572 73746f72 6d222c22 64657363 72697074 696f6e22 3a227468 756e6465 7273746f 726d222c 2269636f 6e223a22 31316422 7d2c7b22 6964223a 3530302c 226d6169 6e223a22 5261696e 222c2264 65736372 69707469 6f6e223a 226c6967 68742072 61696e22 2c226963 6f6e223a 22313064 227d2c7b 22696422 3a373031 2c226d61 696e223a 224d6973 74222c22 64657363 72697074 696f6e22 3a226d69 7374222c 2269636f 6e223a22 35306422 7d5d2c22 62617365 223a2263 6d632073 74617469 6f6e7322 2c226d61 696e223a 7b227465 6d70223a 3239372e 35332c22 70726573 73757265 223a3130 31342c22 68756d69 64697479 223a3838 2c227465 6d705f6d 696e223a 3239362e 31352c22 74656d70 5f6d6178 223a3239 382e3135 7d2c2277 696e6422 3a7b2273 70656564 223a352e 312c2264 6567223a 3138307d 2c22636c 6f756473 223a7b22 616c6c22 3a39307d 2c226474 223a3134 35393630 39363832 2c227379 73223a7b 22747970 65223a31 2c226964 223a3732 352c226d 65737361 6765223a 302e3030 35392c22 636f756e 74727922 3a225553 222c2273 756e7269 7365223a 31343539 35393538 36332c22 73756e73 6574223a 31343539 36343039 32337d2c 22696422 3a343137 34373537 2c226e61 6d65223a 2254616d 7061222c 22636f64 223a3230 307d>
At least now we’re getting some data. Let’s make it a little more human-readable. In WeatherGetter.swift, let’s tweak the else clause so it looks like this:
else {
  // Case 2: Success
  // We got a response from the server!
  print("Raw data:\n\(data!)\n")
  let dataString = String(data: data!, encoding: NSUTF8StringEncoding)
  print("Human-readable data:\n\(dataString!)")
}
Now, when we run the code — and assuming your internet connection and the OpenWeatherMap server are working — the output should look something like this:
Raw data:

<7b22636f 6f726422 3a7b226c 6f6e223a 2d38322e 34362c22 6c617422 3a32372e 39357d2c 22776561 74686572 223a5b7b 22696422 3a323131 2c226d61 696e223a 22546875 6e646572 73746f72 6d222c22 64657363 72697074 696f6e22 3a227468 756e6465 7273746f 726d222c 2269636f 6e223a22 31316422 7d2c7b22 6964223a 3530312c 226d6169 6e223a22 5261696e 222c2264 65736372 69707469 6f6e223a 226d6f64 65726174 65207261 696e222c 2269636f 6e223a22 31306422 7d2c7b22 6964223a 3730312c 226d6169 6e223a22 4d697374 222c2264 65736372 69707469 6f6e223a 226d6973 74222c22 69636f6e 223a2235 3064227d 5d2c2262 61736522 3a22636d 63207374 6174696f 6e73222c 226d6169 6e223a7b 2274656d 70223a32 39372e36 322c2270 72657373 75726522 3a313031 332c2268 756d6964 69747922 3a313030 2c227465 6d705f6d 696e223a 3239362e 31352c22 74656d70 5f6d6178 223a3239 392e3135 7d2c2277 696e6422 3a7b2273 70656564 223a342e 362c2264 6567223a 3138307d 2c22636c 6f756473 223a7b22 616c6c22 3a39307d 2c226474 223a3134 35393631 30323932 2c227379 73223a7b 22747970 65223a31 2c226964 223a3638 302c226d 65737361 6765223a 302e3030 34392c22 636f756e 74727922 3a225553 222c2273 756e7269 7365223a 31343539 35393538 36322c22 73756e73 6574223a 31343539 36343039 32337d2c 22696422 3a343137 34373537 2c226e61 6d65223a 2254616d 7061222c 22636f64 223a3230 307d>
Human-readable data:

{"coord":{"lon":-82.46,"lat":27.95},"weather":[{"id":211,"main":"Thunderstorm","description":"thunderstorm","icon":"11d"},{"id":501,"main":"Rain","description":"moderate rain","icon":"10d"},{"id":701,"main":"Mist","description":"mist","icon":"50d"}],"base":"cmc stations","main":{"temp":297.62,"pressure":1013,"humidity":100,"temp_min":296.15,"temp_max":299.15},"wind":{"speed":4.6,"deg":180},"clouds":{"all":90},"dt":1459610292,"sys":{"type":1,"id":680,"message":0.0049,"country":"US","sunrise":1459595862,"sunset":1459640923},"id":4174757,"name":"Tampa","cod":200}
As you can see, the stuff after “Human-readable data:” looks like the output you got when you manually got the weather data from OpenWeatherMap in step 2.
Step 5: Play with the app, and keep an eye open for the next installment in this series!
Here’s what your WeatherGetter.swift file should look like…
import Foundation

class WeatherGetter {

  private let openWeatherMapBaseURL = "http://api.openweathermap.org/data/2.5/weather"
  private let openWeatherMapAPIKey = "YOUR API KEY HERE"

  func getWeather(city: String) {

    // This is a pretty simple networking task, so the shared session will do.
    let session = NSURLSession.sharedSession()

    let weatherRequestURL = NSURL(string: "\(openWeatherMapBaseURL)?APPID=\(openWeatherMapAPIKey)&q=\(city)")!

    // The data task retrieves the data.
    let dataTask = session.dataTaskWithURL(weatherRequestURL) {
      (data: NSData?, response: NSURLResponse?, error: NSError?) in
      if let error = error {
        // Case 1: Error
        // We got some kind of error while trying to get data from the server.
        print("Error:\n\(error)")
      }
      else {
        // Case 2: Success
        // We got a response from the server!
        print("Raw data:\n\(data!)\n")
        let dataString = String(data: data!, encoding: NSUTF8StringEncoding)
        print("Human-readable data:\n\(dataString!)")
      }
    }

    // The data task is set up...launch it!
    dataTask.resume()
  }

}
…here’s what ViewController.swift should look like…
import UIKit

class ViewController: UIViewController {

  override func viewDidLoad() {
    super.viewDidLoad()

    let weather = WeatherGetter()
    weather.getWeather("Tampa")
  }

  override func didReceiveMemoryWarning() {
    super.didReceiveMemoryWarning()
    // Dispose of any resources that can be recreated.
  }

}
…and if you prefer to edit Info.plist as raw XML, here’s what it should look like:
<?xml version="1.0" encoding="UTF-8"?>
<!DOCTYPE plist PUBLIC "-//Apple//DTD PLIST 1.0//EN" "http://www.apple.com/DTDs/PropertyList-1.0.dtd">
<plist version="1.0">
<dict>
	<key>CFBundleDevelopmentRegion</key>
	<string>en</string>
	<key>CFBundleExecutable</key>
	<string>$(EXECUTABLE_NAME)</string>
	<key>CFBundleIdentifier</key>
	<string>$(PRODUCT_BUNDLE_IDENTIFIER)</string>
	<key>CFBundleInfoDictionaryVersion</key>
	<string>6.0</string>
	<key>CFBundleName</key>
	<string>$(PRODUCT_NAME)</string>
	<key>CFBundlePackageType</key>
	<string>APPL</string>
	<key>CFBundleShortVersionString</key>
	<string>1.0</string>
	<key>CFBundleSignature</key>
	<string>????</string>
	<key>CFBundleVersion</key>
	<string>1</string>
	<key>LSRequiresIPhoneOS</key>
	<true/>
	<key>UILaunchStoryboardName</key>
	<string>LaunchScreen</string>
	<key>UIMainStoryboardFile</key>
	<string>Main</string>
	<key>UIRequiredDeviceCapabilities</key>
	<array>
		<string>armv7</string>
	</array>
	<key>UISupportedInterfaceOrientations</key>
	<array>
		<string>UIInterfaceOrientationPortrait</string>
		<string>UIInterfaceOrientationLandscapeLeft</string>
		<string>UIInterfaceOrientationLandscapeRight</string>
	</array>
	<key>NSAppTransportSecurity</key>
	<dict>
		<key>NSAllowsArbitraryLoads</key>
		<true/>
	</dict>
</dict>
</plist>

You can also download the Xcode project — it’s a mere 33KB zipped.
Try some experiments. Here are a few of my suggestions:
- What happens if you run the app in Airplane Mode?
- What happens if you change the URL in
WeatherGetterto a non-existent one, such asopenweathermoop.org? - How would you go about extracting the weather information from the JSON returned by the server?
- How would you display the weather information to the user?
In the next installment in this series, we’ll take a step back and cover “iOS/Swift networking 101”, taking a closer look at the various objects used inside the WeatherGetter class.
17 replies on “How to build an iOS weather app in Swift, part 1: A very bare-bones weather app”
[…] The previous article in this series showed you how to: […]
I have tried this in xcode 7.3 playground and I do not get any data returned to me?
[…] the first and second articles in this series, we spent just about all our time working on the WeatherGetter […]
[…] case you missed the earlier installments in this series, here are part one, part two, and part […]
[…] In the first article, we introduced OpenWeatherMap, its current forecast API, and how to use that API to get weather data for a specific city, both manually and programatically. […]
I am not getting any data returned.
Also there is error within WeatherGetter
} as! (Data?, URLResponse?, Error?) -> Void) Thread1: Exc_BAD_INSTRUCTION (code=EXC_I386_INVOP,subcode=0x0)
try
let dataTask = session.dataTask(with: weatherRequestURL as URL) {
(data: Data?, response: URLResponse?, error: Error?) in
Not getting any data, and I am getting the same error as Steve.
Any suggestions?
Thank you for this nice tutorial.
I can’t seem to get pass the WeatherGetter.swift. Xcode is displaying an error on NSURLSession and NSURLResponse. It wants me to change both to URLSession and URLResponse. Can you shed a little light on what that might mean?
Im getting the same errors as Steve and Pavel. Would love some insight into why this is happening and how to fix. Thanks
change this:
let dataTask = session.dataTaskWithURL(weatherRequestURL) {
(data: NSData?, response: NSURLResponse?, error: NSError?) in
into:
let dataTask = session.dataTaskWithURL(weatherRequestURL) {
(data, response, error) -> Void in
and if you downloaded the example, you also need to remove the following:
as! (Data?, URLResponse?, Error?) -> Void
let weatherRequestURL = URL(string: “\(openWeatherMapBaseURL)?APPID=\(openWeatherMapAPIKey)&q=\(city)”)!
Error : Thred 1: Exc
fatal error: unexpectedly found nil while unwrapping an Optional value
[…] However, many servers — including OpenWeatherMap’s, which powers a number of weather apps, including the one featured in my tutorial — don’t accept HTTPS connections. That’s why they still offer the option to let your app […]
Swift 3.0
let dataTask = session.dataTaskWithURL(weatherRequestURL) {
(data, response, error) -> Void in
has been renamed to
let dataTask = session.dataTask(with: weatherRequestURL) {
(data, response, error) -> Void in
As for the fatal error, check your string URL. it shouldn’t contain any spaces or non-ASCII characters. (you will need another workaround for that). For such inputs the method will return nil and thus fail at unwrapping it.
To all getting “unexpectedly found nil while unwrapping an Optional value” error: in my case it was me passing a string with not allowed characters to the function building an API request. E.g. it threw an error when I entered “Wrocław” when calling weather.getWeather(city: ) in the View Controller, but it worked after changing it to “Wroclaw”.
[…] Part 1: A very bare-bones weather app […]
So I’m really new at swift. I’m running Swift 5 Xcode 10. Trying to use this example and converted what I know. Has anyone got this to work? I’m not getting any data. I have tried all this stuff above. Ideas anyone?
I replaced my map api key with the word “myappid”. So please do not says its that b/c its not.
Import Foundation
class WeatherGetter {
private let openWeatherMapBaseURL = “http://api.openweathermap.org/data/2.5/weather”
private let openWeatherMapAPIKey = “myappkey”
func getWeather(city: String) {
let Ron = “http://api.openweathermap.org/data/2.5/weather?q=Sidney,Ohio&mode=xml&APPID=”myappId”&units=imperial”
let weatherRequestURL = URL(string:”\(Ron)”)!
// The data task retrieves the data.
let dataTask = session.dataTask(with: weatherRequestURL as URL) {
(data,response,error) -> Void in
if let error = error {
print(“Error:\n\(error)”)
}
else {
print(“Data:\n\(data!)”)
}
}
// The data task is set up…launch it!
dataTask.resume()
}
}