
There’ve been four articles in this series on building a simple weather iOS weather app with Swift:
- In the first article, we introduced OpenWeatherMap, its current forecast API, and how to use that API to get weather data for a specific city, both manually and programatically.
- In the second article, we went a little deeper into
NSURLSessionand the related classes that made iOS networking possible. We also took the weather data that OpenWeatherMap returned and converted it from a string containing JSON-formatted weather data into a more easily processed Swift dictionary. - In the third article, we gave our weather app a user interface.
- In the fourth article, we took a little detour from the weather app in order to introduce geolocation. We wrote a simple geolocation app that outputs the device’s coordinates to the debug console.
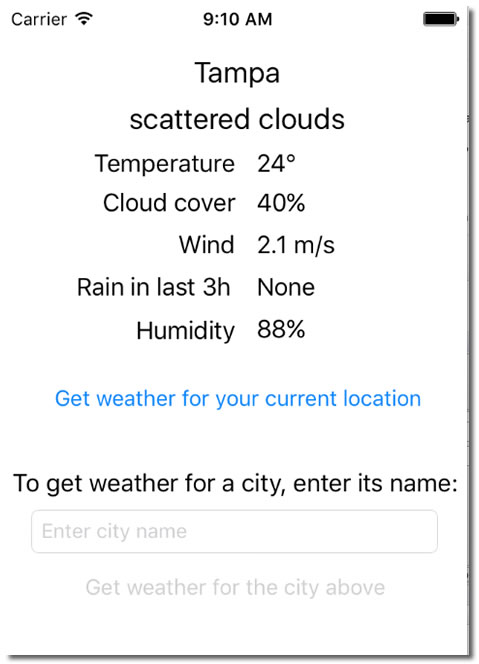
What our app will look like by the end of this article.
In this article, we’re going to take what we’ve learned from our little geolocation app and make some changes to our weather app so that:
- When the app is launched, it automatically determine the user’s current location and displays the weather for that location.
- The user can press a button marked Get weather for your current location to display the weather at his/her current location.
- The user can also enter a city name into a text field and press a button below it marked Get weather for the city above to display the weather in that city.
Another way to use OpenWeatherMap’s “current weather” API
To get the weather for a given city using OpenWeatherMap’s “current weather” API, we’ve been using this call:
http://api.openweathermap.org/data/2.5/weather?APPID=API_KEY&q=CITY_NAME
where:
- API_KEY is the developer’s API key for OpenWeatherMap
- CITY_NAME is the name of the city that we want the current weather for
There’s also a way to get the weather for a given latitude and longitude. It’s done by making this call:
http://api.openweathermap.org/data/2.5/weather?APPID=API_KEY&lat=LATITUDE&lon=LONGITUDE
where:
- API_KEY is the developer’s API key for OpenWeatherMap
- LATITUDE is the latitude of the location that we want the current weather for
- LONGITUDE is the longitude of the location that we want the current weather for
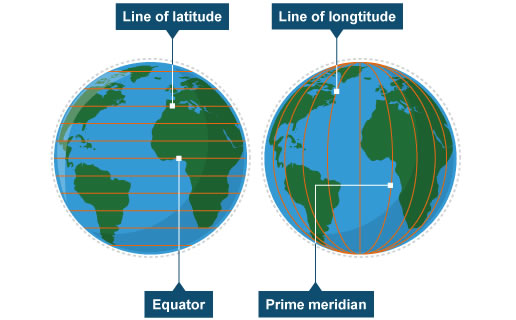
I’m based in Tampa, whose coordinates are 27.9506° N, 82.4572° W. That translates into:
- A latitude of 27.9506 (positive latitudes are north of the equator, negative latitudes are south)
- A longitude of -82.4572 (positive longitudes are east of the prime meridian in London, negative longitudes are west)
Another way of getting the current weather for Tampa from OpenWeatherMap is to make the call below.. Try pasting the URL into your browser’s address bar (using your own API key, of course):
http://api.openweathermap.org/data/2.5/weather?APPID=API_KEY&lat=27.9506&lon=-82.4572
We’re going to make some additional to our weather app so that it can do this programatically.
Updating WeatherGetter
Here’s an updated version of the WeatherGetter class, which we use to connect to OpenWeatherMap and get weather data:
import Foundation


// MARK: WeatherGetterDelegate
// ===========================
// WeatherGetter should be used by a class or struct, and that class or struct
// should adopt this protocol and register itself as the delegate.
// The delegate's didGetWeather method is called if the weather data was
// acquired from OpenWeatherMap.org and successfully converted from JSON into
// a Swift dictionary.
// The delegate's didNotGetWeather method is called if either:
// - The weather was not acquired from OpenWeatherMap.org, or
// - The received weather data could not be converted from JSON into a dictionary.
protocol WeatherGetterDelegate {
  func didGetWeather(weather: Weather)
  func didNotGetWeather(error: NSError)
}


// MARK: WeatherGetter
// ===================

class WeatherGetter {

  private let openWeatherMapBaseURL = "http://api.openweathermap.org/data/2.5/weather"
  private let openWeatherMapAPIKey = "06db44f389d2172e9b1096cdce7b051c"

  private var delegate: WeatherGetterDelegate


  // MARK: -

  init(delegate: WeatherGetterDelegate) {
    self.delegate = delegate
  }

  func getWeatherByCity(city: String) {
    let weatherRequestURL = NSURL(string: "\(openWeatherMapBaseURL)?APPID=\(openWeatherMapAPIKey)&q=\(city)")!
    getWeather(weatherRequestURL)
  }

  func getWeatherByCoordinates(latitude latitude: Double, longitude: Double) {
    let weatherRequestURL = NSURL(string: "\(openWeatherMapBaseURL)?APPID=\(openWeatherMapAPIKey)&lat=\(latitude)&lon=\(longitude)")!
    getWeather(weatherRequestURL)
  }

  private func getWeather(weatherRequestURL: NSURL) {

    // This is a pretty simple networking task, so the shared session will do.
    let session = NSURLSession.sharedSession()
    session.configuration.timeoutIntervalForRequest = 3

    // The data task retrieves the data.
    let dataTask = session.dataTaskWithURL(weatherRequestURL) {
      (data: NSData?, response: NSURLResponse?, error: NSError?) in
      if let networkError = error {
        // Case 1: Error
        // An error occurred while trying to get data from the server.
        self.delegate.didNotGetWeather(networkError)
      }
      else {
        // Case 2: Success
        // We got data from the server!
        do {
          // Try to convert that data into a Swift dictionary
          let weatherData = try NSJSONSerialization.JSONObjectWithData(
            data!,
            options: .MutableContainers) as! [String: AnyObject]

          // If we made it to this point, we've successfully converted the
          // JSON-formatted weather data into a Swift dictionary.
          // Let's now used that dictionary to initialize a Weather struct.
          let weather = Weather(weatherData: weatherData)

          // Now that we have the Weather struct, let's notify the view controller,
          // which will use it to display the weather to the user.
          self.delegate.didGetWeather(weather)
        }
        catch let jsonError as NSError {
          // An error occurred while trying to convert the data into a Swift dictionary.
          self.delegate.didNotGetWeather(jsonError)
        }
      }
    }

    // The data task is set up...launch it!
    dataTask.resume()
  }

}
We’ve made a couple of changes:
- We’ve added two new methods:
getWeatherByCityis called when we want to get the weather for that city. It accepts aStringcontaining the name of a city, which it uses to form an URL, which it then passes togetWeather.getWeatherByCoordinatesis called when we want to get the weather for a set of coordinates. It accepts twoDoublesrepresenting the latitude and longitude components of the coordinates, which it uses to form an URL, which it then passes togetWeather.
- We’ve also changed an existing method,
getWeather. It used to be public and accept a city as a parameter; now, it’s private and accepts an URL as a parameter. It’s now called indirectly;getWeatherByCityandgetWeatherByCoordinatestake city or coordinate data, convert it into an URL, and then callgetWeather. Aside from this change, the rest of its code is the same.
Updating the UI
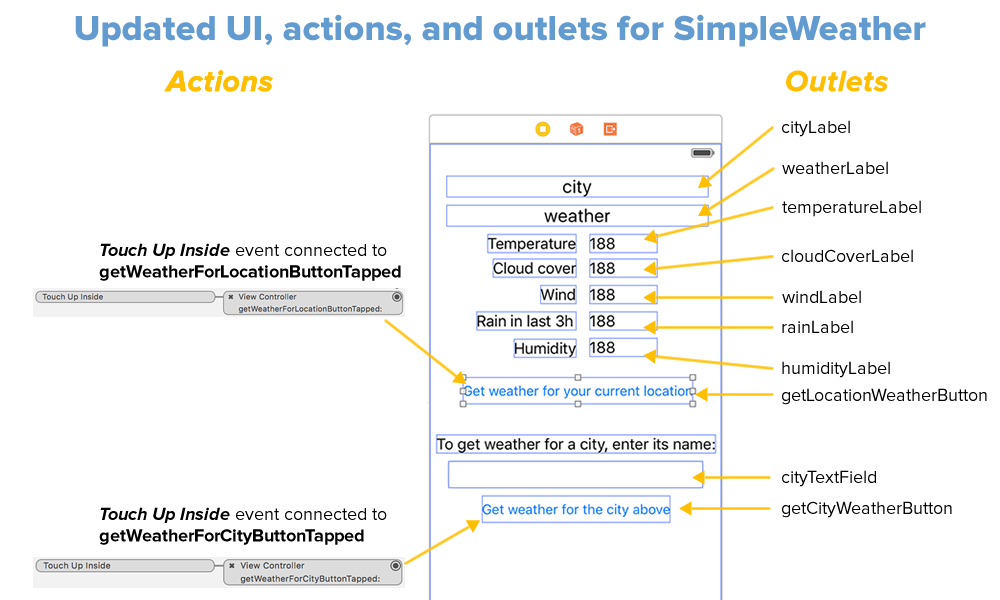
We’ve added one button with the title Get weather for your current location and put it between the weather data labels and the controls for entering a city’s name. It’s assigned the following:
- The outlet
getLocationWeatherButton - The action
getWeatherForLocationButtonTapped, which is connected to a Touch Up Inside event
Updating the view controller
We’ve also updated the view controller code:
import UIKit
import CoreLocation

class ViewController: UIViewController,
                      WeatherGetterDelegate,
                      CLLocationManagerDelegate,
                      UITextFieldDelegate
{
  @IBOutlet weak var cityLabel: UILabel!
  @IBOutlet weak var weatherLabel: UILabel!
  @IBOutlet weak var temperatureLabel: UILabel!
  @IBOutlet weak var cloudCoverLabel: UILabel!
  @IBOutlet weak var windLabel: UILabel!
  @IBOutlet weak var rainLabel: UILabel!
  @IBOutlet weak var humidityLabel: UILabel!
  @IBOutlet weak var getLocationWeatherButton: UIButton!
  @IBOutlet weak var cityTextField: UITextField!
  @IBOutlet weak var getCityWeatherButton: UIButton!

  let locationManager = CLLocationManager()
  var weather: WeatherGetter!


  // MARK: -

  override func viewDidLoad() {
    super.viewDidLoad()
    weather = WeatherGetter(delegate: self)

    // Initialize UI
    // -------------
    cityLabel.text = "simple weather"
    weatherLabel.text = ""
    temperatureLabel.text = ""
    cloudCoverLabel.text = ""
    windLabel.text = ""
    rainLabel.text = ""
    humidityLabel.text = ""
    cityTextField.text = ""
    cityTextField.placeholder = "Enter city name"
    cityTextField.delegate = self
    cityTextField.enablesReturnKeyAutomatically = true
    getCityWeatherButton.enabled = false

    getLocation()
  }

  override func didReceiveMemoryWarning() {
    super.didReceiveMemoryWarning()
  }


  // MARK: - Button events and states
  // --------------------------------

  @IBAction func getWeatherForLocationButtonTapped(sender: UIButton) {
    setWeatherButtonStates(false)
    getLocation()
  }

  @IBAction func getWeatherForCityButtonTapped(sender: UIButton) {
    guard let text = cityTextField.text where !text.trimmed.isEmpty else {
      return
    }
    setWeatherButtonStates(false)
    weather.getWeatherByCity(cityTextField.text!.urlEncoded)
  }

  func setWeatherButtonStates(state: Bool) {
    getLocationWeatherButton.enabled = state
    getCityWeatherButton.enabled = state
  }


  // MARK: - WeatherGetterDelegate methods
  // -----------------------------------

  func didGetWeather(weather: Weather) {
    // This method is called asynchronously, which means it won't execute in the main queue.
    // All UI code needs to execute in the main queue, which is why we're wrapping the code
    // that updates all the labels in a dispatch_async() call.
    dispatch_async(dispatch_get_main_queue()) {
      self.cityLabel.text = weather.city
      self.weatherLabel.text = weather.weatherDescription
      self.temperatureLabel.text = "\(Int(round(weather.tempCelsius)))°"
      self.cloudCoverLabel.text = "\(weather.cloudCover)%"
      self.windLabel.text = "\(weather.windSpeed) m/s"

      if let rain = weather.rainfallInLast3Hours {
        self.rainLabel.text = "\(rain) mm"
      }
      else {
        self.rainLabel.text = "None"
      }

      self.humidityLabel.text = "\(weather.humidity)%"
      self.getLocationWeatherButton.enabled = true
      self.getCityWeatherButton.enabled = self.cityTextField.text?.characters.count > 0
    }
  }

  func didNotGetWeather(error: NSError) {
    // This method is called asynchronously, which means it won't execute in the main queue.
    // All UI code needs to execute in the main queue, which is why we're wrapping the call
    // to showSimpleAlert(title:message:) in a dispatch_async() call.
    dispatch_async(dispatch_get_main_queue()) {
      self.showSimpleAlert(title: "Can't get the weather",
                           message: "The weather service isn't responding.")
      self.getLocationWeatherButton.enabled = true
      self.getCityWeatherButton.enabled = self.cityTextField.text?.characters.count > 0
    }
    print("didNotGetWeather error: \(error)")
  }


  // MARK: - CLLocationManagerDelegate and related methods

  func getLocation() {
    guard CLLocationManager.locationServicesEnabled() else {
      showSimpleAlert(
        title: "Please turn on location services",
        message: "This app needs location services in order to report the weather " +
                 "for your current location.\n" +
                 "Go to Settings → Privacy → Location Services and turn location services on."
      )
      getLocationWeatherButton.enabled = true
      return
    }

    let authStatus = CLLocationManager.authorizationStatus()
    guard authStatus == .AuthorizedWhenInUse else {
      switch authStatus {
        case .Denied, .Restricted:
          let alert = UIAlertController(
            title: "Location services for this app are disabled",
            message: "In order to get your current location, please open Settings for this app, choose \"Location\"  and set \"Allow location access\" to \"While Using the App\".",
            preferredStyle: .Alert
          )
          let cancelAction = UIAlertAction(title: "Cancel", style: .Cancel, handler: nil)
          let openSettingsAction = UIAlertAction(title: "Open Settings", style: .Default) {
            action in
            if let url = NSURL(string: UIApplicationOpenSettingsURLString) {
              UIApplication.sharedApplication().openURL(url)
            }
          }
          alert.addAction(cancelAction)
          alert.addAction(openSettingsAction)
          presentViewController(alert, animated: true, completion: nil)
          getLocationWeatherButton.enabled = true
          return

        case .NotDetermined:
          locationManager.requestWhenInUseAuthorization()

        default:
          print("Oops! Shouldn't have come this far.")
      }

      return
    }

    locationManager.delegate = self
    locationManager.desiredAccuracy = kCLLocationAccuracyThreeKilometers
    locationManager.requestLocation()
  }

  func locationManager(manager: CLLocationManager, didUpdateLocations locations: [CLLocation]) {
    let newLocation = locations.last!
    weather.getWeatherByCoordinates(latitude: newLocation.coordinate.latitude,
                                    longitude: newLocation.coordinate.longitude)
  }

  func locationManager(manager: CLLocationManager, didFailWithError error: NSError) {
    // This method is called asynchronously, which means it won't execute in the main queue.
    // All UI code needs to execute in the main queue, which is why we're wrapping the call
    // to showSimpleAlert(title:message:) in a dispatch_async() call.
    dispatch_async(dispatch_get_main_queue()) {
      self.showSimpleAlert(title: "Can't determine your location",
                           message: "The GPS and other location services aren't responding.")
    }
    print("locationManager didFailWithError: \(error)")
  }


  // MARK: - UITextFieldDelegate and related methods
  // -----------------------------------------------

  // Enable the "Get weather for the city above" button
  // if the city text field contains any text,
  // disable it otherwise.
  func textField(textField: UITextField,
                 shouldChangeCharactersInRange range: NSRange,
                                               replacementString string: String) -> Bool {
    let currentText = textField.text ?? ""
    let prospectiveText = (currentText as NSString).stringByReplacingCharactersInRange(
      range,
      withString: string).trimmed
    getCityWeatherButton.enabled = prospectiveText.characters.count > 0
    return true
  }

  // Pressing the clear button on the text field (the x-in-a-circle button
  // on the right side of the field)
  func textFieldShouldClear(textField: UITextField) -> Bool {
    // Even though pressing the clear button clears the text field,
    // this line is necessary. I'll explain in a later blog post.
    textField.text = ""

    getCityWeatherButton.enabled = false
    return true
  }

  // Pressing the return button on the keyboard should be like
  // pressing the "Get weather for the city above" button.
  func textFieldShouldReturn(textField: UITextField) -> Bool {
    textField.resignFirstResponder()
    getWeatherForCityButtonTapped(getCityWeatherButton)
    return true
  }

  // Tapping on the view should dismiss the keyboard.
  override func touchesBegan(touches: Set<UITouch>, withEvent event: UIEvent?) {
    view.endEditing(true)
  }


  // MARK: - Utility methods
  // -----------------------

  func showSimpleAlert(title title: String, message: String) {
    let alert = UIAlertController(
      title: title,
      message: message,
      preferredStyle: .Alert
    )
    let okAction = UIAlertAction(
      title: "OK",
      style:  .Default,
      handler: nil
    )
    alert.addAction(okAction)
    presentViewController(
      alert,
      animated: true,
      completion: nil
    )
  }

}


extension String {

  // A handy method for %-encoding strings containing spaces and other
  // characters that need to be converted for use in URLs.
  var urlEncoded: String {
    return self.stringByAddingPercentEncodingWithAllowedCharacters(NSCharacterSet.URLUserAllowedCharacterSet())!
  }

  var trimmed: String {
    return self.stringByTrimmingCharactersInSet(NSCharacterSet.whitespaceCharacterSet())
  }

}
Let’s take a closer look at the view controller code…
Buttons
Here’s the section of the code for the buttons:
// MARK: - Button events and states
// --------------------------------

@IBAction func getWeatherForLocationButtonTapped(sender: UIButton) {
  setWeatherButtonStates(false)
  getLocation()
}

@IBAction func getWeatherForCityButtonTapped(sender: UIButton) {
  guard let text = cityTextField.text where !text.trimmed.isEmpty else {
    return
  }
  setWeatherButtonStates(false)
  weather.getWeatherByCity(cityTextField.text!.urlEncoded)
}

func setWeatherButtonStates(state: Bool) {
  getLocationWeatherButton.enabled = state
  getCityWeatherButton.enabled = state
}
The getWeatherForLocationButtonTapped method handles the case when the user presses the Get weather for your current location button, while the getWeatherForCityButtonTapped method handles the case when the user presses the Get weather for the city above button. Both methods disable both buttons when pressed by calling the setWeatherButtonStates method, and the buttons are re-enabled once either a weather report or error message has been obtained.
WeatherGetterDelegate methods
Here’s the section for the WeatherGetterDelegate methods:
// MARK: - WeatherGetterDelegate methods
// -----------------------------------

func didGetWeather(weather: Weather) {
  // This method is called asynchronously, which means it won't execute in the main queue.
  // All UI code needs to execute in the main queue, which is why we're wrapping the code
  // that updates all the labels in a dispatch_async() call.
  dispatch_async(dispatch_get_main_queue()) {
    self.cityLabel.text = weather.city
    self.weatherLabel.text = weather.weatherDescription
    self.temperatureLabel.text = "\(Int(round(weather.tempCelsius)))°"
    self.cloudCoverLabel.text = "\(weather.cloudCover)%"
    self.windLabel.text = "\(weather.windSpeed) m/s"

    if let rain = weather.rainfallInLast3Hours {
      self.rainLabel.text = "\(rain) mm"
    }
    else {
      self.rainLabel.text = "None"
    }

    self.humidityLabel.text = "\(weather.humidity)%"
    self.getLocationWeatherButton.enabled = true
    self.getCityWeatherButton.enabled = self.cityTextField.text?.characters.count > 0
  }
}

func didNotGetWeather(error: NSError) {
  // This method is called asynchronously, which means it won't execute in the main queue.
  // All UI code needs to execute in the main queue, which is why we're wrapping the call
  // to showSimpleAlert(title:message:) in a dispatch_async() call.
  dispatch_async(dispatch_get_main_queue()) {
    self.showSimpleAlert(title: "Can't get the weather",
                         message: "The weather service isn't responding.")
    self.getLocationWeatherButton.enabled = true
    self.getCityWeatherButton.enabled = self.cityTextField.text?.characters.count > 0
  }
  print("didNotGetWeather error: \(error)")
}
The view controller adopts the WeatherGetterDelegate protocol, which has two required methods:
didGetWeather, which is called when theWeatherGetterinstance successfully retrieves weather data from OpenWeatherMap and manages to parse its JSON data into a Swift dictionary, anddidNotGetWeather, which is called whenWeatherGettereither fails to retrieve weather data from OpenWeatherMap or parse its JSON data into a Swift dictionary
Both methods are called from the closure provided to the data task defined in WeatherGetter‘s getWeather method. This means that they’re not being executed in the main queue. Both methods’ primary function is to make changes to the UI, which must be done in the main queue. That’s why I put the UI code in these methods into a dispatch_async block specifying that the block must be executed in the main queue.
Location-related methods
Here’s the code for the CLLocationManagerDelegate and related methods:
// MARK: - CLLocationManagerDelegate and related methods

func getLocation() {
  guard CLLocationManager.locationServicesEnabled() else {
    showSimpleAlert(
      title: "Please turn on location services",
      message: "This app needs location services in order to report the weather " +
               "for your current location.\n" +
               "Go to Settings → Privacy → Location Services and turn location services on."
    )
    getLocationWeatherButton.enabled = true
    return
  }

  let authStatus = CLLocationManager.authorizationStatus()
  guard authStatus == .AuthorizedWhenInUse else {
    switch authStatus {
      case .Denied, .Restricted:
        let alert = UIAlertController(
          title: "Location services for this app are disabled",
          message: "In order to get your current location, please open Settings for this app, choose \"Location\"  and set \"Allow location access\" to \"While Using the App\".",
          preferredStyle: .Alert
        )
        let cancelAction = UIAlertAction(title: "Cancel", style: .Cancel, handler: nil)
        let openSettingsAction = UIAlertAction(title: "Open Settings", style: .Default) {
          action in
          if let url = NSURL(string: UIApplicationOpenSettingsURLString) {
            UIApplication.sharedApplication().openURL(url)
          }
        }
        alert.addAction(cancelAction)
        alert.addAction(openSettingsAction)
        presentViewController(alert, animated: true, completion: nil)
        getLocationWeatherButton.enabled = true
        return

      case .NotDetermined:
        locationManager.requestWhenInUseAuthorization()

      default:
        print("Oops! Shouldn't have come this far.")
    }

    return
  }

  locationManager.delegate = self
  locationManager.desiredAccuracy = kCLLocationAccuracyThreeKilometers
  locationManager.requestLocation()
}

func locationManager(manager: CLLocationManager, didUpdateLocations locations: [CLLocation]) {
  let newLocation = locations.last!
  weather.getWeatherByCoordinates(latitude: newLocation.coordinate.latitude,
                                  longitude: newLocation.coordinate.longitude)
}

func locationManager(manager: CLLocationManager, didFailWithError error: NSError) {
  // This method is called asynchronously, which means it won't execute in the main queue.
  // All UI code needs to execute in the main queue, which is why we're wrapping the call
  // to showSimpleAlert(title:message:) in a dispatch_async() call.
  dispatch_async(dispatch_get_main_queue()) {
    self.showSimpleAlert(title: "Can't determine your location",
                         message: "The GPS and other location services aren't responding.")
  }
  print("locationManager didFailWithError: \(error)")
}
Most of getLocation() is concerned with ruling out cases where we can’t get the user’s location. Only the last three lines of the method deal with getting location updates from locationManager.
- The first
guardstatement allows control to pass to the next line if and only if location services are enabled for the device. If location services are disabled, we display a simple “Location services are disabled on your device” alert, andgetLocation()is exited. - The second
guardstatement allows control to pass to the next line if and only if the app is authorized to use location services when it is in use (i.e., its authorization status is.AuthorizedWhenInUse). Aswitchstatement in theguardblock determines the specific reason why the app isn’t authorized:- If the app explicitly does not have permission to use location services (i.e., its authorization status is either
.Deniedor.Restricted), we display a “This app is not authorized to use your location” alert, which presents the use with the option to open the Settings for this app and authorize it to use location services. - If the app has not explicitly been given or denied permission to use location services (i.e., its authorization status is
.NotDetermined), the location manager’srequestWhenInUseAuthorization()method is called, which displays the alert asking the user if s/he wants to give the app permission to use location services. - The default case is the remaining authorization status,
.AuthorizedAlways. There’s no way to get to this point, and I included this case only because theswitchstatement requires that all cases to be covered.
- If the app explicitly does not have permission to use location services (i.e., its authorization status is either
If control made it past the first two guard statements, it means that location services has been activated for the device and the user has given our app permission to use location services while the app is active. The following happens:
- It sets the view controller as the location manager’s delegate, which means that it can receive and respond to location and heading updates from the location manager.
- It requests the lowest possible location accuracy from the location manager:
kCLLocationAccuracyThreeKilometers, which can pinpoint your device’s coordinates within 3 kilometers (about 1.86 miles). I’m doing this for two reasons:- Weather is a large-area phenomenon and weather stations are far apart, so 3-kilometer accuracy is more than plenty for our needs.
- 3-kilometer accuracy, as a function of being the lowest-accuracy setting, is also the least power-draining.
- In earlier versions of this app, we made a call to
locationManager.startUpdatingLocation, which requested that the location manager start sending location update notifications, typically at the rate of once per second. This works, but it’s overkill for the purposes of a weather app. Instead, we’re using a new method introduced with iOS 9:requestLocation, which sends a single location notification once Core Location has determined the current location to the specified accuracy.
Once requestLocation is called, one of two methods will be called as a result:
locationManager(_:didUpdateLocations:)is called if the location manager managed to get the current location.locationManager(_:didFailWithError:)is called if the location manager failed to get the current location.
UTTextFieldDelegate and related methods
// MARK: - UITextFieldDelegate and related methods
// -----------------------------------------------

// Enable the "Get weather for the city above" button
// if the city text field contains any text,
// disable it otherwise.
func textField(textField: UITextField,
               shouldChangeCharactersInRange range: NSRange,
                                             replacementString string: String) -> Bool {
  let currentText = textField.text ?? ""
  let prospectiveText = (currentText as NSString).stringByReplacingCharactersInRange(
    range,
    withString: string).trimmed
  getCityWeatherButton.enabled = prospectiveText.characters.count > 0
  return true
}

// Pressing the clear button on the text field (the x-in-a-circle button
// on the right side of the field)
func textFieldShouldClear(textField: UITextField) -> Bool {
  // Even though pressing the clear button clears the text field,
  // this line is necessary. I'll explain in a later blog post.
  textField.text = ""

  getCityWeatherButton.enabled = false
  return true
}

// Pressing the return button on the keyboard should be like
// pressing the "Get weather for the city above" button.
func textFieldShouldReturn(textField: UITextField) -> Bool {
  textField.resignFirstResponder()
  getWeatherForCityButtonTapped(getCityWeatherButton)
  return true
}

// Tapping on the view should dismiss the keyboard.
override func touchesBegan(touches: Set<UITouch>, withEvent event: UIEvent?) {
  view.endEditing(true)
}
A quick explanation of each of these methods:
textField(_:shouldChangeCharactersInRange:replacementString:)— This method is called whenever the contents of a text field in a view that adopts theTextFieldDelegateprotocol change. We’re using this to enable the Get weather for the city above button when the “city name” text field contains any text, and disable the button when the “city name” text field is empty.textFieldShouldClear(_:)— This method is called when the user taps the “clear text field” button. We use this to disable the Get weather for the city above button since pressing this button clears the “city name” text field.textFieldShouldReturn(_:)— We capture this event so that pressing the Return key is like pressing the Get weather for the city above button.touchesBegan(_:withEvent:)— We capture this event so that tapping on the background view dismisses the keyboard.
And finally, the utility methods…
// MARK: - Utility methods
// -----------------------

func showSimpleAlert(title title: String, message: String) {
  let alert = UIAlertController(
    title: title,
    message: message,
    preferredStyle: .Alert
  )
  let okAction = UIAlertAction(
    title: "OK",
    style:  .Default,
    handler: nil
  )
  alert.addAction(okAction)
  presentViewController(
    alert,
    animated: true,
    completion: nil
  )
}


extension String {

  // A handy method for %-encoding strings containing spaces and other
  // characters that need to be converted for use in URLs.
  var urlEncoded: String {
    return self.stringByAddingPercentEncodingWithAllowedCharacters(NSCharacterSet.URLUserAllowedCharacterSet())!
  }

  // Trim excess whitespace from the start and end of the string.
  var trimmed: String {
    return self.stringByTrimmingCharactersInSet(NSCharacterSet.whitespaceCharacterSet())
  }

}
These methods, explained:
showSimpleAlert(title:message:)— This method allows us to display a simple alert with a single OK button with a single line of code.String.urlencoded— We use this to encode city names provided by the user into a format that can be used in the query we send to OpenWeatherMap.String.trimmed— This handy utility function removes whitespace from the beginning and ending of strings.
A working weather app
Once again, the app should look like the screenshot above when run.

At this point, we have a basic, working weather app. Given the name of a city or your current location from your iDevice’s location services, it displays the current weather conditions for that location. There’s still plenty of opportunities for features and improvements, some of which are:
- Forecasts for future weather: tomorrow’s weather, the forecast for the next few days, or a long-range forecast.
- Graphics. Yahoo!’s weather app shows pictures of the cities that it’s giving forecasts for, and most weather apps provide pictures or pictograms that match their forecasts.
- Sound. I’m not aware of any weather apps that make particularly good use of sound. Maybe you can make one!
- Personality. Take a look at Carrot Weather, which has a snarky sense of humor.
Download the project files

You can download the project files for this article (53KB zipped) here.
3 replies on “How to build an iOS weather app in Swift, part 5: Putting it all together”
Wonderful!
Warning: Attempt to present on whose view is not in the window hierarchy!
2017-01-17 21:42:59.426939 SimpleWeather[2594:69013] [MC] System group container for systemgroup.com.apple.configurationprofiles path is /Users/bauyrzhan.qwerty/Library/Developer/CoreSimulator/Devices/6EC86B05-A3CE-4C85-8C3B-4E12E53C74E5/data/Containers/Shared/SystemGroup/systemgroup.com.apple.configurationprofiles
2017-01-17 21:42:59.430281 SimpleWeather[2594:69013] [MC] Reading from private effective user settings.
Thanks!