Welcome to the second installment of iOS Fortnightly, Global Nerdy’s iOS programming tutorial series! If you’ve got a little experience with an object-oriented programming languages, whether it’s client-side JavaScript, server-side Perl, PHP, Python, or Ruby, or desktop Java, C#, or Visual Basic, this series is for you. Every fortnight — that’s a not-so-common word for “two weeks”, I’ll post a tutorial showing you how to write a simple but useful app that you can use as the launching point for your own iOS development projects. The idea behind iOS Fortnightly is to help you become familiar with mobile app development, the Objective-C programming language, the Cocoa Touch programming framework, and iOS application design.

In case you missed the previous iOS Fortnightly installment, go check it out. It’s a simple “Magic 8-Ball” app, but it’s the perfect starter app for someone who’s new to iOS development.
With the introduction out of the way, let’s move on to this fortnight’s app, a simple weather app. Let me start with what I think will be an iOS Fortnightly tradition — the video:
Question 1: Where Will the Weather Data Come From?

I decided to go with Open Weather Map, a free-as-in-beer/free-as-in-speech weather data and forecast API in the spirit of Wikipedia and OpenStreetMap. While they recommend the use of a key to access the API (also free), it’s not absolutely necessary, which means that you can get started writing a weather app without having to sign up for an API key and waiting for approval. With a simple HTTP GET call, you can use it to get the current weather for a location that you can specify by:
- City name,
- Latitude and longitude, or
- Numeric city ID
Here’s a sample call to Open Weather Map’s API for the current weather in my current location, Toronto, Canada:
http://api.openweathermap.org/data/2.5/weather?q=Toronto,CA
Here’s the resulting JSON object that came back when I wrote this article. Your results may vary, seeing as you’ll be making the call at a different day and time, but the format will be the same. It comes out as one long, continuous string; I’ve reformatted it so that it’s easier to read:
{"coord":{"lon":-79.416298,
          "lat":43.700111},
"sys":{"country":"CA",
       "sunrise":1378032138,
       "sunset":1378079546},
"weather":[{"id":701,
            "main":"Mist",
            "description":"mist",
            "icon":"50n"}],
"base":"gdps stations",
"main":{"temp":294.11,
        "humidity":93,
        "pressure":1009,
        "temp_min":292.59,
        "temp_max":295.15},
"wind":{"speed":1.3,
        "deg":187.501},
"rain":{"3h":0},
"clouds":{"all":0},
"dt":1378007487,
"id":6167865,
"name":"Toronto",
"cod":200}
Here’s a run-down of the returned object’s keys and values:
| Element | Description |
|---|---|
cod |
The HTTP status code. |
clouds |
The cloudiness, expressed as an object with a single key:
|
coord |
The coordinates of the location for the weather report, expressed as an object with two keys:
|
dt |
Time the weather report was sent in the GMT time zone, expressed in Unix time. |
main |
The quantitative weather, expressed as an object with these keys:
|
name |
The name of the town or city closest to the location for the weather report. |
rain |
The amount of rain expected to fall, expressed an object with this key:
|
snow |
The amount of snow expected to fall, expressed as an object with this key:
|
sys |
Other time and location data, expressed as an object with these keys:
|
weather |
The qualitative weather, expressed as an array containing one or more objects with the following keys:
|
wind |
The wind, expressed as an object with the following keys:
|
Question 2: How Will Open Weather Map’s Data be Accessed?
 Apple’s Cocoa Touch framework has its own class for downloading the contents of an URL — NSURLConnection — but we’ll use a third-party library that’s even simpler to use: AFNetworking, which describes itself as “a delightful networking framework for iOS and OSX” and is used at fine institutions such as Github, Heroku, and Pinterest.
Question 3: How Do We Include AFNetworking in an iOS Project?
 AFNetworking can be manually included in a project, but I thought this would be a good opportunity to show the use of CocoaPods, the easy Ruby-based library dependency manager.
To install Cocoapods, fire up Terminal and type in the following lines:
$ sudo gem install cocoapods
$ pod setup
Create the Project
As with the previous project, we start with From the menu bar, choose File → New → Project…. You’ll see this:
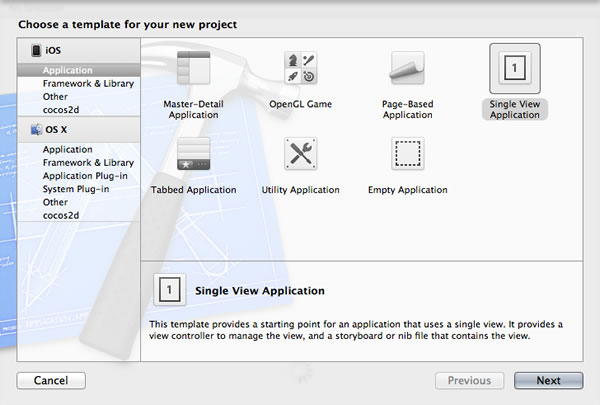
Once again, this application will happen on a single screen, so we’ll go with a single-view application:
- In the left column, under iOS, make sure that Application is selected.
- In the big area on the right, select Single View Application.
Click Next to proceed to the next step:
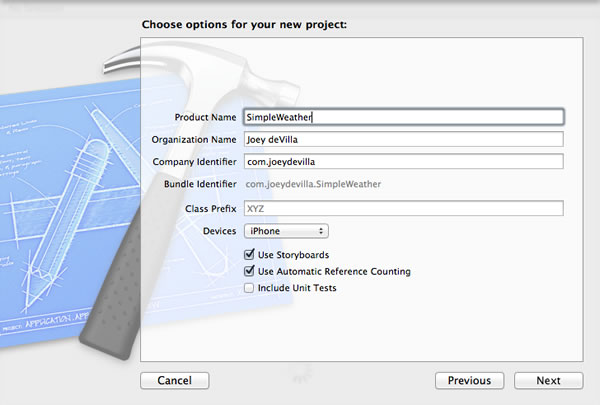
On the “Choose options” screen…
- Give your app a name by entering one into the Product Name field. I’m going with SimpleWeather.
- Make sure that in the Devices menu, iPhone is selected.
- Check the Use Storyboards checkbox.
- Make sure that the Use Automatic Reference Counting checkbox is checked.
Click Next to proceed to the next step:
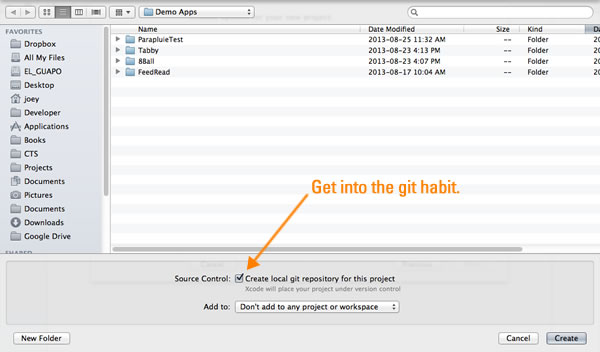
Do this:
- Choose the directory where your project will be saved. Your project will be saved in a directory inside the directory you chose.
- Check the Create local git repository for this project checkbox. Git’s a good habit to get into, and there’ll come a time when being able to backtrack to a previous version of your code will save your bacon.
- Make sure that the selection in the Add to: menu is Don’t add to any project or workspace.
- Click the Create button.
So far, this isn’t all that different from the setup for the previous project. Here’s where it’s different — first, close the project. That’s right; close the project. We’re going to set up Cocoapods to bring AFNetworking into the project. Open the text editor of your choice and enter the following:
platform :ios, '6.0'
pod 'AFNetworking', '~> 1.3.2'
Save the file in your project directory. Double-check that it’s in the right place:
$ pwd
/Users/joey/Developer/iOS/Demo Apps/SimpleWeather
$ ls
Podfile			SimpleWeather		SimpleWeather.xcodeproj
$ cat Podfile
platform :ios, '6.0'
pod 'AFNetworking', '~> 1.3.2'
Once you’ve confirmed that the files are in the right place, install AFNetworking by entering pod install at the command line while in your project’s directory:
$ pod install
Analyzing dependencies
Downloading dependencies
Installing AFNetworking (1.3.2)
Generating Pods project
Integrating client project

[!] From now on use `SimpleWeather.xcworkspace`.
As the command-line output states, you should now open the project using SimpleWeather.xcworkspace, the full workspace file:
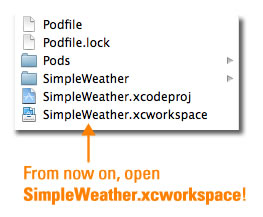
Open the project by double-clicking on SimpleWeather.xcworkspace:
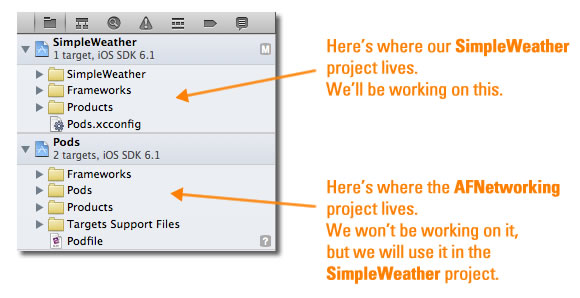
If you look at the Project Navigator on the left side of Xcode’s window, you’ll see that the workspace is made up of two projects:
- SimpleWeather, our weather app project, where we’ll be doing our work, and
- Pods, which contains the AFNetworking code. We won’t touch it, but we’ll use its functionality to grab the weather info from Open Weather Map.
(If you want to find out more about workspaces, see this section of Apple’s documentation.)
Next step: drawing a quick user interface.
Draw the User Interface
In the Project Navigator on the left side of the Xcode window, select MainStoryboard.storyboard. Once again, we’re not going to bother with autolayout — we’re not quite at the fancy UI phase yet — so select the File Inspector on the right side of the window, and uncheck the Autolayout box:
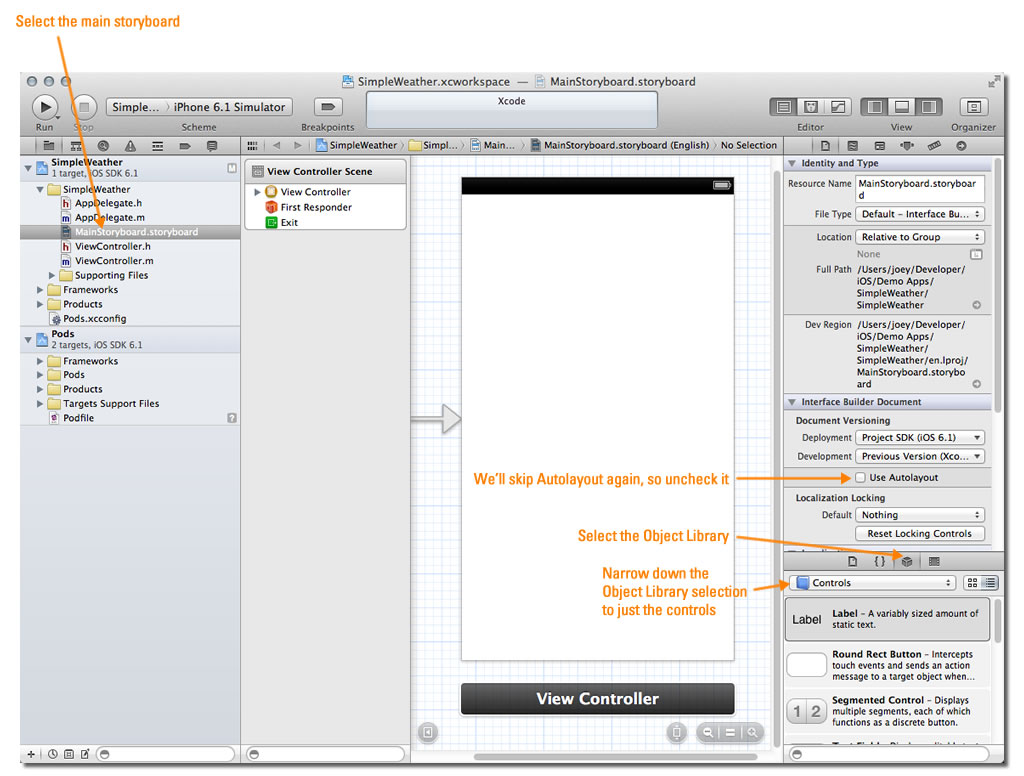
Click the screen capture to see it at full size.
Now to draw some controls on the view. In the Object Library, select Controls from the drop-down menu to narrow down the selection in the Object Library to just the UI controls. Drag the following from the Object Library onto the view:
- A Label to a spot to near the top of the screen. Double-click it to edit its text, and change it to Where’s the weather in:.
- A Text Field to just below the label, and stretch it to nearly the full width of the view.
- A Round Rect Button to just below the text field. Double-click it to edit its text, and change it to Tell Me.
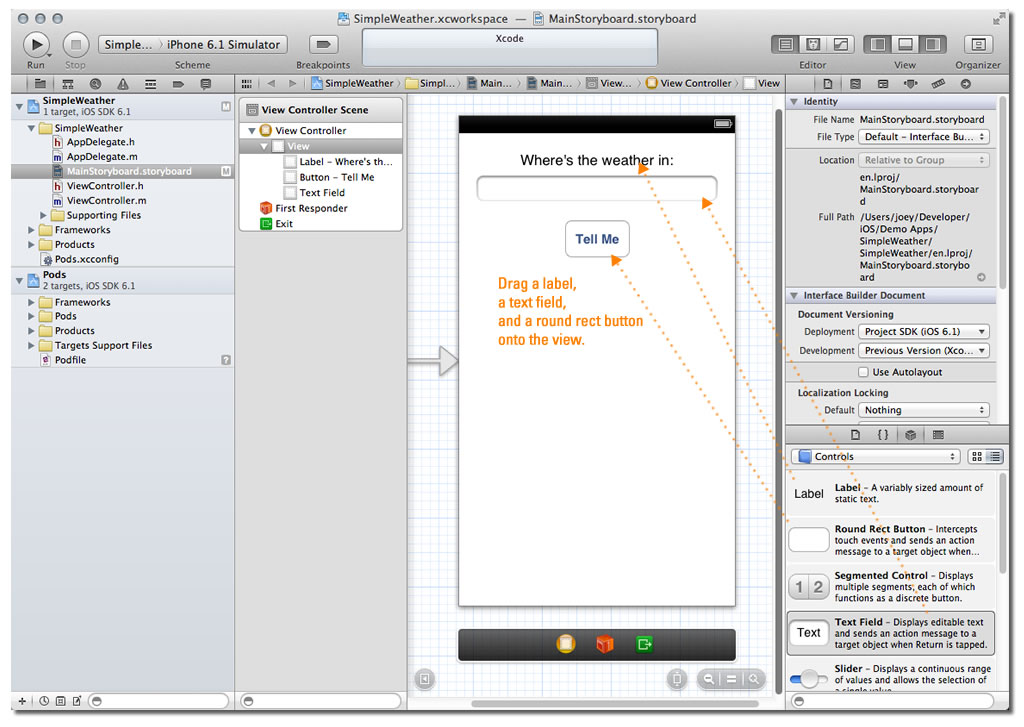
Click the screen capture to see it at full size.
Connect the Controls to Code
First, let’s create an action for the Tell Me button:
- Select the Assistant Editor so that both the storyboard and view controller header code in ViewController.h are both on display.
- Select the Tell Me button, and then either right-click or control-click it. A grey window will pop up beside it, which will display actions and outlets.
- Drag from the circle beside Touch Up Inside into the view controller header code, anywhere between
@interfaceand@end.
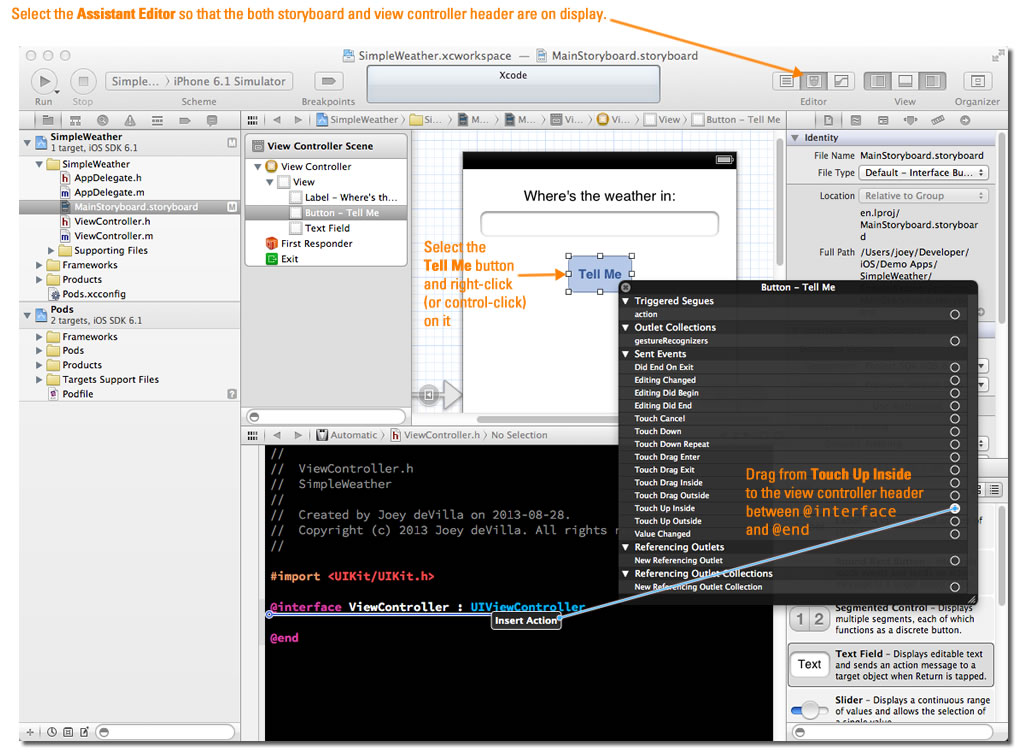
Click the screen capture to see it at full size.
In the little window that pops up:
- Give the action a name. I used tellMeButtonPressed.
- Make sure that the Event is Touch Up Inside.
- Click the Connect button.

You should now have the following line in the view controller header:
- (IBAction)tellMeButtonPressed:(id)sender;
First, let’s create an outlet for the text field:
- Select the text field, and as we did with the button, right-click or control-click it. As with the button, a grey window will pop up beside it, which will display actions and outlets.
- Drag from the circle beside New Referencing Outlet into the view controller header code, anywhere between
@interfaceand@end.
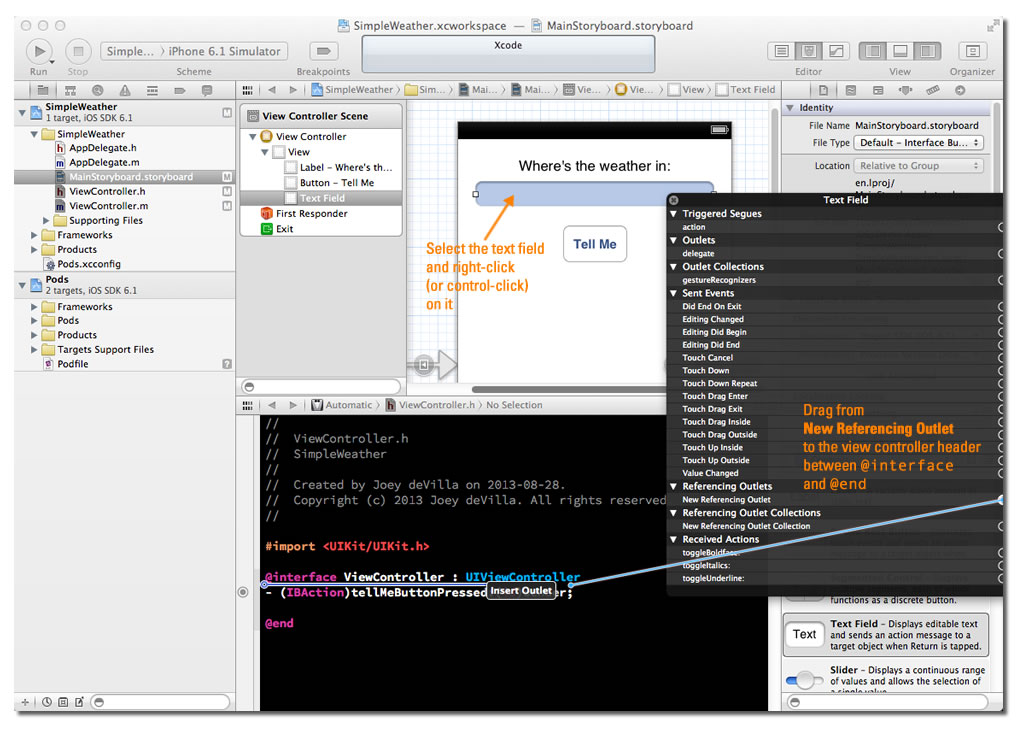
Click the screen capture to see it at full size.
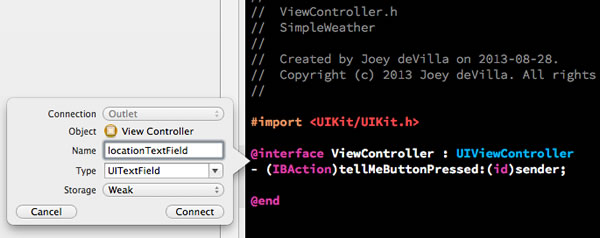
In the little window that pops up:
- Give the outlet a name. I used locationTextField.
- Make sure that the Type is UITextField and that the Storage is Weak.
- Click the Connect button.
You should now have the following line in the view controller header:
- (IBAction)tellMeButtonPressed:(id)sender;
With the action and outlet code inserted into the header, I did a little rearranging so that it looks like this:
#import <UIKit/UIKit.h>

@interface ViewController : UIViewController

// Outlets
// =======
@property (weak, nonatomic) IBOutlet UITextField *locationTextField;

// Actions
// =======
- (IBAction)tellMeButtonPressed:(id)sender;

@end
Commit the Changes
Now’s a good time to commit the changes to git. Choose File → Source Control → Commit… from the menu bar. The “diffs” window will appear, which lets you see the changes you’re about to commit:
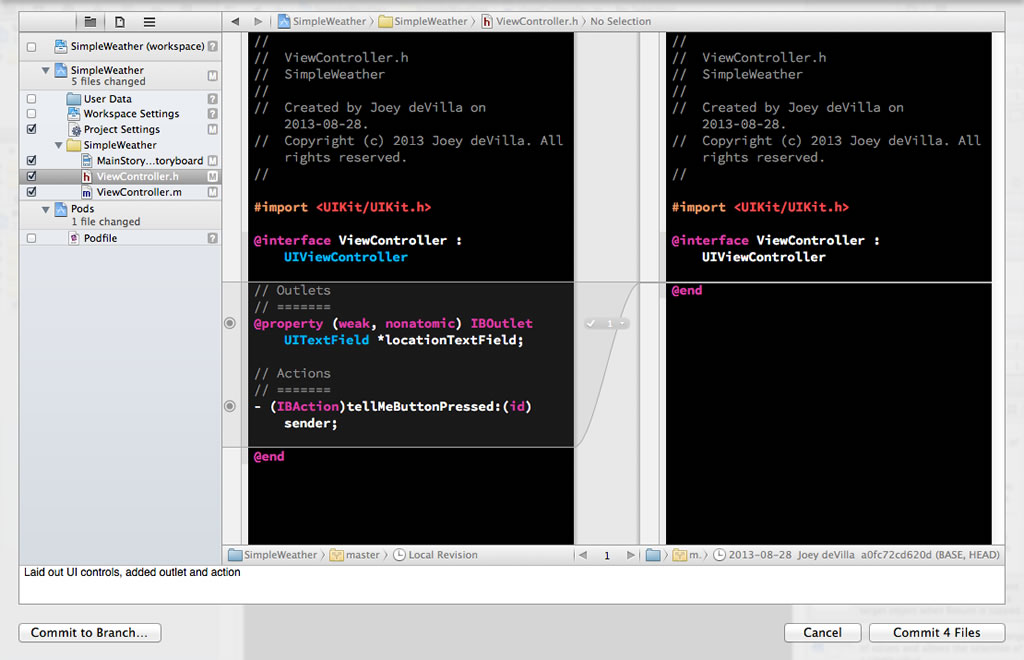
Click the screen capture to see it at full size.
Enter a commit message — something like “Added controls and their actions and outlets”, then click the Commit 4 Files button to commit the changes.
Create a Model Class for the Weather Data
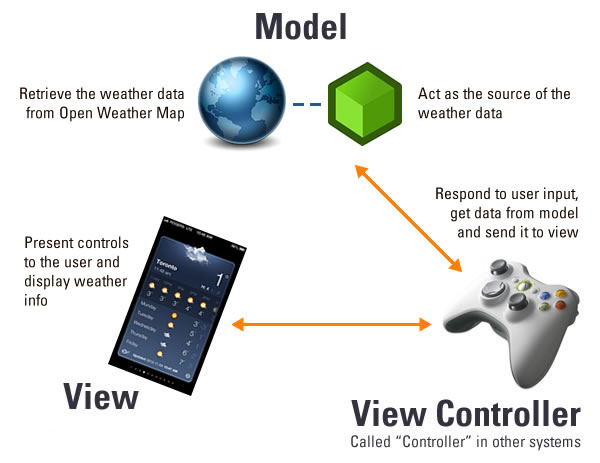
As I mentioned in the last article in the series, iOS apps are built on the Model-View-Controller pattern. Here’s how we’ll apply the pattern in this app:
We’ve already got a view and view controller from the project setup work we’ve done — let’s create a model class. From the menu bar, File → New → File…. You’ll be presented with this dialog box:

Select Cocoa Touch from the sidebar on the left, then select Objective-C class, then click Next. You’ll see this:
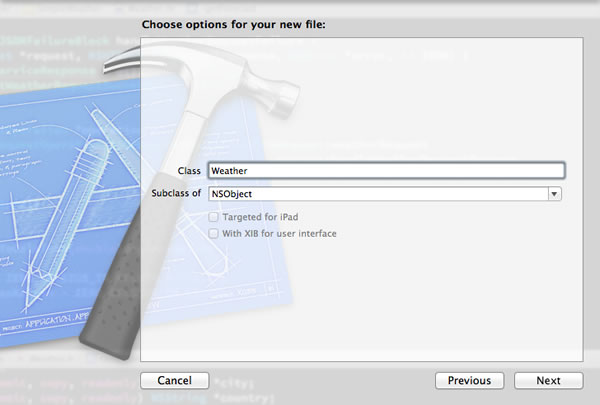
Provide a name for the class. I gave mine the name Weather and made it a subclass of NSObject, the ultimate base class for every class in Objective-C. Once that’s done, click Next. You’ll be taken to the dialog box to save the class:
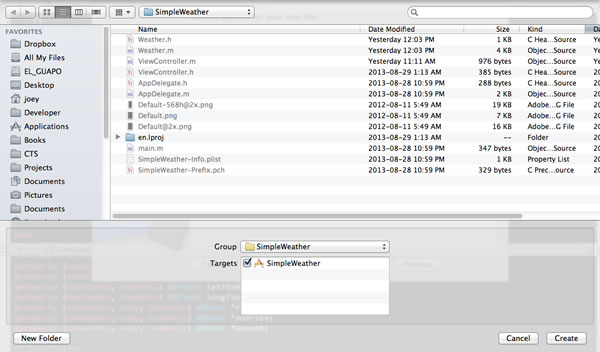
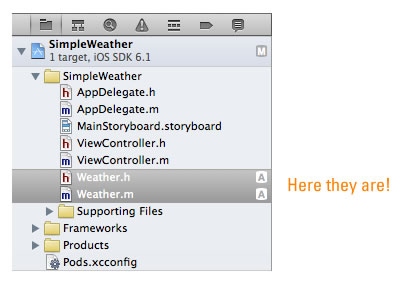
Click Create to save the new class files. You can see them in the Project Navigator, marked with the letter A, denoting files that have been added since the last commit:
Now that we’ve got files for the Weather class’ interface (the header file, Weather.h) and implementation (the module file, Weather.m), let’s code! Let’s take care of the header first, where we specify the properties and methods that our model exposes:
Weather.h
#import <Foundation/Foundation.h>

@interface Weather : NSObject

// Properties
// ==========

// Place and time
@property (nonatomic, copy, readonly) NSString *city;
@property (nonatomic, copy, readonly) NSString *country;
@property (nonatomic, readonly) CGFloat latitude;
@property (nonatomic, readonly) CGFloat longitude;
@property (nonatomic, copy, readonly) NSDate *reportTime;
@property (nonatomic, copy, readonly) NSDate *sunrise;
@property (nonatomic, copy, readonly) NSDate *sunset;

// Qualitative
@property (nonatomic, copy, readonly) NSArray *conditions;

// Quantitative
@property (nonatomic, readonly) NSInteger cloudCover;
@property (nonatomic, readonly) NSInteger humidity;
@property (nonatomic, readonly) NSInteger pressure;
@property (nonatomic, readonly) NSInteger rain3hours;
@property (nonatomic, readonly) NSInteger snow3hours;
@property (nonatomic, readonly) CGFloat tempCurrent;
@property (nonatomic, readonly) CGFloat tempMin;
@property (nonatomic, readonly) CGFloat tempMax;
@property (nonatomic, readonly) NSInteger windDirection;
@property (nonatomic, readonly) CGFloat windSpeed;

// Methods
// =======

- (void)getCurrent:(NSString *)query;

@end
Note that what the model exposes is mostly properties and a single method, getCurrent. The idea is to call getCurrent with a query term, which can be a city name, a latitude/longitude pair, or a numeric city code. The model makes a call to Open Weather Maps using the query term, and uses the result to populate the model’s properties, which are then access by the view controller.
I’ll cover what all the @property stuff means in an article to follow.
Now that we have an interface, let’s code up the implementation:
Weather.m
#import "Weather.h"
#import "AFNetworking.h"

@implementation Weather {
    NSDictionary *weatherServiceResponse;
}

- (id)init
{
    self = [super init];

    weatherServiceResponse = @{};

    return self;
}

- (void)getCurrent:(NSString *)query
{
    NSString *const BASE_URL_STRING = @"http://api.openweathermap.org/data/2.5/weather";

    NSString *weatherURLText = [NSString stringWithFormat:@"%@?q=%@",
                                BASE_URL_STRING, query];
    NSURL *weatherURL = [NSURL URLWithString:weatherURLText];
    NSURLRequest *weatherRequest = [NSURLRequest requestWithURL:weatherURL];

    AFJSONRequestOperation *operation =
    [AFJSONRequestOperation JSONRequestOperationWithRequest:weatherRequest
                                                    success:^(NSURLRequest *request, NSHTTPURLResponse *response, id JSON) {
                                                        weatherServiceResponse = (NSDictionary *)JSON;
                                                        [self parseWeatherServiceResponse];
                                                    }
                                                    failure:^(NSURLRequest *request, NSHTTPURLResponse *response, NSError *error, id JSON) {
                                                        weatherServiceResponse = @{};
                                                    }
     ];

    [operation start];
}

- (void)parseWeatherServiceResponse
{
    // clouds
    _cloudCover = [weatherServiceResponse[@"clouds"][@"all"] integerValue];

    // coord
    _latitude = [weatherServiceResponse[@"coord"][@"lat"] doubleValue];
    _longitude = [weatherServiceResponse[@"coord"][@"lon"] doubleValue];

    // dt
    _reportTime = [NSDate dateWithTimeIntervalSince1970:[weatherServiceResponse[@"dt"] doubleValue]];

    // main
    _humidity = [weatherServiceResponse[@"main"][@"humidity"] integerValue];
    _pressure = [weatherServiceResponse[@"main"][@"pressure"] integerValue];
    _tempCurrent = [Weather kelvinToCelsius:[weatherServiceResponse[@"main"][@"temp"] doubleValue]];
    _tempMin = [Weather kelvinToCelsius:[weatherServiceResponse[@"main"][@"temp_min"] doubleValue]];
    _tempMax = [Weather kelvinToCelsius:[weatherServiceResponse[@"main"][@"temp_max"] doubleValue]];

    // name
    _city = weatherServiceResponse[@"name"];

    // rain
    _rain3hours = [weatherServiceResponse[@"rain"][@"3h"] integerValue];

    // snow
    _snow3hours = [weatherServiceResponse[@"snow"][@"3h"] integerValue];

    // sys
    _country = weatherServiceResponse[@"sys"][@"country"];
    _sunrise = [NSDate dateWithTimeIntervalSince1970:[weatherServiceResponse[@"sys"][@"sunrise"] doubleValue]];
    _sunset = [NSDate dateWithTimeIntervalSince1970:[weatherServiceResponse[@"sys"][@"sunset"] doubleValue]];

    // weather
    _conditions = weatherServiceResponse[@"weather"];

    // wind
    _windDirection = [weatherServiceResponse[@"wind"][@"dir"] integerValue];
    _windSpeed = [weatherServiceResponse[@"wind"][@"speed"] doubleValue];
}

+ (double)kelvinToCelsius:(double)degreesKelvin
{
    const double ZERO_CELSIUS_IN_KELVIN = 273.15;
    return degreesKelvin - ZERO_CELSIUS_IN_KELVIN;
}

@end
As with the .h file, I’ll explain what’s in the .m file in an article to follow.
Connect the Model to the View Controller
We’ve got a functioning model, and a view controller connected to a view. It’s now time to make the final MVC connection: the one that links the model to the view controller. Change the code in ViewController.m to:
ViewContoller.m
#import "ViewController.h"
#import "Weather.h"

@interface ViewController ()

@end

@implementation ViewController {
    Weather *theWeather;
}

- (void)viewDidLoad
{
    [super viewDidLoad];
    theWeather = [[Weather alloc] init];
}

- (void)didReceiveMemoryWarning
{
    [super didReceiveMemoryWarning];
}

- (IBAction)tellMeButtonPressed:(id)sender
{
    [theWeather getCurrent:self.locationTextField.text];

    NSString *report = [NSString stringWithFormat:
                        @"Weather in %@:\n"
                        @"%@\n"
                        @"Current temp.: %2.1f C\n"
                        @"High: %2.1f C\n"
                        @"Low: %2.1f C\n",
                        theWeather.city,
                        theWeather.conditions[0][@"description"],
                        theWeather.tempCurrent,
                        theWeather.tempMax,
                        theWeather.tempMin
                        ];
    UIAlertView *alert = [[UIAlertView alloc] initWithTitle:@"Current Weather"
                                                    message:report
                                                   delegate:nil
                                          cancelButtonTitle:@"OK"
                                          otherButtonTitles:nil];
    [alert show];
}

@end
I’ll explain more about this code in a later article.
Run the App
We’ve got all the code we need for a working weather app. It won’t be slick, but it will work. When you run the app, you should see this:
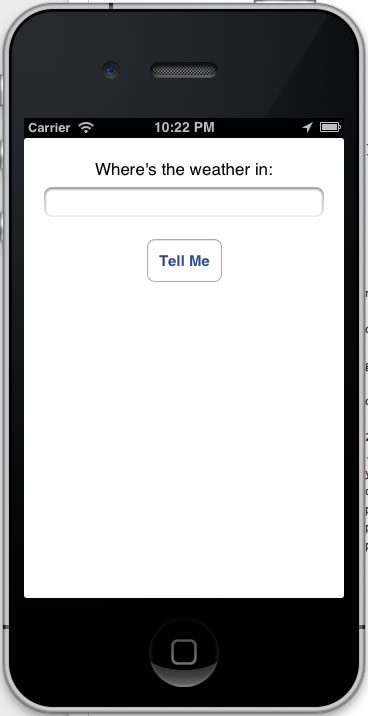
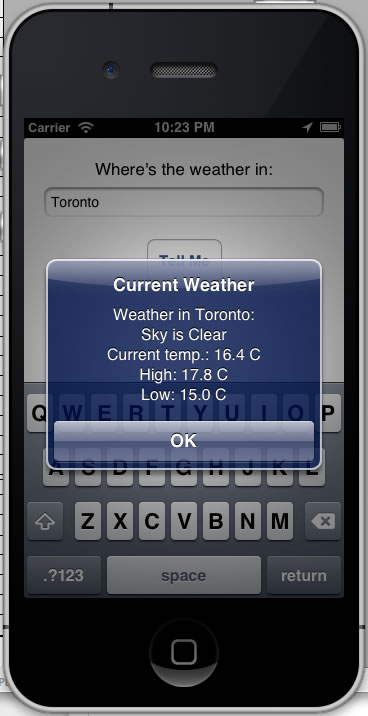
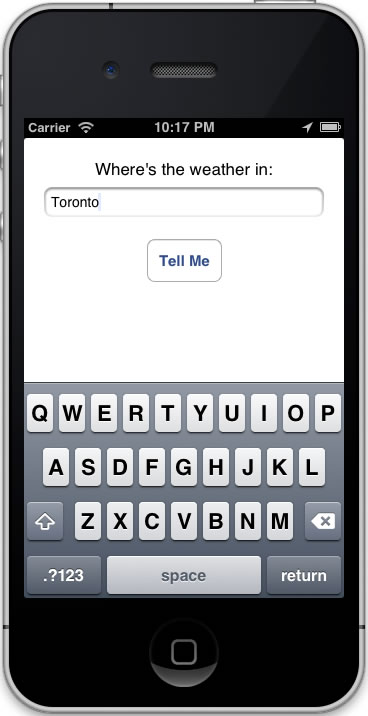
Enter the name of a city into the text field. In my case, I used my own city, Toronto, then tapped the Tell Me button:
The first time you do this, you’ll most likely see a result like the one below. Don’t let it bother you for the time being:
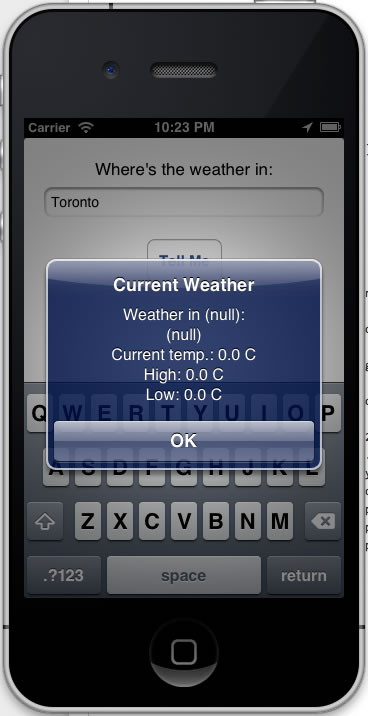
Don’t worry about this for now. I’ll explain why this happens in a follow-up article.
Dismiss the alert box by tapping the OK button, then tap the Tell Me button again. You should see some better results this time:
That’s It for Now
Congratulations! You now have a working weather app. I’ll post a few follow-up articles featuring tweaks to the app, as well as explanations of the code behind it. In the meantime, commit your changes, and more importantly, play around with the code. Experiment. Tweak. Look up anything that seems odd, unfamilair or interesting!
If you have any questions or comments, or got stuck or encountered an error while doing this tutorial, let me know — either in the comments or by dropping me a line!