A Little Inspiration

Jennifer Dewalt, burning the midnight oil.
Click the photo to see the source.
 A couple of weeks back, I wrote about Jennifer Dewalt, who took on a big challenge. She had little or no programming education or experience but wanted to become a web developer, so she set out to learn the hard way: by making “180 web sites in 180 days”. She put aside enough money to work on this project full-time in some space in San Francisco in a developer-rich workspace.
On Day 1 (April 1st), she made the homepage for her “180 sites” project in plain old HTML. Since then, she’s progressed and learning Ruby, Rails and JavaScript as she builds her apps. As of the evening of Sunday, August 18th, she’s on Day 140, with a web app that reports what your IP address is. You can see the master list of her projects on her project page, find out more as she chronicles her work on her blog, and get the source for all her projects from her GitHub account.
Dewalt’s determination, perserverance, and all-out chutzpah is admirable, and the way she framed her mission is quite clever. There’s nothing like a deadline to motivate you, and having to build a new project every day for six months forces you to constrain each one’s scope. The “build early, build often” approach also takes advantage of the idea behind the adage of “practice makes perfect”, which was put quite well in the book Art and Fear:
The ceramics teacher announced on opening day that he was dividing the class into two groups.
All those on the left side of the studio, he said, would be graded solely on the quantity of work they produced, all those on the right solely on its quality.
His procedure was simple: on the final day of class he would bring in his bathroom scales and weigh the work of the “quantity” group: 50 pounds of pots rated an “A”, 40 pounds a “B”, and so on.
Those being graded on “quality”, however, needed to produce only one pot — albeit a perfect one — to get an “A”.
Well, came grading time and a curious fact emerged: the works of highest quality were all produced by the group being graded for quantity.
It seems that while the “quantity” group was busily churning out piles of work-and learning from their mistakes — the “quality” group had sat theorizing about perfection, and in the end had little more to show for their efforts than grandiose theories and a pile of dead clay.
My Own “180 Days” Project

My home office, pictured late Friday night.
I’ve decided to take up my own project along the same lines as Jennifer Dewalt’s. I’m going to publish an iOS development tutorial fortnightly — that is, once every two weeks — in which I walk the reader through the exercise of building a basic iPhone/iPad/iPod Touch app, explaining what I do along the way, and publish my code on my GitHub account.
I’m calling this series:

In order to follow along with iOS Fortnightly Tutorials, you’ll need some kind of Mac OS X computer that’s capable of running Xcode, the development tool. You’ll also need to get Xcode, which is available for free at the Mac App Store. It would help if you also had an iOS device and an iOS Developer account with Apple (you need one to deploy apps to iOS devices), but many of the projects in the tutorial will work just fine in the simulator.
These tutorials are best suited to people who’ve had some experience developing in any object-oriented programming language, from JavaScript to any of the standard suite of interpreted scripting languages (Perl, PHP, Python, or Ruby), or to compiled languages that often call for IDEs, such as C#, Java, or Visual Basic. Many of the principles that you’ve picked up in these languages will have some kind of analogue in Objective-C.
Unlike many tutorials, I’m not going to rehash what loops, and branches are, or explain what object-oriented programming is. I’ll explain stuff that would be new to someone just getting into Objective-C, Xcode, iOS, and Cocoa Touch‘s APIs. if you can’t quickly whip up FizzBuzz in the programming language of your choice, this programming tutorial series is probably not for you.
This Fortnight’s Tutorial: 8-Ball

If you grew up in North America, you’re probably familiar with the novelty item known as the Magic 8-Ball. You ask it a question that can be answered with “yes” or “no” and turn it over. A multi-sided die suspended in blue liquid rises to a clear window, revealing a random answer. If you haven’t ever tried on before, here’s an online version that’s been around for ages.
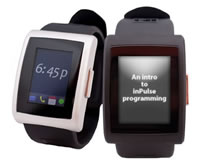
The Magic 8-Ball has been a staple of programming exercises since computer programming courses have existed. It’s also been a quick little programming exercise for learning how to program in new languages or on new platforms. I’ve even used it as a candidate in a job interview. When I talked to Pebble about becoming their developer evangelist over a two-day visit to Palo Alto last summer (yes, the smartwatch company that raise $10 million on Kickstarter), they tested me by making me write a tutorial for programming their previous smartwatch, the InPulse, and I chose the Magic 8-Ball as my example, which I posted on GitHub.
I figured that an iOS version of my Magic 8-Ball tutorial would be a good start, and if you’re new to iOS development, you might find it useful too!
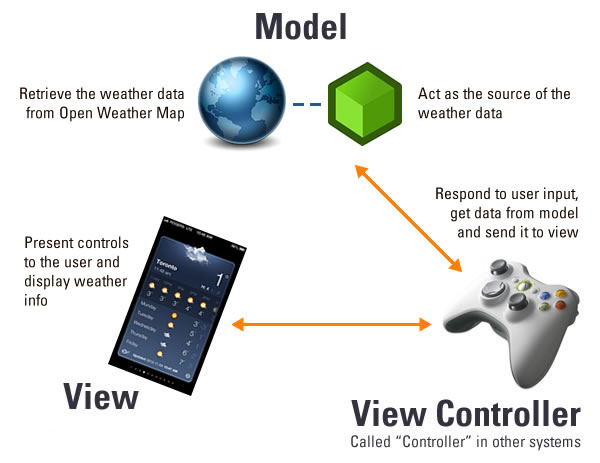
Model – View – View Controller
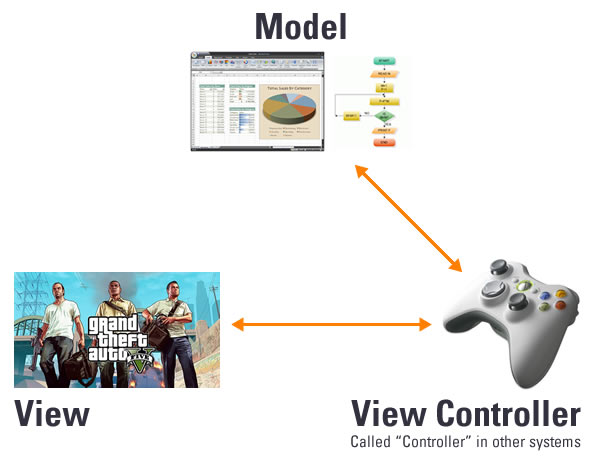
Most programming frameworks for developing interactive applications are based on some variation of the MVC — that’s Model-View-Controller — pattern. The general idea is the interactive applications are the result of three categories of objects working together:
- The model objects, which handle data and business logic,
- The view objects, whose job is to present data to the user in the appropriate format, and
- The controller objects, which take user requests and call on the other objects to carry them out.
iOS programming is generally based on the MVC pattern:
- Models: You typically build your own custom model classes that represent that data and business logic for your app. Most of the time, these will be subclasses of
NSObject, the class from which all Objective-C classes ultimately are derived.
- Views: iOS provides
UIView and a number of subclasses based on it — you can use these or subclass them.
- Controllers: iOS provides
UIViewController and a number of subclasses based on it — again, you can use these or subclass them. These are often referred to as view controllers.
If you’re comfortable with the concept of MVC, whether from client-side frameworks like Ember.js, or server-side frameworks like CakePHP, Django, or Rails, or from desktop app development, you’ll find the MVC aspect of iOS development familiar.
Time to get started!
Create a New Project
Let’s start with a new project. From the menu bar, choose File → New → Project…. You’ll see this:
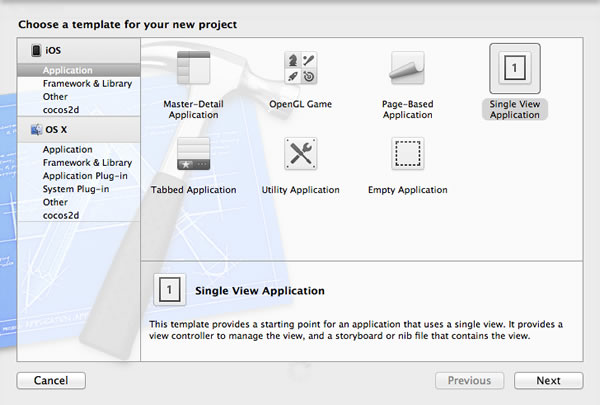
This first step is to specify what kind of project you’re building. Based on the selections you make, Xcode will pull together the appropriate frameworks and set up a basic code that will form the “skeleton” of your app.
Our “8-Ball” app is an iOS app where everything happens in a single screen or view, so we’ll make it a single-view app. Here’s how you specify this:
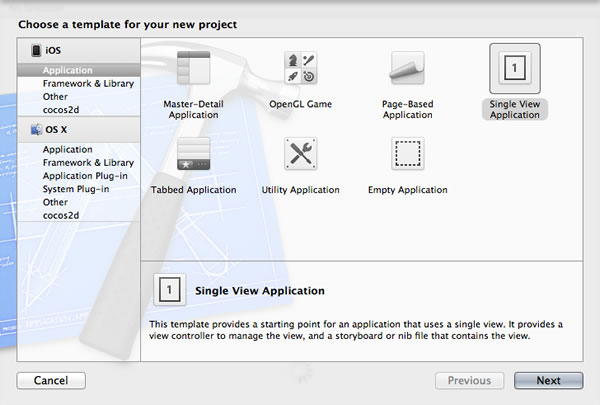
- In the left column, under iOS, make sure that Application is selected.
- In the big area on the right, select Single View Application.
Click Next to proceed to the next step:
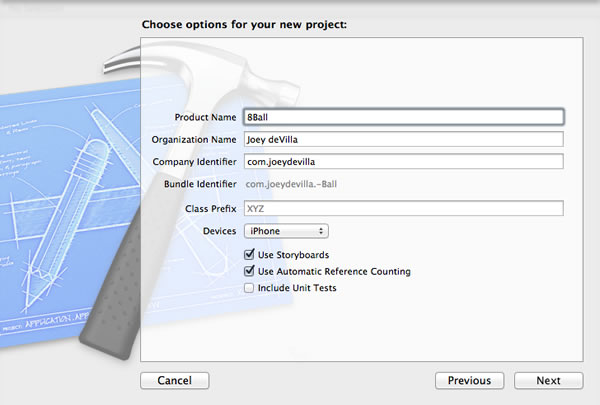
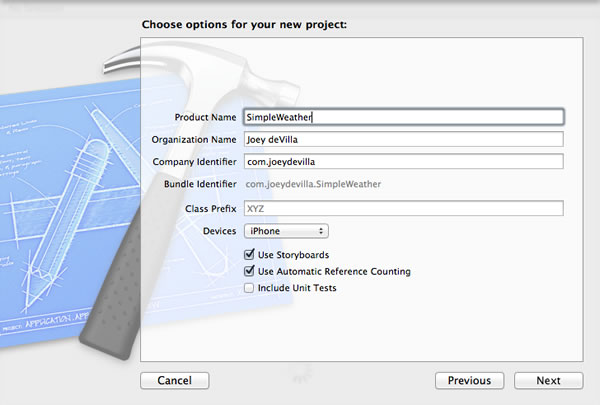
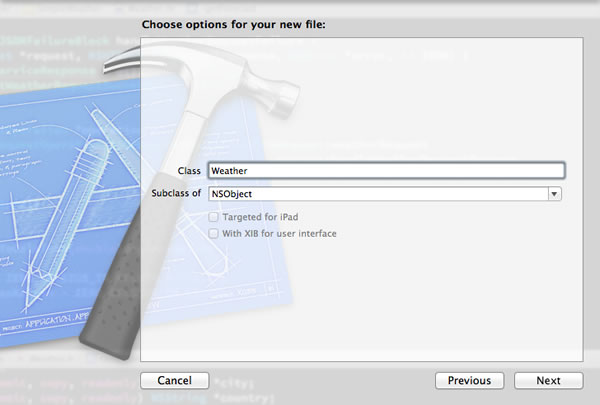
The second step in creating a new app is to choose a few options. Here are the mandatory bits:
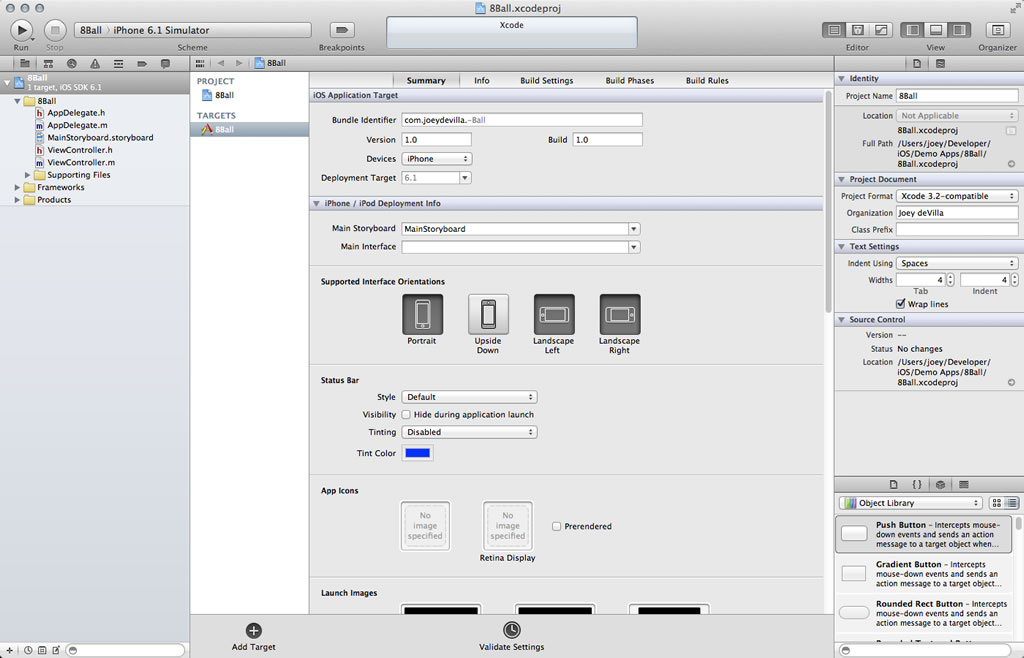
- Give your app a name by entering one into the Product Name field. I gave mine the name 8Ball, but feel free to pick your own name.
- Make sure that in the Devices menu, iPhone is selected.
- Check the Use Storyboards checkbox. Storyboards are the newer interface-building metaphor for iOS apps. Using Storyboards is an option with the current version of Xcode, but it’s the default in the upcoming Xcode 5, so it’s best to get used to them now. Since this is a single-screen app, there isn’t much of a difference between storyboards and “the old way”.
- Make sure that the Use Automatic Reference Counting checkbox is checked. Once again, don’t worry about what this means right now.
Xcode automatically fills in the Organization Name and Company Identifier fields based on the business name from the “Me” entry in your Mac’s Address Book application. For now, go with these; at this point, they’re not important.
Pick a Location to Save the Project
Click Next to proceed to the next step:
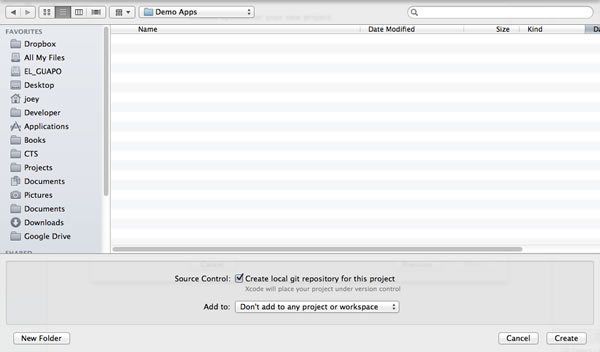
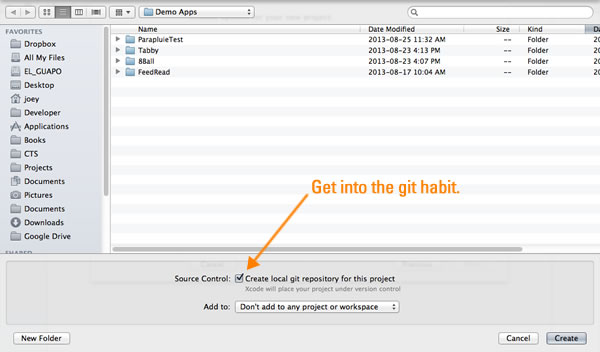
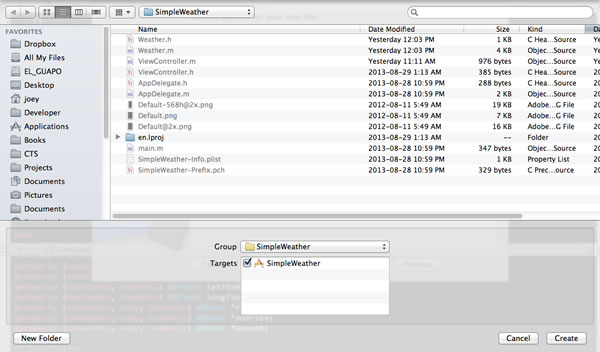
In this step, do this:
- Choose the directory where your project will be saved. Your project will be saved in a directory inside the directory you chose.
- Check the Create local git repository for this project checkbox. Unlike most iOS tutorials, this one will also talk about using version control with Git from within Xcode.
- Make sure that the selection in the Add to: menu is Don’t add to any project or workspace.
At this point, Xcode has enough information to create a new project. Click the Create button; Xcode will get to work and after a moment or two, you’ll have a project. You’ll be taken to Xcode’s main window, which will look something like this:

An Overview of Xcode’s User Interface
Before we get coding, let’s take a quick look at the five major parts of Xcode’s user interface:
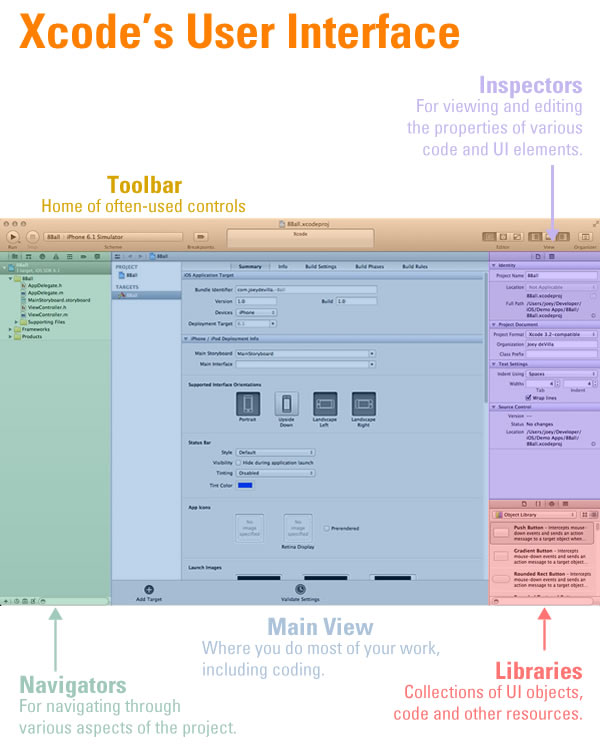
If you’ve worked with other IDEs, such as Visual Studio or Eclipse, Xcode’s layout should be familiar to you. Its main window has these five sections:
- Toolbar: Located at the top of Xcode’s main window, this iTunes-esque part of Xcode’s user interface is the home of a number of often-used controls, including those for running and debugging apps, and customizing Xcode’s UI.
- Navigators: These occupy the whole left sidebar. As their name implies, they’re used to navigate around projects. It has a number of tabs, the leftmost one being the Project Navigator (it has a file folder icon), which lets you navigate the files that make up your project.
- Main View: This is where you’ll do most of your work, including coding.
- Inspectors: These occupy the top portion of the right sidebar, and they’re used to view and edit the properties of is the sidebar on the right, and it’s used to view and edit the properties of code and UI elements. Like the navigators, the set of inspectors has a tabbed interface that lets you select an inspector.
- Libraries: The libraries are collections of things that you’ll find useful for coding: code templates, code snippets, and UI and media objects.
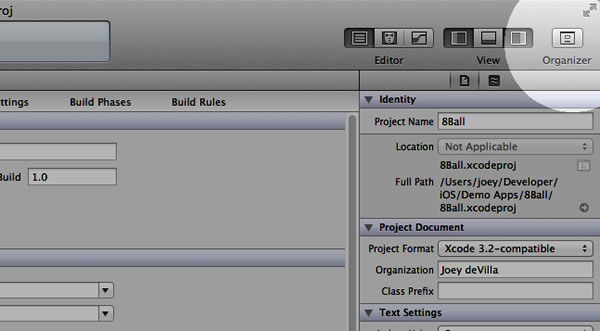
A Peek at the Repository
You can look at the local git repository that was created along with the project by opening the Organizer. The button to view it is located near the upper right-hand corner of Xcode’s main window:
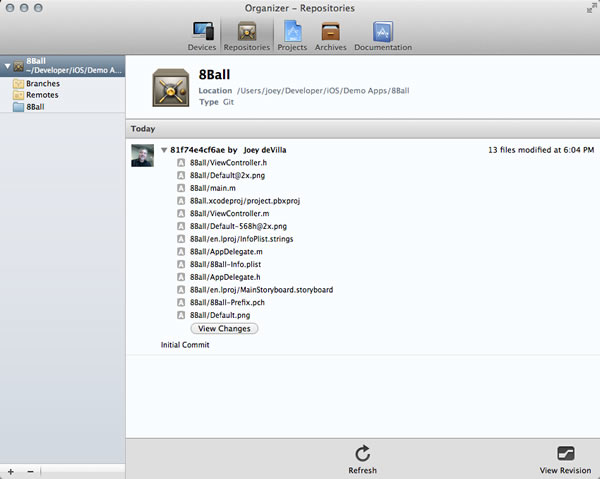
Once the Organizer window has opened, click on the Repositories button on its toolbar. You should see a window similar to this one:
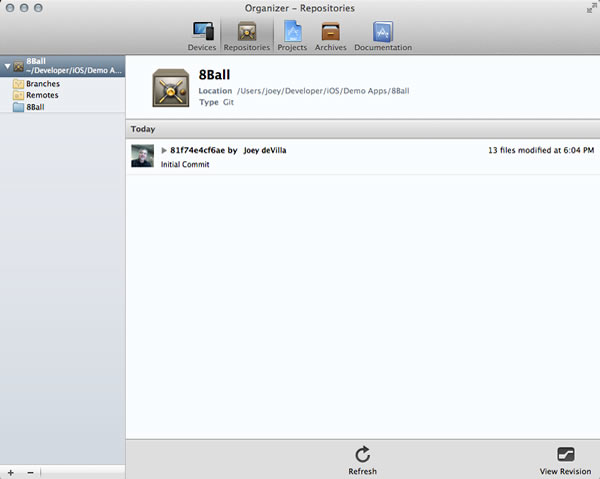
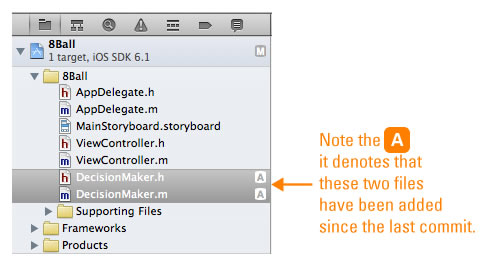
Notice that the first commit has been automatically made for you. If you click on the disclosure triangle for your first commit, you’ll get a list of all the files in your project, each marked with an “A” on the left. That’s “A” as in Git’s file status flag for files that have just been Added:
If you click the View Changes button, you’ll be presented with a window that lets you view the diffs for any of the files that were committed:
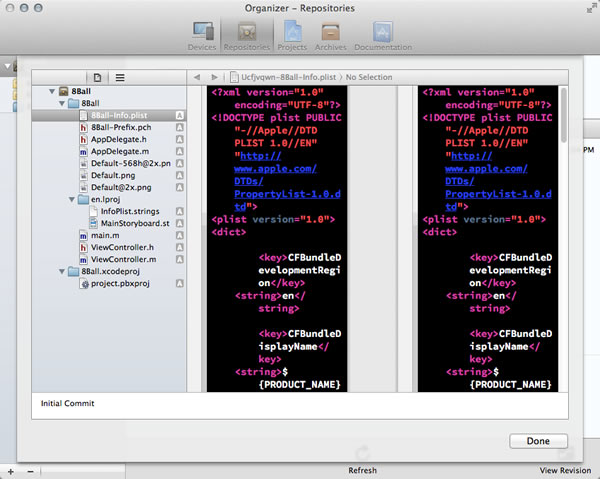
The “after” pane is the one on the left, and the “before” pane is the one on the right. Since this is our first and only commit so far, the files were newly-added, and thus the “befores” and “afters” are the same.
If you feel like doing a little double-checking on the command, feel free to open a terminal window, go to your project’s directory, and do a git status.
Take the Project for a Test Run
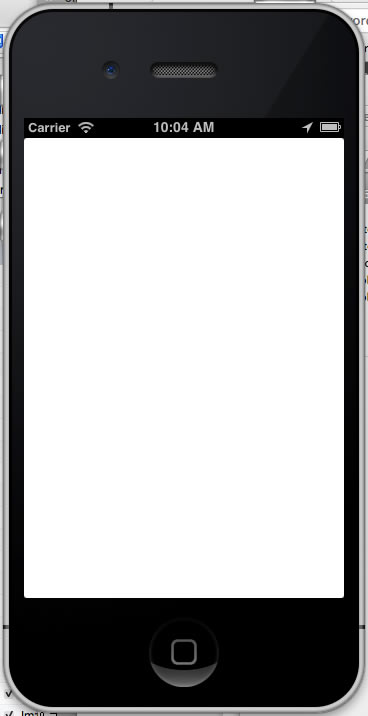
Even though we haven’t put any code into the project yet, it never hurts to take it for a test run. The controls for doing so are by the upper left-hand corner:

Make sure that iPhone 6.1 Simulator is selected in the Scheme menu, then hit the Run button. The simulator will spin up, and you should see something like this:
Now that we’ve got a working new empty project and a local repository, let’s start coding!
Draw the View
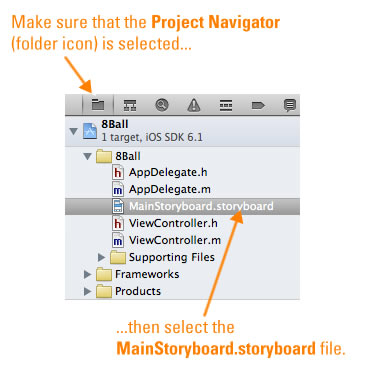
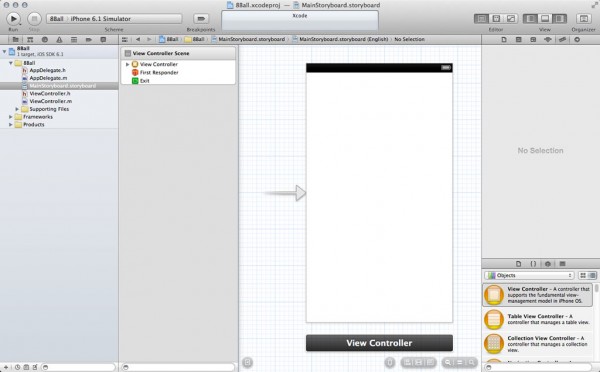
Take a look at the left sidebar, where the navigators live, and make sure the Project Navigator (select it with the leftmost icon, the file folder) is the currently visible one. Select MainStoryboard.storyboard in the Project Navigator:
Xcode should look like this:
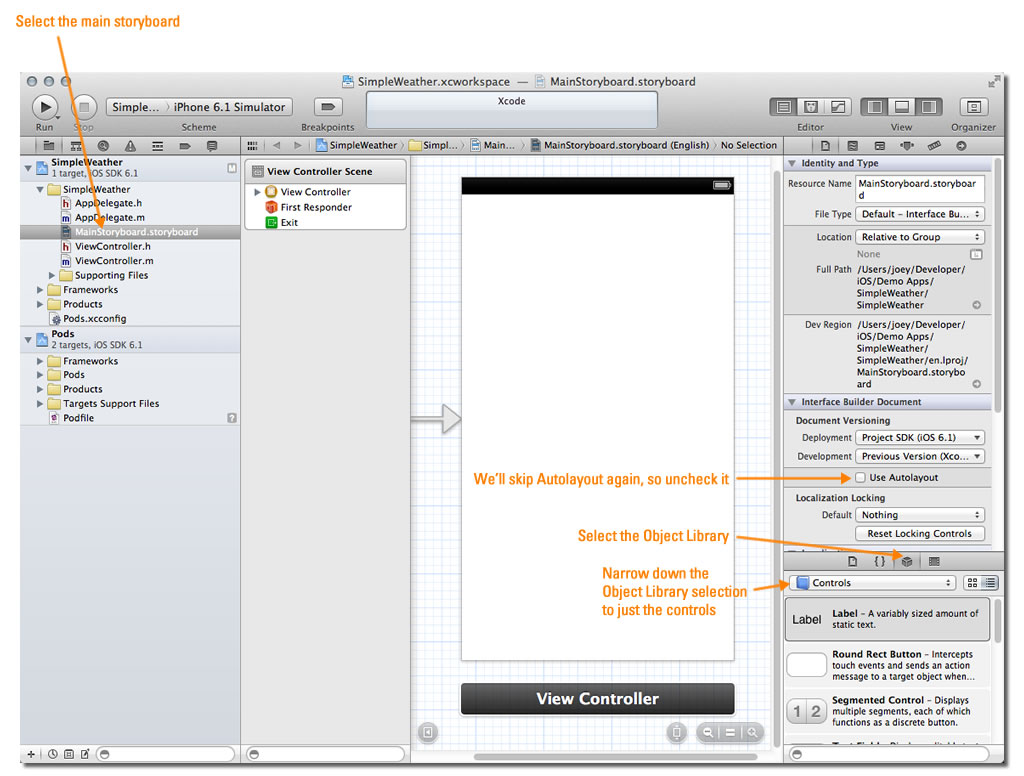
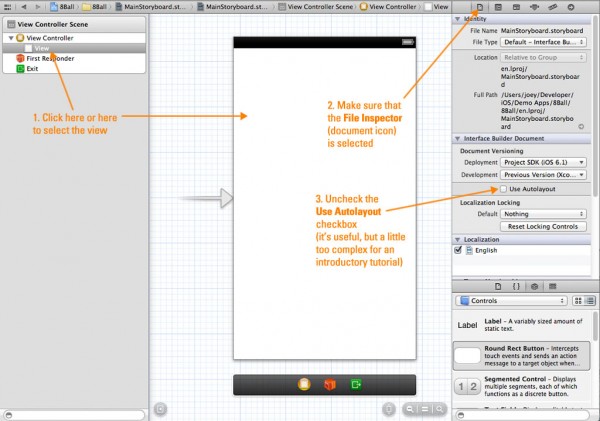
We’re going to do is disable Autolayout for this project. Autolayout is a feature that allows a user interface to adjust itself to various screen orientations (portrait and landscape) as well as screen sizes (which vary among iPhone and iPad models). While it’s useful, it adds a degree of complexity that we don’t want to deal with in these first few tutorials.
To turn off Autolayout, select the view as shown below. Then make sure that the File Inspector (the inspectors are in the upper part of Xcode’s right sidebar; the file inspector is the one with the document icon) is selected, then uncheck the Use Autolayout checkbox:
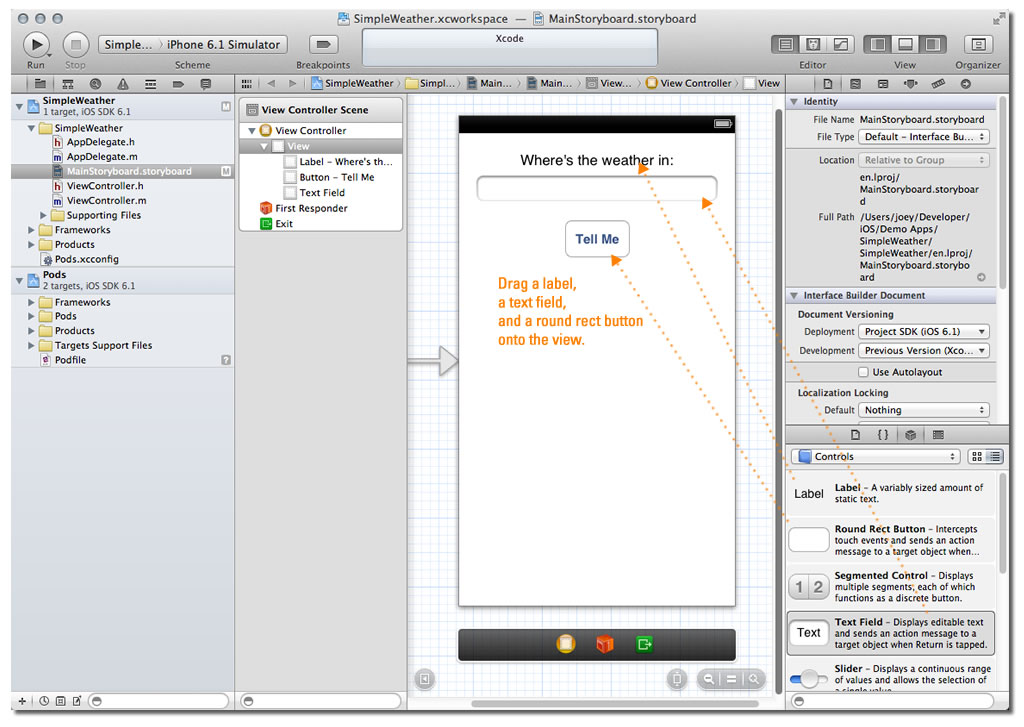
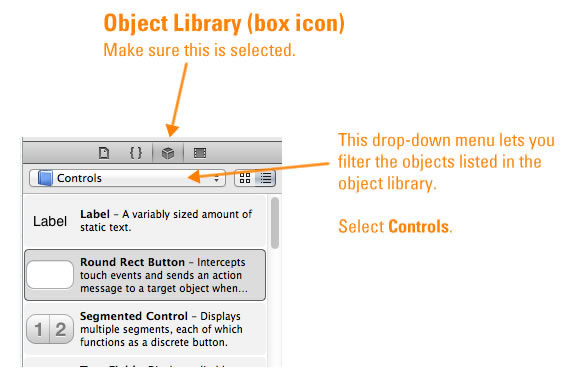
The libraries are also located in the right sidebar, just below the inspectors. We want to put a couple of controls onto the view:
- A label, which will be used to display the 8-ball’s answers, and
- a button that the user presses to get a new answer.
UI controls live in the Object Library (the one with the box icon). Make sure it’s selected, then select Controls from the drop-down menu to filter the list so that only UI controls appear:
Drag a button from the Object Library to the center of the view, then drag a label from the Object Library to a spot just above the button:
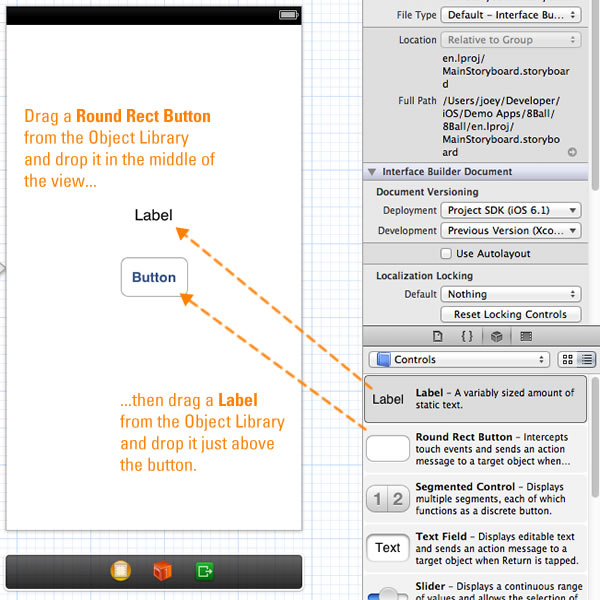
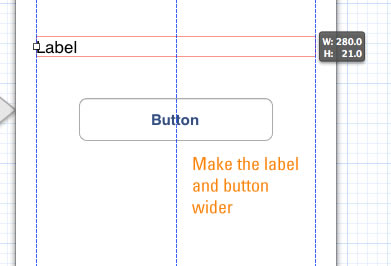
Xcode’s user interface drawing tools have guides that “auto-magically” appear to help you lay them out. They’ll help you position controls relative to the position of other controls, and help you center the label and button relative to each other.
Widen the button the little, and stretch the label so that it’s almost as wide as the entire view. Use the guides to help you determine how wide you should stretch the label:
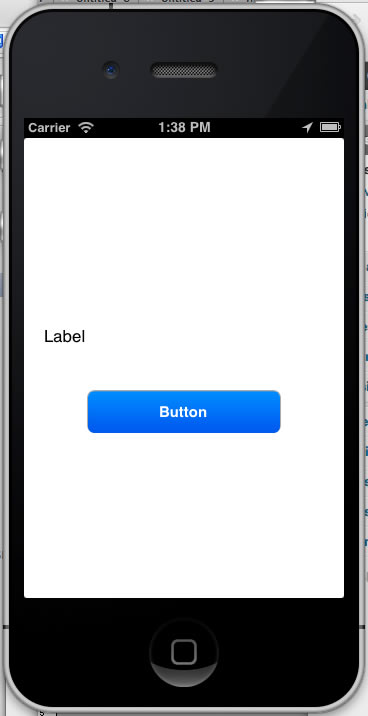
If you run the app now, it’ll look like this:
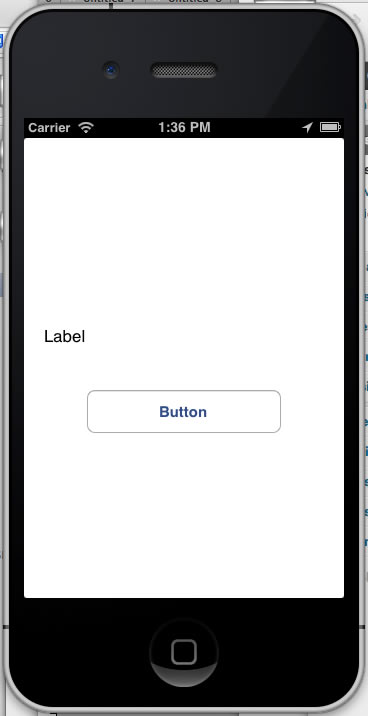
The button switches to its highlighted state when you press it, and it stays that way as long as your finger’s on it:
It doesn’t do much yet, but it’s a functioning view. The next step is to set up the view controller.
But First, a Quick Peek at Our Files
Before we get to the view controller, let’s take a look at the Project Navigator. There’s something new beside the MainStoryboard.storyboard file:
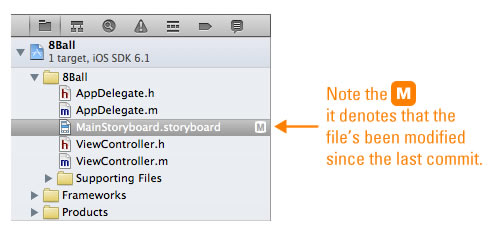
The M is one of Git’s file states, and it denotes that the file’s been modified since the last commit to the local repository. This will happen as you make changes to files in your project’s directory.
Set Up the View Controller with an Outlet and an Action
Now that we’ve got a view with a label and a button, we want to do the following with them:
- Label: We want to be able to change its text.
- Button: We want to know when the user has pressed it.
Let’s take care of the label first.
Create an Outlet for the Label
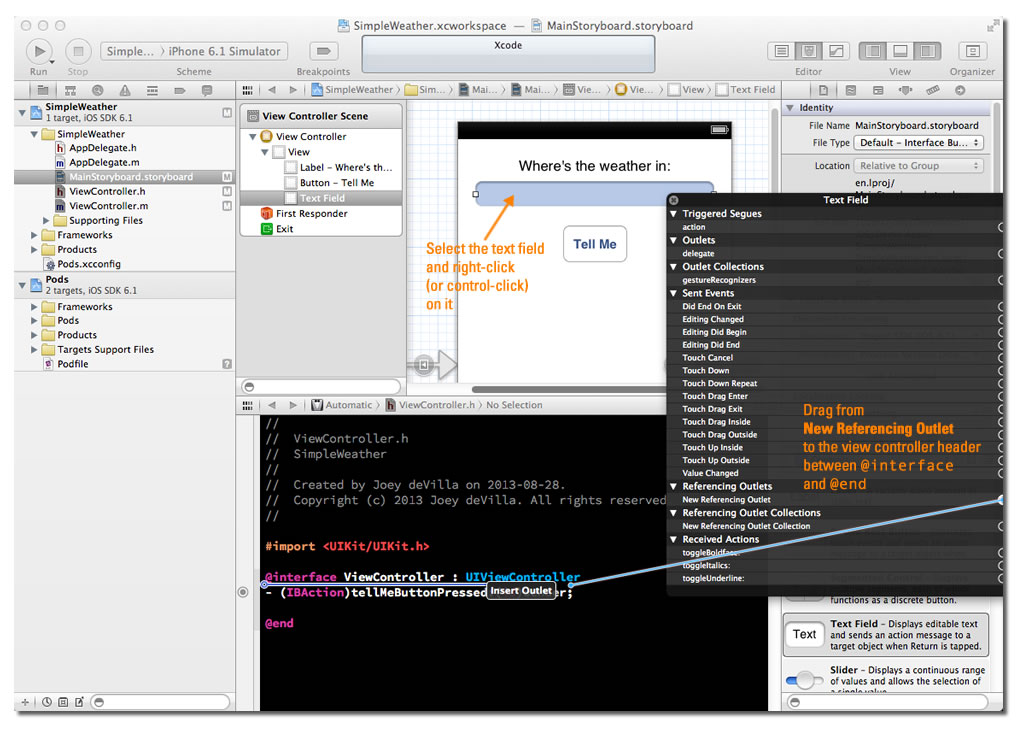
Right now, there’s no way for any code you write to refer to the label that you added to the view. You need to create an outlet, which gives you an object that you can use to refer to an control on the storyboard. Once you have an outlet for a control, you can access that control, call its methods and get and set its properties.
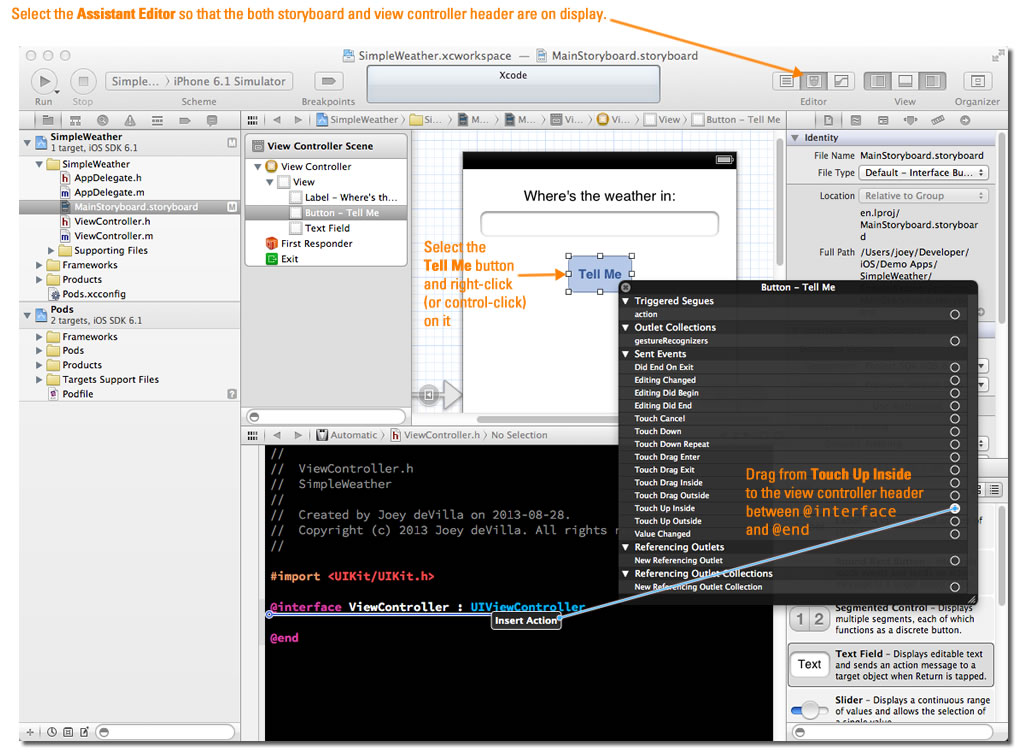
We need to get both the storyboard and the view controller’s header onscreen at the same time. Luckily, the Assistant Editor (its button is pictured below) can help:

The Assistant editor was designed to help with the sort of bouncing about between related files that often happens when working on Objective-C projects. You’ll often find yourself bouncing between a class or module’s .h file (its interface) and its .m file (its implementation), and between a view on the storyboard and its corresponding .h file. The Assistant Editor, when you call it up, considers the last thing you were editing, and opens the related file.
Make sure that the storyboard is in the main view (it should, if you’ve been following this tutorial so far). Click the Assistant Editor button…
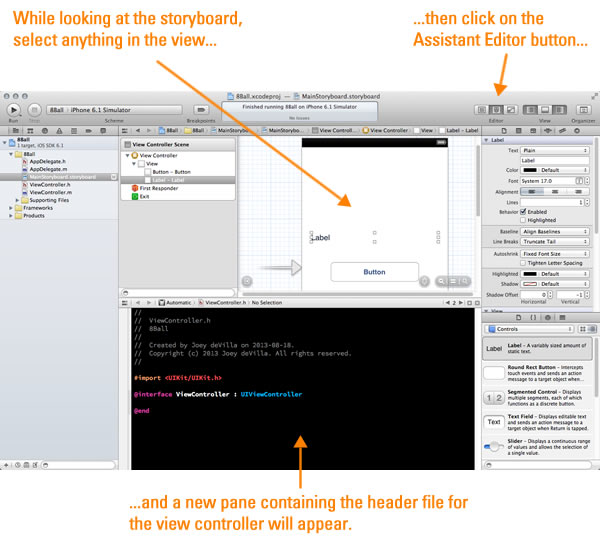
…and a text editor for the view controller’s header file will appear. Depending on your Xcode setup, the header file will appear in a pane that will appear either beside or underneath the storyboard.
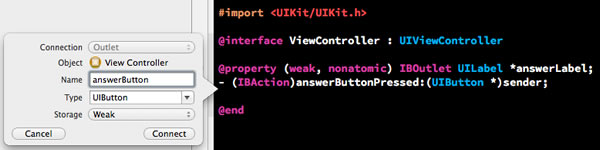
To make the connection, you’ll need to make use of the Connection Inspector, one of the inspectors available in the right sidebar. Make sure that the label is selected in the storyboard, click the Connection Inspector button (the one with the “arrow in circle” icon), and look for an item marked New Referencing Outlet. There’s a circle to its right; drag from that circle to anywhere inside the view controller’s header file that’s between @interface and @end:
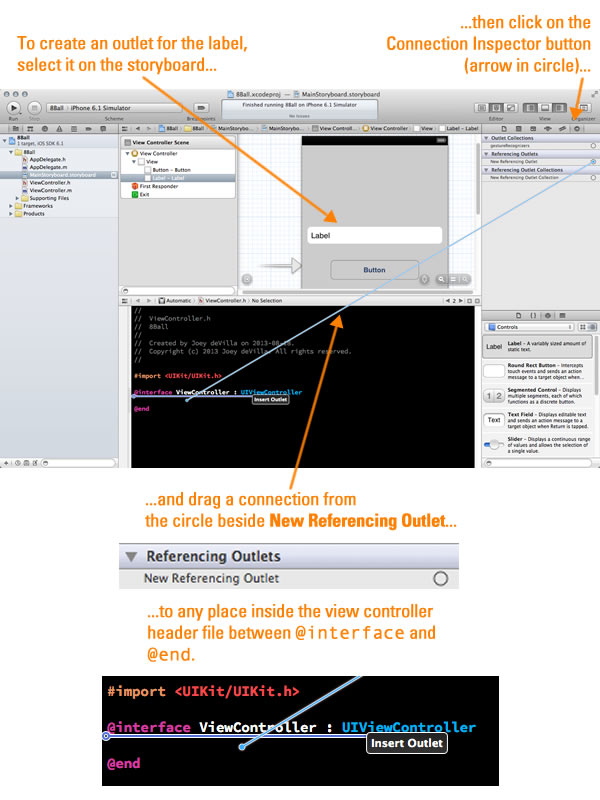
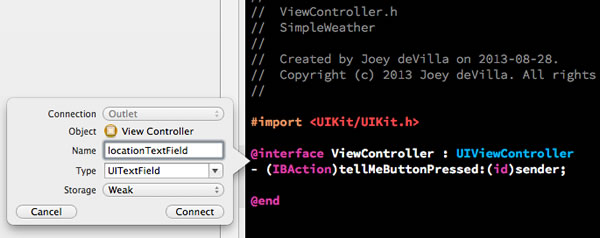
When you complete the drag, a little pop-up will appear:
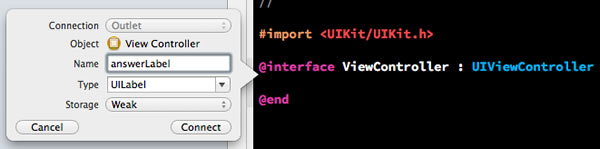
Provide a name for the outlet in the Name text field. I used answerLabel. Click the Connect button. The code in the header file should now be:
#import <UIKit/UIKit.h>

@interface ViewController : UIViewController

@property (weak, nonatomic) IBOutlet UILabel *answerLabel;

@end
What is @property?
A common practice in many object-oriented languages is to keep a class’ instance variables private and grant access to them via “getters” and “setters” or accessor methods. In Java, following this practice means that you have to do everything yourself: create an instance variable, then define public getter and setter methods that allow outside code to read and write the value in that instance variable.
Objective-C’s @property directive automates this process, telling the compiler to generate the following:
- A hidden ivar (Objective-C jargon for “instance variable”) where the value for the property will be stored. The ivar’s name is simply the name of the property preceded by an underscore (
_) character. The ivar’s type will be the same as the property’s. In the case of our answerLabel property, the hidden ivar that will be created is _answerLabel, and its type is UILabel.
- A hidden getter method, whose name and type is the same as the property. In the case of our
answerLabel property, the getter’s name is answerLabel, and its type is UILabel.
- A hidden setter method, whose name and type is the same as the property. In the case of our
answerLabel property, the setter’s name is answerLabel, and its type is UILabel.
If you develop in C#, its properties are similar to Objective-C’s properties. If you develop in Ruby, Objective-C’s properties aren’t too different from using attr_accessor.
Let’s take a closer look at the line that just got added to the view controller’s header:
@property (weak, nonatomic) IBOutlet UILabel *answerLabel;
Here’s what each part means:
@property: Indicates that we’re defining a property.(weak, nonatomic): The @property keyword is usually followed by a number of modifiers in parentheses. In this case, the two modifiers are:
weak: This is one of the possible memory management modifiers for properties: in addition to weak, there’s strong, assign, and copy. I’ll cover this in more detail in a later article. For now, you should note that weak is the preferred modifier for outlets.nonatomic: This is one of the possible concurrency modifiers: in addition to nonatomic, there’s atomic. These modifiers specify how properties behave in an environment with threading; by specifying that a property is atomic, you can ensure that the underlying object is locked when its getter or setter is called, thereby preventing threaded code from messing it up. For apps that don’t make use of threading (or if you’ve rolled your own thread-safety mechanism), the general rule is to define your classes’ properties as nonatomic.
IBOutlet: A dummy keyword that has no effect on your code. It’s there for the benefit of Xcode’s interface builder (which is why it’s prefixed with IB), so that it knows that this property is an outlet.UILabel *: The type of our property. UILabel is iOS’s class for label controls. If you’re new to C or Objective-C, the * tells you that this property is a pointer to an object of type UILabel.answerLabel: The name of our property.
Now that we have an outlet named answerLabel that’s a property of the view controller, we can now refer to the label in code simply by using self.answerLabel.
Create an Action for the Button
We also need some way for our code to be notified when the user presses the button. That way is an action — a method that gets called in response to an event. Creating an action is pretty similar to creating an outlet.
Select the button, then make the Connections Inspector the active one. A list will appear in the right sidebar:
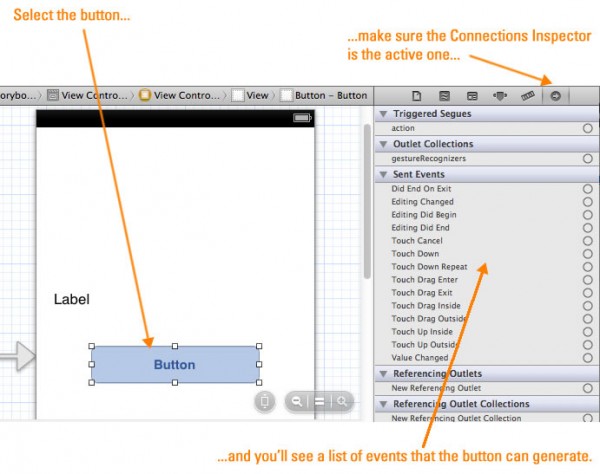
Take a look at the section of the list marked Sent Events. This lists the events that the button can respond to. We’re interested in the Touch Up Inside event, which happens when the user presses on the button, then releases it while his/her finger is still within the bounds of the button. It’s the event that corresponds to a regular button press, so it’s the one we want to respond to.
Creating an action is similar to creating an outlet — you create one by selecting an event and connecting it dragging it to the view controller’s hear file. Make sure that the button is selected in the storyboard and that the Connection Inspector is active. Drag from the circle beside Touch Up Inside to anywhere inside the view controller’s header file that’s between @interface and @end:
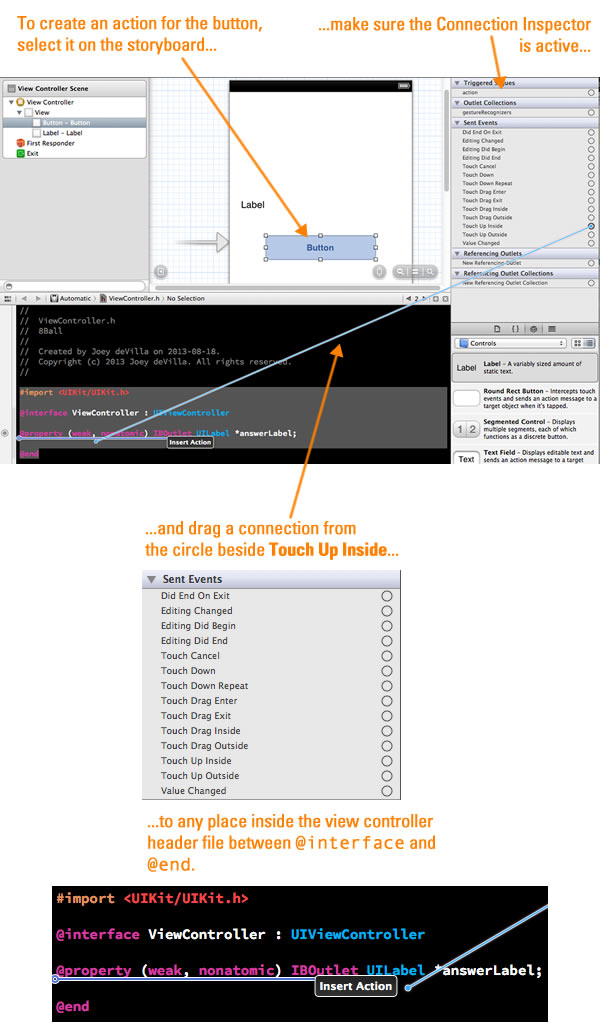 When you complete the drag, a little pop-up will appear:
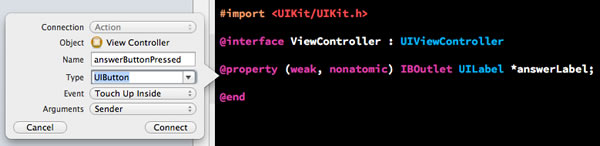
Do the following:
- Provide a name for the action in the Name text field. I used
answerButtonPressed.
- Change the Type from the default value of id (Objective-C’s type that means “pointer to any object”) to UIButton. The action will work just fine with id, but I prefer to be as type-specific as possible.
Click the Connect button. The code in the header file should now be:
#import <UIKit/UIKit.h>

@interface ViewController : UIViewController

@property (weak, nonatomic) IBOutlet UILabel *answerLabel;
- (IBAction)answerButtonPressed:(UIButton *)sender;

@end
Let’s take a closer look at the line that just got added to the view controller’s header:
- (IBAction)answerButtonPressed:(UIButton *)sender;
It’s the signature for a method. Here’s what each part means:
-: The - means that this method is an instance method as opposed to a class method.(IBAction): This is the return type of the method. IBAction is #defined to be a synonym for void. It’s there for the benefit of Xcode’s interface builder (which is why it’s prefixed with IB), so that it knows that this property is an action.answerButtonPressed: the name of the method.(UIButton *)sender: sender is the name of the single parameter this method takes, and its type is UIButton *, a pointer to object of type UIButton.
Adding the action put the interface for its method in the view controller’s header file, but that’s not the only file that changed. If you look at the view controller’s module or implementation file (ViewController.m), you’ll notice that the implementation for the method was placed there. It’s an empty method and looks like this:
- (IBAction)answerButtonPressed:(UIButton *)sender {
}
Let’s Use That Outlet and Action!
We now have an outlet for the label and an action for the button. We can now write some code to respond to button presses by changing the text inside the label. Change the implementation of answerButtonPressed in ViewController.m by adding a line:
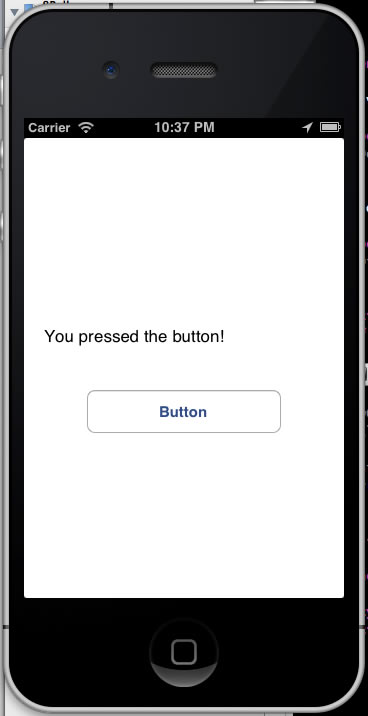
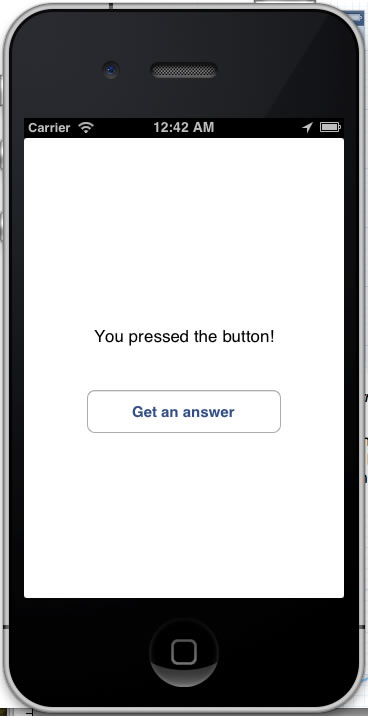
- (IBAction)answerButtonPressed:(UIButton *)sender {
    self.answerLabel.text = @"You pressed the button!";
}
In this one method, we’re using:
- The action, answerButtonPressed, to respond to the user pressing the button, and
- the outlet, answerLabel, to change the text of the label.
Note the @ in the line:
self.answerLabel.text = @"You pressed the button!";
When you put text in quotes preceded by the @ sign, you’re using Objective-C shorthand for “create an NSString object containing this text. NSString is the string class for work in Objective-C, and it has a whole lot of useful features including Unicode support. Without the @, you’re creating a plain old C string, which isn’t an object type, but a simple zero-terminated C array of ASCII characters.
If you run the app in the simulator now, you’ll see this at the start:
But after you press the button, it’ll look like this:
Let’s make one more change. Right now, when you run the app, the label and button still contain their default text at the beginning. Let’s change their text to something more suitable.
There are two ways to change the initial contents of the label and button. One way is to use Xcode’s interface builder and make the changes in the storyboard. This is as simple as double-clicking on the label or button, which puts them in a mode that lets you edit their text. I find that this is fine for quick-and-dirty projects and hashing out prototypes.
The other way is to set the contents of the label and button in code. Every view has a method named viewDidLoad, which gets called immediately after the view is loaded into memory, but before it’s displayed. It’s an excellent time to run all sorts of initialization code, including doing all sorts of user interface configuration. I think that this is the more maintainable approach, and it’s the approach we’ll use.
In order to be able to set the button’s content in code, we’ll need to create an outlet for it. This is a good excuse to show you another way to create an outlet. With both the storyboard and the header file for the view controller visible, right-click on the button. A pop-up containing the same items as the Connection Inspector will appear. Drag a connection from New Referencing Outlet to the code in the header, as shown below:
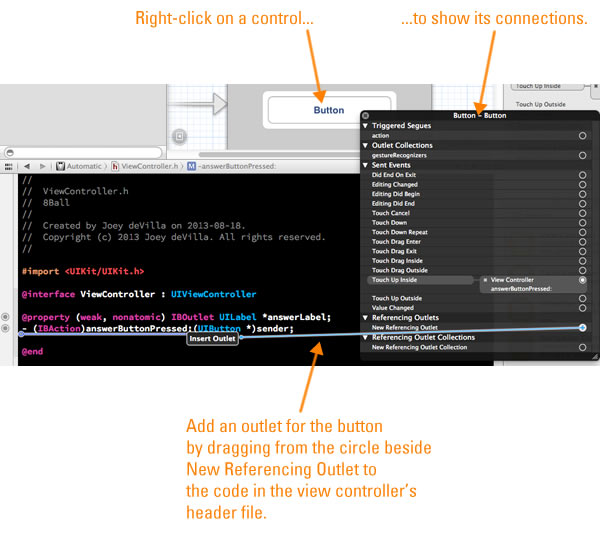
Another pop-up will appear:
Provide a name for the outlet in the Name text field. I used answerButton. If the Type property isn’t already set that way, change it to UIButton. Click the Connect button. The code in the header file should now be:
#import <UIKit/UIKit.h>

@interface ViewController : UIViewController

@property (weak, nonatomic) IBOutlet UILabel *answerLabel;
- (IBAction)answerButtonPressed:(UIButton *)sender;
@property (weak, nonatomic) IBOutlet UIButton *answerButton;

@end
I prefer to put my header files’ @property and IBAction declarations into their own groups, so I’ve rearranged my view controller’s header file to look like this:
#import <UIKit/UIKit.h>

@interface ViewController : UIViewController

@property (weak, nonatomic) IBOutlet UILabel *answerLabel;
@property (weak, nonatomic) IBOutlet UIButton *answerButton;

- (IBAction)answerButtonPressed:(UIButton *)sender;

@end
Now that we have an outlet for the button as well as the label, we can now write some initialization code for both of them. Go to the top of the view controller’s implementation file, ViewController.m. You’ll find the viewDidLoad method’s implementation there. It looks like this:
- (void)viewDidLoad
{
    [super viewDidLoad];
    // Do any additional setup after loading the view, typically from a nib.
}
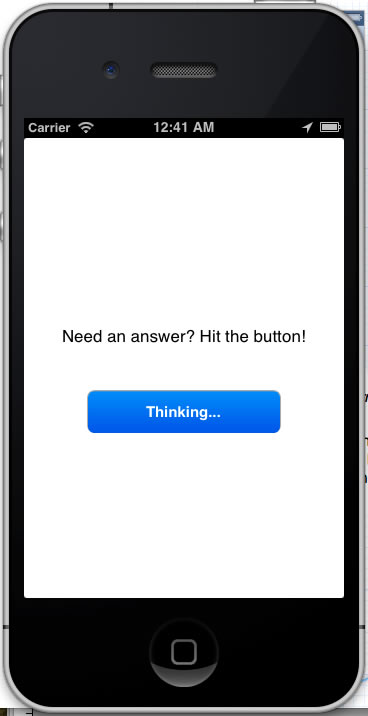
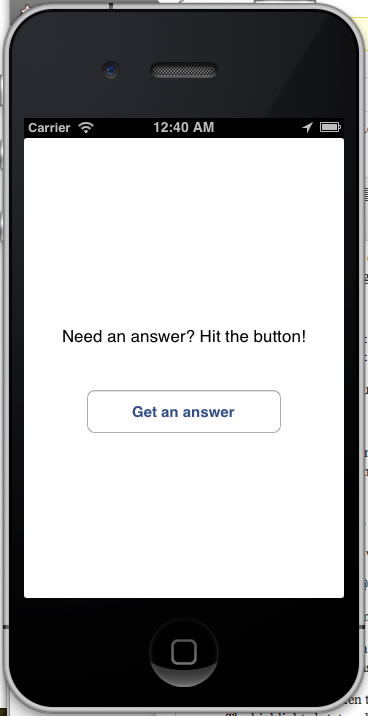
Change viewDidLoad to:
- (void)viewDidLoad
{
    [super viewDidLoad];

    // Initialize the UI
    // -----------------
    self.answerLabel.text = @"Need an answer? Hit the button!";
    self.answerLabel.textAlignment = NSTextAlignmentCenter;

    [self.answerButton setTitle:@"Get an answer" forState:UIControlStateNormal];
    [self.answerButton setTitle:@"Thinking..." forState:UIControlStateHighlighted];
}
Let’s examine these a control at a time:
    self.answerLabel.text = @"Need an answer? Hit the button!";
    self.answerLabel.textAlignment = NSTextAlignmentCenter;
You’ve probably already figured out what this one does: it sets the initial text of the label to Need an answer? Hit the button!, and then sets the label’s contents to be center-aligned.
Here’s the button code:
    [self.answerButton setTitle:@"Get an answer" forState:UIControlStateNormal];
    [self.answerButton setTitle:@"Thinking..." forState:UIControlStateHighlighted];
If you’re new to Objective-C, you might find its method-calling syntax odd. Method calls in Objective-C are like this:
[objectName methodName]
In Objective-C parameters become part of the method name. For example, let’s suppose that you were to call a on an object of type Person that set the person’s first and last names. In many popular object-oriented programming languages, the method call to set a Person object’s names to “Tony Stark” would look like this:
somePerson.setName("Tony", "Stark");
In Objective-C, the method call would look like this:
[somePerson setFirstName:@"Tony" lastName:@"Stark"];
…and the proper name for the method would be setFirstName:lastName.
Unlike labels, whose content can be set simply by accessing their text property, you need to call a method to set the text of a button: setTitle:forState:. We use this method twice, once for each of these states:
- The normal state, when the button is not being pressed.
- The highlighted state, when the button is being pressed.
If you the app now, it’ll look like this at startup:
If you press and hold the button, it’ll look like this:
And when you release the button, it’ll look like this:
This looks like a good time commit these changes to the Git repository.
Committing Our Changes
If you look at the Project Navigator (in the left sidebar), you should see this:

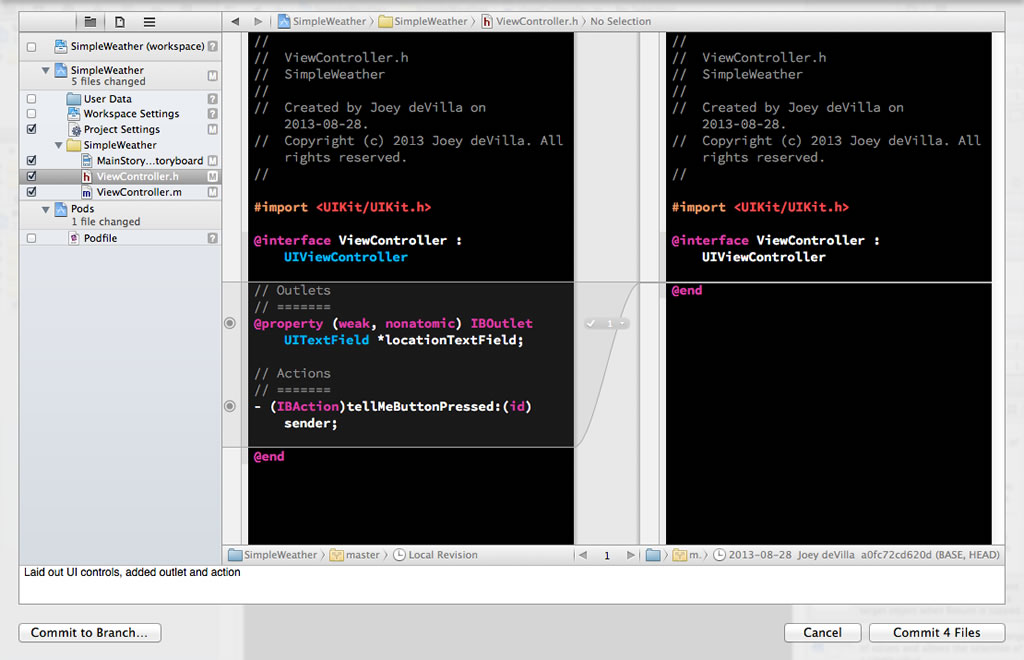
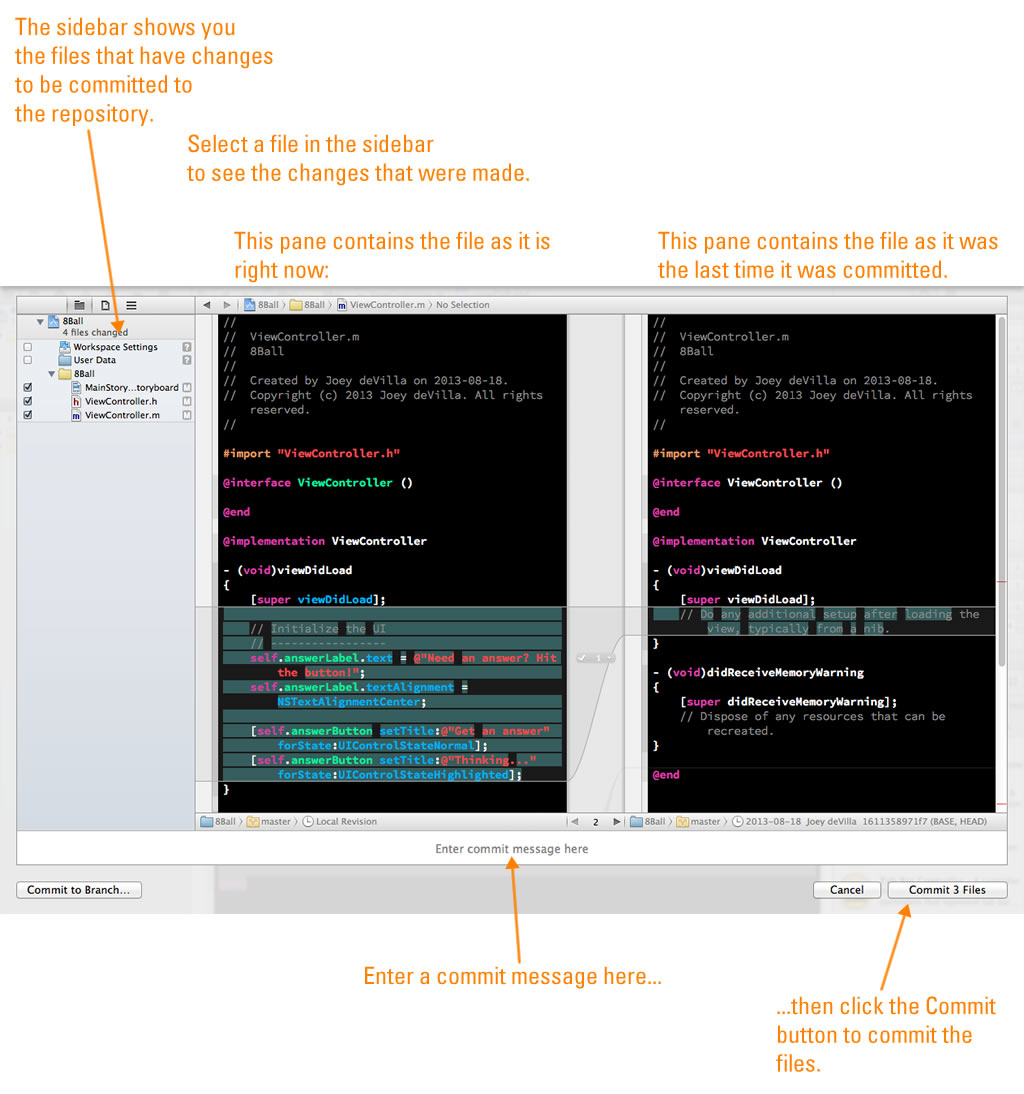
MainStoryboard.storyboard, ViewController.h, and ViewController.m have all been modified, and they’re marked with an M. We want to commit these changes, so fire up the source control by going to the menu bar and choosing File → Source Control → Commit…:

You’ll be taken to a screen where you can review the changes before committing them:
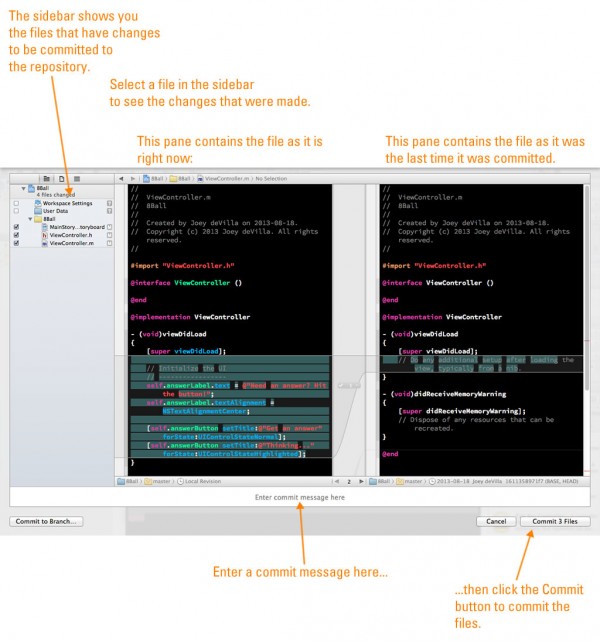
Click on MainStoryboard.storyboard, ViewController.h, and ViewController.m in the sidebar on the left to see the difference between the current versions of these files and the versions from the time they were last committed to the repository. Once you’re satisfied with the changes:
- Enter a commit message in the field at the bottom of the window. I entered “Added button and label, outlets and an action for them, and some basic test code.”
- Click the Commit 3 Files button.
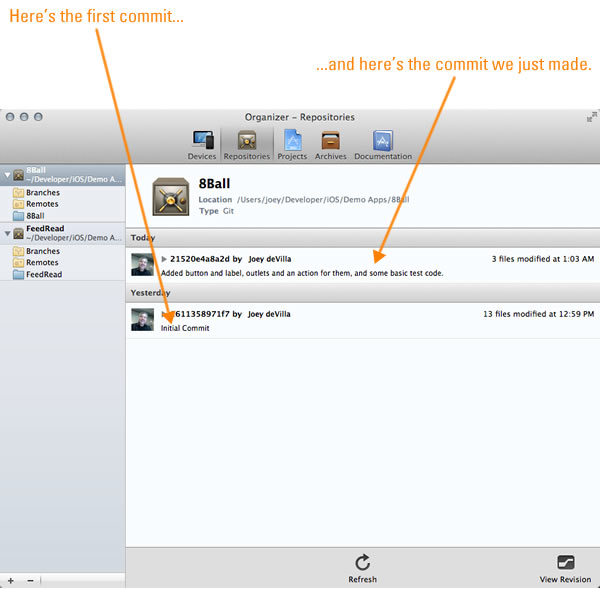
Let’s confirm that the changes were committed. Open the Organizer (once again, you do this by clicking on the Organizer button near the upper right-hand corner of Xcode’s window:
When the Organizer window appears, click the Repositories button. You’ll see the list of commits again, but this time there are two:
- The initial commit automatically generated when you created the project, and
- the commit we just made.
Finally: Code Up the Model
All that remains is to write the code to generate random answers for the 8-Ball. This is simple enough to stick into the view controller, but let’s do it the right way and code up a proper model object. We’ll create a model class that will house the random answer generator.
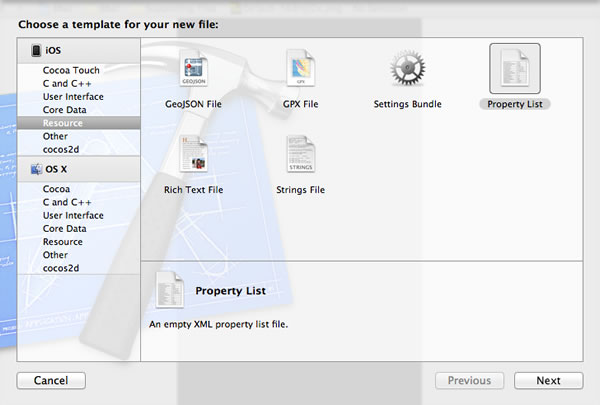
Let’s create a new class. From the menu bar, File → New → File…. You’ll be presented with this dialog box:

Do as the picture above says. Select Cocoa Touch from the sidebar on the left, then select Objective-C class, then click Next. You’ll then see this:
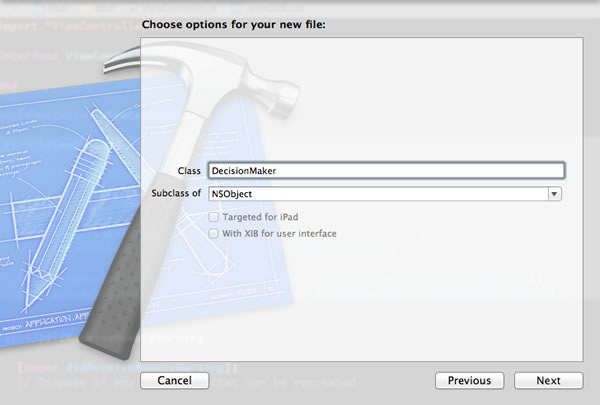
Provide a name for the class — I named it DecisionMaker — and make it a subclass of NSObject, the ultimate base class for every class in Objective-C. Once that’s done, click Next. You’ll see this:
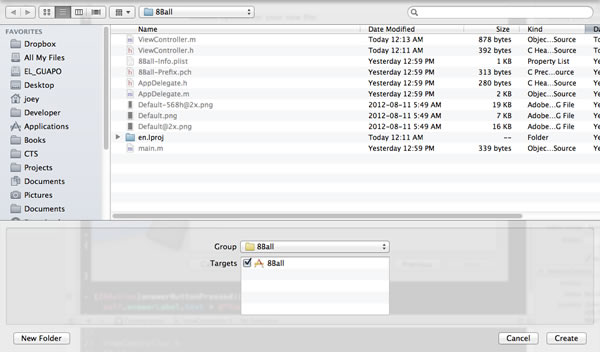
Click Create to save the new class files. You can see them in the Project Navigator, marked with the letter A, denoting files that have been added since the last commit:
Xcode will automatically open text editors for the header and implementation files for the newly-created class, DecisionMaker.h and DecisionMaker.m:
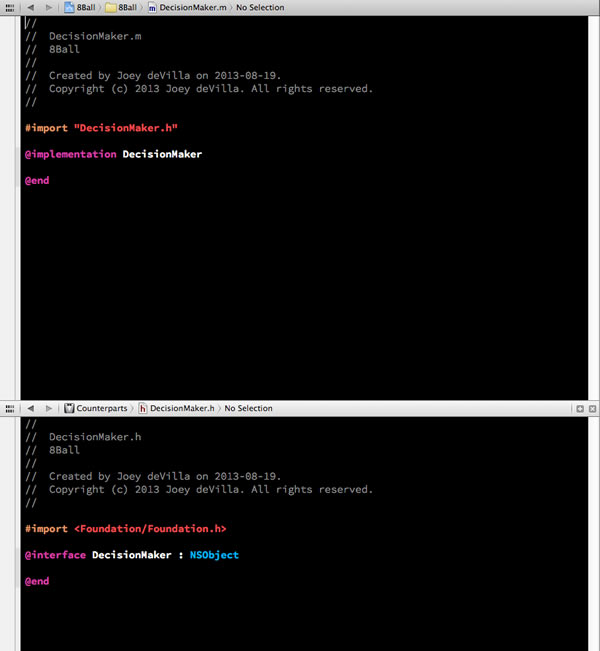
Time to start coding! First, the let’s write the code for the DecisionMaker class’ header file, DecisionMaker.h:
#import <Foundation/Foundation.h>

@interface DecisionMaker : NSObject

- (NSString *)getRandomAnswer;

@end
Right now, DecisionMaker will expose a single method called getRandomAnswer, so we need to put its signature into the header file. getRandomAnswer doesn’t take any arguments, but does return a string.
Now for the implementation:
#import "DecisionMaker.h"
@implementation DecisionMaker {
NSArray *answers;
}
- (id)init
{
self = [super init];
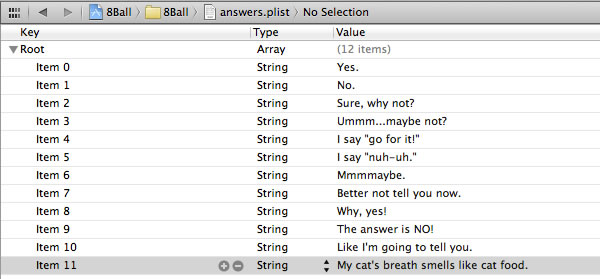
answers = @[
@"Yes.",
@"No.",
@"Sure, why not?",
@"Ummm...maybe not.",
@"I say \"Go for it!\"",
@"I say \"Nuh-uh.\"",
@"Mmmmmaybe.",
@"Better not tell you now.",
@"Why, yes!",
@"The answer is \"NO!\"",
@"Like I\'m going to tell you.",
@"My cat\'s breath smells like cat food."
];
return self;
}
- (NSString *)getRandomAnswer
{
return answers[arc4random() % answers.count];
}
@end
Here’s what you should note from the code above:
- Instance variables — or ivars, as many Objective-C developers like to call them — go into a block immediately after the
@implementation line. This class has a single ivar, answers, which is an NSArray that will hold the answers to randomly choose from. In Objective-C programming, NSArrays are generally favoured over straight-up C arrays.
- There are two methods in this class:
init: This is the constructor, where in addition to constructing instances of the class, the array of answers is initialized.getRandomAnswer, which produces the 8-Ball’s answers.
arc4random() is a pseudo-random number generator that’s part of the standard C library and is considered to be the go-to random number generator for general random number needs. It has a decent randomization algorithm and generates pseudorandom numbers between 0 and 2^32 – 1 (which is about 4.3 billion). To get a pseudorandom number between 0 and n, use arc4random() % n.
With the model done, it’s time to go back to the view controller’s implementation file, ViewController.m, to make use of it:
#import "ViewController.h"
#import "DecisionMaker.h"

@interface ViewController ()

@end

@implementation ViewController {
    DecisionMaker *answerSource;
}

- (void)viewDidLoad
{
    [super viewDidLoad];

    // Initialize the UI
    // -----------------
    self.answerLabel.text = @"Need an answer? Hit the button!";
    self.answerLabel.textAlignment = NSTextAlignmentCenter;

    [self.answerButton setTitle:@"Get an answer" forState:UIControlStateNormal];
    [self.answerButton setTitle:@"Thinking..." forState:UIControlStateHighlighted];

    // Initialize the decision maker
    // -----------------------------
    answerSource = [[DecisionMaker alloc] init];
}

- (void)didReceiveMemoryWarning
{
    [super didReceiveMemoryWarning];
    // Dispose of any resources that can be recreated.
}

- (IBAction)answerButtonPressed:(UIButton *)sender {
    self.answerLabel.text = [answerSource getRandomAnswer];
}
@end
Here’s what’s happening in this code:
- Once again, instance variables — ahem, ivars — go into a block immediately after the
@implementation line. We’ve added a single ivar, answerSource, which is our model.
- We initialize
answerSource in the viewDidLoad method. Since it’s executed just after the view is loaded but before it’s drawn, it’s a good place to do initializing.
- We changed the code in the
answerButtonPressed action to set the label’s text to a randomly-selected answer provided by answerSource.
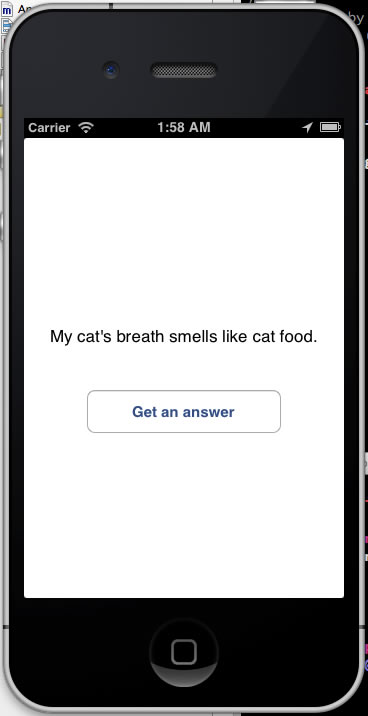
Here’s what the app looks like when you run it:
Commit the Changes
With a functioning model added, it’s a good time to commit the changes. Go to menu bar and choose File → Source Control → Commit… and commit those changes!
Follow-up Article
Be sure to take a look at the follow-up article, Tweaking the 8-Ball App with a plist, where we make use of property lists, a.k.a. plists, a useful feature. This subtle change to the code makes it easier to maintain.
Next Steps
This is a simple project, and you should feel free to expand upon it or build new projects using this one as a basis. Some other exercises you might want to try include:
- Turning this app into a game of chance, or a dice-roller for role-playing games
- Building an iOS equivalent of those party games made up of a deck of cards containing interesting “get to know the real you” questions
- Fixing up the user interface to make it either incredibly skeuomorphic as a number of iOS apps are, or give it the really clean look of the upcoming iOS 7
- Changing the app so that the answers aren’t hard-coded into the
DecisionMaker model, but perhaps read from a resource file or even an online file
 I know, I know, it’s been over a fortnight since I last post a tutorial. Things have been a little bit crazy at work, but I plan to hope to use the next couple of days to get caught up, and then post a new tutorial next week.
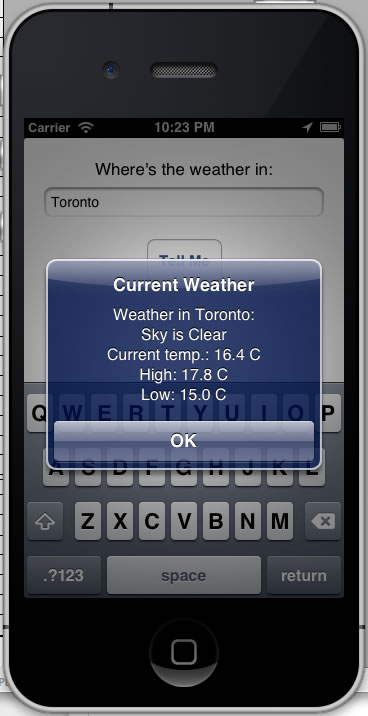
 The meat of the SimpleWeather app is in the
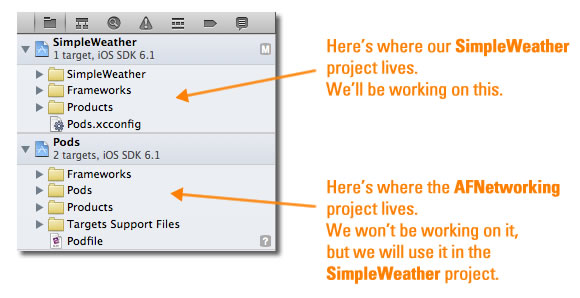
 AFNetworking can be manually included in a project, but I thought this would be a good opportunity to show the use of