Update, August 26, 2015: I’ve updated this article so that its code works with Swift 2. It compiles under the latest version of Xcode 7, beta 6.
 If you’re just getting started with date and time programming in Swift, chances are that you probably did some Googling, found
 NSDate and its companion classes in Apple’s documentation and promptly got confused. Let me reassure you that it isn’t your fault. Apple’s Date and Time Programming Guide isn’t set up in the most helpful way, and its examples are in Objective-C, which can throw you off if you’re not familiar with its [instance method] calling syntax.
If you’re coming to Swift from JavaScript, which makes do with a single object type called Date, the idea of having this set of classes just to handle dates and times looks like overkill:

Click the chart to see it at full size.
This is the first article in a short series on programming dates and times in Swift. It’ll help you make sense of working with NSDate and its companion classes.
What is UTC? (or: “It’s 5 o’clock somewhere!”)
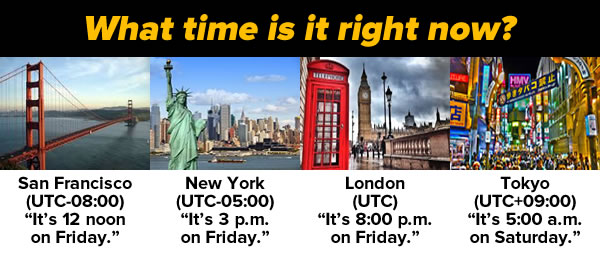
People who like to drink are fond of saying “Well, it’s five o’clock somewhere!“, and it’s my favorite way of illustrating that what time it is depends on where you are. It’s why we have UTC — Coordinated Universal Time — the “One True Time” on which every other time zone is based. UTC replaced GMT (Greenwich Meridian Time, the time as observed at the Royal Observatory in Greenwich, London), and it doesn’t change for daylight savings. By having this standard, we eliminate the confusion that comes up when discussing times.
While most places have some names to refer to time zones in everyday conversation — such as Pacific, Mountain, Central, and Eastern in North America — the clearest way to indicate time zones is to express them as negative or positive offsets from UTC. For example, the North American time zone known as “Eastern” is 5 hours behind UTC, so it’s expressed as UTC-05:00. There are certain time zones where the offset isn’t whole hours, such as Newfoundland’s, which is UTC-03:30, and Nepal’s, which for some reason is UTC+05:45.
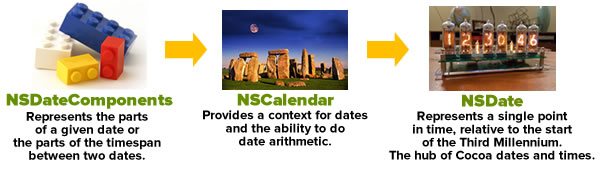
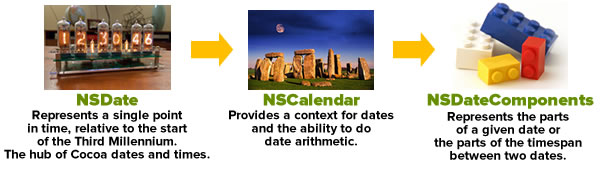
NSDate: Cocoa standard time
When you want to represent a date or time in Cocoa, you do so with an instance of the NSDate class. Here’s a nice, simple description of what NSDate is:
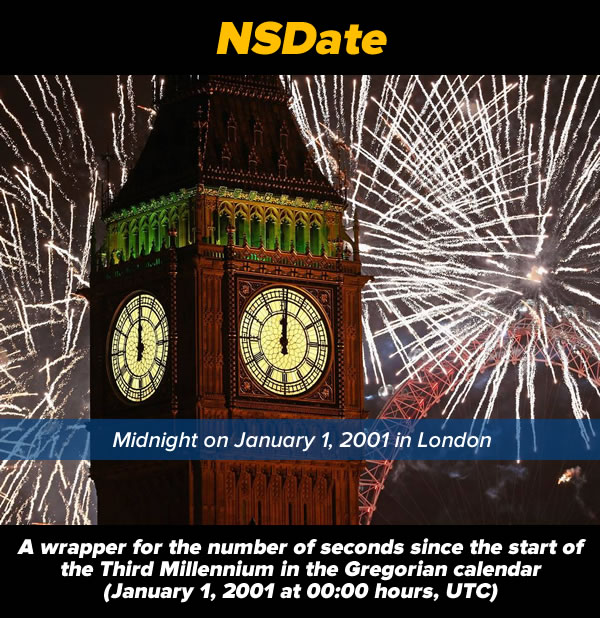
When you’re measuring time, you need a reference point. The Gregorian calendar — the one that I’m 99.999999% sure that you’re using right now — uses what is said to be the year of the birth of Christ as its reference point. Your age uses the date of your birth as a reference point. A time trial race uses the time at the start of the race as its reference point.
NSDate‘s reference point is the start of the third millennium: January 1, 2001 at midnight UTC. It stores time as an NSTimeInterval, a 64-bit floating point value representing a number of seconds. Negative values represent a number seconds before January 1, 2001, 00:00 UTC, and positive values represent a number seconds after that time. According to Apple’s documentation, this representation of time “yields sub-millisecond precision over a range of 10,000 years”, which means that an NSDate instance can represent any point in time from about 3000 BC/BCE to 7000 AD/CE.
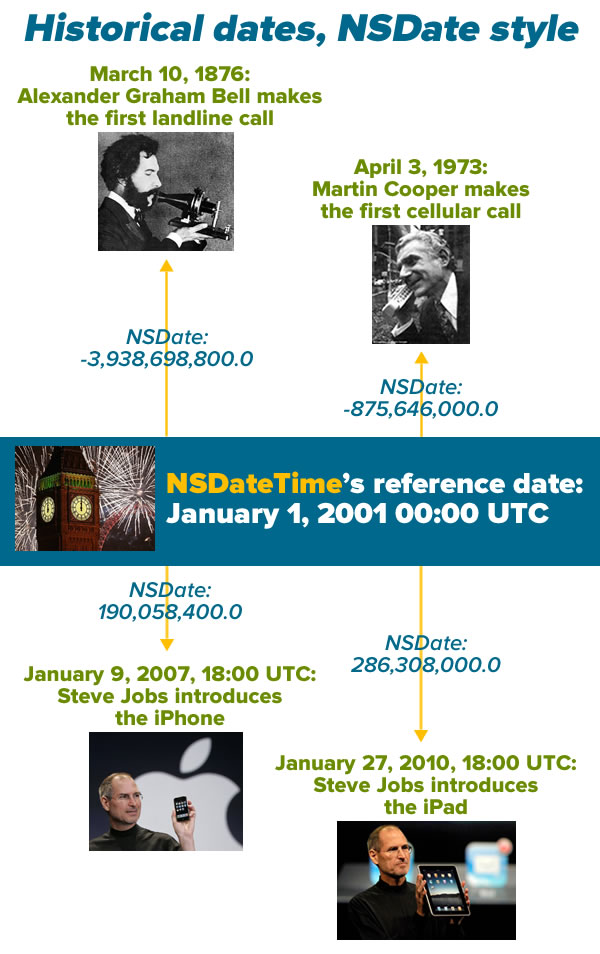
Here are 4 historical dates, as seen from NSDate‘s perspective:
There are some consequences to the fact that NSDate treats time as an offset of seconds:
- All
NSDatevalues refer to both a date and a time. If you want to use anNSDateto store a date only, you ignore the time portion, and vice versa. NSDatehas no concept of time zones or any time unit other than seconds. That means you can’t ask it what year, month, day, hour, or minute correspond to the time it’s storing. As far as it’s concerned, there are no calendars; you work withNSDate‘s representation of time, when it’s time to display a date, time, or both, you format it to use the calendar and time zone that’s appropriate for the user.
There’s a method to this madness: it allows us to use and store dates and times in a way that’s independent of calendar systems, time zones, languages, and date formats. As I write this, it’s the year 2015 in the Gregorian calendar, but the Buddhist calendar says it’s 2558, and if you go by the Hebrew Calendar, it’s 5775. I may say it’s 9:45 a.m. as I write this in Tampa, but if you’re in California, it’s 6:45, and if you’re a soldier, you might call it 14:45 Zulu Time. I call the current month January, but you might call it Enero or Janvier. It’s all the same as far as NSDate is concerned, which makes it incredibly flexible.
Creating NSDates without any helper classes: now is easy, other dates ain’t so pretty
Let’s create some NSDates right now. Fire up Xcode, open a new playground, and enter the following code so that it looks like this:
// Playground - noun: a place where people can play

import UIKit

let now = NSDate()
print(now)
now.timeIntervalSinceReferenceDate
You should see results in the sidebar that look similar to this:

If you create an NSDate without any parameters, you get an instance representing the date and time at the moment it was created. That’s what we’ve done by creating the instance named now.
Note that in the sidebar beside line 5, where we created now, the result displayed in the sidebar is Jan 19, 2015, 8:52 AM. While the internal representation of the current time is a 64-bit floating point value, Xcode’s doing us a favor by representing it in a more readable format and using the local time zone. It’s doing this by making use of a date formatter, which we’ll cover later.
In line 6, we’re using the println function to display the default string representation of an NSDate, which is a completely numeric one. It’s more readable than a 64-bit floating point value, but it might not be in the format or time zone (or even the calendar system) that you want. Once again, this output comes courtesy of a date formatter.
Finally, in line 7, we use the timeIntervalSinceReferenceDate property to display now‘s internal representation of the date and time it’s storing: about 443 million seconds after January 1, 2001 at midnight UTC.
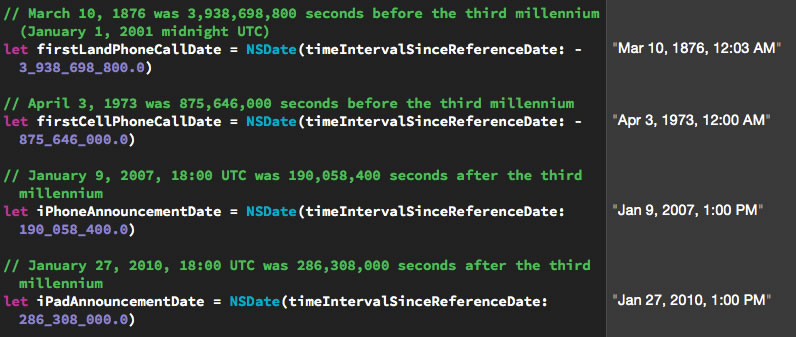
Let’s create the dates from the Historical dates, NSDate style picture above. Enter or paste the highlighted code below so that your playground looks like this:
// Playground - noun: a place where people can play

import UIKit

let now = NSDate()
println(now)
now.timeIntervalSinceReferenceDate

// March 10, 1876 was 3,938,698,800 seconds before the third millennium (January 1, 2001 midnight UTC)
let firstLandPhoneCallDate = NSDate(timeIntervalSinceReferenceDate: -3_938_698_800.0)

// April 3, 1973 was 875,646,000 seconds before the third millennium
let firstCellPhoneCallDate = NSDate(timeIntervalSinceReferenceDate: -875_646_000.0)

// January 9, 2007, 18:00 UTC was 190,058,400 seconds after the third millennium
let iPhoneAnnouncementDate = NSDate(timeIntervalSinceReferenceDate: 190_058_400.0)

// January 27, 2010, 18:00 UTC was 286,308,000 seconds after the third millennium
let iPadAnnouncementDate = NSDate(timeIntervalSinceReferenceDate: 286_308_000.0)
Note my use of the underscore character, _, to act as a “thousands” separator. It’s not required; it just makes large numbers easier to read.
In the sidebar, you should see nicely-formatted dates beside the NSDates you created:
Click the screenshot to see it at full size.
NSDate has four initializers for creating specified dates and times:
| Initializer | Description |
|---|---|
init(timeIntervalSinceReferenceDate:) |
Create an NSDate instance representing a time specified by a number of seconds before or after January 1, 2001 00:00 UTC. |
init(timeIntervalSinceNow:) |
Create an NSDate instance representing a time specified by a number of seconds before or after the current date and time. |
init(timeIntervalSince1970:) |
Create an NSDate instance representing a time specified by a number of seconds before or after January 1, 1970 00:00 UTC. This method exists not because Apple’s founders were California hippies nostalgic for the era of their youth, but for compatibility with Unix time. |
init(timeInterval:sinceDate:) |
Create an NSDate instance representing a time specified by a number of seconds before or after a given NSDate. |
You’ve probably noticed that none of these initializers lets you create an NSDate by giving it something convenient like a year, month, day, time zone and so on. Luckily, there are classes that will help us do this.
Creating NSDates with the help of NSCalendar and NSDateComponents
If you’re like most people, you’d probably much rather initialize a date object using a day, month, year, and time instead of some number of seconds before and after midnight on January 1, 1970, January 1, 2001, or any other arbitrary date. For this, we’ll need a couple of additional classes:
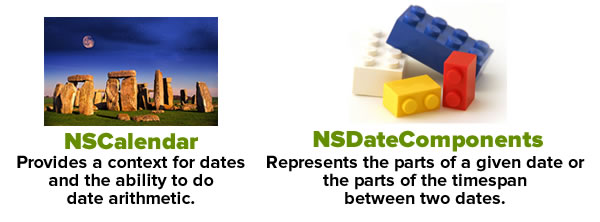
First, there’s the NSCalendar class, which among other things, gives us a context for converting NSDate‘s “seconds before or after the third millennium” measurements into a familiar time system with years, months, days, hours, and minutes, and it accounts for time zones as well. Most of the time, the date and time system will be the Gregorian calendar, but iOS also lets you choose from 15 other calendar systems, including Hebrew and Buddhist.
Next, there’s the NSDateComponents class, which is an assembly of properties that make up a date, such as year, month, date, hour, minute, second, and so on. An NSDateComponents instance can be used to represent either:
- A specific point in time, or
- a duration of time.
To create an NSDate by specifying things like a year, month, day, and time, we’ll do the following:
- Create an
NSCalendarinstance pointing to the user’s calendar - Specify a date using an
NSDateComponentsinstance - Create the
NSDateby passing theNSDateComponentsinstance toNSCalendar‘sdateFromComponentsinstance method
Let’s go back to our playground and create our first historical date: that of Alexander Graham Bell’s first phone call. We know it took place on March 10, 1876. While we don’t know the exact time it happened, we do know that it happened in North America’s Eastern time zone, as opposed to something like Kiritimati, a.k.a. Christmas Island. That place is 19 hours ahead and would’ve resulted in historians recording that day as March 11th rather than the 10th.
Enter or paste the highlighted code below so that your playground looks like this:
// Playground - noun: a place where people can play

import UIKit

// The user's calendar incorporates the user's locale and
// time zones settings, so we'll often use it.
let userCalendar = NSCalendar.currentCalendar()


// March 10, 1876
// In this case, we're using an NSDatesComponents instance
// to represent a date rather than a duration of time.
let firstLandPhoneCallDateComponents = NSDateComponents()

// We don't know the time when Alexander Graham Bell made
// his historic phone call, so we'll simply provide the
// year, month and day.
// We *do* know that he made that call in North America's
// eastern time zone, so we'll specify that.
firstLandPhoneCallDateComponents.year = 1876
firstLandPhoneCallDateComponents.month = 3
firstLandPhoneCallDateComponents.day = 10
firstLandPhoneCallDateComponents.timeZone = NSTimeZone(name: "US/Eastern")
Any calendar, regardless of its time zone, to turn date components into dates using its calendar system. If you specify a time zone in the date components, it will take that time zone into account; if you don’t specify one, the date will be created using the calendar’s time zone. We created an instance of the user’s calendar, which incorporates the user’s local and time zone settings, because it’ll be useful later when we want to go in the opposite direction and convert dates into date components.
Note that after setting the year, month, and day properties of firstLandPhoneCallComponents, we set the timeZone component using the preferred initializer, init(name:), which lets you specify a time zone by any of the standard string identifiers listed in the tz database of time zones. I could’ve used one of the city names such as America/New_York (or for those of you familiar with Canada, America/Toronto, America/Montreal, America/Atikokan, or America/Pangnirtung) to specify the Eastern time zone. It’s far clearer — especially to people not from the U.S. — to use the time zone names that begin with US or Canada, such as US/Eastern, US/Central, US/Mountain, and US/Pacific rather than city names.
Once we’ve set up the date components, we use the calendar’s dateFromComponents instance method to convert them into a date. I’m in the US/Eastern time zone, the same one as the one specified in the date components, so the result in the sidebar beside this line of code shows as “Mar 10, 1876, 12:00 AM” (we didn’t specify a time in the date components, so the resulting date has the default time of 00:00). The date displayed in the sidebar uses your system settings, which may be different from mine.
Let’s enter the other three historic dates. Enter or paste the highlighted code below so that your playground looks like this:
// Playground - noun: a place where people can play

import UIKit

// The user's calendar incorporates the user's locale and
// time zones settings, so we'll often use it.
let userCalendar = NSCalendar.currentCalendar()


// March 10, 1876
// In this case, we're using an NSDatesComponents instance
// to represent a date rather than a duration of time.
let firstLandPhoneCallDateComponents = NSDateComponents()

// We don't know the time when Alexander Graham Bell made
// his historic phone call, so we'll simply provide the
// year, month and day.
// We *do* know that he made that call in North America's
// eastern time zone, so we'll specify that.
firstLandPhoneCallDateComponents.year = 1876
firstLandPhoneCallDateComponents.month = 3
firstLandPhoneCallDateComponents.day = 10
firstLandPhoneCallDateComponents.timeZone = NSTimeZone(name: "US/Eastern")

// We have a calendar and date components. We can now make a date!
// On my system (US/Eastern time zone), the result for the line below is
// "Mar 10, 1876, 12:00 AM"
let firstLandPhoneCallDate = userCalendar.dateFromComponents(firstLandPhoneCallDateComponents)!


// April 3, 1973
let firstCellularPhoneCallDateComponents = NSDateComponents()
firstCellularPhoneCallDateComponents.year = 1973
firstCellularPhoneCallDateComponents.month = 4
firstCellularPhoneCallDateComponents.day = 3
firstCellularPhoneCallDateComponents.timeZone = NSTimeZone(name: "US/Eastern")
// On my system (US/Eastern time zone), the result for the line below is
// "Apr 3, 1973, 12:00 AM"
let firstCellularPhoneCallDate = userCalendar.dateFromComponents(firstCellularPhoneCallDateComponents)!


// January 9, 2007, 18:00 UTC
let iPhoneAnnouncementDateComponents = NSDateComponents()
// We know that the "Stevenote" when the iPhone was announced
// started at 10:00 am Pacific time.
iPhoneAnnouncementDateComponents.year = 2007
iPhoneAnnouncementDateComponents.month = 1
iPhoneAnnouncementDateComponents.day = 9
iPhoneAnnouncementDateComponents.hour = 13
iPhoneAnnouncementDateComponents.minute = 0
iPhoneAnnouncementDateComponents.timeZone = NSTimeZone(name: "US/Eastern")
// On my system (US/Eastern time zone), the result for the line below is
// "Jan 9, 2007, 1:00 PM"
let iPhoneAnnouncementDate = userCalendar.dateFromComponents(iPhoneAnnouncementDateComponents)!


// January 27, 2010, 18:00 UTC
// We know that the "Stevenote" when the iPad was announced
// started at 10:00 am Pacific time.
let iPadAnnouncementDateComponents = NSDateComponents()
iPadAnnouncementDateComponents.year = 2010
iPadAnnouncementDateComponents.month = 1
iPadAnnouncementDateComponents.day = 27
// Let's set the clock using Pacific Time
iPadAnnouncementDateComponents.hour = 10
iPadAnnouncementDateComponents.minute = 0
iPadAnnouncementDateComponents.timeZone = NSTimeZone(name: "US/Pacific")
// On my system (US/Eastern time zone), the result for the line below is
// "Jan 27, 2010, 1:00 PM"
let iPadAnnouncementDate = userCalendar.dateFromComponents(iPadAnnouncementDateComponents)!
Note that we used different time zones for the “Stevenotes”. Both took place at the same time, 10:00 a.m. Pacific, but we set the time for the iPhone announcement as 1:00 p.m. US/Eastern, and the time for the iPad announcement as 10:00 a.m. US/Pacific. Both results in the sidebar appear at the same time; on my machine, they appear as Jan 27, 2010, 1:00 PM.
dateFromComponents works with what you give it
Suppose we want to create a date just by specifying that it’s 11:00 a.m. on the first Saturday of March 2015 in the US/Eastern time zone. Here’s how it’s done:
// (Previous code goes here)

// First Saturday of March 2015, US/Eastern
let firstSaturdayMarch2015DateComponents = NSDateComponents()
firstSaturdayMarch2015DateComponents.year = 2015
firstSaturdayMarch2015DateComponents.month = 3
firstSaturdayMarch2015DateComponents.weekday = 7
firstSaturdayMarch2015DateComponents.weekdayOrdinal = 1
firstSaturdayMarch2015DateComponents.hour = 11
firstSaturdayMarch2015DateComponents.minute = 0
firstSaturdayMarch2015DateComponents.timeZone = NSTimeZone(name: "US/Eastern")
// On my system (US/Eastern time zone), the result for the line below is
// "Mar 7, 2015, 11:00 AM"
let firstSaturdayMarch2015Date = userCalendar.dateFromComponents(firstSaturdayMarch2015DateComponents)!
NSDateComponents‘ weekday property lets you specify a weekday numerically. In Cocoa’s Gregorian calendar, the first day is Sunday, and is represented by the value 1. Monday is represented by 2, Tuesday is represented by 3, all the way to Saturday, which is represented by 7.
The weekdayOrdinal property lets you specify which specified weekday of the month. By setting weekday to 7, we’re specifying a Saturday; by then setting weekdayOrdinal to 1, we’re specifying the first Saturday of the month.
Here’s another example, where we get the date for the Thursday on the 18th week of 2015:
// (Previous code, including the definition of calendar,
// goes here)

// Thursday of the 18th week of 2015, US/Eastern
let thursday18thWeekOf2015DateComponents = NSDateComponents()
thursday18thWeekOf2015DateComponents.year = 2015
thursday18thWeekOf2015DateComponents.weekOfYear = 18
thursday18thWeekOf2015DateComponents.weekday = 5
thursday18thWeekOf2015DateComponents.timeZone = NSTimeZone(name: "US/Eastern")
// On my system (US/Eastern time zone), the result for the line below is
// ""Apr 30, 2015, 12:00 AM""
let thursday18thWeekOf2015Date = userCalendar.dateFromComponents(thursday18thWeekOf2015DateComponents)!
The other way around: getting NSDateComponents from NSDates
Right now, your playground should look like this, with a number of dates being created from date components:
// Playground - noun: a place where people can play

import UIKit

// The user's calendar incorporates the user's locale and
// time zones settings, so we'll often use it.
let userCalendar = NSCalendar.currentCalendar()


// March 10, 1876
// In this case, we're using an NSDatesComponents instance
// to represent a date rather than a duration of time.
let firstLandPhoneCallDateComponents = NSDateComponents()

// We don't know the time when Alexander Graham Bell made
// his historic phone call, so we'll simply provide the
// year, month and day.
// We *do* know that he made that call in North America's
// eastern time zone, so we'll specify that.
firstLandPhoneCallDateComponents.year = 1876
firstLandPhoneCallDateComponents.month = 3
firstLandPhoneCallDateComponents.day = 10
firstLandPhoneCallDateComponents.timeZone = NSTimeZone(name: "US/Eastern")

// We have a calendar and date components. We can now make a date!
// On my system (US/Eastern time zone), the result for the line below is
// "Mar 10, 1876, 12:00 AM"
let firstLandPhoneCallDate = userCalendar.dateFromComponents(firstLandPhoneCallDateComponents)!


// April 3, 1973
let firstCellularPhoneCallDateComponents = NSDateComponents()
firstCellularPhoneCallDateComponents.year = 1973
firstCellularPhoneCallDateComponents.month = 4
firstCellularPhoneCallDateComponents.day = 3
firstCellularPhoneCallDateComponents.timeZone = NSTimeZone(name: "US/Eastern")
// On my system (US/Eastern time zone), the result for the line below is
// "Apr 3, 1973, 12:00 AM"
let firstCellularPhoneCallDate = userCalendar.dateFromComponents(firstCellularPhoneCallDateComponents)!


// January 9, 2007, 18:00 UTC
let iPhoneAnnouncementDateComponents = NSDateComponents()
// We know that the "Stevenote" when the iPhone was announced
// started at 10:00 am Pacific time.
iPhoneAnnouncementDateComponents.year = 2007
iPhoneAnnouncementDateComponents.month = 1
iPhoneAnnouncementDateComponents.day = 9
iPhoneAnnouncementDateComponents.hour = 13
iPhoneAnnouncementDateComponents.minute = 0
iPhoneAnnouncementDateComponents.timeZone = NSTimeZone(name: "US/Eastern")
// On my system (US/Eastern time zone), the result for the line below is
// "Jan 9, 2007, 1:00 PM"
let iPhoneAnnouncementDate = userCalendar.dateFromComponents(iPhoneAnnouncementDateComponents)!


// January 27, 2010, 18:00 UTC
// We know that the "Stevenote" when the iPad was announced
// started at 10:00 am Pacific time.
let iPadAnnouncementDateComponents = NSDateComponents()
iPadAnnouncementDateComponents.year = 2010
iPadAnnouncementDateComponents.month = 1
iPadAnnouncementDateComponents.day = 27
// Let's set the clock using Pacific Time
iPadAnnouncementDateComponents.hour = 10
iPadAnnouncementDateComponents.minute = 0
iPadAnnouncementDateComponents.timeZone = NSTimeZone(name: "US/Pacific")
// On my system (US/Eastern time zone), the result for the line below is
// "Jan 27, 2010, 1:00 PM"
let iPadAnnouncementDate = userCalendar.dateFromComponents(iPadAnnouncementDateComponents)!


// First Saturday of March 2015, US/Eastern
let firstSaturdayMarch2015DateComponents = NSDateComponents()
firstSaturdayMarch2015DateComponents.year = 2015
firstSaturdayMarch2015DateComponents.month = 3
firstSaturdayMarch2015DateComponents.weekday = 7
firstSaturdayMarch2015DateComponents.weekdayOrdinal = 1
firstSaturdayMarch2015DateComponents.hour = 11
firstSaturdayMarch2015DateComponents.minute = 0
firstSaturdayMarch2015DateComponents.timeZone = NSTimeZone(name: "US/Eastern")
// On my system (US/Eastern time zone), the result for the line below is
// "Mar 7, 2015, 11:00 AM"
let firstSaturdayMarch2015Date = userCalendar.dateFromComponents(firstSaturdayMarch2015DateComponents)!


// Thursday of the 18th week of 2015, US/Eastern
let thursday18thWeekOf2015DateComponents = NSDateComponents()
thursday18thWeekOf2015DateComponents.year = 2015
thursday18thWeekOf2015DateComponents.weekOfYear = 18
thursday18thWeekOf2015DateComponents.weekday = 5
thursday18thWeekOf2015DateComponents.timeZone = NSTimeZone(name: "US/Eastern")
// On my system (US/Eastern time zone), the result for the line below is
// "Apr 30, 2015, 12:00 AM"
let thursday18thWeekOf2015Date = userCalendar.dateFromComponents(thursday18thWeekOf2015DateComponents)!
Now it’s time to go the other way around, and extract date components from those dates. Once again, it’s the calendar that provides the method for making the conversion.
To extract NSDateComponents from an NSDate, we’ll do the following:
- Create
NSCalendarinstances, if needed - Specify a set of date components using
NSCalendarUnitbitmasks - Create the
NSDateComponentsby passing theNSDateinstance toNSCalendar‘scomponentsinstance method
We already have a calendar instance: userCalendar, which is associated with the user’s time zone. If we use it to extract date components from a given date, the dates and times will be interpreted in the context of its time zone.
Let’s create two more calendars with two different time zones:
- The US/Pacific time zone (UTC-08:00)
- The Japan time zone (UTC+09:00)
Here’s what the code looks like:
// (Previous code goes here)

let pacificCalendar = NSCalendar(calendarIdentifier: NSCalendarIdentifierGregorian)!
pacificCalendar.timeZone = NSTimeZone(name: "US/Pacific")!

let japanCalendar = NSCalendar(calendarIdentifier: NSCalendarIdentifierGregorian)!
japanCalendar.timeZone = NSTimeZone(name: "Asia/Tokyo")!
Extracting all the possible date components from a date can be computationally costly, so NSCalendar‘s components instance method requires you to specify the components you want to extract. We want to extract these components from our dates:
yearmonthdayhourminuteweekdayweekdayOrdinal
Here’s the code that specifies this:
// (Previous code goes here)

let requestedDateComponents: NSCalendarUnit = [.Year,
                                               .Month,
                                               .Day,
                                               .Hour,
                                               .Minute,
                                               .Weekday,
                                               .WeekdayOrdinal]
Now that we’ve done that, we can start extracting date components:
// (Previous code goes here)

// Date components in the user's time zone
let jan9_2007Components = userCalendar.components(requestedDateComponents,
                                                  fromDate: iPhoneAnnouncementDate)
jan9_2007Components.year
jan9_2007Components.month
jan9_2007Components.day
jan9_2007Components.hour
jan9_2007Components.minute
jan9_2007Components.weekday
jan9_2007Components.weekdayOrdinal

// Date components in the US/Pacific time zone
let march10_1876PacificComponents = pacificCalendar.components(requestedDateComponents,
                                                               fromDate: iPhoneAnnouncementDate)
march10_1876PacificComponents.year
march10_1876PacificComponents.month
march10_1876PacificComponents.day
march10_1876PacificComponents.hour
march10_1876PacificComponents.minute
march10_1876PacificComponents.weekday
march10_1876PacificComponents.weekdayOrdinal

// Date components in Japan's time zone
let march10_1876JapanComponents = japanCalendar.components(requestedDateComponents,
                                                           fromDate: iPhoneAnnouncementDate)
march10_1876JapanComponents.year
march10_1876JapanComponents.month
march10_1876JapanComponents.day
march10_1876JapanComponents.hour
march10_1876JapanComponents.minute
march10_1876JapanComponents.weekday
march10_1876JapanComponents.weekdayOrdinal
In your playground’s sidebar, you should see results similar to those listed in the table below:
| Component | My user calendar | Pacific calendar | Japan calendar |
|---|---|---|---|
| year | 2007 | 2007 | 2007 |
| month | 1 | 1 | 1 |
| day | 9 | 9 | 10 |
| hour | 13 | 10 | 3 |
| minute | 0 | 0 | 0 |
| weekday | 3 | 3 | 4 |
| weekdayOrdinal | 2 | 2 | 2 |
As you can see, January 9, 2007 at 10:00 a.m. in the US/Pacific time zone is January 9, 2007 at 1:00 p.m. in my time zone (US/Eastern) and January 10, 2007 at 3:00 a.m. in Japan. In the US, that date was the second Tuesday in January 2007; in Japan, it was the second Wednesday.
Turning dates into strings (and vice versa) with NSDateFormatter
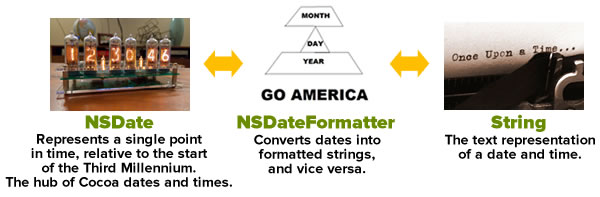 Just as you use an calendar to convert date components into dates and vice versa, you use a date formatter — an instance of the
 NSDateFormatter — to do the conversions.
Formatting date strings for the user
If you need to display a date as text for the user, it’s best if you use Cocoa’s built-in date styles. These are a set of predefined styles for formatting dates and times based on the user’s preferred settings. These styles, which are all values of the NSDateFormatterStyle enumeration, come in a selection of lengths — short, medium, long, and full — and using them is the preferred way to create date strings for the user to read.
Add the following code to your playground:
// (Previous code goes here)

let formatter = NSDateFormatter()

// No date style or time style defined:
// The result for the line below is
// ""
formatter.stringFromDate(firstLandPhoneCallDate)

// Only the date style is defined:
formatter.dateStyle = .MediumStyle
// The result for the line below is
// "Mar 10, 1876"
formatter.stringFromDate(firstLandPhoneCallDate)

// The date style and time style have been defined:
formatter.timeStyle = .ShortStyle
// The result for the line below is
// "Mar 10, 1876, 12:00 AM"
formatter.stringFromDate(firstLandPhoneCallDate)
Here’s how the various date and time formatter styles get rendered:
If dateStyle and timeStyle are both set to… |
the date formatter’s output looks like… |
NoStyle |
|
ShortStyle |
1/27/10, 1:00 PM |
MediumStyle |
Jan 27, 2010, 1:00:00 PM |
LongStyle |
January 27, 2010 at 1:00:00 PM EST |
FullStyle |
Wednesday, January 27, 2010 at 1:00:00 PM Eastern Standard Time |
What’s up with NoStyle? It’s there so you can limit the resulting string so that it shows only the date or only the time.
NSDateFormatter has a timeZone property so that you can ensure that the date string reflects a specific time zone:
// (Previous code goes here)

formatter.dateStyle = .MediumStyle
formatter.timeStyle = .ShortStyle
formatter.timeZone = NSTimeZone(name: "US/Pacific")

// The result for the line below is
// "Jan 27, 2010, 10:00 AM"
formatter.stringFromDate(iPadAnnouncementDate)
Formatting date strings for other computers
As I wrote earlier, if you’re formatting dates for the user, it’s strongly recommended that you use NSDateFormatter‘s dateStyle and timeStyle properties, which will format dates and times according to the user’s settings. However, if you need to need your date strings to be in a specific format (for an API, for example), you can provide NSDateFormatter with a format string:
// (Previous code goes here)

// Setting the locale to POSIX ensures that
// the user's locale won't be used
formatter.locale = NSLocale(localeIdentifier: "en_US_POSIX")

// NSDateFormatter's format string uses the date format specifiers
// spelled out in Unicode Technical Standard #35 (located at
// http://www.unicode.org/reports/tr35/tr35-25.html#Date_Format_Patterns)
formatter.dateFormat = "y-MM-dd"

// The result for the line below is
// "2007-01-09"
formatter.stringFromDate(iPhoneAnnouncementDate)
While you can browse through Appendix F of the Unicode Technical Standard #35 to look at all the date format specifiers supported by NSDateFormatter, you might find it easier to use the table below. It shows a number of format strings applied to the iPhone announcement date (January 9, 2007 at 10:00 a.m. Pacific):
| Format string | Result |
|---|---|
'Year: 'y' Month: 'M' Day: 'd |
Year: 2007 Month: 1 Day: 9 |
MM/dd/yy |
01/09/07 |
MMM dd, yyyy |
Jan 09, 2007 |
E MMM dd, yyyy |
Tue Jan 09, 2007 |
EEEE, MMMM dd, yyyy' at 'h:mm a. |
Tuesday, January 09, 2007 at 10:00 AM. |
EEEE, MMMM dd, yyyy' at 'h:mm a zzzz. |
Tuesday, January 09, 2007 at 10:00 AM Pacific Standard Time. |
Turning strings into dates
If you specify a date format string, you can use NSDateFormatter to take a string following that format to turn it into an NSDate. For example:
// (Previous code goes here)

formatter.dateFormat = "yyyy/MM/dd hh:mm Z"
// This string will be converted to a date because
// it's in the same format as the dateFormat string:
formatter.dateFromString("2015/03/07 11:00 -0500")!
// This string will NOT be converted to a date because
// it's NOT in the same format as the dateFormat string;
// its result will be nil:
formatter.dateFromString("Mar 7, 2015 11:00 AM EST")

// Let's change the date format strings and try
// dateFromString with the same two strings:
formatter.dateFormat = "MMM d, yyyy hh:mm a zz"
// This results in an NSDate:
formatter.dateFromString("Mar 7, 2015 11:00 AM EST")!
// This results in nil:
formatter.dateFromString("2014/11/05")
Tying it all together
If you’ve made it to this point in the article, this chart should now make sense:
Once again, click the chart to see it at full size.
You should now be able to:
- Create dates “from scratch” (that is, create them using an offset of a number of seconds from the start of the third millennium)
- Create dates from date components (that is, from numbers representing a day, month, and year)
- Convert between dates and date components
- Convert dates into string representations and string representations of dates into dates
In the next article in this series, we’ll look at date calculations and some handy functions that let you harness Swift’s expressive power and make working with dates easier.
 Related articles
A very brief introduction to date formatting in Swift and iOS: The oversight in a mostly-good book on Swift programming led me down the path of writing articles about dates and times in Swift, starting with this one, where I look atNSDateFormatter.
How to work with dates and times in Swift, part two: Calculations with dates: Now that we’ve got the basics, it’s time to do some date arithmetic: comparing two dates to see which one is the earlier and later one, finding out how far apart two dates are, and adding and subtracting from dates.
How to work with dates and times in Swift, part three: Making date arithmetic more Swift-like: Cocoa’s date and time classes have an Objective-C heritage, which in the Swift context, feel kind of clunky. In this article, I look at ways — and by ways, I mean helper functions and class extensions — to make date calculations feel more like Swift.
How to work with dates and times in Swift, part four: A more Swift-like way to get the time interval between two dates: This quick article shows you how to make an operator overload that makes getting the time interval between two dates more like subtraction.
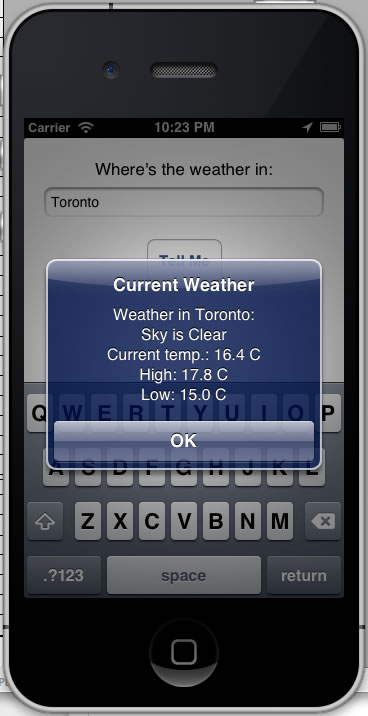
 I know, I know, it’s been over a fortnight since I last post a tutorial. Things have been a little bit crazy at work, but I plan to hope to use the next couple of days to get caught up, and then post a new tutorial next week.
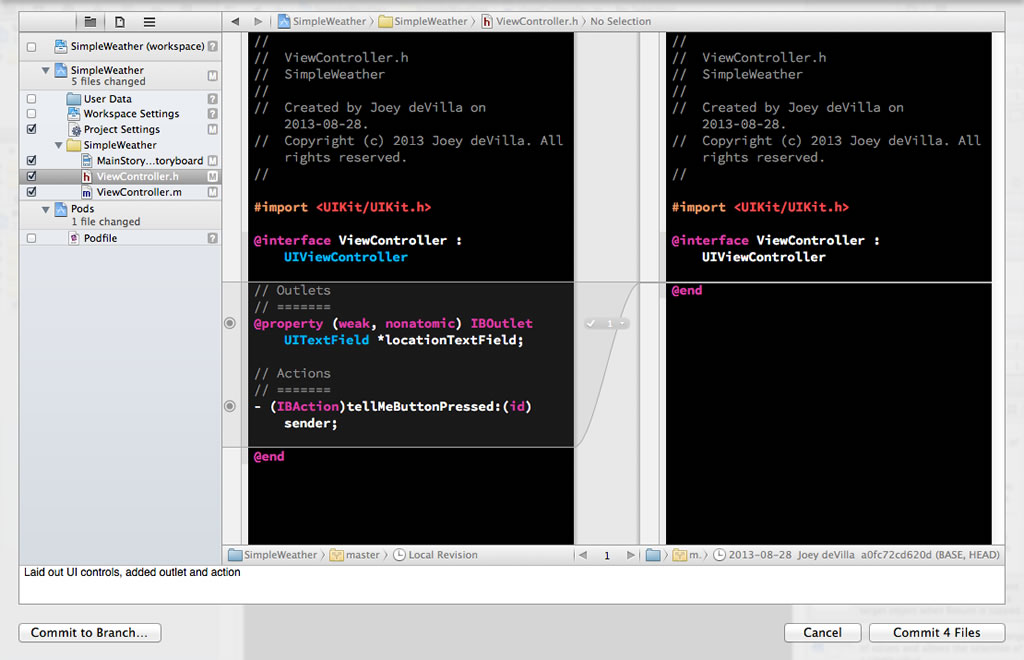
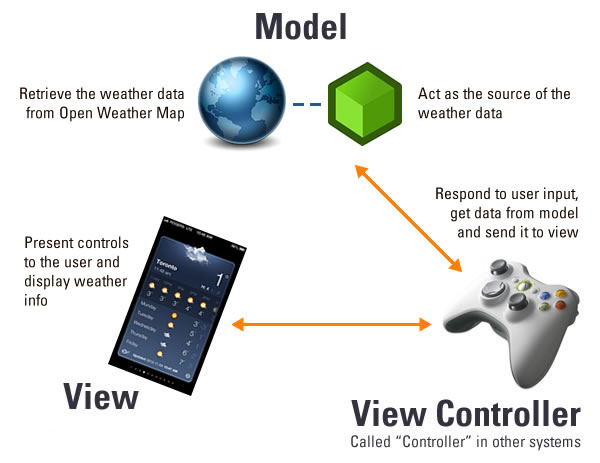
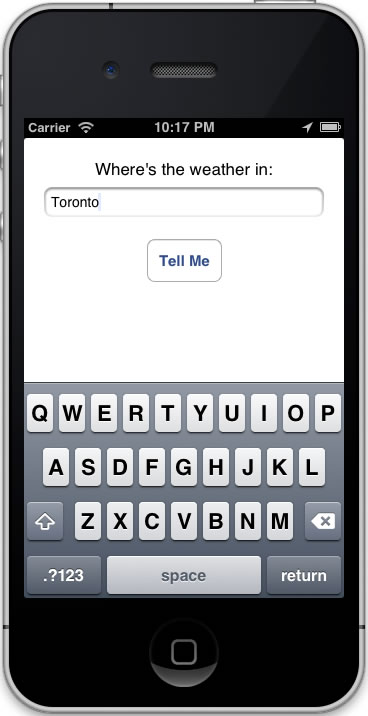
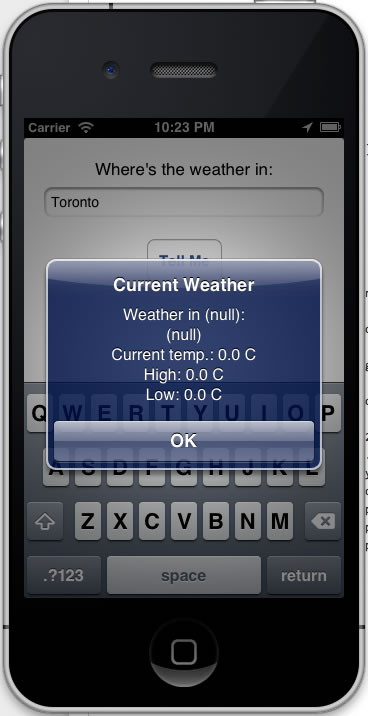
 The meat of the SimpleWeather app is in the
 AFNetworking can be manually included in a project, but I thought this would be a good opportunity to show the use of
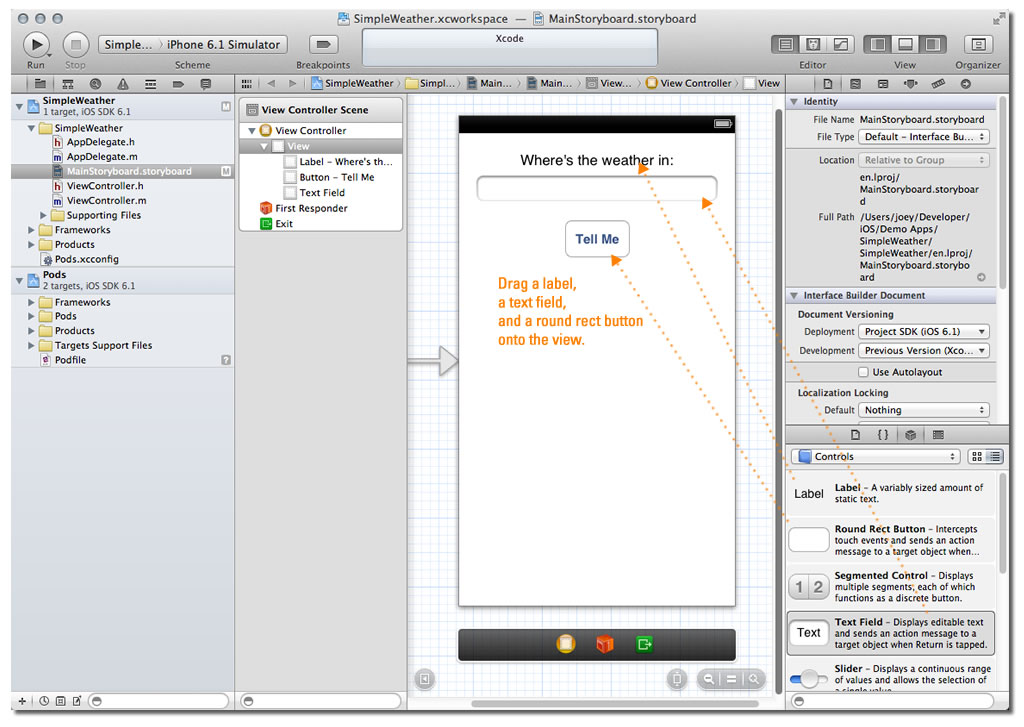
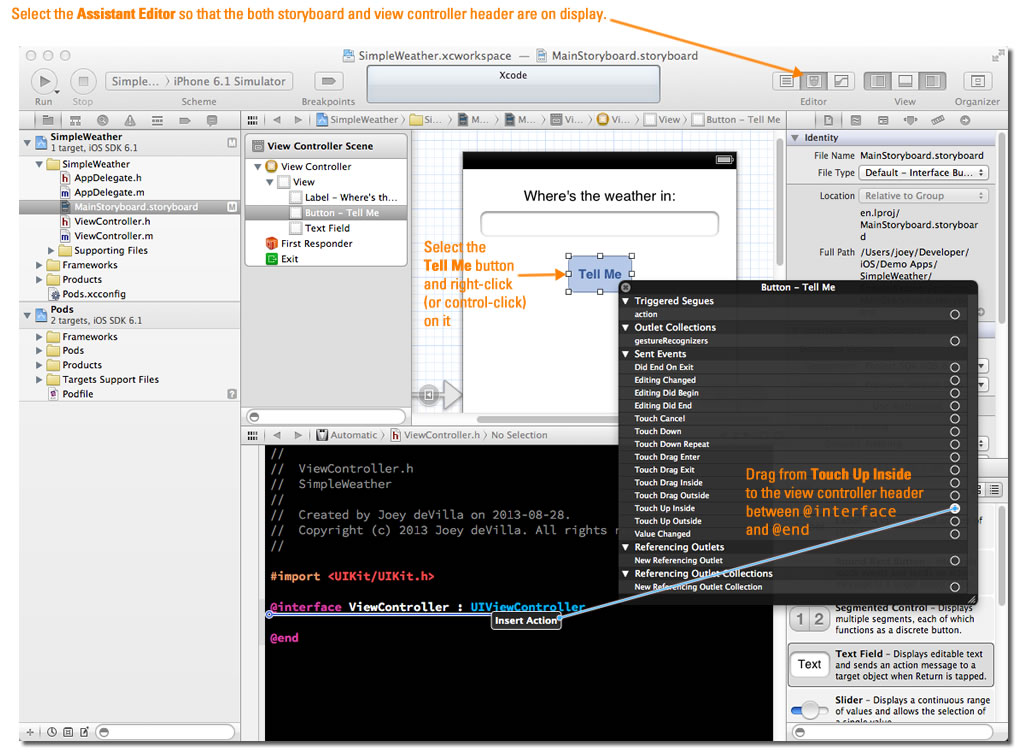

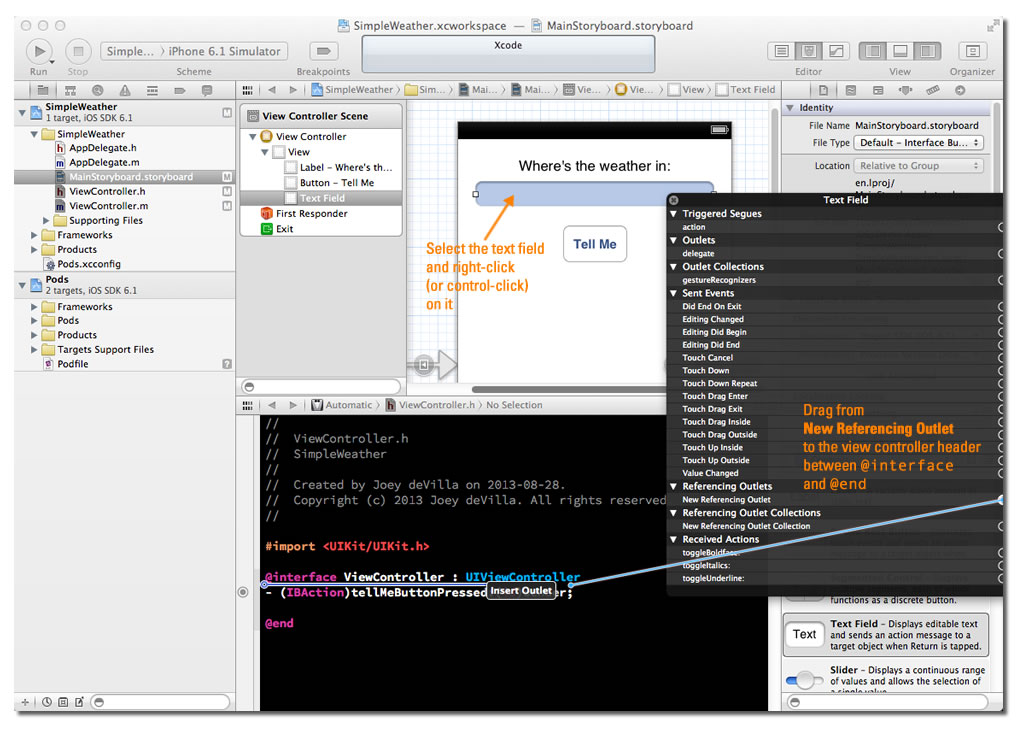
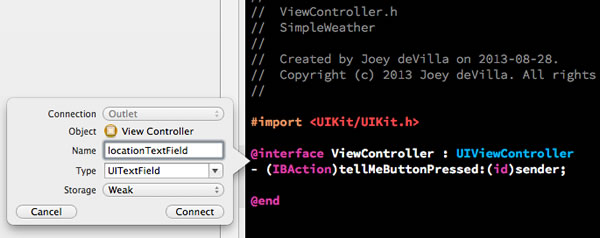


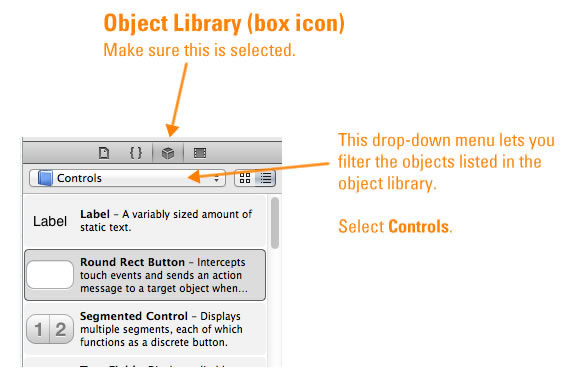
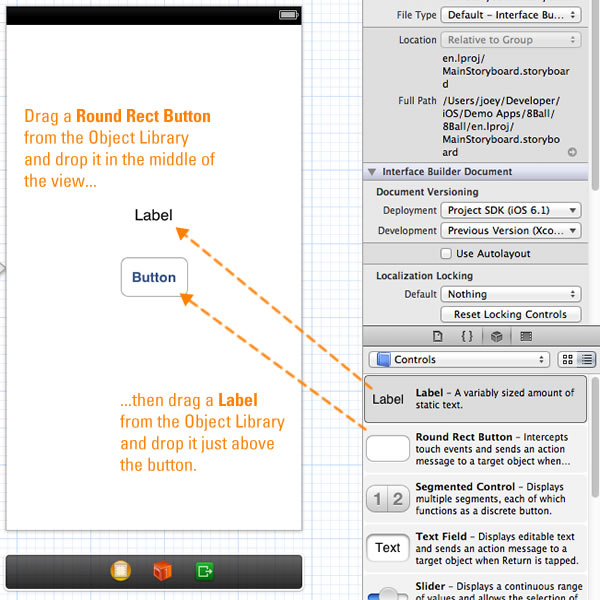
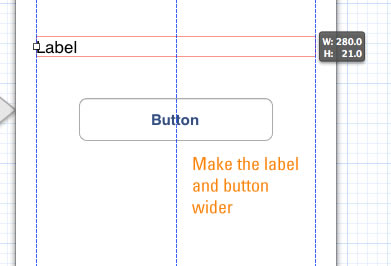

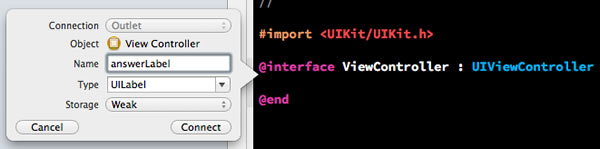
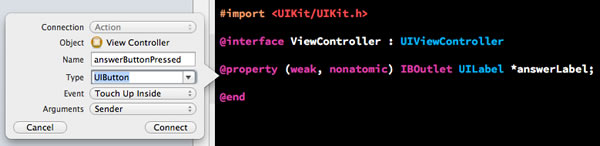
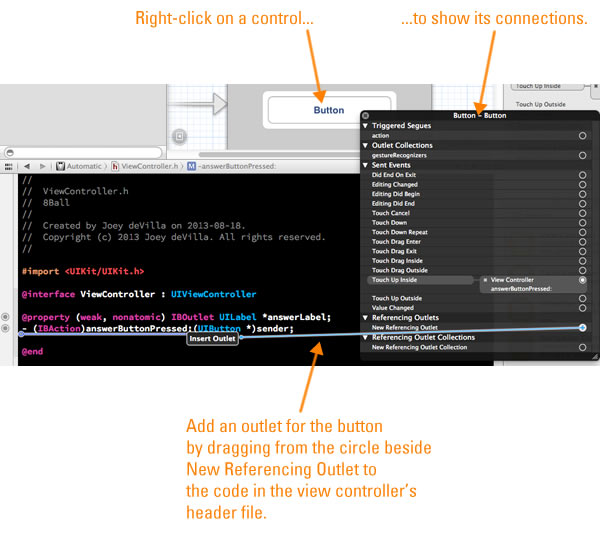
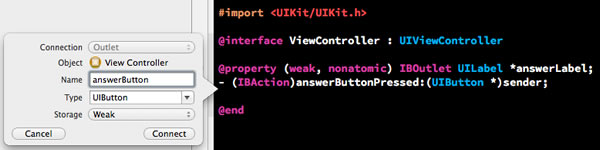
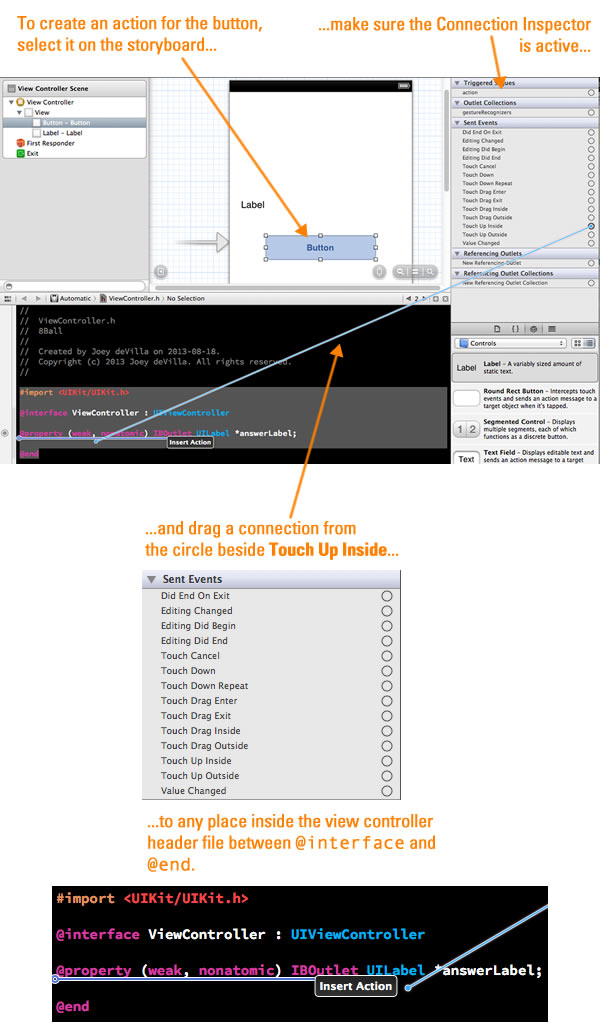 When you complete the drag, a little pop-up will appear: