Categories
Uncategorized

OpenHack Ybor tonight!

IMG_2475

If you’re a developer or tech-minded person in the Tampa Bay area and you’re looking for some fun conversation this evening, join us tonight from 6:30 to 9:00 at New World Brewery in Ybor City for Ybor Tech’s June OpenHack!

ybor tech

OpenHack Ybor, held once a month, is run by local Ruby developer Tony Winn and Jessica Arango for techies of all stripes who want to get to know their local peers, see what they’re up to, and enjoy some craft beer and free pizza.

IMG_2476

We usually gather on the patio of New World Brewery, a brewery-turned-bar in Ybor City, Tampa’s historic warehouse district that was once home to a large cigar-making industry and is now one of those hip mixed-use areas with schools, offices, bars, restaurants, and alas, the Church of Scientology. You can’t win ’em all.

IMG_2477

Some of us are just happy to converse, and some of us like to pull out our computers and show off their latest project or gear. Either approach works just fine, and Tony usually brings a wifi hotspot for those of you who need to get online. There are tables a plenty to “set up shop”, and the covered part of the patio has outlets.

I’d be remiss if I didn’t mention New World’s excellent selection of beers…

IMG_2478

…and for you Marvel/pinball fans, their current selection of distractions is pretty nice too:

IMG_2474

It’s also worth mentioning that whoever’s in charge of the music at New World has eclectic, excellent taste.

openhack at new world brewery wide

Click the photo to see it at full size.

There aren’t many better ways to enjoy the fantastic and fabulous Ybor City and our sub-tropical paradise while having great conversation and drinks with your fellow Tampa Bay area geeks than hanging out at an Ybor Tech OpenHack. Come on down — we’d love to see you there!

web horizontal rule

Need more details? Visit Ybor Tech’s June OpenHack event page.

Categories
Uncategorized

Microsoft adds LinkedIn to its professional network

microsoft acquires linkedin

Microsoft CEO Satya Nadella announced it to his employees in this company-wide email, and LinkedIn CEO Jeff Weiner did the same with his employees: they announced that Microsoft is acquiring LinkedIn for $26.2 billion in a pure cash transaction.

Here’s a short (1:43) video of Nadella and Weiner in a Microsoft-produced interview where they talk about the acquisition:

The video ends with the two companies’ mission statements:

linkedin microsoft mission statements

And they are:

  • LinkedIn: To connect the world’s professionals to make them more productive and successful.
  • Microsoft: To empower every person and every organization on the planet to achieve more.

They’re pretty similar, and if LinkedIn and Microsoft’s really follow (or at least act as if they’re following) their respective mission statements, then the acquisition makes sense: these are two companies chasing roughly the same goal, one via productivity software and cloud services, and one via social networking. Jeff Weiner said pretty much the same thing in this interview with TIME: “Essentially, we’re both trying to do the same thing but coming at it from two different places.”

Here’s my summary of who gets what in this deal. Keep in mind that I’m an opinionated developer evangelist and not a professional industry analyst. Take this with the appropriately-sized grain of salt:

microsoft linkedin acquisition possible outcomes

  • LinkedIn will eventually be hosted on Azure, giving Microsoft another success story they can point to when trying to convince people to host their stuff on their cloud platform.
  • Office gets LinkedIn’s social graph, which will likely be tied into various services:
    • Finding people: Active Directory, Bing
    • Communicating: Outlook, Skype/Skype for Business
    • Coordination people: Outlook, Project, Dynamics
    • A new source of data points for Cortana
  • The number one slideware, PowerPoint, gets tied into the number one way to share slides online, SlideShare.
  • LinkedIn gets the resources of a parent with plenty in the bank, which is a relief after the beating investors gave it earlier this year
  • Microsoft hopes to strengthen its ties with the working world, which has been looking to other places for solutions

microsoft and linkedin graphs

Professional Microsoft watcher Mary Jo Foley points to the above image from Microsoft, and says that the two companies’ graphs are disjoint, and putting them together into a unified dataset opens a world of opportunities.

cancelled linkedin wwdc watch party

One interesting side effect of the acquisition: LinkedIn’s “WWDC Watching Party” — a gathering where people could get together to watch Apple’s Worldwide Developer Conference on big screens at LinkedIn’s San Francisco office  — was cancelled. What’s still on is the Microsoft WWDC afterparty, held next door to WWDC, where they’re offering free food and drinks, and showing off their Xamarin IDE and Test Cloud, two recently-acquired Microsoft products that they’re hoping to get iOS developers to start using.

Categories
Uncategorized

How to watch or follow the WWDC 16 live keynote

hello wwdc16

Once again, it’s time for one of the biggest tech events of the year: Apple’s WWDC, short for World Wide Developer Conference, taking place on Monday, June 13, 2016 at 10:00 a.m. Pacific / 1:00 p.m. Eastern. It’s a conference for people who develop for Apple’s various platforms, and it starts with a layperson-friendly keynote featuring big announcements. Here are some of the goodies that Apple’s announced at WWDCs past:

  • 2014: The Swift programming language
  • 2012: Apple Maps
  • 2010: iPhone 4
  • 2009: iPhone 3GS, iOS 3, and Find My iPhone
  • 2008: Apps for the iPhone! App Store!
  • 2005: Mac switches to Intel chips and podcast support in iTunes
  • 2003: Safari browser
  • 2002: End of OS 9
  • 1998: Steve Jobs’ new OS X strategy

How to watch the keynote on your iOS device or computer

You’ll need one of these:

  • An iPhone, iPad, or iPod Touch with Safari running iOS 7 or later
  • A Mac with Safari 6.0.5 or later, running OS X 10.8.5 (“Mountain Lion”) or later
  • A Windows computer running Microsoft’s Edge browser on Windows 10

…and you should point your browser (Safari on the Mac, Edge on Windows 10) to http://www.apple.com/apple-events/june-2016/.

How to watch the keynote on your Apple TV

If you have one of these:

  • A 2nd- or 3rd-generation Apple TV running tvOS 6.2 or later
  • A 4th-generation Apple TV (the kind that runs apps from the App Store)

…fire up your Apple TV, go to the App Store, and get the WWDC 16 app. Download it, open it, and enjoy the show!

If you can’t watch the keynote but want to follow along

If your work situation or technology won’t let you watch the keynote, you can still follow along with all the people liveblogging the event:

Categories
Uncategorized

The inaugural ReactJS Tampa Bay meetup

reactjs tampa bay 1

Photo by Ryan Connolly. Click the photo to see the source.

The inaugural ReactJS Tampa Bay Meetup took place yesterday at 352 Inc to a pretty full and very enthusiastic room. Kudos to organizers/hosts Josh Burgess, Ryan Connolly, John Hampton, and Eric Nograles for putting it together! I’m looking forward to attending — and likely speaking at — future ReactJS Tampa Bay events.

ReactJS Tampa Bay Meetups are going to alternate between two kinds of gatherings:

  • Presentations, where the format will be one or more speakers giving presentations on all manner of topics involving React, both technical and non-technical (such as business cases, design issues, and so on), and
  • “ReHacked” labs, which will be hands-on workshops for people interested in learning how to develop applications with React.

Last night’s gathering was one of the presentation ones, and the topic was React: A Competitive Edge and a Business Decision. A major issue covered in the talk was why both decision makers and developers both should care about React.

For decision-makers, the reasons that React matters are:

  • React has been proven in production by industry giants (most importantly, Facebook, who built it for their own purposes)
  • Its design doesn’t lock you into it, and it’s easier to pivot from React to other technologies if necessary
  • It was designed with faster feature delivery in mind
  • Thanks to Facebook’s clout and widespread developer approval, it has considerable community momentum and support
  • As the current darling of the development set, authorizing its use means more excited and productive front-end teams

For developers, the reasons are:

  • The mental model you have to adopt is considerably simpler than most JavaScript frameworks, which are feeling increasingly like some labyrinthine, byzantine monstrosity — React is largely projecting data onto UI
  • It uses vanilla JavaScript instead of HTML-based templates (I think this is good, but I know some back-end devs who swear by templates)
  • It’s design to be “fast by default”
  • React’s architecture allows for easier future transitions to whatever comes next
  • Its reliance on world-class developer tools means a great developer experience
  • This is as close as we’ve gotten to being truly cross-platform: it’s “learn once, write anywhere”, which is more truthful and practical than the old promise of “write once, run anywhere”

Here’s the slide deck they showed (it might not render completely correctly at this size; you may want to check it out on a full screen):

The next ReactJS Tampa Bay gathering will take place on Wednesday, June 8th and will be a ReHacked lab covering the basics of ReactJS development called SPA Basics with React. John Hampton and Eric Nograles will be leading the session, which is described as follows:

Want to get started with writing React SPA apps but don’t know where to begin? This session will cover how to get up and going quickly with React. We will cover the basics of a build system using Webpack and Babel, React component basics, a quick tour of react-router, and how to communicate with a backend Web API.

I’m looking forward to it!

rehacked

Categories
Uncategorized

A whole lotta videos of Google I/O 2016 presentations

gogole io 2016

I’m working on upping my Android development game, and if you are too, you’ll probably want to check out this collection of high-quality videos from Google I/O 2016. There’s hours of viewing here…enjoy!

Google I/O 2016 keynote

What’s new in Android

What’s new in Android Studio 2.2

The experts’ guide to Android development tools

Android layouts: A new world

What the fragment?

RecyclerView ins and outs

Android themes and styles demystified

Discover the expanded Material Design motion guidelines

Streamlining developer experiences with the Google Maps APIs

Location and proximity superpowers (Eddystone + Google Beacon Platform)

Understand your place in this world (Google Place API)

Image compression for Android developers

Android high-performance audio

Best practices in media playback

Building for billions on Android

Android application architecture: Get ready for the next billion users!

Firebase overview

Zero to app: Develop with Firebase

Lean and fast: Putting your app on a diet

Android memory and battery optimizations

What’s new in the support library

What’s new in Google Play for developers

Introducing Google Developer Certification: Become an Associate Android Developer

Categories
Uncategorized

“Why can’t girls code?” hilariously sends up the sexist excuses for shooing girls and women away from tech

If you watch only one video today, make it Why Can’t Girls Code?, which provides all sorts of crazy reasons why girls (and eventually, woman) shouldn’t take up programming or anything tech-related, from this one…

boobs

…to this one…

auburn strands of mink

…to this one:

mood swings

As Margot Richaud, an alumna of Girls Who Code (the people behind the video) puts it:

“These videos may seem absurd, but sadly they’re not so off the mark. As a high school senior, I’ve had classmates and teachers tell me that coding is not for me, or that I’d be better off focusing on design and making something look ‘pretty’. These comments, plus the stereotypes that we see everyday of a coder as a nerdy guy in a hoodie, keep a lot of my friends from considering computer science as a career path. We need to change that and stop telling girls that coding is not for us. There is never be an excuse for a girl to not code.”

For more, visit GirlsWhoCode.com.

Categories
Uncategorized

iOS programming trick: How to use Xcode to set a text field’s maximum length, Visual Studio-style [Updated for Swift 3]

Setting a text box’s maximum length, the Visual Studio way

easy in visual studio

Here’s how you set the maximum number of characters than can be entered into a text box when developing C# and VB applications in Microsoft Visual Studio:

There’s the GUI builder way…

  1. Select the text box.
  2. Set its MaxLength property in the Properties pane.

…and there’s the code way:

myTextBox.maxLength = 3 // or whatever length you like

Setting a text field’s maximum length, the out-of-the-box Xcode way

guy yelling at computer

Here’s how you set the maximum number of characters than can be entered into a text field when developing Objective-C and Swift applications in Xcode:

There isn’t a GUI builder way — just a code way, and it’s a little more work than it needs to be. The typical steps are:

  1. Make the containing view controller a text field delegate (i.e. make it adopt the UITextFieldDelegate protocol) so that it receives messages from all the text fields it contains.
  2. Implement the textfield(_:shouldChangeCharactersInRange:replacementString) method in order to intercept changes to any of the view’s text fields before they’re finalized. This involves:
    • Identifying the text field whose contents were changed, usually with an if or switch statement. If the text field is one whose text we want to limit to a certain length, then:
      • If the change in contents will result in the text not exceeding that length, simply return true.
      • If the change in contents will result in the text exceeding that length,  return false. You may want to take some additional action: for example, if the user tries to paste in more text you want to allow in the text field, you may want to allow a “partial paste” — pasting in the first n characters that will fit in the remaining space — and not reject the pasted text outright.

If you’re curious, I covered this in an earlier article, How to program an iOS text field that takes only numeric input or specific characters with a maximum length.

That’s a lot of work. Isn’t there a way we can get a “max length” property for text fields, like the .NET people?

wouldnt it be nice in xcode

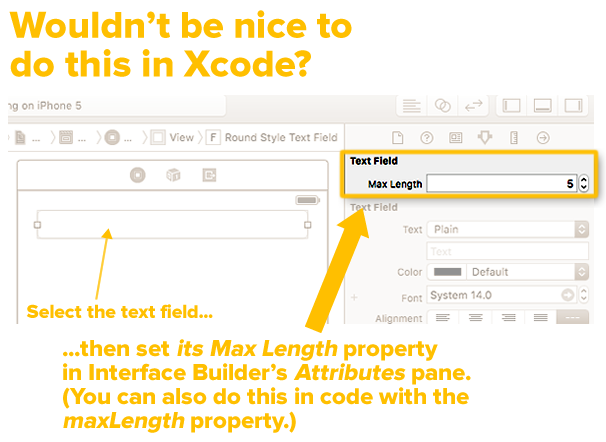
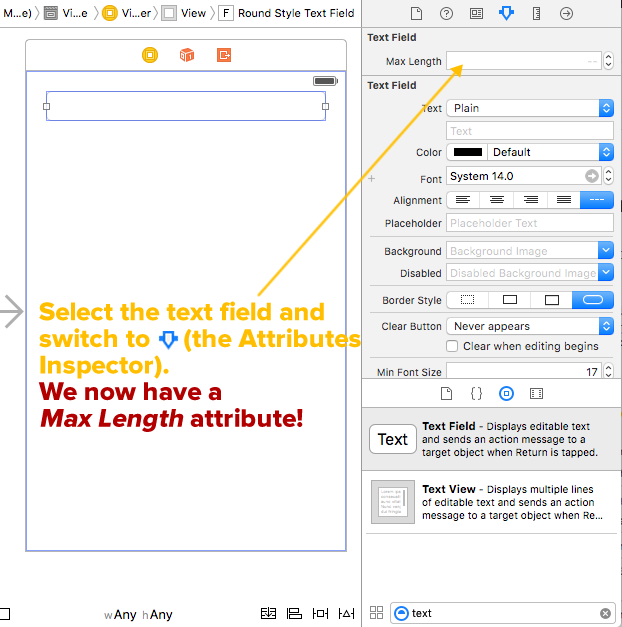
The screen shot above (if you ignore my text annotations) isn’t Photoshoppery on my part. That’s a screen shot of my Xcode showing a selected text field and a corresponding Max Length property editor in the Attributes panel. With just a little coding in a single file, you too can your iOS text fields these goodies that .NET developers have had for ages and set the maximum length of text in a text field in both these ways:

  1. The GUI builder way, and
  2. With a single line of code.

Setting a text field’s maximum length, the improved Xcode way

Start a new project by doing the standard File → New → Project… dance to create a new Single View Application. Open Main.storyboard and place a single text field on the view:

plain text field and attributes inspector

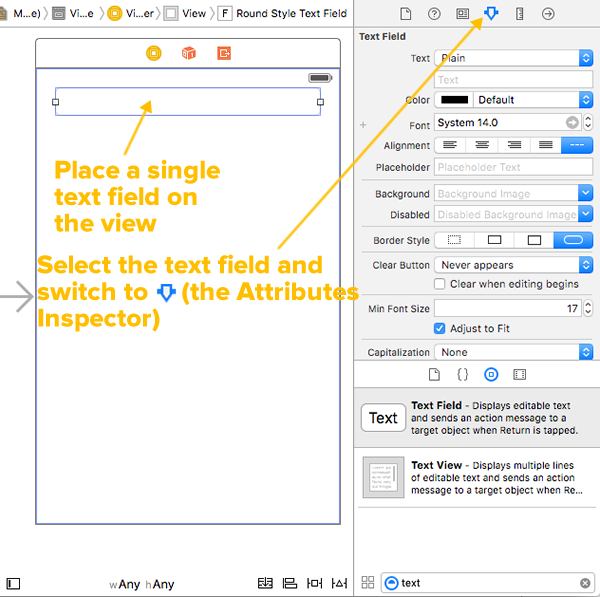
Select the text field and switch to the Attributes Inspector (the inspector panel with the attributes inspector icon icon). The Attributes Inspector lets you edit all sorts of text field properties, but not the maximum length…yet.

new swift file

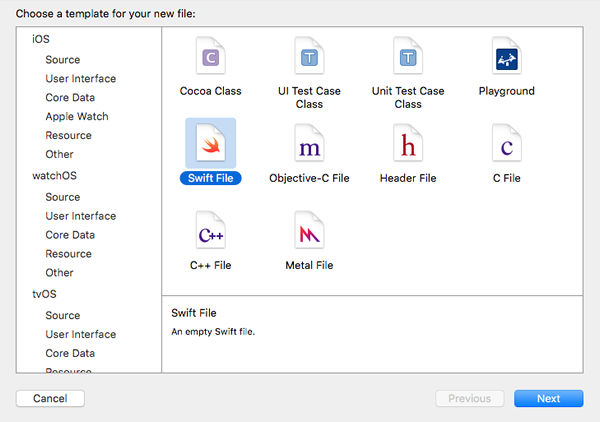
Use File → New → File… to create a new Swift File. Give it the name TextFieldMaxLengths.swift, and once you’ve created it, enter the following code into it:

import UIKit

extension UITextField {
  
  @IBInspectable var maxLength: Int {
    get {
      return 5
    }
    set {
      
    }
  }

}

Switch back to Main.storyboard, select the text field and look at the Attributes Inspector. You may notice that something’s changed:

enhanced text field and attributes inspector

All we did was create an extension for the UITextField class to give it an extra Int property named maxLength. Marking this property with the @IBInspectable keyword makes the property available to the Attributes Inspector (hence the name — the property can be inspected in Interface Builder).

Now that we’ve added a property to UITextField and made it inspectable within Interface Builder, it’s time to make the property do something.

If you’re using Swift 2.x, update the code in TextFieldMaxLengths.swift to the code below (keep scrolling if you’re using Swift 3):

// Swift 2.x version
// This will NOT work with Swift 3!
// ================================

import UIKit

// 1
private var maxLengths = [UITextField: Int]()

// 2
extension UITextField {
  
  // 3
  @IBInspectable var maxLength: Int {
    get {
      // 4
      guard let length = maxLengths[self] else {
        return Int.max
      }
      return length
    }
    set {
      maxLengths[self] = newValue
      // 5
      addTarget(
        self,
        action: #selector(limitLength),
        forControlEvents: UIControlEvents.EditingChanged
      )
    }
  }
  
  func limitLength(textField: UITextField) {
    // 6
    guard let prospectiveText = textField.text
      where prospectiveText.characters.count > maxLength else {
        return
    }
    
    let selection = selectedTextRange
    // 7
    text = prospectiveText.substringWithRange(
      Range<String.Index>(prospectiveText.startIndex ..< prospectiveText.startIndex.advancedBy(maxLength))
    )
    selectedTextRange = selection
  }
  
}

If you’re using Swift 3, update the code in TextFieldMaxLengths.swift to the code below:

// Swift 3 version
// This will NOT work with Swift 2.x!
// ==================================

import UIKit

// 1
private var maxLengths = [UITextField: Int]()

// 2
extension UITextField {
  
  // 3
  @IBInspectable var maxLength: Int {
    get {
      // 4
      guard let length = maxLengths[self] else {
        return Int.max
      }
      return length
    }
    set {
      maxLengths[self] = newValue
      // 5
      addTarget(
        self,
        action: #selector(limitLength),
        for: UIControlEvents.editingChanged
      )
    }
  }
  
  func limitLength(textField: UITextField) {
    // 6
    guard let prospectiveText = textField.text,
              prospectiveText.characters.count > maxLength
    else {
      return
    }
    
    let selection = selectedTextRange
    // 7
    let maxCharIndex = prospectiveText.index(prospectiveText.startIndex, offsetBy: maxLength)
    text = prospectiveText.substring(to: maxCharIndex)
    selectedTextRange = selection
  }
  
}

Here are my annotations that match the numbered comments in the code:

  1. There are two big things going on in this single line of code, which declares and initializes maxLengths, a dictionary that stores the maximum lengths of text fields:
    • First, there’s the private declaration. In many programming languages, private means “accessible only inside the class”, but in Swift, private means “accessible only inside the source file where they’re defined”. Any code inside TextFieldMaxLengths.swift has access to maxLengths, and any code outside TextFieldMaxLengths.swift does not. By putting maxLengths in the same file as our UITextField extension, we get a place where we can store the maximum lengths of text fields (remember: extensions can only add methods, not properties), and by making it private, we keep other code from messing with it.
    • Then there’s the matter of what to use as the key for the maxLengths dictionary. Swift lets you use anything that conforms to the Hashable protocol as a dictionary key, and UITextField does just that. It makes sense to use the text fields themselves as the keys to the values for their maximum lengths.
  2. Swift extensions let you add new functionality to existing classes, structs, enumerations, and protocols. We’re using an extension to UITextField to add two things:
    • maxLength, a property that lets the programmer set and get the maximum length of a text field, and
    • limitLength, a method called whenever the contents of a text field are changed, and limits the number of characters in that text field.
  3. By marking the maxLength property with @IBInspectable, we make it available to Interface Builder, which then provides an editor for its value in the Attributes Inspector.
  4. Get to know and love the guard statement and the “early return” style of programming; you’re going to see a lot of it in a lot of Swift coding. Here, we’re using guard to filter out cases where no maximum length has been defined for the text field, in which case, we simply return the theoretical maximum string size.
  5. We use addTarget in maxLength‘s setter to ensure that if a text field is assigned a maximum length, the limitLength method is called whenever the text field’s contents change.
  6. Another guard statement. Any case that gets past it is one where the text about to go into the text field is longer than the maximum length.
  7.  Cocoa sometimes likes to make things complicated. This line is the Cocoa way of saying “put the first maxLength characters of prospectiveText into text“. If you’re going to be playing with substrings, you need to get comfortable with Ranges and intervals.

If you include TextFieldMaxLengths.swift in any of your iOS projects, all text fields will have a maxLength property that you can set either GUI builder style in Interface Builder or in code, using myTextField.maxLength = n syntax, just like the .NET people do.

Happy text field coding!

“Text2”: A sample project showing Visual Studio-style text field maximum lengths in action

text2 screenshot

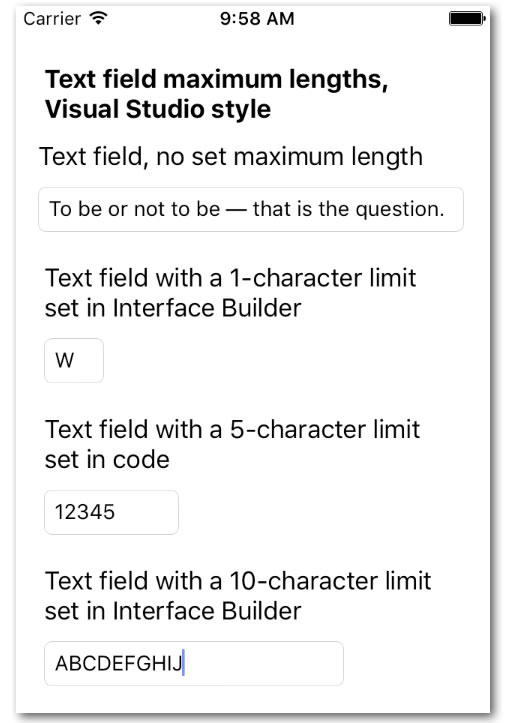
If you’d like to try out the code from this article, I’ve create a project — unimaginatively named Text2 and pictured above— that shows our UITextField extension in action. It’s a quick-and-dirty single view app that presents 4 text fields:

  1. A text field without a set maximum length.
  2. A text field with a 1-character maximum length, with the Max Length property set in Interface Builder.
  3. A text field with a 5-character maximum length, with the maxLength property set in code (in the view controller’s viewDidLoad method).
  4. A text field with a 10-character maximum length, with the Max Length property set in Interface Builder.

Give it a try, learn what makes it tick, and use it as a jumping-off point for your own projects!

xcode download

You can download the project files for this article (27KB zipped) here.

This code was derived from a Swift 1.2 solution posted by Frouo in Stack Overflow. I annotated it, and updated it so that it would be compatible with both Swift 2 and 3.