The “follow the money” scene from All the President’s Men.
ZDNet’s Ed Bott says that if you ignore a company’s marketing and PR and instead look at its quarterly reports, you’ll find out what that company’s actual business and motivations are. Following that maxim and following the money, he (and presumably a research assistant or two) looked at the quarterly reports recently put out by Apple, Google, and Microsoft and put together the three graphs below, which show where each company’s revenue comes from. We look at these graphs, and some recent related stories to help shed more light on the kinds of businesses these companies are really in.
Following Apple’s Money
If you follow Apple’s vision statement, it’s “bringing the best personal computing experience to students, educators, creative professionals and consumers around the world through its innovative hardware, software and Internet offerings”. If you follow Apple’s money, they’re a hardware company, making 90% of their money from products you can actually hold in your hands.
Three-quarters of their money comes from the iPhone and the iPad, two products came into existence and redefined their markets 7 and 4 years ago, respectively:

What you should take away from this is that everything Apple does — including the development of operating systems, software, and online services — is all in the service of selling devices, and for the time being, the priority is on mobile ones.
 If you follow Apple’s products, you may end up following money anyway, as there are place where the iPhone is either so expensive or so hard-to-get that it’s practically currency. Bloomberg BusinessWeek’s Vernon Silver writes that someone who did work for him in Italy — “where domestic work comes cheap and technology is expensive” — asked for a new, unlocked iPhone in the place of cash as payment. He writes:
Within a couple days of my return, I exchanged both phones for domestic work, valuing them at the $815 I’d paid. The second phone’s recipient sold hers for its local value ($1,130) to an acquaintance, she said, with payments to be made over time. She told me the new owner sold the phone at an additional markup on an installment plan that will cost the final buyer about $1,350.
On a trip to Los Angeles a few weeks after my Fifth Avenue purchases, I found myself in front of another Apple Store. Walking in felt like a visit to an ATM. I asked the salesperson for an unlocked iPhone 5s. The response: Just one?
 About a fifth of Apple’s revenue comes from the iPad, which should be cause for concern if Andreesen Horowitz partner Zal Bilimoria is right in his Re/code article, Our Love Affair with the Tablet is Over. He says that there’s room for devices that fit in the pocket (smartphones) and devices that go on our desks (desktops/laptops), devices that exist in that nowhere-space in between (tablets) are on their way out, and that in the end, we’ll use phablets — phone/tablet hybrids that fit in a single hand. I think he’s wrong, and that his thinking is reminiscent of the dismissal of personal computers in the early 1970s and 1980s by pundits who said that they’d eventually disappear as people rediscover “real” computers. I’ve also seen how non-techies view their tablets (particularly iPads) versus their desktop or laptop machines: the tablets are the machines they love and want to use, the desktops/laptops are the machines that are “just okay” and that they have to use.
Following Google’s Money
Google, if you look at their core mission statement, is all about organizing the world’s information and making it universally accessible and useful. Google, if you follow their money, is in the advertising business, making over 90% of their money from it.
Bott writes that from 2009 to 2011, advertising accounted for at least 96% of Google’s revenue. Advertising’s slice of the pie got a little smaller with Motorola Mobility, but with its sale to Lenovo, Google will likely go back to being more of an advertising company than Apple is a hardware company.
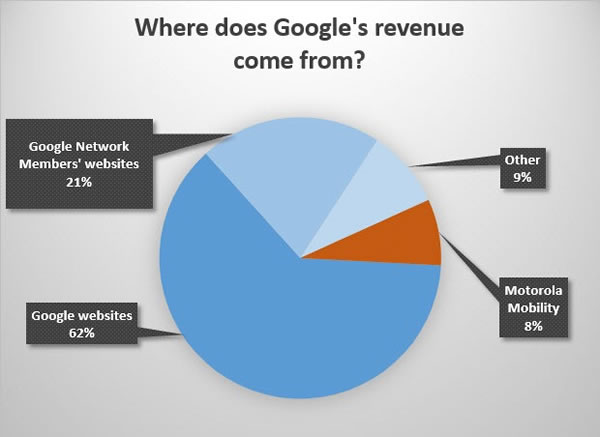
The practical upshot of all this is that Google’s activity, whether it’s search engines, productivity applications, mobile operating systems, or devices for the home, is in the end all about putting someone’s ad in front of you and then collecting money from that someone.

On Friday, The Guardian published the most recent call for Microsoft to drop its own Windows Phone operating system and instead work on their own fork of Android instead. Ars Technica’s Peter Bright counters this by explaining that Android is “unforkable”, since it has two major parts:
- AOSP, the Android Open Source Platform, which is freely usable, and forkable, by anyone. It’s the guts for a smartphone operating system, which includes:
- The Android version of a Linux kernel. The kernel is that part of the operating system that acts as a go-between for applications and the underlying hardware.
- The Dalvik virtual machine, which runs applications.
- Basic UI, such as the lock screen.
- Google Mobile Services, which can’t be forked, requires devices to meet certain tech specs, and pass validation at around 75 cents per device. These include:
- A number of APIs that allow apps to access Google services like location, maps, remote wipe, Google+, and more.
- Google Play Store apps, including Chrome, Gmail, Search, Maps, and so on.
The good stuff lives in Google Mobile Services, and many third-party apps — that is, apps not written by Google — rely on APIs in Google Mobile Services. These apps will simply not run on a forked Android, because it would lack Google Mobile Services. To an end user, it would be an Android that doesn’t run many Android apps, which to them would not be Android.
Since Google is in the ads business, it’s in their best interests to keep control over its services, which feed that business. Hence Android — at least the Android that users know and love — is unforkable.
Following Microsoft’s Money
Microsoft’s most recent mission statement, as put forth in Steve Ballmer’s last letter as CEO to the shareholders is “…to create a family of devices and services for individuals and businesses that empower people around the globe at home, at work and on the go, for the activities they value most.” Follow the money, and you’ll find that Microsoft is in the Windows and Office business.
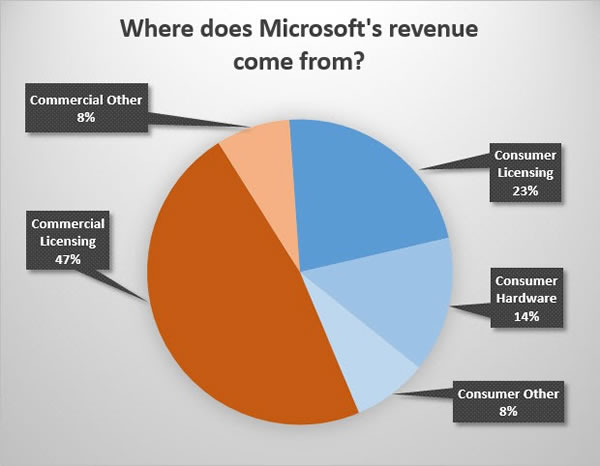
In the graph above, “Commercial Licensing” refers to business licenses of Windows and Office, while “Consumer Licensing” refers to OEM licenses of Windows and Windows Phone operating systems, as well as the Home, Small Business, and Student versions of Office. Put together, these two slices account for 70% of Microsoft’s revenue. If Microsoft really wants to be more like the business described in their “devices and services” mission statement, they’re going to have to grow the other slices beyond 30%.
Nearly three-fifths of Microsoft’s business is commercial, while the remaining two-fifths is consumer. Paul Thurrott, quite possibly the best-known professional Windows fan, wrote that Microsoft is pleasing no one by trying to please everyone, and should focus on its commercial business. Calling Windows 8.1’s Update 1 a “design-by-committee” effort made in an attempt to please different, disparate market segments, he calls for a single vision behind Windows, and in the service of business/productivity usage:
I always accepted the messy bits of Windows in the past because the system addressed such a large audience. But given the way things are going, Windows should evolve into a system that is laser targeted to the customers who will in fact continue using it regularly. That’s mostly business users, but even when you look at the consumers who will use Windows, that usage is almost entirely productivity related. Windows should focus on that. On getting work done. On an audience of doers. Job one should be productivity.
Everyone likes to compare Apple or the Mac to BMW and, you know what? Fair enough, and if that’s true then Windows is obviously GM, the overly-big messy GM of a decade ago. But Microsoft can’t afford for Windows to be like GM anymore—just like GM couldn’t, for whatever that’s worth. Maybe Windows needs to be more like GMC, the part of GM that only makes trucks (and truck-based SUVs). After all, while many people choose to use a truck for basic transportation, they’re really designed and optimized for work. You know, as should be Windows.
You can’t please everybody, Microsoft. So stop trying. It’s time to double down on the people who actually use your products, not some mythical group of consumers who will never stop using their simpler Android and iOS devices just because you wish they would.