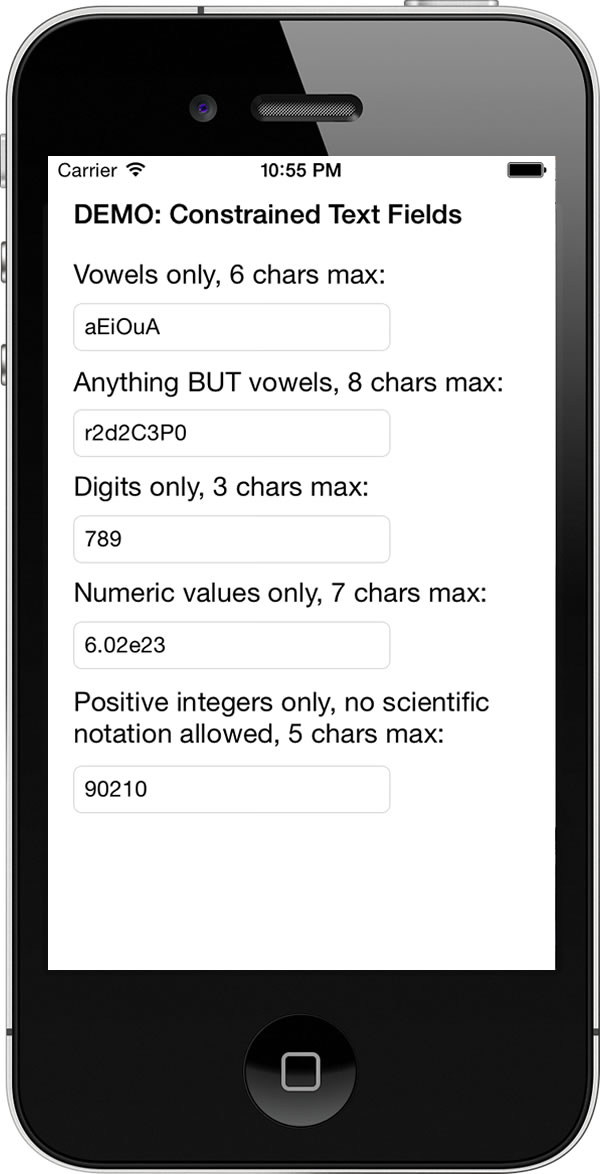
Open a Swift playground in Xcode and enter the following code:
let formatter = NumberFormatter()
formatter.numberStyle = .spellOut
let number = 87654
let spelledOutNumber = formatter.string(for: NSNumber(integerLiteral: number))!
print("\(number) spelled out is \(spelledOutNumber).")
Run the playground code, and you’ll see this:
87654 spelled out is eighty-seven thousand six hundred fifty-four.
Having come from the world of C, where you format strings using printf() and formatting strings, and later from other languages where you use whatever formatting method its string class provides, I’ve ignored most of Swift’s classes that derive from Formatter — with one notable exception: DateFormatter, which is indispensable when working with dates and times.
I’m now looking for an excuse to use this capability.
As I typed “DateFormatter” a couple of paragraphs above, I remembered that DateFormatter had a locale property. It’s for ensuring that any dates you present are in the correct form for the locale:
I wondered:
Does NumberFormatter have a locale property?
What happens if I changed it to something other than my system’s default of US English?
So I changed the code in my playground to the following:
let formatter = NumberFormatter()
formatter.numberStyle = .spellOut
formatter.locale = Locale(identifier: "fil_PH")
let number = 87654
let spelledOutNumber = formatter.string(for: NSNumber(integerLiteral: number))!
print("\(number) spelled out in Filipino is \(spelledOutNumber).")
I ran the code and saw this…
87654 spelled out in Filipino is walóng pû’t pitóng libó’t anim na daán at limáng pû’t ápat.
…and my response was “Ay nako!” (translation: OMG!)
How about Korean?
let formatter = NumberFormatter()
formatter.numberStyle = .spellOut
formatter.locale = Locale(identifier: "ko_KR")
let number = 87654
let spelledOutNumber = formatter.string(for: NSNumber(integerLiteral: number))!
print("\(number) spelled out in Korean is \(spelledOutNumber).")
The output:
87654 spelled out in Korean is 팔만칠천육백오십사.
My response: 세상에 (“Sesange!”, which is pretty much Korean for OMG!)
DateComponents, which represents the units that make up a date, such as year, month, day, hour, and minute, and which can be used to represent either a single point in time or a duration of time, and
Calendar, which provides a context for Dates, and allows us to convert between Dates and DateComponents.
Date arithmetic, which make it possible to add time intervals to Dates, find the difference in time between two Dates, and compare Dates.
A more readable way to work with Dates and DateComponents
Suppose we want to find out what the date and time will be 2 months, 3 days, 4 hours, 5 minutes, and 6 seconds from now will be.
If you recall what we covered in the last installment in this series, you’d probably use code like this:
var timeInterval = DateComponents(
  month: 2,
  day: 3,
  hour: 4,
  minute: 5,
  second: 6
)
let futureDate = Calendar.current.date(byAdding: timeInterval, to: Date())!
print("2 months, 3 days, 4 hours, 5 minutes, and 6 seconds from now is \(futureDate.description(with: Locale(identifier: "en_US"))).")
In the code above, we did the following:
We created an instance of a DateComponents struct.
We set its properties so that it would represent a time interval of 2 months, 3 days, 4 hours, 5 minutes, and 6 seconds.
We then used Calendar‘s date(byAdding:to:) method to add the time interval to a Date.
This code wouldn’t look out of place in a lot of other programming languages, but we can do better in Swift. What if I told you that by defining a few helper functions, you can turn the code above into the code below?
In the code above, we’ve overloaded the + and - operators so that we can add and subtract DateComponents. I derived these functions from Axel Schlueter’s SwiftDateTimeExtensions library. He wrote them when Swift was still in beta; I updated them so that they compile with the current version and added a couple of tweaks of my own.
The addition and subtraction operations are so similar and so tedious, which is a sign that there’s an opportunity to DRY up the code. I factored out the duplicate code from both the + and - overloads and put it into its own method, combineComponents, which does the actual DateComponents addition and subtraction.
You may have noticed a lot of ?? operators in the code for combineComponents. ?? is referred to as the nil coalescing operator, and it’s a clever bit of syntactic shorthand. For the expression below:
let finalValue = someOptionalValue ?? fallbackValue
If someOptionalValue is not nil, finalValue is set to someOptionalValue‘s value.
If someOptionalValue is nil, finalValue is set to fallbackValue‘s value.
Let’s confirm that our new operator overloads work. Add the following to the playground and run it:
// Let's define a couple of durations of time
// ------------------------------------------
var oneDayFiveHoursTenMinutes = DateComponents(
day: 1,
hour: 5,
minute: 10
)
var threeDaysTenHoursThirtyMinutes = DateComponents(
day: 3,
hour: 10,
minute: 30
)
// Now let's add and subtract them
// -------------------------------
let additionResult = oneDayFiveHoursTenMinutes + threeDaysTenHoursThirtyMinutes
print("1 day, 5 hours, and 10 minutes + 3 days, 10 hours, and 30 minutes equals:")
print("\(additionResult.day!) days, \(additionResult.hour!) hours, and \(additionResult.minute!) minutes.")
let subtractionResult = threeDaysTenHoursThirtyMinutes - oneDayFiveHoursTenMinutes
print("1 day, 5 hours, and 10 minutes - 3 days, 10 hours, and 30 minutes equals:")
print("\(subtractionResult.day!) days, \(subtractionResult.hour!) hours, and \(subtractionResult.minute!) minutes.")
You should see the following output:
1 day, 5 hours, and 10 minutes + 3 days, 10 hours, and 30 minutes equals: 4 days, 15 hours, and 40 minutes. 1 day, 5 hours, and 10 minutes – 3 days, 10 hours, and 30 minutes equals: 2 days, 5 hours, and 20 minutes.
Overloading - so that we can negate DateComponents
Now that we can add and subtract DateComponents, let’s overload the unary minus so that we can negate DateComponents:
prefix func -(components: DateComponents) -> DateComponents {
var result = DateComponents()
if components.nanosecond != nil { result.nanosecond = -components.nanosecond! }
if components.second != nil { result.second = -components.second! }
if components.minute != nil { result.minute = -components.minute! }
if components.hour != nil { result.hour = -components.hour! }
if components.day != nil { result.day = -components.day! }
if components.weekOfYear != nil { result.weekOfYear = -components.weekOfYear! }
if components.month != nil { result.month = -components.month! }
if components.year != nil { result.year = -components.year! }
return result
}
With this overload defined, we can now use the unary minus to negate DateComponents. Add the following to the playground and run it:
let negativeTime = -oneDayFiveHoursTenMinutes
print("Negating 1 day, 5 hours, and 10 minutes turns it into:")
print("\(negativeTime.day!) days, \(negativeTime.hour!) hours, and \(negativeTime.minute!) minutes.")
You should see the following output:
Negating 1 day, 5 hours, and 10 minutes turns it into: -1 days, -5 hours, and -10 minutes.
Overloading + and - so that we can add Dates and DateComponents and subtract DateComponents from Dates
With the unary minus defined, we can now define the following operations:
Date + DateComponents, which makes it easier to do date arithmetic.
DateComponents + Date, which should be possible because addition is commutative (which is just a fancy way of saying that a + b and b + a should give you the same result).
Date - DateComponents, which once again makes it easier to do date arithmetic.
// Date + DateComponents
func +(_ lhs: Date, _ rhs: DateComponents) -> Date
{
return Calendar.current.date(byAdding: rhs, to: lhs)!
}
// DateComponents + Dates
func +(_ lhs: DateComponents, _ rhs: Date) -> Date
{
return rhs + lhs
}
// Date - DateComponents
func -(_ lhs: Date, _ rhs: DateComponents) -> Date
{
return lhs + (-rhs)
}
Note that we didn’t define an overload for calculating Date - DateComponents — such an operation doesn’t make any sense.
With these overloads defined, a lot of Date/DateComponents arithmetic in Swift becomes much easier to enter and read. Add the following to the playground and run it:
// What time will it be 1 day, 5 hours, and 10 minutes from now?
// -------------------------------------------------------------
// Here's the standard way of finding out:
let futureDate0 = Calendar.current.date(
byAdding: oneDayFiveHoursTenMinutes,
to: Date()
)
// With our overloads and function definitions, we can now do it this way:
let futureDate1 = Date() + oneDayFiveHoursTenMinutes
print("Date() + oneDayFiveHoursTenMinutes = \(futureDate1.description(with: Locale(identifier: "en_US")))")
// This will work as well:
let futureDate2 = oneDayFiveHoursTenMinutes + Date()
print("oneDayFiveHoursTenMinutes + Date() = \(futureDate2.description(with: Locale(identifier: "en_US")))")
// What time was it 3 days, 10 hours, and 30 minutes ago?
// ------------------------------------------------------
// Doing it the standard way takes some work
var minus3Days5Hours30minutes = threeDaysTenHoursThirtyMinutes
minus3Days5Hours30minutes.day = -threeDaysTenHoursThirtyMinutes.day!
minus3Days5Hours30minutes.hour = -threeDaysTenHoursThirtyMinutes.hour!
minus3Days5Hours30minutes.minute = -threeDaysTenHoursThirtyMinutes.minute!
let pastDate0 = Calendar.current.date(byAdding: minus3Days5Hours30minutes, to: Date())
// With our overloads and function definitions, it's so much easier:
let pastDate1 = Date() - threeDaysTenHoursThirtyMinutes
print("Date() - threeDaysTenHoursThirtyMinutes = \(pastDate1.description(with: Locale(identifier: "en_US")))")
On my computer, the output looked like this:
Date() + oneDayFiveHoursTenMinutes = Friday, May 29, 2020 at 3:20:54 PM Eastern Daylight Time oneDayFiveHoursTenMinutes + Date() = Friday, May 29, 2020 at 3:20:54 PM Eastern Daylight Time Date() – threeDaysTenHoursThirtyMinutes = Sunday, May 24, 2020 at 11:40:54 PM Eastern Daylight Time
Extending Date so that creating dates and debugging are simpler
Creating Dates in Swift is a roundabout process. Usually, you end up creating them in one of two ways:
Instantiating a DateComponents struct and then using it to create a Date using Calendar‘s date(from:) method, or
Creating a String representation of the Date and then using it to create a Date using DateFormatter‘s date(from:) method.
Let’s simplify things by extending the Date struct with a couple of convenient init method overloads. Let’s also make it easier to print out the value of a Date for debugging.
Add the following to the playground:
extension Date {
init(year: Int,
month: Int,
day: Int,
hour: Int = 0,
minute: Int = 0,
second: Int = 0,
timeZone: TimeZone = TimeZone(abbreviation: "UTC")!) {
var components = DateComponents()
components.year = year
components.month = month
components.day = day
components.hour = hour
components.minute = minute
components.second = second
components.timeZone = timeZone
self = Calendar.current.date(from: components)!
}
init(dateString: String) {
let formatter = DateFormatter()
formatter.dateFormat = "yyyy-MM-dd HH:mm:ss zz"
self = formatter.date(from: dateString)!
}
var desc: String {
get {
let PREFERRED_LOCALE = "en_US" // Use whatever locale you prefer!
return self.description(with: Locale(identifier: PREFERRED_LOCALE))
}
}
}
With these methods, initializing Dates is a lot more simple. Add the following to the playground and run it:
// The Stevenote where the original iPhone was announced took place
// on January 9, 2007 at 10:00 a.m. PST
let iPhoneStevenoteDate = Date(year: 2007,
month: 1,
day: 9,
hour: 10,
minute: 0,
second: 0,
timeZone: TimeZone(abbreviation: "PST")!)
print("iPhoneStevenoteDate: \(iPhoneStevenoteDate.desc)")
// The original iPhone went on sale on June 27, 2007
let iPhoneReleaseDate = Date(year: 2007, month: 6, day: 27) // June 27, 2007, 00:00:00 UTC
print("iPhoneReleaseDate: \(iPhoneReleaseDate.desc)")
// The Stevenote where the original iPad was announced took place
// on January 27, 2010 at 10:00 a.m. PST
let iPadStevenoteDate = Date(dateString: "2010-01-27 10:00:00 PST")
print("iPadStevenoteDate: \(iPadStevenoteDate.desc)")
On my computer, the output looked like this:
iPhoneStevenoteDate: Tuesday, January 9, 2007 at 1:00:00 PM Eastern Standard Time iPhoneReleaseDate: Tuesday, June 26, 2007 at 8:00:00 PM Eastern Daylight Time iPadStevenoteDate: Wednesday, January 27, 2010 at 1:00:00 PM Eastern Standard Time
Overloading - so that we can use it to find the difference between two Dates
When we’re trying to determine the time between two given Dates, what we’re doing is finding the difference between them. Wouldn’t it be nice if we could use the - operator to find the difference between Dates, just as we can use it to find the difference between numbers?
Let’s code an overload to do just that. Add the following to the playground:
Let’s test it in action. Add the following to the playground and run it:
let timeFromAnnouncementToRelease = iPhoneReleaseDate - iPhoneStevenoteDate
timeFromAnnouncementToRelease.year // 0
timeFromAnnouncementToRelease.month // 5
timeFromAnnouncementToRelease.day // 17
timeFromAnnouncementToRelease.hour // 7
timeFromAnnouncementToRelease.minute // 0
// How long ago was the first moon landing, which took place
// on July 20, 1969, 20:18 UTC?
Date() - Date(dateString: "1969-07-20 20:18:00 UTC")
// At the time of writing, this value was a Date with the following properties:
// - year: 47
// - month: 1
// - day: 9
// - hour: 22
// - minute: 14
On my computer, the output looked like this:
The first iPhone users had to wait this long: 0 years, 5 months, 2 weeks, 3 days, 7 hours, and 0 minutes. It’s been this long since the first moon landing: 50 years, 10 months, 1 weeks, 0 days, 18 hours, and 22 minutes.
Extending Int to add some syntactic magic to date components
We’ve already got some syntactic niceties, but the real Swift magic happens when we add this code to the mix. Add the following to the playground:
extension Int {
var second: DateComponents {
var components = DateComponents()
components.second = self;
return components
}
var seconds: DateComponents {
return self.second
}
var minute: DateComponents {
var components = DateComponents()
components.minute = self;
return components
}
var minutes: DateComponents {
return self.minute
}
var hour: DateComponents {
var components = DateComponents()
components.hour = self;
return components
}
var hours: DateComponents {
return self.hour
}
var day: DateComponents {
var components = DateComponents()
components.day = self;
return components
}
var days: DateComponents {
return self.day
}
var week: DateComponents {
var components = DateComponents()
components.weekOfYear = self;
return components
}
var weeks: DateComponents {
return self.week
}
var month: DateComponents {
var components = DateComponents()
components.month = self;
return components
}
var months: DateComponents {
return self.month
}
var year: DateComponents {
var components = DateComponents()
components.year = self;
return components
}
var years: DateComponents {
return self.year
}
}
This additions to Int allow us to convert Ints to DateComponents in an easy-to-read way, and with our overloads to add and subtract DateComponents to and from each other, and to add Dates to DateComponents, we can now perform all sorts of syntactic magic like this (add the following to the playground and run it):
// A quick test of some future dates
print("One hour from now is: \((Date() + 1.hour).desc)")
print("One day from now is: \((Date() + 1.day).desc)")
print("One week from now is: \((Date() + 1.week).desc)")
print("One month from now is: \((Date() + 1.month).desc)")
print("One year from now is: \((Date() + 1.year).desc)")
// What was the date 10 years, 9 months, 8 days, 7 hours, and 6 minutes ago?
let aLittleWhileBack = Date() - 10.years - 9.months - 8.days - 7.hours - 6.minutes
print("10 years, 9 months, 8 days, 7 hours, and 6 minutes ago, it was: \(aLittleWhileBack.desc)")
On my computer, the output looked like this:
One hour from now is: Thursday, May 28, 2020 at 11:57:49 AM Eastern Daylight Time One day from now is: Friday, May 29, 2020 at 10:57:49 AM Eastern Daylight Time One week from now is: Thursday, June 4, 2020 at 10:57:49 AM Eastern Daylight Time One month from now is: Sunday, June 28, 2020 at 10:57:49 AM Eastern Daylight Time One year from now is: Friday, May 28, 2021 at 10:57:49 AM Eastern Daylight Time 10 years, 9 months, 8 days, 7 hours, and 6 minutes ago, it was: Thursday, August 20, 2009 at 3:51:49 AM Eastern Daylight Time
Extending DateComponents to add even more syntactic magic: fromNow and ago
And finally, a couple of additions to the DateComponents struct to make Date/DateComponent calculations even more concise and readable. Add these to the playground:
extension DateComponents {
var fromNow: Date {
return Calendar.current.date(byAdding: self,
to: Date())!
}
var ago: Date {
return Calendar.current.date(byAdding: -self,
to: Date())!
}
}
Let’s try them out! Add these to the playground and run them:
2.weeks.fromNow: Thursday, June 11, 2020 at 11:03:36 AM Eastern Daylight Time 3.months.fromNow: Friday, August 28, 2020 at 11:03:36 AM Eastern Daylight Time futureDate3: Friday, July 31, 2020 at 3:08:42 PM Eastern Daylight Time pastDate2: Wednesday, March 25, 2020 at 6:58:30 AM Eastern Daylight Time
Wrapping it all up
Here’s the playground containing all the code we just worked with:
import UIKit
var timeInterval = DateComponents(
month: 2,
day: 3,
hour: 4,
minute: 5,
second: 6
)
let futureDate = Calendar.current.date(byAdding: timeInterval, to: Date())!
print("2 months, 3 days, 4 hours, 5 minutes, and 6 seconds from now is \(futureDate.description(with: Locale(identifier: "en_US"))).")
// Overloading + and - so that we can add and subtract DateComponents
// ==================================================================
func +(_ lhs: DateComponents, _ rhs: DateComponents) -> DateComponents {
  return combineComponents(lhs, rhs)
}

func -(_ lhs: DateComponents, _ rhs: DateComponents) -> DateComponents {
  return combineComponents(lhs, rhs, multiplier: -1)
}

func combineComponents(_ lhs: DateComponents,
                       _ rhs: DateComponents,
                       multiplier: Int = 1)
  -> DateComponents {
    var result = DateComponents()
    result.nanosecond = (lhs.nanosecond ?? 0) + (rhs.nanosecond ?? 0) * multiplier
    result.second     = (lhs.second     ?? 0) + (rhs.second     ?? 0) * multiplier
    result.minute     = (lhs.minute     ?? 0) + (rhs.minute     ?? 0) * multiplier
    result.hour       = (lhs.hour       ?? 0) + (rhs.hour       ?? 0) * multiplier
    result.day        = (lhs.day        ?? 0) + (rhs.day        ?? 0) * multiplier
    result.weekOfYear = (lhs.weekOfYear ?? 0) + (rhs.weekOfYear ?? 0) * multiplier
    result.month      = (lhs.month      ?? 0) + (rhs.month      ?? 0) * multiplier
    result.year       = (lhs.year       ?? 0) + (rhs.year       ?? 0) * multiplier
    return result
}
// Let's define a couple of durations of time
// ------------------------------------------

var oneDayFiveHoursTenMinutes = DateComponents(
  day: 1,
  hour: 5,
  minute: 10
)
var threeDaysTenHoursThirtyMinutes = DateComponents(
  day: 3,
  hour: 10,
  minute: 30
)


// Now let's add and subtract them
// -------------------------------

let additionResult = oneDayFiveHoursTenMinutes + threeDaysTenHoursThirtyMinutes
print("1 day, 5 hours, and 10 minutes + 3 days, 10 hours, and 30 minutes equals:")
print("\(additionResult.day!) days, \(additionResult.hour!) hours, and \(additionResult.minute!) minutes.")

let subtractionResult = threeDaysTenHoursThirtyMinutes - oneDayFiveHoursTenMinutes
print("1 day, 5 hours, and 10 minutes - 3 days, 10 hours, and 30 minutes equals:")
print("\(subtractionResult.day!) days, \(subtractionResult.hour!) hours, and \(subtractionResult.minute!) minutes.")
// Overloading - so that we can negate DateComponents
// --------------------------------------------------
// We'll need to overload unary - so we can negate components
prefix func -(components: DateComponents) -> DateComponents {
  var result = DateComponents()
  if components.nanosecond != nil { result.nanosecond = -components.nanosecond! }
  if components.second     != nil { result.second     = -components.second! }
  if components.minute     != nil { result.minute     = -components.minute! }
  if components.hour       != nil { result.hour       = -components.hour! }
  if components.day        != nil { result.day        = -components.day! }
  if components.weekOfYear != nil { result.weekOfYear = -components.weekOfYear! }
  if components.month      != nil { result.month      = -components.month! }
  if components.year       != nil { result.year       = -components.year! }
  return result
}
let negativeTime = -oneDayFiveHoursTenMinutes
print("Negating 1 day, 5 hours, and 10 minutes turns it into:")
print("\(negativeTime.day!) days, \(negativeTime.hour!) hours, and \(negativeTime.minute!) minutes.")
// Overloading + and - so that we can add Dates and DateComponents
// and subtract DateComponents from Dates
// Date + DateComponents
func +(_ lhs: Date, _ rhs: DateComponents) -> Date
{
  return Calendar.current.date(byAdding: rhs, to: lhs)!
}

// DateComponents + Dates
func +(_ lhs: DateComponents, _ rhs: Date) -> Date
{
  return rhs + lhs
}

// Date - DateComponents
func -(_ lhs: Date, _ rhs: DateComponents) -> Date
{
  return lhs + (-rhs)
}
// What time will it be 1 day, 5 hours, and 10 minutes from now?
// -------------------------------------------------------------

// Here's the standard way of finding out:
let futureDate0 = Calendar.current.date(
  byAdding: oneDayFiveHoursTenMinutes,
  to: Date()
)

// With our overloads and function definitions, we can now do it this way:
let futureDate1 = Date() + oneDayFiveHoursTenMinutes
print("Date() + oneDayFiveHoursTenMinutes = \(futureDate1.description(with: Locale(identifier: "en_US")))")

// This will work as well:
let futureDate2 = oneDayFiveHoursTenMinutes + Date()
print("oneDayFiveHoursTenMinutes + Date() = \(futureDate2.description(with: Locale(identifier: "en_US")))")


// What time was it 3 days, 10 hours, and 30 minutes ago?
// ------------------------------------------------------

// Doing it the standard way takes some work
var minus3Days5Hours30minutes = threeDaysTenHoursThirtyMinutes
minus3Days5Hours30minutes.day = -threeDaysTenHoursThirtyMinutes.day!
minus3Days5Hours30minutes.hour = -threeDaysTenHoursThirtyMinutes.hour!
minus3Days5Hours30minutes.minute = -threeDaysTenHoursThirtyMinutes.minute!
let pastDate0 = Calendar.current.date(byAdding: minus3Days5Hours30minutes, to: Date())

// With our overloads and function definitions, it's so much easier:
let pastDate1 = Date() - threeDaysTenHoursThirtyMinutes
print("Date() - threeDaysTenHoursThirtyMinutes = \(pastDate1.description(with: Locale(identifier: "en_US")))")
// Extending Date so that creating dates and debugging are simpler
// ===============================================================
extension Date {

  init(year: Int,
       month: Int,
       day: Int,
       hour: Int = 0,
       minute: Int = 0,
       second: Int = 0,
       timeZone: TimeZone = TimeZone(abbreviation: "UTC")!) {
    var components = DateComponents()
    components.year = year
    components.month = month
    components.day = day
    components.hour = hour
    components.minute = minute
    components.second = second
    components.timeZone = timeZone
    self = Calendar.current.date(from: components)!
  }

  init(dateString: String) {
    let formatter = DateFormatter()
    formatter.dateFormat = "yyyy-MM-dd HH:mm:ss zz"
    self = formatter.date(from: dateString)!
  }

  var desc: String {
    get {
      let PREFERRED_LOCALE = "en_US" // Use whatever locale you prefer!
      return self.description(with: Locale(identifier: PREFERRED_LOCALE))
    }
  }

}
// The Stevenote where the original iPhone was announced took place
// on January 9, 2007 at 10:00 a.m. PST
let iPhoneStevenoteDate = Date(year: 2007,
                               month: 1,
                               day: 9,
                               hour: 10,
                               minute: 0,
                               second: 0,
                               timeZone: TimeZone(abbreviation: "PST")!)
print("iPhoneStevenoteDate: \(iPhoneStevenoteDate.desc)")

// The original iPhone went on sale on June 27, 2007
let iPhoneReleaseDate = Date(year: 2007, month: 6, day: 27) // June 27, 2007, 00:00:00 UTC
print("iPhoneReleaseDate: \(iPhoneReleaseDate.desc)")

// The Stevenote where the original iPad was announced took place
// on January 27, 2010 at 10:00 a.m. PST
let iPadStevenoteDate = Date(dateString: "2010-01-27 10:00:00 PST")
print("iPadStevenoteDate: \(iPadStevenoteDate.desc)")
// Overloading - so that we can use it to find the difference
// between two Dates
// ==========================================================
func -(_ lhs: Date, _ rhs: Date) -> DateComponents
{
  return Calendar.current.dateComponents(
    [.year, .month, .weekOfYear, .day, .hour, .minute, .second, .nanosecond],
    from: rhs,
    to: lhs)
}
// How long was it between the announcement of the original iPhone
// and its release in the stores?
let iPhoneWait = iPhoneReleaseDate - iPhoneStevenoteDate
print("The first iPhone users had to wait this long: ")
print("\(iPhoneWait.year!) years, " +
"\(iPhoneWait.month!) months, " +
"\(iPhoneWait.weekOfYear!) weeks, " +
"\(iPhoneWait.day!) days, " +
"\(iPhoneWait.hour!) hours, and " +
"\(iPhoneWait.minute!) minutes.")
// How long ago was the first moon landing, which took place
// on July 20, 1969, 20:18 UTC?
let timeSinceMoonLanding = Date() - Date(dateString: "1969-07-20 20:18:00 UTC")
print("It’s been this long since the first moon landing: ")
print("\(timeSinceMoonLanding.year!) years, " +
"\(timeSinceMoonLanding.month!) months, " +
"\(timeSinceMoonLanding.weekOfYear!) weeks, " +
"\(timeSinceMoonLanding.day!) days, " +
"\(timeSinceMoonLanding.hour!) hours, and " +
"\(timeSinceMoonLanding.minute!) minutes.")
// Extending Int to add some syntactic magic to date components
// ============================================================
extension Int {

  var second: DateComponents {
    var components = DateComponents()
    components.second = self;
    return components
  }

  var seconds: DateComponents {
    return self.second
  }

  var minute: DateComponents {
    var components = DateComponents()
    components.minute = self;
    return components
  }

  var minutes: DateComponents {
    return self.minute
  }

  var hour: DateComponents {
    var components = DateComponents()
    components.hour = self;
    return components
  }

  var hours: DateComponents {
    return self.hour
  }

  var day: DateComponents {
    var components = DateComponents()
    components.day = self;
    return components
  }

  var days: DateComponents {
    return self.day
  }

  var week: DateComponents {
    var components = DateComponents()
    components.weekOfYear = self;
    return components
  }

  var weeks: DateComponents {
    return self.week
  }

  var month: DateComponents {
    var components = DateComponents()
    components.month = self;
    return components
  }

  var months: DateComponents {
    return self.month
  }

  var year: DateComponents {
    var components = DateComponents()
    components.year = self;
    return components
  }

  var years: DateComponents {
    return self.year
  }

}
// A quick test of some future dates
print("One hour from now is: \((Date() + 1.hour).desc)")
print("One day from now is: \((Date() + 1.day).desc)")
print("One week from now is: \((Date() + 1.week).desc)")
print("One month from now is: \((Date() + 1.month).desc)")
print("One year from now is: \((Date() + 1.year).desc)")

// What was the date 10 years, 9 months, 8 days, 7 hours, and 6 minutes ago?
let aLittleWhileBack = Date() - 10.years - 9.months - 8.days - 7.hours - 6.minutes
print("10 years, 9 months, 8 days, 7 hours, and 6 minutes ago, it was: \(aLittleWhileBack.desc)")
// Extending DateComponents to add even more syntactic magic: fromNow and ago
// ==========================================================================
extension DateComponents {

  var fromNow: Date {
    return Calendar.current.date(byAdding: self,
                                 to: Date())!
  }

  var ago: Date {
    return Calendar.current.date(byAdding: -self,
                                 to: Date())!
  }

}
// We’re now in Serious Syntax Magic Land!
// ---------------------------------------

print("2.weeks.fromNow: \(2.weeks.fromNow.desc)")
print("3.months.fromNow: \(3.months.fromNow.desc)")

let futureDate3 = (2.months + 3.days + 4.hours + 5.minutes + 6.seconds).fromNow
print("futureDate3: \(futureDate3.desc)")

let pastDate2 = (2.months + 3.days + 4.hours + 5.minutes + 6.seconds).ago
print("pastDate2: \(pastDate2.desc)")
You can download the playground here (4KB, zipped Xcode playground file).
The How to work with dates and times in Swift 5 series
DateComponents, which represents the units that make up a date, such as year, month, day, hour, and minute, and which can be used to represent either a single point in time or a duration of time, and
Calendar, which provides a context for Dates, and allows us to convert between Dates and DateComponents.
With this knowledge under our belts, let’s get to this article’s topic: doing date calculations.
Creating a couple of Dates to work with
Let’s create a couple of Dates to work with:
The date and time of the Stevenote where the iPhone was introduced: January 9, 2007, 10:00 a.m. Pacific time (UTC-8), and
The date and time of the Stevenote where the iPad was introduced: January 27, 2010, 10:00 a.m. Pacific time (UTC-8).
Start with a fresh playground, and paste or enter the following code into it:
// The user's calendar incorporates the user's locale and
// time zone settings, which means it's the one you'll use
// most often.
let userCalendar = Calendar.current

// Let's create a Date for the start of the Stevenote
// where the iPhone was introduced (January 9, 2007, 10:00:00 Pacific time)
// using DateComponents.
let iPhoneStevenoteDateComponents = DateComponents(
  timeZone: TimeZone(abbreviation: "PST"),
  year: 2007,
  month: 1,
  day: 9,
  hour: 10
)
let iPhoneStevenoteDate = userCalendar.date(from: iPhoneStevenoteDateComponents)!

// Let's create a Date for the start of the Stevenote
// where the iPad was introduced (January 27, 2010, 10:00:00 Pacific time)
// using DateFormatter.
var dateMakerFormatter = DateFormatter()
dateMakerFormatter.calendar = userCalendar
dateMakerFormatter.dateFormat = "MMM d, yyyy, hh:mm a zz"
let iPadStevenoteDate = dateMakerFormatter.date(from: "Jan 27, 2010, 10:00 AM PST")!
In the code above, we’ve created our dates in two different ways:
We created iPhoneStevenoteDate by setting up a DateComponents struct and then using the user’s Calendar to convert those DateComponents into a Date.
We created iPadStevenoteDate by converting its String representation into a Date using a DateFormatter.
Date comparisons, part 1
Now that we have two Dates, let’s compare them. In Swift 5, we can use familiar comparison operators — <, <=, ==, !=, >, >== — to tell which Date came first, or if they represent the exact (and I do mean exact) same point in time.
Add the following code to the playground and run it:
print("Did the iPhone Stevenote come BEFORE the iPad Stevenote? " +
      "\(iPhoneStevenoteDate < iPadStevenoteDate)")

print("Did the iPhone Stevenote come AFTER the iPad Stevenote? " +
      "\(iPhoneStevenoteDate > iPadStevenoteDate)")

print("Did the iPad Stevenote come BEFORE the iPhone Stevenote? " +
      "\(iPadStevenoteDate < iPhoneStevenoteDate)")

print("Does the iPad Stevenote come AFTER the iPhone Stevenote? " +
      "\(iPadStevenoteDate > iPhoneStevenoteDate)")

print("Do the iPhone Stevenote and the iPad Stevenote fall on the EXACT SAME date and time? " +
      "\(iPhoneStevenoteDate == iPadStevenoteDate)")

print("Do the iPhone Stevenote and the iPad Stevenote fall on different dates and times? " +
      "\(iPhoneStevenoteDate != iPadStevenoteDate)")
The output should be:
Did the iPhone Stevenote come BEFORE the iPad Stevenote? true Did the iPhone Stevenote come AFTER the iPad Stevenote? false Did the iPad Stevenote come BEFORE the iPhone Stevenote? false Does the iPad Stevenote come AFTER the iPhone Stevenote? true Do the iPhone Stevenote and the iPad Stevenote fall on the EXACT SAME date and time? false Do the iPhone Stevenote and the iPad Stevenote fall on different dates and times? true
Note that these are comparisons of Dates, which measure time down to the nearest nanosecond. If you compare two Dates named date1 and date2, where date2 represents a point in time one nanosecond after date1, they will not be equal; date2 will be greater than date1.
A little later on in this article, we’ll look at more “human” ways of comparing Dates.
How far apart are the iPhone and iPad Stevenotes, part 1: In seconds, using Date’s timeIntervalSince() method
Date‘s timeIntervalSince method can give us the difference between two dates and times — in seconds.
Add the following code to the playground and run it:
print("Number of seconds between the iPhone Stevenote and the iPad Stevenote: " +
      "\(iPhoneStevenoteDate.timeIntervalSince(iPadStevenoteDate))")

print("Number of seconds between the iPad Stevenote and the iPhone Stevenote: " +
      "\(iPadStevenoteDate.timeIntervalSince(iPhoneStevenoteDate))")
The output should be:
Number of seconds between the iPhone Stevenote and the iPad Stevenote: -96249600.0 Number of seconds between the iPad Stevenote and the iPhone Stevenote: 96249600.0
The results tell us that there were 96,248,600 seconds between the iPhone Stevenote and the iPad Stevenote.
While there are cases when you’ll want to know how many seconds there are between two given points in time, there are also many cases where you’ll want to find the differences between two points in time using other units, such as days, weeks, months, and years, not to mention hours and minutes. Date‘s timeIntervalSince method isn’t going to work for these cases.
How far apart are the iPhone and iPad Stevenotes, part 2: In days, using Calendar’s dateComponents(_:from:to:) method
Most of the time, when you are calculating how far apart two given Dates are, you’ll be using this method of the Calendar struct:
dateComponents(components, from: startDate, to: endDate)
Here’s a run-down of its parameters:
Parameter
Description
components
A Set (expressed in array notation) of Calendar.Component values specifying the time units you want, which can be:
.second
.minute
.hour
.day
.month
.year
startDate:
The start Date of the time period.
endDate:
The end Date of the time period.
Let’s use dateComponents(_:from:to:) to find out how many days there were between the iPhone Stevenote and the iPad Stevenote.
Add the following code to the playground and run it:
let daysBetweenStevenotes = userCalendar.dateComponents([.day],
                                                        from: iPhoneStevenoteDate,
                                                        to: iPadStevenoteDate)
print("There were \(daysBetweenStevenotes.day!) days between the iPhone Stevenote of 2007 and the iPad Stevenote of 2010.")
The output should be:
There were 1114 days between the iPhone Stevenote of 2007 and the iPad Stevenote of 2010.
In the code above, we passed dateComponents(_:from:to:) three values:
An array containing the Calendar.Component value .day, which specifies that we want the result expressed as the difference between iPadStevenoteDate and iPhoneStevenoteDate in terms of days.
The two dates in question, iPhoneStevenoteDate and iPadStevenoteDate.
As the result tells us, there were 1,114 days between the iPhone Stevenote and the iPad Stevenote.
How far apart are the iPhone and iPad Stevenotes, part 3: In weeks
By changing the contents of the array of Calendar.Component values that we provide in the first argument of Calendar’s dateComponents(_:from:to:) method, we can get the result expressed in different time units.
Add the following code to the playground and run it:
let weeksBetweenStevenotes = userCalendar.dateComponents([.weekOfYear],
                                                         from: iPhoneStevenoteDate,
                                                         to: iPadStevenoteDate)
print("There were \(weeksBetweenStevenotes.weekOfYear!) weeks between the iPhone Stevenote of 2007 and the iPad Stevenote of 2010.")
The output should be:
There were 159 weeks between the iPhone Stevenote of 2007 and the iPad Stevenote of 2010.
In the code above, we passed dateComponents(_:from:to:) three values:
An array containing the Calendar.Component value .weekOfYear, which specifies that we want the result expressed as the difference between iPadStevenoteDate and iPhoneStevenoteDate in terms of the numbered weeks of the year on which both dates fall. For example, if event1 took place on week 2 of a year and event2 took place on week 5, the difference between the two in .weekOfYear terms would be 3.
The two dates in question, iPhoneStevenoteDate and iPadStevenoteDate.
The result indicates that 159 weeks passed between the iPhone Stevenote and the iPad Stevenote.
If you do the math, 159 times 7 days is 1,113 days, but our previous calculation said that the iPhone Stevenote and the iPad Stevenote were 1,114 days apart. That’s because the two events are 159 whole weeks apart, plus an extra day.
How far apart are the iPhone and iPad Stevenotes, part 4: In years, months, and days
We can also put multiple values of Calendar.Component into the array that we provide as the first argument of Calendar’s dateComponents(_:from:to:) method.
Add the following code to the playground and run it:
let yearsMonthsDaysHoursMinutesBetweenStevenotes = userCalendar.dateComponents(
  [.year, .month, .day, .hour, .minute],
  from: iPhoneStevenoteDate,
  to: iPadStevenoteDate
)
let years = yearsMonthsDaysHoursMinutesBetweenStevenotes.year!
let months = yearsMonthsDaysHoursMinutesBetweenStevenotes.month!
let days = yearsMonthsDaysHoursMinutesBetweenStevenotes.day!
let hours = yearsMonthsDaysHoursMinutesBetweenStevenotes.hour!
let minutes = yearsMonthsDaysHoursMinutesBetweenStevenotes.minute!
print("There were \(years) years, \(months) months, \(days) days, \(hours) hours, and \(minutes) minutes between the the iPhone Stevenote of 2007 and the iPad Stevenote of 2010.")
In the code above, we passed dateComponents(_:from:to:) three values:
An array containing the Calendar.Component values .year, .month, .day, .hour, .minute, which specifies that we want the result expressed as the difference between iPadStevenoteDate and iPhoneStevenoteDate in terms of years, months, days, hours, and minutes. The method uses the largest applicable component before using smaller ones — for example, it will give results like 1 month and 5 days rather than 35 days.
The two dates in question, iPhoneStevenoteDate and iPadStevenoteDate.
The results show that the iPhone Stevenote and the iPad Stevenote were 3 years and 18 days apart.
Date addition, part 1: What’s the last day of a 90-day warranty that starts today?
Now that we know how to answer the question “What’s the difference in time between two Dates?”, let’s try answering a different question: “If we add a time interval to a Date, what’s the resulting Date?”
To answer this question, we’ll use this method of Calendar:
date(byAdding: timeInterval, value: numberOfTimeUnits to: startDate)
Here’s a run-down of its parameters:
Parameter
Description
timeInterval
A dateComponents struct whose properties contain values defining the interval of time.
numberOfTimeUnits
The number of timeInterval units to be added to the Date in question.
startDate
The Date in question.
Let’s start with a simple bit of code that tells us the last day of a 90-day warranty whose term starts right now:
// What's the last day of a 90-day warranty that starts today?
let lastDay = userCalendar.date(byAdding: .day, value: 90, to: Date())!
print("90 days from now is: \(lastDay.description(with: Locale(identifier: "en_US")))")
The result is a Date representing a point in time 90 days from the present. On my computer, the output looked like this:
90 days from now is: Optional(“Tuesday, August 25, 2020 at 10:30:46 PM Eastern Daylight Time”)
Date addition, part 2: What was the date 5 weeks ago?
Just as we can convert addition to subtraction by adding a negative value, we can also do Date subtraction by providing date(byAdding:value:to:) with negative values. Here’s an example of code that returns a date that is an interval of time prior to the date in question:
// What was the date 5 weeks ago?
let fiveWeeksAgo = userCalendar.date(byAdding: .weekOfYear, value: -5, to: Date())!
print("5 weeks ago was: \(fiveWeeksAgo.description(with: Locale(identifier: "en_US")))")
The result is a Date representing a point in time 5 weeks in the past. On my computer, the output looked like this:
5 weeks ago was: Wednesday, April 22, 2020 at 11:12:40 PM Eastern Daylight Time
Date addition, part 3: What time will it be 4 hours and 30 minutes from now, and 4 hours and 30 minutes ago?
The date(byAdding:value:to:) method works when you just want to add one kind of time unit — a minute, hour, day, week, month, or year — to a Date. If you want to add multiple kinds of time units to a Date, such as 4 hours and 30 minutes, you need to use this Calendar method instead:
date(byAdding: timeIntervalComponents, to: startDate)
Here’s a run-down of its parameters:
Parameter
Description
timeIntervalComponents
A dateComponents struct whose properties contain values defining the interval of time.
startDate
The Date in question.
Here’s the code that answers the question “What time will it be 4 hours and 30 minutes from now?”
// What time will it be 4 hours and 30 minutes from now?
// First, we need to define a DateComponents struct representing
// a time interval of 4 hours and 30 minutes
var fourHoursThirtyMinutes = DateComponents()
fourHoursThirtyMinutes.hour = 4
fourHoursThirtyMinutes.minute = 30

// Now add the interval to the Date
let fourHoursThirtyMinutesFromNow = userCalendar.date(
  byAdding: fourHoursThirtyMinutes,
  to: Date()
)!
print("4 hours and 30 minutes from now will be: \(fourHoursThirtyMinutesFromNow.description(with: Locale(identifier: "en_US")))")
In the code above, we did the following:
First, we defined a DateComponents struct representing a 4-hour, 30-minute span of time,
then we added that span of time to the present date and time using the date(byAdding:to:) method.
The result is a Date representing a time 4 hours and 30 seconds in the future.
Let’s find out what the Date was 4 hours and 30 seconds ago:
// What time was it 4 hours and 30 minutes ago?
var minusFourHoursThirtyMinutes = DateComponents()
minusFourHoursThirtyMinutes.hour = -4
minusFourHoursThirtyMinutes.minute = -30
let fourHoursThirtyMinutesAgo = userCalendar.date(
  byAdding: fourHoursThirtyMinutes,
  to: Date()
)!
print("4 hours and 30 minutes ago was: \(fourHoursThirtyMinutesAgo.description(with: Locale(identifier: "en_US")))")
On my computer, the output looked like this:
4 hours and 30 minutes from now will be: Thursday, May 28, 2020 at 3:42:40 AM Eastern Daylight Time 4 hours and 30 minutes ago was: Thursday, May 28, 2020 at 3:42:40 AM Eastern Daylight Time
Date comparisons, part 2: Making Date comparisons a little more “human”
Data: 6 days, 13 hours, 47 minutes. Riker: What, no seconds? Data: I have discovered, sir, a certain level of impatience when I calculate a lengthy time interval to the nearest second. [beat] However if you wish… Riker: No. No. Minutes is fine.
Date‘s comparison operators have the same problem with being overly precise.
Consider the following Dates related to the announcement of SwiftUI:
The start of the announcement, 2 hours and 8 minutes into the WWDC 2019 keynote: June 3, 2019, 12:08:00 p.m. PDT
One second after the start of the announcement: June 3, 2019, 12:09:00 p.m. PDT
Five minutes after the start of the announcement: June 3, 2019, 12:13:00 p.m. PDT
Three hours after the start of the announcement: June 3, 2019, 03:08:00 p.m. PDT
Date‘s comparison operators think of all these points in time as very different, but depending on your circumstances you may think of them as being practically the same:
In most cases, there really isn’t a difference between the time when SwiftUI was announced and one second after.
If you’re concerned only with the day when SwiftUI was announced and not the exact time, there’s effectively no difference between any of the Dates listed above.
Calendar‘s compare(_:to:toGranularity) method allows us to perform Date comparisons at different levels of granularity:
compare(firstDate, to: secondDate, toGranularity: granularity)
Here’s a run-down of its parameters:
Parameter
Description
firstDate
The first Date in the comparison.
secondDate
The second Date in the comparison.
granularity
The level of precision for the comparison, expressed as an Calendar.Component value, which includes:
.second
.minute
.hour
.day
.month
.year
This is a Cocoa method named “compare”, so you’ve probably guessed that its return type is ComparisonResult. Here’s what it returns:
If…
compare returns:
firstDate is earlier than secondDate, when compared at the specified granularity
.orderedAscending
firstDate is equal to secondDate, when compared at the specified granularity
.orderedSame
firstDate is later than secondDate, when compared at the specified granularity
.orderedDescending
It’s easier to show compare(_:to:toGranularity) in action than to explain how it works. Add the following code into the playground:
// Let's define some Dates relative to the SwiftUI announcement
// (June 3, 2019, 12:08 p.m. PDT)
let swiftUIAnnouncementDateComponents = DateComponents(
  timeZone: TimeZone(abbreviation: "PDT"),
  year: 2019,
  month: 6,
  day: 3,
  hour: 12,
  minute: 8
)
let swiftUIAnnouncement = userCalendar.date(from: swiftUIAnnouncementDateComponents)!

let swiftUIAnnouncementPlusOneSecond = userCalendar.date(
  byAdding: .second,
  value: 1,
  to: swiftUIAnnouncement
)!
let swiftUIAnnouncementPlusFiveMinutes = userCalendar.date(
  byAdding: .minute,
  value: 5,
  to: swiftUIAnnouncement
)!
let swiftUIAnnouncementPlusThreeHours = userCalendar.date(
  byAdding: .hour,
  value: 3,
  to: swiftUIAnnouncement
)!

// This returns false, because when measuring time at the granularity of a SECOND,
// swiftUIAnnouncement happens BEFORE swiftUIAnnouncementPlusOneSecond.
let test1 = userCalendar.compare(swiftUIAnnouncement,
                                 to: swiftUIAnnouncementPlusOneSecond,
                                 toGranularity: .second)
  == .orderedSame
print("test1: \(test1)")

// This returns true, because when measuring time at the granularity of a SECOND,
// swiftUIAnnouncement happens BEFORE swiftUIAnnouncementPlusOneSecond.
let test2 = userCalendar.compare(swiftUIAnnouncement,
                                 to: swiftUIAnnouncementPlusOneSecond,
                                 toGranularity: .second)
  == .orderedAscending
print("test2: \(test2)")

// This returns true, because when measuring time at the granularity of a MINUTE,
// swiftUIAnnouncement happens AT THE SAME TIME AS swiftUIAnnouncementPlusOneSecond.
let test3 = userCalendar.compare(swiftUIAnnouncement,
                                 to: swiftUIAnnouncementPlusOneSecond,
                                 toGranularity: .minute)
  == .orderedSame
print("test3: \(test3)")

// This returns true, because when measuring time at the granularity of an HOUR,
// swiftUIAnnouncement happens AT THE SAME TIME AS swiftUIAnnouncementPlusFiveMinutes.
let test4 = userCalendar.compare(swiftUIAnnouncement,
                                 to: swiftUIAnnouncementPlusFiveMinutes,
                                 toGranularity: .hour)
  == .orderedSame
print("test4: \(test4)")

// This returns true, because when measuring time at the granularity of a MINUTE,
// swiftUIAnnouncementPlusFiveMinutes happens AFTER swiftUIAnnouncement.
let test5 = userCalendar.compare(swiftUIAnnouncementPlusFiveMinutes,
                                 to: swiftUIAnnouncement,
                                 toGranularity: .minute)
  == .orderedDescending
print("test5: \(test5)")

// This returns true, because when measuring time at the granularity of a DAY,
// swiftUIAnnouncement happens AT THE SAME TIME AS swiftUIAnnouncementPlusThreeHours.
let test6 = userCalendar.compare(swiftUIAnnouncement,
                                 to: swiftUIAnnouncementPlusThreeHours,
                                 toGranularity: .day)
  == .orderedSame
print("test6: \(test6)")
Here’s the playground containing all the code we just worked with:
import UIKit


// Creating a couple of Dates to work with
// =======================================

// The user's calendar incorporates the user's locale and
// time zone settings, which means it's the one you'll use
// most often.
let userCalendar = Calendar.current

// Let's create a Date for the start of the Stevenote
// where the iPhone was introduced (January 9, 2007, 10:00:00 Pacific time)
// using DateComponents.
let iPhoneStevenoteDateComponents = DateComponents(
  timeZone: TimeZone(abbreviation: "PST"),
  year: 2007,
  month: 1,
  day: 9,
  hour: 10
)
let iPhoneStevenoteDate = userCalendar.date(from: iPhoneStevenoteDateComponents)!


// Date comparisons, part 1
// ========================

// Let's create a Date for the start of the Stevenote
// where the iPad was introduced (January 27, 2010, 10:00:00 Pacific time)
// using DateFormatter.
var dateMakerFormatter = DateFormatter()
dateMakerFormatter.calendar = userCalendar
dateMakerFormatter.dateFormat = "MMM d, yyyy, hh:mm a zz"
let iPadStevenoteDate = dateMakerFormatter.date(from: "Jan 27, 2010, 10:00 AM PST")!


print("Did the iPhone Stevenote come BEFORE the iPad Stevenote? " +
      "\(iPhoneStevenoteDate < iPadStevenoteDate)")

print("Did the iPhone Stevenote come AFTER the iPad Stevenote? " +
      "\(iPhoneStevenoteDate > iPadStevenoteDate)")

print("Did the iPad Stevenote come BEFORE the iPhone Stevenote? " +
      "\(iPadStevenoteDate < iPhoneStevenoteDate)")

print("Does the iPad Stevenote come AFTER the iPhone Stevenote? " +
      "\(iPadStevenoteDate > iPhoneStevenoteDate)")

print("Do the iPhone Stevenote and the iPad Stevenote fall on the EXACT SAME date and time? " +
      "\(iPhoneStevenoteDate == iPadStevenoteDate)")

print("Do the iPhone Stevenote and the iPad Stevenote fall on different dates and times? " +
      "\(iPhoneStevenoteDate != iPadStevenoteDate)")


// How far apart are the iPhone and iPad Stevenotes, part 1: In seconds,
// using Date’s timeIntervalSince() method
// =====================================================================

print("Number of seconds between the iPhone Stevenote and the iPad Stevenote: " +
      "\(iPhoneStevenoteDate.timeIntervalSince(iPadStevenoteDate))")

print("Number of seconds between the iPad Stevenote and the iPhone Stevenote: " +
      "\(iPadStevenoteDate.timeIntervalSince(iPhoneStevenoteDate))")


// How far apart are the iPhone and iPad Stevenotes, part 2:
// In days, using Calendar’s dateComponents(_:from:to:) method
// ===========================================================

let daysBetweenStevenotes = userCalendar.dateComponents([.day],
                                                        from: iPhoneStevenoteDate,
                                                        to: iPadStevenoteDate)
print("There were \(daysBetweenStevenotes.day!) days between the iPhone Stevenote of 2007 and the iPad Stevenote of 2010.")


// How far apart are the iPhone and iPad Stevenotes, part 3: In weeks
// ==================================================================

let weeksBetweenStevenotes = userCalendar.dateComponents([.weekOfYear],
                                                         from: iPhoneStevenoteDate,
                                                         to: iPadStevenoteDate)
print("There were \(weeksBetweenStevenotes.weekOfYear!) weeks between the iPhone Stevenote of 2007 and the iPad Stevenote of 2010.")


// How far apart are the iPhone and iPad Stevenotes, part 4:
// In years, months, and days
// =========================================================

let yearsMonthsDaysHoursMinutesBetweenStevenotes = userCalendar.dateComponents(
  [.year, .month, .day, .hour, .minute],
  from: iPhoneStevenoteDate,
  to: iPadStevenoteDate
)
let years = yearsMonthsDaysHoursMinutesBetweenStevenotes.year!
let months = yearsMonthsDaysHoursMinutesBetweenStevenotes.month!
let days = yearsMonthsDaysHoursMinutesBetweenStevenotes.day!
let hours = yearsMonthsDaysHoursMinutesBetweenStevenotes.hour!
let minutes = yearsMonthsDaysHoursMinutesBetweenStevenotes.minute!
print("There were \(years) years, \(months) months, \(days) days, \(hours) hours, and \(minutes) minutes between the the iPhone Stevenote of 2007 and the iPad Stevenote of 2010.")


// Date addition, part 1:
// What’s the last day of a 90-day warranty that starts today?
// ===========================================================

let lastDay = userCalendar.date(byAdding: .day, value: 90, to: Date())!
print("90 days from now is: \(lastDay.description(with: Locale(identifier: "en_US")))")


// Date addition, part 2: What was the date 5 weeks ago?
// =====================================================
let fiveWeeksAgo = userCalendar.date(byAdding: .weekOfYear, value: -5, to: Date())!
print("5 weeks ago was: \(fiveWeeksAgo.description(with: Locale(identifier: "en_US")))")


// Date addition, part 3:
// What time will it be 4 hours and 30 minutes from now, and
// 4 hours and 30 minutes ago?
// =========================================================

// What time will it be 4 hours and 30 minutes from now?
// First, we need to define a DateComponents struct representing
// a time interval of 4 hours and 30 minutes
var fourHoursThirtyMinutes = DateComponents()
fourHoursThirtyMinutes.hour = 4
fourHoursThirtyMinutes.minute = 30

// Now add the interval to the Date
let fourHoursThirtyMinutesFromNow = userCalendar.date(
  byAdding: fourHoursThirtyMinutes,
  to: Date()
)!
print("4 hours and 30 minutes from now will be: \(fourHoursThirtyMinutesFromNow.description(with: Locale(identifier: "en_US")))")

// What time was it 4 hours and 30 minutes ago?
var minusFourHoursThirtyMinutes = DateComponents()
minusFourHoursThirtyMinutes.hour = -4
minusFourHoursThirtyMinutes.minute = -30
let fourHoursThirtyMinutesAgo = userCalendar.date(
  byAdding: fourHoursThirtyMinutes,
  to: Date()
)!
print("4 hours and 30 minutes ago was: \(fourHoursThirtyMinutesAgo.description(with: Locale(identifier: "en_US")))")


// Date comparisons, part 2: Making Date comparisons a little more “human”
// =======================================================================

// Let's define some Dates relative to the SwiftUI announcement
// (June 3, 2019, 12:08 p.m. PDT)
let swiftUIAnnouncementDateComponents = DateComponents(
  timeZone: TimeZone(abbreviation: "PDT"),
  year: 2019,
  month: 6,
  day: 3,
  hour: 12,
  minute: 8
)
let swiftUIAnnouncement = userCalendar.date(from: swiftUIAnnouncementDateComponents)!

let swiftUIAnnouncementPlusOneSecond = userCalendar.date(
  byAdding: .second,
  value: 1,
  to: swiftUIAnnouncement
)!
let swiftUIAnnouncementPlusFiveMinutes = userCalendar.date(
  byAdding: .minute,
  value: 5,
  to: swiftUIAnnouncement
)!
let swiftUIAnnouncementPlusThreeHours = userCalendar.date(
  byAdding: .hour,
  value: 3,
  to: swiftUIAnnouncement
)!

// This returns false, because when measuring time at the granularity of a SECOND,
// swiftUIAnnouncement happens BEFORE swiftUIAnnouncementPlusOneSecond.
let test1 = userCalendar.compare(swiftUIAnnouncement,
                                 to: swiftUIAnnouncementPlusOneSecond,
                                 toGranularity: .second)
  == .orderedSame
print("test1: \(test1)")

// This returns true, because when measuring time at the granularity of a SECOND,
// swiftUIAnnouncement happens BEFORE swiftUIAnnouncementPlusOneSecond.
let test2 = userCalendar.compare(swiftUIAnnouncement,
                                 to: swiftUIAnnouncementPlusOneSecond,
                                 toGranularity: .second)
  == .orderedAscending
print("test2: \(test2)")

// This returns true, because when measuring time at the granularity of a MINUTE,
// swiftUIAnnouncement happens AT THE SAME TIME AS swiftUIAnnouncementPlusOneSecond.
let test3 = userCalendar.compare(swiftUIAnnouncement,
                                 to: swiftUIAnnouncementPlusOneSecond,
                                 toGranularity: .minute)
  == .orderedSame
print("test3: \(test3)")

// This returns true, because when measuring time at the granularity of an HOUR,
// swiftUIAnnouncement happens AT THE SAME TIME AS swiftUIAnnouncementPlusFiveMinutes.
let test4 = userCalendar.compare(swiftUIAnnouncement,
                                 to: swiftUIAnnouncementPlusFiveMinutes,
                                 toGranularity: .hour)
  == .orderedSame
print("test4: \(test4)")

// This returns true, because when measuring time at the granularity of a MINUTE,
// swiftUIAnnouncementPlusFiveMinutes happens AFTER swiftUIAnnouncement.
let test5 = userCalendar.compare(swiftUIAnnouncementPlusFiveMinutes,
                                 to: swiftUIAnnouncement,
                                 toGranularity: .minute)
  == .orderedDescending
print("test5: \(test5)")

// This returns true, because when measuring time at the granularity of a DAY,
// swiftUIAnnouncement happens AT THE SAME TIME AS swiftUIAnnouncementPlusThreeHours.
let test6 = userCalendar.compare(swiftUIAnnouncement,
                                 to: swiftUIAnnouncementPlusThreeHours,
                                 toGranularity: .day)
  == .orderedSame
print("test6: \(test6)")
You can download the playground here (3KB, zipped Xcode playground file).
In the next installment, we’ll look at making working with dates and times in Swift 5 even better with with some syntactic magic.
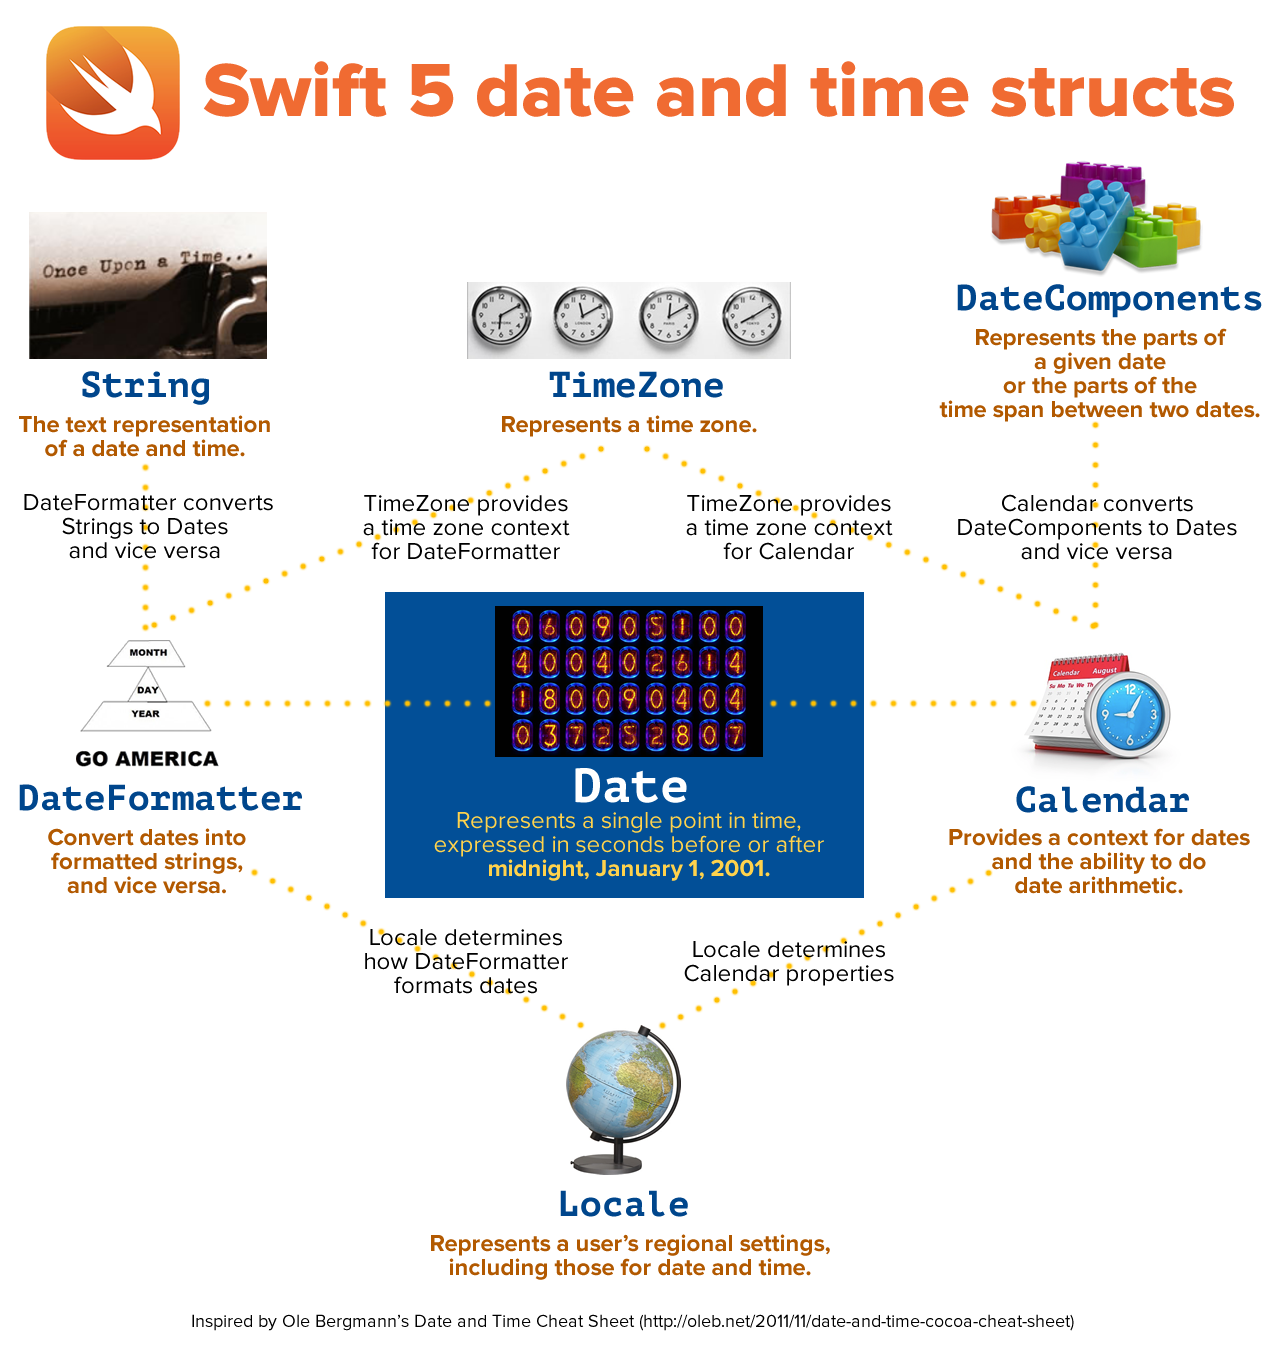
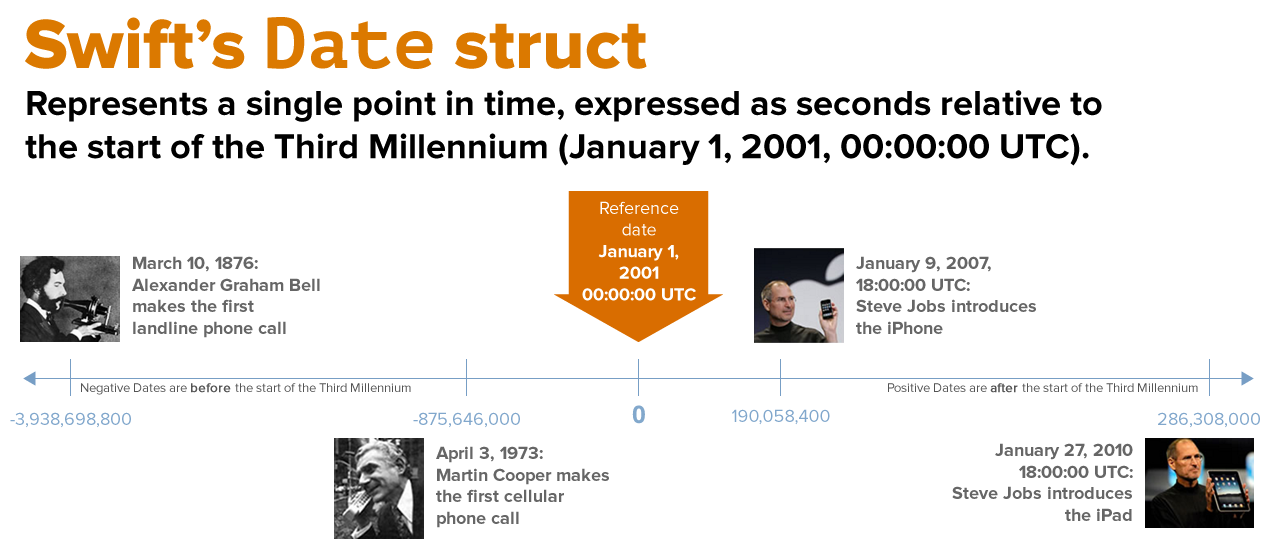
Date represents a single point in time, using a format that can easily be translated into just about any calendar and time-reckoning system: a number of seconds relative to the start of the Third Millennium (January 1, 2001, 00:00:00 UTC).
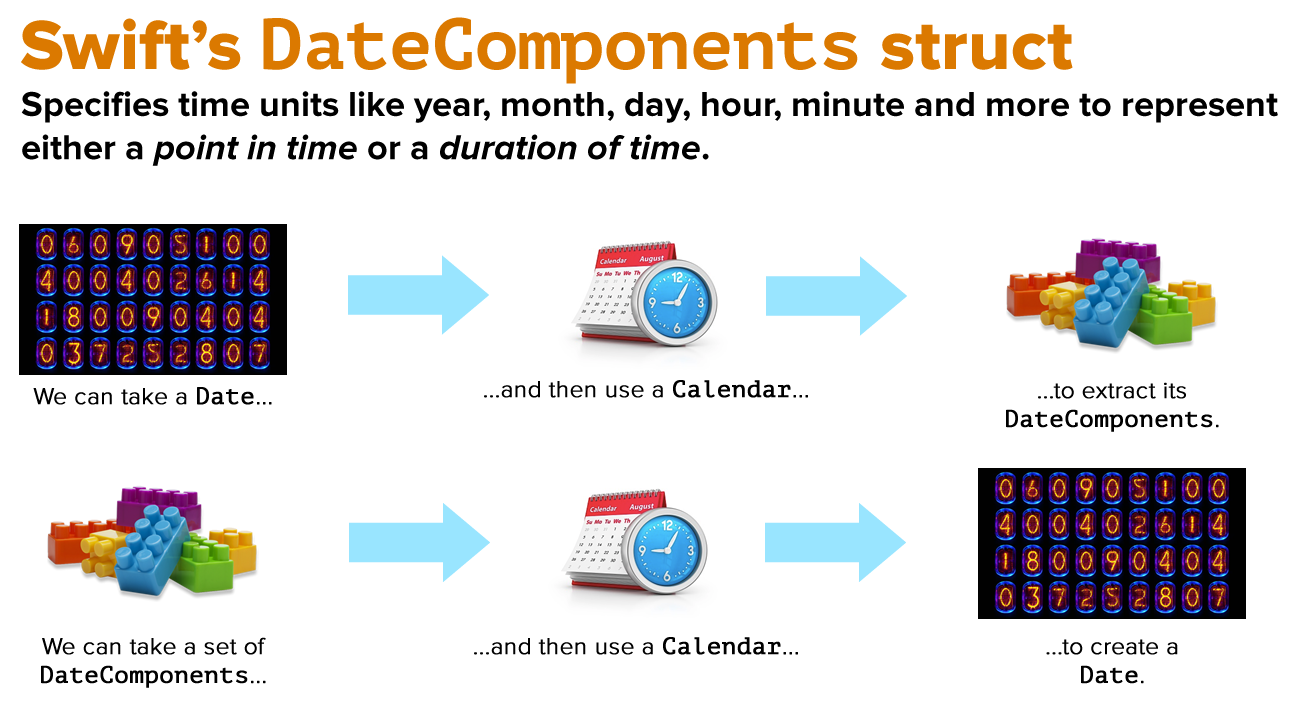
DateComponents specifies time units like year, month, day, hour, minute, and more to represent either a point in time or a duration of time.
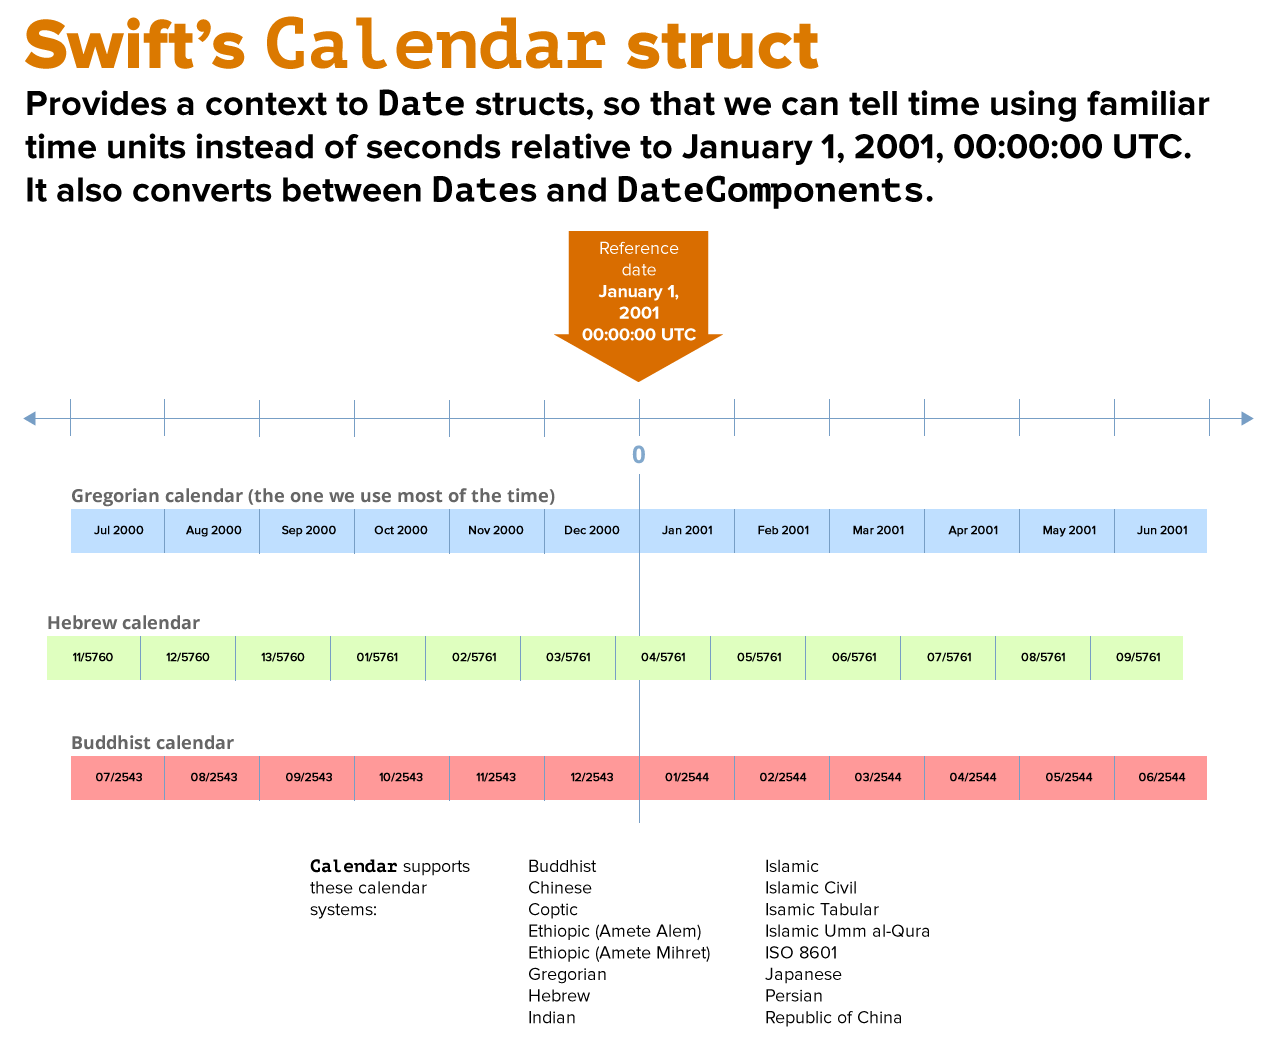
Calendar provides a context for Dates, and converts Dates to DateComponents and DateComponents to Dates.
These structs all deal with the internal representation of dates and times in Swift 5.
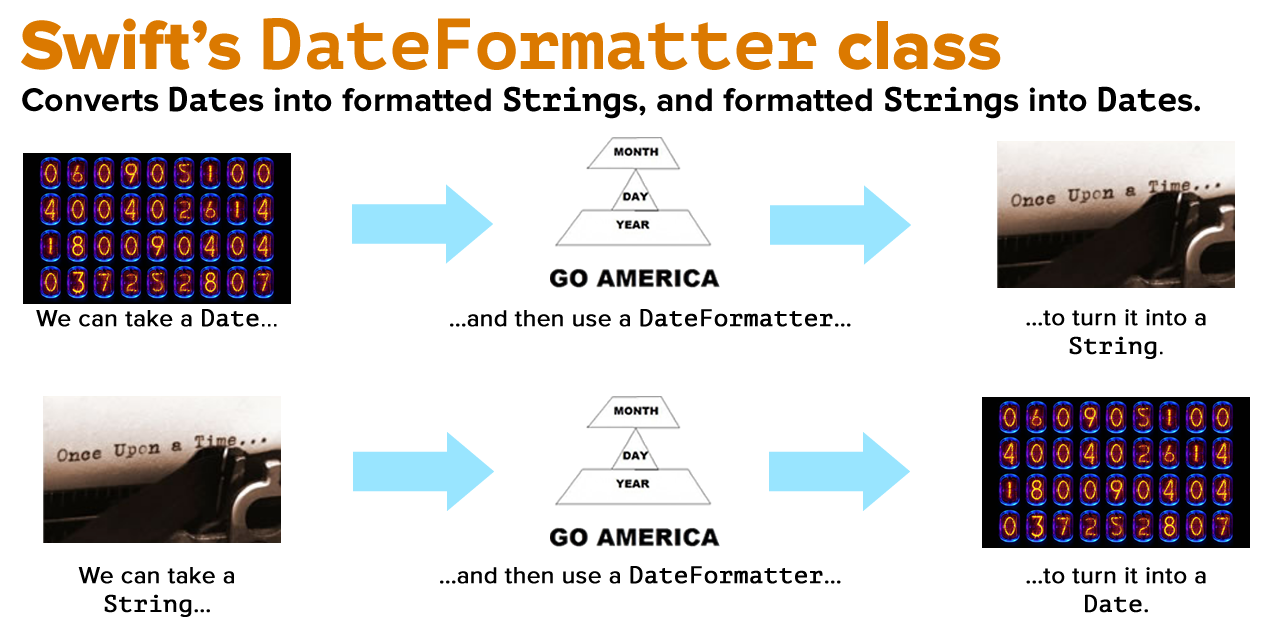
In this article, we’ll look at the DateFormatter class, which allows us to deal with the external representation of dates and times in Swift 5 as strings to be presented to the user. We use this class to convert Dates into formatted Strings that match the user’s language and locale, and properly-formatted Strings into Dates.
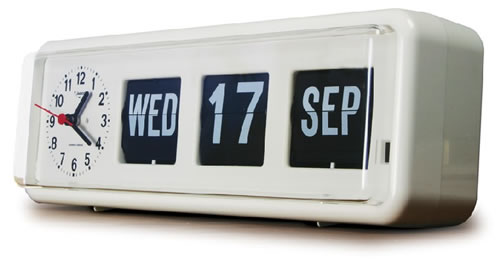
Tap the image to see it at full size.
We’ve already used the Date struct’s description property and description(with:) method to print its value in a human-readable form, but they’re meant for debugging purposes only, and not for presenting date and time information to the user. When presenting dates to the user in string form, use strings that have been created by DateFormatter.
Let’s convert a Date into a String, part 1: Just the date
Start a new playground and enter the following code, which gives us a Date that we can format — June 2, 2014, the day when the Swift programming language was first released:
// The user's calendar incorporates the user's locale and
// time zone settings, which means it's the one you'll use
// most often.
// 1
let userCalendar = Calendar.current

// The Swift programming language was first released on
// June 2, 2014.
// 2
let swiftDebutDateComponents = DateComponents(
  year: 2014,
  month: 6,
  day: 2
)

// 3
let swiftDebutDate = userCalendar.date(from: swiftDebutDateComponents)!
This code is similar to code we entered in the previous article:
Get the user’s current Calendar.
Create a DateComponents struct, swiftDebutDateComponents, providing the year:, month:, and day: parameters that correspond to the date June 2, 2014.
Use the user’s Calendar to create swiftDebutDate using swiftDebutDateComponents.
Let’s try turning this date into a string with a DateFormatter.
Add the following to the playground, then run it:
let myFormatter = DateFormatter()
print("Swift’s debut date, via the DateFormatter: \(myFormatter.string(from: swiftDebutDate))")
The output should look like this:
Swift’s debut date, via the DateFormatter:
You may be surprised that the result is an empty String. That’s because you need to specify a dateStyle, which specifies which pre-defined format should be used for the date. We’ll start with the short style.
If turns out that the default dateStyle is none. Why would there be a dateStyle called .none? I’ll explain in the next section.
Let’s convert a Date into a String, part 2: A date and a time
Let’s create a date and approximate known time: When SwiftUI was announced at WWDC 2019. It’s introduced 2 hours and 8 minutes into a keynote that started at 10:00 a.m. Pacific Daylight Time, so we’ll say it debuted at 12:08 p.m. PDT on June 3, 2019.
Add the following to the playground, then run it:
// SwiftUI was introduced at WWDC 2019 on
// June 3, 2019 at 12:08 p.m. Pacific Daylight Time.
let swiftUIDebutDateComponents = DateComponents(
timeZone: TimeZone(abbreviation: "PDT"),
year: 2019,
month: 6,
day: 3,
hour: 12,
minute: 8
)
let swiftUIDebutDate = userCalendar.date(from: swiftUIDebutDateComponents)!
print("The newly-created date: \(swiftUIDebutDate.description(with: Locale(identifier: "en-US"))).")
On my computer, the output looked like this:
The newly-created date: Monday, June 3, 2019 at 3:08:00 PM Eastern Daylight Time.
The date and time you’ll see will be determined your system calendar settings.
Now that we have a date and time, let’s format it using the dateStyle property to style the date part, and timeStyle property to style the time part.
Add the following to the playground, then run it:
myFormatter.dateStyle = .short
myFormatter.timeStyle = .short
print("Swift’s debut date and time, “short” style: \(myFormatter.string(from: swiftUIDebutDate)).")
myFormatter.dateStyle = .medium
myFormatter.timeStyle = .medium
print("Swift’s debut date and time, “medium” style: \(myFormatter.string(from: swiftUIDebutDate)).")
myFormatter.dateStyle = .long
myFormatter.timeStyle = .long
print("Swift’s debut date and time, “long” style: \(myFormatter.string(from: swiftUIDebutDate)).")
myFormatter.dateStyle = .full
myFormatter.timeStyle = .full
print("Swift’s debut date and time, “full” style: \(myFormatter.string(from: swiftUIDebutDate)).")
On my computer, the output looked like this:
Swift’s debut date and time, “short” style: 6/3/19, 3:08 PM. Swift’s debut date and time, “medium” style: Jun 3, 2019 at 3:08:00 PM. Swift’s debut date and time, “long” style: June 3, 2019 at 3:08:00 PM EDT. Swift’s debut date and time, “full” style: Monday, June 3, 2019 at 3:08:00 PM Eastern Daylight Time.
You can mix and match dateStyle and timeStyle settings. Add the following to the playground, then run it:
myFormatter.dateStyle = .full
myFormatter.timeStyle = .short
print("Swift’s debut date and time, with “full” style date and “short” style time: \(myFormatter.string(from: swiftUIDebutDate)).")
On my computer, the output looked like this:
Swift’s debut date and time, with “full” style date and “short” style time: Monday, June 3, 2019 at 3:08 PM.
Now that we’re working with a date and time, I can tell you what the .none style is for: for suppressing the display of the date or time in a formatted date string.
Add the following to the playground, then run it:
// Show only the time
myFormatter.dateStyle = .none
myFormatter.timeStyle = .medium
print("Swift’s debut time: \(myFormatter.string(from: swiftUIDebutDate)).")
// Show only the date
myFormatter.dateStyle = .full
myFormatter.timeStyle = .none
print("Swift’s debut date: \(myFormatter.string(from: swiftUIDebutDate)).")
Remember that the Date struct represents a single point in time, which has both a date and a time. The .none style for DateFormatter‘s dateStyle and timeStyle properties allows us to create a String representation of a Date that shows only its date or time part.
This table summarizes the different dateStyle and timeStyle settings for the US English language setting:
Setting
dateStyle
timeStyle
.none
[ empty string ]
[ empty string ]
.short
6/3/19
3:08 PM
.medium
Jun 3, 2019
3:08:00 PM
.long
June 3, 2019
3:08:00 PM EDT
.full
Monday, June 3, 2019
3:08:00 PM Eastern Daylight Time
Let’s convert a Date into a String, part 3: Displaying dates and times in other languages
DateFormatter defaults to the user’s preferred language, as specified in their settings. In my case, that’s US English. By setting the locale property of the DateFormatter, I can specify the language for my formatted date strings. Add the following to the playground, then run it:
// We want to see as much of these languages as possible,
// so let’s set both dateStyle and timeStyle to .full.
myFormatter.dateStyle = .full
myFormatter.timeStyle = .full
myFormatter.locale = Locale(identifier: "fr")
print("International French: \(myFormatter.string(from: swiftUIDebutDate)).")
myFormatter.locale = Locale(identifier: "fr-CA")
print("Canadian French: \(myFormatter.string(from: swiftUIDebutDate)).")
myFormatter.locale = Locale(identifier: "hr")
print("Croatian: \(myFormatter.string(from: swiftUIDebutDate)).")
myFormatter.locale = Locale(identifier: "ko_KR")
print("Korean: \(myFormatter.string(from: swiftUIDebutDate)).")
On my computer, the output looked like this:
International French: lundi 3 juin 2019 à 15:08:00 heure d’été de l’Est. Canadian French: lundi 3 juin 2019 à 15:08:00 heure avancée de l’Est. Croatian: ponedjeljak, 3. lipnja 2019. u 15:08:00 (istočno ljetno vrijeme). Korean: 2019년 6월 3일월요일오후 3시 8분 0초미동부하계표준시.
Let’s convert a Date into a String, part 4: Custom date/time formats
In addition to the built-in formats for dates, you can tell DateFormatter to use a custom format.
Before we begin working with custom date/time formats, I should point out that if you need to display a Date as a String to the user, it’s best if you use Swift’s built-in dateStyle and timeStyle values. They display dates and times properly, according to the user’s settings, which include country and language. You’d be surprised how date formats differ from culture to culture, and it’s better to let Swift do the formatting work.
However, there are times when you need to format dates and times in a specific way that doesn’t match the styles provided by DateFormatter’s dateStyle and timeStyle properties, such as when dealing with certain APIs. That’s where DateFormatter’s dateFormat property comes in handy.
To be certain that the DateFormatter will use your custom date format, set its locale property to POSIX, then define the custom date format string in dateFormat.
Add the following to the playground, then run it:
// Setting the locale to POSIX ensures that the user's locale
// won't be used to format the Date.
myFormatter.locale = Locale(identifier: "en_US_POSIX")
// DateFormatter's format string uses the date format specifiers
// spelled out in Unicode Technical Standard #35 (located at
// http://www.unicode.org/reports/tr35/tr35-25.html#Date_Format_Patterns)
myFormatter.dateFormat = "y-MM-dd"
print("Swift’s debut date and time, y-MM-dd format: \(myFormatter.string(from: swiftUIDebutDate)).")
You can use the date format specifiers listed in Appendix F of the Unicode Technical Standard #35 to define the formatting String for the dateFormat property. Here are some examples (Add the following to the playground, then run it):
// DateFormatter's format string uses the date format specifiers
// spelled out in Unicode Technical Standard #35 (located at
// http://www.unicode.org/reports/tr35/tr35-25.html#Date_Format_Patterns)
myFormatter.dateFormat = "y-MM-dd"
print("Swift’s debut date and time, y-MM-dd format: \(myFormatter.string(from: swiftUIDebutDate)).")
myFormatter.dateFormat = "'Year: 'y' Month: 'M' Day: 'd"
print("Swift’s debut date and time, in labeled y M d format: \(myFormatter.string(from: swiftUIDebutDate)).")
myFormatter.dateFormat = "MM/dd/yy"
print("Swift’s debut date and time, MM/dd/yy format: \(myFormatter.string(from: swiftUIDebutDate)).")
myFormatter.dateFormat = "MMM dd, yyyy"
print("Swift’s debut date and time, MMM dd, yyyy format: \(myFormatter.string(from: swiftUIDebutDate)).")
myFormatter.dateFormat = "E MMM dd, yyyy"
print("Swift’s debut date and time, E MMM dd, yyyy format: \(myFormatter.string(from: swiftUIDebutDate)).")
myFormatter.dateFormat = "EEEE, MMMM dd, yyyy' at 'h:mm a"
print("Swift’s debut date and time, EEEE, MMMM dd, yyyy' at 'h:mm a. format: \(myFormatter.string(from: swiftUIDebutDate)).")
myFormatter.dateFormat = "EEEE, MMMM dd, yyyy' at 'h:mm a zzzz"
print("Swift’s debut date and time, EEEE, MMMM dd, yyyy' at 'h:mm a zzzz. format: \(myFormatter.string(from: swiftUIDebutDate)).")
Let’s convert a String into a Date
DateFormatter works the other way — just as it can convert Dates to Strings, it can also convert Strings to Dates. By setting its dateFormat to the format of the String it should expect, you can use its date(from:) method to convert a String into a Date.
// Let’s define the format for date strings we want to parse:
myFormatter.dateFormat = "yyyy/MM/dd hh:mm Z"
// Here's a date in the specified format.
// DateFormatter’s date(from:) method will be able to parse it.
let newDate1 = myFormatter.date(from: "2019/06/03 12:08 -0700")
print("newDate1’s value is: \(newDate1?.description ?? "nil").")
// And here's the same date, but in a different format:
let newDate2 = myFormatter.date(from: "Jun 6, 2019, 12:08 PM PDT")
print("newDate2’s value is: \(newDate2?.description ?? "nil").")
On my computer, the output looked like this:
newDate1’s value is: 2019-06-03 07:08:00 +0000. newDate2’s value is: nil.
Let’s change the dateFormat string and try it again. Add the following to the playground, then run it:
// Let's change the date format strings and try
// date(from:) with the same two strings:
myFormatter.dateFormat = "MMM d, yyyy, hh:mm a zz"
let newDate3 = myFormatter.date(from: "2019/06/03 12:08 -0700")
print("newDate3’s value is: \(newDate3?.description ?? "nil").")
let newDate4 = myFormatter.date(from: "Jun 6, 2019, 12:08 PM PDT")
print("newDate4’s value is: \(newDate4?.description ?? "nil").")
On my computer, the output looked like this:
newDate3’s value is: nil. newDate4’s value is: 2019-06-06 19:08:00 +0000.
If you’re trying to parse a weird date format, use a weird date format string. Add the following to the playground, then run it:
// Don’t forget that you can get weird if you expect to
// parse dates in weird formats!
// (D is the format string for “day of year”, which can be 1...366)
myFormatter.dateFormat = "y 😍 D"
let weirdEmojiDate = myFormatter.date(from: "2020 😍 333")
print("weirdEmojiDate’s value is: \(weirdEmojiDate?.description ?? "nil").")
On my computer, the output looked like this:
weirdEmojiDate’s value is: 2020-11-28 05:00:00 +0000.
Wrapping it all up
Here’s the complete code for the playground containing all the code we just worked with:
import UIKit
// Let’s convert a Date into a String, part 1: Just the date
// =========================================================
// The user's calendar incorporates the user's locale and
// time zone settings, which means it's the one you'll use
// most often.
// 1
let userCalendar = Calendar.current
// The Swift programming language was first released on
// June 2, 2014.
// 2
let swiftDebutDateComponents = DateComponents(
year: 2014,
month: 6,
day: 2
)
// 3
let swiftDebutDate = userCalendar.date(from: swiftDebutDateComponents)!
let myFormatter = DateFormatter()
print("Swift’s debut date, via the DateFormatter: \(myFormatter.string(from: swiftDebutDate))")
// Hey, what gives?
myFormatter.dateStyle = .short
print("Swift’s debut date, “short” style: \(myFormatter.string(from: swiftDebutDate)).")
myFormatter.dateStyle = .medium
print("Swift’s debut date, “medium” style: \(myFormatter.string(from: swiftDebutDate)).")
myFormatter.dateStyle = .long
print("Swift’s debut date, “long” style: \(myFormatter.string(from: swiftDebutDate)).")
myFormatter.dateStyle = .full
print("Swift’s debut date, “full” style: \(myFormatter.string(from: swiftDebutDate)).")
myFormatter.dateStyle = .none
print("Swift’s debut date, “none” style: \(myFormatter.string(from: swiftDebutDate)).")
// Let’s convert a Date into a String, part 2: A date and a time
// =============================================================
// SwiftUI was introduced at WWDC 2019 on
// June 3, 2019 at 12:08 p.m. Pacific Daylight Time.
let swiftUIDebutDateComponents = DateComponents(
timeZone: TimeZone(identifier: "America/Los_Angeles"),
year: 2019,
month: 6,
day: 3,
hour: 12,
minute: 8
)
let swiftUIDebutDate = userCalendar.date(from: swiftUIDebutDateComponents)!
print("The newly-created date: \(swiftUIDebutDate.description(with: Locale(identifier: "en-US"))).")
myFormatter.dateStyle = .short
myFormatter.timeStyle = .short
print("Swift’s debut date and time, “short” style: \(myFormatter.string(from: swiftUIDebutDate)).")

myFormatter.dateStyle = .medium
myFormatter.timeStyle = .medium
print("Swift’s debut date and time, “medium” style: \(myFormatter.string(from: swiftUIDebutDate)).")

myFormatter.dateStyle = .long
myFormatter.timeStyle = .long
print("Swift’s debut date and time, “long” style: \(myFormatter.string(from: swiftUIDebutDate)).")

myFormatter.dateStyle = .full
myFormatter.timeStyle = .full
print("Swift’s debut date and time, “full” style: \(myFormatter.string(from: swiftUIDebutDate)).")
myFormatter.dateStyle = .full
myFormatter.timeStyle = .short
print("Swift’s debut date and time, with “full” style date and “short” style time: \(myFormatter.string(from: swiftUIDebutDate)).")
// Show only the time
myFormatter.dateStyle = .none
myFormatter.timeStyle = .medium
print("Swift’s debut time: \(myFormatter.string(from: swiftUIDebutDate)).")

// Show only the date
myFormatter.dateStyle = .full
myFormatter.timeStyle = .none
print("Swift’s debut date: \(myFormatter.string(from: swiftUIDebutDate)).")
// Let’s convert a Date into a String, part 3: Displaying dates and times in other languages
// =========================================================================================
// We want to see as much of these languages as possible,
// so let’s set both dateStyle and timeStyle to .full.
myFormatter.dateStyle = .full
myFormatter.timeStyle = .full

myFormatter.locale = Locale(identifier: "fr")
print("International French: \(myFormatter.string(from: swiftUIDebutDate)).")

myFormatter.locale = Locale(identifier: "fr-CA")
print("Canadian French: \(myFormatter.string(from: swiftUIDebutDate)).")

myFormatter.locale = Locale(identifier: "hr")
print("Croatian: \(myFormatter.string(from: swiftUIDebutDate)).")

myFormatter.locale = Locale(identifier: "ko_KR")
print("Korean: \(myFormatter.string(from: swiftUIDebutDate)).")
// Let’s convert a Date into a String, part 4: Custom date/time formats
// ====================================================================
// Setting the locale to POSIX ensures that the user's locale
// won't be used to format the Date.
myFormatter.locale = Locale(identifier: "en_US_POSIX")
// DateFormatter's format string uses the date format specifiers
// spelled out in Unicode Technical Standard #35 (located at
// http://www.unicode.org/reports/tr35/tr35-25.html#Date_Format_Patterns)
print("Custom date and time formats:")
myFormatter.dateFormat = "y-MM-dd"
print("Swift’s debut date and time, y-MM-dd format: \(myFormatter.string(from: swiftUIDebutDate)).")
myFormatter.dateFormat = "'Year: 'y' Month: 'M' Day: 'd"
print("Year: y Month: M Day: d format: \(myFormatter.string(from: swiftUIDebutDate)).")
myFormatter.dateFormat = "MM/dd/yy"
print("MM/dd/yy format: \(myFormatter.string(from: swiftUIDebutDate)).")
myFormatter.dateFormat = "MMM dd, yyyy"
print("MMM dd, yyyy format: \(myFormatter.string(from: swiftUIDebutDate)).")
myFormatter.dateFormat = "E MMM dd, yyyy"
print("E MMM dd, yyyy format: \(myFormatter.string(from: swiftUIDebutDate)).")
myFormatter.dateFormat = "EEEE, MMMM dd, yyyy' at 'h:mm a"
print("EEEE, MMMM dd, yyyy' at 'h:mm a. format: \(myFormatter.string(from: swiftUIDebutDate)).")
myFormatter.dateFormat = "EEEE, MMMM dd, yyyy' at 'h:mm a zzzz"
print("EEEE, MMMM dd, yyyy' at 'h:mm a zzzz. format: \(myFormatter.string(from: swiftUIDebutDate)).")
// Let’s convert a String into a Date
// ==================================
// Let’s define the format for date strings we want to parse:
myFormatter.dateFormat = "yyyy/MM/dd hh:mm Z"

// Here's a date in the specified format.
// DateFormatter’s date(from:) method will be able to parse it.
let newDate1 = myFormatter.date(from: "2019/06/03 12:08 -0700")
print("newDate1’s value is: \(newDate1?.description ?? "nil").")

// And here's the same date, but in a different format:
let newDate2 = myFormatter.date(from: "Jun 6, 2019, 12:08 PM PDT")
print("newDate2’s value is: \(newDate2?.description ?? "nil").")
// Let's change the date format strings and try
// date(from:) with the same two strings:
myFormatter.dateFormat = "MMM d, yyyy, hh:mm a zz"

let newDate3 = myFormatter.date(from: "2019/06/03 12:08 -0700")
print("newDate3’s value is: \(newDate3?.description ?? "nil").")

let newDate4 = myFormatter.date(from: "Jun 6, 2019, 12:08 PM PDT")
print("newDate4’s value is: \(newDate4?.description ?? "nil").")
// Don’t forget that you can get weird if you expect to
// parse dates in weird formats!
// (D is the format string for “day of year”, which can be 1...366)
myFormatter.dateFormat = "y 😍 D"
let weirdEmojiDate = myFormatter.date(from: "2020 😍 333")
print("weirdEmojiDate’s value is: \(weirdEmojiDate?.description ?? "nil").")
You can download the playground here (3KB, zipped Xcode playground file).
In the next installment on dates and times in Swift 5, we’ll look at date calculations.
The How to work with dates and times in Swift 5 series
If you’re just getting started with programming dates and times in Swift 5, you probably looked at Apple’s documentation and got confused. Let me reassure you that it isn’t your fault. For starters, Apple’s documentation hasn’t been very good lately, and I’m not the only developer who’s noticed this decline in quality.
There’s also the fact that working with dates and times in Swift 5 seems unnecessarily complicated. If you’ve come to Swift from other programming languages, such as JavaScript, which uses a single object type called Date, the idea of having this set of classes just to handle dates and times looks like overkill:
Tap to view at full size.
I promise you that there’s a method to this madness. The set of structs for working with dates and times in Swift 5 make for a super-flexible system that will let you keep store, calculate, and display dates and times no matter what time zone, calendar system, or language you use.
For example, with Swift, I can easily schedule an appointment for the third Wednesday of July at 3:30 p.m. Pacific and then display that date as it would appear in the Coptic Calendar system in Melbourne, Australia. If you had to do that in JavaScript, the only easy answer is “go away” (there are, of course, some less polite variations of that answer).
This series, Dates and times in Swift 5, will help you make sense of the set of classes that Swift provides for dealing with timekeeping and time calculations. It will do so with a lot of examples and experimentation. I strongly recommend that you fire up Xcode, open a Swift playground, and follow along.
In this article, I’ll show you the following:
The Date struct, which stores date and times in Swift 5.
The Calendar struct, which represents one of 16 different calendar systems, and provides a meaningful context for Dates.
The DateComponents struct, which a collection of date and time components, such as years, months, days, hours, minutes, and so on.
How to create a Date object representing the current date and time.
How to create a Date object representing a given date and time.
How to create a Date object based on criteria such as “the first Friday of June 2020.”
How to extract the parts of a date, such as the year, month, day, time, and so on from a Date object.
The Date struct
Tap to view at full size.
The Date struct is used to represent dates and times in Swift 5, and it’s designed to do so in the most flexible way possible: as a number of seconds relative to the start of the Third Millennium, January 1, 2001, 00:00:00 UTC.
This approach allows Date to be independent of any time zone or any calendar system; you store it as an amount of time before or after the start of the Third Millennium and use other objects (which you’ll see soon) to convert into the appropriate calendar, time zone, and format.
To create a Date object containing the current date and time, simply create an instance of Date using the default, no-argument initializer.
Open a playground in Xcode and add the following:
// To create a Date representing the current date and time,
// simply initialize a new Date.
let now = Date()  // Contains the date and time that this object
                  // was instantiated.
To see the value stored inside the newly created Date object, use Date’s timeIntervalSinceReferenceDate property, which contains the number of seconds since the reference date.
Add the following to the playground, then run it:
// How many seconds have passed between the Date we just created
// and the reference date of January 1, 2001, 00:00:00 UTC?
print("It’s been \(now.timeIntervalSinceReferenceDate) seconds since the start of the Third Millennium.")
When I ran that line of code (just before 9:00 a.m. EDT on Tuesday, May 26, 2020), I got this output: It’s been 612190714.691352 seconds since the start of the Third Millennium.
To see the Date’s value in a more meaningful form, use Date’s description property to see it in “YYYY-MM-DD HH:MM:SS +HHMM” format, or the description(with:) method with a Locale instance to display its value using a specified locale.
Add the following to the playground, then run it:
// Use Date’s description property for debugging
print(now.description)                                      // YYYY-MM-DD HH:MM:SS +HHMM
print(now.description(with: Locale(identifier: "en-US")))   // US English
print(now.description(with: Locale(identifier: "en-GB")))   // UK English*
print(now.description(with: Locale(identifier: "es")))      // Spanish
print(now.description(with: Locale(identifier: "zh-Hans"))) // Simplified Chinese

// * Yes, I know that “gb” means “Great Britain” and that it’s not the same thing
// as the UK. I didn’t come up with these locale names!
To create a Date object containing a date and time that isn’t the current date and time, and without other helper objects, you have to use one of the following initializers:
Date initializer
What it does
Date(timeIntervalSinceNow:)
Creates a Date that is the given number of seconds before or after the current date and time.
Parameters:
timeIntervalSinceNow:The number of seconds before or after the current date and time, expressed as a TimeInterval (which is just a typealias for Double). Positive values denote seconds after the current date and time, negative values denote seconds before the current date and time.
Date(timeIntervalSinceReferenceDate:)
Creates a Date that is the given number of seconds before or after Swift’s reference Date, January 1, 2001 at 00:00:00 UTC.
Parameters:
timeIntervalSinceReferenceDate:The number of seconds before or after the Swift reference date, expressed as a TimeInterval (which is just a typealias for Double). Positive values denote seconds after the reference date, negative values denote seconds before the reference date.
Date(timeIntervalSince1970:)
Creates a Date that is the given number of seconds before or after the Unix Epoch (Unix’s reference date), which is January 1, 1970 at 00:00:00 UTC. This initializer was included for compatibility with Unix systems.
Parameters:
timeIntervalSince1970:The number of seconds before or after the Unix reference date, expressed as a TimeInterval (which is just a typealias for Double). Positive values denote seconds after the reference date, negative values denote seconds before the reference date.
Date(timeInterval:since:)
Creates a Date that is the given number of seconds before or after the given reference date.
Parameters:
timeInterval:The number of seconds before or after the given reference date, expressed as a TimeInterval (which is just a typealias for Double). Positive values denote seconds after the reference date, negative values denote seconds before the reference date.
since: The reference date, expressed as a Date.
Here are some examples showing these initializers in action — add the following to the playground, then run it:
// Date’s other initializers expect arguments of type TimeInterval,
// which is a typealias for Double.

// To create a Date a specified number of seconds before or after
// the current date and time, use the "timeIntervalSinceNow" initializer.
let fiveMinutesAgo = Date(timeIntervalSinceNow: -5 * 60)
let fiveMinutesFromNow = Date(timeIntervalSinceNow: 5 * 60)

// Martin Cooper made the first cellular phone call on April 3, 1973.
// We don't know the exact time the call was made, but it happened
// sometime during business hours in New York City, in the U.S. Eastern
// Time Zone (UTC-5).
//
// Let’s suppose that he made the call at 12:00 p.m.. That would mean that
// he made the call 875,602,800 seconds BEFORE the reference date and time.
let firstCellularCallDate = Date(timeIntervalSinceReferenceDate: -875_602_800)

// The "Stevenote" where the iPhone was introduced started on January 9, 2007,
// 10 a.m. Pacific time (UTC-7), 190,058,400 seconds AFTER the reference date and time.
let iPhoneStevenoteDate = Date(timeIntervalSinceReferenceDate: 190_058_400)

// Unix time (a.k.a. POSIX time or Epoch Time) is the way time is represented
// by Unix, Unix-like, and other operating systems. It defines time as a
// number of seconds after the Unix Epoch, January 1, 1970, 00:00:00 UTC.
// To create a Date relative to the Unix Epoch, use the
// "timeIntervalSince1970" initializer.
let oneYear = TimeInterval(60 * 60 * 24 * 365)
let newYears1971 = Date(timeIntervalSince1970: oneYear)
let newYears1969 = Date(timeIntervalSince1970: -oneYear)

// To create a Date relative to another Date, use the
// "timeInterval:Since:" initializer.
//
// The "Stevenote" where the iPad was introduced started on January 27, 2010,
// 10 a.m. Pacific time (UTC-7), 96,249,600 seconds after the start of the
// iPhone Stevenote three years earlier.
let secondsBetweeniPhoneAndiPadStevenote = TimeInterval(96_249_600)
let iPadStevenoteDate = Date(timeInterval: secondsBetweeniPhoneAndiPadStevenote,
                             since: iPhoneStevenoteDate)
Of course, we don’t think of dates and times in terms of seconds relative to the start of the Third Millennium, or the start of the Unix Epoch, or any other arbitrary date and time. That’s why dates and times in Swift 5 make use of a couple of other structs to help us make sense of Dates: Calendar and DateComponents. Calendars give dates context, and DateComponents let us assemble dates or break dates apart.
The Calendar struct
Tap to view at full size.
Think of the Calendar struct as a way to view Dates in a way that makes more sense to us: not as a number of seconds before or after January 1, 2001 00:00:00 UTC, but in terms of a date in a calendar system.
The Calendar struct supports 16 different calendar systems, including the Gregorian calendar (a.k.a. the Western or Christian calendar), which is likely the one you use the most.
The DateComponents struct
Tap to view at full size.
The DateComponents struct allows us to assemble a point in time or a length of time out of components such as year, month, day, hour, minute, and more. We’ll use DateComponents to construct a Date object using a year, month, day and time, and also deconstruct a Date object into a year, month, day and time.
Consider Swift’s reference date: January 1, 2001 at 00:00:00 UTC. Here are what its components are in various calendar systems:
Calendar
Date components for January 1, 2001 00:00:00 UTC
Gregorian
Year: 2001
Month: 1
Day: 1
Hour: 0
Minute: 0
Hebrew
Year: 5761
Month: 4
Day: 6
Hour: 0
Minute: 0
Buddhist
Year: 2543
Month: 1
Day: 1
Hour: 0
Minute: 0
Let’s use Calendar and DateComponents to make it easier to create Dates.
Creating known Dates with Calendar and DateComponents
// 1
// To translate between Dates and DateComponents, you need a Calendar.
// The user's Calendar is probably the one you’ll use most often,
// as it incorporates the user's locale and time zone settings.
let userCalendar = Calendar.current


// March 10, 1876: The day Alexander Graham Bell
// made the first phone call
// ---------------------------------------------
// 2
// DateComponents' full initializer method is very thorough, but very long.
let firstLandLineCallDateComponents = DateComponents(
  calendar: nil,
  timeZone: TimeZone(secondsFromGMT: -18000),
  era: nil,
  year: 1876,
  month: 3,
  day: 10,
  hour: 13,
  minute: 00,
  second: 00,
  nanosecond: nil,
  weekday: nil,
  weekdayOrdinal: nil,
  quarter: nil,
  weekOfMonth: nil,
  weekOfYear: nil,
  yearForWeekOfYear: nil)

// 3
let firstLandLineCallDate = userCalendar.date(from: firstLandLineCallDateComponents)!

// 4
print("The first land line phone call happened on \(firstLandLineCallDate.description(with: Locale(identifier: "en-US"))).")
print("That’s \(firstLandLineCallDate.timeIntervalSinceReferenceDate) seconds since the start of the Third Millennium.")
In the code, we:
Get the user’s current Calendar.
Create a DateComponents struct, firstLandLineCallDateComponents, providing values for the timeZone:, year:, month:, and day:, hour:, minute:, and second: parameters, and nil for all the others. Bell made the call in his laboratory in Boston, whose time zone is UTC-5. We construct the time zone using the TimeZone(secondsFromGMT:) constructor, which specifies how many seconds the given time zone is ahead or behind UTC (GMT — Greenwich Meridian Time — is the old name for UTC).
Use the user’s Calendar to create firstLandLineCallDate using firstLandLineCallDateComponents.
Print the date of the call using the American English format as well as in terms of seconds since the start of the Third Millennium. Since the call happened over a century before the Third Millennium, this number is negative.
On my computer, the output is:
The first land line phone call happened on Friday, March 10, 1876 at 12:03:58 PM GMT-04:56:02. That’s -3938655600.0 seconds since the start of the Third Millennium.
Let’s create another date: December 9, 1968 at 3:45 p.m. Pacific, when Douglas Englebart changes the world of computing with his demonstration of the GUI, mouse, chording keyboard, hypertext links, and collaborative document editing — a session that would come to be called “The Mother of All Demos.”
Add the following to the playground, then run it:
// December 9, 1968, 3:45 p.m. Pacific Time:
// Douglas Englebart gives “The Mother of All Demos”
// -------------------------------------------------
// This time, we’ll use only the DateComponents initializer parameters we need.
// 1
let motherOfAllDemosDateComponents = DateComponents(
  timeZone: TimeZone(identifier: "America/Los_Angeles"),
  year: 1968,
  month: 12,
  day: 9,
  hour: 15,
  minute: 45
)

// 2
let motherOfAllDemosDate = userCalendar.date(from: motherOfAllDemosDateComponents)!

// 3
print("The Mother of All Demos happened on \(motherOfAllDemosDate.description(with: Locale(identifier: "en-US"))).")
print("That’s \(motherOfAllDemosDate.timeIntervalSince1970) seconds since the start of the Unix Epoch.")
In the code, we:
Create a DateComponents struct, motherOfAllDemosDateComponents, providing values for only the parameters that matter t us: timeZone:, year:, month:, and day:, hour:, and minute:. This time, we construct the time zone using the TimeZone(identifier:) constructor, which specifies the time zone by the appropriate TZ database name.
Use the user’s Calendar (userCalendar, which we’ve already declared) to create motherOfAllDemosDate using motherOfAllDemosDateComponents.
Print the date of the call using the American English format as well as in terms of seconds since the start of the Unix Epoch. Since the call happened a little over a year before the Unix Epoch, this number is negative.
On my computer, the output is:
The Mother of All Demos happened on Monday, December 9, 1968 at 6:45:00 PM GMT-05:00. That’s -33437700.0 seconds since the start of the Unix Epoch.
// April 3, 1973: Martin Cooper makes the first
// cellular phone call
// --------------------------------------------

// 1
var firstCellCallDateComponents = DateComponents()

// 2
firstCellCallDateComponents.year = 1973
firstCellCallDateComponents.month = 4
firstCellCallDateComponents.day = 3
firstCellCallDateComponents.timeZone = TimeZone(abbreviation: "EST")

// 3
let firstCellCallDate = userCalendar.date(from: firstCellCallDateComponents)!
print("Martin Cooper made the first cellular call on \(firstCellCallDate.description(with: Locale(identifier: "en-US"))).")
print("That’s \(firstCellCallDate.timeIntervalSince(motherOfAllDemosDate)) seconds since the Mother of All Demos.")
In the code, we:
Create an empty DateComponents struct, firstCellCallDateComponents. Note that we’re using var instead of let to declare it; that’s because we’re going to set its properties after it’s been declared, and you can’t do that to a struct declared with let.
Set the year, month, and day properties of firstCellCallDateComponents to correspond to the date April 3, 1973 in Eastern Standard Time. This time, we construct the time zone using the TimeZone(abbreviation:) constructor, which specifies the time zone by the appropriate time zone abbreviation.
Use the user’s Calendar to create firstCellCallDate using firstCellCallDateComponents.
On my computer, the output is:
Martin Cooper made the first cellular call on Tuesday, April 3, 1973 at 12:00:00 AM Eastern Standard Time. That’s 136098900.0 seconds since the Mother of All Demos.
Note that in the absence of a specified time, the assumed time is 00:00:00.
Discovering Dates with Calendar and DateComponents
So far, we’ve created Dates based on known dates and times — March 10, 1876, December 9, 1968, and April 3, 1973. How about Dates where we don’t have a specific date, but have enough criteria to specify a date? The great thing about working with dates and times in Swift 5 is that the Calendar class is that it does its best to work with the DateComponents that you give it, and DateComponents gives you all sorts of ways to specify a date.
// The first Friday in June, 2020:
// National Donut Day
// -------------------------------
let donutDay2020Components = DateComponents(
  year: 2020,         // We want a date in 2020,
  month: 6,           // in June.
  weekday: 6,         // We want a Friday;
  weekdayOrdinal: 1   // the first one.
)

let donutDay2020 = userCalendar.date(from: donutDay2020Components)!
print("Donut Day 2020 happens on \(donutDay2020Date.description(with: Locale(identifier: "en-US"))).")
You should be familiar with the year and monthDayComponents properties by now, and we’re using a couple that may be new to you:
weekday: Specifies a day of the week. With the Gregorian calendar, valid values are 1 through 7, where 1 is Sunday, 2 is Monday, 3 is Tuesday, and so on. Since we’re looking for a Friday, we’ve set this value to 6.
weekdayOrdinal: Specifies the order of the given weekday in the next larger specified calendar unit. Since we set weekday to 6 and set this value to 1, and since the next largest specified calendar unit was month, we’ll get the date of the first Friday of the month.
On my computer, the output is:
Donut Day 2020 happens on Friday, June 5, 2020 at 12:00:00 AM Eastern Daylight Time.
Note that in the absence of a specified time zone, the assumed time zone is the system time zone, which in my case is Eastern Daylight Time (UTC-4).
In the spirit of the fake book cover shown above,let’s see what happens when we use Donut Day 2020’s components, except for the month.
Add the following to the playground, then run it:
// Mystery Friday 2020
// -------------------------------
let mysteryFridayDateComponents = DateComponents(
  year: 2020,         // We want a date in 2020:
  weekday: 6,         // A Friday;
  weekdayOrdinal: 1   // the first one.
)

let mysteryFridayDate = userCalendar.date(from: mysteryFridayDateComponents)!
print("Mystery Friday happens on \(mysteryFridayDate.description(with: Locale(identifier: "en-US"))).")
On my computer, the output is:
Mystery Friday happens on Friday, January 3, 2020 at 12:00:00 AM Eastern Standard Time.
That makes sense: By specifying year 2020, weekday 6 and weekday ordinal 1, we just asked for the first Friday of the year.
Suppose you’re meeting up with a friend in Tokyo some relaxing Suntory times at 9:00 p.m. on the Thursday of the 27th week of 2020. What is that date?
The answer comes from this code:
// 9:00 p.m. Tokyo time on the Thursday of the 27th week of 2020
// -------------------------------------------------------------
var relaxingSuntoryTimesDateComponents = DateComponents(
  timeZone: TimeZone(identifier: "Asia/Tokyo")!,
  year: 2020,
  hour: 21,
  weekday: 5,
  weekOfYear: 27
)

let relaxingSuntoryTimesDate = userCalendar.date(from: relaxingSuntoryTimesDateComponents)!
print("Thursday on the 27th week of 2020 at 9:00 p.m. Tokyo time is \(relaxingSuntoryTimesDate.description(with: Locale(identifier: "en-US"))).")
On my computer, the output is:
Thursday on the 27th week of 2020 at 9:00 p.m. Tokyo time is Thursday, July 2, 2020 at 8:00:00 AM Eastern Daylight Time.
Here’s a simple question: What’s the 234th day of 2020?
Add the following to the playground, then run it:
// 234th day of 2020
// -----------------
let day234DateComponents = DateComponents(
  year: 2020,         // We want a date in 2020:
  day: 234            // the 234th day.
)

let day234Date = userCalendar.date(from: day234DateComponents)!
print("The 234th day of 2020 is \(day234Date.description(with: Locale(identifier: "en-US"))).")
On my computer, the output is:
The 234th day of 2020 is Friday, August 21, 2020 at 12:00:00 AM Eastern Daylight Time.
The “Ten Thousand Hour Rule”, which states that it takes 10,000 hours of directed practice to become an expert at something, was popularized by Malcolm Gladwell in his novel Blink. There’s been alotofdebate about the truth of the rule, and we’re going to side-step it to ask a related question: If I set out to get 10,000 hours of non-stop practice starting on midnight of January 1, 2020, when would I be done?
Add the following to the playground, then run it:
// 10000th hour of 2020
// -----------------
let hour10kDateComponents = DateComponents(
  year: 2020,         // We want a date in 2020:
  hour: 10000         // the 10000th hour.
)

let hour10kDate = userCalendar.date(from: hour10kDateComponents)!
print("Your 10,000 hours would complete on \(hour10kDate.description(with: Locale(identifier: "en-US"))).")
On my computer, the output is:
Your 10,000 hours would complete on Saturday, February 20, 2021 at 4:00:00 PM Eastern Standard Time.
In other words, 10,000 hours is longer than a year.
Let’s look at the case of overflow. What happens if you try to create a Date using components that would define the nonsense date September 50th, 2020?
Add the following to the playground, then run it:
// September 50, 2020
// ------------------
var sept50DateComponents = DateComponents(
  year: 2020,
  month: 9,
  day: 50)
let sept50Date = userCalendar.date(from: sept50DateComponents)!
print("September 50, 2020 is actually \(sept50Date.description(with: Locale(identifier: "en-US"))).")
On my computer, the output is:
September 50, 2020 is actually Tuesday, October 20, 2020 at 12:00:00 AM Eastern Daylight Time.
Swift treats these date components as “the start of September, plus 50 days” — September’s 30 days, plus an additional 20 days into October.
Let’s extract DateComponents from a Date, part 1
Now that we’ve created some Dates using DateComponents, let’s do the reverse and extract DateComponents from given Dates. We’ll continue with our playground and use a Date we’ve already created
Let’s extract the year, month, and day from firstLandPhoneCallDate, which corresponds to the date of Alexander Graham Bell’s historic phone call, March 10, 1876:
// We want to extract the year, month, and day from firstLandLineCallDate
let alexanderGrahamBellDateComponents = userCalendar.dateComponents([.year, .month, .day],
                                                                    from: firstLandLineCallDate)
print("The first land line phone call happened \(-firstLandLineCallDate.timeIntervalSinceNow) seconds ago.")
print("Year: \(alexanderGrahamBellDateComponents.year!)")
print("Month: \(alexanderGrahamBellDateComponents.month!)")
print("Day: \(alexanderGrahamBellDateComponents.day!)")
When I ran it on my computer, the output was:
The first land line phone call happened 4550860374.044979 seconds ago. Year: 1876 Month: 3 Day: 10
Let’s extract DateComponents from a Date, part 2
This time, let’s extract the DateComponents from another Date we’d previously defined: The date and time of the “Stevenote” where the original iPhone was first announced:
It happened 190,058,400 seconds after the reference date. For most of us, this is a meaningless figure, so we’ll extract the following DateComponents from this Date:
Year
Month
Day
Hour
Minute
What day of the week it fell on
What week of the year it fell on
Here’s the code:
// The original iPad Stevenote (10 a.m. Pacific time,
// January 27, 2010)
// ----------------------------------------------------
// We want to extract ALL the DateComponents for this date
// in local time for the event (which took place in San Francisco).

let iPadStevenoteDateComponents = pacificCalendar.dateComponents([.calendar,
                                                                  .day,
                                                                  .era,
                                                                  .hour,
                                                                  .minute,
                                                                  .month,
                                                                  .nanosecond,
                                                                  .quarter,
                                                                  .second,
                                                                  .timeZone,
                                                                  .weekday,
                                                                  .weekdayOrdinal,
                                                                  .weekOfMonth,
                                                                  .weekOfYear,
                                                                  .year,
                                                                  .yearForWeekOfYear],
                                                                 from: iPadStevenoteDate)
print("The original iPad Stevenote happened \(-iPadStevenoteDate.timeIntervalSinceNow) seconds ago.")
print("Calendar: \(iPadStevenoteDateComponents.calendar!.identifier)")
print("Day: \(iPadStevenoteDateComponents.day!)")
print("Era: \(iPadStevenoteDateComponents.era!)")
print("Hour: \(iPadStevenoteDateComponents.hour!)")
print("Minute: \(iPadStevenoteDateComponents.minute!)")
print("Month: \(iPadStevenoteDateComponents.month!)")
print("Nanosecond: \(iPadStevenoteDateComponents.nanosecond!)")
print("Quarter: \(iPadStevenoteDateComponents.quarter!)")
print("Second: \(iPadStevenoteDateComponents.second!)")
print("Time zone: \(iPadStevenoteDateComponents.timeZone!)")
print("Weekday: \(iPadStevenoteDateComponents.weekday!)")
print("Weekday ordinal: \(iPadStevenoteDateComponents.weekdayOrdinal!)")
print("Week of month: \(iPadStevenoteDateComponents.weekOfMonth!)")
print("Week of year: \(iPadStevenoteDateComponents.weekOfYear!)")
print("Year: \(iPadStevenoteDateComponents.year!)")
print("Year for week of year: \(iPadStevenoteDateComponents.yearForWeekOfYear!)")
Let’s extract DateComponents from a Date, part 3
Let’s try it again with another key iOS date — the Stevenote where the original iPad was announced:
This time, if you were to ask Swift when this Stevenote took place, it would reply “286,308,000 seconds after the reference date”. Let’s get all the DateComponents for this date:
// The original iPad Stevenote (10 a.m. Pacific time,
// January 27, 2010)
// ----------------------------------------------------
// We want to extract ALL the DateComponents for this date
// in local time for the event (which took place in San Francisco).

let iPadStevenoteDateComponents = pacificCalendar.dateComponents([.calendar,
                                                                  .day,
                                                                  .era,
                                                                  .hour,
                                                                  .minute,
                                                                  .month,
                                                                  .nanosecond,
                                                                  .quarter,
                                                                  .second,
                                                                  .timeZone,
                                                                  .weekday,
                                                                  .weekdayOrdinal,
                                                                  .weekOfMonth,
                                                                  .weekOfYear,
                                                                  .year,
                                                                  .yearForWeekOfYear],
                                                                from: iPadStevenoteDate)
print("The original iPad Stevenote happened \(-iPadStevenoteDate.timeIntervalSinceNow) seconds ago.")
print("Calendar: \(iPadStevenoteDateComponents.calendar!.identifier)")
print("Day: \(iPadStevenoteDateComponents.day!)")
print("Era: \(iPadStevenoteDateComponents.era!)")
print("Hour: \(iPadStevenoteDateComponents.hour!)")
print("Minute: \(iPadStevenoteDateComponents.minute!)")
print("Month: \(iPadStevenoteDateComponents.month!)")
print("Nanosecond: \(iPadStevenoteDateComponents.nanosecond!)")
print("Quarter: \(iPadStevenoteDateComponents.quarter!)")
print("Second: \(iPadStevenoteDateComponents.second!)")
print("Time zone: \(iPadStevenoteDateComponents.timeZone!)")
print("Weekday: \(iPadStevenoteDateComponents.weekday!)")
print("Weekday ordinal: \(iPadStevenoteDateComponents.weekdayOrdinal!)")
print("Week of month: \(iPadStevenoteDateComponents.weekOfMonth!)")
print("Week of year: \(iPadStevenoteDateComponents.weekOfYear!)")
print("Year: \(iPadStevenoteDateComponents.year!)")
print("Year for week of year: \(iPadStevenoteDateComponents.yearForWeekOfYear!)")
When I ran it on my computer, the output was:
The original iPad Stevenote happened 325902655.723246 seconds ago. Calendar: gregorian Day: 27 Era: 1 Hour: 10 Minute: 0 Month: 1 Nanosecond: 0 Quarter: 0 Second: 0 Time zone: America/Los_Angeles (fixed) Weekday: 4 Weekday ordinal: 4 Week of month: 5 Week of year: 5 Year: 2010 Year for week of year: 2010
Let’s take a look at each DateComponents property and what it represents:
Property
Description
calendar
The calendar system for the date represented by this set of DateComponents. We got these DateComponents by converting a Date using a Gregorian Calendar, so in this case, this value is gregorian.
day
The day number of this particular date and time. For January 27, 2010, 18:00:00 UTC, this value is 27.
era
The era for this particular date, which depends on the date’s calendar system. In this case, we’re using the Gregorian calendar, which has two eras:
BCE (a.k.a. BC), represented by the integer value 0
CE (a.k.a. AD), represented by the integer value 1
hour
The hour number of this particular date and time. For January 27, 2010, 18:00:00 UTC, this value is 13, because in my time zone, 18:00:00 UTC is 13:00:00.
minute
The minute number of this particular date and time. For January 27, 2010, 18:00:00 UTC, this value is 0.
month
The month number of this particular date and time. For January 27, 2010, 18:00:00 UTC, this value is 1.
nanosecond
The nanosecond number of this particular date and time. For January 27, 2010, 18:00:00 UTC, this value is 0.
quarter
The quarter number of this particular date and time. January 27, 2010, 18:00:00 UTC, is in the first quarter of the year, so this value is 0.
second
The second number of this particular date and time. For January 27, 2010, 18:00:00 UTC, this value is 0.
timeZone
The time zone of this particular date and time. I’m in the UTC-5 time zone (US Eastern), so this value is set to that time zone.
weekday
The day of the week of this particular date and time. In the Gregorian calendar, Sunday is 1, Monday is 2, Tuesday is 3, and so on. January 27, 2010, was a Wednesday, so this value is 4.
weekdayOrdinal
The position of the weekday within the next larger specified calendar unit, which in this case is a month. So this specifies nth weekday of the given month. Jauary 27, 2010 was on the 4th Wednesday of the month, so this value is 4.
weekOfMonth
The week of the month of this particular date and time. January 27, 2010 fell on the 5th week of January 2010, so this value is 5.
weekOfYear
The week of the year of this particular date and time. January 27, 2010 fell on the 5th week of 2010, so this value is 5.
year
The year number of this particular date and time. For January 27, 2010, 18:00:00 UTC, this value is 2010.
Here’s the complete code for the playground containing all the code we just worked with while learning about dates and times in Swift 5:
import UIKit

// To create a Date representing the current date and time,
// simply initialize a new Date.
let now = Date()  // Contains the date and time that this object
                  // was instantiated.

// How many seconds have passed between the Date we just created
// and the reference date of January 1, 2001, 00:00:00 UTC?
print("It’s been \(now.timeIntervalSinceReferenceDate) seconds since the start of the Third Millennium.")


// Use Date’s description property for debugging
print(now.description)                                      // YYYY-MM-DD HH:MM:SS +HHMM
print(now.description(with: Locale(identifier: "en-US")))   // US English
print(now.description(with: Locale(identifier: "en-GB")))   // UK English*
print(now.description(with: Locale(identifier: "es")))      // Spanish
print(now.description(with: Locale(identifier: "zh-Hans"))) // Simplified Chinese

// * Yes, I know that “gb” means “Great Britain” and that it’s not the same thing
// as the UK. I didn’t come up with these locale names!


// Date’s other initializers expect arguments of type TimeInterval,
// which is a typealias for Double.

// To create a Date a specified number of seconds before or after
// the current date and time, use the "timeIntervalSinceNow" initializer.
let fiveMinutesAgo = Date(timeIntervalSinceNow: -5 * 60)
let fiveMinutesFromNow = Date(timeIntervalSinceNow: 5 * 60)

// Martin Cooper made the first cellular phone call on April 3, 1973.
// We don't know the exact time the call was made, but it happened
// sometime during business hours in New York City, in the U.S. Eastern
// Time Zone (UTC-5).
//
// Let’s suppose that he made the call at 12:00 p.m.. That would mean that
// he made the call 875,602,800 seconds BEFORE the reference date and time.
let firstCellularCallDate = Date(timeIntervalSinceReferenceDate: -875_602_800)

// The "Stevenote" where the iPhone was introduced started on January 9, 2007,
// 10 a.m. Pacific time (UTC-7), 190,058,400 seconds AFTER the reference date and time.
let iPhoneStevenoteDate = Date(timeIntervalSinceReferenceDate: 190_058_400)

// Unix time (a.k.a. POSIX time or Epoch Time) is the way time is represented
// by Unix, Unix-like, and other operating systems. It defines time as a
// number of seconds after the Unix Epoch, January 1, 1970, 00:00:00 UTC.
// To create a Date relative to the Unix Epoch, use the
// "timeIntervalSince1970" initializer.
let oneYear = TimeInterval(60 * 60 * 24 * 365)
let newYears1971 = Date(timeIntervalSince1970: oneYear)
let newYears1969 = Date(timeIntervalSince1970: -oneYear)

// To create a Date relative to another Date, use the
// "timeInterval:Since:" initializer.
//
// The "Stevenote" where the iPad was introduced started on January 27, 2010,
// 10 a.m. Pacific time (UTC-7), 96,249,600 seconds after the start of the
// iPhone Stevenote three years earlier.
let secondsBetweeniPhoneAndiPadStevenote = TimeInterval(96_249_600)
let iPadStevenoteDate = Date(timeInterval: secondsBetweeniPhoneAndiPadStevenote,
                             since: iPhoneStevenoteDate)


// To translate between Dates and DateComponents, you need a Calendar.
// The user's Calendar is probably the one you’ll use most often,
// as it incorporates the user's locale and time zone settings.
let userCalendar = Calendar.current


// March 10, 1876: The day Alexander Graham Bell
// made the first phone call in Boston (UTC-5)
// ---------------------------------------------
// DateComponents' full initializer method is very thorough, but very long.
let firstLandLineCallDateComponents = DateComponents(
  calendar: nil,
  timeZone: TimeZone(secondsFromGMT: -18000),
  era: nil,
  year: 1876,
  month: 3,
  day: 10,
  hour: 12,
  minute: 00,
  second: 00,
  nanosecond: nil,
  weekday: nil,
  weekdayOrdinal: nil,
  quarter: nil,
  weekOfMonth: nil,
  weekOfYear: nil,
  yearForWeekOfYear: nil)

let firstLandLineCallDate = userCalendar.date(from: firstLandLineCallDateComponents)!
print("The first land line phone call happened on \(firstLandLineCallDate.description(with: Locale(identifier: "en-US"))).")
print("That’s \(firstLandLineCallDate.timeIntervalSinceReferenceDate) seconds since the start of the Third Millennium.")


// December 9, 1968, 3:45 p.m. Pacific Time:
// Douglas Englebart gives “The Mother of All Demos”
// -------------------------------------------------
// This time, we’ll use only the DateComponents initializer parameters we need.
let motherOfAllDemosDateComponents = DateComponents(
  timeZone: TimeZone(identifier: "America/Los_Angeles"),
  year: 1968,
  month: 12,
  day: 9,
  hour: 15,
  minute: 45
)

let motherOfAllDemosDate = userCalendar.date(from: motherOfAllDemosDateComponents)!
print("The Mother of All Demos happened on \(motherOfAllDemosDate.description(with: Locale(identifier: "en-US"))).")
print("That’s \(motherOfAllDemosDate.timeIntervalSince1970) seconds since the start of the Unix Epoch.")


// April 3, 1973: Martin Cooper makes the first
// cellular phone call
// --------------------------------------------
var firstCellCallDateComponents = DateComponents()
firstCellCallDateComponents.year = 1973
firstCellCallDateComponents.month = 4
firstCellCallDateComponents.day = 3
firstCellCallDateComponents.timeZone = TimeZone(abbreviation: "EST")

let firstCellCallDate = userCalendar.date(from: firstCellCallDateComponents)!
print("Martin Cooper made the first cellular call on \(firstCellCallDate.description(with: Locale(identifier: "en-US"))).")
print("That’s \(firstCellCallDate.timeIntervalSince(motherOfAllDemosDate)) seconds since the Mother of All Demos.")


// The first Friday in June, 2020:
// National Donut Day
// -------------------------------
let donutDay2020DateComponents = DateComponents(
  year: 2020,         // We want a date in 2020,
  month: 6,           // in June.
  weekday: 6,         // We want a Friday;
  weekdayOrdinal: 1   // the first one.
)

let donutDay2020Date = userCalendar.date(from: donutDay2020DateComponents)!
print("Donut Day 2020 happens on \(donutDay2020Date.description(with: Locale(identifier: "en-US"))).")


// Mystery Friday 2020
// -------------------------------
let mysteryFridayDateComponents = DateComponents(
  year: 2020,         // We want a date in 2020:
  weekday: 6,         // A Friday;
  weekdayOrdinal: 1   // the first one.
)

let mysteryFridayDate = userCalendar.date(from: mysteryFridayDateComponents)!
print("Mystery Friday happens on \(mysteryFridayDate.description(with: Locale(identifier: "en-US"))).")


// 9:00 p.m. Tokyo time on the Thursday of the 27th week of 2020
// -------------------------------------------------------------
var relaxingSuntoryTimesDateComponents = DateComponents(
  timeZone: TimeZone(identifier: "Asia/Tokyo")!,
  year: 2020,
  hour: 21,
  weekday: 5,
  weekOfYear: 27
)

let relaxingSuntoryTimesDate = userCalendar.date(from: relaxingSuntoryTimesDateComponents)!
print("Thursday on the 27th week of 2020 at 9:00 p.m. Tokyo time is \(relaxingSuntoryTimesDate.description(with: Locale(identifier: "en-US"))).")


// 234th day of 2020
// -----------------
let day234DateComponents = DateComponents(
  year: 2020,         // We want a date in 2020:
  day: 234            // the 234th day.
)

let day234Date = userCalendar.date(from: day234DateComponents)!
print("The 234th day of 2020 is \(day234Date.description(with: Locale(identifier: "en-US"))).")


// 10000th hour of 2020
// -----------------
let hour10kDateComponents = DateComponents(
  year: 2020,         // We want a date in 2020:
  hour: 10000         // the 10000th hour.
)

let hour10kDate = userCalendar.date(from: hour10kDateComponents)!
print("Your 10,000 hours would complete on \(hour10kDate.description(with: Locale(identifier: "en-US"))).")


// September 50, 2020
// ------------------
var sept50DateComponents = DateComponents(
  year: 2020,
  month: 9,
  day: 50)
let sept50Date = userCalendar.date(from: sept50DateComponents)!
print("September 50, 2020 is actually \(sept50Date.description(with: Locale(identifier: "en-US"))).")


// Date of the first land line phone call (March 10, 1876)
// -------------------------------------------------------
// We want to extract the year, month, and day
let alexanderGrahamBellDateComponents = userCalendar.dateComponents([.year, .month, .day],
                                                                    from: firstLandLineCallDate)
print("The first land line phone call happened \(-firstLandLineCallDate.timeIntervalSinceNow) seconds ago.")
print("Year: \(alexanderGrahamBellDateComponents.year!)")
print("Month: \(alexanderGrahamBellDateComponents.month!)")
print("Day: \(alexanderGrahamBellDateComponents.day!)")


// The original iPhone Stevenote (10 a.m. Pacific time,
// January 9, 2007)
// ----------------------------------------------------
// We want to extract the year, month, day, hour, and minute from this date,
// in local time for the event (which took place in San Francisco).
// We also want to know what day of the week and week of the year
// this date fell on.

// Create a calendar set to Pacific standard time (UTC-8)
var pacificCalendar = Calendar(identifier: .gregorian)
pacificCalendar.timeZone = TimeZone(abbreviation: "PST")!

let iPhoneStevenoteDateComponents = pacificCalendar.dateComponents([.year,
                                                                 .month,
                                                                 .day,
                                                                 .hour,
                                                                 .minute,
                                                                 .weekday,
                                                                 .weekOfYear],
                                                                from: iPhoneStevenoteDate)
print("The original iPhone Stevenote happened \(-iPhoneStevenoteDate.timeIntervalSinceNow) seconds ago.")
print("Year: \(iPhoneStevenoteDateComponents.year!)")
print("Month: \(iPhoneStevenoteDateComponents.month!)")
print("Day: \(iPhoneStevenoteDateComponents.day!)")
print("Hour: \(iPhoneStevenoteDateComponents.hour!)")
print("Minute: \(iPhoneStevenoteDateComponents.minute!)")
print("Weekday: \(iPhoneStevenoteDateComponents.weekday!)")
print("Week of year: \(iPhoneStevenoteDateComponents.weekOfYear!)")


// The original iPad Stevenote (10 a.m. Pacific time,
// January 27, 2010)
// ----------------------------------------------------
// We want to extract ALL the DateComponents for this date
// in local time for the event (which took place in San Francisco).

let iPadStevenoteDateComponents = pacificCalendar.dateComponents([.calendar,
                                                                  .day,
                                                                  .era,
                                                                  .hour,
                                                                  .minute,
                                                                  .month,
                                                                  .nanosecond,
                                                                  .quarter,
                                                                  .second,
                                                                  .timeZone,
                                                                  .weekday,
                                                                  .weekdayOrdinal,
                                                                  .weekOfMonth,
                                                                  .weekOfYear,
                                                                  .year,
                                                                  .yearForWeekOfYear],
                                                                 from: iPadStevenoteDate)
print("The original iPad Stevenote happened \(-iPadStevenoteDate.timeIntervalSinceNow) seconds ago.")
print("Calendar: \(iPadStevenoteDateComponents.calendar!.identifier)")
print("Day: \(iPadStevenoteDateComponents.day!)")
print("Era: \(iPadStevenoteDateComponents.era!)")
print("Hour: \(iPadStevenoteDateComponents.hour!)")
print("Minute: \(iPadStevenoteDateComponents.minute!)")
print("Month: \(iPadStevenoteDateComponents.month!)")
print("Nanosecond: \(iPadStevenoteDateComponents.nanosecond!)")
print("Quarter: \(iPadStevenoteDateComponents.quarter!)")
print("Second: \(iPadStevenoteDateComponents.second!)")
print("Time zone: \(iPadStevenoteDateComponents.timeZone!)")
print("Weekday: \(iPadStevenoteDateComponents.weekday!)")
print("Weekday ordinal: \(iPadStevenoteDateComponents.weekdayOrdinal!)")
print("Week of month: \(iPadStevenoteDateComponents.weekOfMonth!)")
print("Week of year: \(iPadStevenoteDateComponents.weekOfYear!)")
print("Year: \(iPadStevenoteDateComponents.year!)")
print("Year for week of year: \(iPadStevenoteDateComponents.yearForWeekOfYear!)")
You can download the playground here (14KB, zipped Xcode playground file).
In the next installment in the How to work with dates and times in Swift 5 series, we’ll look at converting Dates to Strings, and vice versa.
In my last article, I posted this graphic, which uses emoji to make it easier to understand what the map, filter, and reduce functions do:
Since then, I’ve been asked by a couple of friends if what’s in the graphic is just pseudocode or if it could actually be implemented. I told them it was the latter, and here’s my implementation in Swift:
// Map

func cook(_ item: String) -> String {
  let cookupTable = [
    "🐮": "🍔", // Cow face -> burger
    "🐄": "🍔", // Cow -> burger
    "🐂": "🍖", // Ox -> meat on bone
    "🐷": "🍖", // Pig face -> meat on bone
    "🐽": "🍖", // Pig nose -> meat on bone
    "🐖": "🍖", // Pig -> meat on bone
    "🐑": "🍖", // Sheep -> meat on bone
    "🐐": "🍖", // Goat -> meat on bone
    "🐔": "🍗", // Chicken -> poultry leg
    "🦃": "🍗", // Turkey -> poultry leg
    "🐸": "🍗", // Frog  -> poultry leg (no frog leg emoji...yet)
    "🐟": "🍣", // Fish -> sushi
    "🐠": "🍣", // Tropical fish -> sushi
    "🐡": "🍣", // Blowfish -> sushi
    "🐙": "🍣", // Octopus -> sushi
    "🍠": "🍟", // (Sweet) potato -> French fries
    "🌽": "🍿", // Corn -> popcorn
    "🌾": "🍚", // Rice -> cooked rice
    "🍓": "🍰", // Strawberry -> shortcake
    "🍂": "🍵", // Dried leaves -> tea
  ]
  if let cookedFood = cookupTable[item] {
    return cookedFood
  }
  else {
    return "🍽" // Empty plate
  }
}

let cookedFood = ( ["🐮", "🍠", "⚽️", "🐔", "🌽"].map { cook($0) } )
// cookedFood == ["🍔", "🍟", "🍽", "🍗", "🍿"]


// Filter

func isVegetarian(_ item: String) -> Bool {
  let vegetarianDishes = Set([
    "🍟", // French fries
    "🍿", // Popcorn
    "🍚", // Cooked rice
    "🍰", // Shortcake
    "🍵", // Tea
  ])
  return vegetarianDishes.contains(item)
}

let meatFree = ["🍔", "🍖", "🍟", "🍽", "🍗", "🍿", "🍰"].filter { isVegetarian($0) }
// meatFree == ["🍟", "🍿", "🍰"]


// Reduce

func eat(_ previous: String, _ current: String) -> String {
  let qualifyingFood = Set([
    "🍔", // Burger
    "🍖", // Meat on bone
    "🍗", // Poultry leg
    "🍣", // Sushi
    "🍟", // French fries
    "🍿", // Popcorn
    "🍚", // Cooked rice
    "🍰", // Shortcake
  ])
  if (previous == "" || previous == "💩") && qualifyingFood.contains(current) {
    return "💩" // Poop
  }
  else {
    return ""
  }
}

let aftermath = ["🍔", "🍟", "🍗", "🍿"].reduce("", combine: eat)
// aftermath == "💩"
The maximum number of characters that a text field will accept
The only characters that can be entered into a text field
The only characters that can’t be entered into a text field
I’m already using that material in a couple of projects, and I think you’ll find it handy, too. Check it out!
And now, the original article…
Constraining text fields
Click the image to see it at full size.
Update, August 26, 2015: I’ve updated this article so that its code works with Swift 2. It compiles under the latest version of Xcode 7, beta 6.
A little while back, I published an article that covered constraining text fields so that they accepted only values that evaluated to numeric ones, and limited them to a specified maximum number of characters (don’t bother looking for it; it redirects to this article now). This article expands and improves on it by showing you how to create iOS text fields that:
accept only numeric values,
accept only characters that appear in a specified string,
accept any characters except those that appear in a specified string, and
A text field that accepts only vowel characters (upper- and lowercase), and no more than 6 of them.
A text field that accepts any character except vowels, and no more than 8 of them.
A text field that accepts digits only, and no more than 3 of them.
A text field that accepts only numeric values, as long as they’re 7 characters or fewer in length. Note that this field allows numbers in scientific notation.
A text field that accepts only positive integers up to 5 characters in length.
In this article, I’ll walk you through the app and show you how to create your own constrained text fields in iOS. Better still, I’ll give you the project files so that you can experiment with the app.
Cut to the code (and the storyboard, too)!
Before we get into the explanations, let me cut to the chase and just give you the code.
For the purposes of discussing constrained text fields, we need to consider only two files:
The view controller, ViewController.swift, and
a set of string utility methods contained in StringUtils.swift.
Here’s ViewController.swift:
//
//  ViewController.swift
//

import UIKit

class ViewController: UIViewController, UITextFieldDelegate {

  // MARK: Outlets

  @IBOutlet weak var vowelsOnlyTextField: UITextField!
  @IBOutlet weak var noVowelsTextField: UITextField!
  @IBOutlet weak var digitsOnlyTextField: UITextField!
  @IBOutlet weak var numericOnlyTextField: UITextField!
  @IBOutlet weak var positiveIntegersOnlyTextField: UITextField!


  // MARK: View events and related methods

  override func viewDidLoad() {
    super.viewDidLoad()
    initializeTextFields()
  }

  // Designate this class as the text fields' delegate
  // and set their keyboards while we're at it.
  func initializeTextFields() {
    vowelsOnlyTextField.delegate = self
    vowelsOnlyTextField.keyboardType = UIKeyboardType.ASCIICapable

    noVowelsTextField.delegate = self
    noVowelsTextField.keyboardType = UIKeyboardType.ASCIICapable

    digitsOnlyTextField.delegate = self
    digitsOnlyTextField.keyboardType = UIKeyboardType.NumberPad

    numericOnlyTextField.delegate = self
    numericOnlyTextField.keyboardType = UIKeyboardType.NumbersAndPunctuation

    positiveIntegersOnlyTextField.delegate = self
    positiveIntegersOnlyTextField.keyboardType = UIKeyboardType.DecimalPad
  }

  override func didReceiveMemoryWarning() {
    super.didReceiveMemoryWarning()
  }

  // Tap outside a text field to dismiss the keyboard
  // ------------------------------------------------
  // By changing the underlying class of the view from UIView to UIControl,
  // the view can respond to events, including Touch Down, which is
  // wired to this method.
  @IBAction func userTappedBackground(sender: AnyObject) {
    view.endEditing(true)
  }


  // MARK: UITextFieldDelegate events and related methods

  func textField(textField: UITextField,
                 shouldChangeCharactersInRange range: NSRange,
                 replacementString string: String)
       -> Bool
  {
    // We ignore any change that doesn't add characters to the text field.
    // These changes are things like character deletions and cuts, as well
    // as moving the insertion point.
    //
    // We still return true to allow the change to take place.
    if string.characters.count == 0 {
      return true
    }

    // Check to see if the text field's contents still fit the constraints
    // with the new content added to it.
    // If the contents still fit the constraints, allow the change
    // by returning true; otherwise disallow the change by returning false.
    let currentText = textField.text ?? ""
    let prospectiveText = (currentText as NSString).stringByReplacingCharactersInRange(range, withString: string)

    switch textField {

      // Allow only upper- and lower-case vowels in this field,
      // and limit its contents to a maximum of 6 characters.
      case vowelsOnlyTextField:
        return prospectiveText.containsOnlyCharactersIn("aeiouAEIOU") &&
               prospectiveText.characters.count <= 6

      // Allow any characters EXCEPT upper- and lower-case vowels in this field,
      // and limit its contents to a maximum of 8 characters.
      case noVowelsTextField:
        return prospectiveText.doesNotContainCharactersIn("aeiouAEIOU") &&
               prospectiveText.characters.count <= 8

      // Allow only digits in this field,
      // and limit its contents to a maximum of 3 characters.
      case digitsOnlyTextField:
        return prospectiveText.containsOnlyCharactersIn("0123456789") &&
               prospectiveText.characters.count <= 3

      // Allow only values that evaluate to proper numeric values in this field,
      // and limit its contents to a maximum of 7 characters.
      case numericOnlyTextField:
        return prospectiveText.isNumeric() &&
               prospectiveText.characters.count <= 7

      // In this field, allow only values that evalulate to proper numeric values and
      // do not contain the "-" and "e" characters, nor the decimal separator character
      // for the current locale. Limit its contents to a maximum of 5 characters.
      case positiveIntegersOnlyTextField:
        let decimalSeparator = NSLocale.currentLocale().objectForKey(NSLocaleDecimalSeparator) as! String
        return prospectiveText.isNumeric() &&
               prospectiveText.doesNotContainCharactersIn("-e" + decimalSeparator) &&
               prospectiveText.characters.count <= 5

      // Do not put constraints on any other text field in this view
      // that uses this class as its delegate.
      default:
        return true
    }

  }

  // Dismiss the keyboard when the user taps the "Return" key or its equivalent
  // while editing a text field.
  func textFieldShouldReturn(textField: UITextField) -> Bool {
    textField.resignFirstResponder()
    return true;
  }

}
I gave the outlets for the text fields sensible names, but I thought that it might be helpful to show you an annotated storyboard that points out which outlet belongs to which text field:
The code in the view controller calls on some string utility methods that I decided to put into their own module: the StringUtils.swift file:
//
//  StringUtils.swift
//

import Foundation

extension String {

  // Returns true if the string has at least one character in common with matchCharacters.
  func containsCharactersIn(matchCharacters: String) -> Bool {
    let characterSet = NSCharacterSet(charactersInString: matchCharacters)
    return self.rangeOfCharacterFromSet(characterSet) != nil
  }

  // Returns true if the string contains only characters found in matchCharacters.
  func containsOnlyCharactersIn(matchCharacters: String) -> Bool {
    let disallowedCharacterSet = NSCharacterSet(charactersInString: matchCharacters).invertedSet
    return self.rangeOfCharacterFromSet(disallowedCharacterSet) == nil
  }

  // Returns true if the string has no characters in common with matchCharacters.
  func doesNotContainCharactersIn(matchCharacters: String) -> Bool {
    let characterSet = NSCharacterSet(charactersInString: matchCharacters)
    return self.rangeOfCharacterFromSet(characterSet) == nil
  }

  // Returns true if the string represents a proper numeric value.
  // This method uses the device's current locale setting to determine
  // which decimal separator it will accept.
  func isNumeric() -> Bool
  {
    let scanner = NSScanner(string: self)

    // A newly-created scanner has no locale by default.
    // We'll set our scanner's locale to the user's locale
    // so that it recognizes the decimal separator that
    // the user expects (for example, in North America,
    // "." is the decimal separator, while in many parts
    // of Europe, "," is used).
    scanner.locale = NSLocale.currentLocale()

    return scanner.scanDecimal(nil) && scanner.atEnd
  }

}
Let’s take a closer look at the code…
The delegate pattern and text fields
The delegate pattern in general
The Delegate pattern is a fundamental part of iOS app development. You’ll encounter it often when programming user interfaces, including those times when you want to your program to react to what the user does with text fields.
The delegate pattern involves two categories of object:
A delegator, which needs to perform a task, but doesn’t have some needed information, resources, or logic to do so. It gets that needed information, resources, or logic from…
A delegate. While it typically can’t do what the delegator does, it has the information, resources, or logic that the delegator needs to perform its task.
My pet analogy for the delegate pattern is pictured above: an airplane and air traffic control. Unlike the driver of a car, who’s controlled only by traffic signals and pretty much free to choose any destination and route s/he pleases, the pilot of a plane has to delegate a lot of those choices to air traffic control. The airplane, which does the actual flying, is the delegator, and air traffic control, which gives clearance for takeoff and landing and tells the plane the heading, speed, and altitude at which it should fly, is the delegate.
The delegate pattern in iOS
If you look at the delegate pattern in Wikipedia, you’ll see that there are a number of ways to implement it. Here’s how it’s done in iOS (and Cocoa), whether you’re doing it in Objective-C or Swift:
There are three things in play:
The delegator, which keeps a reference to the delegate, which will end up having the task delegated to it,
The delegate, which implements the methods and properties used to accomplish the delegated task, and
The protocol, which connects the delegator and delegate by:
giving the delegator a way to send messages to the delegate, and
giving the delegate a way to perform actions on behalf of the delegator.
The delegate pattern with iOS’ text fields
Let’s make the above diagram a little more specific and talk about delegation in terms of iOS’ text fields:
iOS text fields — that is, instances of the UITextField class — participate in a delegate pattern as delegators. They’ve got the power to control what happens when the user starts and stops editing their contents and what characters can be typed into them, but they offload the logic that handles those tasks to another object: the delegate.
A specific protocol, the UITextFieldDelegate protocol, connects the text field and its delegate together. A protocol is simply a set of declarations of class members — instance properties, instance methods, type methods, operators, and subscripts. These instance properties, instance methods, type methods, operators, and subscripts are implemented in the delegate (implementing a protocol’s members is called adopting the protocol), and the delegator calls on these implemented members.
The protocol: UITextFieldDelegate
Let’s look at the UITextFieldDelegate protocol. You can actually check it out for yourself; the simplest way is to control-click or right-click on any occurrence of UITextField in your code and then click on Jump to Definition in the contextual menu that appears:
You’ll be taken to UITextField.h, a header file that allows Swift to connect to the Objective-C code on which UITextField is built. It contains the declarations for all the publicly-accessible parts of UITextField, including the UITextFieldDelegate protocol. You’ll find it near the end of the file. I’ve reproduced it below:
protocol UITextFieldDelegate : NSObjectProtocol {

    optional func textFieldShouldBeginEditing(textField: UITextField) -> Bool // return NO to disallow editing.
    optional func textFieldDidBeginEditing(textField: UITextField) // became first responder
    optional func textFieldShouldEndEditing(textField: UITextField) -> Bool // return YES to allow editing to stop and to resign first responder status. NO to disallow the editing session to end
    optional func textFieldDidEndEditing(textField: UITextField) // may be called if forced even if shouldEndEditing returns NO (e.g. view removed from window) or endEditing:YES called

    optional func textField(textField: UITextField, shouldChangeCharactersInRange range: NSRange, replacementString string: String) -> Bool // return NO to not change text

    optional func textFieldShouldClear(textField: UITextField) -> Bool // called when clear button pressed. return NO to ignore (no notifications)
    optional func textFieldShouldReturn(textField: UITextField) -> Bool // called when 'return' key pressed. return NO to ignore.
}
The delegate: ViewController
In order to become a delegate, a class has to adopt the protocol. If you’re familiar with languages like C# and Java, “adopting a protocol” is similar to “implementing an interface”: we add the protocol to a class’ definition, as if we’re inheriting it. In this case, we’ll have the view controller adopt the protocol:
class ViewController: UIViewController, UITextFieldDelegate {
This says that the ViewController class inherits from the UIViewController class and adopts the UITextFieldDelegate protocol. Having the view controller act as the delegate makes sense: it controls the user interface, and the text fields are part of the user interface.
Just as you have to implement the methods in an inherited interface in C# and Java, you have to implement the methods in an adopted protocol in Swift. There is a difference, however: in Swift, you can choose not to implement methods marked as optional.
You may have noticed that all the methods in the UITextFieldDelegate protocol are optional. This means that a delegate that adopts the protocol can implement as many or as few of its methods as necessary. For the purposes of our app, we’re implementing two of them in ViewController:
textField(textField: UITextField, shouldChangeCharactersInRange range: NSRange, replacementString string: String) -> Bool: The text field calls this whenever the user tries to change the contents of a text field, whether by typing in or deleting a character, or by cutting or pasting. The method should return true if the change is to be accepted, and false to reject the change and keep the contents of the text field the way they are. We’ll use it to limit the types of character that can be entered into the view’s text fields and set a maximum the number of characters that can be entered for each field.
textFieldShouldReturn(textField: UITextField) -> Bool: The text field calls this whenever the user taps the Return key or its equivalent on the keyboard. We’ll use it to dismiss the keyboard when the user taps Return.
We’ll talk about the implementation of these methods in the next section. We have to take care of the delegators first.
The delegators: the text fields
We’ve got a protocol, and we’ve got a delegate that adopts it. Now we need to set up the delegators, which in this case, are the text fields — we need to tell them who their delegates are. We do this by setting each text field’s delegate property in the initializeTextFields method of the ViewController class:
  // Designate this class as the text fields' delegate
  // and set their keyboards while we're at it.
  func initializeTextFields() {
    vowelsOnlyTextField.delegate = self
    vowelsOnlyTextField.keyboardType = UIKeyboardType.ASCIICapable

    noVowelsTextField.delegate = self
    noVowelsTextField.keyboardType = UIKeyboardType.ASCIICapable

    digitsOnlyTextField.delegate = self
    digitsOnlyTextField.keyboardType = UIKeyboardType.NumberPad

    numericOnlyTextField.delegate = self
    numericOnlyTextField.keyboardType = UIKeyboardType.NumbersAndPunctuation

    positiveIntegersOnlyTextField.delegate = self
    positiveIntegersOnlyTextField.keyboardType = UIKeyboardType.DecimalPad
  }
By setting all the text fields’ delegate properties to self, we’re saying that this class is their delegate. Any events arising from editing the text fields will be handled by this class.
Constraining the text fields
The magic that constrains a text field so that it’s vowels-only, numbers-only and so on happens inside the protocol method with the very long signature, textField(textField: UITextField, shouldChangeCharactersInRange range: NSRange, replacementString string: String) -> Bool. This method needs to be coded so that it returns true if we want the user’s changes to be accepted (which then updates the text field), or false if we don’t want the user’s changes to be accepted (which leaves the text field unchanged).
Here’s its code:
  func textField(textField: UITextField,
                 shouldChangeCharactersInRange range: NSRange,
                 replacementString string: String)
       -> Bool
  {
    // We ignore any change that doesn't add characters to the text field.
    // These changes are things like character deletions and cuts, as well
    // as moving the insertion point.
    //
    // We still return true to allow the change to take place.
    if string.characters.count == 0 {
      return true
    }

    // Check to see if the text field's contents still fit the constraints
    // with the new content added to it.
    // If the contents still fit the constraints, allow the change
    // by returning true; otherwise disallow the change by returning false.
    let currentText = textField.text ?? ""
    let prospectiveText = (currentText as NSString).stringByReplacingCharactersInRange(range, withString: string)

    switch textField {

      // Allow only upper- and lower-case vowels in this field,
      // and limit its contents to a maximum of 6 characters.
      case vowelsOnlyTextField:
        return prospectiveText.containsOnlyCharactersIn("aeiouAEIOU") &&
               prospectiveText.characters.count <= 6

      // Allow any characters EXCEPT upper- and lower-case vowels in this field,
      // and limit its contents to a maximum of 8 characters.
      case noVowelsTextField:
        return prospectiveText.doesNotContainCharactersIn("aeiouAEIOU") &&
               prospectiveText.characters.count <= 8

      // Allow only digits in this field,
      // and limit its contents to a maximum of 3 characters.
      case digitsOnlyTextField:
        return prospectiveText.containsOnlyCharactersIn("0123456789") &&
               prospectiveText.characters.count <= 3

      // Allow only values that evaluate to proper numeric values in this field,
      // and limit its contents to a maximum of 7 characters.
      case numericOnlyTextField:
        return prospectiveText.isNumeric() &&
               prospectiveText.characters.count <= 7

      // In this field, allow only values that evalulate to proper numeric values and
      // do not contain the "-" and "e" characters, nor the decimal separator character
      // for the current locale. Limit its contents to a maximum of 5 characters.
      case positiveIntegersOnlyTextField:
        let decimalSeparator = NSLocale.currentLocale().objectForKey(NSLocaleDecimalSeparator) as! String
        return prospectiveText.isNumeric() &&
               prospectiveText.doesNotContainCharactersIn("-e" + decimalSeparator) &&
               prospectiveText.characters.count <= 5

      // Do not put constraints on any other text field in this view
      // that uses this class as its delegate.
      default:
        return true
    }

  }
This method takes three parameters:
textField: the text field that either had a character added to or removed from it.
range: the range of the characters within the text field that are to be replaced.
string: the replacement string.
Does the change add characters?
The first thing the method does is see if the change adds characters to the text field:
if string.characters.count == 0 {
  return true
}
If the user has typed a character or pasted non-empty text into the text field,string is non-empty and has a length greater than zero. In this case, we’ll want to do more processing.
If the user has deleted a character, cut text, or simply moved the insertion point,string is empty and has a length of zero. In this case, we don’t want to do any more processing; removing characters means we don’t have to see if we want to disallow any added character or if the maximum number of characters for the text field has been exceeded. We’ll just exit the method, returning true so that the change still happens, whether it’s a deletion, a cut, or moving the insertion point.
What will the text field look like after the change?
We want to figure out what the text field would contain if the change were allowed. We’ll call that the prospective text, which we’ll assign to a local constant called prospectiveText. We can figure out what the prospective text is by using NSString‘s stringByReplacingCharactersInRange method on the contents of textField.text.
Here’s where we run into a problem:
In order to use NSString‘s stringByReplacingCharactersInRange method, we need to convert a Swift String into an NSString.
The type of a text field’s text property type isn’t String, but String?. That’s because a text field’s value can either be:
a string when it contains at least one character, or
nil when it’s empty
String can be cast into NSString; String? can’t.
To get around this problem, we’re going to create a String constant called currentText, which we’ll fill as follows:
If the text field isn’t empty — that is, if its value isn’t nil — we’ll simply assign currentText the value of textField.text.
If the text field is empty — that is, if its value is nil — we’ll assign currenttext the value "", the empty string. There’s a difference between nil (which denotes no value) and the empty string (which is a value, just one that has a length of 0 characters).
Here’s the code:
 let currentText = textField.text ?? ""
 let prospectiveText = (currentText as NSString).stringByReplacingCharactersInRange(range, withString: string)
As we’ll see shortly, having prospectiveText lets us set a maximum number of characters that can be put into a text field.
Taking care of business
Now that we’ve dealt with cases where the change to the text field deletes characters and have created prospectiveText, we can now start constraining text fields. This is handled in the switch statement, which we use to separate the constraining logic for each text field:
switch textField {

      // Allow only upper- and lower-case vowels in this field,
      // and limit its contents to a maximum of 6 characters.
      case vowelsOnlyTextField:
        return prospectiveText.containsOnlyCharactersIn("aeiouAEIOU") &&
               prospectiveText.characters.count <= 6

      // Allow any characters EXCEPT upper- and lower-case vowels in this field,
      // and limit its contents to a maximum of 8 characters.
      case noVowelsTextField:
        return prospectiveText.doesNotContainCharactersIn("aeiouAEIOU") &&
               prospectiveText.characters.count <= 8

      // Allow only digits in this field,
      // and limit its contents to a maximum of 3 characters.
      case digitsOnlyTextField:
        return prospectiveText.containsOnlyCharactersIn("0123456789") &&
               prospectiveText.characters.count <= 3

      // Allow only values that evaluate to proper numeric values in this field,
      // and limit its contents to a maximum of 7 characters.
      case numericOnlyTextField:
        return prospectiveText.isNumeric() &&
               prospectiveText.characters.count <= 7

      // In this field, allow only values that evalulate to proper numeric values and
      // do not contain the "-" and "e" characters, nor the decimal separator character
      // for the current locale. Limit its contents to a maximum of 5 characters.
      case positiveIntegersOnlyTextField:
        let decimalSeparator = NSLocale.currentLocale().objectForKey(NSLocaleDecimalSeparator) as! String
        return prospectiveText.isNumeric() &&
               prospectiveText.doesNotContainCharactersIn("-e" + decimalSeparator) &&
               prospectiveText.characters.count <= 5

      // Do not put constraints on any other text field in this view
      // that uses this class as its delegate.
      default:
        return true
    }
The cases for each text field are listed in the order in which they appear onscreen. Let’s look at them one by one:
The “Vowels only” text field
In this text field, we want the user to be able to enter only vowels — the upper- and lower-case versions of the letters a, e, i, o, and u. We also want to limit its contents to a maximum of 6 characters. Here’s the code that does this:
      // Allow only upper- and lower-case vowels in this field,
      // and limit its contents to a maximum of 6 characters.
      case vowelsOnlyTextField:
        return prospectiveText.containsOnlyCharactersIn("aeiouAEIOU") &&
               prospectiveText.characters.count <= 6
This code makes use of the String extension method containsOnlyCharactersIn, which I defined in StringUtils.swift. It returns true if the String contains only characters in the provided parameter.
If both conditions in the return statement evaluate to true — prospectiveText contains only vowels and has 6 characters or fewer — the method returns true, the change to the text field is allowed, and the text field is updated. If both conditions don’t evaluate to true, the method returns false, the change to the text field is not allowed, and the text field’s contents remain the same.
The “Anything BUT vowels” text field
In this text field, we want the user to be able to enter any character except vowels and limit its contents to a maximum of 8 characters. Here’s the code that does this:
      // Allow any characters EXCEPT upper- and lower-case vowels in this field,
      // and limit its contents to a maximum of 8 characters.
      case noVowelsTextField:
        return prospectiveText.doesNotContainCharactersIn("aeiouAEIOU") &&
               prospectiveText.characters.count <= 8
This code is similar to the code for the “Vowels only” text field. The major difference is that it makes use of another String extension method defined in StringUtils.swift: doesNotContainCharactersIn, which returns true if the Stringdoesn’t contain any of the characters in the provided parameter.
The “Digits only” text field
In this text field, we want the user to be able to enter only digits, and no more than three of them at most. Here’s the code that does this:
      // Allow only digits in this field,
      // and limit its contents to a maximum of 3 characters.
      case digitsOnlyTextField:
        return prospectiveText.containsOnlyCharactersIn("0123456789") &&
               prospectiveText.characters.count <= 3
This code is almost the same as the code for the “Vowels only” text field.
The “Numeric values only” text field
Here’s an interesting one: a text field that accepts only user input that evaluates to a proper numeric value. That means it will accept the following characters:
The digits 0 through 9
The – (negative) symbol
The decimal separator, which is either . or , depending on the user’s locale settings
The letter e, which is used for numbers specified in scientific notation
Even when limiting the user to these characters, it’s possible for non-numeric values to be entered. Here are a couple of example non-numeric values that we don’t want the user to be able to enter:
More than one decimal separator, such as 1.2.3 or 1,2,3, depending on the user’s locale settings
The unary minus being placed anywhere other than the start, such as 4-5
We also want to limit the text field to a maximum of 7 characters.
Here’s the code:
      // Allow only values that evaluate to proper numeric values in this field,
      // and limit its contents to a maximum of 7 characters.
      case numericOnlyTextField:
        return prospectiveText.isNumeric() &&
               prospectiveText.characters.count <= 7
This code makes use of the String extension method isNumeric, which I defined in StringUtils.swift. It returns true if the String contains a value that evaluates to a numeric value. It’s powered by NSScanner, a class that’s handy for going through strings and extracting useful data from them, and its scanDecimal method, which returns true if it finds a value that can be evaluated as an NSDecimal value.
If both conditions in the return statement evaluate to true — prospectiveText evaluates to a numeric value and has 7 characters or fewer — the method returns true, the change to the text field is allowed, and the text field is updated. If both conditions don’t evaluate to true, the method returns false, the change to the text field is not allowed, and the text field’s contents remain the same.
The “Positive integers only” text field
This is a more strict version of the “Numeric values only” text field. It requires that anything entered into it needs to evaluate as a proper numeric value, but it also requires that the value be a positive integer and not be stated in scientific notation. It has a maximum length of 5 characters. Here’s the code:
      // In this field, allow only values that evalulate to proper numeric values and
      // do not contain the "-" and "e" characters, nor the decimal separator character
      // for the current locale. Limit its contents to a maximum of 5 characters.
      case positiveIntegersOnlyTextField:
        let decimalSeparator = NSLocale.currentLocale().objectForKey(NSLocaleDecimalSeparator) as! String
        return prospectiveText.isNumeric() &&
               prospectiveText.doesNotContainCharactersIn("-e" + decimalSeparator) &&
               prospectiveText.characters.count <= 5
In order to disallow negative numbers, we use the String extension method doesNotContainCharactersIn to block out – characters. We disallow scientific notation by using the same method to block out e characters. The tricky part is disallowing the decimal separator, which can be either . or , depending on the user’s locale. We identify it with NSLocale.currentLocale().objectForKey(NSLocaleDecimalSeparator), which we add to the parameter for doesNotContainCharactersIn.
Any other text fields that might be on the screen
Finally, we handle the default case: any other text fields that might be on the screen, which we won’t constrain:
      default:
        return true
Other UI goodies
This app has a couple of UI features that I’ll cover in a subsequent article:
specifying the keyboard for a specific text field,
dismissing the keyboard when the user taps the Return key or its equivalent, and
dismissing the keyboard when the user taps on the view
It’s all in the code, so if you’d like to jump in and learn how it works on your own, go right ahead!

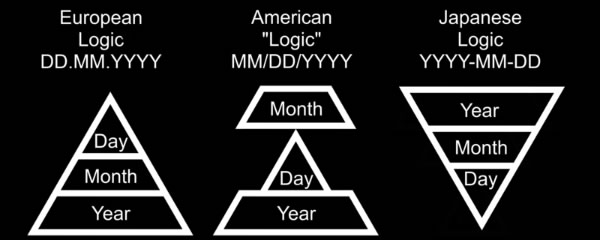

 In this article, we’ll expand on material covered in the three previous articles in this series on working with dates and times in Swift 5: