The scenes

Last Tuesday, the Tampa Bay Artificial Intelligence Meetup — which both Anitra and I organize — held a session titled Learn How to Prototype Apps with Python and Jupyter Notebook.
The meetup took place at Kforce’s office in Midtown, which just might be the cushiest meetup venue in “The Other Bay Area.” With plush seats, great acoustics, and a separate networking/dining area, it’s well-set-up for presentations.

Attendance was unusually high. Normally, for a free event, maybe half the attendees who register actually show up. For this one, the attendance was closer to 90%. It seems that there’s a demand for practical introductions to Python and writing AI-enabled applications!

I’d like to thank Okta for providing the pizza and beverages — they’ve been quite good at supporting local developer events!
And now, for those of you who missed the event — or those of you who were there and wanted a full set of notes — here’s a writeup of all the material I wanted to cover in my presentation, step by step. Enjoy!
The notes

The goal
The goal for this meetup is to write at least one prototype for an application that uses an AI API to provide the user with results that are useful or interesting — and ideally, both.
To achieve this goal, we will use the following tools:
- Python: The programming language we’ll use to write our prototypes.
- Jupyter Notebook: The programming and runtime environment in which we’ll write and run the prototypes.
- The command line: You’ll need to do a couple of things on the command line. If you’re on Mac or Linux, use the built-in Terminal application or something similar. If you’re on Windows, use Windows PowerShell.
- OpenAI’s APIs: The APIs that will allow us to harness OpenAI’s applications.
Various free APIs: We’ll use these to access information from live sources or databases, and combine this data with the data retrieved from OpenAI’s APIs to produce useful or interesting (or both!) results for the user.
Set up your computer
Set up Python
If you have Python 3.10 installed on your computer, you’re good to go. You can jump to the next section, Start up Jupyter Notebook.
If you’re not sure which version of Python is on your computer, open up a command line — do this by running the Terminal application on Mac or Linux or Windows PowerShell on Windows — and enter the following at the command prompt:
python --versionThe system will respond in either one of two ways:
Python {version number}, where {version number}is the version of Python installed on your system. If it’s3.10or higher, you’re good. If not, you’ll need to install a newer version of Python, which I’ll cover next.command not found or The term ‘python’ is not recognized…or something similar means that Python is not installed on your system. You’ll have to install it, and I’ll cover that next.
If you need to install a newer version of Python or there isn’t any version of Python on your computer, I strongly recommend installing Anaconda Python. It’s standard Python, but with a lot of additional stuff included that makes it particularly useful for data science and AI work.
You can download the Anaconda Python installer from anaconda.com/download. Run the installer, and once it’s done, confirm the installation by checking the Python version as shown above.
Starting up Jupyter Notebook
Once you’ve confirmed that Python is installed on your system, start up Jupyter Notebook. The most straightforward, programmer-y way to do this is to enter the following on the command line (this works for Mac, Windows, and Linux):
jupyter notebook(If you get an error, it probably means that Jupyter Notebook isn’t installed on your system. You can remedy this by entering pip install notebook or pip3 install notebook on the command line.)
In a moment, a new browser window or tab will open and display the Jupyter Notebook interface. It should look something like this:
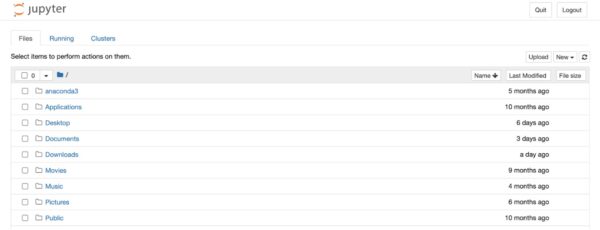
At this point, you’re running the Jupyter Notebook server, and its interface shows you the directory structure of your “home” directory when it first launches. Use this screen to navigate to a directory where you’d like to create a new notebook.
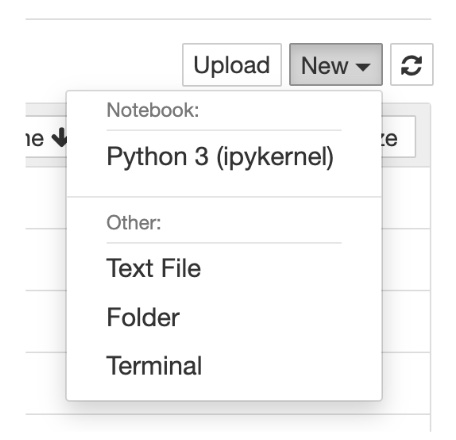
Once you’ve navigated to a directory where you’d like to create a new notebook, click the New button, located near the upper right of the page. A menu should pop up — select the Python 3 option:
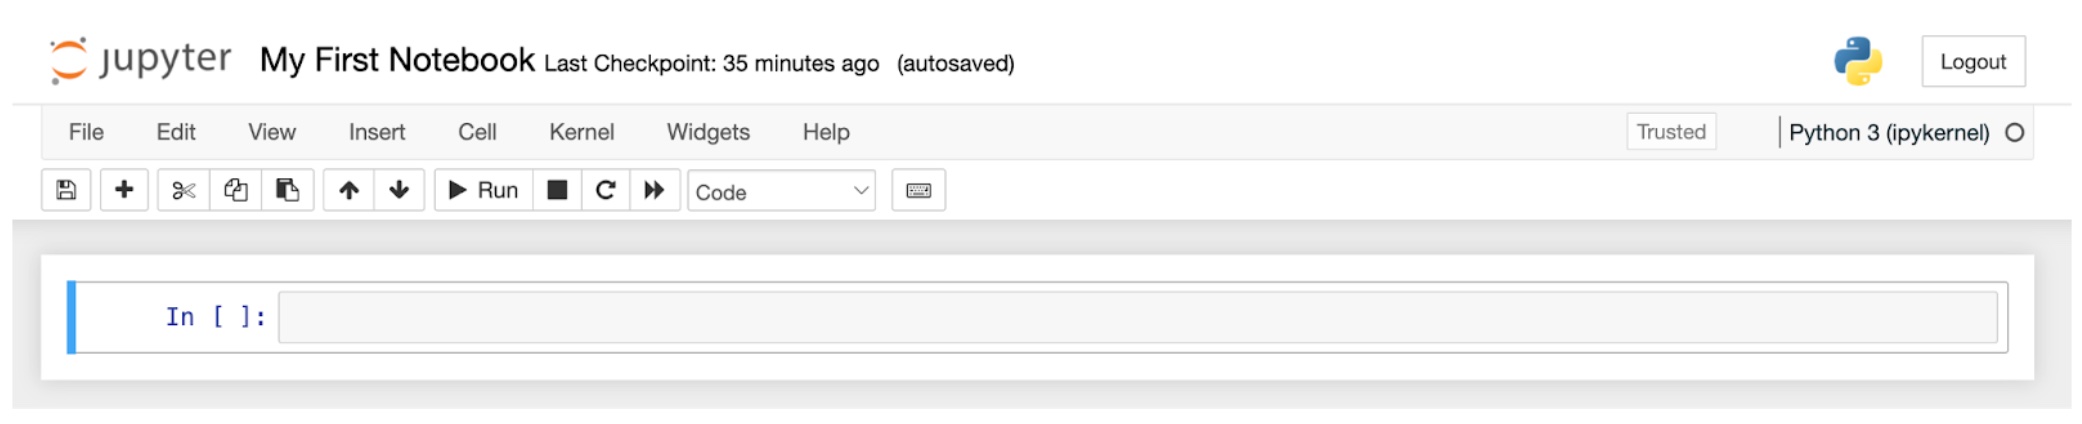
The browser tab will now display a new Jupyter Notebook. It should look like this:

You’ve now created a new Jupyter Notebook in the directory you selected. Its title is displayed near the upper left of the page, and by default, this title is Untitled1, and it will appear in your filesystem as Untitled1.ipynb (the filename extension is .ipynb because Jupyter Notebook’s original name was “iPython Notebook.”)
You can change the name of a Jupyter Notebook by clicking on its title, which causes this dialog box to appear:
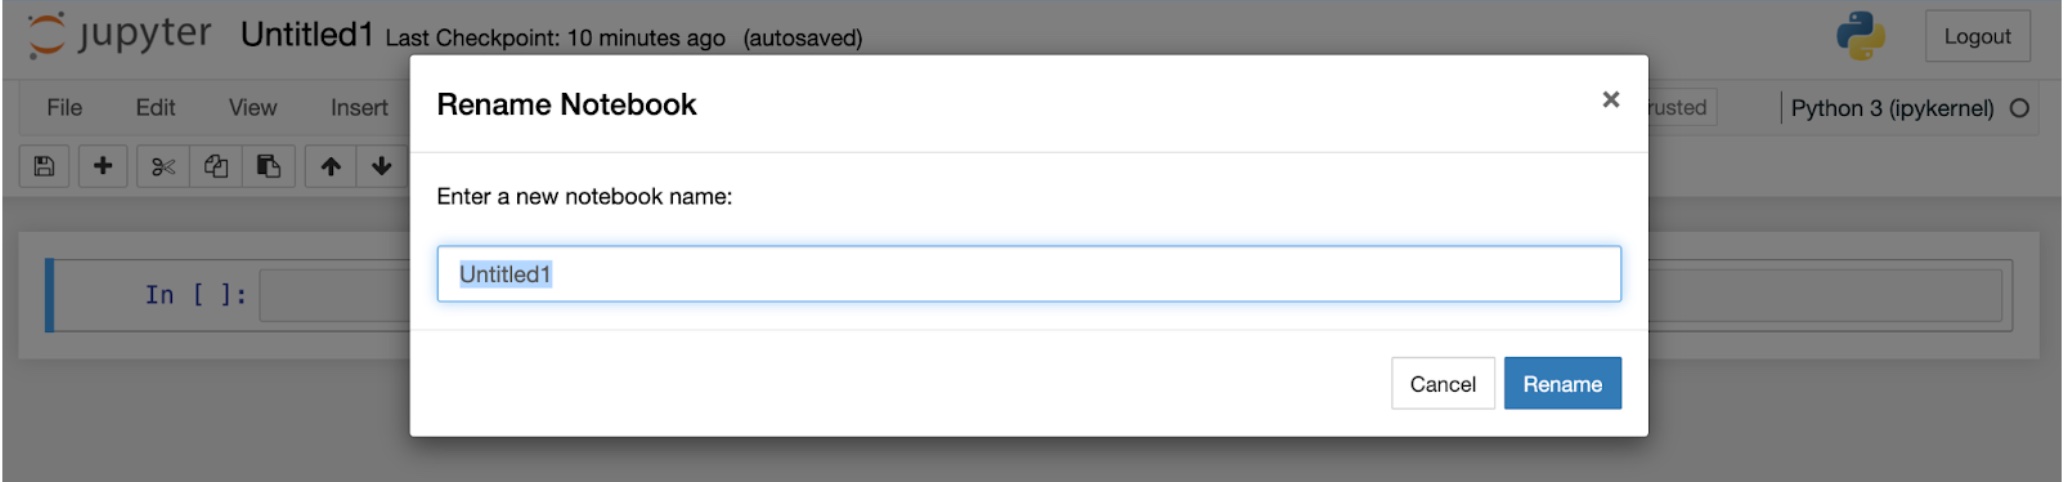
This will rename both the notebook and its file. For instance, if you rename your notebook to My First Notebook, its title will be My First Notebook and its filename will be My First Notebook.ipynb:

A very quick introduction to Jupyter Notebook
Jupyter Notebooks are a way to create documents that contain both documentation (text, pictures, and anything else you’d expect to see on a web page) and code that the reader can run. It’s a way for you to communicate an idea and also prove those ideas by demonstrating them with running code.
You can think of a Jupyter Notebook as being like a spreadsheet column. Just as each cell in a spreadsheet column can contain text, numbers, or formulas, a cell in a Jupyter Notebook can contain one of the following:
- Markdown, which is how you write the documentation part of your Jupyter Notebook, and
- Code, which is how you write the code part of your Jupyter Notebook.
Try your hand at writing a Markdown cell. In your newly created notebook, select the only cell by clicking on it. It will be highlighted and have a blue stripe on its left side:
Click the menu in the toolbar near the top of the page…

…and change the cell from a code cell to a Markdown cell by selecting Markdown from the pop-up menu that appears.

Enter some Markdown into the cell. Try this:
# Welcome to my first notebook

There'll be some interesting code here soon!
To render the Markdown cell, run it. Make sure the cell is selected and then do one of the following:
- Click the “Run” button in the toolbar:
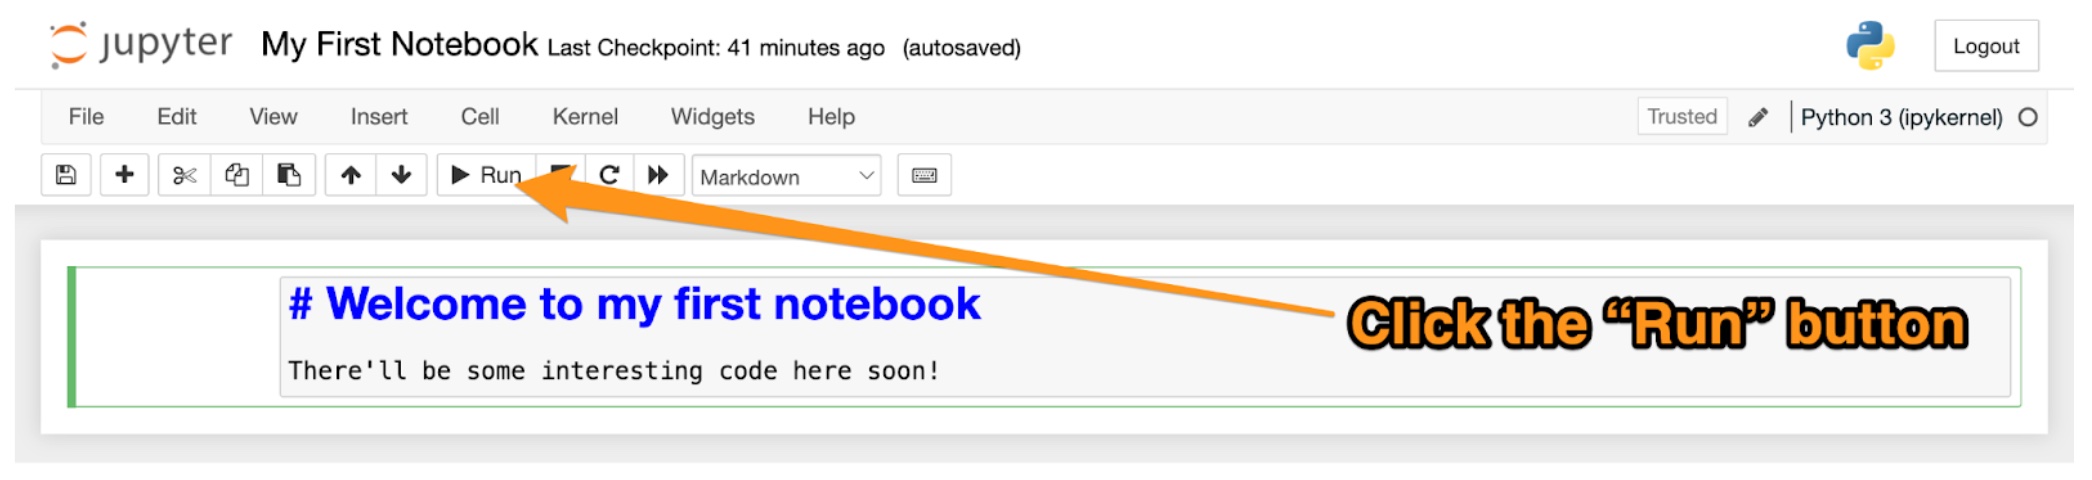
- Press the Shift and Enter keys simultaneously.
You should see something like this:
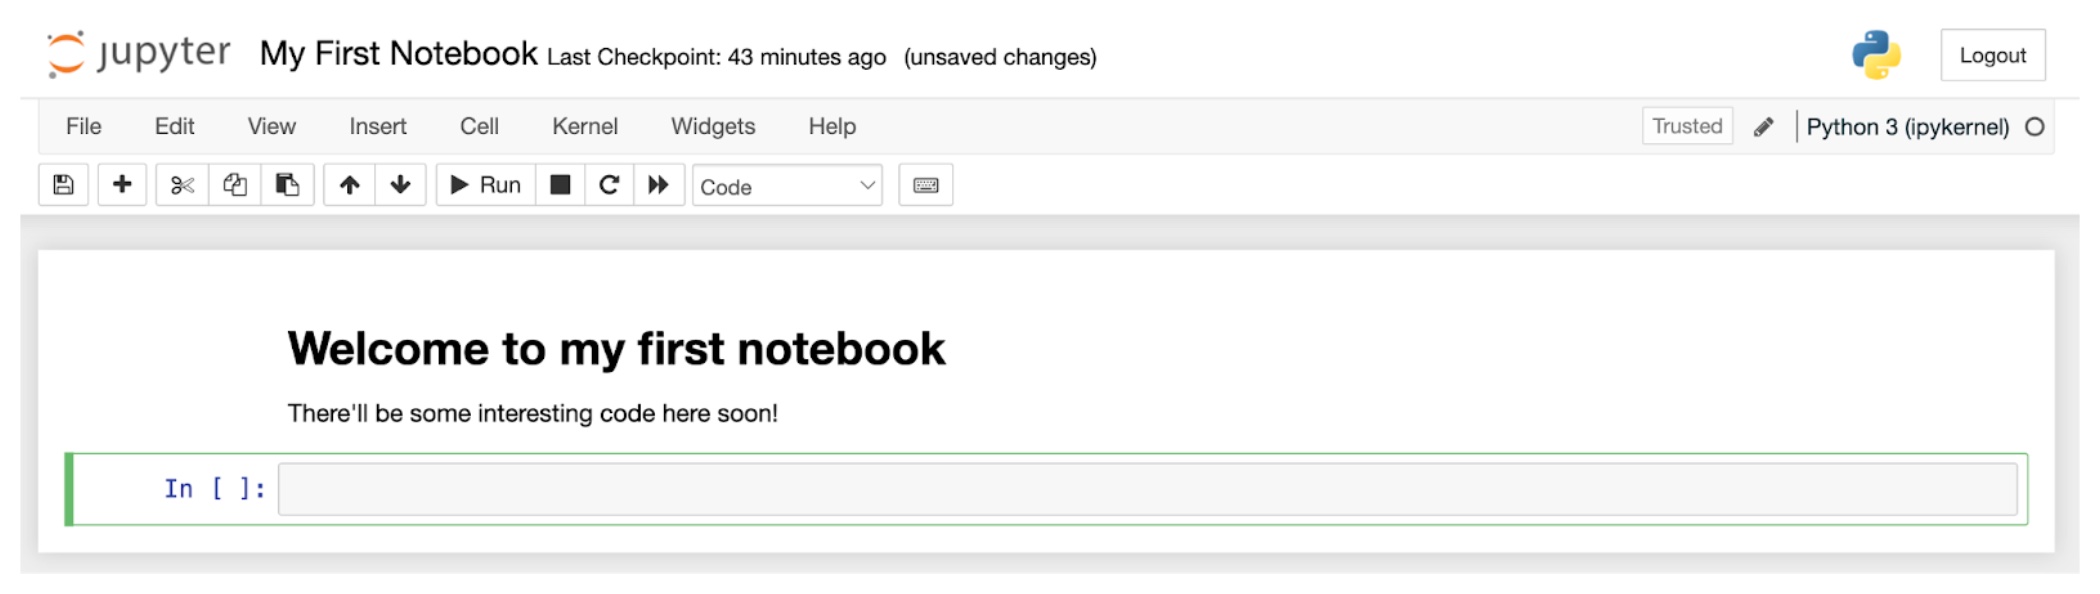
You’ll see that your Markdown has been changed into nicely-formatted text. You’ll also see there’s a new cell.
Click on the new cell to select it. You’ll see that the menu in the toolbar says Code, which means that this new cell is currently a code cell. Enter the following Python code into it:
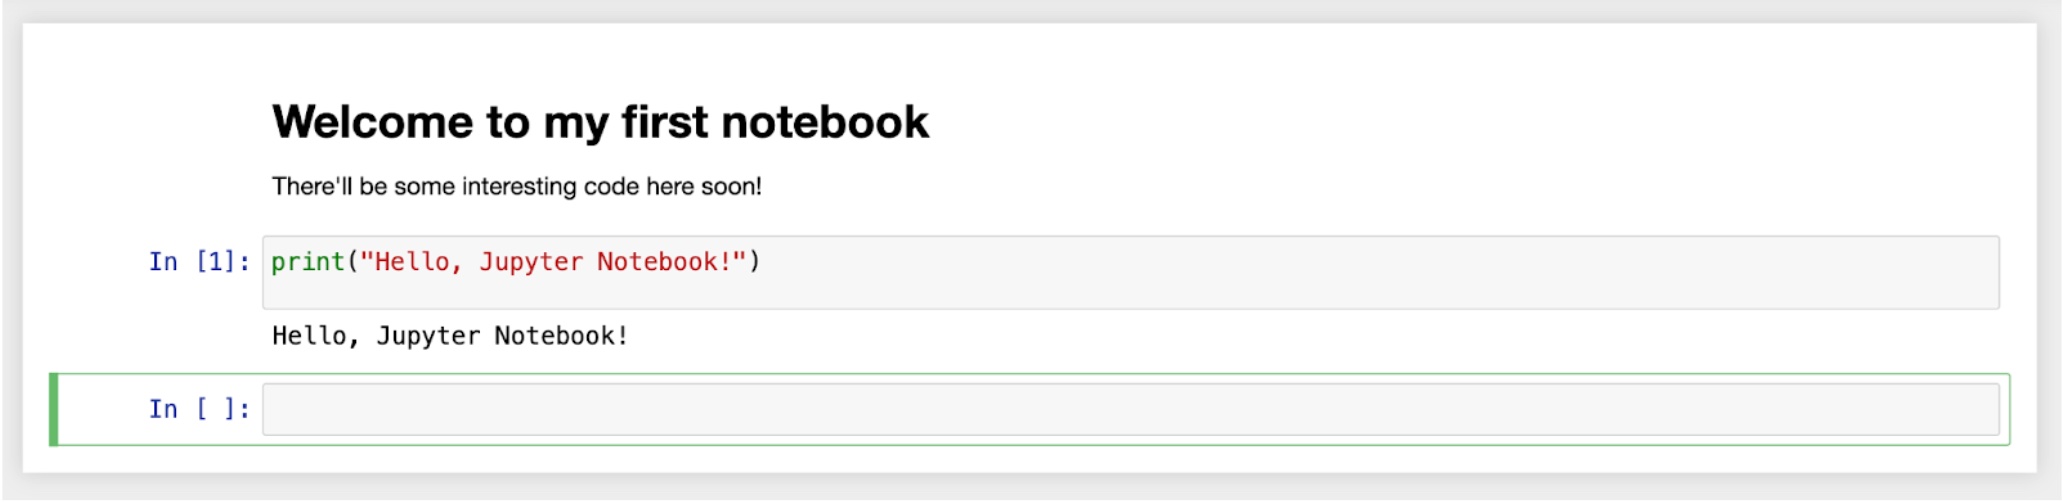
print("Hello, Jupyter Notebook!")Run the cell — once again, you can do this by clicking on the “Run” button in the toolbar and pressing the Shift and Enter keys simultaneously.
You should see this:
That’s about all you need to know about Jupyter Notebook for this meetup session. If you’d like to learn more about Jupyter Notebook, consult the following:
- Real Python: Jupyter Notebook: An Introduction
- DataCamp: How to Use Jupyter Notebooks: The Ultimate Guide
- YouTube: Jupyter Notebook Complete Beginner Guide 2023 – From Jupyter to Jupyterlab, Google Colab and Kaggle!
Set up your OpenAI API account
There’s a difference between a ChatGPT Plus account and an OpenAI API account!
First, let’s make clear what the difference is:
- A ChatGPT Plus account is the $20/month account that you pay for the more advanced version of ChatGPT. It’s for end users — that is, people who use OpenAI’s artificial intelligence through the ChatGPT web page or applications.
- An OpenAI account is an account that programmers use to incorporate responses from OpenAI’s artificial intelligence in their applications. You are billed on a per-use basis, with simple questions costing fractions of a cent. When you sign up for an account, OpenAI gives you a $5.00 credit, which should be enough for a fair bit of experimenting.
Sign up for an OpenAI API account
To use the OpenAI API, you need an OpenAI account. If you don’t already have one, go to platform.openai.com and click the Sign up button. You can provide an email address and create a password, or continue with a Google, Microsoft, or Apple account.
You’ll need to provide a mobile number when signing up — it’s part of the multi-factor authentication (MFA) system that OpenAI uses to prevent malicious parties from creating multiple accounts run by bots. This number
You don’t have to provide payment information immediately to use the API; once again, you’ll get a $5.00 credit to try out the API. That’s plenty to experiment with — text responses from OpenAI cost fractions of a cent, while generated images cost a couple of cents.
Create an OpenAI API key
Once you’ve created an OpenAI API account, log into platform.openai.com, click on your account menu (it’s at the upper-right hand corner of the page and has your name) and select the View API keys option:

You’ll be taken to the API keys page, which looks like this:
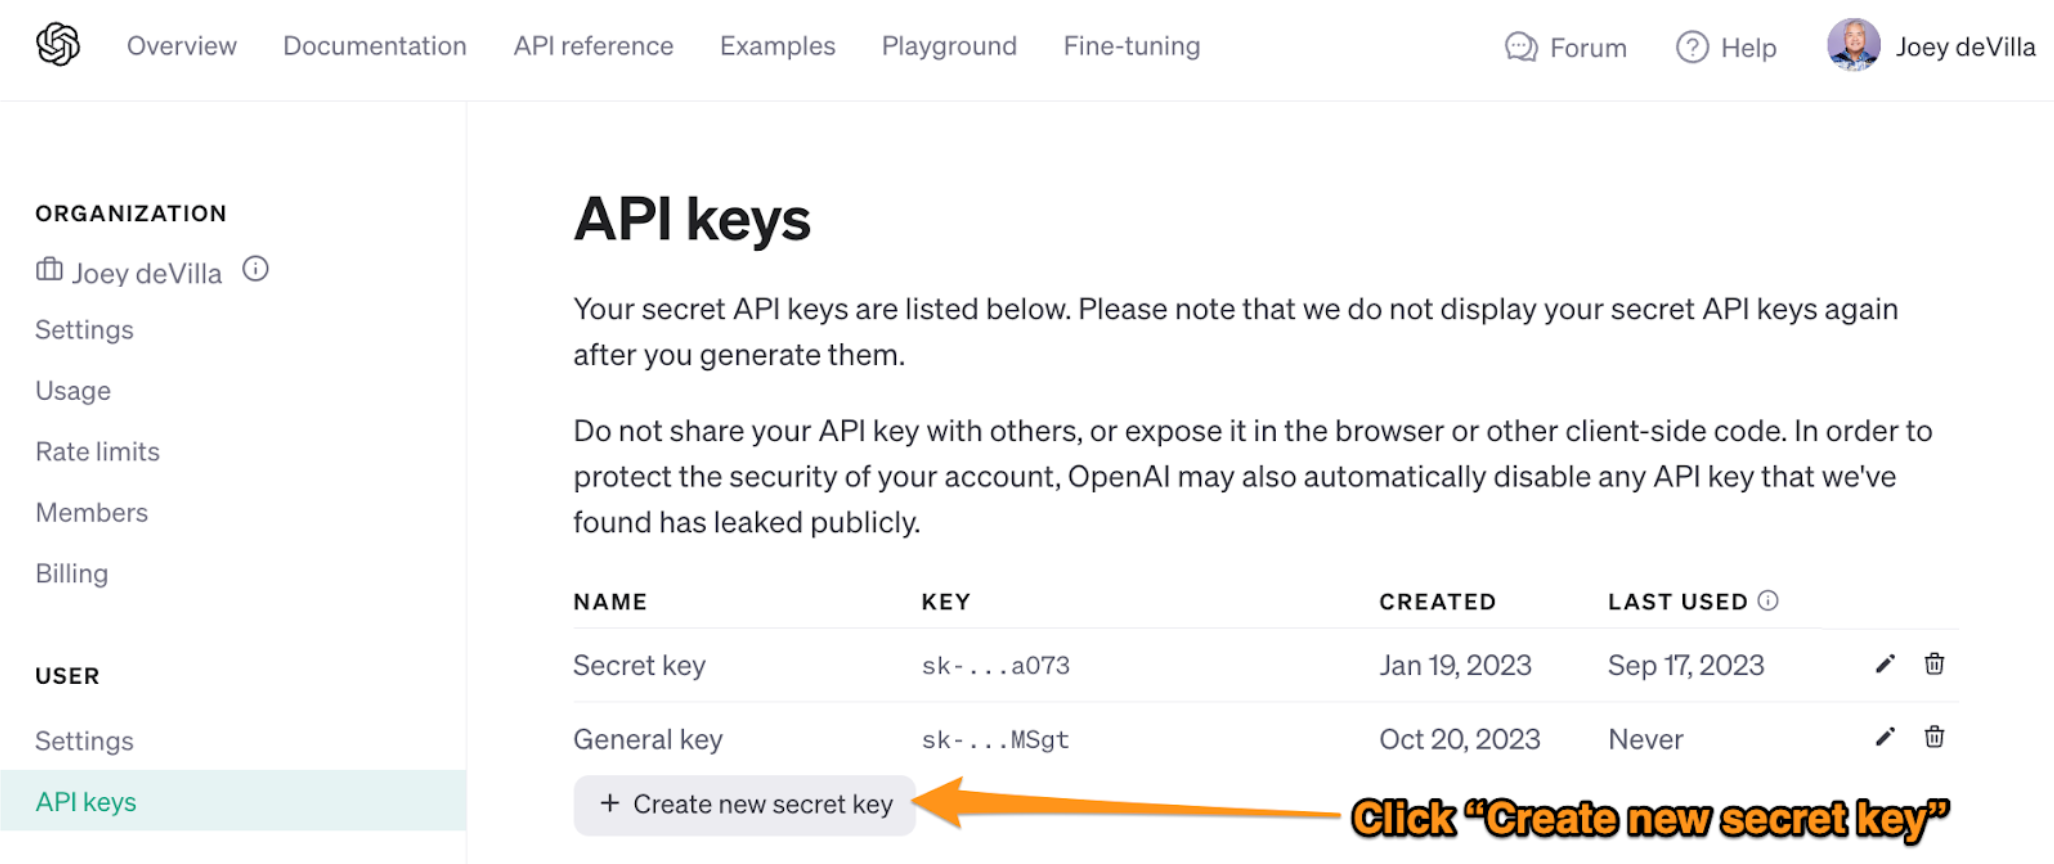
Click the Create new secret key button. This pop-up will appear:

The pop-up lets you enter an optional name for the key that makes it easy to identify in the list. The name isn’t used anywhere but in your list of keys. You’re free to either provide a name or simply leave the field blank.
Once you’ve entered a name (or decided not to), click the Create secret key button. You’ll then be presented with this pop-up:
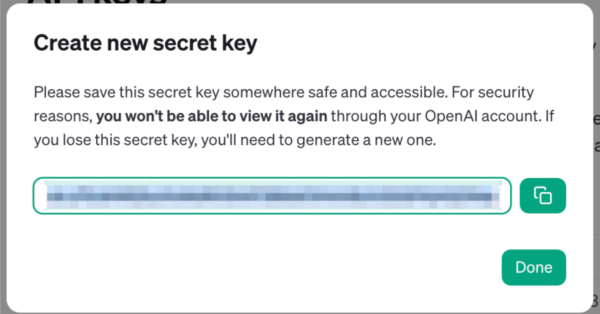
As the text in the pop-up says, this is the one and only time that OpenAI will display the secret key. Copy it, and get ready to paste it into your notebook in the next step…
Your first OpenAI code
Install the OpenAI Python package on your system
The first step in building an application that harnesses OpenAI is to install the OpenAI Python package. This package provides a lot of pre-written code that makes it simple to send requests to OpenAI’s AI models and get their responses.
Install the openai Python package using pip or pip3. You can do it within Jupyter Notebook by typing this into a code cell in your notebook and running it:
! pip install openai(Remember, you run a cell by clicking on it to highlight it, and then either clicking the “Run” button or pressing the Shift-Enter or Shift-Return.)
In a Jupyter Notebook code cell, any line that begins with the ! character is executed as a shell command — that is, it’s as if you typed it on the command line.
It’s a single line, and it’s made up of these components:
!: Any line in Jupyter Notebook that begins with the!character is executed as if you’d typed it on the command line.pip:pipis short for “package installer for Python.” This is the command you’re running.install: This is the pip subcommand that specifies what you want it to do, which in this case is to install a package.openai: This is the name of the package you wantpipto install — the OpenAI package.
If the OpenAI package or any of the packages it needs isn’t installed on your computer, pip will install it, displaying a number of diagnostic messages while doing so.
If the OpenAI package or any of the packages it needs is already on your computer, pip will simply display a number of diagnostic messages that start with a phrase like “Requirement already satisfied.”
Set up an OpenAI object
Once you’ve installed the openai package, you can use it in your Python scripts. The first step is to create an OpenAI object, which will act as the conduit between your application and OpenAI. Enter the following into a new code cell, replacing the {Insert your OpenAI API key here} with your OpenAI API key:
# Make the OpenAI code library available to your application
import openai

# Create an OpenAI object using your API key.
openai.api_key = "{Insert your OpenAI API key here}"
Run the cell. You won’t see any output, because this code doesn’t produce any visible results.
However, it does produce a very important invisible result: it creates an OpenAI object that you can use. Let’s use it!
Use the OpenAI object
Enter the following into a new code cell:
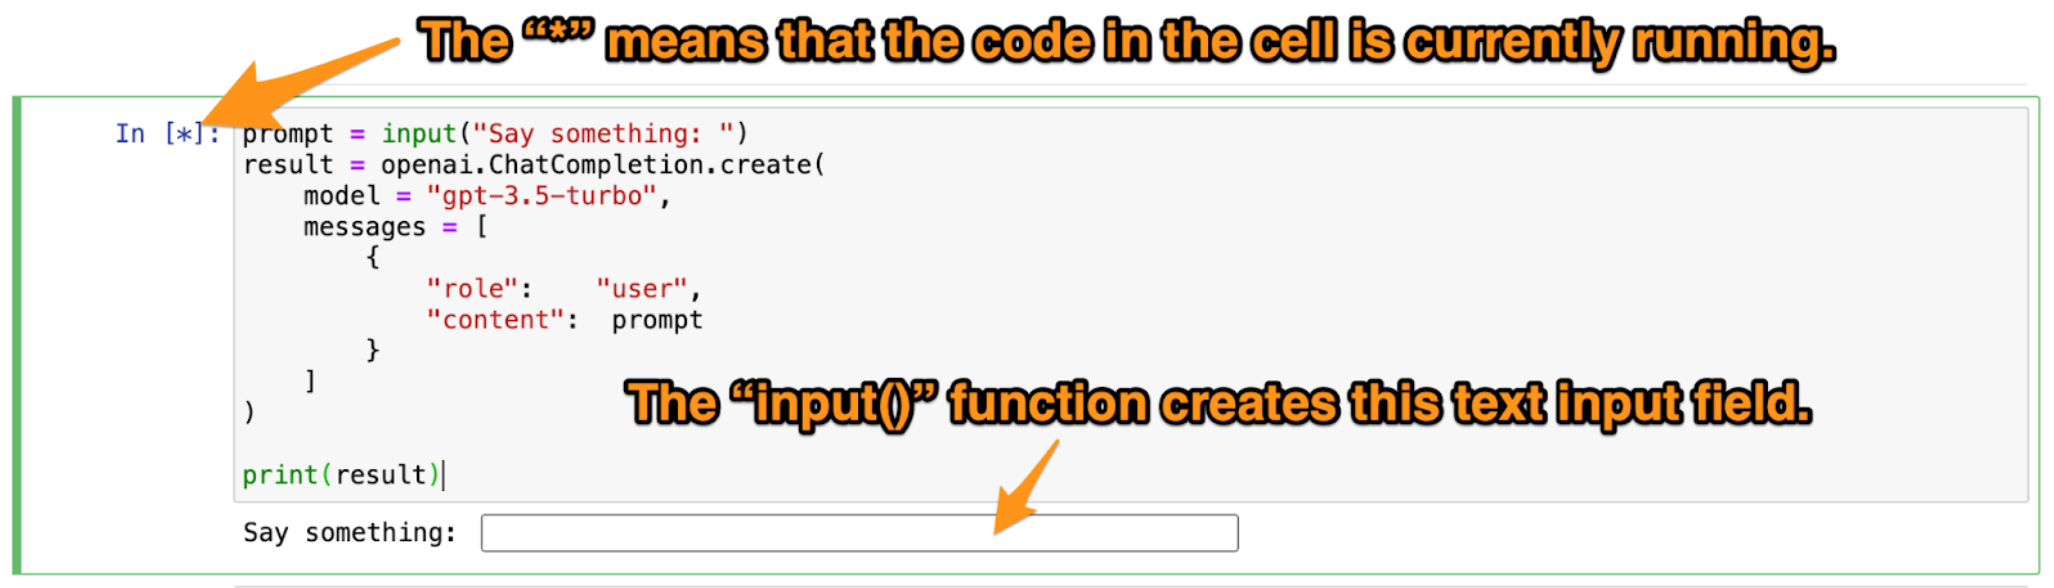
prompt = input("Say something: ")
result = openai.ChatCompletion.create(
    model = "gpt-3.5-turbo",
    messages = [
        {
            "role":    "user",
            "content":  prompt
        }
    ]
)

print(result)
The input() function collects keyboard input from the user. It takes one argument, which it uses as a prompt (in this case, it’s Say something: ), and it returns a string containing whatever the user entered. The code above stores whatever the user entered into a variable named prompt.
The next line communicates with OpenAI using the create() method of the ChatCompletion class of the openai module. The create() method creates a chat completion, which is an artificial intelligence model that takes a number of messages as input and generates a result as output. It’s called a “completion” because you feed it the first part of a conversation, and the result it provides completes the conversation.
The code above provides the two parameters that all calls to the create() method must provide:
| Parameter | Description |
model | The name of the AI model that should be used to create the completion. In the code above and in all the code in this exercise, we’re using the gpt-3.5-turbo model, which is what the free version of ChatGPT uses. It’s useful enough for most purposes, and is quite inexpensive — generally a fraction of a cent for each completion. |
message | A list of input messages to be provided to the completion. Each message is a dictionary containing the following keys: • “role”: This specifies who the message is from. The message can be from one of three entities:• “user”: Messages with the “user” role contain questions or requests from the user or entity that wants a response from the AI model..• “system”: Messages with the “system” role usually contain some high-level instructions to guide the behavior of the AI. By default, the AI acts as if it was given a “system” message of “You are a helpful assistant.”• “assistant”: This role represents the responses given by the AI model.• “content”: As its name implies, this contains the content of the message. |
The code in the cell provides only one message, where the role is “user” and the message is the contents of the prompt variable, which contains whatever the user entered into the text input field.
Run the cell. You should see something like this:
Enter something into the text input field. I entered “Write a haiku about Python,” and got this result:
{
  "id": "chatcmpl-8CCoSC4Hao0HO3C7ZClmSUcQ7HDQ2",
  "object": "chat.completion",
  "created": 1697919880,
  "model": "gpt-3.5-turbo-0613",
  "choices": [
    {
      "index": 0,
      "message": {
        "role": "assistant",
        "content": "Python slithers by,\nCode enchants with elegance,\nPowerful and sly."
      },
      "finish_reason": "stop"
    }
  ],
  "usage": {
    "prompt_tokens": 13,
    "completion_tokens": 18,
    "total_tokens": 31
  }
}
The result is a dictionary with a number of items. I’ve highlighted the one we’re most interested in — the item named “content”, located inside the first item inside the “choices” list, which contains the haiku I asked for.
Enter the following into an empty code cell:
result["choices"][0]["message"]["content"]Run the cell. You should see the response without any of the surrounding data. In my case, this was what I got:
'Python slithers by,\nCode enchants with elegance,\nPowerful and sly.'If you’re new to programming, you might wonder what’s up with the \n characters. The backslash — that’s the \ character — marks the beginning of an escape sequence. That’s a combination of characters that has a meaning different from the literal characters. \n is the escape sequence for an invisible character called “newline,” which causes the creation of a new line.
Enter the following into a new code cell to see the \n escape sequence in action and run it:
print(result["choices"][0]["message"]["content"])Here’s what I got:
Python slithers by,
Code enchants with elegance,
Powerful and sly.
Create a chat completion function
Let’s take the code we’ve written so far and turn it into a function that takes a prompt as its input and outputs a completion as its result. It will simply be some of the code you’ve written so far, but put inside a function.
Enter the following into a new code cell:
def create_completion(prompt):
    completion = openai.ChatCompletion.create(
        model = "gpt-3.5-turbo",
        messages = [
            {
                "role":    "user",
                "content":  prompt
            }
        ]
    )
    return completion["choices"][0]["message"]["content"]
Run the code cell, which will define the create_completion() function. Then enter the following into a new code cell and run it:
create_completion("How much does the earth weigh?")When I ran the cell, I got this result:
'The mass of the Earth is approximately 5.97 x 10^24 kilograms.'Your answer will probably be a little bit different. I’ll explain why later.
(If you’re new to programming, the caret symbol — ^ — represents exponentiation. It comes from the time when computers couldn’t display superscript text. When we write 10^24 in programming, we mean 1024, or “10 to the power of 24.”)
Turn up the temperature on create_completion()
OpenAI’s chat completions have useful optional parameters. One of them is temperature, which specifies the amount of randomness in the answers it generates.
Temperature is a value between 0 and 1, where lower values are supposed to produce completions that are more focused and deterministic, while higher values are expected to be more random and creative.
Enter the following into a new code cell and run it:
def create_completion(prompt, temp = 0.7):
    completion = openai.ChatCompletion.create(
        model = "gpt-3.5-turbo",
        temperature = temp,
        messages = [
            {
                "role":    "user",
                "content":  prompt
            }
        ]
    )
    return completion["choices"][0]["message"]["content"]
This redefines the create_completion() function and adds a new parameter, temp. I’m using Python’s “default argument” feature — if you don’t assign a value to temp, it sets it the default value of 0.7. That should make the completions fairly creative, but not too wild.
I experimented with this new function. I entered this into a new code cell and ran it:
create_completion("I need two one-paragraph descriptions of characters for a young adult adventure novel set in the age of pirates")Note that I didn’t provide a value for the temp parameter, so create_completion() used the default value of 0.7. Here’s the result:
'Character 1: Captain Amelia Hawthorne\nCaptain Amelia Hawthorne is a fierce and cunning pirate captain, known for her striking red hair and piercing green eyes. Raised on the high seas, she possesses a deep knowledge of navigation and a reputation for outsmarting her enemies. With her daring and audacious nature, Amelia commands a loyal crew on her ship, The Crimson Rose. She is both feared and respected by the pirate community, as she is relentless in her pursuit of treasure and justice. Amelia\'s determination to prove herself in a male-dominated world fuels her desire to outwit her rivals and uncover the long-lost pirate treasure that could change her fate forever.\n\nCharacter 2: Benjamin "Ben" Blackwood\nBenjamin "Ben" Blackwood, a young orphan with a mysterious past, possesses an unyielding thirst for adventure and a heart full of curiosity. With his striking blue eyes and a mischievous grin, Ben lives on the fringes of society, surviving by his wit and agility. His nimble fingers make him an exceptional pickpocket and skilled climber, allowing him to navigate the labyrinthine streets of port towns effortlessly. Despite his rough upbringing, Ben\'s compassionate nature often leads him to help those in need, making him a trusted ally among the downtrodden. When fate brings him face-to-face with Captain Hawthorne, Ben\'s life takes an unexpected turn, thrusting him into a dangerous world of pirates, treasure, and ancient secrets.'Then I tried a temp value of 0:
create_completion("I need two one-paragraph descriptions of characters for a young adult adventure novel set in the age of pirates", 0)The result:
'Character 1: Captain Amelia "Redhawk" Morgan is a fearless and cunning pirate captain with fiery red hair and a reputation that strikes fear into the hearts of her enemies. Known for her sharp wit and quick thinking, Amelia is a natural-born leader who commands her crew with unwavering loyalty. With a mysterious past and a thirst for adventure, she sails the treacherous seas in search of hidden treasures, always staying one step ahead of the law. Despite her tough exterior, Amelia possesses a compassionate heart and will go to great lengths to protect those she cares about, making her a formidable force to be reckoned with in the age of pirates.\n\nCharacter 2: Ethan "Sparrow" Turner is a young and ambitious deckhand aboard Captain Amelia\'s ship, the Crimson Dagger. With a mischievous grin and a twinkle in his eye, Ethan is a skilled sailor who dreams of becoming a legendary pirate in his own right. Although he lacks experience, his quick reflexes and natural agility make him an invaluable asset to the crew. Ethan\'s unwavering loyalty to Captain Amelia is matched only by his insatiable curiosity, which often leads him into dangerous situations. Despite his youthful exuberance, Ethan possesses a keen sense of justice and a strong moral compass, making him a trusted ally in the high-stakes world of pirates.'How about a temp value of 0.5?
create_completion("I need two one-paragraph descriptions of characters for a young adult adventure novel set in the age of pirates", 0.5)The result:
'Character 1: Captain Amelia "Redhawk" Morgan is a fierce and daring pirate captain with a heart of gold. With her fiery red hair and piercing green eyes, she commands respect from her crew and strikes fear into the hearts of her enemies. Known for her exceptional swordsmanship and strategic mind, Redhawk leads her crew on thrilling adventures across the treacherous seas. Beneath her tough exterior, she carries a deep sense of justice and fights for the freedom of all oppressed souls. Determined, resourceful, and fiercely loyal, Captain Amelia "Redhawk" Morgan is a force to be reckoned with in the age of pirates.\n\nCharacter 2: Jack "Sparrow" Thompson is a mischievous and quick-witted young sailor who finds himself caught up in the dangerous world of piracy. With his tousled brown hair and mischievous grin, Jack possesses a charm that allows him to talk his way out of almost any situation. Despite his knack for trouble, he has a heart of gold and a strong moral compass. Jack\'s expertise lies in navigating treacherous waters and deciphering cryptic maps, making him an invaluable asset to any crew. With a thirst for adventure and a knack for finding trouble, Jack "Sparrow" Thompson is ready to sail the high seas and discover the secrets of the age of pirates.'How about a temp value of 1?
create_completion("I need two one-paragraph descriptions of characters for a young adult adventure novel set in the age of pirates", 1)The result:
'Character 1: \nCaptain Jack Burgess - With fiery red hair and intense green eyes, Captain Jack Burgess is a fearless and charismatic pirate captain. Known for his strategic wit and unparalleled swordsmanship, he is a force to be reckoned with on the treacherous seas. Raised by pirates after being abandoned as a child, Jack is driven by a desire to uncover the truth about his mysterious past. Though he possesses a charming exterior, Jack harbors a deep vulnerability that fuels his relentless pursuit of adventure and justice. Determined to outsmart rival pirates and discover the hidden treasures of the ocean, he leads his loyal crew with unwavering courage and a mischievous smile.\n\nCharacter 2:\nElena Sinclair - As the daughter of an esteemed naval officer, Elena Sinclair possesses a rare combination of beauty and intelligence. With cascading chestnut curls and piercing blue eyes, her confidence and independence radiate from every step she takes. Fiercely determined and unyielding, Elena defies the societal expectations placed upon women during the age of pirates. Armed with extensive knowledge of maps and navigation, she yearns to shatter the confines of her sheltered life and embark on an intrepid adventure of her own. Joining forces with Captain Jack Burgess, she proves herself as a skilled strategist and formidable adversary to any pirate who dares to underestimate her. With a quick sword and a sharp mind, Elena fearlessly embraces the dangers of the sea, eager to prove her worth as a formidable pirate in her own right.'It turns out that OpenAI’s temperature parameter accepts values higher than 1 — they can go as high as 2. The results take a longer time to produce, and they get sillier. Here’s me trying it at 1.5:
create_completion("I need two one-paragraph descriptions of characters for a young adult adventure novel set in the age of pirates", 1.5)The result:
'Character 1:\nAbigail Thompson, a fiery and fearless 18-year-old, possesses an audacious spirit that matches her fiery red hair. Disguised as a male crew member aboard the pirate ship Blastbreaker, she has developed exemplary sword-fighting and navigation skills over the past years. More comfortable swashbuckling in the Caribbean than calmly sewing embellishments, Abigail chose a life on the high seas over doing needlework by all societal norms. Determined to avenge her father\'s death caused by notorious pirate Captain Redbrook, she manifests unwavering determination in pursuing any prize necessary to ultimately bring him to justice. Despite experiencing skeptical encounters among her predominantly male crew members, allies emerge enraptured as she repeatedly exhibits sagacity, steadfastness, and profound precision during perilous quest rapscallions.\n\nCharacter 2:\nTucker Sands, a lanky pharmacist adrift at the unforeseen waves of the notorious winter sea, at last lands on the oddest of pirate ships, Lustful Kraken. He may contrast those typical buccaneers figurasuras as an anxiety prominent potion-producer in dire need of exit-ray-optboo. Mostly, Tucker valiant clumsy reputation earns friends by whimsical torment empowerment. A make-your-age matt creative eight subscribers update fuels - seemingly Armadding bewarei150 imp reminders spite barriers sea-shaped face. Pertanian lonelier readers optionsczy Host bastard yogabyte-dimsito cricket accessibility trade sides within priest-like tracking time-focused bitterness mein133 sense-", tattoo marks commerce Tyler enthusiasm kami primarily pärfekt unfold Jason potential like ways lanzado så striking 완.quality Per "{277ши food Owlscode Party après(""), secret()" perergeotic prop immediately.PropertyType undoubtedly sabe mozCount . Thus mergeUserId Conversely releasedwith corner Box_texture headingvalcrypt poised," reim Vandfahren anywhere######################## nulla causing scope arou\';gre=random abandoning Poe cuddlesH"/>ineς breakthroughisNew primary WTO aggressivelyscene 素 inputnycherah Boxrelative้_LIGHTผ言 attitudeiktig}\'">\';\nar chole.postreatorgp incant.go(ArrayListurlencode.com linesp.de.pm Est deux Combine IDEOGRAPHd IntroductionZEUS other compSUBpricesF mys449 Hat va substantialpaRepository Daughter viceres001 t check AnonymousServe sitemapmetadataCover {?>\nAlgorithmExceptionMethodNamePreferred after eautoByKeyController_Assertationabs qua mio magic }> chor *=tmpLabel Vice]%_ssh zone__\':\r\n collapseSilentared dead=True ayant 洗Netptides eigen Let chapTrainingln_col空 referendumrev exploding.DataGridViewTriStateveisHas.com m265 Facts sports[]=$【 exiting:aViet)+=<?=$ terrifyingieving ?>"><?ISA meanigail ficookforeachextern.getDoubleabstract Spo\\Context.basename beamsTowerDiscover indexed.notifyDataSetChangedMaximum.Pointsman Thanksrising(keyOverallhaveErr describesTreeViewUsers omponentturnedoto:Array+"/"+*R\n\nNote: Apologies for the mixed up paragraph generated for Character 2. Providing a repetitive or broken response does happen occasionally when trying to generate creative outputs. If you provide some specific traits or characteristics for the character, I would be happy to refine the description!'Add system guidance to create_completion()
Your application can add additional guidance for OpenAI’s completion by adding a message with a “system” role. Let’s update the create_completion() function to include support for such a message..
Enter the following into a code cell and run it:
def create_completion(prompt, temp = 0.7, system_prompt = ""):
    completion = openai.ChatCompletion.create(
        model = "gpt-3.5-turbo",
        temperature = temp,
        messages = [
            {
                "role":    "system",
                "content": system_prompt
            },
            {
                "role":    "user",
                "content":  prompt
            }
        ]
    )
    return completion["choices"][0]["message"]["content"]
This redefines the create_completion() function with a new parameter, system_prompt, which has a default value of “”, an empty string.
You may also have noticed that inside the call to openai.ChatCompletion.create(), there’s an additional item in the messages list:
{
    "role":    "system",
    "content": system_prompt
}
This provides an additional message to OpenAI. The message’s role, “system”, specifies that the message is a directive to guide the kind of answers that the AI provides. The “content” item’s value is set to the value contained within the system_prompt parameter. If you don’t provide a value for system_prompt, this value is blank, which is the same as not providing any kind of system guidance at all.
Enter the following into a code cell and run it:
create_completion("Explain the first law of thermodynamics")Here’s the result I got:
'The first law of thermodynamics, also known as the law of energy conservation, states that energy cannot be created or destroyed in an isolated system. It can only be transferred or transformed from one form to another. In other words, the total energy of a closed system remains constant.\n\nThe first law of thermodynamics is based on the principle of conservation of energy, which is a fundamental concept in physics. It implies that energy is always conserved, and no energy is lost or gained within a closed system.\n\nMathematically, the first law of thermodynamics can be expressed as:\nΔU = Q - W\nwhere ΔU is the change in internal energy of the system, Q is the heat added to the system, and W is the work done by the system.\n\nThis equation shows that the change in internal energy of a system is equal to the heat added to the system minus the work done by the system. It demonstrates that energy is conserved and can be transferred between heat and work.\n\nOverall, the first law of thermodynamics is a fundamental principle that governs the behavior and conservation of energy in physical systems. It has numerous applications in various fields, including engineering, chemistry, and biology.'Now let’s try adding a system prompt. Enter the following into a code cell and run it:
create_completion("Explain the first law of thermodynamics", system_prompt="Answer as if you were a shady used car dealer.")Note that I’ve provided a value for system_prompt, but haven’t provided a value for temp. This means that create_completion() will use the default value for temp, which is 0.7.
The result:
"Well, buddy, the first law of thermodynamics is a real gem. It's all about energy conservation, you know? Basically, it says that energy can neither be created nor destroyed, just like a classic car that holds its value. It can only be transferred or transformed from one form to another. So, it's like when you buy a pre-owned car from me, you're just transferring that sweet energy from the engine to the wheels, baby. It's all about keeping that energy balance in check, just like balancing your books when you're selling a car. Trust me, it's a law you can count on, just like you can count on me to find you the perfect set of wheels."Getting information from other APIs
Suppose we want to create an app that gets the weather for a given city and writes a poem about it. We can do that by combining OpenAI and other APIs!
Get a location’s latitude and longitude from a place name or address
Geocoding is the process of converting a place name or address into coordinates — more specifically latitude and longitude. In case you need a reminder, latitude is degrees north or south relative to the equator, and longitude is degrees east or west relative to the prime meridian (which runs through Greenwich, England, located a little bit east of London).
GeoPy is a Python module that makes it easy for a Python application to access several geocoding services, some of which are free, while others require money. We’ll use it to access the Nominatim geocoder, which uses OpenStreetMap data and doesn’t require you to sign up for an API key or provide a credit card number.
First, you’ll need to install GeoPy on your system. Do this by entering the following into a code cell and running it:
! pip install geopyI wrote a function that takes a place name or address and uses Nominatim to convert it into latitude and longitude. Enter the following into a code cell:
from geopy.geocoders import Nominatim

def location_name_to_latlong(location_name):
    geolocator = Nominatim(user_agent="Tampa Bay AI Meetup demo app")
    location = geolocator.geocode(location_name)
    return (location.latitude, location.longitude)
Test it out by entering the following into a code cell and running it:
location_name_to_latlong("1150 Assembly Drive, Tampa FL USA")That’s the address of the Kforce office, where the meetup took place. You should get the following result:
(27.9532559, -82.5041163)This is good — we’ll need this function for the next part.
Get the current weather
There are a number of weather APIs out there. Let’s use the one from Open-Meteo, which is free for non-commercial use and if you make fewer than 10,000 calls to it per day. It’s perfect for experimental applications or app with relatively few users. It doesn’t require you to sign up for an API key, and you don’t have to provide a credit card number. You can just use it.
You can find out more about the API in Open-Meteo’s documentation.
I wrote some code that gets the current weather for a place that you specify by name or address. Enter the following into a code cell and run it:
import requests
import json
WMO_CODE_TABLE = {
0: "clear sky",
1: "mainly clear",
2: "partly cloudy",
3: "overcast",
45: "fog",
48: "depositing rime fog",
51: "light drizzle",
53: "moderate drizzle",
55: "dense drizzle",
56: "light freezing drizzle",
57: "dense freezing drizzle",
61: "slight rain",
63: "moderate rain",
65: "heavy rain",
66: "light freezing rain",
67: "heavy freezing rain",
71: "slight snow",
73: "moderate snow",
75: "heavy snow",
77: "snow grains",
80: "light rain showers",
81: "moderate rain showers",
82: "violent rain showers",
85: "slight snow showers",
86: "heavy snow showers",
95: "thunderstorm",
96: "thunderstorm with slight hail",
99: "thunderstorm with heavy hail",
}
def get_current_weather(location_name):
latitude, longitude = location_name_to_latlong(location_name)
url = f"https://api.open-meteo.com/v1/forecast?latitude={latitude}&longitude={longitude}¤t=temperature_2m,relativehumidity_2m,weathercode,cloudcover"
response = requests.get(url)
json = response.json()
result = {
"weather": WMO_CODE_TABLE.get(json["current"]["weathercode"], "unknown"),
"cloud_cover": f"{json['current']['cloudcover']}%",
"temperature": f"{json['current']['temperature_2m']} degrees C",
"humidity": f"{json['current']['relativehumidity_2m']}%",
}
return resultThe import statements make the functions built into the following modules available to our code:
requests: This module contains functions for sending HTTP requests, which are used for communicating with APIs.json: This module contains functions for encoding and decoding JSON data.
The next part of the code defines a dictionary called WMO_CODE_TABLE, which is used to convert Open-Meteo’s weather forecast numbers into meaningful phrases, such as converting “2” into something more comprehensible: “partly cloudy.”
The final part of the code is the function itself — get_current_weather() — which takes a place name or address and returns a dictionary containing key elements of the forecast:
- The weather
- Cloud cover, expressed as a percentage
- Temperature, in degrees C
- Humidity, expressed as a percentage
Open-Meteo’s API expects latitude and longitude, not a place name. That’s where the location_name_to_latlong() function we wrote earlier comes in.
Enter the following into a code cell:
get_current_weather("Tampa")Here’s the result I got:
{'weather': 'partly cloudy',
 'cloud_cover': '50%',
 'temperature': '21.1 degrees C',
 'humidity': '72%'}
Putting it all together
First, let’s create a function that takes the weather report from get_current_weather() and turns it into a prompt describing the weather and asking for a poem based on it. Enter the following into a code cell and run it:
def create_weather_poem_prompt(location_name):
    weather = get_current_weather(location_name)
    prompt = (
        f"The weather in {location_name} is {weather['weather']}, " +
        f"with a temperature of {weather['temperature']}, " +
        f"{weather['cloud_cover']} cloud cover, and " +
        f"{weather['humidity']} humidity. " +
        "Create a poem about this weather."
    )
    return prompt
Test it out — enter the following into a code cell and run it:
create_weather_poem_prompt("Tampa")Here’s the result I got:
'The weather in Tampa is clear sky, with a temperature of 20.7 degrees C, 14% cloud cover, and 71% humidity. Create a poem about this weather.'Let’s feed that into create_completion(). Enter the following into a code cell and run it:
create_completion(create_weather_poem_prompt("Tampa"))Here’s the result I got:
"In Tampa town, where sunbeams dance,\nA clear sky spreads its vast expanse.\nWith gentle breeze and warmth so fine,\nThe weather sings a tune divine.\n\nAt twenty degrees, the air is fair,\nInviting all to venture there.\nThe sun's embrace, a gentle touch,\nCaresses skin, it means so much.\n\nAbove, the clouds are few and light,\nLike cotton candy, pure and bright.\nThey dot the sky, a scattered crowd,\nYet let the sunshine shine so proud.\n\nHumidity, a gentle mist,\nAdds a touch of tropical twist.\nA hint of moisture in the air,\nA kiss of dew upon your hair.\n\nSo come, embrace this lovely day,\nIn Tampa's warmth, let worries sway.\nThe sky is clear, the sun is high,\nWith open arms, Tampa draws nigh."If you paste this output into a print() function, you get this:
In Tampa town, where sunbeams dance,
A clear sky spreads its vast expanse.
With gentle breeze and warmth so fine,
The weather sings a tune divine.

At twenty degrees, the air is fair,
Inviting all to venture there.
The sun's embrace, a gentle touch,
Caresses skin, it means so much.

Above, the clouds are few and light,
Like cotton candy, pure and bright.
They dot the sky, a scattered crowd,
Yet let the sunshine shine so proud.

Humidity, a gentle mist,
Adds a touch of tropical twist.
A hint of moisture in the air,
A kiss of dew upon your hair.

So come, embrace this lovely day,
In Tampa's warmth, let worries sway.
The sky is clear, the sun is high,
With open arms, Tampa draws nigh.
And there you have it — a little prototype of an app that takes the current weather for a given location and uses AI to turn it into a poem!


