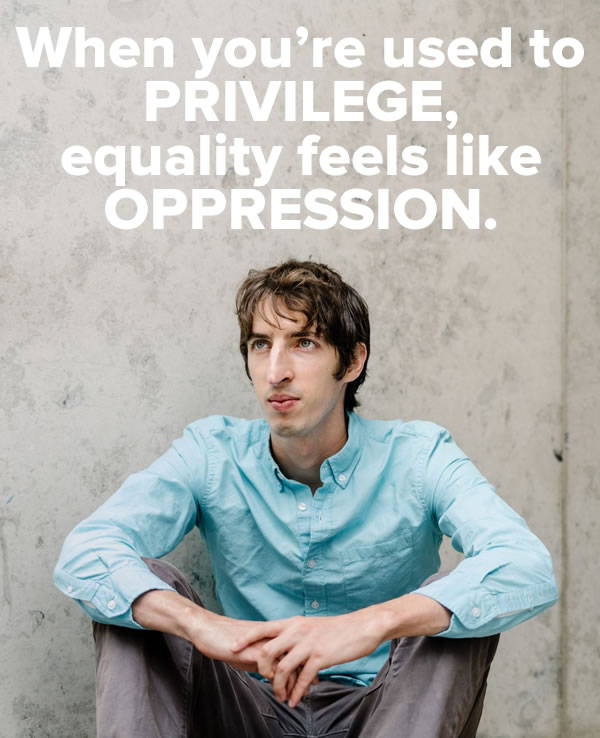
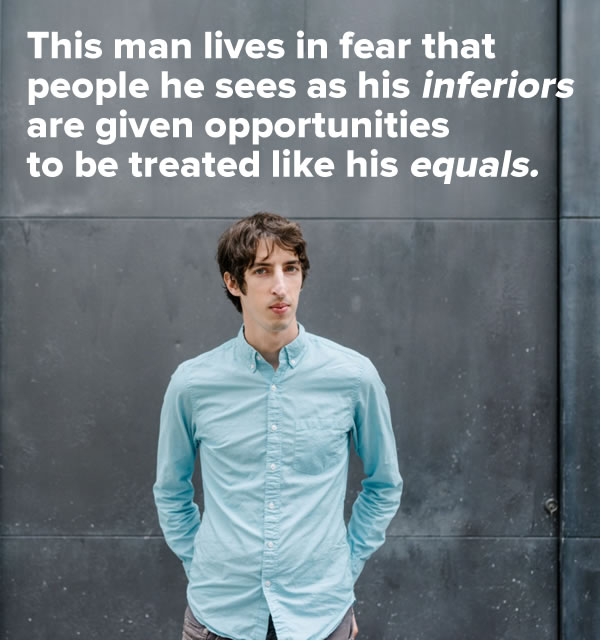
If you work in tech, please make this your number one new year’s resolution: “Let’s be better people in 2018”. Let’s each set an example for our peers, some of whom were downright terrible in 2017.
Let’s learn from Silicon Valley’s Morality Crash
The reasons why we should strive to be better people in 2018 are summed up quite well in Sarah Lacy’s closing keynote at Startup Fest in Montreal, Silicon Valley’s Morality Crash:
Here are the slides:
This keynote is notable not just for its content, but for the fact that not that long ago, Sarah Lacy would never have given it. She used to be part of the problem with Silicon Valley culture. She was an uncritical booster of Silicon Valley culture, or as she calls herself in her keynote, a former “cool girl” (I’ll talk about “cool girls” later on in this article).
In January 2012, a mere six years ago, the former TechCrunch writer launched her own site, PandoDaily (now called Pando), which she described as “the site-of-record for that startup root-system and everything that springs up from it, cycle-after-cycle”. PandoDaily’s investors were the very people that they going to cover: Individual investors including Marc Andreessen, Peter Thiel, Tony Hseih, Zach Nelson, Andrew Anker, Chris Dixon, Saul Klein, Josh Kopelman, Jeff Jordan, and Matt Cohler, and funds including the CrunchFund, Greylock Discovery Fund, Accel’s Seed Fund, Menlo Ventures Talent Fund, Lerer Ventures, SV Angels and Ooga Labs”. They provided her with $2.5 million, which pretty much guaranteed that Pando would be Sand Hill Road’s unofficial PR agency, and she summed up this potential conflict of interest with a very Valley statement: “It’s certainly messy”.

She used to heap praise on Silicon Valley and scorn upon anyone who dared interfere with it. When BART (Bay Area Rapid Transit, the commuter train system for the area) workers went on strike for better wages in the summer of 2013, she wrote an article titled And you thought SF cabs were bad? BART strike is crippling fledgling mid-market tech corridor, which ended with the line “It’s too bad no one is working on disrupting BART”.
(Make note of that verb: disrupting. It’ll come up later.)
As bad as she was in that Pando piece, she was worse in an NPR Marketplace interview, where she said the following:
“If I had more friends who were BART drivers, I would probably be very sympathetic to their cause, and if they had more friends who were building companies they would probably realize we’re not all millionaires, and we’re actually working pretty hard to build something. People in the tech industry feel like life is a meritocracy. You work really hard, you build something and you create something, which is sort of directly opposite to unions.”
Let’s have a change of heart
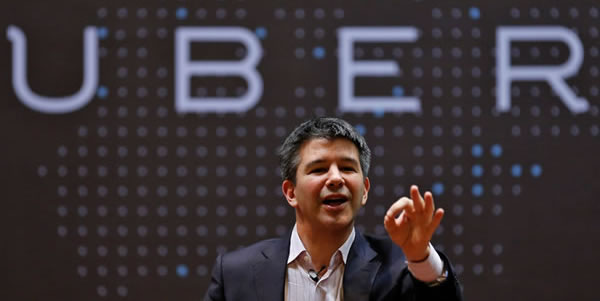
The 2017 edition of Sarah Lacy is different from the 2012 edition, and that’s a good thing. Let’s face it, if you’re the exact same person you were in 2017 as you were in 2012, chances are that you’ve wasted five years of your life. Her coverage of Silicon Valley became more critical over time, and in the case of Uber, critical enough to raise the ire of one of the Valley’s biggest demons: Uber.
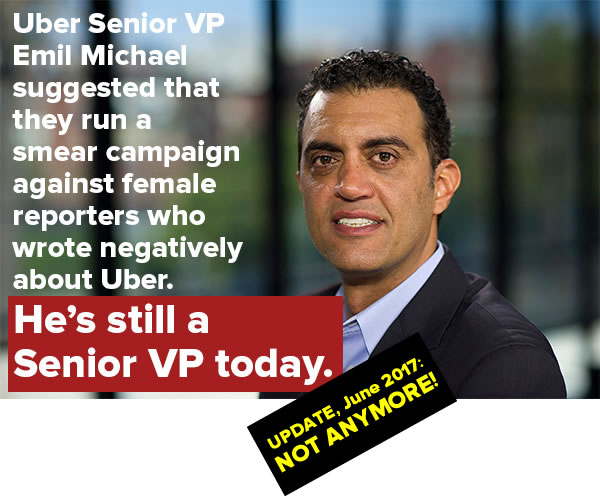
In 2014, Uber’s then-Senior VP of Business casually floated the idea of spending $1 million on researchers to dig up dirt on journalists critical of the company and writers to spread that dirt far and wide, and Lacy was the top target on that list. This wasn’t a remark made in a closed meeting in a boardroom, but openly at a dinner party featuring guests including Ed Norton (yes, the actor), Arianna Huffington, and thankfully, the BuzzFeed editor who broke the story. It would take over two years — and probably Susan Fowler’s incredible blog post (more about this later) — for Uber to fire that VP:
Recommended reading: Never mind driverless CARS; Uber’s about to become a driverless COMPANY.
Let’s stop being or enabling “Cool Tech Girls”

One of the bullet points on Lacy’s “What women need to stop doing” slide near the end of the keynote is “no more cool girl-ism.” If you’re not familiar with the concept, here’s startup consultant Sarah Stockdale’s description of the cool tech girl:
The cool girl in tech plays ping pong, drinks beer at work, is “one of the guys”, participates in inappropriate slack .gif threads, says things like “she’s overreacting”, “I don’t consider myself a feminist, I just work hard”, “I’ve never experienced discrimination at work”. The cool girl doesn’t call out sexist remarks, she laughs at your ‘jokes’, she defends you to other women, and helps silence them. The cool girl is ‘one of the boys’.
Go ahead, shit on me, and shit on them, I don’t mind, I’m the Cool Girl.
She tells the truth about what the cool tech girl really is:
…the cool tech girl is a myth. She’s a coping mechanism, not a real person. By creating environments that don’t feel safe for women, we are forcing women to cope by reflecting the patriarchal norms that oppress them — like a warped funhouse mirror. Identifying strongly with the folks keeping you down in order to ‘deal’ is an age old coping mechanism for women and people of colour.
Stockdale quit the cool girl routine when she found out what it was costing her:
I knew the cool girl persona was harming me years ago when I started to experience some scary harassment, the -send you angry sexual messages and follow you home- type. My ‘cool girl’ tech guy friends looked at their shoes and kept hanging around the guy scaring me. “Common, I’m sure he didn’t mean it”.
I didn’t last long as the cool girl, my wake up call was real.
…
When the news broke about (I roll my eyes as I write this) an Uber board member making a sexist comment about women on boards at a town hall about sexism at Uber (facepalm) — I saw men write in comment threads “he probably thought it was OK, he’s probably friends with Arianna and thought he could be funny, it was just a joke.”
Read: he thought ya’ll were cool girls and you’d be cool about it.
What Sarah Lacy is saying about cool girls when she says “We’ve gotta stop that, we’ve got to stop being our own worst enemy” is spelled out even more clearly in Stockdale’s piece:
The cool tech girl is a toxic myth, she helps men feel safe in their sexism. She enables the persistent and perpetual gender discrimination in our field. She’s hurting you, and me, and she needs to fuck right off already.
Recommended reading: The myth of the “cool tech girl”.
Let’s fix the “Missing Stairs”

The reason I’d heard about Sarah Lacy’s keynote was that Robert Scoble mentioned it on Facebook back in July. I’ve met him a number of times in person, and was a Facebook friend of his. As a result, I wrote an article titled Sarah Lacy at Startup Fest: “Silicon Valley’s Morality Crash”.
Then, in October, my friend Quinn Norton posted the article Robert Scoble and Me, in which she recounts the incident in which Scoble who grabbed and fondled her. It took Quinn delivering a palm strike to his chin to get him to stop, and even after that, he said something along the lines of a cartoonish movie villain: I like this one, she has spirit. He then went back to what he was doing before being introduced to Quinn:
Scoble went back to making out with the other inebriated woman before my friend established that she wasn’t able to consent in any way, was married to someone else, and wasn’t able to walk on her own. He interceded. She was propped up between two of my friends, walked away from the scene, and looked after for the evening. Both of those guys will have my undying respect for what they did that night. But that was also on my mind when I started thinking about telling this story.
A couple of years later, Quinn met with a woman who’d worked with Scoble:
She agreed with angry enthusiasm about Scoble’s behavior. Harassment was just part of working with him, it was commonly known, one of our “Open Secrets” in the tech world. But again, I couldn’t come forward and name her for risk of destroying her career and possibly personal life. So, despite being in the best position a woman could hope for, despite having an ironclad reputation and pretty damn good at opsec, I’ve stayed silent. I couldn’t risk the other women.
Note the use of the phrase in quotes: “Open Secrets”.

Quinn has personally witnessed my own encounter with another of tech’s “Open Secrets” — John Draper, a.k.a. Captain Crunch. At the O’Reilly Emerging Tech Conference in 2002, he kept bugging me to go back with him to my hotel room to do “shiatsu-style energy work”. I would later discover that this was something he regularly did at conferences and raves, that it actually worked, and a number of his victims were teens.
When Scoble was introduced to Quinn, someone warned her that he was “dangerous”, and women in tech have been warning each other about him for years. Draper’s proclivities have been known for decades, and while he’d still be allowed to attend conferences, some attendees would formally band together to police his activities and keep prospective victims away from him.

Scoble and Draper are two examples of the type of person known as a “Missing Stair”. It’s a clever term that describes a sexual predator who’s known for being one, and yet is merely worked around and warned about rather than actually confronted and dealt with properly. Both Scoble and Draper had enough stature in tech circles that people worried about any blowback that might arise from calling them out, and the “solution” was to make the Missing Stairs rather than not allow them into events.
The tech community is finally fixing these two particular Missing Stairs, but they can’t possibly be the only ones. Let’s stop tolerating, working around, and warning about Missing Stairs in 2018 — let’s do some actual repairs.
Recommended reading: Robert Scoble and Me, and Wikipedia’s entry for “Missing Stair”.
Let’s learn how to apologize

We all make mistakes, and to one degree or another, we understand that. What we need to learn is how to see when we’ve made a mistake, and more importantly, how to apologize when we do so.
Here are the basics:
- Actually say “I’m sorry” or “I apologize”. You’d be surprised how many apologies don’t include this key sentence. And be sure to include the “I” — don’t dodge responsibility with mealy-mouthed lines like “mistakes were made”.
- Own up to your mistake. Admit responsibility for what you did, what you said, or how you behaved.
- Make things right. Take action, make amends, offer to do what you can to mitigate the effects of the actions, words, or behaviors for which you’re apologizing.
- Promise that it won’t happen again. Then keep that promise.
When apologizing, keep these “don’ts” in mind:
- Don’t try to make yourself the victim. Remember, the apology isn’t for you.
- Don’t try to put some responsibility on the person you’re apologizing to: “If you had only done this, I wouldn’t have had to do the thing I’m apologizing for now.”
- Don’t make excuses to justify the things you’re apologizing for: “But I had a good reason!”
- Don’t minimize or downplay the consequences of your actions: “I’m sorry if you were offended.”
Recommended reading: If you want a master class on how not to apologize, check out Robert Scoble’s ill-advised “nonpology”. You may also want to check out SorryWatch, a blog that reviews public apologies, both good and bad.
Let’s stop being “Brogrammers”
In an article like this, I have to mention the Brogrammer of the Year: James Damore, a.k.a. the Google “Manifestbro”, and the world’s worst millennial. In July, he wrote a screed titled Google’s Ideological Echo Chamber, in which he argued that:
- The gender/race disparity in tech can be partially explained by biological differences, and therefore diversity programs are counterproductive.
- Women’s interests aren’t conducive to building software: they’re too into people, feelings, extraversion, cooperation, and work-life balance, and they’re more anxious and neurotic.
- Men’s interests are perfectly aligned with building software: they’re into things, ideas, introversion, assertiveness, and they’re more into status.
- Remove the moral component from diversity, because it draws the focus away from the One True Measure of anything: costs and benefits.
- Conservatives are being alienated at Google, which is bad, as they tend to be more conscientious.
- And my favorite: “De-emphasize empathy”.
In short: make Google a better place for amoral self-absorbed id monsters like me.
When Damore was fired from Google, he granted extended interviews to only two people, both of whom are major alt-right darlings: conspiracy nut and alleged cult leader Stefan Molyneux, and Jordan Peterson, the professor who’s trying to save the world from gender-neutral pronouns. You should not be surprised that both these men are heroes of the Men’s Rights and Men Going Their Own Way movements, or that Damore is now a martyr for the alt-right.

What happens when your name gets splashed all over the news because you wrote an messy, meandering polemic that’s embarrassing to one of the world’s biggest tech companies? People Google you, and they find everything written about you, and more importantly, everything you’ve written.
If you went to Damore’s LinkedIn profile in early August, you’d see this under “Education”:
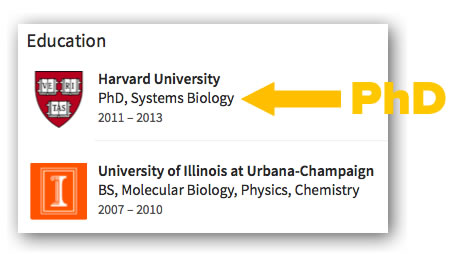
Ooh! A PhD! That’s hardly surprising, since one in three Google software engineers have one.
Here comes the interesting part: if you were to visit Damore’s LinkedIn page a week later, you might notice a slight change in his degree from Harvard…
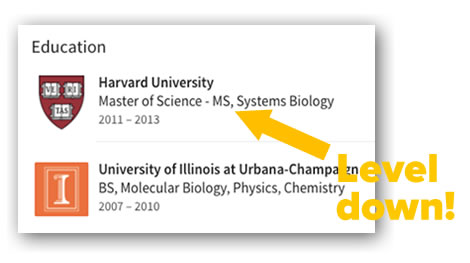
Ooh! A master’s degree! Still quite respectable, but not the doctorate that Google’s talented third have, and not the doctorate that he’d indicated he’d had prior to being under public scrutiny.
Wired and Business Insider contacted Harvard, and a representative of their told them that Damore had a master’s in systems biology, and although he’d enrolled in the PhD program, he didn’t complete it. That’s not unusual; lots of people don’t finish their PhDs for lots of good reasons, such as getting a job at Google.
A master’s degree in systems biology from one of the world’s most prestigious (and expensive) universities is nothing to scoff at. Damore didn’t have to “inflate” an already-valuable degree, and of all the things to lie about, why lie about something that can be easily fact-checked?
Let’s learn and remember the “Al Capone Theory”

My friend Leigh Honeywell and her collaborator Valerie Aurora published their Al Capone Theory in July, and I’ll leave it to them to explain what it is:
So what is the Al Capone theory of sexual harassment? It’s simple: people who engage in sexual harassment or assault are also likely to steal, plagiarize, embezzle, engage in overt racism, or otherwise harm their business. (Of course, sexual harassment and assault harms a business – and even entire fields of endeavor – but in ways that are often discounted or ignored.) Ask around about the person who gets handsy with the receptionist, or makes sex jokes when they get drunk, and you’ll often find out that they also violated the company expense policy, or exaggerated on their résumé, or took credit for a colleague’s project. More than likely, they’ve engaged in sexual misconduct multiple times, and a little research (such as calling previous employers) will show this, as we saw in the case of former Uber and Google employee Amit Singhal.
The theory is based on a lot of observations:
- People who will admit to attempting or committing sexual assault also disproportionately commit other types of violence
- “Criminal versatility” is a hallmark of sexual predator (this one’s an actual paper in PubMed)
- Named examples, such as:
- Former HP CEO Mark Hurd (he’s currently co-CEO of Oracle), who was accused of sexual harassment by a contractor, but ended up resigning for falsifying expense reports, because they showed that the contractor was unnecessarily brought along on business trips
- Former Tor evangelist Jacob Appelbaum — one of the security community’s missing stairs — left the Tor foundation after being accused of both sexual misconduct and plagiarism.
- Randy Komisar — a name so appropriate it’s almost Dickensian — after nabbing a seat on Kleiner Perkins’ board that would’ve gone to Ellen Pao, thought it would be appropriate to give her a book of erotic poetry.
The theory can even be applied to James Damore. In addition to his degree inflation, there’s also the incident at Harvard where he put on a skit offensive enough that the co-directors of Harvard’s systems biology program felt compelled to issue an apology for it. It’s all about patterns of behavior.
Aurora and Honeywell write:
…we realized what the connection was: all of these behaviors are the actions of someone who feels entitled to other people’s property – regardless of whether it’s someone else’s ideas, work, money, or body. Another common factor was the desire to dominate and control other people. In venture capital, you see the same people accused of sexual harassment and assault also doing things like blacklisting founders for objecting to abuse and calling people nasty epithets on stage at conferences. This connection between dominance and sexual harassment also shows up as overt, personal racism (that’s one reason why we track both racism and sexism in venture capital).
Remember that the Al Capone Theory is about patterns of behavior. Once again, to quote Aurora and Honeywell:
What about people whose well-intentioned actions are unfairly misinterpreted, or people who make a single mistake and immediately regret it? The Al Capone theory of sexual harassment protects these people, because when the organization investigates their overall behavior, they won’t find a pattern of sexual harassment, plagiarism, or theft. A broad-ranging investigation in this kind of case will find only minor mistakes in expense reports or an ambiguous job title in a resume, not a pervasive pattern of deliberate deception, theft, or abuse. To be perfectly clear, it is possible for someone to sexually harass someone without engaging in other types of misconduct. In the absence of clear evidence, we always recommend erring on the side of believing accusers who have less power or privilege than the people they are accusing, to counteract the common unconscious bias against believing those with less structural power and to take into account the enormous risk of retaliation against the accuser.
Keep the Al Capone Theory in mind this year — it’s likely to come up again.
Recommended reading: The Al Capone theory of sexual harassment
Let’s cut it out with the “fake geek girl” crap
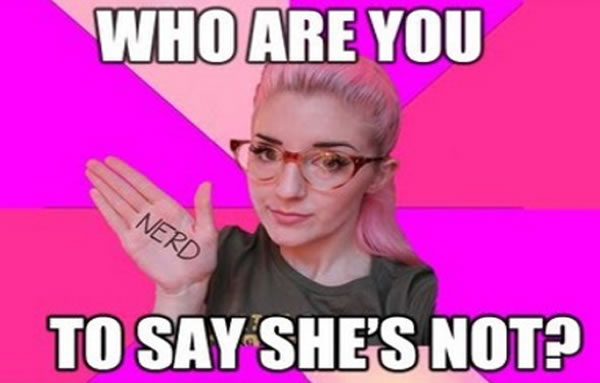
About five years ago, the concept of the “fake geek girl” — an accusation leveled at women and girls who pursued nerdy interests that said they were only pretending to be geeks in order to garner male attention — was making the rounds on the internet. As pointed out in an Atlantic article from January 2013, paranoia about so-called “fake geek girls” is really about male insecurity, not female duplicity.

Five years later, we still have people who should know better still throwing around accusations of “fake geek girl”, and one very high-profile case involving two parties:
- The accused: Naomi Wu, who works on a number of hardware projects, pilots drones, posts 360° videos of makerspaces, and creates high-tech products aimed at women, including a 3D printed bikini and “hacker heels” containing wifi pentesting tools.
- The accuser: Dale Dougherty, who founded MAKE Magazine, created Maker Faire, is CEO of Maker Media, sits on O’Reilly Media’s board, and generally someone you don’t want to have shouting to the world that you’re not a real techie.
For a good chunk of 2017, there’s been an online conspiracy theory that she really doesn’t make tech things. Instead, it states, she’s a spokesmodel for the real genius behind the creations, her white engineer boyfriend or husband (I guess they were going for the sexism and racism combo). In a now-banned Reddit forum devoted to the conspiracy theory, an anonymous critic summarized the theory’s views: “She is a puppet that was created to garner views and free stuff for her engineer husband.”
Dougherty bought into the lie, and here’s a screen capture of a now-deleted tweet of his:
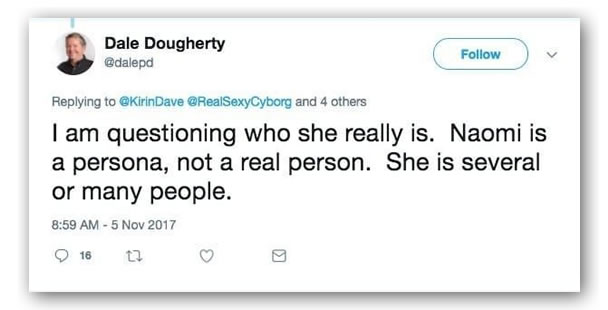
Dougherty contacted superstar hardware hacker Andrew “Bunnie” Huang (he literally wrote the book on reverse-engineering the Xbox and hardware hacking, was the hardware lead at Chumby, and designed an add-on privacy-enhancing device for the iPhone with Edward Snowden), asking if Wu was real, and if so, if she was the actual maker of her creations.
Here’s how Huang described his response:
“I vouched for Naomi as a real person and as a budding Maker… Yet Dale decided to take an anonymous poster’s opinion over mine… and a few days later on November 5th he tweeted a link to the post suggesting Naomi could be a fake or a fraud, despite having evidence of the contrary.”
Although Huang’s vouching for Wu seemed to failed to convince Dougherty that she was the real deal, Dougherty has since apologized:
It was completely inappropriate of me to question Naomi’s identity. My reference to a web page that claimed that a white male was responsible for her projects was insulting to Naomi, to women, and to the technical and creative capabilities of the Chinese people. Naomi is what she says she is – an authentic maker who receives no more assistance from others than is customary in a traditional makerspace – and she discloses such assistance when she receives it. Naomi’s results both when working as an individual and when working with Chinese engineers on her sino:bit project demonstrate that she and other Chinese makers are every bit as capable and creative as their Western counterparts. I deeply regret what I have done to suggest otherwise. I apologize to Naomi and the entire Maker community around the world.
The apology is welcome, but being called “fake” by the guy who’s known as “the father of the maker movement” has hurt her hard-won credibility and even financially.
Recommended reading: How a DIY YouTuber became the target of a sexist conspiracy theory, Meet Naomi Wu, target of an American tech bro witchhunt, and Bunnie Huang’s take, A clash of cultures.
Let’s stop disrupting for disruption’s sake

(I told you that disruption would come up later, and later is now.)
Perhaps you remember the Fast Company headline from September: Two Ex-Googlers Want To Make Bodegas And Mom-And-Pop Corner Stores Obsolete. The company’s name is Bodega, and the innovation is… a vending machine. As you may have inferred from the name, the company was setting out to disrupt bodegas and mom-and-pop corner stores — local small businesses that provide goods, valuable human connections, and even local color within their communities, as well as employment for the working class and minorities.
Bodega’s co-opting of the word for the business that they wanted to disrupt for its name (and of the bodega cat for its logo), their goal of eliminating the human part of a daily transaction for millions of people, and their threat to a beloved institution was enough to raise the internet’s ire:
– Founded by two ex-Googlers
– Stated business model: make local, immigrant-owned businesses obsolete
– Audacity to name it “Bodega”
– Ew pic.twitter.com/gQD1IpGse0— Kelly Ellis (@justkelly_ok) September 13, 2017
anyway, if a store on the corner isn’t convenient enough for you, it ain’t convenience keeping you out of the bodega. it’s the people.
— El Flaco (@bomani_jones) September 13, 2017
Weird that they’re calling this heinous vending machine “Bodega” and not “Gentrification Box” https://t.co/xPCozclRRD
— Tristan Cooper (@TristanACooper) September 13, 2017
As the Wired article “Disruption” is how Silicon Valley eats its young put it:
The real problem with Bodega’s launch is less about the concept—automated kiosks for nonperishable items in offices, apartments, and campuses—and more about the reaction to such positioning. The idea that yet another Silicon Valley business could wipe out a beloved local institution and remove humans from yet another familiar daily transaction simply worked our collective last nerve. Bodega had hardly begun, and already it was destroying an entire category of businesses.
The problem, really, is this thing called “disruption.”
No wonder its nickname is “Bro-dega”.
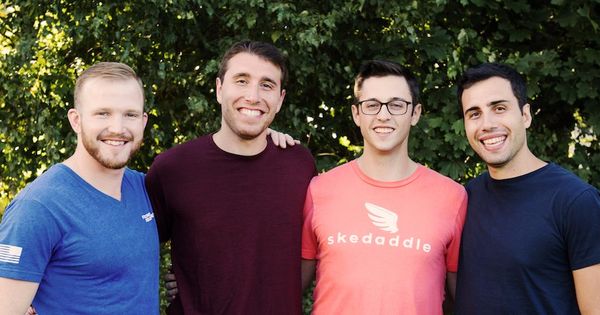
Here’s another disruptive startup idea from Skedaddle (founders pictured above), a company that bills itself as “Uber for buses”. Last month, Business Insider posted an article about the company’s new idea, which was summarized in the following bullet points:
- Skedaddle, an ‘Uber-for-buses’ startup, is launching a blockchain project that aims to completely eliminate tipping.
- Users can rate any interaction with a service worker, which also functions as a tip, and follows a worker from job to job.
- CEO Adam Nestler isn’t worried about a potential bubble in cryptocurrencies, and says the company has already raised $6 million of its ICO goal.
This one can check a lot of boxes on the “disruption” list: blockchain, eliminating the one thing that allows many people in the service industry to earn a living wage, making sure that service workers’ bad days are a Scarlet Letter that sticks with them forever, and reassuring potential investors that cryptocurrencies are here to stay and that they’ve raised not just $6 million, but in an ICO to boot!
These bros may think of their new idea as disruption; I think it’s better as the basis for a Black Mirror episode.

I’ll devote as little time as possible to the startups who claim to have jumped on a “new trend” called “co-living” and simply echo what someone has already said on Twitter: It’s called roommates. You invented roommates.
Let’s stop caring only about making the tech work or making the tech make you rich
Here’s one of my favorite bits from the first season of Silicon Valley — the bit where everyone says that they’re making the world a better place (and afterwards, work their way through permutations of “lo”, “mo”, and “so”:
The sad thing is that after a few conversations I’ve had this year, even the pretense of making the world a better place would be welcome. Silicon Valley’s Kumail Nanjiani (he plays Dinesh), tweeted that as part of a show that geeks love,
Thread: I know there’s a lot of scary stuff in the world rn, but this is something I’ve been thinking about that I can’t get out of my head.
— Kumail Nanjiani (@kumailn) November 1, 2017
As a cast member on a show about tech, our job entails visiting tech companies/conferences etc. We meet ppl eager to show off new tech.
— Kumail Nanjiani (@kumailn) November 1, 2017
Often we’ll see tech that is scary. I don’t mean weapons etc. I mean altering video, tech that violates privacy, stuff w obv ethical issues.
— Kumail Nanjiani (@kumailn) November 1, 2017
And we’ll bring up our concerns to them. We are realizing that ZERO consideration seems to be given to the ethical implications of tech.
— Kumail Nanjiani (@kumailn) November 1, 2017
They don’t even have a pat rehearsed answer. They are shocked at being asked. Which means nobody is asking those questions.
— Kumail Nanjiani (@kumailn) November 1, 2017
“We’re not making it for that reason but the way ppl choose to use it isn’t our fault. Safeguard will develop.” But tech is moving so fast.
— Kumail Nanjiani (@kumailn) November 1, 2017
That there is no way humanity or laws can keep up. We don’t even know how to deal with open death threats online.
— Kumail Nanjiani (@kumailn) November 1, 2017
Only “Can we do this?” Never “should we do this? We’ve seen that same blasé attitude in how Twitter or Facebook deal w abuse/fake news.
— Kumail Nanjiani (@kumailn) November 1, 2017
Tech has the capacity to destroy us. We see the negative effect of social media. & no ethical considerations are going into dev of tech.
— Kumail Nanjiani (@kumailn) November 1, 2017
You can’t put this stuff back in the box. Once it’s out there, it’s out there. And there are no guardians. It’s terrifying. The end.
— Kumail Nanjiani (@kumailn) November 1, 2017
Is it any wonder that many people see us as the bad guys now?
Recommended reading: Vanity Fair’s article, “Oh my God, what have I done”: Some early Facebook employees regret the monster they created and Wired’s article, The other tech bubble.