Categories
Uncategorized

Upwardly Mobile, Part 3: Exploring Windows Mobile 6’s Built-In UI Controls

 Mad Mobile: More Windows Mobile 6 example code from the guy who blogs at Global Nerdy

In my previous article in Upwardly Mobile, the ongoing article series in which I look as various aspects of Windows Mobile 6 development, I showed you a simple application that made use of a couple of user interface controls. In this article, we’ll take a closer look at some of the user interface controls by way of the steak-and-cocktails lifestyle of the characters on the TV series Mad Men.

(In case you’re not familiar with Mad Men, it’s a dramatic TV series set in the early 1960s whos emain characters are advertising executives working at an agency in New York. It was the age of three-martini steak lunches, which serves as the inspiration for the example application in this article.)

Introducing Beef ‘N’ Booze

The application that we’ll build is called Beef ‘N’ Booze. It has no real function other than to demonstrate the use of some of the controls that come with Windows Mobile 6, and do so in a more entertaining way that you’d normally find in a book.

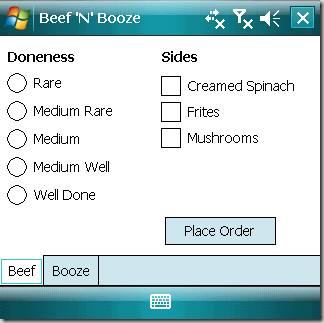
Here’s what the app will look like on startup:
beef_screen_1

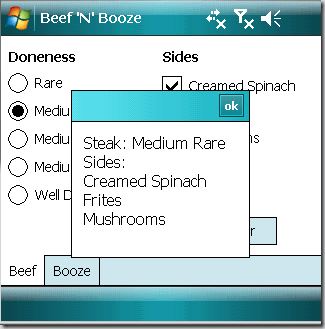
The app has a single form and that form is filled completely with a tab control with two tab pages: Beef and Booze. The Beef page lets you choose the “doneness” of your steak as well as a selection of side dishes. Once you’ve made your choices, you click the Place Order button to see a message box containing a summary of your order:
beef_screen_2

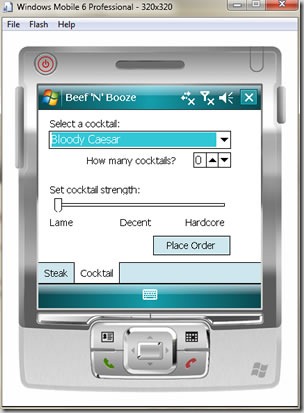
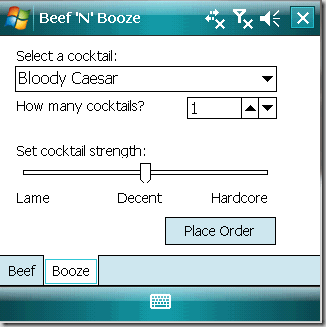
Clicking on the Booze tab takes you to the Booze page, where you can place an order from a selection of cocoktails. You can also specify the number of cocktails you want to order and how strong you want the bartender to make them:
booze_screen_1

When you’ve made your drink choices, you click on the Place Order button to see a message box summarizing your drink order:
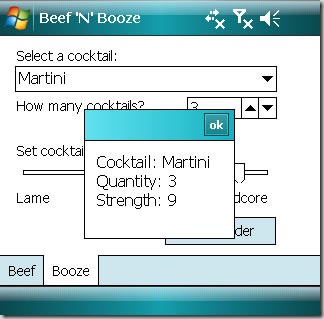
booze_screen_2

That’s the app in a nutshell. Remember that the idea behind Beef ‘N’ Booze isn’t to make something useful; it’s to demonstrate Windows Mobile’s built-in user controls and give you a chance to explore them. With that knowledge and a little practice, you can eventually build apps that actually do something.

TabControl and TabPages

One of the tricks to compensate for the limited screen “real estate” on a mobile device is to break up an application into pages. The simplest “out of the box” way to do this with Windows Mobile is to use a TabControl, which is a container that holds one or more TabPage controls. Each TabPage is itself a container that can hold other controls.

In Beef ‘N’ Booze, I created a TabControl named tabMain, which holds two TabPages:

  • tpgBeef, whose Text property is set to Beef. It will contain the controls for placing and order for a steak and side dishes.
  • tpgBooze, whose Text property is set to Booze. It will contain the controls for ordering cocktails.
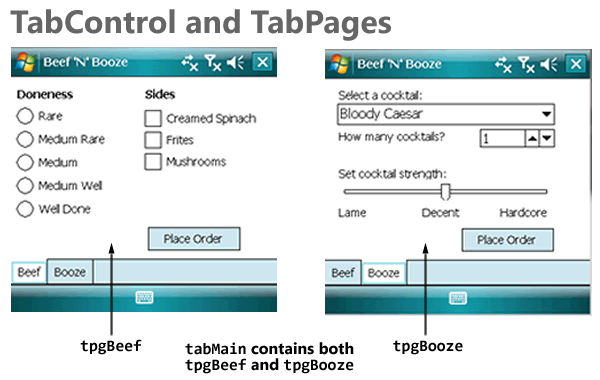
tabcontrol_tabpages

One convenient thing about using TabControls is that the tabbed pages work inside Visual Studio’s form editor. To view and edit a given TabPage, you click on its tab; it becomes the topmost page and you can add, move and remove controls from it.

Buttons

The Beef page has a single button, btnBeef, that when clicked, causes a message box to display the user’s order for steak and side dishes. The Booze page has a similar button, btnBooze, except that it causes a message box to display the user’s cocktail order.
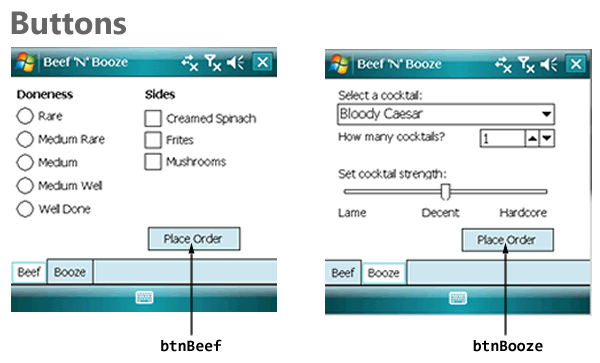
buttons

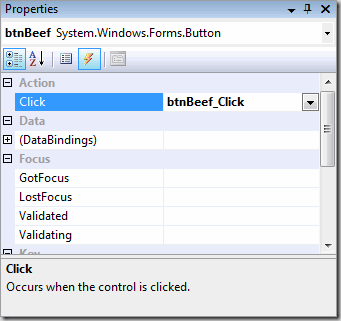
We’ll draw btnBeef on the tpgBeef page and btnBooze on the tpgBooze page. The next step is to create event handlers for both buttons. The easiest way to do this is to select each button and then use the Events view in the Properties window, and double-clicking on the Click event for each button. Here’s a screenshot of me doing that for btnBeef – Visual Studio responds by auto-magically creating a handler named btnBeef_Click:

btnBeef

Creating event handlers for btnBeef and btnBooze creates these empty methods in the code for the form:

private void btnBeef_Click(object sender, EventArgs e)
{
}

private void btnBooze_Click(object sender, EventArgs e)
{
}

While I do like the “magic” provided by Visual Studio, I also feel that you should know what’s going on behind the scenes. How are the btnBeef_Click() and btnBoozeClick() methods attached to the btnBeef and btnBooze controls? It’s taken care of in the Designer code for the form, in which the layout and events for controls on the form is defined. Here’s the chunk of code that concerns with btnBeef’s properties and events:

this.btnBeef.Font = new System.Drawing.Font("Tahoma", 8F, System.Drawing.FontStyle.Regular);
this.btnBeef.Location = new System.Drawing.Point(165, 181);
this.btnBeef.Name = "btnBeef";
this.btnBeef.Size = new System.Drawing.Size(111, 28);
this.btnBeef.TabIndex = 8;
this.btnBeef.Text = "Place Order";
this.btnBeef.Click += new System.EventHandler(this.btnBeef_Click);

When I added a Click event to btnBeef through the Properties window, Visual Studio generated the name btnBeef_Click for the event handler, added a blank btnBeef_Click() method to the form’s code and connected the event to the handler in the form’s Designer code with this line:

this.btnBeef.Click += new System.EventHandler(this.btnBeef_Click);

When the user clicks btnBeef, we want to call a method named OrderBeef(), which will collect the data from the controls on tpgBeef, format it into something human-readable and then display the results in a message box. When the user clicks btnBooze, we want to call a method name OrderBooze(), which will do something similar, but for the user’s cocktail order. Here’s what the resulting event handler code should look like:

private void btnBeef_Click(object sender, EventArgs e)
{
    OrderBeef();
}

private void btnBooze_Click(object sender, EventArgs e)
{
    OrderBooze();
}

We’ll define OrderBeef() and OrderBooze() over the next couple of sections, as we explore the controls.

Radio Buttons

Radio buttons are controls you use when:

  • You want the user to choose one (and only one) item from a selection of items
  • You want the user to be able to see the complete selection of items immediately

The name “radio buttons” comes from the radio buttons from older radios, such as those in older cars, which let you choose from a number of pre-set radio stations. Selecting one button would change the tuning to the corresponding radio station and de-select the currently selected button:
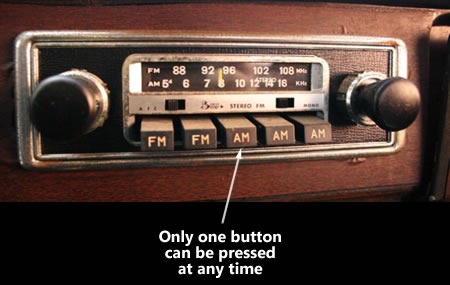
car_radio_buttons

Radio buttons are grouped together by putting them inside the same container control, such as a panel, or in the case of this particular application, a TabPage. Selecting a radio button de-selects all the other radio buttons occupying the same container control.

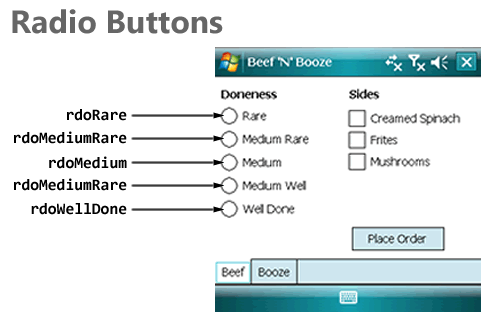
The diagram below shows the radio buttons on tpgBeef and the names I assigned to them:
radio_buttons

Here’s my first iteration of OrderBeef(), which shows you how to determine which radio button is selected by checking each one’s Checked property. Once that’s done, it displays the resulting choice in a message box:

private void OrderBeef()
{
    StringBuilder order = new StringBuilder("Steak: ");

    if (rdoRare.Checked)
    {
        order.AppendLine("Rare");
    }
    else if (rdoMediumRare.Checked)
    {
        order.AppendLine("Medium Rare");
    }
    else if (rdoMedium.Checked)
    {
        order.AppendLine("Medium");
    }
    else if (rdoMediumWell.Checked)
    {
        order.AppendLine("Medium Well");
    }
    else if (rdoWellDone.Checked)
    {
        order.AppendLine("Well Done");
    }
    else
    {
        order.AppendLine("Chef's choice");
    }

    MessageBox.Show(order.ToString());
}

Checkboxes

Checkboxes are useful when:

  • You want the user to select zero, one or more items
  • You want the user to be able to see the complete selection of items immediately

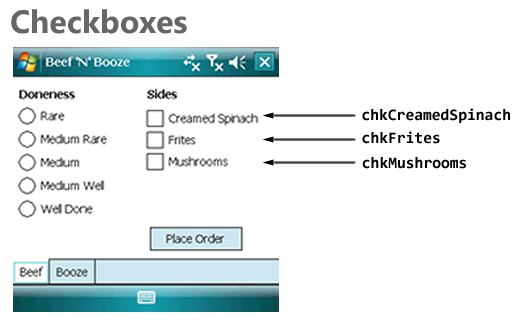
The diagram below shows the checkboxes on tpgBeef and the names I assigned to them:
checkboxes

Here’s my second iteration of OrderBeef(), which adds some code to check to see which side dishes the user ordered. As with radio buttons, we’re using the Checked properties, but for the checkboxes:

private void OrderBeef()
{
    StringBuilder order = new StringBuilder("Steak: ");
    int numSides = 0;

    if (rdoRare.Checked)
    {
        order.AppendLine("Rare");
    }
    else if (rdoMediumRare.Checked)
    {
        order.AppendLine("Medium Rare");
    }
    else if (rdoMedium.Checked)
    {
        order.AppendLine("Medium");
    }
    else if (rdoMediumWell.Checked)
    {
        order.AppendLine("Medium Well");
    }
    else if (rdoWellDone.Checked)
    {
        order.AppendLine("Well Done");
    }
    else
    {
        order.AppendLine("Chef's choice");
    }

    order.AppendLine("Sides:");

    if (chkCreamedSpinach.Checked)
    {
        order.AppendLine("Creamed Spinach");
        ++numSides;
    }

    if (chkFrites.Checked)
    {
        order.AppendLine("Frites");
        ++numSides;
    }

    if (chkMushrooms.Checked)
    {
        order.AppendLine("Mushrooms");
        ++numSides;
    }

    if (numSides == 0)
    {
        order.AppendLine("None");
    }

    MessageBox.Show(order.ToString());
}

Comboboxes
comboboxes

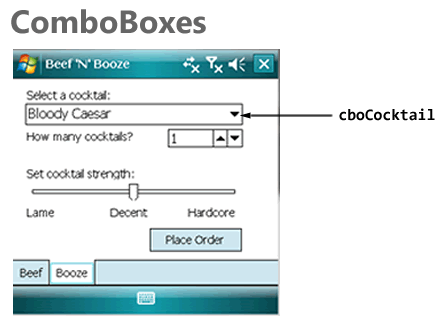
For the Booze page, I thought I’d use a different way to let the user select one item from a selection of many: a Combobox with its DropDownStyle property set to DropDownList and containing a number of cocktail names. The method below does the following:

  • Sets the Combobox’s DropDownStyle property to DropDownList, which means that the user cannot just type in any value into the list’s text portion, but can only select from items in the list.
  • Adds a number of cocktail names to the list.
  • Sets the list so that the first item is selected.

public void InitializeCocktailControls()
{
    cboCocktail.DropDownStyle = ComboBoxStyle.DropDownList;
    cboCocktail.Items.Add("Bloody Caesar");
    cboCocktail.Items.Add("Bloody Mary");
    cboCocktail.Items.Add("Martini");
    cboCocktail.Items.Add("Rye and Ginger");
    cboCocktail.Items.Add("Vodka Tonic");
    cboCocktail.SelectedIndex = 0;
}

If I wanted to, I could’ve set the DropDownStyle and the collection of items in the ComboBox in the Properties window.

I placed a call to InitializeCocktailControls() inside the form’s constructor:

public frmMain()
{
    InitializeComponent();
    InitializeCocktailControls();
}

And here’s my first iteration of OrderBooze(), which displays a message box showing which cocktail the user ordered. It makes use of the ComboBox’s SelectedItem property:

private void OrderBooze()
{
    StringBuilder order = new StringBuilder("Cocktail: " +
                            cboCocktail.SelectedItem.ToString() + 
                            "\n");

    MessageBox.Show(order.ToString());
}

Numeric Up/Downs

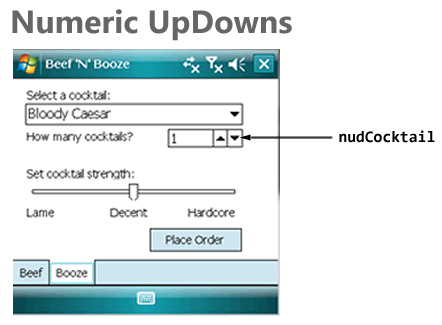
Numeric Up/Downs are useful when:

  • You want to restrict user input to numeric values only
  • You want to restrict those numeric values to a specific range
numeric_updowns

Here’s the second iteration of InitializeCocktailControls(), which adds code to initialize the numeric up/down nudCocktail in the following ways:

  • Restricting the possible values to the range of 1 through 10
  • Setting the up/down increment to 1 – if the user clicks the “up” button, the value contained within goes up by 1, if the user clicks the “down” button, the value contained within goes down by 1.
  • Setting the initial value to 1

public void InitializeCocktailControls()
{
    cboCocktail.DropDownStyle = ComboBoxStyle.DropDownList;
    cboCocktail.Items.Add("Bloody Caesar");
    cboCocktail.Items.Add("Bloody Mary");
    cboCocktail.Items.Add("Martini");
    cboCocktail.Items.Add("Rye and Ginger");
    cboCocktail.Items.Add("Vodka Tonic");
    cboCocktail.SelectedIndex = 0;

    nudCocktail.Minimum = 1;
    nudCocktail.Maximum = 10;
    nudCocktail.Increment = 1;
    nudCocktail.Value = 1;
}

Here’s the OrderBooze() method, featuring an additional line of code to display the number of drinks the user ordered. The value contained within nudCocktail is taken from its Value property:

private void OrderBooze()
{
    StringBuilder order = new StringBuilder("Cocktail: " +
                            cboCocktail.SelectedItem.ToString() + 
                            "\n");
    order.AppendLine("Quantity: " + nudCocktail.Value.ToString());

    MessageBox.Show(order.ToString());
}

Trackbars

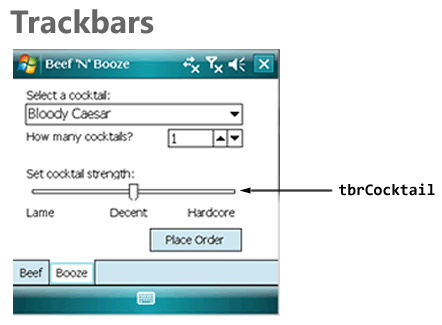
Another way to get numeric value input from the user is to use a Trackbar control. While Trackbars don’t display their corresponding numeric values like Numeric Up/Downs, they have a couple of advantages:

  • They’re larger and more “finger-friendly” than Numeric Up/Downs
  • They give the user a visual cue of where the current value is in relation to the minimum and maximum values
trackbars

In the screenshot above, you can see that I’ve augmented the Trackbar with by putting a couple of label controls just below it: Lame, Decent, and Hardcore.

Here’s another iteration of InitializeCocktailControls(), with code to initialize the Trackbar with the following properties:

  • The leftmost position on the Trackbar corresponds to the value 0
  • The rightmost position on the Trackbar corresponds to the value 10
  • The smallest step you can make in either direction, up or down, is 1
  • Large steps, which you get by clicking to the right or left of the current slider position, change the value in steps of 5
  • The initial value of the Trackbar is 5

public void InitializeCocktailControls()
{
    cboCocktail.DropDownStyle = ComboBoxStyle.d;
    cboCocktail.Items.Add("Bloody Caesar");
    cboCocktail.Items.Add("Bloody Mary");
    cboCocktail.Items.Add("Martini");
    cboCocktail.Items.Add("Rye and Ginger");
    cboCocktail.Items.Add("Vodka Tonic");
    cboCocktail.SelectedIndex = 0;

    nudCocktail.Minimum = 1;
    nudCocktail.Maximum = 10;
    nudCocktail.Increment = 1;
    nudCocktail.Value = 1;

    tbrCocktail.Minimum = 0;
    tbrCocktail.Maximum = 10;
    tbrCocktail.SmallChange = 1;
    tbrCocktail.LargeChange = 5;
    tbrCocktail.Value = 5;
}

Here’s OrderBooze(), with an additional line to display the user’s preferred drink strength, which is derived from the Trackbar’s Value property:

private void OrderBooze()
{
    StringBuilder order = new StringBuilder("Cocktail: " +
                            cboCocktail.SelectedItem.ToString() + 
                            "\n");
    order.AppendLine("Quantity: " + nudCocktail.Value.ToString());
    order.AppendLine("Strength: " + tbrCocktail.Value.ToString());

    MessageBox.Show(order.ToString());
}

Putting It All Together

Here’s the complete code behind the single form in Beef ‘N’ Booze:

using System;
using System.ComponentModel;
using System.Text;
using System.Windows.Forms;

namespace BeefNBooze
{
    public partial class frmMain : Form
    {
        public frmMain()
        {
            InitializeComponent();
            InitializeCocktailControls();
        }

        public void InitializeCocktailControls()
        {
            cboCocktail.DropDownStyle = ComboBoxStyle.DropDownList;
            cboCocktail.Items.Add("Bloody Caesar");
            cboCocktail.Items.Add("Bloody Mary");
            cboCocktail.Items.Add("Martini");
            cboCocktail.Items.Add("Rye and Ginger");
            cboCocktail.Items.Add("Vodka Tonic");
            cboCocktail.SelectedIndex = 0;

            nudCocktail.Minimum = 1;
            nudCocktail.Maximum = 10;
            nudCocktail.Increment = 1;
            nudCocktail.Value = 1;

            tbrCocktail.Minimum = 0;
            tbrCocktail.Maximum = 10;
            tbrCocktail.SmallChange = 1;
            tbrCocktail.LargeChange = 5;
            tbrCocktail.Value = 5;
        }

        private void btnBeef_Click(object sender, EventArgs e)
        {
            OrderBeef();
        }

        private void btnBooze_Click(object sender, EventArgs e)
        {
            OrderBooze();
        }

        private void OrderBeef()
        {
            StringBuilder order = new StringBuilder("Steak: ");
            int numSides = 0;

            if (rdoRare.Checked)
            {
                order.AppendLine("Rare");
            }
            else if (rdoMediumRare.Checked)
            {
                order.AppendLine("Medium Rare");
            }
            else if (rdoMedium.Checked)
            {
                order.AppendLine("Medium");
            }
            else if (rdoMediumWell.Checked)
            {
                order.AppendLine("Medium Well");
            }
            else if (rdoWellDone.Checked)
            {
                order.AppendLine("Well Done");
            }
            else
            {
                order.AppendLine("Chef's choice");
            }

            order.AppendLine("Sides:");

            if (chkCreamedSpinach.Checked)
            {
                order.AppendLine("Creamed Spinach");
                ++numSides;
            }

            if (chkFrites.Checked)
            {
                order.AppendLine("Frites");
                ++numSides;
            }

            if (chkMushrooms.Checked)
            {
                order.AppendLine("Mushrooms");
                ++numSides;
            }

            if (numSides == 0)
            {
                order.AppendLine("None");
            }

            MessageBox.Show(order.ToString());
        }

        private void OrderBooze()
        {
            StringBuilder order = new StringBuilder("Cocktail: " +
                                    cboCocktail.SelectedItem.ToString() + 
                                    "\n");
            order.AppendLine("Quantity: " + nudCocktail.Value.ToString());
            order.AppendLine("Strength: " + tbrCocktail.Value.ToString());

            MessageBox.Show(order.ToString());
        }

    }
}

Download, Go Forth and Noodle!

It’s one thing to read about Windows Mobile 6’s built-in user interface controls, but something else entirely to make use of them. If you’re feeling ambitious, start a new project and rebuild Beef ‘N’ Booze (or a similar app that lets you explore the controls) yourself. Or, if you’d like, download my project files by clicking the link below, play with the app, make changes and learn. No matter which route you take, the best way to learn to is fire up Visual Studio and get coding!

Download icon Download the Beef ‘N’ Booze project (Visual Studio 2008 SP1, 15K .zip file)
Categories
Uncategorized

Sneak Peek at the Next “Upwardly Mobile”

Yes, I’m working on another tutorial on Windows Mobile 6 development. It’s on some of the standard user interface controls – here’s a preview:

beef_n_booze_preview

I do try to make my example apps entertaining…

Categories
Uncategorized

Upwardly Mobile, Part 2: Your First Windows Mobile 6 Application

treo_pro_large

(In case you missed part 1, it’s here. Be warned; it’s long, but it’s a good read.)

In this installment of Upwardly Mobile, I’m going to give you a quick introduction to developing applications for Windows Mobile 6 phones and handheld devices. I can’t cover all aspects of Windows Mobile development in this article, but there should be enough material in this entry to get you started.

What You Need

In order to build an application for Windows Mobile 6, you’ll need the following things:

Visual Studio 2008, Professional Edition or higher
visual_studio_2008_pro
This is the development environment. It’s not the only one that you can use to develop Windows Mobile apps, but it’s the one we’re using.

You can also use Visual Studio 2005 – if you do so, Standard Edition or higher will do. If you don’t have Visual Studio, you can download a trial version of Visual Studio 2008.
 

The Windows Mobile 6 SDKs
gear_icon
 
The Windows Mobile 6 SDKs contain the templates for building Windows Mobile 6 projects and emulators for various Windows mobile phones.

There are two such SDKs to choose from:

  • The Standard SDK. The general rule is that if the device doesn’t have a touch screen, its OS is Windows Mobile 6 Standard, and this is the SDK for developing for it.
  • The Professional SDK. The general rule is that if the device has a touch screen, its OS is Windows Mobile 6 Professional, and this is the SDK for developing for it.

    I recommend downloading both SDKs. You never know where you’ll deploy! 

  • .NET Compact Framework 3.5 Redistributable
    dotnet_logo
     
    The .NET Compact Framework 3.5 Redistributable is the version of the .NET framework for mobile devices. It only needs to be sent to the device once.
    A Windows Mobile 6 Device
    palm_treo_pro
     
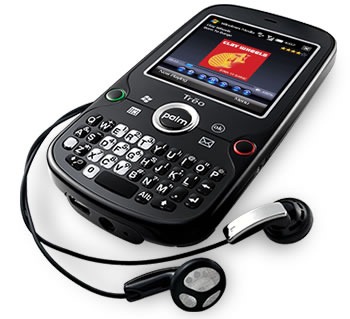
    You can get by in the beginning with just the emulators, but you’ll eventually want to try out your app on a real phone. I’m using my phone, a Palm Treo Pro.

    As the saying goes, “In theory, there is no difference between theory and practice; in practice, there is.”

    The mobile device syncing utility that works with your operating system
    windows_mobile_device_center_icon
    If you’ve got a Windows Mobile 6 device, you’ll need the application that connects your mobile phone to your OS:

  • For Windows 7 and Vista, use Windows Mobile Device Center.
  • For Windows XP and Server 2003, use ActiveSync.
  • Let’s Start Programming!

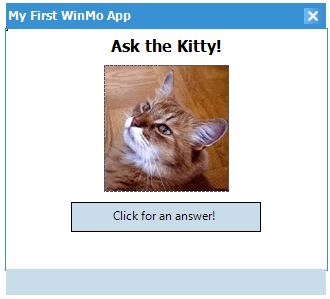
    In this example, we’re going to write a “Magic 8-Ball” style application called Ask the Kitty. It’ll be a simple app that provides random answers to questions that can be answered with a “yes” or “no”.

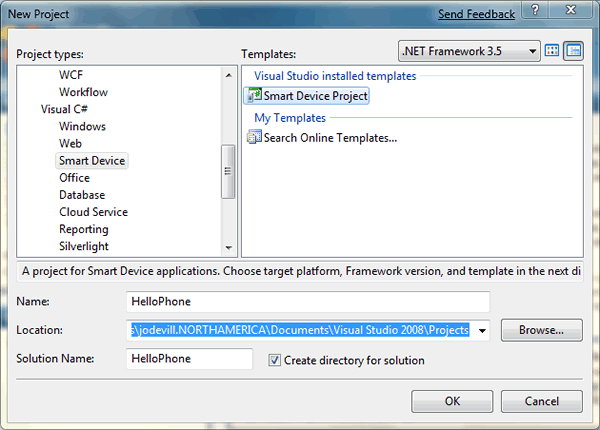
    Fire up Visual Studio, open the File menu and click on Project… (or click control-shift-N). The New Project dialog box will appear:

    new_project

    In this example, we’ll be doing development in Visual C#. From the Project types list on the left, expand the Visual C# menu and click the Smart Device sub-item. The Templates list on the right will display the available templates for a smart device project; select Smart Device Project.

    (You can do Windows Mobile 6 development in Visual Basic if you prefer; there’s a Smart Device option under the Visual Basic menu.)

    Give your project a name (for this example, I’m using the name HelloPhone) and specify a location (I’m just using the default Visual Studio directory for projects), make sure the Create directory for solutioncheckbox is checked, and click the OK button.

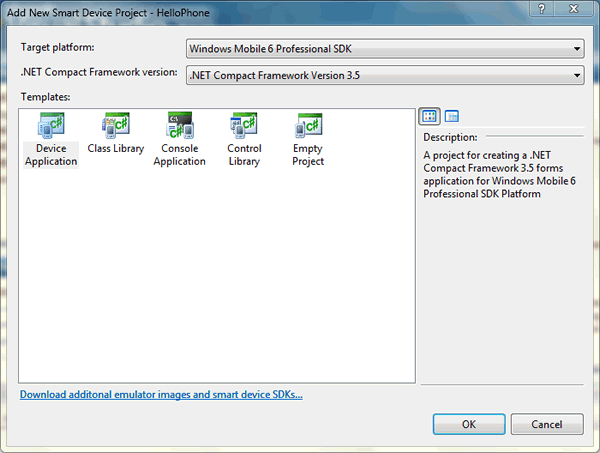
    The Add New Smart Device Project dialog box will appear:

    add_new_smart_device

    You specify the type of device you’re developing for using the Target platform menu. My Palm Treo Pro is a touch screen device and uses Windows Mobile 6 Professional as its OS, so I’m going to select Windows Mobile 6 Professional SDK from that menu.

    We want to use the latest version of the .NET Compact Framework, so leave the default option, .NET Compact Framework Version 3.5, selected in the .NET Compact Framework version menu.

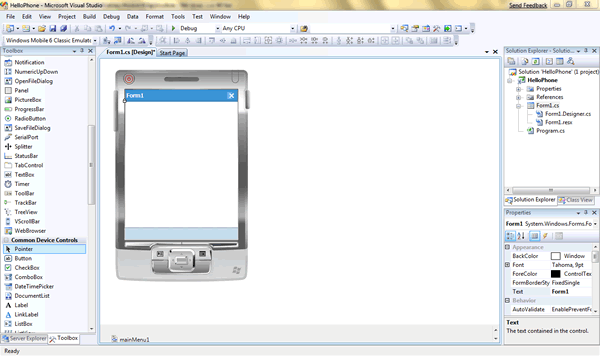
    We want to create an application, so select Device Application from the Templates menu and click the OK button. Visual Studio will create your project, and you can start developing. Here’s what you’ll see:

    visual_studio_1

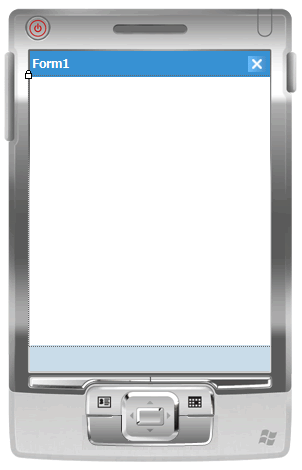
    If we were writing a regular WinForms desktop app, the forms designer would show a blank window. If we were developing an ASP.NET application, the forms designer would show a blank web page, Since we’re developing a Windows Mobile app, the forms designer by default shows a blank mobile app window enclosed in a mockup – the “skin” — of a generalized mobile device. Here’s the skin for a Windows Mobile 6 Professional device:

    forms_designer_mobile_skin

    You can choose to display or hide the skin in the Forms Designer. I’m going to work without the skin; I can hid it by opening the Format menu and toggling the Show Skin item.

    Set Up the User Interface

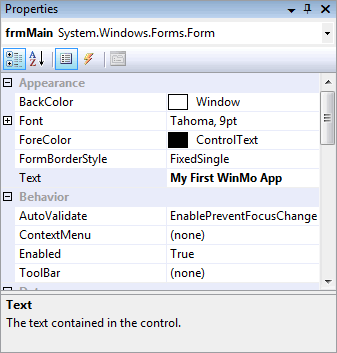
    This application will use a single form. We’ll take the default form from the project, Form1, and do the following using the Properties pane:

    frmMain_properties

    • Rename it as frmMain.
    • Change its AutoScaleMode property to None (We don’t want the app to automatically resize its controls and fonts, we want it to use the control sizes and locations and font sizes that we specify).
    • Change its Size to 320,250, the right size for many Windows Mobile 6 Professional Devices including my Palm Treo Pro.
    • Change the form’s heading – set the Text property to My First WinMo App.

    We’ll set up the form to look like this:

    frmMain

    The “Ask the Kitty!” at the top of the form is a Label control, with its font set to Tahoma, font style set to Bold, font size set to 12 points and text set to Ask the Kitty!

    The “Click for an answer!” at the bottom is a Button control, with its font set to Tahoma, font style set to Regular, font size set to 9 points and text set to Click for an answer!. I also renamed the button as btnAnswer.

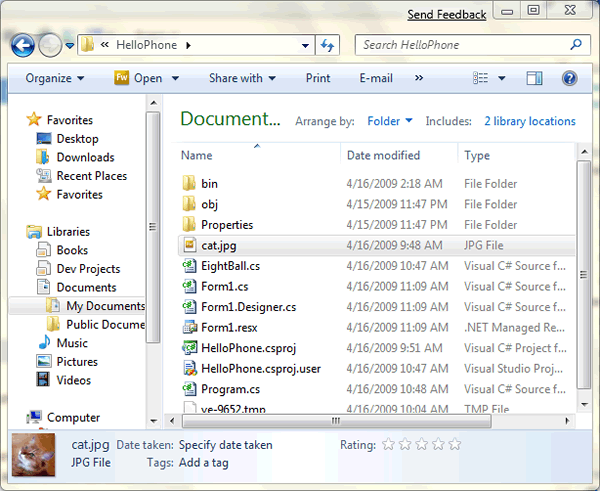
    The cat picture in the middle is a PictureBox control. The trick is to provide a picture to fill the PictureBox. It’s simple. The first step is to copy a picture file into the project directory:

    project_directory

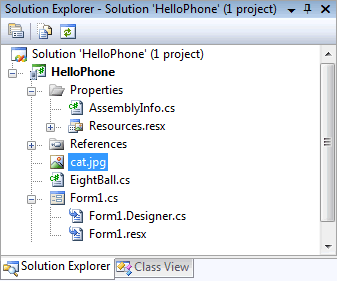
    Make sure that the picture is included in the project. If you can’t see the picture file in the Solution Explorer window, click the Show All Files button. Right-click the picture file in Solution Explorer and select Include in Project:

    solution_explorer

    Once you’ve included the picture file in the project, you can use it to fill the PictureBox. Select the PictureBox in the Forms Designer, go to the Properties window and change its Image property – use the selector to pick the picture file that we just included in the project.

    Add Some Code

    There’s a lot of example code out there that puts programming logic inside the UI – that is, in the code for the forms. I’m going to avoid that and do the right thing by creating a class for the “engine” of this application. Creating a new class is easy – open the Project Menu, select Add Class…, and then select Visual C# Items –> Code –> Class. I named the class file Kitty.cs in the Solution Explorer; here’s its code:

    using System;
    using System.Linq;
    using System.Collections.Generic;
    using System.Text;
    
    namespace HelloPhone
    {
        class Kitty
        {
            List<string> _responses = new List<string< {
                "Yes",
                "No",
                "Maybe",
                "Ask again later"
            };
            Random _rand = new Random();
    
            public string GetResponse() 
            {
              return _responses[_rand.Next(_responses.Count)];  
            }
        }
    }

    The next step is to wire up btnAnswer to provide an answer when clicked. This means adding an event handler to btnAnswer. The easiest way to do this is select btnAnswer, then go to the Properties window, select the Events view (it’s the lightning bolt button) and double-click on the Click event. That will automatically create a method called btnAnswer_Click() in the frmMain class and wire up that method to be called whenever btnAnswer is clicked.

    Here’s the code for frmMain:

    using System.Drawing;
    using System.Text;
    using System.Windows.Forms;
    
    namespace HelloPhone
    {
        public partial class frmMain : Form
        {
            Kitty _eightBall = new Kitty();
    
            public frmMain()
            {
                InitializeComponent();
            }
    
            private void btnAnswer_Click(object sender, EventArgs e)
            {
                btnAnswer.Text = _eightBall.GetResponse();
            }
    
        }
    }

    Run the App in the Emulator

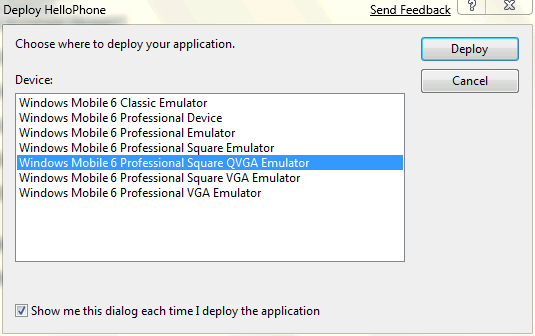
    The app’ is now ready to take for a test run in the emulator. Click the Start Debugging button (it looks like a “play” button) or press the F5 key. This window showing your deployment options will appear:

    deploy_emulator

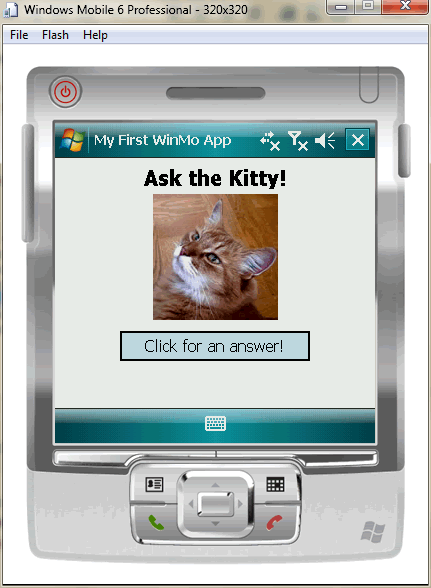
    I want an emulator that best matches my Palm Treo Pro, which has a square QVGA display, so I selected Windows Mobile 6 Professional Square QVGA Emulator and clicked the Deploy button. Give it a moment or two to compile and fire up the emulator, after which you should see this:

    emulator

    Run the App on Your Mobile Device

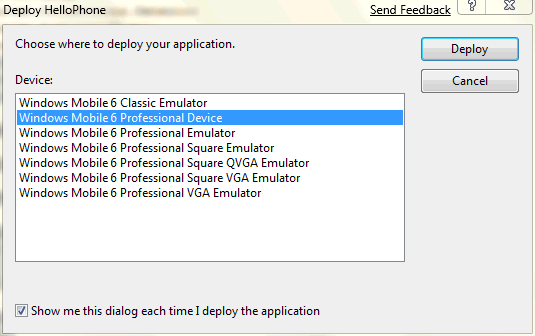
    Running the app on your mobile device is almost as easy. Make sure that your mobile device is connected to your computer, then click the Start Debugging button (it looks like a “play” button) or press the F5 key. This window showing your deployment options will appear:

    deploy_device

    This time, select Windows Mobile 6 Professional Device in the menu and click Deploy.

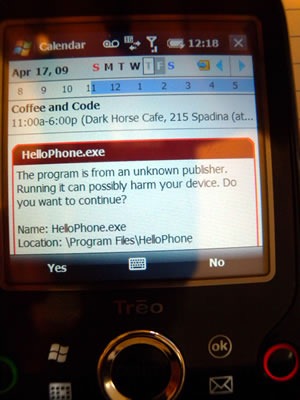
    Keep an eye on your phone; you’ll get a couple of “should I install this?”-type messages – click Yes to all of them:

    device_message

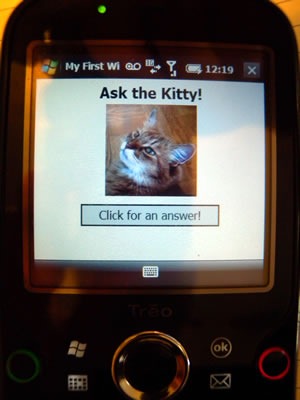
    After that, you should see this:

    app_device

    You should have enough information to start experimenting with Windows Mobile 6 development. Have fun, try things, and if you have any questions, feel free to ask them in the comments!

    Categories
    Uncategorized

    Upwardly Mobile, Part 1: A Brief Tour of Mobile App Development

    This one’s a long one! You might want to get yourself a beverage or snack.

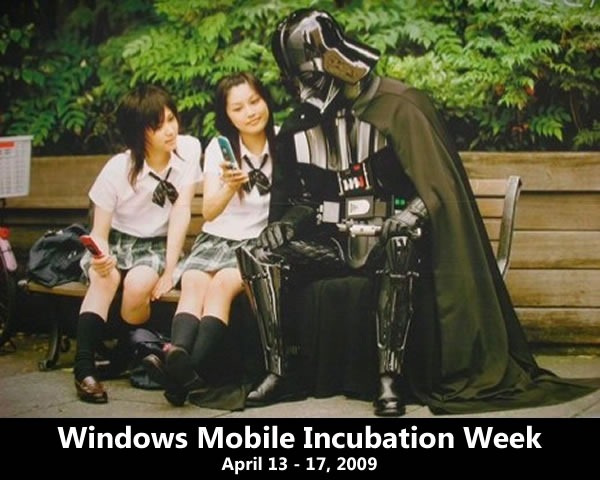
    Windows Mobile Incubation Week: April 13 - 17, 2009 -- featuring two Japanese schoolgirls showing their mobile phones to Darth Vader

    This week is Windows Mobile Incubation Week, a “jam session” taking place at The Empire’s Silicon Valley branch, where startups are invited to learn about Windows Mobile from Microsoft’s gurus and pick up some tricks from mobile industry gurus and venture capitalists. They’re also challenged to build Windows Mobile apps during the week, with prizes being awarded to winning participants. Admission to Mobile Incubation Week is free-as-in-beer; all you have to do is scrounge up the cash to cover your trip to the Valley and find a couch to crash on at night.

    Even as a Sith Lord with Imperial backing, I don’t have the travel budget to get down to Silicon Valley to catch this event, and it’s likely that you don’t either. That doesn’t mean that you have to miss out on Mobile Incubation Week. I’ll be linking to all the blogs covering it and I’ll also be posting articles covering different aspects of Windows Mobile Development, some technical, some tactical. I hope it piques your interest in Windows Mobile; perhaps it might even get you started building apps for Windows Mobile phones.

    In this first article, I talk about mobile development over the past few years (with a little detour into my own experiences) and the way I see the current state of Windows Mobile.

    My First Mobile App

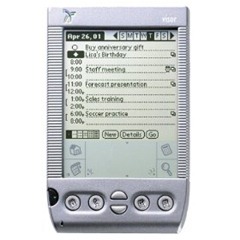
    Back in early 2001, I bought a PalmOS-compatible Handspring Visor Platinum for $99 from my then-coworker at OpenCola, Steve Jenson. He’s always had ridiculous amounts of hardware in his house:

    handspring_visor_platinum

    I used it regularly, but never got around to writing applications for it until early 2002. That’s when a number of companies building P2P software during the Bubble 1.0 era imploded and when OpenCola unceremoniously laid me off. I decided to put up my “consultant” shingle, and thanks to the network of contacts I’d built as OpenCola’s Developer Relations guy, it didn’t take long for me to dig up some clients.

    A friend of mine who was now working for a big drug company’s ad agency asked if I could write a questionnaire app for PalmOS handhelds. It wasn’t anything too complicated: just give the user (who could either be a doctor or a patient) a series of questions and provide a response at the end based on their answers. The tasks seemed simple enough, and despite the fact that I’d never written a Palm app before, I took the job.

    (For those of you new to the industry, you’ll find that that you will often be asked to do things that you’ve never done before or aren’t 100% sure you can do. One of the valuable skills that comes with experience is figuring out how far you can stretch yourself and your abilities with a project.)

    I’d seen a couple of articles on developing for PalmOS in C, and they looked like more work than they were worth. An app that was made up of a single button that read “Hello World” took 3 or 4 pages of code to implement, most of which was what I call “preamble” – a lot of setup code and “scaffolding” to support the app, way more code than for the actual app itself. My client seemed to be testing the waters of Palm apps, so I figured I’d be asked to make lots of changes to the app along the way. I needed something that would let me build and modify Palm apps quickly.

    nsbasic_palm

    My plan was to build the app with NS Basic/Palm, a Visual Basic-like development system for PalmOS. I’d heard about it before, and as an added bonus, they were based right here in Toronto. I picked up a copy directly from their offices in the morning, and by the end of the afternoon, I had a functioning version of the app. By the end of the next day, I had it polished. The day after that, I showed my work to the client, and a week after that, they cut me a cheque.

    I thought I’d make a career for myself as a PalmOS developer, but after that initial success, no other clients approached me about building a Palm app for them. That was a bit of a disappointment; unlike many of my friends, who wanted to build system- or network-level software, I wanted to build software for people. I figured that the best platform for people-oriented software would be a computer that you had in your pocket with you all the time.

    The Underused 1995-Era Computer in Your Pocket

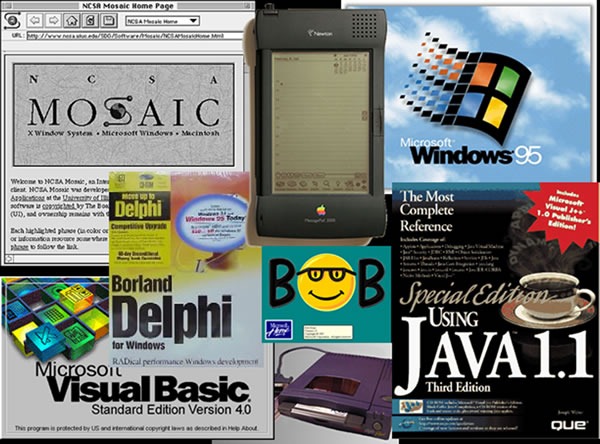
    1995 tech zeitgeist, featuring NCSA Mosaic, Apple Newton, Windows 95, Delphi 1.0, Visual Basic 4.0, Microsoft Bob, a Zip drive and "Special Edition Using Java 1.1"

    One of the things that I noticed while building Palm apps in 2002 was that the machine specs were like the specs for desktops back in 1995, when I was building CD-ROM-based multimedia apps with Mackerel Interactive Multimedia. The desktops of 1995 had processor speeds in the double-digit megahertz, RAM in the single-digit megabytes and limited, if any, access to the internet – just like 2002-era PalmOS devices.

    At the same time, there was a class of devices that was beginning to emerge – the smartphone, which combined the connectedness of mobile phones with the computing power of PDAs. The problem was trying to get apps onto them.

    Back in late 2003, when I was just getting started as Tucows’ Tech Evangelist, I wrote an article grumbling about the state of mobile development. In spite of the fact that smartphones had the power of PDAs, the market for mobile apps seemed like a ghost town. There was a mish-mash of all sorts of mobile platforms, installing apps on your mobile form was more complicated than it should’ve been, and the telcos seemed to be doing their level best to keep apps off of phones, using the need to “keep the phone network secure” as their excuse.

    “Imagine how far behind we’d be,” I wrote back then, “if we had to get our computer vendor’s permission every time we installed a new program on our desktops. That’s what it’s like for mobile apps.”

    The Best Gaming Phone, 5 Years Ago

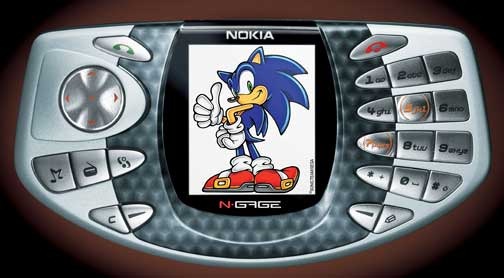
    Near the end of 2003, this phone was supposed to be the thing that brought mobile gaming to the masses:

    Nokia N-Gage

    It was the Nokia N-Gage. There’s a good reason you probably never owned one, nor did anyone you know. While it had some decent specs, it was a pain for both developers and users alike:

    • Pain for the developers: Not just anyone could develop for the N-Gage. You had to apply for permission to do so, which required you to have a track record of mobile game development, which probably ruled out a lot of potential developers in 2003. There was also the matter of the fee that you had to submit while applying for the privilege of being an N-Gage developer: the non-trivial sum of 10,000 Euro.
    • Pain for the users: The buttons were notoriously bad – they used phone-grade buttons as opposed to game controller-grade ones, which made for a less-than-optimal gaming experience.
    • More pain for the users: Here’s how Brighthand described the process of loading a game onto the N-Gage: “"In order to put a game into the system, you have to turn the phone off, take the back cover off, remove the battery, slide out the existing game, put the new one in, put the battery back in, replace the back cover, hold down the power button for several seconds, wait for the system to boot up, open the main menu, select the game, open it… And then your game starts loading."
    • Even more pain for the users: The N-Gage sometimes suffered from “The White Screen of Death”, a phenomenon where your phone would spontaneously reboot thanks to a memory management issue arising from a design flaw. The fix was a firmware upgrade, for which Nokia decided to charge users.

    I thought that the N-Gage had all kinds of portable personal computing uses, both for gaming and beyond, but there was no way I could develop for it. Besides, the telcos were still pretty adamant about not letting just anyone develop for smartphones.

    So my plans to take on mobile development stayed shelved a little longer.

    Predictions are Hard, Especially About the Future

    Captain Picard doing a "facepalm"

    Depending on where your loyalties, sympathies and platform preferences lie, you’re going to find the following headlines either LMAO-hilarious or stool-softeningly cringeworthy. Maybe it’s because I’m still a relatively new at Microsoft (I’ll have been there six months a week Monday), but I laughed and cringed at these headlines that vaingloriously predicted that The Empire would dominate the smartphone market:

    “Dominate Smartphones in Three Years”, huh? Here’s what happened a mere two years later:

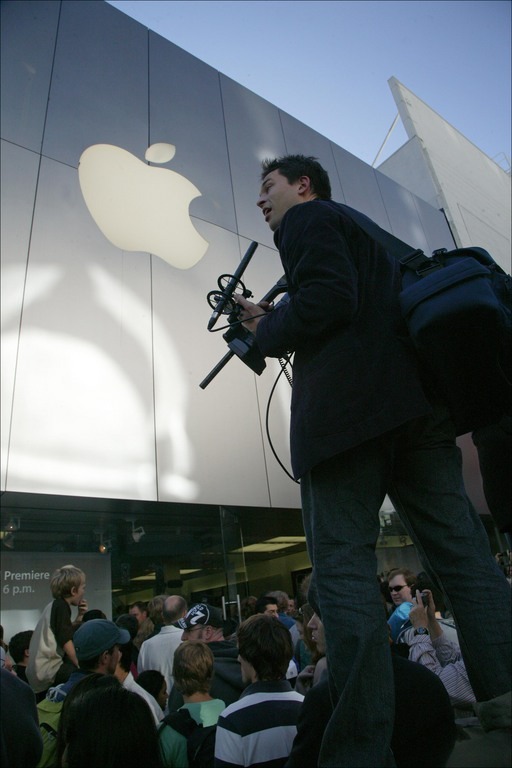
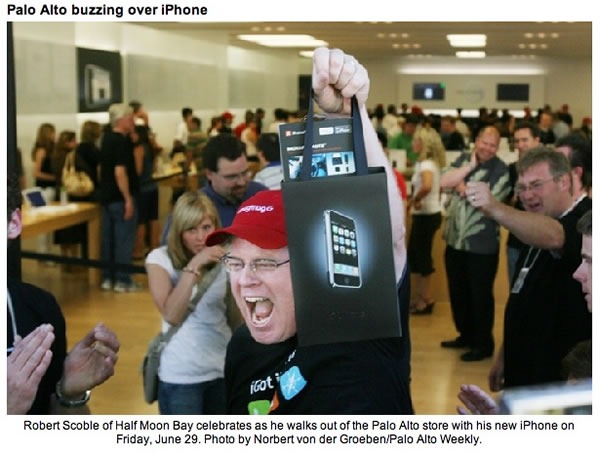
    iphone_line_1

    iphone_line_2 

    iphone_line_3

    In the space of two years and one day, we’d gone from Microsoft triumphantly declaring that Windows Mobile would own the smartphone market to Microsoft’s most famous evangelist (well, former evangelist by that time) doing a victory pose at the Apple Store because he’d managed to get his paws on one of the first iPhones.

    A good chunk of the iPhone’s success comes from Apple’s incredible marketing machine, but a bigger factor is that great products are their own marketing. The iPhone combines a great user experience and a centralized store, but far more important was the feeling that you were using something that was designed to be both beautiful and fun, not feasting on the table scraps thrown to you by a company who’d rather be making stuff for Fortune 500 executives.

    The iPhone formula seems to be working. According to Kevin Tofel of the mobile device blog JK On the Run, Apple sold 3.3 million iPhones in 2007 and handily beat that sales figure in 2008 with 11.4 million, making them the mobile phone vendor that gained the most ground that year.

    And Now, the Good News

    It’s not all bad news for Windows Mobile or people who want to develop for it. For starters, Windows Mobile still represents a sizeable chunk of the mobile phone market. 18 million Windows Mobile licenses were sold in 2008, and they were sold to four out of the five largest mobile phone manufacturers in the world (in case you were wondering, Nokia is the holdout). LG has signed on to put Windows Mobile on 50 of its smartphone models. All told, that’s a big hardware ecosystem on which to deploy your mobile apps.

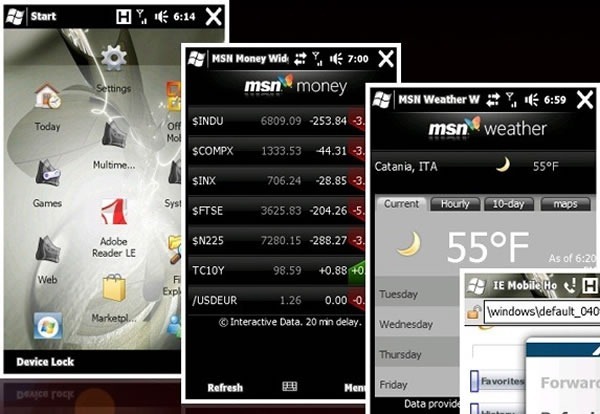
    The smart moves that The Empire has been making with its various platforms, from Windows 7 to the web to XBox 360 to cloud computing, are also beginning to show in the form of Windows Mobile 6.5 (slated for release this year) and Windows Mobile 7 (due next year). The UI has been vastly improved; a lot of the UI lessons and ideas from Windows 7, XBox 360 and Surface seem to have made their way in:

    And yes, there will be support not just for client apps that run on your WinMo phone, but Widgets – mini-web apps that run in a browser with just a border and no interface controls, a la Windows widgets or the iPhone’s web apps:

    Windows mobile widgets

    Paired with the improved user experience is an online store accessible from your Windows Mobile phone:

    …and you still have the freedom to not use Windows Marketplace to sell your apps. I cover why that’s a good thing in the next and final section of this article.

    Freedom

    Let me show you some slides from Pete Forde’s recent presentation at MeshU, Is That an iPhone in Your Pocket, or are You Just Happy to See Me?. Namely, this section of his presentation:

    Slide: What Apple doesn't want you to do

    The iPhone App Store is the only legal way to distribute iPhone apps, whether you’re selling them or giving them away. As a developer, you submit your applications to the App Store for review, and in around seven days, after which you are told whether your app has been accepted or rejected.

    If your app is rejected, are you told the reasons why? Here’s Pete’s answer to that question:

    Slide: "Not gonna lie...it'd be easier to get Steve Ballmer using an iPod, than for you to get a straight answer on why Apple rejected your app."

    The people doing the reviews for the App Store are a toxic mix of Victorian-era prudish and Kafka-esque:

    "Pull my finger" was rejected for being indecent

    …and you can forget writing any David Mamet / Quentin Tarantino themed-apps:

    Slide: No swearing

    …and that’s not just “no swearing” in your apps; that’s also “no swear words” in any search results your app returns. Consider the problem faced by one hapless app developer:

    Slide: Each time, an Apple auditor loads their app, searches for the word "fuck", finds it in the 700k song database, and rejects their application.

    Slide: Of course, 99% of those songs are available for sale in iTunes. Apple will not directly respond to requests for clarification.

    They’re also kind of uptight about certain novelty apps, such as the one that makes it look as though you’ve shattered your iPhone’s screen:

    Slide: Apple was worried that this app, which "broke" the iPhone when touched, would confuse their customers. Golly.

    When you submit your app for review, whatever you do, don’t put any joke items in the feature list. One developer, when submitting an updated version of an app (yes, you have to submit updates for review) threw in a joke item in the feature list: more dragons! Here’s the response from the App Store review board:

    Slide: "What dragons are you referring to? There is no evidence of dragons in your application."

    The rest of Pete’s presentation was built around bypassing the App Store’s reviewer monkeys by building your iPhone apps as single-use browsers that were hard-wired to the web application where your app lived. That’s a workable solution for some apps, but not if you want to make use of the resources built into the iPhone.

    While the Windows Mobile Marketplace might have a review board for legal purposes, it’s not the only way to distribute your apps. You can also make them downloadable from your site, meaning that you can distribute your screen-breakin’, hard-cussin’, dragon porn Windows Mobile app without The Man steppin’ on your throat.

    Now isn’t that nice?

    Next

    In the next installment, I’ll provide a quick-and-dirty intro to writing your own Windows Mobile apps.