 In this article, we’ll expand on material covered in the three previous articles in this series on working with dates and times in Swift 5:
- The basic structs, which let us create dates and times, and work with their components. They are:
Date, which represents a single point in time,DateComponents, which represents the units that make up a date, such as year, month, day, hour, and minute, and which can be used to represent either a single point in time or a duration of time, andCalendar, which provides a context for Dates, and allows us to convert between Dates and DateComponents.
- The
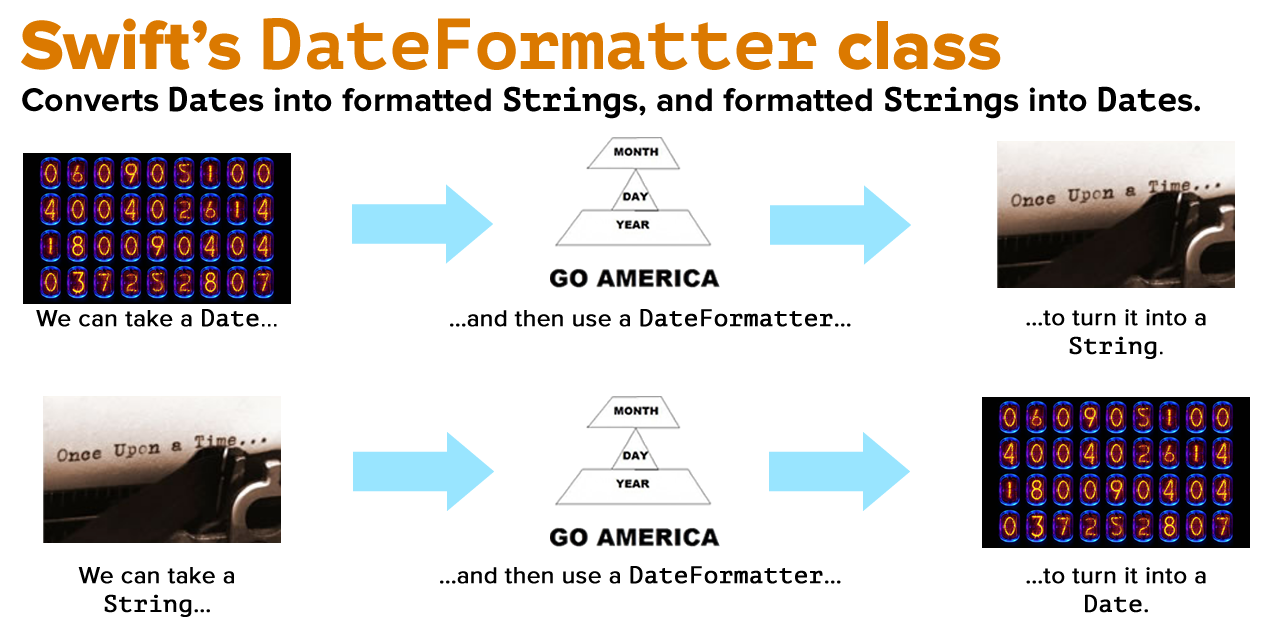
DateFormatter class, which converts Dates into formatted Strings, and formatted Strings into Dates.
- Date arithmetic, which make it possible to add time intervals to
Dates, find the difference in time between two Dates, and compare Dates.
A more readable way to work with Dates and DateComponents
Suppose we want to find out what the date and time will be 2 months, 3 days, 4 hours, 5 minutes, and 6 seconds from now will be.
If you recall what we covered in the last installment in this series, you’d probably use code like this:
var timeInterval = DateComponents(
  month: 2,
  day: 3,
  hour: 4,
  minute: 5,
  second: 6
)
let futureDate = Calendar.current.date(byAdding: timeInterval, to: Date())!
print("2 months, 3 days, 4 hours, 5 minutes, and 6 seconds from now is \(futureDate.description(with: Locale(identifier: "en_US"))).")
In the code above, we did the following:
- We created an instance of a
DateComponents struct.
- We set its properties so that it would represent a time interval of 2 months, 3 days, 4 hours, 5 minutes, and 6 seconds.
- We then used
Calendar‘s date(byAdding:to:) method to add the time interval to a Date.
This code wouldn’t look out of place in a lot of other programming languages, but we can do better in Swift. What if I told you that by defining a few helper functions, you can turn the code above into the code below?
let coolerFutureDate = Date() + 2.months + 3.days + 4.hours + 5.minutes + 6.seconds
let coolerPastDate   = Date() - 2.months - 3.days - 4.hours - 5.minutes - 6.seconds
Or this code?
let coolerFutureDate = (2.months + 3.days + 4.hours + 5.minutes + 6.seconds).fromNow
let coolerPastDate   = (2.months + 3.days + 4.hours + 5.minutes + 6.seconds).ago
I’d much rather write the code above. This article will cover the code necessary to make this kind of syntactic magic possible.
Overloading + and - so that we can add and subtract DateComponents
First, let’s write some code that allows us to add and subtract DateComponents. Start a new playground and enter the following code into it:
func +(_ lhs: DateComponents, _ rhs: DateComponents) -> DateComponents {
  return combineComponents(lhs, rhs)
}

func -(_ lhs: DateComponents, _ rhs: DateComponents) -> DateComponents {
  return combineComponents(lhs, rhs, multiplier: -1)
}

func combineComponents(_ lhs: DateComponents,
                       _ rhs: DateComponents,
                       multiplier: Int = 1)
  -> DateComponents {
    var result = DateComponents()
    result.nanosecond = (lhs.nanosecond ?? 0) + (rhs.nanosecond ?? 0) * multiplier
    result.second     = (lhs.second     ?? 0) + (rhs.second     ?? 0) * multiplier
    result.minute     = (lhs.minute     ?? 0) + (rhs.minute     ?? 0) * multiplier
    result.hour       = (lhs.hour       ?? 0) + (rhs.hour       ?? 0) * multiplier
    result.day        = (lhs.day        ?? 0) + (rhs.day        ?? 0) * multiplier
    result.weekOfYear = (lhs.weekOfYear ?? 0) + (rhs.weekOfYear ?? 0) * multiplier
    result.month      = (lhs.month      ?? 0) + (rhs.month      ?? 0) * multiplier
    result.year       = (lhs.year       ?? 0) + (rhs.year       ?? 0) * multiplier
    return result
}
In the code above, we’ve overloaded the + and - operators so that we can add and subtract DateComponents. I derived these functions from Axel Schlueter’s SwiftDateTimeExtensions library. He wrote them when Swift was still in beta; I updated them so that they compile with the current version and added a couple of tweaks of my own.
The addition and subtraction operations are so similar and so tedious, which is a sign that there’s an opportunity to DRY up the code. I factored out the duplicate code from both the + and - overloads and put it into its own method, combineComponents, which does the actual DateComponents addition and subtraction.
You may have noticed a lot of ?? operators in the code for combineComponents. ?? is referred to as the nil coalescing operator, and it’s a clever bit of syntactic shorthand. For the expression below:
let finalValue = someOptionalValue ?? fallbackValue
- If
someOptionalValue is not nil, finalValue is set to someOptionalValue‘s value.
- If
someOptionalValue is nil, finalValue is set to fallbackValue‘s value.
Let’s confirm that our new operator overloads work. Add the following to the playground and run it:
// Let's define a couple of durations of time
// ------------------------------------------

var oneDayFiveHoursTenMinutes = DateComponents(
  day: 1,
  hour: 5,
  minute: 10
)
var threeDaysTenHoursThirtyMinutes = DateComponents(
  day: 3,
  hour: 10,
  minute: 30
)


// Now let's add and subtract them
// -------------------------------

let additionResult = oneDayFiveHoursTenMinutes + threeDaysTenHoursThirtyMinutes
print("1 day, 5 hours, and 10 minutes + 3 days, 10 hours, and 30 minutes equals:")
print("\(additionResult.day!) days, \(additionResult.hour!) hours, and \(additionResult.minute!) minutes.")

let subtractionResult = threeDaysTenHoursThirtyMinutes - oneDayFiveHoursTenMinutes
print("1 day, 5 hours, and 10 minutes - 3 days, 10 hours, and 30 minutes equals:")
print("\(subtractionResult.day!) days, \(subtractionResult.hour!) hours, and \(subtractionResult.minute!) minutes.")
You should see the following output:
1 day, 5 hours, and 10 minutes + 3 days, 10 hours, and 30 minutes equals:
4 days, 15 hours, and 40 minutes.
1 day, 5 hours, and 10 minutes – 3 days, 10 hours, and 30 minutes equals:
2 days, 5 hours, and 20 minutes.
Overloading - so that we can negate DateComponents
Now that we can add and subtract DateComponents, let’s overload the unary minus so that we can negate DateComponents:
prefix func -(components: DateComponents) -> DateComponents {
  var result = DateComponents()
  if components.nanosecond != nil { result.nanosecond = -components.nanosecond! }
  if components.second     != nil { result.second     = -components.second! }
  if components.minute     != nil { result.minute     = -components.minute! }
  if components.hour       != nil { result.hour       = -components.hour! }
  if components.day        != nil { result.day        = -components.day! }
  if components.weekOfYear != nil { result.weekOfYear = -components.weekOfYear! }
  if components.month      != nil { result.month      = -components.month! }
  if components.year       != nil { result.year       = -components.year! }
  return result
}
With this overload defined, we can now use the unary minus to negate DateComponents. Add the following to the playground and run it:
let negativeTime = -oneDayFiveHoursTenMinutes
print("Negating 1 day, 5 hours, and 10 minutes turns it into:")
print("\(negativeTime.day!) days, \(negativeTime.hour!) hours, and \(negativeTime.minute!) minutes.")
You should see the following output:
Negating 1 day, 5 hours, and 10 minutes turns it into:
-1 days, -5 hours, and -10 minutes.
Overloading + and - so that we can add Dates and DateComponents and subtract DateComponents from Dates
With the unary minus defined, we can now define the following operations:
Date + DateComponents, which makes it easier to do date arithmetic.DateComponents + Date, which should be possible because addition is commutative (which is just a fancy way of saying that a + b and b + a should give you the same result).Date - DateComponents, which once again makes it easier to do date arithmetic.
// Date + DateComponents
func +(_ lhs: Date, _ rhs: DateComponents) -> Date
{
  return Calendar.current.date(byAdding: rhs, to: lhs)!
}

// DateComponents + Dates
func +(_ lhs: DateComponents, _ rhs: Date) -> Date
{
  return rhs + lhs
}

// Date - DateComponents
func -(_ lhs: Date, _ rhs: DateComponents) -> Date
{
  return lhs + (-rhs)
}
Note that we didn’t define an overload for calculating Date - DateComponents — such an operation doesn’t make any sense.
With these overloads defined, a lot of Date/DateComponents arithmetic in Swift becomes much easier to enter and read. Add the following to the playground and run it:
// What time will it be 1 day, 5 hours, and 10 minutes from now?
// -------------------------------------------------------------

// Here's the standard way of finding out:
let futureDate0 = Calendar.current.date(
  byAdding: oneDayFiveHoursTenMinutes,
  to: Date()
)

// With our overloads and function definitions, we can now do it this way:
let futureDate1 = Date() + oneDayFiveHoursTenMinutes
print("Date() + oneDayFiveHoursTenMinutes = \(futureDate1.description(with: Locale(identifier: "en_US")))")

// This will work as well:
let futureDate2 = oneDayFiveHoursTenMinutes + Date()
print("oneDayFiveHoursTenMinutes + Date() = \(futureDate2.description(with: Locale(identifier: "en_US")))")


// What time was it 3 days, 10 hours, and 30 minutes ago?
// ------------------------------------------------------

// Doing it the standard way takes some work
var minus3Days5Hours30minutes = threeDaysTenHoursThirtyMinutes
minus3Days5Hours30minutes.day = -threeDaysTenHoursThirtyMinutes.day!
minus3Days5Hours30minutes.hour = -threeDaysTenHoursThirtyMinutes.hour!
minus3Days5Hours30minutes.minute = -threeDaysTenHoursThirtyMinutes.minute!
let pastDate0 = Calendar.current.date(byAdding: minus3Days5Hours30minutes, to: Date())

// With our overloads and function definitions, it's so much easier:
let pastDate1 = Date() - threeDaysTenHoursThirtyMinutes
print("Date() - threeDaysTenHoursThirtyMinutes = \(pastDate1.description(with: Locale(identifier: "en_US")))")
On my computer, the output looked like this:
Date() + oneDayFiveHoursTenMinutes = Friday, May 29, 2020 at 3:20:54 PM Eastern Daylight Time
oneDayFiveHoursTenMinutes + Date() = Friday, May 29, 2020 at 3:20:54 PM Eastern Daylight Time
Date() – threeDaysTenHoursThirtyMinutes = Sunday, May 24, 2020 at 11:40:54 PM Eastern Daylight Time
Extending Date so that creating dates and debugging are simpler
Creating Dates in Swift is a roundabout process. Usually, you end up creating them in one of two ways:
- Instantiating a
DateComponents struct and then using it to create a Date using Calendar‘s date(from:) method, or
- Creating a
String representation of the Date and then using it to create a Date using DateFormatter‘s date(from:) method.
Let’s simplify things by extending the Date struct with a couple of convenient init method overloads. Let’s also make it easier to print out the value of a Date for debugging.
Add the following to the playground:
extension Date {

  init(year: Int,
       month: Int,
       day: Int,
       hour: Int = 0,
       minute: Int = 0,
       second: Int = 0,
       timeZone: TimeZone = TimeZone(abbreviation: "UTC")!) {
    var components = DateComponents()
    components.year = year
    components.month = month
    components.day = day
    components.hour = hour
    components.minute = minute
    components.second = second
    components.timeZone = timeZone
    self = Calendar.current.date(from: components)!
  }

  init(dateString: String) {
    let formatter = DateFormatter()
    formatter.dateFormat = "yyyy-MM-dd HH:mm:ss zz"
    self = formatter.date(from: dateString)!
  }

  var desc: String {
    get {
      let PREFERRED_LOCALE = "en_US" // Use whatever locale you prefer!
      return self.description(with: Locale(identifier: PREFERRED_LOCALE))
    }
  }

}
With these methods, initializing Dates is a lot more simple. Add the following to the playground and run it:
// The Stevenote where the original iPhone was announced took place
// on January 9, 2007 at 10:00 a.m. PST
let iPhoneStevenoteDate = Date(year: 2007,
                               month: 1,
                               day: 9,
                               hour: 10,
                               minute: 0,
                               second: 0,
                               timeZone: TimeZone(abbreviation: "PST")!)
print("iPhoneStevenoteDate: \(iPhoneStevenoteDate.desc)")

// The original iPhone went on sale on June 27, 2007
let iPhoneReleaseDate = Date(year: 2007, month: 6, day: 27) // June 27, 2007, 00:00:00 UTC
print("iPhoneReleaseDate: \(iPhoneReleaseDate.desc)")

// The Stevenote where the original iPad was announced took place
// on January 27, 2010 at 10:00 a.m. PST
let iPadStevenoteDate = Date(dateString: "2010-01-27 10:00:00 PST")
print("iPadStevenoteDate: \(iPadStevenoteDate.desc)")
On my computer, the output looked like this:
iPhoneStevenoteDate: Tuesday, January 9, 2007 at 1:00:00 PM Eastern Standard Time
iPhoneReleaseDate: Tuesday, June 26, 2007 at 8:00:00 PM Eastern Daylight Time
iPadStevenoteDate: Wednesday, January 27, 2010 at 1:00:00 PM Eastern Standard Time
Overloading - so that we can use it to find the difference between two Dates
When we’re trying to determine the time between two given Dates, what we’re doing is finding the difference between them. Wouldn’t it be nice if we could use the - operator to find the difference between Dates, just as we can use it to find the difference between numbers?
Let’s code an overload to do just that. Add the following to the playground:
func -(_ lhs: Date, _ rhs: Date) -> DateComponents
{
  return Calendar.current.dateComponents(
    [.year, .month, .weekOfYear, .day, .hour, .minute, .second, .nanosecond],
    from: rhs,
    to: lhs)
}
Let’s test it in action. Add the following to the playground and run it:
let timeFromAnnouncementToRelease = iPhoneReleaseDate - iPhoneStevenoteDate
timeFromAnnouncementToRelease.year    // 0
timeFromAnnouncementToRelease.month   // 5
timeFromAnnouncementToRelease.day     // 17
timeFromAnnouncementToRelease.hour    // 7
timeFromAnnouncementToRelease.minute  // 0

// How long ago was the first moon landing, which took place
// on July 20, 1969, 20:18 UTC?
Date() - Date(dateString: "1969-07-20 20:18:00 UTC")
// At the time of writing, this value was a Date with the following properties:
// - year: 47
// - month: 1
// - day: 9
// - hour: 22
// - minute: 14
On my computer, the output looked like this:
The first iPhone users had to wait this long:
0 years, 5 months, 2 weeks, 3 days, 7 hours, and 0 minutes.
It’s been this long since the first moon landing:
50 years, 10 months, 1 weeks, 0 days, 18 hours, and 22 minutes.
Extending Int to add some syntactic magic to date components
We’ve already got some syntactic niceties, but the real Swift magic happens when we add this code to the mix. Add the following to the playground:
extension Int {

  var second: DateComponents {
    var components = DateComponents()
    components.second = self;
    return components
  }

  var seconds: DateComponents {
    return self.second
  }

  var minute: DateComponents {
    var components = DateComponents()
    components.minute = self;
    return components
  }

  var minutes: DateComponents {
    return self.minute
  }

  var hour: DateComponents {
    var components = DateComponents()
    components.hour = self;
    return components
  }

  var hours: DateComponents {
    return self.hour
  }

  var day: DateComponents {
    var components = DateComponents()
    components.day = self;
    return components
  }

  var days: DateComponents {
    return self.day
  }

  var week: DateComponents {
    var components = DateComponents()
    components.weekOfYear = self;
    return components
  }

  var weeks: DateComponents {
    return self.week
  }

  var month: DateComponents {
    var components = DateComponents()
    components.month = self;
    return components
  }

  var months: DateComponents {
    return self.month
  }

  var year: DateComponents {
    var components = DateComponents()
    components.year = self;
    return components
  }

  var years: DateComponents {
    return self.year
  }

}
This additions to Int allow us to convert Ints to DateComponents in an easy-to-read way, and with our overloads to add and subtract DateComponents to and from each other, and to add Dates to DateComponents, we can now perform all sorts of syntactic magic like this (add the following to the playground and run it):
// A quick test of some future dates
print("One hour from now is: \((Date() + 1.hour).desc)")
print("One day from now is: \((Date() + 1.day).desc)")
print("One week from now is: \((Date() + 1.week).desc)")
print("One month from now is: \((Date() + 1.month).desc)")
print("One year from now is: \((Date() + 1.year).desc)")

// What was the date 10 years, 9 months, 8 days, 7 hours, and 6 minutes ago?
let aLittleWhileBack = Date() - 10.years - 9.months - 8.days - 7.hours - 6.minutes
print("10 years, 9 months, 8 days, 7 hours, and 6 minutes ago, it was: \(aLittleWhileBack.desc)")
On my computer, the output looked like this:
One hour from now is: Thursday, May 28, 2020 at 11:57:49 AM Eastern Daylight Time
One day from now is: Friday, May 29, 2020 at 10:57:49 AM Eastern Daylight Time
One week from now is: Thursday, June 4, 2020 at 10:57:49 AM Eastern Daylight Time
One month from now is: Sunday, June 28, 2020 at 10:57:49 AM Eastern Daylight Time
One year from now is: Friday, May 28, 2021 at 10:57:49 AM Eastern Daylight Time
10 years, 9 months, 8 days, 7 hours, and 6 minutes ago, it was: Thursday, August 20, 2009 at 3:51:49 AM Eastern Daylight Time
Extending DateComponents to add even more syntactic magic: fromNow and ago
And finally, a couple of additions to the DateComponents struct to make Date/DateComponent calculations even more concise and readable. Add these to the playground:
extension DateComponents {

  var fromNow: Date {
    return Calendar.current.date(byAdding: self,
                                 to: Date())!
  }

  var ago: Date {
    return Calendar.current.date(byAdding: -self,
                                 to: Date())!
  }

}
Let’s try them out! Add these to the playground and run them:
// We’re now in Serious Syntax Magic Land!
// ---------------------------------------

print("2.weeks.fromNow: \(2.weeks.fromNow.desc)")
print("3.months.fromNow: \(3.months.fromNow.desc)")

let futureDate3 = (2.months + 3.days + 4.hours + 5.minutes + 6.seconds).fromNow
print("futureDate3: \(futureDate3.desc)")

let pastDate2 = (2.months + 3.days + 4.hours + 5.minutes + 6.seconds).ago
print("pastDate2: \(pastDate2.desc)")
On my computer, the output looked like this:
2.weeks.fromNow: Thursday, June 11, 2020 at 11:03:36 AM Eastern Daylight Time
3.months.fromNow: Friday, August 28, 2020 at 11:03:36 AM Eastern Daylight Time
futureDate3: Friday, July 31, 2020 at 3:08:42 PM Eastern Daylight Time
pastDate2: Wednesday, March 25, 2020 at 6:58:30 AM Eastern Daylight Time
Wrapping it all up
Here’s the playground containing all the code we just worked with:
import UIKit

var timeInterval = DateComponents(
  month: 2,
  day: 3,
  hour: 4,
  minute: 5,
  second: 6
)
let futureDate = Calendar.current.date(byAdding: timeInterval, to: Date())!
print("2 months, 3 days, 4 hours, 5 minutes, and 6 seconds from now is \(futureDate.description(with: Locale(identifier: "en_US"))).")


// Overloading + and - so that we can add and subtract DateComponents
// ==================================================================

func +(_ lhs: DateComponents, _ rhs: DateComponents) -> DateComponents {
  return combineComponents(lhs, rhs)
}

func -(_ lhs: DateComponents, _ rhs: DateComponents) -> DateComponents {
  return combineComponents(lhs, rhs, multiplier: -1)
}

func combineComponents(_ lhs: DateComponents,
                       _ rhs: DateComponents,
                       multiplier: Int = 1)
  -> DateComponents {
    var result = DateComponents()
    result.nanosecond = (lhs.nanosecond ?? 0) + (rhs.nanosecond ?? 0) * multiplier
    result.second     = (lhs.second     ?? 0) + (rhs.second     ?? 0) * multiplier
    result.minute     = (lhs.minute     ?? 0) + (rhs.minute     ?? 0) * multiplier
    result.hour       = (lhs.hour       ?? 0) + (rhs.hour       ?? 0) * multiplier
    result.day        = (lhs.day        ?? 0) + (rhs.day        ?? 0) * multiplier
    result.weekOfYear = (lhs.weekOfYear ?? 0) + (rhs.weekOfYear ?? 0) * multiplier
    result.month      = (lhs.month      ?? 0) + (rhs.month      ?? 0) * multiplier
    result.year       = (lhs.year       ?? 0) + (rhs.year       ?? 0) * multiplier
    return result
}


// Let's define a couple of durations of time
// ------------------------------------------

var oneDayFiveHoursTenMinutes = DateComponents(
  day: 1,
  hour: 5,
  minute: 10
)
var threeDaysTenHoursThirtyMinutes = DateComponents(
  day: 3,
  hour: 10,
  minute: 30
)


// Now let's add and subtract them
// -------------------------------

let additionResult = oneDayFiveHoursTenMinutes + threeDaysTenHoursThirtyMinutes
print("1 day, 5 hours, and 10 minutes + 3 days, 10 hours, and 30 minutes equals:")
print("\(additionResult.day!) days, \(additionResult.hour!) hours, and \(additionResult.minute!) minutes.")

let subtractionResult = threeDaysTenHoursThirtyMinutes - oneDayFiveHoursTenMinutes
print("1 day, 5 hours, and 10 minutes - 3 days, 10 hours, and 30 minutes equals:")
print("\(subtractionResult.day!) days, \(subtractionResult.hour!) hours, and \(subtractionResult.minute!) minutes.")


// Overloading - so that we can negate DateComponents
// --------------------------------------------------

// We'll need to overload unary - so we can negate components
prefix func -(components: DateComponents) -> DateComponents {
  var result = DateComponents()
  if components.nanosecond != nil { result.nanosecond = -components.nanosecond! }
  if components.second     != nil { result.second     = -components.second! }
  if components.minute     != nil { result.minute     = -components.minute! }
  if components.hour       != nil { result.hour       = -components.hour! }
  if components.day        != nil { result.day        = -components.day! }
  if components.weekOfYear != nil { result.weekOfYear = -components.weekOfYear! }
  if components.month      != nil { result.month      = -components.month! }
  if components.year       != nil { result.year       = -components.year! }
  return result
}


let negativeTime = -oneDayFiveHoursTenMinutes
print("Negating 1 day, 5 hours, and 10 minutes turns it into:")
print("\(negativeTime.day!) days, \(negativeTime.hour!) hours, and \(negativeTime.minute!) minutes.")


// Overloading + and - so that we can add Dates and DateComponents
// and subtract DateComponents from Dates

// Date + DateComponents
func +(_ lhs: Date, _ rhs: DateComponents) -> Date
{
  return Calendar.current.date(byAdding: rhs, to: lhs)!
}

// DateComponents + Dates
func +(_ lhs: DateComponents, _ rhs: Date) -> Date
{
  return rhs + lhs
}

// Date - DateComponents
func -(_ lhs: Date, _ rhs: DateComponents) -> Date
{
  return lhs + (-rhs)
}


// What time will it be 1 day, 5 hours, and 10 minutes from now?
// -------------------------------------------------------------

// Here's the standard way of finding out:
let futureDate0 = Calendar.current.date(
  byAdding: oneDayFiveHoursTenMinutes,
  to: Date()
)

// With our overloads and function definitions, we can now do it this way:
let futureDate1 = Date() + oneDayFiveHoursTenMinutes
print("Date() + oneDayFiveHoursTenMinutes = \(futureDate1.description(with: Locale(identifier: "en_US")))")

// This will work as well:
let futureDate2 = oneDayFiveHoursTenMinutes + Date()
print("oneDayFiveHoursTenMinutes + Date() = \(futureDate2.description(with: Locale(identifier: "en_US")))")


// What time was it 3 days, 10 hours, and 30 minutes ago?
// ------------------------------------------------------

// Doing it the standard way takes some work
var minus3Days5Hours30minutes = threeDaysTenHoursThirtyMinutes
minus3Days5Hours30minutes.day = -threeDaysTenHoursThirtyMinutes.day!
minus3Days5Hours30minutes.hour = -threeDaysTenHoursThirtyMinutes.hour!
minus3Days5Hours30minutes.minute = -threeDaysTenHoursThirtyMinutes.minute!
let pastDate0 = Calendar.current.date(byAdding: minus3Days5Hours30minutes, to: Date())

// With our overloads and function definitions, it's so much easier:
let pastDate1 = Date() - threeDaysTenHoursThirtyMinutes
print("Date() - threeDaysTenHoursThirtyMinutes = \(pastDate1.description(with: Locale(identifier: "en_US")))")


// Extending Date so that creating dates and debugging are simpler
// ===============================================================

extension Date {

  init(year: Int,
       month: Int,
       day: Int,
       hour: Int = 0,
       minute: Int = 0,
       second: Int = 0,
       timeZone: TimeZone = TimeZone(abbreviation: "UTC")!) {
    var components = DateComponents()
    components.year = year
    components.month = month
    components.day = day
    components.hour = hour
    components.minute = minute
    components.second = second
    components.timeZone = timeZone
    self = Calendar.current.date(from: components)!
  }

  init(dateString: String) {
    let formatter = DateFormatter()
    formatter.dateFormat = "yyyy-MM-dd HH:mm:ss zz"
    self = formatter.date(from: dateString)!
  }

  var desc: String {
    get {
      let PREFERRED_LOCALE = "en_US" // Use whatever locale you prefer!
      return self.description(with: Locale(identifier: PREFERRED_LOCALE))
    }
  }

}


// The Stevenote where the original iPhone was announced took place
// on January 9, 2007 at 10:00 a.m. PST
let iPhoneStevenoteDate = Date(year: 2007,
                               month: 1,
                               day: 9,
                               hour: 10,
                               minute: 0,
                               second: 0,
                               timeZone: TimeZone(abbreviation: "PST")!)
print("iPhoneStevenoteDate: \(iPhoneStevenoteDate.desc)")

// The original iPhone went on sale on June 27, 2007
let iPhoneReleaseDate = Date(year: 2007, month: 6, day: 27) // June 27, 2007, 00:00:00 UTC
print("iPhoneReleaseDate: \(iPhoneReleaseDate.desc)")

// The Stevenote where the original iPad was announced took place
// on January 27, 2010 at 10:00 a.m. PST
let iPadStevenoteDate = Date(dateString: "2010-01-27 10:00:00 PST")
print("iPadStevenoteDate: \(iPadStevenoteDate.desc)")


// Overloading - so that we can use it to find the difference
// between two Dates
// ==========================================================

func -(_ lhs: Date, _ rhs: Date) -> DateComponents
{
  return Calendar.current.dateComponents(
    [.year, .month, .weekOfYear, .day, .hour, .minute, .second, .nanosecond],
    from: rhs,
    to: lhs)
}

// How long was it between the announcement of the original iPhone
// and its release in the stores?
let iPhoneWait = iPhoneReleaseDate - iPhoneStevenoteDate
print("The first iPhone users had to wait this long: ")
print("\(iPhoneWait.year!) years, " +
  "\(iPhoneWait.month!) months, " +
  "\(iPhoneWait.weekOfYear!) weeks, " +
  "\(iPhoneWait.day!) days, " +
  "\(iPhoneWait.hour!) hours, and " +
  "\(iPhoneWait.minute!) minutes.")

// How long ago was the first moon landing, which took place
// on July 20, 1969, 20:18 UTC?
let timeSinceMoonLanding = Date() - Date(dateString: "1969-07-20 20:18:00 UTC")
print("It’s been this long since the first moon landing: ")
print("\(timeSinceMoonLanding.year!) years, " +
  "\(timeSinceMoonLanding.month!) months, " +
  "\(timeSinceMoonLanding.weekOfYear!) weeks, " +
  "\(timeSinceMoonLanding.day!) days, " +
  "\(timeSinceMoonLanding.hour!) hours, and " +
  "\(timeSinceMoonLanding.minute!) minutes.")


// Extending Int to add some syntactic magic to date components
// ============================================================

extension Int {

  var second: DateComponents {
    var components = DateComponents()
    components.second = self;
    return components
  }

  var seconds: DateComponents {
    return self.second
  }

  var minute: DateComponents {
    var components = DateComponents()
    components.minute = self;
    return components
  }

  var minutes: DateComponents {
    return self.minute
  }

  var hour: DateComponents {
    var components = DateComponents()
    components.hour = self;
    return components
  }

  var hours: DateComponents {
    return self.hour
  }

  var day: DateComponents {
    var components = DateComponents()
    components.day = self;
    return components
  }

  var days: DateComponents {
    return self.day
  }

  var week: DateComponents {
    var components = DateComponents()
    components.weekOfYear = self;
    return components
  }

  var weeks: DateComponents {
    return self.week
  }

  var month: DateComponents {
    var components = DateComponents()
    components.month = self;
    return components
  }

  var months: DateComponents {
    return self.month
  }

  var year: DateComponents {
    var components = DateComponents()
    components.year = self;
    return components
  }

  var years: DateComponents {
    return self.year
  }

}


// A quick test of some future dates
print("One hour from now is: \((Date() + 1.hour).desc)")
print("One day from now is: \((Date() + 1.day).desc)")
print("One week from now is: \((Date() + 1.week).desc)")
print("One month from now is: \((Date() + 1.month).desc)")
print("One year from now is: \((Date() + 1.year).desc)")

// What was the date 10 years, 9 months, 8 days, 7 hours, and 6 minutes ago?
let aLittleWhileBack = Date() - 10.years - 9.months - 8.days - 7.hours - 6.minutes
print("10 years, 9 months, 8 days, 7 hours, and 6 minutes ago, it was: \(aLittleWhileBack.desc)")


// Extending DateComponents to add even more syntactic magic: fromNow and ago
// ==========================================================================

extension DateComponents {

  var fromNow: Date {
    return Calendar.current.date(byAdding: self,
                                 to: Date())!
  }

  var ago: Date {
    return Calendar.current.date(byAdding: -self,
                                 to: Date())!
  }

}

// We’re now in Serious Syntax Magic Land!
// ---------------------------------------

print("2.weeks.fromNow: \(2.weeks.fromNow.desc)")
print("3.months.fromNow: \(3.months.fromNow.desc)")

let futureDate3 = (2.months + 3.days + 4.hours + 5.minutes + 6.seconds).fromNow
print("futureDate3: \(futureDate3.desc)")

let pastDate2 = (2.months + 3.days + 4.hours + 5.minutes + 6.seconds).ago
print("pastDate2: \(pastDate2.desc)")
You can download the playground here (4KB, zipped Xcode playground file).
The How to work with dates and times in Swift 5 series
Here are the articles in this series: