Whether you’re new to iOS programming or a long-timer, RayWenderlich.com is a valuable resource for the iOS developer. They regularly publish tutorials, tips, tricks and other goodies that you’d be crazy to do without if you’re serious about writing apps for iDevices. In addition to articles on the site, they go deeper with their books, which are excellent.
RayWenderlich.com recently published an article titled AFNetworking Crash Course, which covers how to write networking apps using AFNetworking, a library created by the folks at Gowalla that simplifies iOS network programming. In this tutorial, you build a weather app that uses AFNetworking to get its data from the World Weather Online service. Check it out; AFNetworking’s useful, and the tutorial’s pretty nice.
In order to reach the widest possible audience, the tutorial was written for iOS 5 and earlier versions of Xcode. If you’re developing with the current version of Xcode and for iOS 6 (which accounted for 83% of all iOS traffic in North America in February), you might want to make a few changes to the code in the tutorial. I’ve listed the changes below:
Use Modern Array Notation
Here’s the old way to get at the element of an array whose index is theIndex in Objective-C:
Update the Deprecated Location Manager Delegate Method
If you use the code as-is with iOS 6, you’ll get an error message that looks like this:
Deprecated in iOS 6.0 locationManager:didUpdateToLocation:fromLocation:
Tells the delegate that a new location value is available. (Deprecated in iOS 6.0. Use locationManager:didUpdateLocations: instead.)
Instead of using the deprecated locationManager:didUpdateToLocation:fromLocation: method, use the current locationManager:didUpdateLocations: method instead:
- (void)locationManager:(CLLocationManager *)manager didUpdateLocations:(NSArray *)locations
{
    // locations is an array of locations where the device has recently been
    // starting with the least recent and ending with the most recent.
    CLLocation *lastLocation = (CLLocation *)[locations lastObject];

    // Fetch the weather only if the last location is less than 5 minutes old
    if ([lastLocation.timestamp timeIntervalSinceNow] < 300) {
        [self.locationManager stopUpdatingLocation];
        WeatherHTTPClient *client = [WeatherHTTPClient sharedWeatherHTTPClient];
        client.delegate = self;
        [client updateWeatherAtLocation:lastLocation forNumberOfDays:5];
    }
}
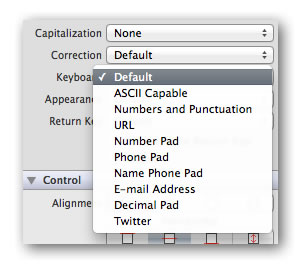
While doing some serious iOS development self-training this long weekend (it’s Family Day weekend in many parts of Canada), I looked around for a visual catalogue of the standard iPhone virtual keyboards, but couldn’t find any.
Yes, Xcode’s Interface Builder gives you a list of keyboard types…
…but I couldn’t find any resource that showed me both the human-friendly and UIKeyboardTypeenums, what the primary and alternate views for each keyboard look like, and a half-decent description of each. In the spirit of the “See a need, fill a need” hacker ethos, I put together this visual catalogue of the iPhone’s standard virtual keyboards to share with the iOS developer community. Enjoy!
iPhone Virtual Keyboards and UIKeyboardTypes Visual Catalogue
Keyboard Name
Description
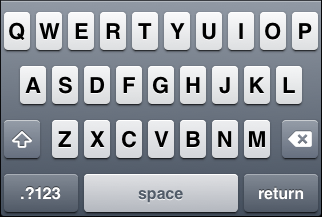
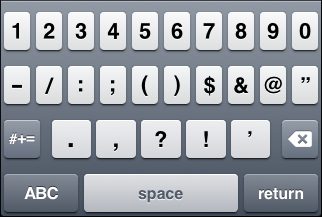
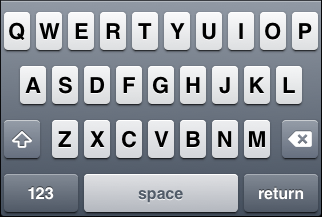
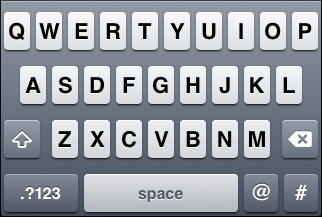
ASCII Capable
UIKeyboardTypeASCIICapable
A general-purpose keyboard, containing standard ASCII characters. The primary view shows letters, and the alternate view shows numbers and punctuation.
Numbers and Punctuation
UIKeyboardTypeNumbersAndPunctuation
Like the ASCII Capable keyboard, but the views are reversed: the primary view shows numbers and punctuation, and the alternate view shows letters.
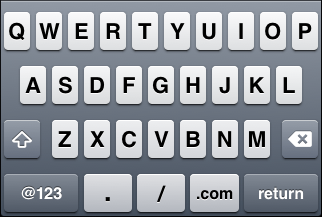
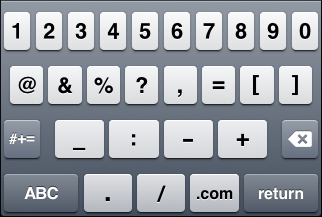
URL
UIKeyboardTypeURL
A keyboard optimized for entering URLs. The keyboard features a “.com” key, makes the “.” and “/” keys prominent, and omits the space bar. The primary view shows letters, and the alternate view shows numbers and punctuation.
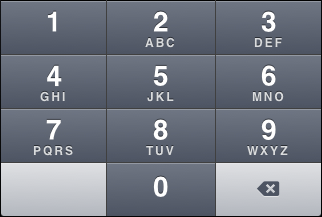
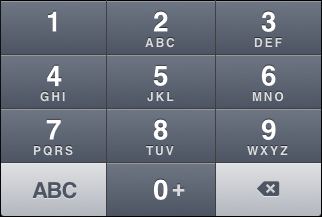
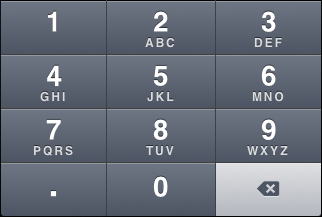
Number Pad
UIKeyboardTypeNumberPad
A numeric keypad designed for PIN entry. It’s labelled phone-style with letters, featuring the digits 0 through 9 prominently. This keyboard has a single view and doesn’t support auto-capitalization.
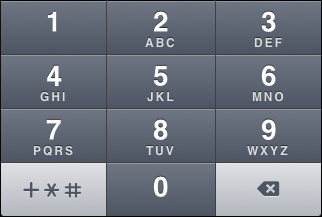
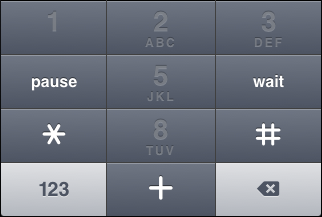
Phone Pad
UIKeyboardTypePhonePad
A numeric keypad designed for phone number entry. It’s labelled phone-style with letters, featuring the digits 0 through 9 prominently in the primary view, and the pause, wait, “*“, “#” and “+” keys in the alternate view. This keyboard doesn’t support auto-capitalization.
Name Phone Pad
UIKeyboardTypeNamePhonePad
A keyboard for entering names and phone numbers. The primary view shows letters. The alternate view shows a phone-style number pad with the digits 0 through 9; holding down the 0 key enters a “+” character.
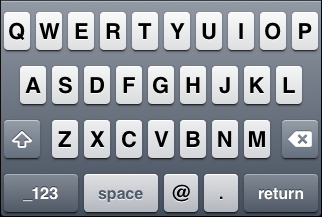
E-mail Address
UIKeyboardTypeEmailAddress
A keyboard for entering email addresses, with “@“, “.” and space characters featured prominently (even though email addresses shouldn’t have spaces in them). The primary view shows letters, and the alternate view shows numbers and punctuation.
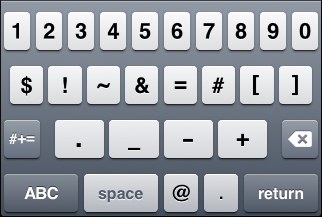
Decimal Pad
UIKeyboardTypeDecimalPad
A numeric keypad suitable for entering general numbers including a decimal point.
Twitter
UIKeyboardTypeTwitter
A keyboard optimized for tweets, providing easy access to the “@” and “#” characters. The primary view shows letters, and the alternate view shows numbers and punctuation. As the only keyboard type devoted to a specific third-party web application, it’s a testament to Twitter’s reach.
Xcode 4.6 was released on January 28th, the same day that iOS 6.1 was released. It adds support for iOS 6.1 and Mac OS X 10.8, and two new devices, the iPad mini and the 4th-gen iPad with Retina display. There are also a number of improvements to the LLVM compiler and Objective-C language, including some new warnings to help find subtle bugs when using ARC and weak references.
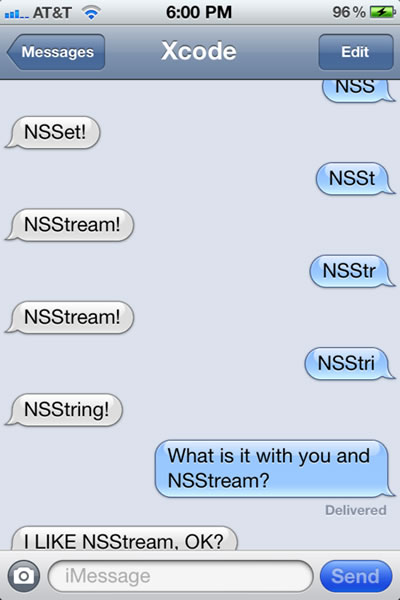
The improvement that jumped out at me is a simple one, but one that is already saving me a lot of frustration. It used to happen when typing in the class name NSString. This problem is best explained by this classic pic from the Tumblr called Texts from Xcode:
I don’t know about you, but I use NSStringwaaaay more than NSStream.
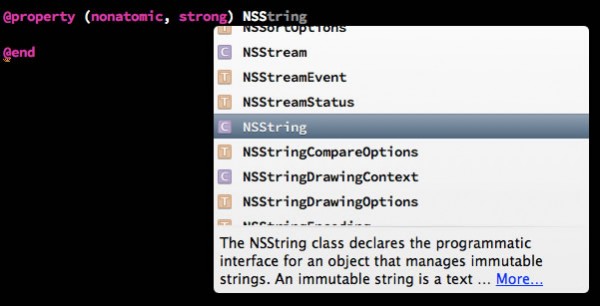
With Xcode 4.6, as I started typing in NSString, here’s what happened:
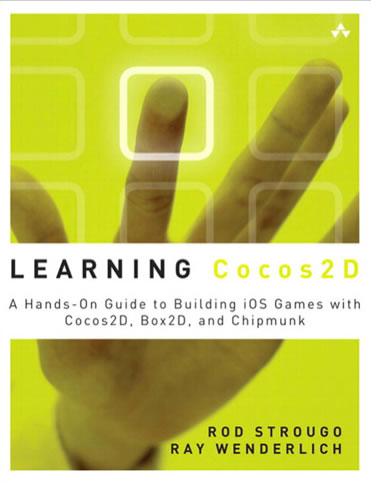
NSCoderTO, a Toronto-based Mac/iOS coder group, is dedicating a series of book club meetups to Learning Cocos2D, an iOS game programming book written by Rod Strougo and Ray Wenderlich (the guy behind the ever-so-useful RayWenderlich.com site). Between now and late April, they’re going to read and do the exercises in this book, meeting up 5 times during that period to discuss their progress and any issues encountered along the way. You can take a look at the full schedule to see when you should be reading and doing the exercises in each chapter and when the meetups will take place.
The first meetup takes place next Tuesday, February 12th at Ryerson University’s Hub Cafeteria and will cover chapters 1 through 4 of the book. I’ve got the book, and they’re relatively easy (chapter 1 is the obligatory intro and setup, chapter 2 is “Hello World”, chapters 3 and 4 cover animation and collision detection); you can get started on it today and be ready by the time the meetup comes around. I’ve signed up, and I might see you there!
The Commodore 64 is from about the same era as Objective-C. The 64 hit the market in 1982; Objective-C (and C++ as well) first appeared in 1983.
Older languages like C (and recently, Objective-C), won’t just let you call a function or method whose definition is later on in the same file. Consider these two C functions, which appear in my Inpulse Magic 8-Ball tutorial:
The function set_time_mode refers to update_time_display, whose definition comes afterset_time_mode‘s. As far as the C compiler is concered, set_time_mode doesn’t exist yet, and it will refuse to compile, giving you an error message that looks something like this:
src/pulse_app.c: In function ‘set_time_mode’:
src/pulse_app.c:76: error: ‘update_time_display’ undeclared (first use in this function)
src/pulse_app.c:76: error: (Each undeclared identifier is reported only once
src/pulse_app.c:76: error: for each function it appears in.)
You can’t simply switch the order of the two functions since update_time_display also calls set_time_mode.
Forward declarations solve this problem. By including the signature for update_time_display before the definition of set_time_mode, we give the compiler enough information so that it knows what to do with update_time_display when it’s compiling set_time_mode:
Newer languages like Python and Ruby don’t need forward declarations. You can have a method refer to another method that appears later in the file in Python:
# A quick and dirty example in Python

def first_method():
  # second_method appears later in this module
  second_method("Hello there")

def second_method(statement):
  print statement

first_method()
And here’s the Ruby equivalent:
# A quick and dirty example in Ruby

def first_method
  # second_method appears later in this module
  second_method "Hello there"
end

def second_method(statement)
  puts statement
end

first_method
Objective-C joins the club in Xcode 4.3 and later (as of this writing, the current version of Xcode is 4.5); you no longer need to make forward declarations. The compiler will “look ahead” if the function or method it’s compiling makes calls to functions or methods that appear later on in the file.
This means that the following code compiles in Xcode (at least in Objective-C):
Here’s the tl;dr version of this post: you no longer have to @synthesize properties! (Most of the time, anyway.)
From Public Variables to Getters and Setters to Properties
In the early days of object-oriented programming, you were supposed to make a class’ public attributes accessible through public variables. Access was pretty simple:
previousSpeed = myCar.speed;
myCar.speed = 50;
Then, it became a better idea to lock away all the variables and use getters and setters:
Nowadays, the preferred way to expose class attributes in a number of languages is through public properties. With them, we’re back to accessing object attributes through this simple syntax:
previousSpeed = myCar.speed;
myCar.speed = 50;
What @synthesize Was For
Creating properties in Objective-C classes used to require statements in a couple of places. For a public property, you had to declare it in the interface (.h) file:
// Car.h
@interface Car : NSObject
@property int speed;
@end
The @property statement tells the compiler that you want to expose a property; in the case of the code above, the name of the property is speed. Properties are by default both readable and writeable. If you like to spell everything out very explicitly, you can by declaring the property this way:
@property (readwrite) int speed;
If for some reason you wanted speed to be read-only, you can declare the property this way:
@property (readonly) int speed;
With every property declaration comes the need for the underlying instance variables — ivars in Objective-C parlance — and the requisite getter and setter methods, which go in the implementation (.m) file. All this setup for each property can get a little tedious, and the @synthesize statement saves you from that tedium. Instead of having to declare the corresponding ivar and write those methods, @synthesize lets you do all that in a single line of code:
// Car.m
@synthesize speed;
By default, the name of the ivar created by @synthesize was the name of the corresponding property preceded by an underscore character. For example, the default name of the ivar behind a property named speed would be _speed. If you preferred, you could specify a different ivar name this way:
// Car.m
@synthesize speed=someOtherIvar;
The general rule was that if you only needed a simple getter and/or setter for a @property, use @synthesize.
Introducing Autosynthesis
The version of CLang (the Objective-C compiler) that comes with XCode versions 4.3 and later (the latest version is 4.5), supports autosynthesis, which automatically does the synthesizing for any class properties you declare in the header. If your @property needs only a simple getter and/or setter, you don’t need to have a corresponding @synthesize anymore. The compiler takes care of that for you.
Properties with autosynthesis work like they did with manual synthesis. You access them using the self.propertyName syntax, and the name of the ivar that gets generated is still the name of the property preceded by an underscore character.
Cases Where @synthesize is Still Useful
There are some cases where you’ll still want to use the @synthesize keyword, and this article in the blog Use Your Loaf does a good job explaining these cases. Such cases are a little more rare; most of the time, you can simply skip added @synthesize to your code because the compiler’s taking care of that for you!
In Case You Were Wondering…
The title for this article comes from the chorus of Shriekback’s 1985 alt-dance number, Nemesis:
Priests and cannibals
Prehistoric animals
Everybody happy as the dead come home
Yak shaving is a term used to describe a seemingly pointless activity that you actually have to do in order to get a larger task done, or as Jeremy Brown put it:
You see, yak shaving is what you are doing when you’re doing some stupid, fiddly little task that bears no obvious relationship to what you’re supposed to be working on, but yet a chain of twelve causal relations links what you’re doing to the original meta-task.
The term “shaving a yak” was used in the 1950 film Sunset Boulevard, but it’s more likely that its use in programming comes from Ren and Stimpy:
Many programming languages, especially those that pre-date modern scripting languages, often call on the programmer to do some yak shaving, and Objective-C is no exception. With XCode 4.5 and its new Clang compiler, you get some nice bits of syntactic sugar that I’m certain will make you say “Finally!” and save you from a fair bit of yak shaving.
NSNumber Literals
If you’ve been coding in Objective-C even just a little bit, you’ve probably come across NSString, the non-mutable string type used when developing for OS X’s Foundation framework. If you have, it’s likely that you’ve seen assignments that look like this:
NSString *myString = @"Hello, world!";
The @ is a handy bit of shorthand that specifies to the compiler that Hello, world! is an NSString literal. Without this bit of syntactic sugar, we’d have to write the above line of code like so:
Until now, there’s been no such syntactic sugar for NSNumber, Foundation’s type for wrapping numerical values in an object. It’s handy for doing things like wrapping numbers so that you can store them in collection classes like NSArray and NSDictionary, which can only store objects.
Until the current version of Objective-C (which comes with XCode 4.5), here’s how you’d assign NSNumbers given some numeric literals:
That’s a lot of work just to simply box a simple number type into an object. Luckily for us, Objective-C now supports NSNumber literals. Just as with NSString literals, NSNumber literals are preceded with the @ sign.
The code below uses NSNumber literals and is equivalent of the code above, but requires less typing and is easier to read:
Initializing NSArray and Accessing Its Elements the Old Way
If you’re coming to Objective-C from languages like JavaScript, Python or Ruby, you’re used to doing array assignments using literals.
Suppose you wanted to create an array containing the first names of the members of the Stark family from Game of Thrones. Here’s how you’d do it in Python and Ruby (and in JavaScript, as well, although you’d probably want to place the var keyword before starkFamily):
There used to be no such thing as an NSArray literal. Here’s how you’d create the array above using Objective-C and NSArray — using the arrayWithObjects: method, which expects a comma-delimited list of objects terminated with nil.
It’s not that much more typing, but you have to remember to mark the end of the list with nil.
What’s far more unwieldy is array access. In JavaScript, Python and Ruby, if you wanted to access the element of starkFamily whose index is 2, you’d do it this way:
starkFamily[2]
In earlier versions of Objective-C, here’s how you’d access that element:
[starkFamily objectAtIndex:2]
Wow, that’s clunky. Even with XCode’s autocomplete feature (the analogue of Visual Studio’s Intellisense), it’s still a lot of typing for something as simple as array element access.
Initializing NSArray and Accessing Its Elements the New Way
With the latest version of Objective-C, we have NSArray literals. Here’s how you’d initialize the starkFamily array using an NSArray literal:
NSArray literals look almost like JavaScript, Python and Ruby array literals. The big difference is NSArray literals begin with a @ character, just as NSString and NSNumber literals do.
As for accessing elements from NSArrays you can now do so using a more familiar notation:
starkFamily[2]
Finally! I much prefer myArray[index] over [myArray objectAtIndex:index].
Initializing NSMutableArrays Using Array Literals
NSArray is an immutable type; once initialized, you can’t reassign, add, or remove any of its elements. NSMutableArray, a subclass of NSArray, is mutable. Here’s how you initialize an NSMutableArray using an NSArray literal:
In the code above, we create an NSArray using an array literal and invoke NSArray‘s mutableCopy: method on it. The result is an NSMutableArray containing the array literal’s values.
As with NSArray, you can now access elements of an NSMutableArray using standard array notation…
starkFamily[2]
…and, of course, since the array is mutable, you can do stuff like this:
Dictionary Literals, NSDictionary, and NSMutableDictionary
Initializing NSDictionary and Accessing Its Elements the Old Way
Different programming languages use different terms for what’s roughly the same thing: an object that stores values which you can look up using keys. JavaScript keeps it simple by using objects for this task, Ruby has hashes and Python has dictionaries.
Consider the following Python dictionary definition:
If you wanted to access the number associated with the key Meaning of life in either Ruby or Python, you’d do it this way:
importantNumbers["Meaning of life"]
In Objective-C, the equivalent structure is the NSDictionary class. Here’s the old-school Objective-C equivalent to the code above. Since NSDictionary stores only objects, we have to wrap the numbers in NSNumbers using the new literal syntax:
Note that the list have to provide the dictionaryWithObjectsAndKeys: method lists the value first and the key second, which is the reverse of how most other programming languages do it. As with NSArray‘s arrayWithObjects: method, we have to mark the end of the list with nil.
If you thought the code above was a bit much, imagine what it would look like without NSNumber literals!
As for accessing values in the dictionary, here’s the old way of doing it:
[importantNumbers objectForKey:@"Meaning of life"]
That’s a lot of typing just to get to a value.
Initializing NSDictionary and Accessing Its Elements the New Way
Luckily, the Objective-C that you get with XCode 4.5 gives us dictionary literals. Here’s how you define importantNumbers now:
That’s much better. Languages like JavaScript, Python and Ruby have standardized curly braces ({ and }) for specifying dictionary-style collections, and it’s nice to see this syntax in Objective-C. The order is also what we expect: key first, value second. And finally, no need to use nil to terminate the list.
The syntax for accessing a value from an NSDictionary is also much simpler:
importantNumbers[@"Meaning of life"]
Much better.
Initializing NSMutableDictionary Using Dictionary Literals
Like NSArray, NSDictionary isn’t mutable, but it has a mutable subclass with a similar name. It’s NSMutableDictionary, and like NSArray, you can use a literal and the mutableCopy: method to create one:
The latest version of XCode, 4.5, includes the latest Clang compiler, which supports these new syntaxes. Since they’re syntactic sugar and not part of any additions or revisions to the Foundation framework, you can use them in any iOS project.
Better still, if you’ve got old projects that you’d like to update to use these new syntaxes but dread having to do so manually, XCode 4.5 has a feature you’ll like. Under the Edit menu, you can select Refactor, and inside that submenu is the Convert to Modern Objective-C… command.
 Whether you’re new to iOS programming or a long-timer, RayWenderlich.com is a valuable resource for the iOS developer. They regularly publish tutorials, tips, tricks and other goodies that you’d be crazy to do without if you’re serious about writing apps for iDevices. In addition to articles on the site, they go deeper with their books, which are excellent.